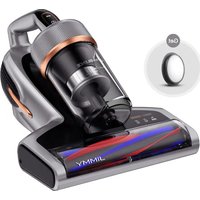
BX7 Pro Max - Vacuum Cleaner JIMMY - Free user manual and instructions
Find the device manual for free BX7 Pro Max JIMMY in PDF.


| Product Type | Anti-dust mite vacuum cleaner |
| Brand | JIMMY |
| Model | BX7 Pro Max |
| Rated Voltage | 120 V~ |
| Rated Frequency | 60 Hz |
| Rated Power | 550 W |
| Power Supply | Mains (power cord) |
| Operating Modes | Suction, beating, UV light, hot air |
| Dust Concentration Sensor | Yes (blue/red light bar) |
| Filtration System | MIF filter and cyclone cone |
| UV Lamp | Yes, with automatic shut-off if tilt >30° or distance >3 cm |
| Protection | Automatic shut-off in case of overheating or full dust bin |
| Maintenance | Regular cleaning of dust bin, MIF filter, and brush |
| Included Accessories | Mini brush, MIF filter, instruction manual |
| Warranty | 1 year |
| Manufacturer | Kingclean Electric Co., Ltd |
| Usage | Household only, for textiles (mattresses, sofas, etc.) |
Frequently Asked Questions - BX7 Pro Max JIMMY
User questions about BX7 Pro Max JIMMY
0 question about this device. Answer the ones you know or ask your own.
Ask a new question about this device
Download the instructions for your Vacuum Cleaner in PDF format for free! Find your manual BX7 Pro Max - JIMMY and take your electronic device back in hand. On this page are published all the documents necessary for the use of your device. BX7 Pro Max by JIMMY.
USER MANUAL BX7 Pro Max JIMMY
Please read this instruction carefully before using the product and keep it properly.
Contents
English
2
François
12
Important Safety Instructions
When using an electrical appliance, basic safety instructions should always be followed, including the following points. Read all instructions before using.
WARNING - To reduce the risk of fire, electric shock, or injury:
1.Don't leave the vacuum cleaner alone when the power is on. Unplug the machine when not in use or before removing filter.
2.Do not use outdoors or on wet surfaces.
3.Do not allow to be used as a toy. Close attention is necessary when used by or near children.
4.Use only as described in this manual. Use only manufacturer's recommended attachments.
5.Do not use with damaged power cable or. If appliance is not working as it should, has been dropped, damaged, left outdoors, or dropped into water, return it to a service center.
6. Do not pull or carry by cord, use cord as a handle, close a door on cord, or pull cord around sharp edges or corners. Do not run appliance over cord. Keep cord away from heated surfaces.
7.Do not unplug the machine by pulling on cord. To pull the plug, grab the plug, not the cable.
8.Do not handle plugs or machines with wet hands.
9.Do not put any object into openings. Do not use with any opening blocked; keep free of dust, lint, hair, and anything that may reduce air flow.
10. Keep hair, loose clothing, fingers, and all parts of body away from openings and moving parts. Do not pick up heat coal, cigarette ends, matches, or anything hot, smoking, or burning.
11. Turn off all controls before unplugging.
12.Be extra careful when cleaning on the stairs.
13. Do not use to pick up flammable or combustible liquids, such as gasoline, or use in areas where they may be present.
14. Do not pick up anything that is burning or smoking, such as cigarettes, matches, or hot ashes.
15.Do not use without filters in place.
16.UV emitted from this lamp. Skin or eye injury could result. Avoid exposure of eyes and skin to unshielded lamp.
17.Eye damage may result from directly viewing the light produced by the lamp in this apparatus. Always turn off lamp before opening this cover.
18. This cover is provided with an interlock to reduce the risk of excessive ultraviolet radiation. Do not defeat its purpose.
19. All serving of UV lamp should be performed by qualified personnel.
SAVE THESE INSTRUCTIONS
For household use only
To reduce the risk of electric shock, this appliance has a polarized plug (one blade is wider than the other). This plug will fit in a polarized outlet only one way. If the plug does not fit fully in the outlet, reverse the plug. If it still does not fit, contact a qualified electrician to install the proper outlet. Do not change the plug in any way.
Cautions
- Please read this instruction manual carefully before use and keep it properly for future use.
2.Never leave the machine working without supervision. - Please turn off the power switch and unplug the power cord if the machine is to be idled. Do Not unplug the power cord with humid hand in case of electric shock.
4.Cut the power source in maintenance or off-service. - Keep the power cord away from sharp objects and do not drag the cord to move the machine in case of cord damage.
- For safety reasons, please do not use the product to clean hot objects such as carbon, cigarette butts, sharp objects such as broken glass, corrosive liquids, flammable and explosive materials such as gasoline and alcohol. Otherwise it may cause product damage or fire.
7.Do not use this product to clean water or wet dust. Do Not operate it in humid places (such as bathroom, toilet, laundry room, etc.) to avoid malfunction.
8.Do Not place the machine near heating appliances or expose it to direct sunlight in case of fire hazard. - Keep this product beyond the reach of special individual such as children without adult supervision.
10.Do Not operate this machine with suction port blocked in case of product damage. - The product has UV light, for safety reasons, Do Not look at the bottom of the machine when the power is on in case of ultraviolet rays harming.
12.Do not apply this product to plants. Excessive use of UV may cause object damage.
13.Do not sit on this product in case of personal injury and product damage. - Do not remove the brushroll cover or force the cover outward when the machine is powered on for safety reasons.
- This product can ONLY use for cleaning of textiles such as mattresses, blankets, pillows, sofas, etc.
16.If the power cord is damaged, please ask for professional help of the manufacturer and other professionals for safety reasons.
Declaration
Conforms to the applicable provisions of applicable US Federal requirements, including CFR 21, Part 1040, Chapter 1, Subchapter J, Radiological Health
Product Installation
Parts Name
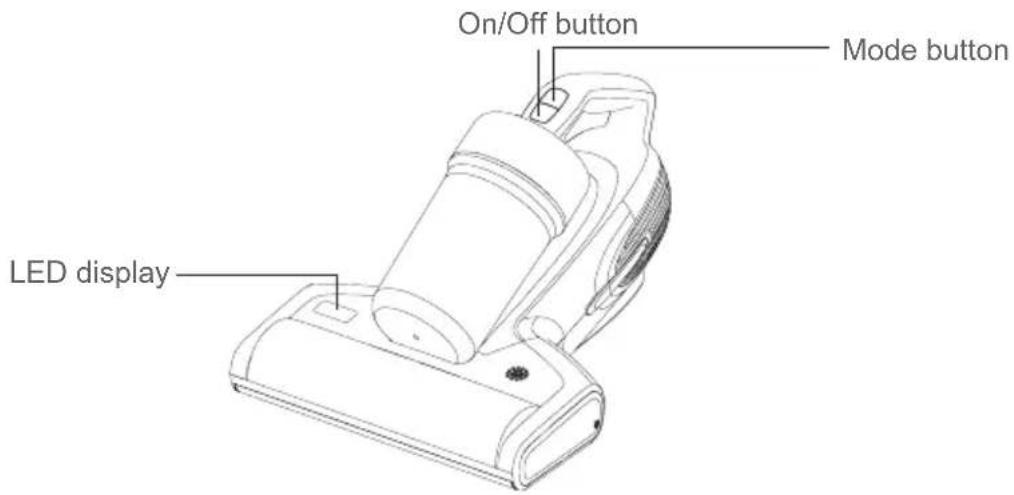
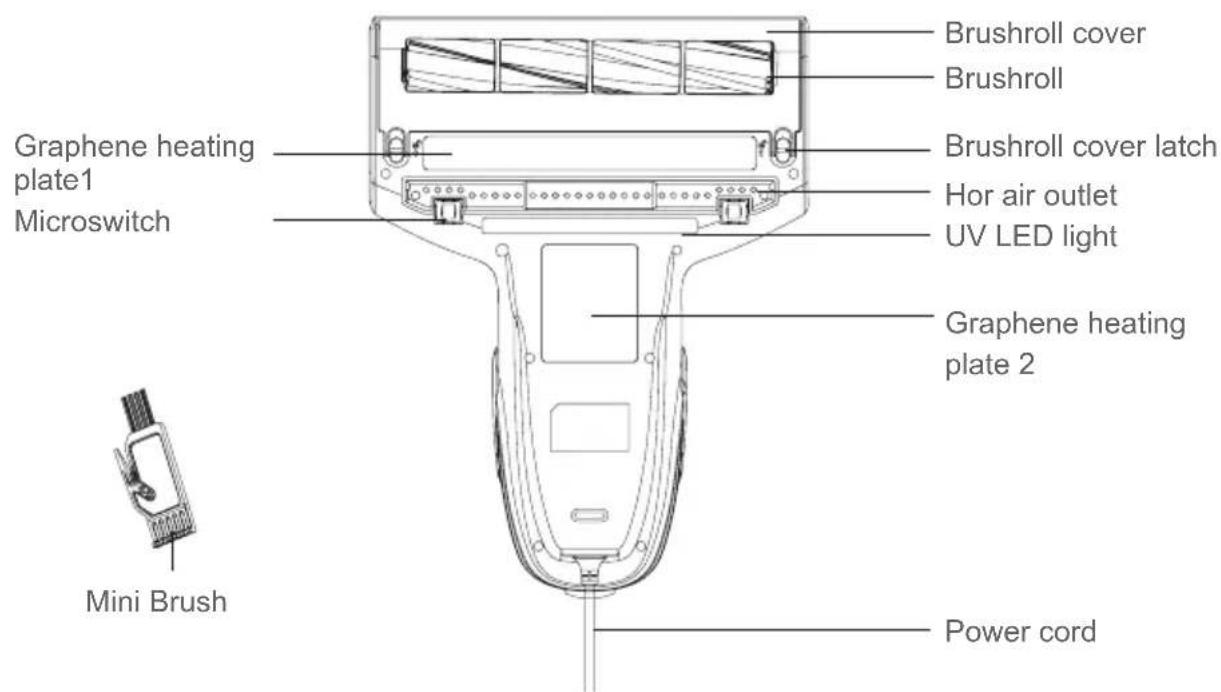
Packing List
| Name | Anti-mite Vacuum Cleaner | MIF Filter Mini | brush User Guide | |
| Quantity 1 1 1 | 1 |
Use of the Product
Insert the power cord into the machine and plug into the socket. Press on/off button, the machine is in vacuuming+UV+tapping mode and all indicators light up. Press the mode button to switch the machine to tapping+vacuuming mode. Press the mode button again to switch the machine to UV+vacuuming mode. Press the mode button again to switch back to the UV+tapping+vacuuming mode. Press on/off button again, the machine stop working(The LED display area has the dust sensor function. When in clean state, the dust concentration light turns blue. When in dirty state, the dust concentration light turns red. As the dust concentration decreases, the dust concentration light slowly changes from red to blue.)
Note:
- When the LED display shows brush trapped mode and the icon flash, please clean the filter and brushroll in time.
2.For safety reasons, the UV light only works within 3cm above object as well as less than 30 inclination degrees. Otherwise, the UV light will automatically turn off.
3.Do not touch the air outlet on the bottom of the machine in case of hand scald.
LED Display
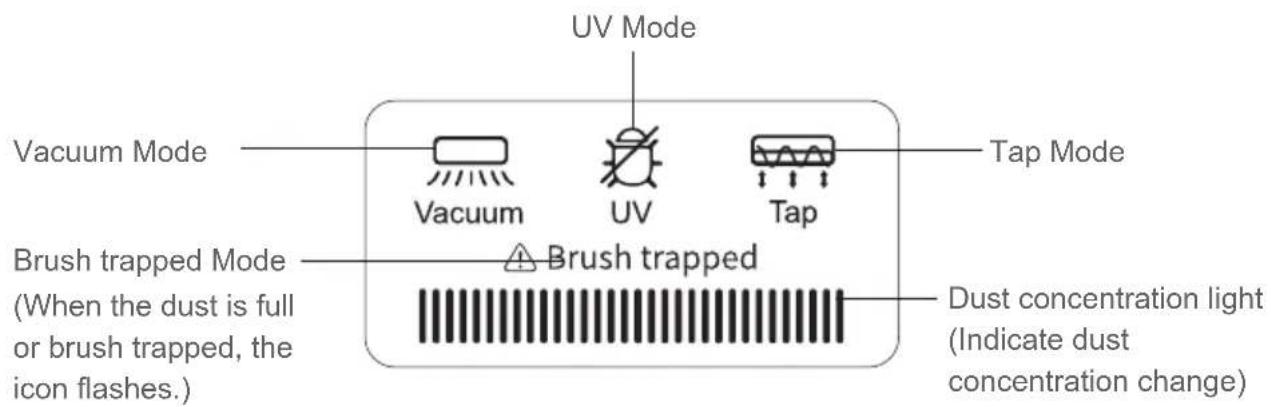
Cleaning and Maintenance
Note:
1.Filter are available at dealers.
2. It is recommended to clean the dust cup after each use. When the filter is blocked due to excessive dust accumulation, it needs to be cleaned and replaced if necessary.
Dust Cup Cleaning
- Turn off the machine and unplug the power cord. Then press the release button and lift upward. (Figure 1)
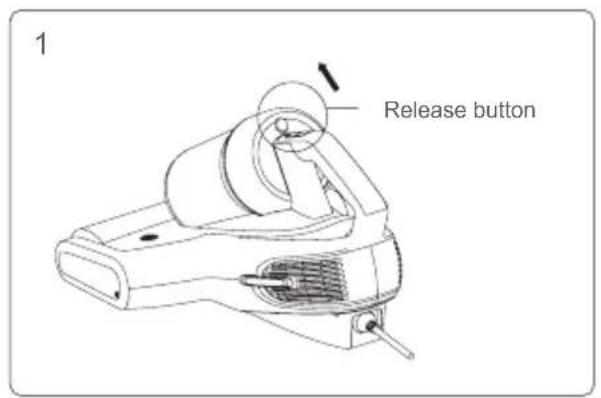
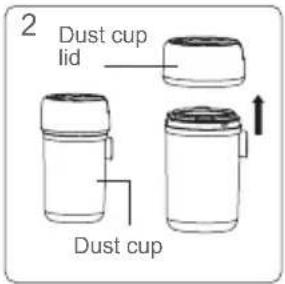
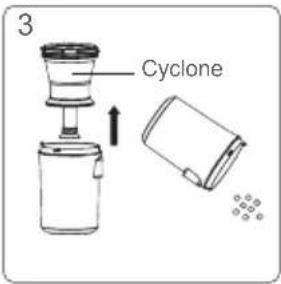
2.Hold the dust cup and dust cup cover separately, twist dust lid anticlockwise (Figure 2), remove it from dust cup to clean. (Figure 3)
Filter and Cyclone Cleaning
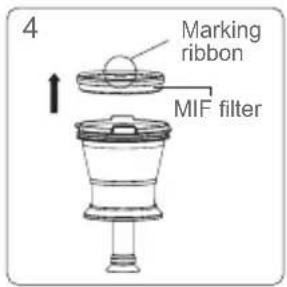
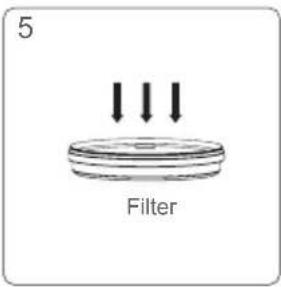
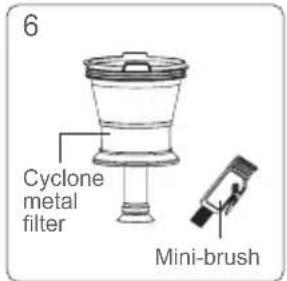
Hold the cyclone in one hand, pinch the "UP" logo with the other hand, and take out the filter (Figure 4). Please tap the filter downward. Do not tap the filter in reverse side in case of filter clog (Figure 5). Clean the cyclone metal filter with the attached mini brush. (Figure 6)
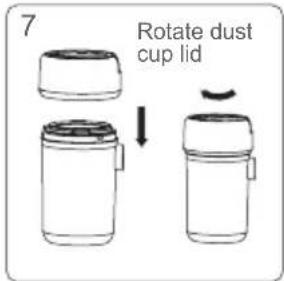
After cleaning the dust cup, filter and cyclone, assemble the cyclone into the dust cup. Rotate the dust cup cover assembly into the dust cup until a "click" sound is heard that is assembled in place. (Figure 7)
Note:
1.Do Not miss the filter!
2.Use water or neutral reagents to clean dust cup and wipe with dry cloths. Do not wash the filter until it is necessary. Make sure the filter and dust cup are completely dry before another use.
Brushroll Cleaning and Installation
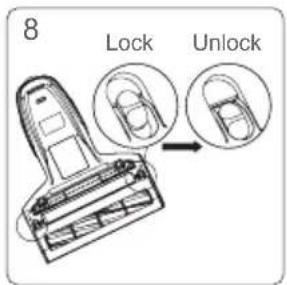
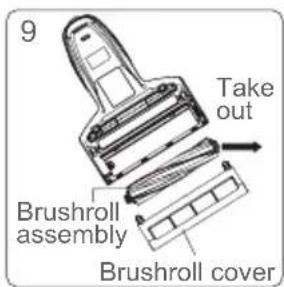
Turn off the machine and unplug the power cord, rotate the right lock knob anticlockwise with hand from locked position to unlock position (Figure 8) to remove the brushroll to clean up. (Figure 9)
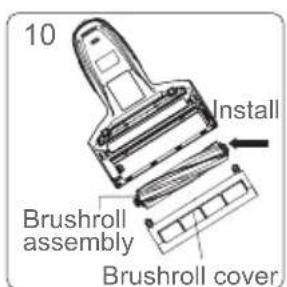
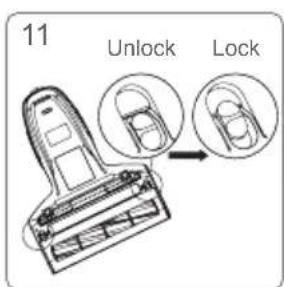
After brushroll cleaning, install the brushroll and the brushroll cover into the machine in turn (Figure 10) and lock the latch of the brushroll. (Figure 11)
Note: For safety reasons, please turn off the machine and unplug power cord before cleaning brushroll.
Maintenance and Storage
Please clean dust cup and filter after each use for further use. It is recommended to replace a filter after 30-50 hours of working time (depending on specific situation) for better use.
Any paper, lead glass, plastic will greatly affect
the effect of UV light. Please wipe and clean the UV tube regularly for better use.
Do Not touch the UV tube as dirt will affect UV light effect.
Put the machine in cool and dry place if the machine is to be idled. Do Not leave it in direct sunlight or humid environment.
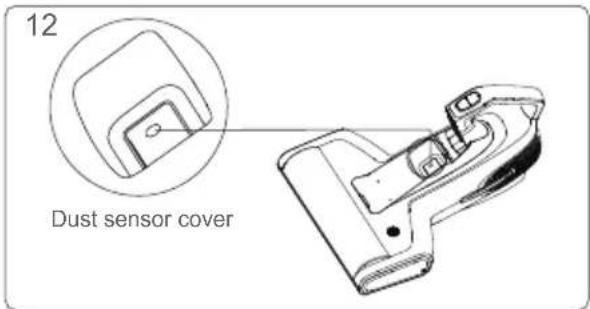
The dust sensor cover in the air duct need to be cleaned regularly to avoid affecting the transmission and reception of infrared signals. (Figure 12)
Trouble Shooting
Please check the following trouble points before go to the maintenance department.
| Problems Possible Reasons Solution | ||
| Power failure | Power cord is not firmly inserted. Insert the power cord firmly. | |
| No power on socket. Check the socket. | ||
| Power switch not pressed. Press the On/Off button. | ||
| Low suction power | Suction port clogged. Clean up suction port. | |
| Dust accumulation on filter. Clean up the dust cup and filter. | ||
| Dust accumulation on cyclone. Clean up cyclone. | ||
| UV light failure | The UV function is automatically off for safety reasons or weak reflection of object. | The UV function operates on the condition of less than 3CM height from the object. |
| The machine operates on the same position for a long time. | Move the machine forward and backward | |
| The machine is placed upright. | Machine tilted no more than 30 degrees. | |
| Sensor window is contaminate. | Clean the sensor window with a half-dry cloth. | |
| UV light damage. Contact after-sale service. | ||
| Automatically turned off | Dust cup full. | The machine will automatically turn off to prevent the motor under long operation. If the machine automat-ically turned off, please clean up the dust cup and filter, unplug pow-er cord and reuse if after 2 hours. |
| Suction port clogged. | ||
| Filter blocked. | ||
| Brushroll failure | Brushroll tangled with foreign matter. | Remove the cover and clean up brushroll according to user guide. |
| Belt broken. | Remove the cover according to user guide and check the belt. If broken, contact after-sale to repair. | |
Note:If fault remains after adopting the following solutions, contact after sale service or local distributor immediately.
Product Specifications
Technical Parameter
| Model BX7 Pro Max | |
| Rated voltage 120V~ | |
| Rated frequency 60Hz | |
| Rated Power 550W |
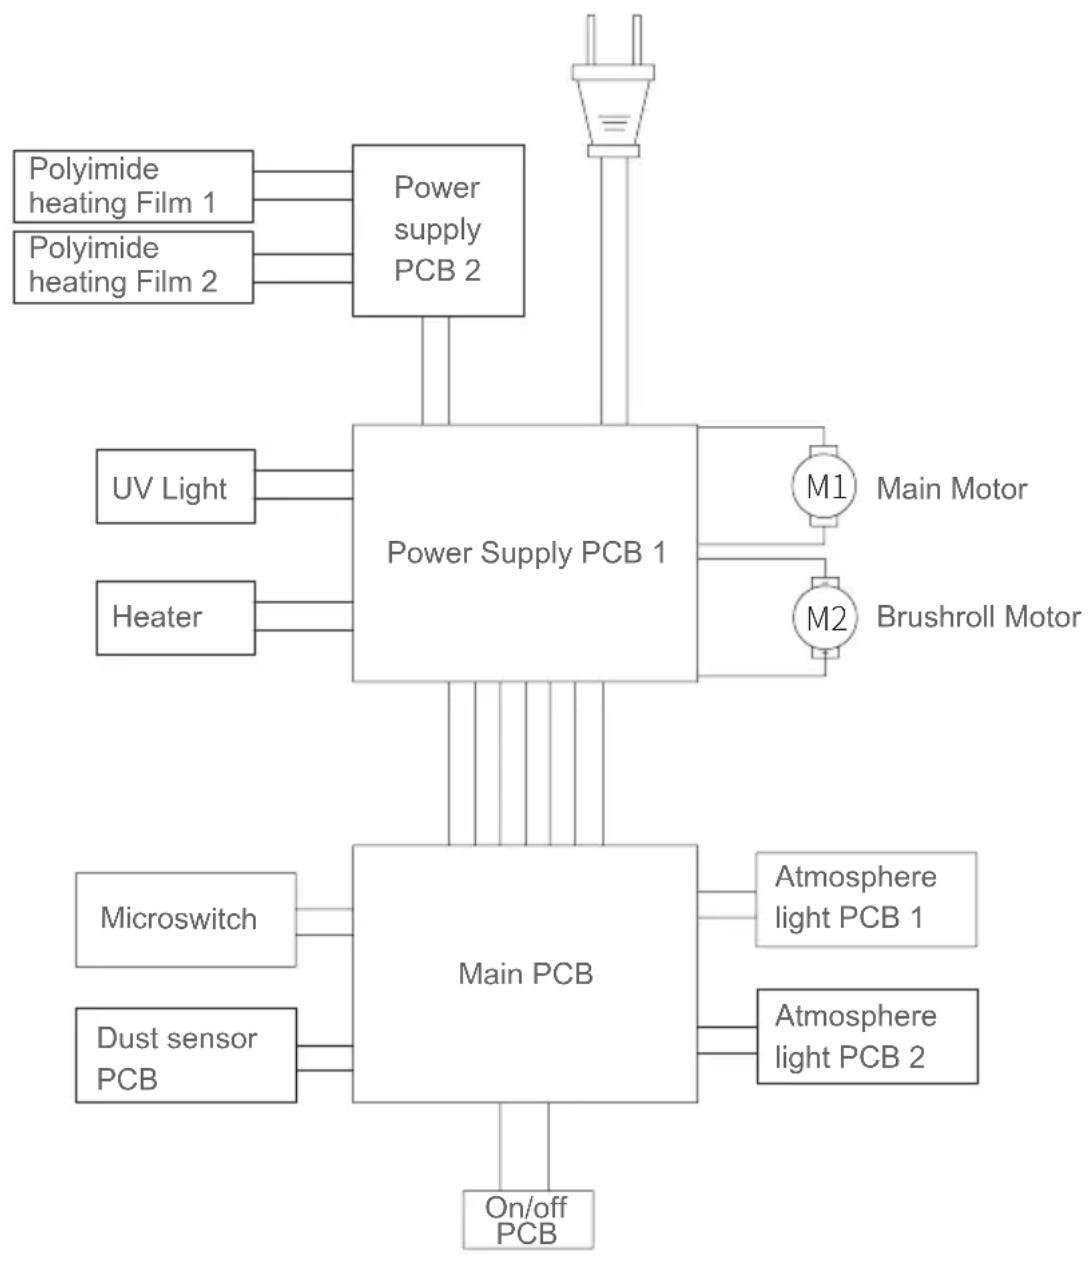
Circuit Diagram
Manufacturer Information
| Manufacturer Kingclean Electric | Co., Ltd |
| Address | No.1 Xiangyang Road, Suzhou New District, Jiangsu Province 215009,China |
Disposal
The machine, accessories and packaging should be sorted for environmental-friendly recycling.

Do not dispose of the machine into household waste!
Subject to change without notice.
Warranty Information
This product enjoys one year warranty for the machine, service starting from the date of purchase.
Excluded from the guarantee is normal wear, commercial use, alterations to the appliance as purchased, cleaning activities, consequences of improper use or damage by the purchaser or a third person, damage, that can be attributed to external circumstances or caused by the batteries.
How to know the production date from the serial number
The serial number label is placed on the package and also on the device itself.
The production date is encoded in its serial number.
To decrypt the production date, for example:

DBP800547
D - Year
B-Month
P-Day
8 - Production Line No
00547 - Serial No
Production date code rules (3 numbers)
Production date code rules (3 numbers)
| Year Month Date | |||||||
| Year Code | Date Code | Date Code | Date Code | ||||
| 2016 A January 1 1st 1 | 17th H | ||||||
| 2017 B February 2 2nd | 2 18th J | ||||||
| 2018 | C | March | 3 | 3rd | 3 | 19th | K |
| 2019 D April 4 4th | 4 20th L | ||||||
| 2020 E May 5 5th | 5 21th M | ||||||
| 2021 F June 6 | 6th 6 22th N | ||||||
| 2022 G July 7 | 7th 7 23th P | ||||||
| 2023 H | August | 8 | 8th 8 | 24th Q | |||
| 2024 J | September | 9 | 9th 9 | 25th R | |||
| 2025 | K | October | A | 10th | A | 26th | S |
| 2026 | L November | B | 11th B | 27th T | |||
| 2027 | M | December | C | 12th | C | 28th | U |
| 2028 N | 13th D | 29th V | |||||
| 2029 P | 14th E | 30th W | |||||
| 2030 | Q | 15th | F 31th X | ||||
| 2031 R | 16th | G | |||||

- Contents
- Important Safety Instructions
- SAVE THESE INSTRUCTIONS
- For household use only
- Cautions
- Declaration
- Product Installation
- Parts Name
- Packing List
- Use of the Product
- Note:
- LED Display
- Cleaning and Maintenance
- Dust Cup Cleaning
- Filter and Cyclone Cleaning
- Brushroll Cleaning and Installation
- Maintenance and Storage
- Trouble Shooting
- Product Specifications
- Manufacturer Information
- Disposal
- Warranty Information
- How to know the production date from the serial number
Brand : JIMMY
Model : BX7 Pro Max
Category : Vacuum Cleaner