
JV9 Pro Aqua - Vacuum Cleaner JIMMY - Free user manual and instructions
Find the device manual for free JV9 Pro Aqua JIMMY in PDF.


| Product Type | Cordless Stick Vacuum with Mop Function |
| Brand | JIMMY |
| Model | JV9 Pro Aqua |
| Rated Voltage | 25.2 V |
| Rated Power | 500 W |
| Battery Capacity | 2500 mAh (Li-ion) |
| Charging Time | 4 to 5 hours |
| Filtration Type | Washable HEPA Filter |
| Dustbin Capacity | Not specified (estimated: 0.5 L) |
| Main Functions | Vacuuming, wet mopping, automatic floor detection, Eco/Turbo/Max/Auto modes |
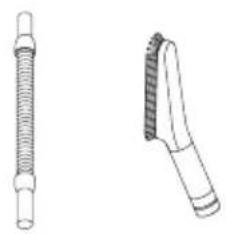
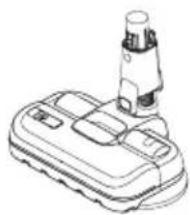
| Included Accessories | Electric floor head, wet polishing head, electric mattress head, flexible metal tube, soft brush, crevice tool, upholstery tool, extension hose, battery, adapter, accessory holder, charging dock |
| Water Tank | Manually refillable, volume not specified |
| Display | LED screen with battery indicator, mode, remaining time, HEPA icon |
| Safety | Automatic brush roll shutoff in case of blockage or overload; motor thermal protection |
| Maintenance | Regular cleaning of dustbin, HEPA filter, and brush roll; wash HEPA filter with water |
| Warranty | 2 years (excluding normal wear, commercial use, external damage) |
| Country of Origin | Not specified (Chinese brand) |
| Weight | Not specified (estimated: 3.5 kg) |
| Dimensions | Not specified |
Frequently Asked Questions - JV9 Pro Aqua JIMMY
User questions about JV9 Pro Aqua JIMMY
0 question about this device. Answer the ones you know or ask your own.
Ask a new question about this device
Download the instructions for your Vacuum Cleaner in PDF format for free! Find your manual JV9 Pro Aqua - JIMMY and take your electronic device back in hand. On this page are published all the documents necessary for the use of your device. JV9 Pro Aqua by JIMMY.
USER MANUAL JV9 Pro Aqua JIMMY
natural_image
Line drawing of a vertical vacuum cleaner with attached base (no text or symbols)JV9 Pro Aqua
| Instruction Manual Vacuum Cleaner | |
| Instrukcja obsługi Odkurzacz | |
| Bedienungsanleitung Staubsauger | |
| Manuel d'instruction Aspirateur | |
| Manuale D’Uso Scopa elettrica senza filo | |
| Manual de instrucciones Aspirador | |
| Руководство по эксплуатации | Пылесос |

Contents
English 2
Polski 16
30Deutsd
Français 44
Italiano 58
Español 71
Русский язык 86
Safety Notes
This vacuum cleaner is designed for home use. Do not use it for commercial or other purposes.
Please read this instruction manual carefully before use, properly save and store it for future use.
Do not put the vacuum close to fire or other high temperature facility.
Do not use or store the machine under extreme bad conditions, for example, extreme temperature. It is recommended to use it indoors between the temperature of 5 °C to 40 °C . Store the machine in dry place and avoid direct sunlight.
Fully charge the battery before first use or after long storage.
Before using the vacuum, make sure brushroll is assembled, otherwise, it may lead to motor fan blockage, causing motor burn out.
Please do not use the vacuum to pick up detergent, oil, glass slag, needle, cigarette ash, wet dust, water, matches, etc.
Please do not use the vacuum to pick up tiny particles such as cement, gypsum powder, wall powder, or large objects such as paper balls, otherwise it will cause malfunctions such as blockage and motor burnout.
Avoid blockage to air inlet or brushroll, it may cause motor failure.
Do not put your hand or foot into floorhead inlet to avoid body hurt.
Do not pour or splash water or other liquids into the machine to avoid short circuit to burn out the machine.
If the brushroll is not working, please check whether the brushroll is entangled with hair or other long fiber, clean it in time.
When storing the machine for a long time, ensure that the battery is fully charged before storage and charge the machine at least every three months.
Unplug the charger to clean or repair the machine. Hold the charger when plugging or unplugging it, and do not pull the charging cord.
Use a dry cloth to clean the machine. Liquids like gasoline, alcohol, lacquer thinner will cause crack or colour fading and cannot be used.
If the machine is not working after fully charged, it must be checked and repaired in our designated office, please do not dismantle the machine on your own.
Discarded machine contains batteries. They should be recycled safely. Do not discard them randomly.
If there is damage on power cord, to avoid danger, it should be replaced or repaired by manufacturer, repairing agency or professional person.
This appliance can be used by children aged from 8 years and above and persons with reduced physical, sensory or mental capabilities or lack of experience and knowledge if they have been given supervision or instruction concerning use of the appliance in a safe way and understand
the hazards involved.
The appliance is only to be used with the power supply unit provided.
Children shall not play with the appliance.
Cleaning and user maintenance shall not be made by children without supervision.
The appliance is only to be used with original battery pack.
If there is leaking on the battery, contact local after service for disposal instructions.
Parts Name
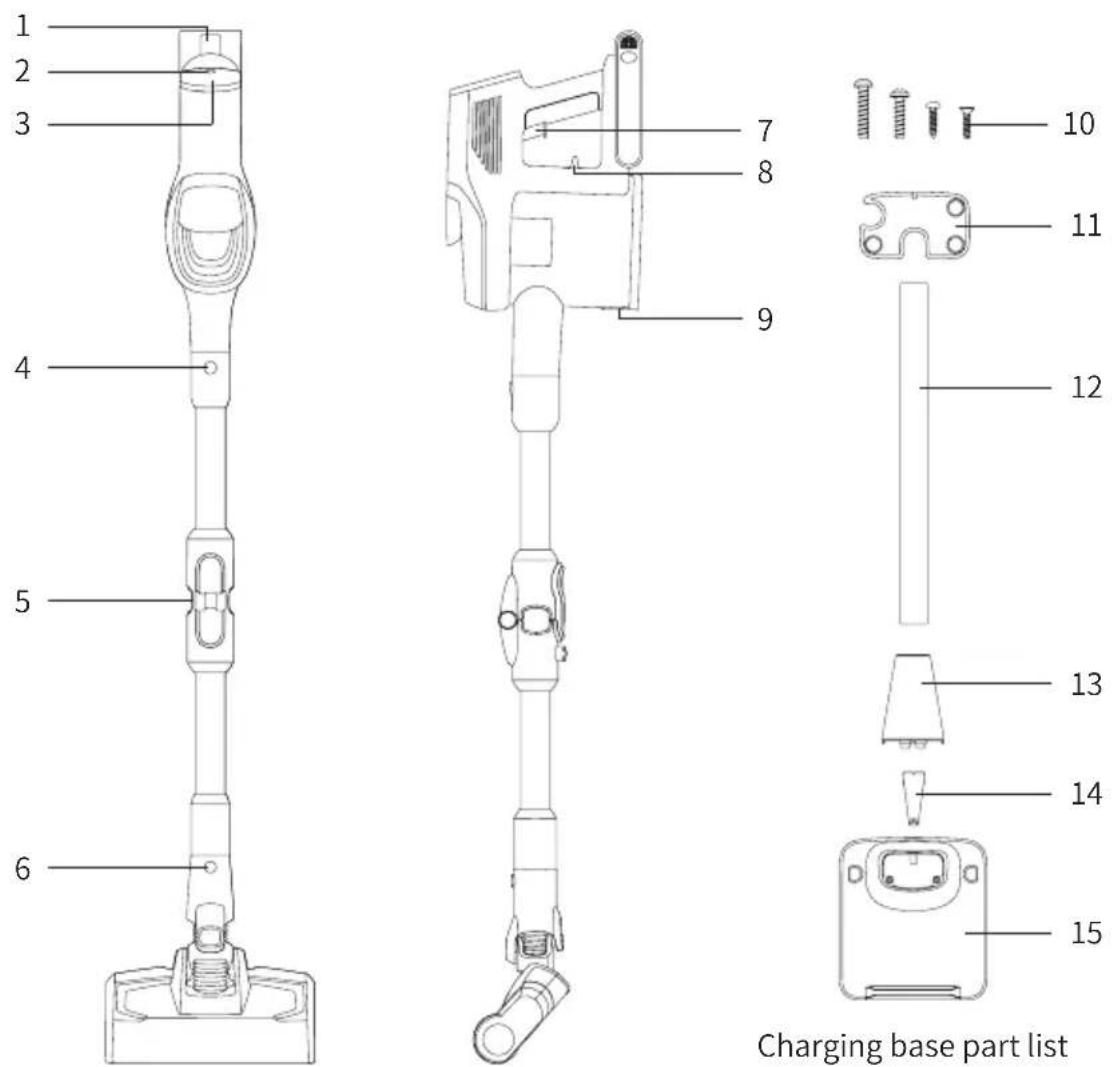
natural_image
Three technical line drawings of a handheld device with labeled parts (no text or symbols on the devices themselves)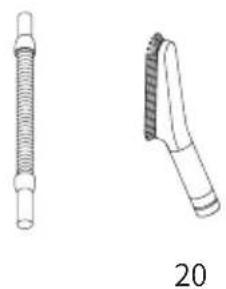
natural_image
Technical line drawings of two mechanical components, one with threaded shaft and one with tapered end (no text or symbols)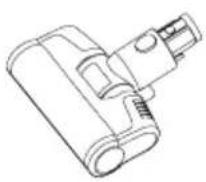
natural_image
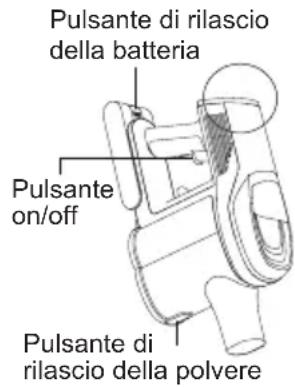
Line drawing of a handheld device with a cylindrical sensor or probe inserted (no text or symbols)- Battery pack release button
- On/off button
3.LED screen - Metal tube release button
- Metal tube
6.Floor head release button
7.Switch button
8.Dust cup release button
9.Dust cup release latch
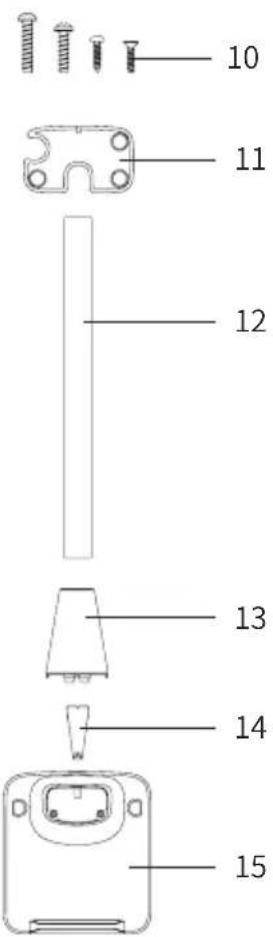
10.Screws
11. Accessory holder
12.Meta tube
13.Base cover
14. Base cover connector
15.Base
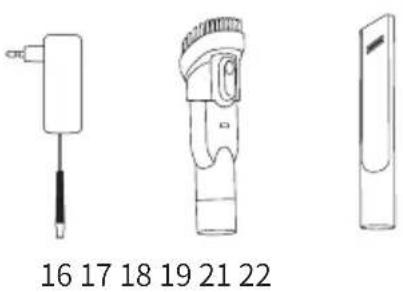
- Charger
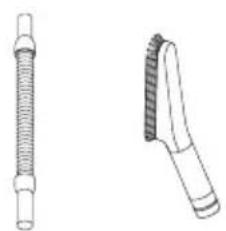
17.Upholstery tool - Crevice tool
- Stretch hose
20.Soft brush
21.Electric mattress head
22.Wet polishing head
Packing list
| Name | Handheld vacuum | Electric floor head | Wet polishing head | Electric mattress head | Flexible metal tube | Soft brush |
| Amount 1 | 1 1 1 1 1 | |||||
| Name Crevice tool | Upholstery tool | Stretch hose | Battery pack | Adapter | Accessory holder | |
| Amount 1 | 1 1 1 1 1 | |||||
| Name Metal tube Base | cover | Base cover connector | Base Screw | User manual | ||
| Amount 1 | 1 1 1 6 1 | |||||
Product Assembly
Charging base assembly
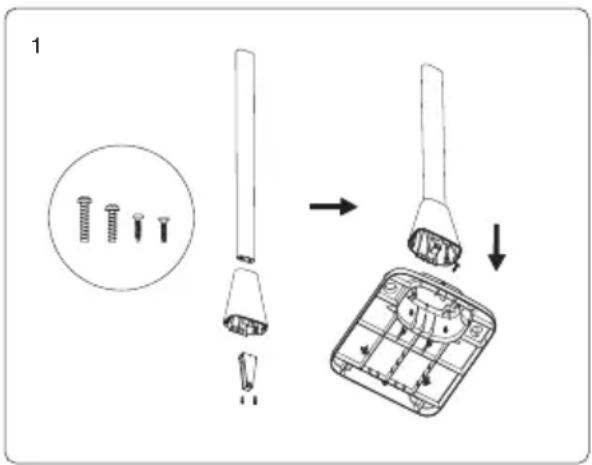
- Take out all parts from package. There are totally 6 pcs 4 types of screws packaged together with base connector. Please use correct screw type as below instruction.
- Insert metal tube and base cover connector into base cover. Make sure that the two parts cycled out are on the same side. Lock two type 1 screws.
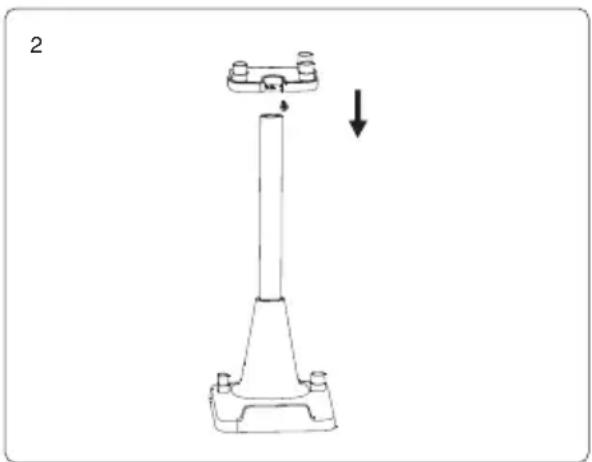
- Assemble metal tube assembly with base, lock one type 2 screw and two type 3 screws.
- Assemble accessory holder with base and tube assembly, lock one type 4 screw.
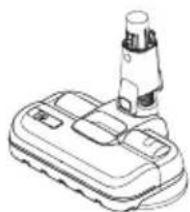
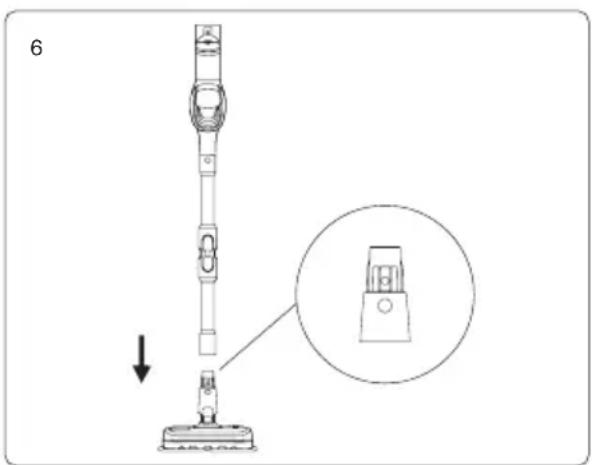
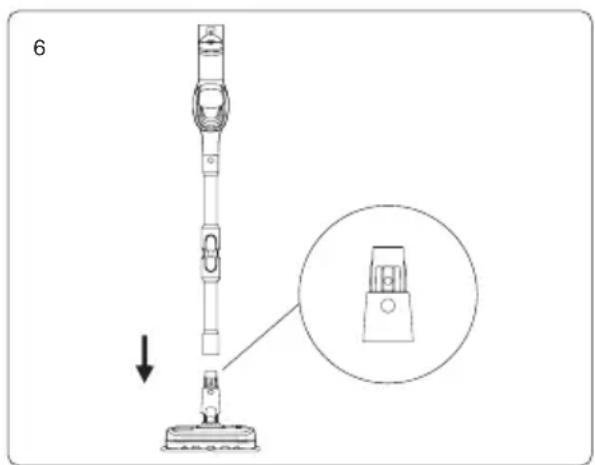
Assemble electric floor head with metal tube
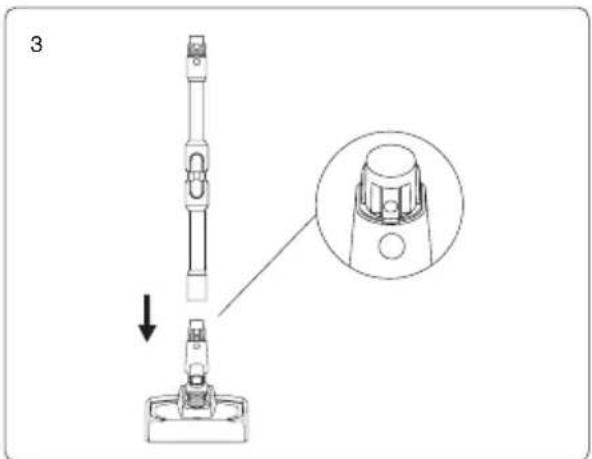
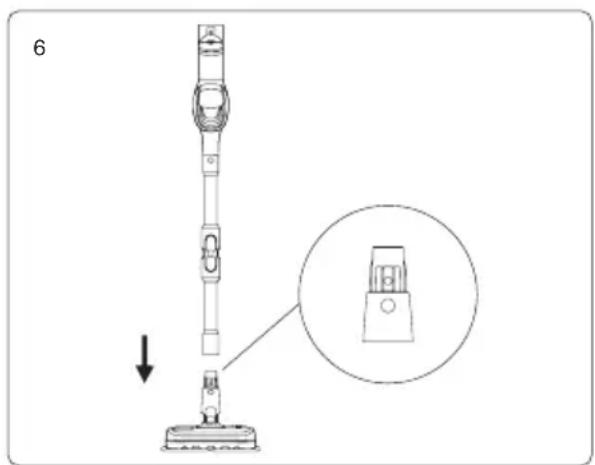
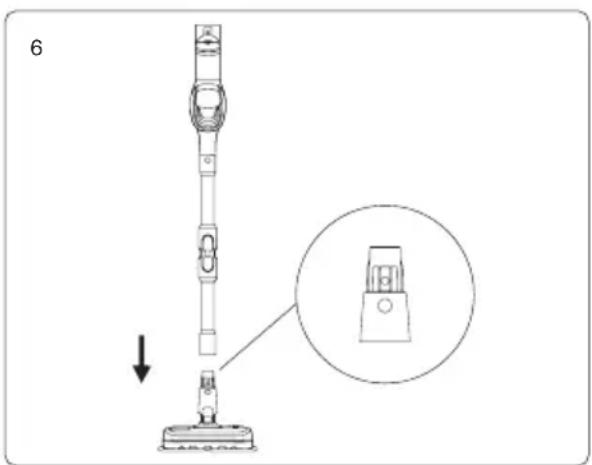
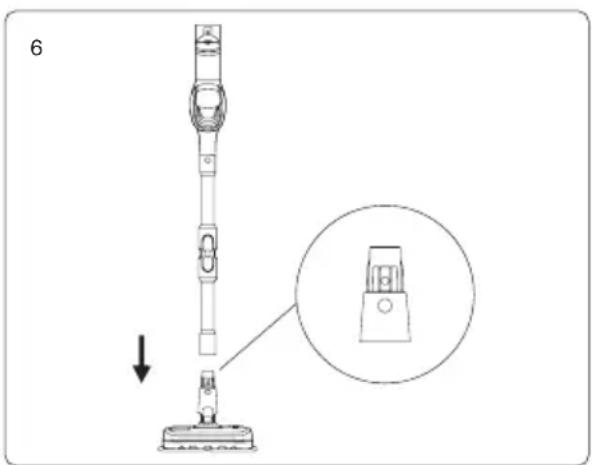
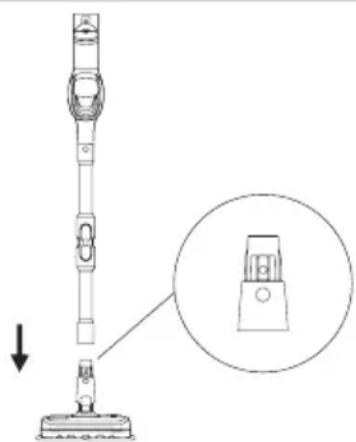
Hold the floor head with left hand, use right hand to insert the metal tube vertically into floor head, align with the conductive needle, press the tube until a "click" sound is heard.
Attention: Keep the handle and floor head in the same direction, conductive needle shall align with the socket.
When packing, storing or cleaning, if the electric floor head needs to be removed, press the brush release button as shown in the picture and pull the electric floor head in the direction shown in the picture.
natural_image
Technical line drawing of a mechanical support structure with a downward arrow indicating force or motion (no text or symbols)Assemble the battery pack and handheld vacuum cleaner
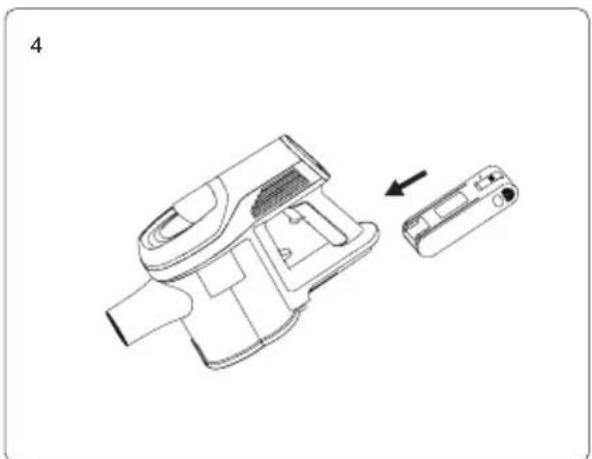
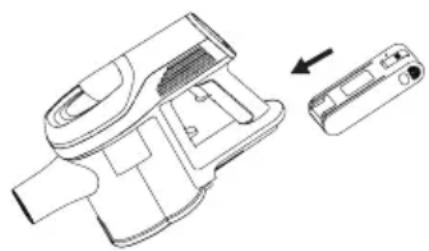
Assembly of battery pack: hold the hand-held vacuum cleaner in one hand, hold the battery pack in the other hand, aim at the guiding groove on the body, slide in the battery pack according to the arrow direction shown in the picture. Pull the battery pack after installation to make sure it does not get loose.
Attention: when the vacuum cleaner is long idled, please remove the battery, pack the product and store it in a cool and dry place, avoid direct sunlight or humid environment.
Assemble metal tube and handheld vacuum
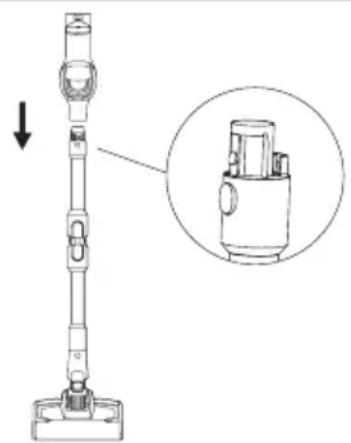
First, assemble floor head and metal tube according to the method of assembling electric floor head and metal tube.
Assemble the floor head with metal tube assembly and handheld vacuum cleaner: as shown in the picture, align the conductive needle of the metal tube with the coupler of the suction nozzle, push up until a "click" sound is heard.
Assemble and disassemble wet polishing head with the machine
-
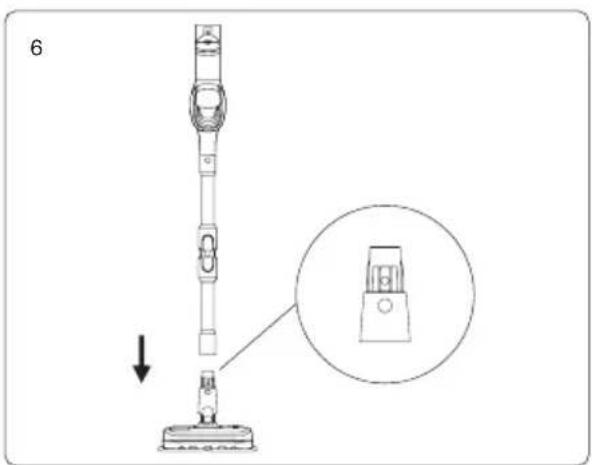
Hold the wet polishing head and insert the metal tube into the connector of the wet polishing head in the direction shown in the picture.
-
Then, align the conductive needle with the coupler and push metal tube until a "click" sound is heard.
natural_image
Technical line drawing of a mechanical device with an arrow indicating assembly or transformation (no text or symbols present)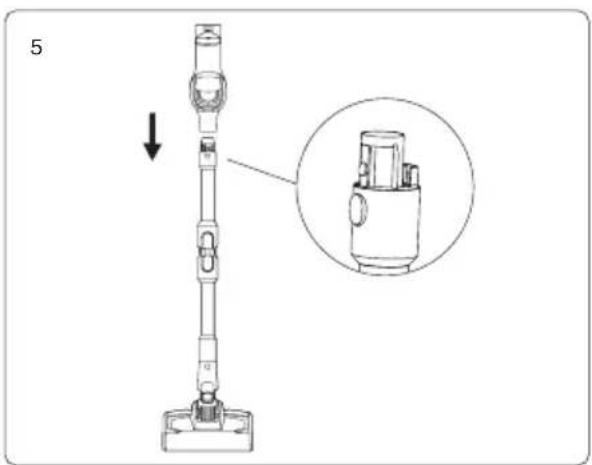
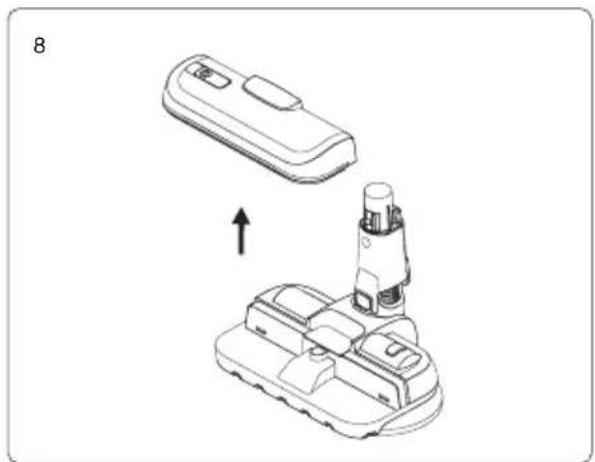
Assemble and disassemble the clean water tank of wet polishing head
- Brush release button as shown in the picture and pull the electric floor head in the direction shown in the picture.
- Brush release button as shown in the picture and pull the electric floor head in the direction shown in the picture.
Assemble and disassemble the mop on the wet polishing head
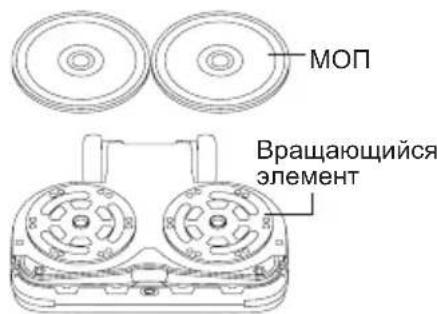
- Assemble and disassemble the mop on the wet polishing head.
2.Peal the mop off the wet polishing head, and you can reuse it after washing and drying.
Attention: Mop or wet polishing head can be purchased at JIMMY distributor or customer service center.
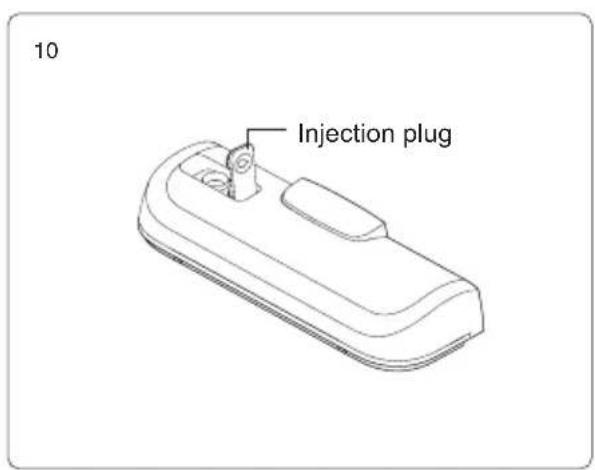
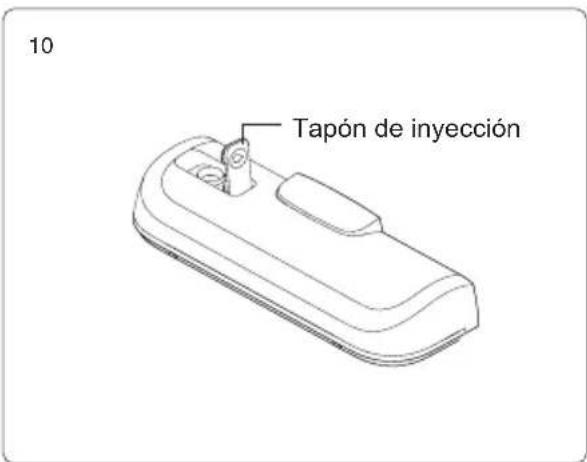
How to fill water in the clean water tank
- Flip up the water filling plug of the clean water tank.
- Fill the clean water tank with clean water.
- After the clean water tank is full, press the injection plug down firmly to secure it in place.
Attention: To prevent damage to the clean water tank, do not fill it with any alcoholic or corrosive solution.
natural_image
Diagram showing a device being assembled into a base, with an arrow indicating the process (no text or symbols present)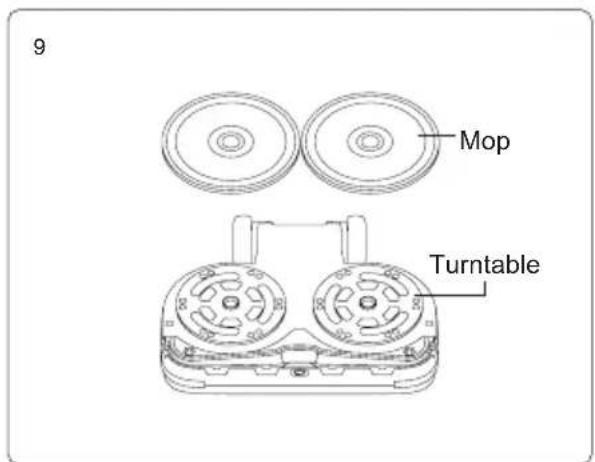
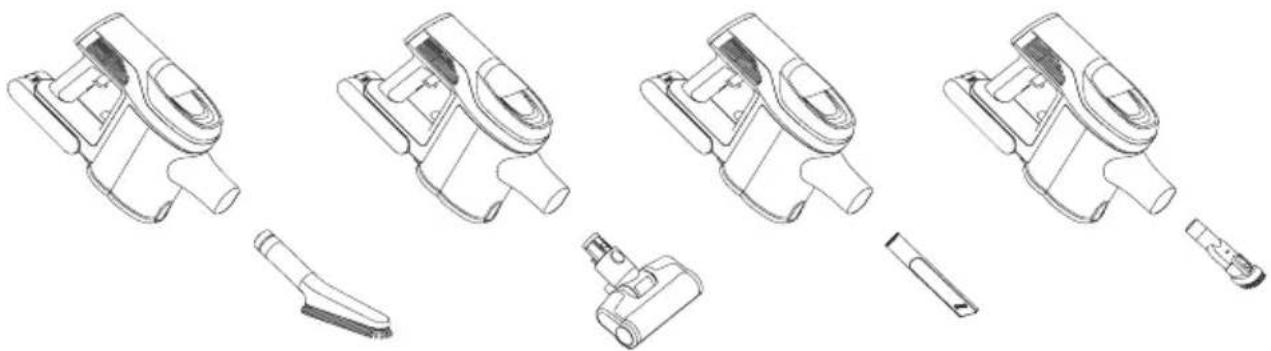
Assembly of accessories
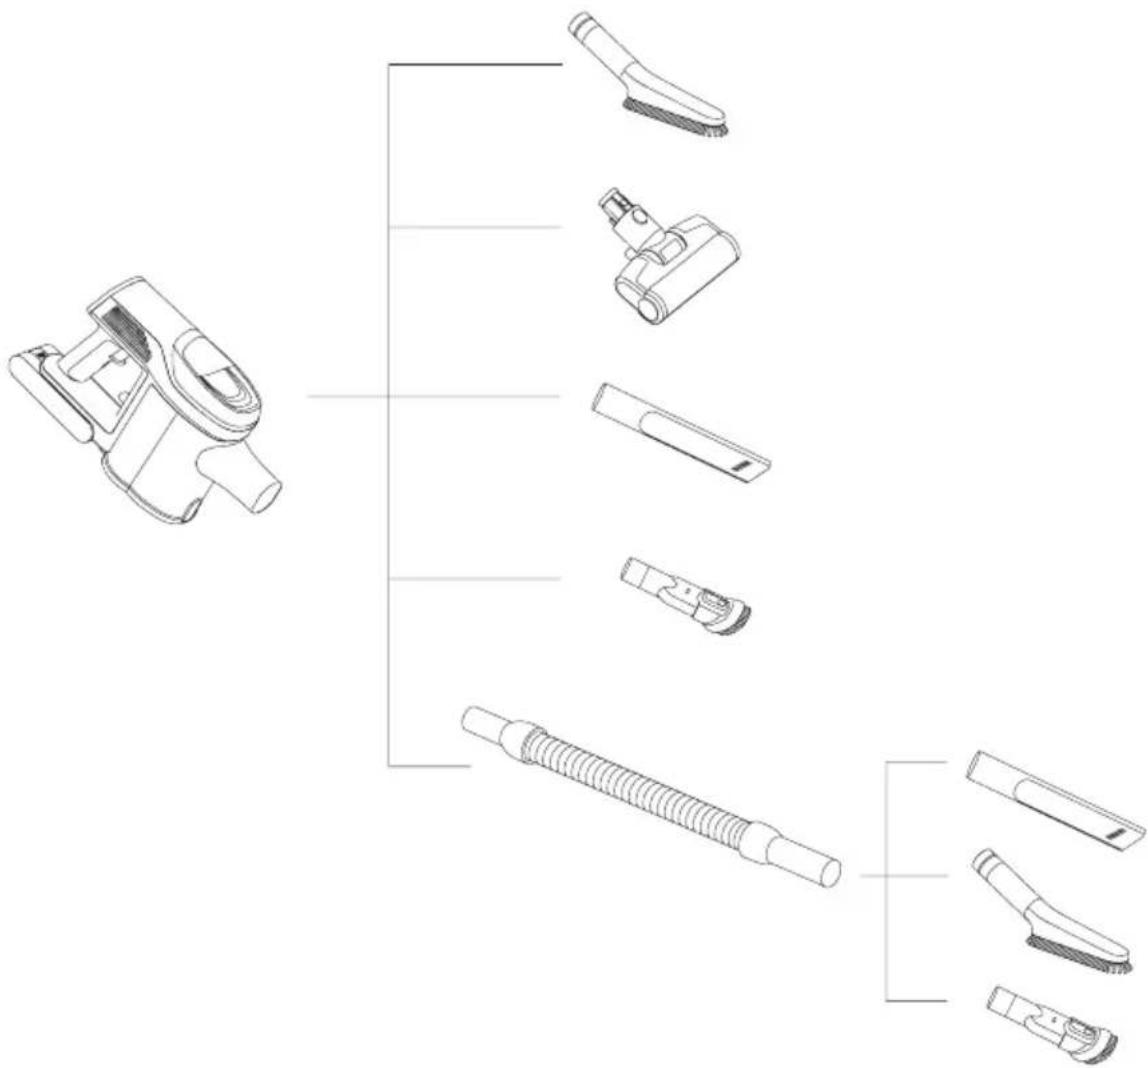
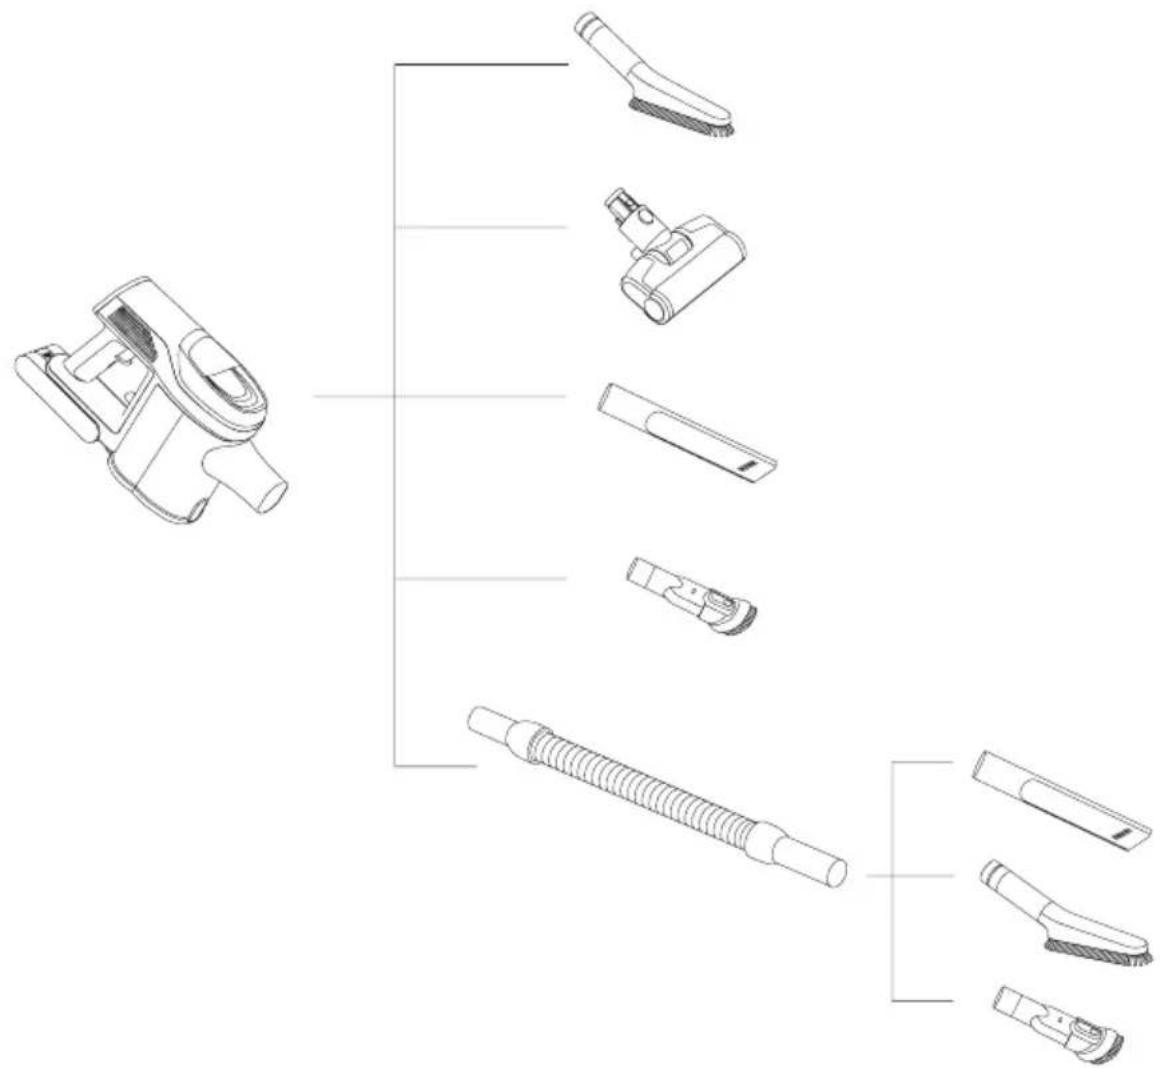
For the convenience of use, this product is specially equipped with some accessories for the hand-held part of the vacuum cleaner. When you use the handheld vacuum cleaner alone, you can directly connect the accessories according to your needs or connect the accessories through the stretch hose.
Connect electric mattress head, crevice tool, upholstery tool and soft brush to handheld vacuum as the picture.
natural_image
Technical line drawings of various mechanical components, including a vacuum cleaner and a plug assembly (no text or labels)Accessories Connection List
Use of Vacuum
Charging
Attention: When use the product for first time, battery power is not full. Need to charge the vacuum before using.
Charging of vacuum cleaner
When the vacuum cleaner power is insufficient, charge the vacuum cleaner in time; When the voltage is too low, to protect the battery, vacuum cleaner will be automatic power-off, at this time the vacuum cleaner need to be charged. When charging, plug the charger connector into the A/C power socket, plug another end of charger into battery to start charging. When the handheld vacuum cleaner LED display shows an increase in power, it indicates that the vacuum cleaner is charging. When charging is completed, LED display show 100% power.
If battery pack is charged separately without being assembled on machine, during charging, indicator in battery pack is red and turns green after charging is completed.
Attention:
-
When battery power is below ≤20% , if product is working in Max mode, it will change to Turbo mode automatically. When battery power runs off, product will turn off automatically.
-
If vacuum cleaner is long idled, charge the battery every three months to avoid battery failure.
After charging, please pull the charger plug off power socket and stop charging.
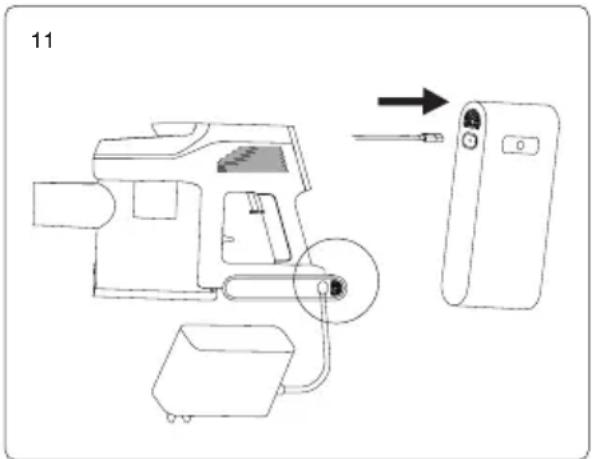
Attention: if power cord is damaged, to avoid danger, it must be replaced by professional staff of the manufacturer, repairing agent or similar department.
Use of handheld vacuum and LED screen contents
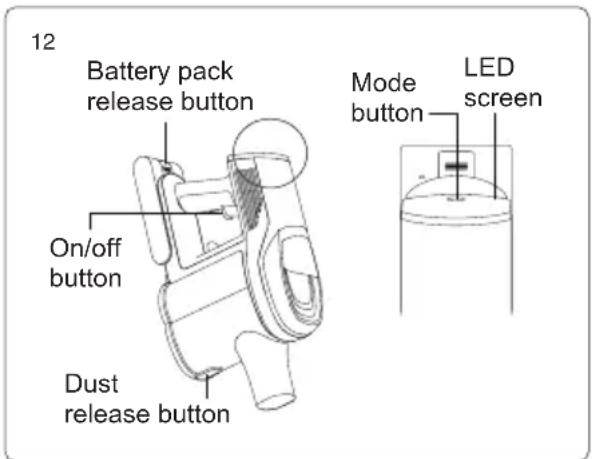
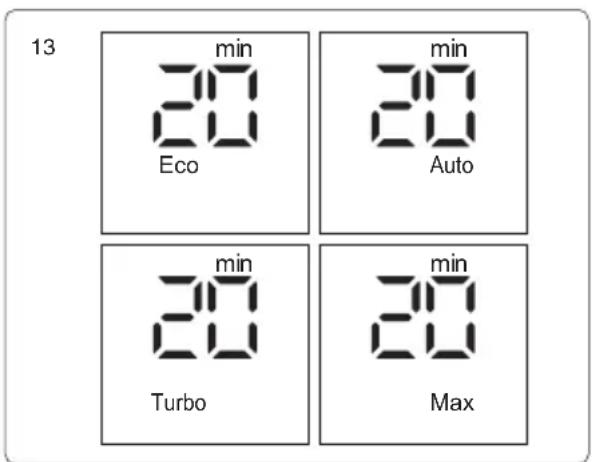
Take the vacuum cleaner off the storage holder, press the on/off button to start or stop the vacuum cleaner. Mode button can adjust working mode. When machine is turned on, it works in Turbo mode, press the mode button to switch to the sequence of Turbo-Max - Eco mode. During mode switch the mode will be displayed in LED screen.
Middle of LED screen displays product run time left in current mode. When mode is changed, left run time will also change accordingly.
When product works in Max mode and battery power drops below 20%, to extend product run time, product will automatically switch from Max to Turbo mode. After battery is charged to higher than 20% power, product can work in Max mode.
When the product is cleaning floor or carpet under Auto mode, it will adjust working power basing on the floor type it detects, in order to achieve higher cleaning efficiency. Under Auto mode, LED screen display Auto regardless how high the working power is.
Use of flexible metal tube
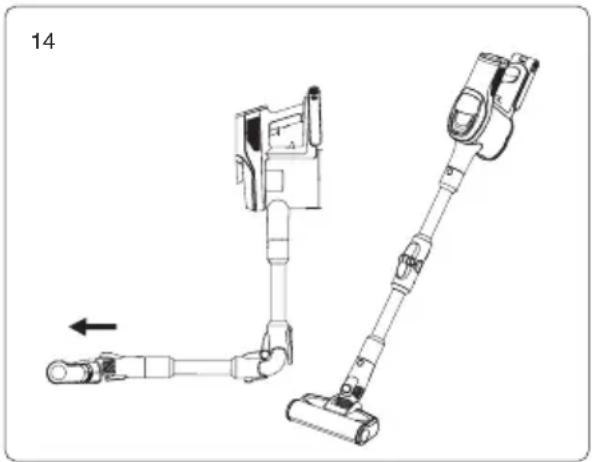
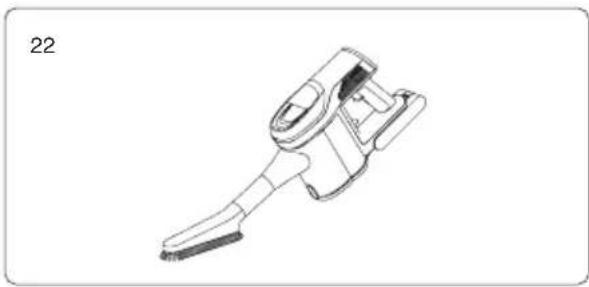
The flexible metal tube can be used for cleaning under the sofa, table, bed, and other furniture. Press the flexible metal tube release button to bend it.
Use of wet polishing head
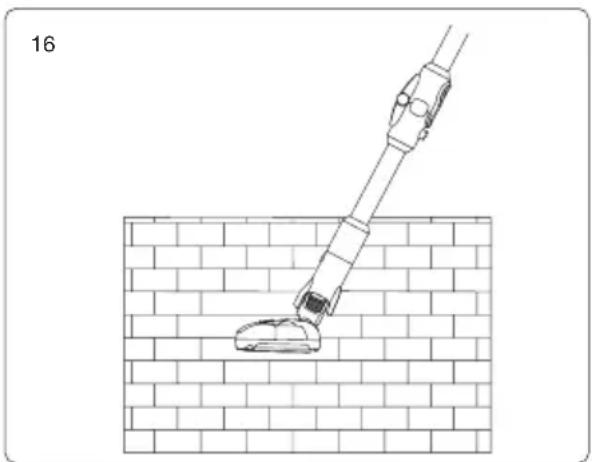
The wet polishing head can be used for cleaning hard floors, tile floors and more.
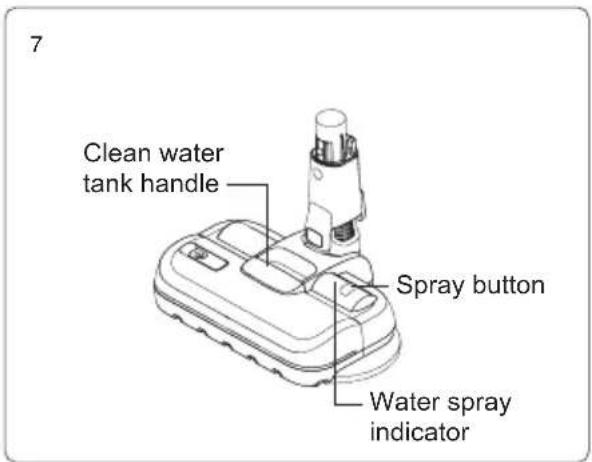
- Turn on the vacuum cleaner, the wet polishing turntable will begin to rotate, and the machine work in Eco mode by default.
- After pressing the spray button, the water outlet indicator lights up, and the device begins spraying water to the wet polishing turntable. Pressing the mode button allows you to adjust water spray volume (Eco mode - less spray volume and Max mode for large spray volume).
- Press the spray button again to stop water spray, and water spray indicator will turn off.
Attention:
- you have to ensure that the outlet indicator is on so that the wet polishing head can spray water.
- When the wet polishing head is mopping excessive sticky liquids on the floor, such as honey/Mayonnaise/ maple syrup/etc, the wet polishing head and vacuum cleaner will turn off automatically. This is a safety feature designed to protect the motor and gears.
- The wet polishing head cannot absorb water.
- The wet polishing head cannot be flushed with water.
natural_image
Technical line drawing of a vacuum cleaner assembly with no visible text or symbols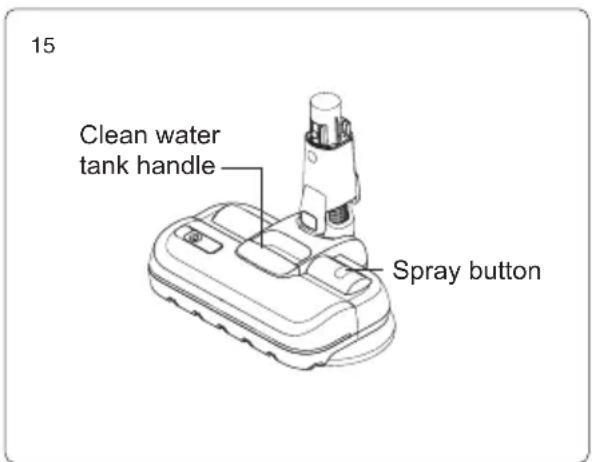
natural_image
Diagram of a robotic arm extending a curved object into a brick wall (no text or symbols)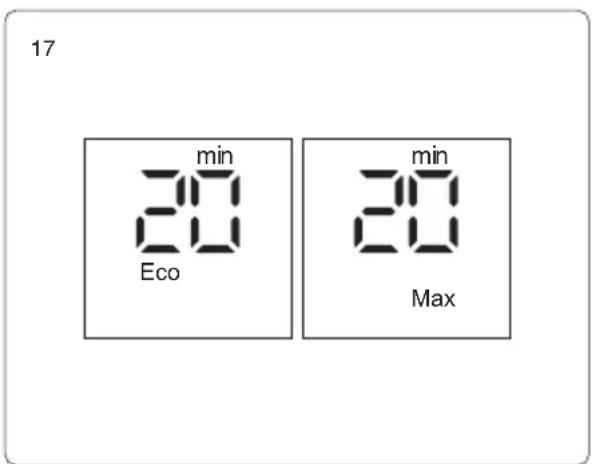
Use of electric floor head
Electric floorhead is suitable to clean all types of floor and carpet.
Attention: During the operation of the electric floor head, if there is a large volume of foreign matter inhaled or too much fiber wound, or even a child in the play of the machine mistakenly put his hand into the nozzle, resulting in the brushroll abnormal stop, the electric floor head will stop working, in order to protect personal safety and brush motor.
Use of accessories
Crevice tool: suitable for cleaning crevice, door or window corners and other narrow gaps.
Upholstery tool: suitable for cleaning closet, windowsill, sofa and table surface.
Electric mattress head: Suitable for sofa and bed mattress. The brushroll beats out and then cleans the dust mite and allergen from deep sofa or bed.
Soft brush: Suitable for cleaning furniture needs special care, like bookshelves, handicrafts, etc.
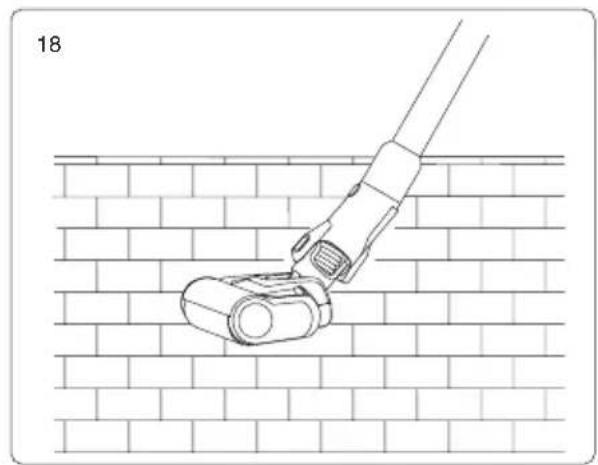
natural_image
Line drawing of a hand using a tool to lift a mechanical component against a brick wall (no text or symbols)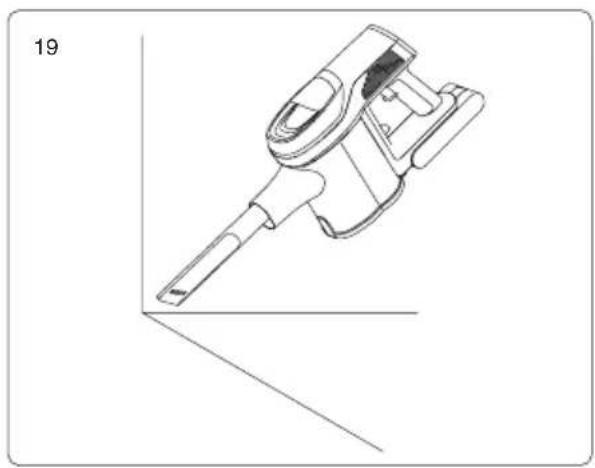
natural_image
Technical line drawing of a mechanical device with no visible text or symbols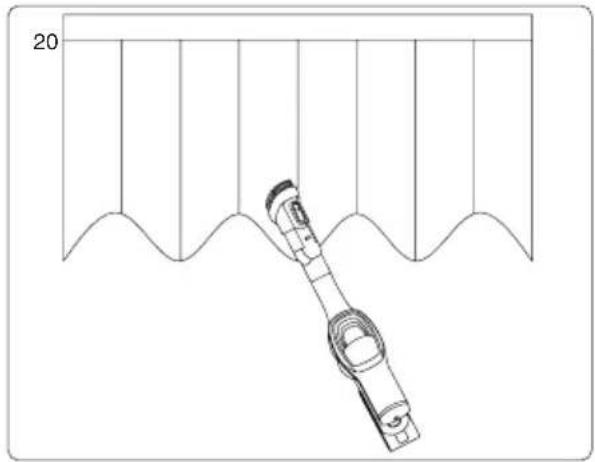
natural_image
Technical line drawing of a mechanical component with wavy base and flanged ends (no text or symbols)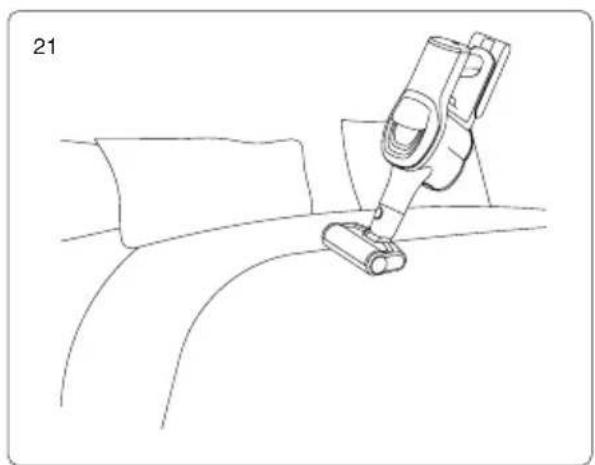
natural_image
Line drawing of a vacuum cleaner performing a lift on a car (no text or symbols)Cleaning and Replacing Parts
Attention:
-
HEPA filter is available for sale from local vacuum cleaner distributors.
-
It is recommended to clean the dust cup after each use; When the dust cup is full or the HEPA filter is clogged, it needs to be cleaned and replaced if necessary.
-
Electric floor head brushroll might be entangled with hair after long time use. It needs to be cleaned in time to keep the vacuum working more efficiently.
Clean dust cup and filtration system
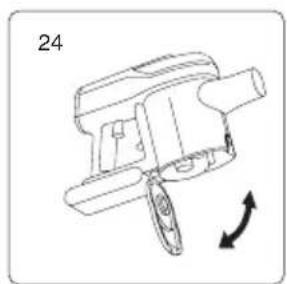
When dust cup is full or HEPA is clogged, LED screen will display HEPA icon as the picture to remind to clean dust cup and filter. Please clean dust cup and HEPA filer in time. Replace HEPA filter if necessary.
Steps of cleaning dust cup and filtration system:
-
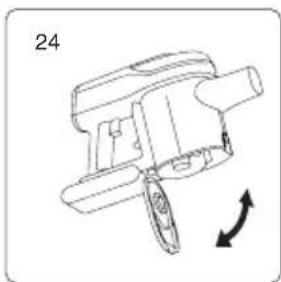
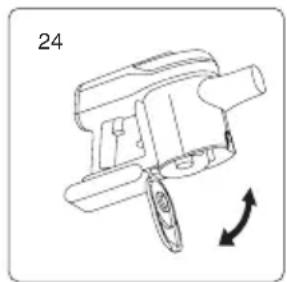
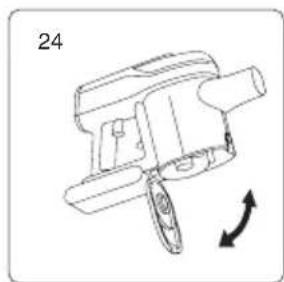
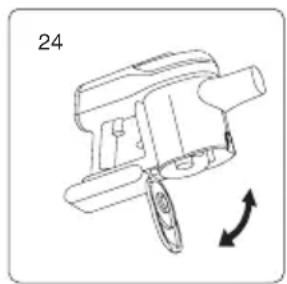
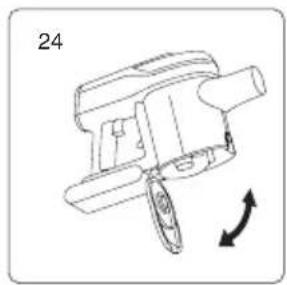
Press dust cup bottom cover release button, open dust cup bottom cover, dump dust into trash can.
-
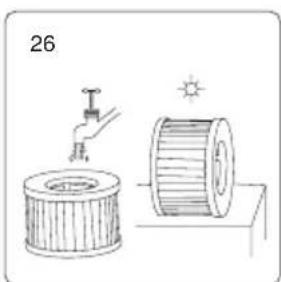
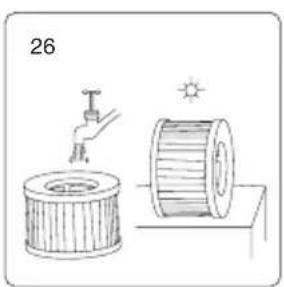
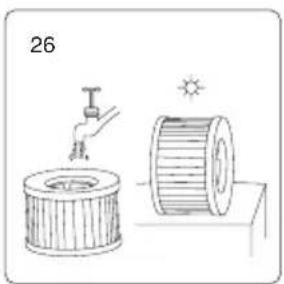
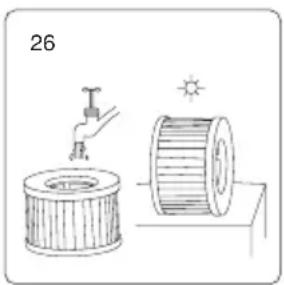
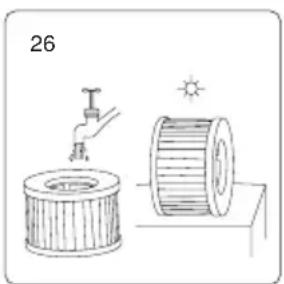
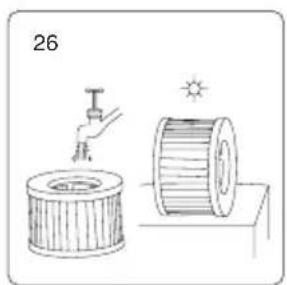
Lift up HEPA lid assembly from dust cup. Rotate HEPA filter clockwise and remove it from HEPA lid for washing. After washing, HEPA need to be completely dry before using it again.
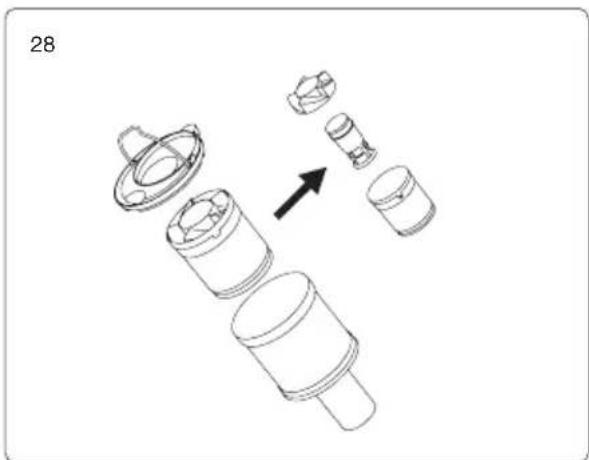
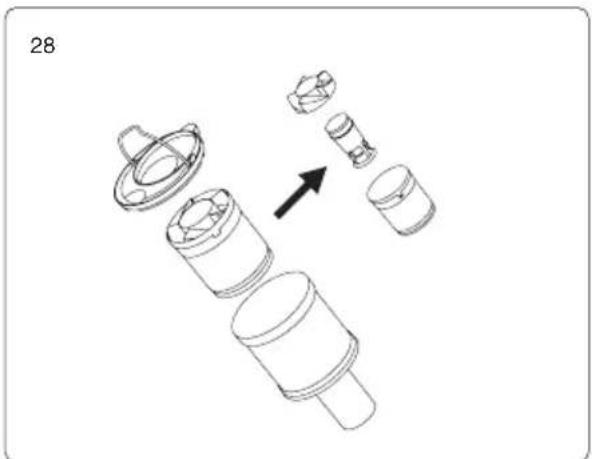
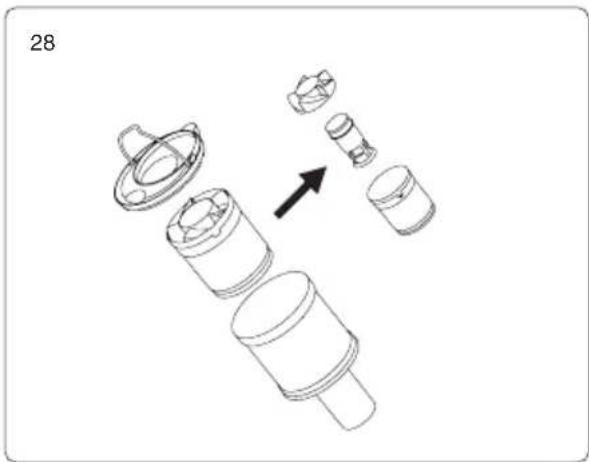
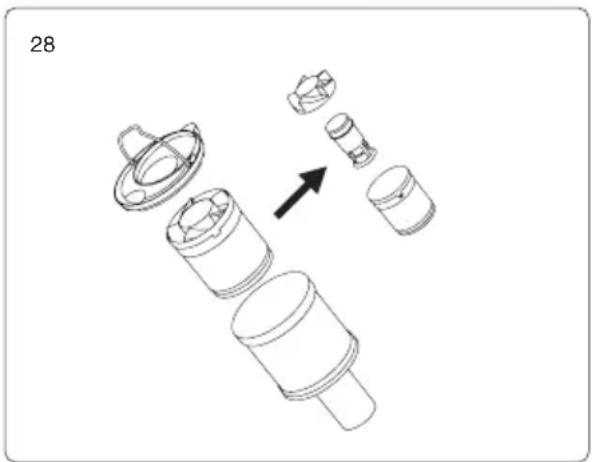
3.Push dust cup release button located behind the dust cup and remove dust cup. Hold cyclone assembly handle and pull it out of dust cup. Disassemble cyclone top, secondary dust cup, adjustment ring and inner cyclone in sequence for cleaning. After washing, all parts need to be completely dry before using again. After cleaning, assemble the parts back in the opposite sequence of disassembly.
natural_image
Technical line drawing of a handheld vacuum cleaner (no text or symbols)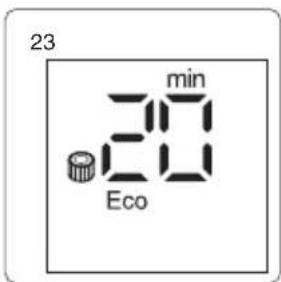
natural_image
Technical line drawing of a mechanical device with a rotating arrow indicating rotation (no text or symbols)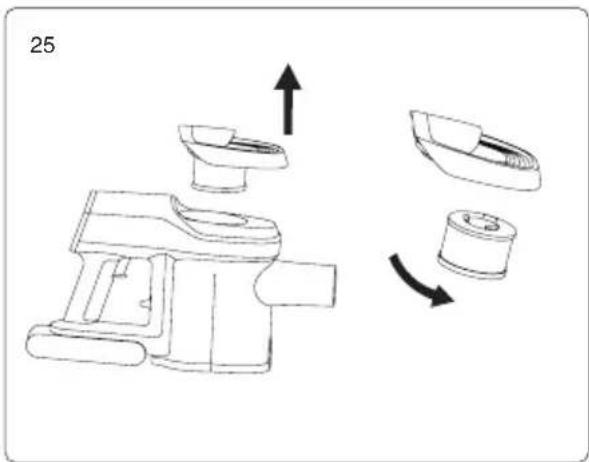
natural_image
Illustration of a water pump and a pulley system with a sun symbol (no text or labels)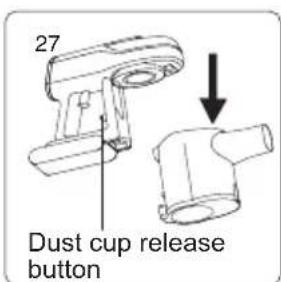
natural_image
Exploded view diagram of a mechanical component with multiple cylindrical parts and a black arrow indicating direction (no text or symbols)Clean brushroll
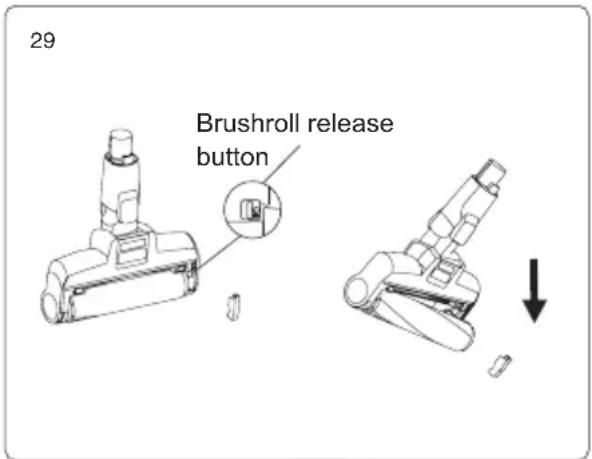
- Move the brushroll release button along the arrow direction remove side cover.
- Remove one end of the brushroll and take it out from nozzle for cleaning.
- After cleaning or replacing brushroll, assemble it back in opposite sequence of disassembly.
Storage of Vacuum Cleaner
When the vacuum is long idled, remove the battery, pack the product and store it in a cool and dry place, do not put in direct sunlight or humid environment.
Battery pack disassembly
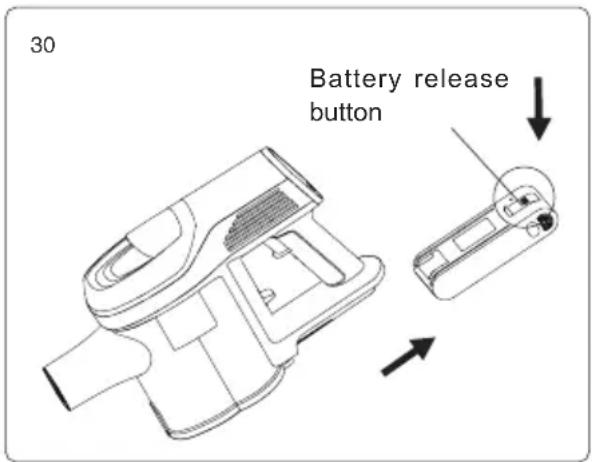
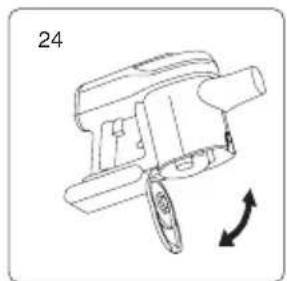
Press the battery release button, remove the battery pack in the arrow direction and place the battery in a plastic bag, then store it in a dry place.
Trouble Shooting
Please check the following issues before sending to designated repair agent.
| Trouble Possible | Causes Solutions | |
| Motor does not work | Battery has no power Charge the vacuum cleaner | |
| Metal tube,floorhead, battery pack and vaccum cleaner is not assembled correctly | Check the accessories are assembled correctly to the vacuum cleaner | |
| Suction drops | Dust cup is full Clean dust cup | |
| Filter blocked Clean or replace filter | ||
| Floorhead air path blocked Clean floorhead air path | ||
| Short working time after charging | Machine not fully charged | Follow instruction manual to fully charge the battery |
| Battery old aging | New batteries can be bought from local distributor | |
When there is electric components defect, which needs professional after service person for instruction or repairing, LED screen will display the defect warning with error code of F1 to F9. Please contact after service of local agent and provide error code.
Attention: if there are other faults needs special tools, in order to avoid danger, must be repaired by professional people of manufacturer, repairing agent or similar agent.
Technical Parameter
| Model No JV9 Pro Aqua | |
| Rated Voltage 25.2V | --- |
| Rated Power 500W | |
| Charger input voltage 100-240V~ 50/60Hz | |
| Charger output voltage 30V | --- 600mA |
| Electric floor head model No T-EB110KC | |
| Electric floor head rated power 30W | |
| Battery pack capacity 2500mAh | |
| Charging time 4h-5h | |
| Wet polishing head model No T-PP2.0A | |
| Wet polishing head rated power 30W |
Circuit Diagram
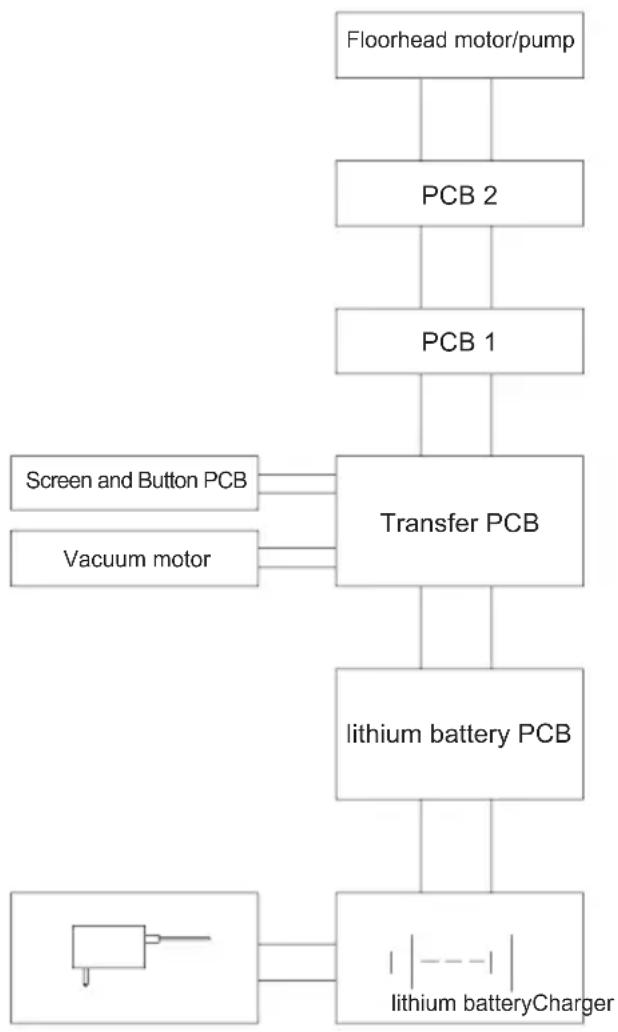
flowchart
graph TD
    A["Floorhead motor/pump"] --> B["PCB 2"]
    B --> C["PCB 1"]
    C --> D["Transfer PCB"]
    D --> E["lithium battery PCB"]
    E --> F["lithium batteryCharger"]
    G["Screen and Button PCB"] --> D
    H["Vacuum motor"] --> D
    I["Ground Symbol"] --> F
Manufacturer Information
| Manufacturer Kingclean Electric Co., Ltd | |
| Address | No.1 Xiangyang Road, Suzhou New District, Jiangsu Province 215009, China |

Disposal
The machine, accessories and packaging should be sorted for environmental-friendly recycling.
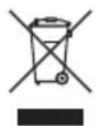
Do not dispose of the machine into household waste!
Only for EC countries: According to the European Guideline 2012/19/EU, machine that are no longer usable, and according to the European Guideline 2006/66/EC, defective or used battery packs/batteries, must be collected separately and disposed of in an environmentally correct manner.
Battery packs/batteries:
Integrated batteries may only be removed for disposal by qualified personnel.
Opening the housing shell can damage or destroy the machine.
Do not dispose of battery packs/batteries into household waste, fire or water. Battery packs/batteries should, if possible, be discharged, collected, recycled or disposed of in an environmental-friendly manner.
Subject to change without notice.s
Warranty Information
This product enjoys two year warranty from the date of purchase.
Excluded from the guarantee is normal wear, commercial use, alterations to the appliance as purchased, cleaning activities, consequences of improper use or damage by the purchaser or a third person, damage that can be attributed to external circumstances.
natural_image
Three technical line drawings of a handheld device with labeled parts (no text or symbols on the devices themselves)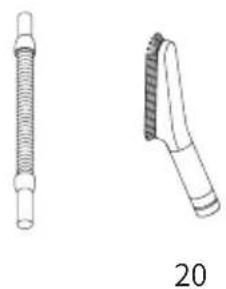
natural_image
Technical line drawings of two mechanical components, one with threaded shaft and one with tapered end (no text or symbols)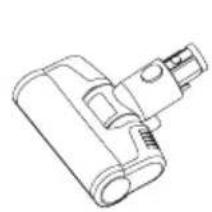
natural_image
Line drawing of a mechanical device with a cylindrical body and a handle (no text or symbols)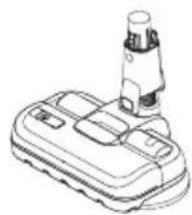
natural_image
Line drawing of a handheld device with a cylindrical sensor or probe inserted (no text or symbols)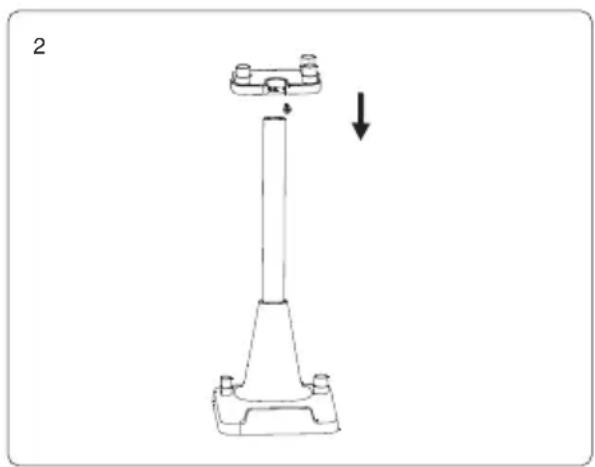
natural_image
Technical line drawing of a mechanical component with a downward arrow indicating motion (no text or symbols)natural_image
Technical line drawing of a mechanical device with an arrow indicating transformation (no text or symbols present)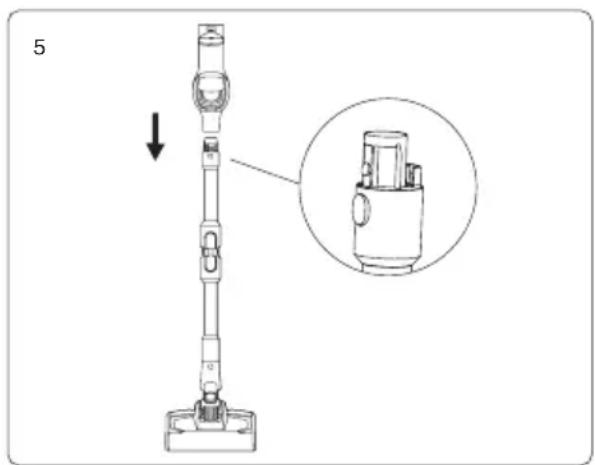
natural_image
Diagram showing a device being assembled into a base, with an arrow indicating the process (no text or symbols present)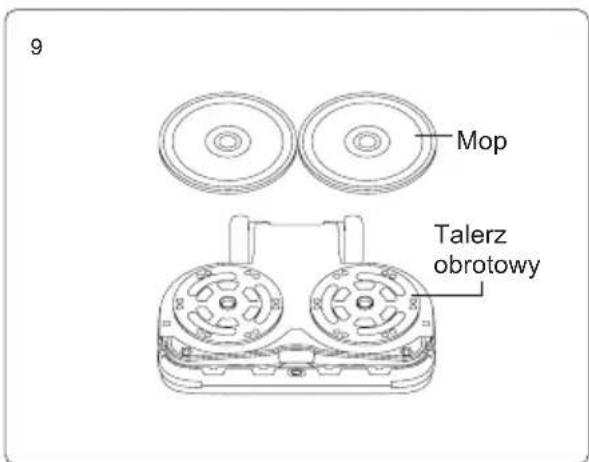
natural_image
Technical line drawings of various mechanical components, including a vacuum cleaner and a plug assembly (no text or labels)Użycie odkurzacza
Ładowanie
natural_image
Technical illustration of a vacuum cleaner assembly with labeled parts and directional arrow (no text or symbols)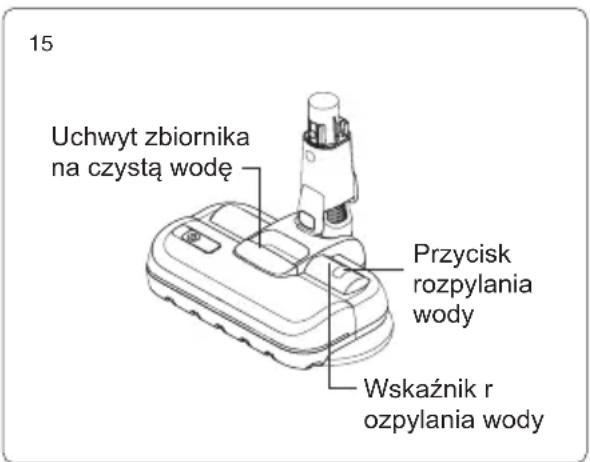
natural_image
Diagram of a mobile phone scanning off a brick wall, no text or symbols present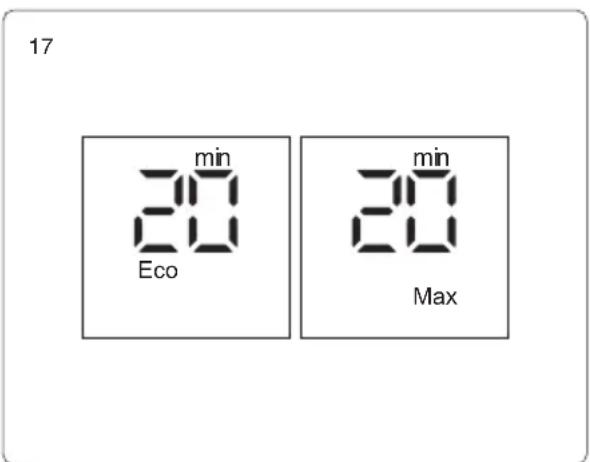
Uwaga:
natural_image
Line drawing of a hand gripping a small mechanical device against a brick wall (no text or symbols)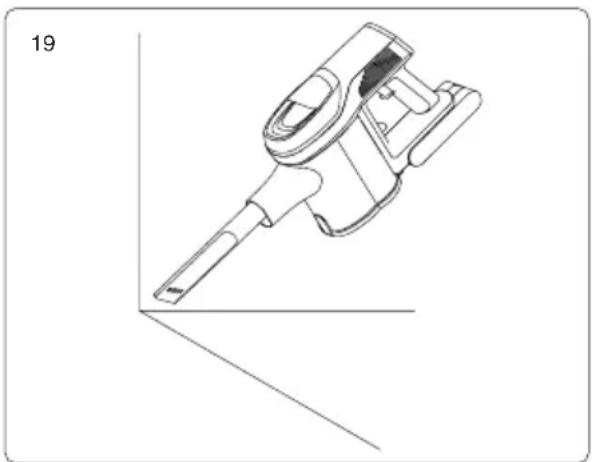
natural_image
Technical line drawing of a handheld device with a pointed tip and handle, shown in 3D perspective (no text or symbols)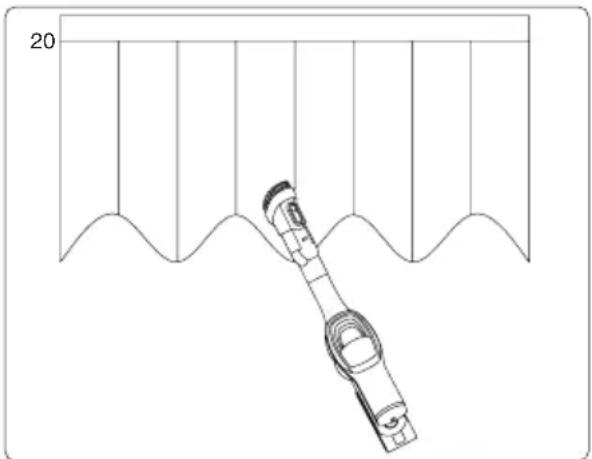
natural_image
Technical line drawing of a mechanical assembly with a bracket and curved components, no text or symbols present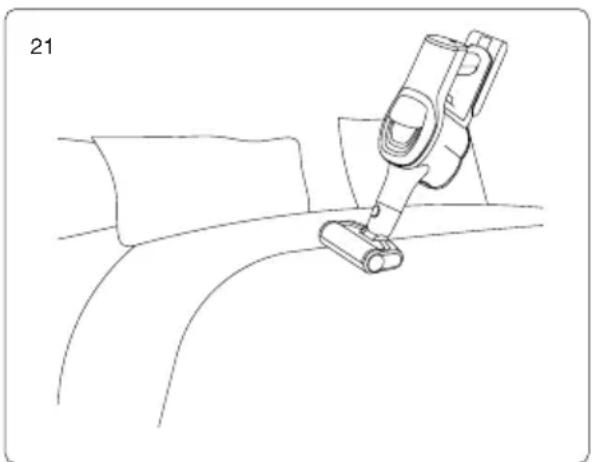
natural_image
Line drawing of a vacuum cleaner attached to a car seat (no text or symbols)natural_image
Technical line drawing of a mechanical device with a lever and handle (no text or symbols)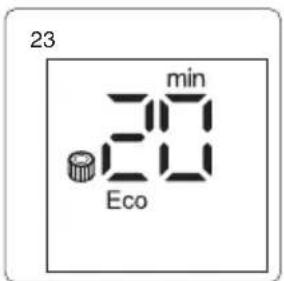
natural_image
Technical line drawing of a mechanical device with a rotating knob and directional arrow (no text or symbols)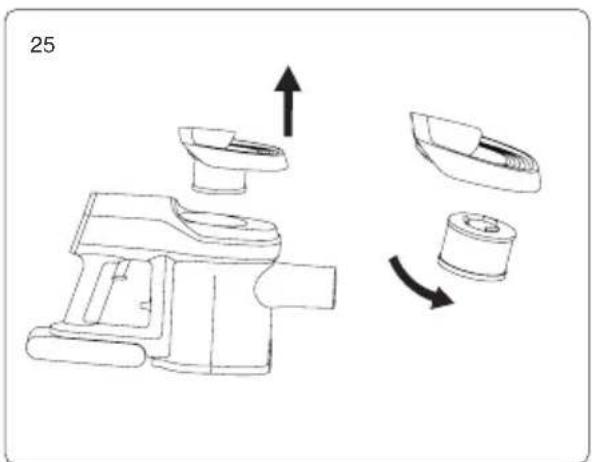
natural_image
Illustration of a water tap and a pulley with sunlight (no text or symbols)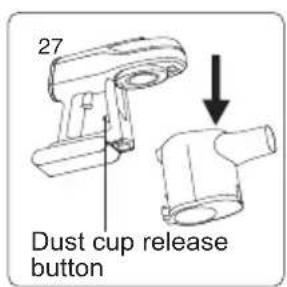
natural_image
Exploded view diagram of a mechanical component with multiple cylindrical parts and a black arrow indicating direction (no text or symbols)When there is electric components defect, which needs professional after service person for instruction or repairing, LED screen will display the defect warning with error code of F1 to F9. Please contact after service of local agent and provide error code.
| Producent Kingclean Electric | Co., Ltd |
| Adres | No.1 Xiangyang road, Suzhou New District,Jiangsu province, 215009, China |

natural_image
Line drawing of a handheld device with a cylindrical sensor or probe inserted (no text or symbols)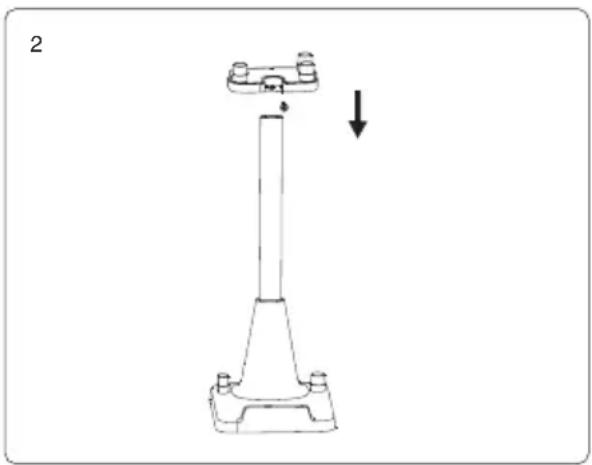
natural_image
Mechanical assembly diagram showing a vertical column with a downward arrow indicating force or motion (no text or symbols)natural_image
Technical line drawing of a mechanical device with an arrow indicating transformation (no text or symbols present)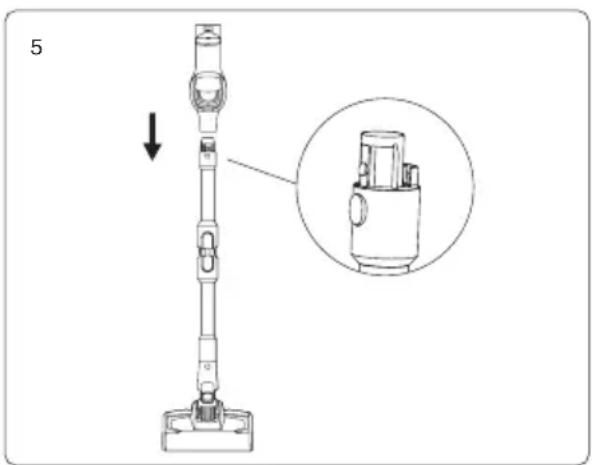
natural_image
Line drawing of a device with an open lid and a mounted sensor or sensor assembly, showing a step-down view (no text or symbols)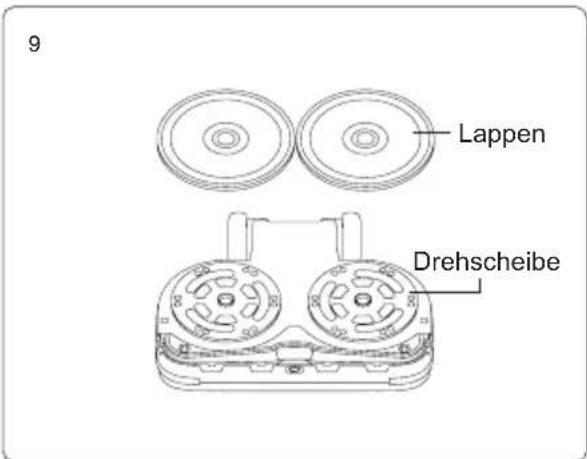
natural_image
Technical line drawings of various mechanical components, including a vacuum cleaner and a plug assembly (no text or labels)natural_image
Technical illustration of a vacuum cleaner assembly with a left-hand rule and a right-hand rule (no text or symbols)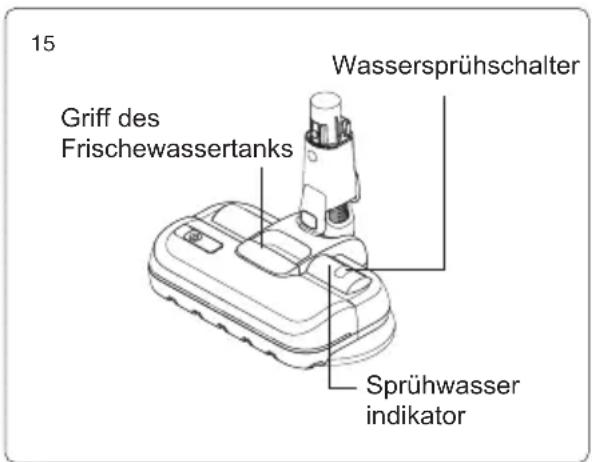
natural_image
Diagram of a hand using a tool to clean or install a component on a brick wall (no text or symbols)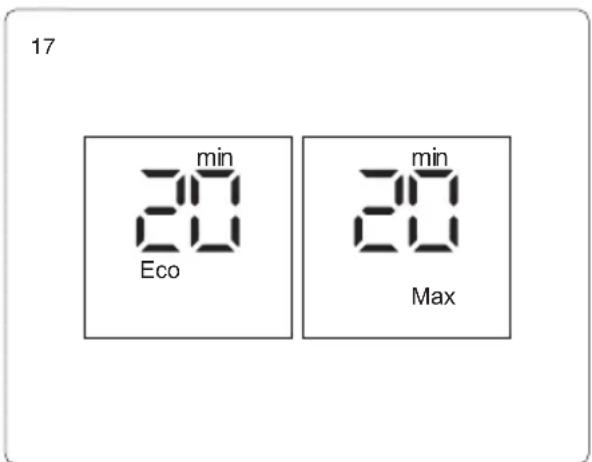
Achtung:
natural_image
Line drawing of a hand gripping a small mechanical device against a brick wall (no text or symbols)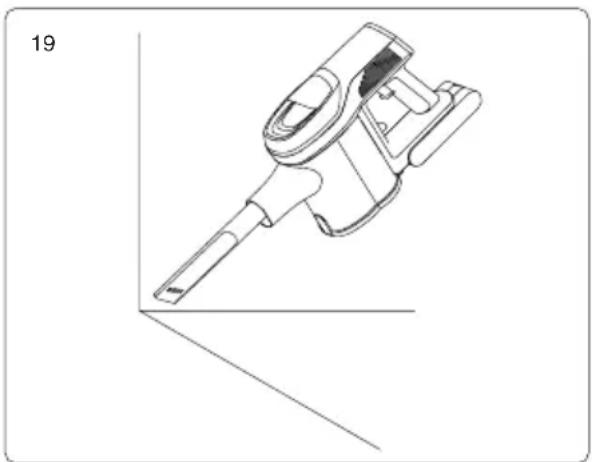
natural_image
Technical line drawing of a handheld device with a pointed tip and handle, shown in 3D perspective (no text or symbols)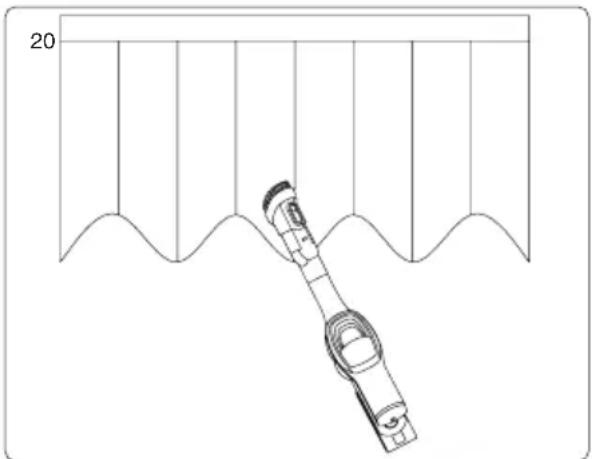
natural_image
Technical line drawing of a mechanical assembly with a bracket and curved components, no text or symbols present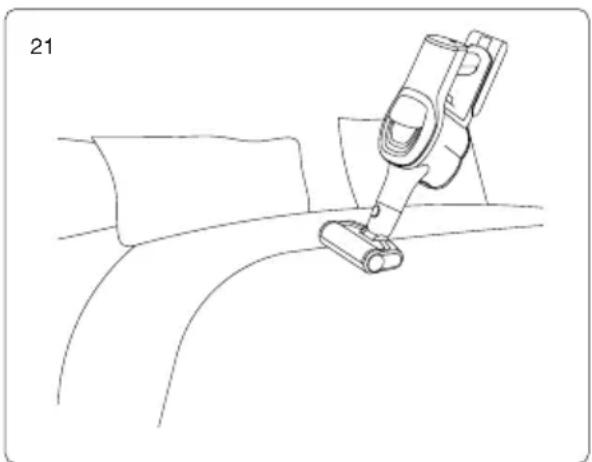
natural_image
Line drawing of a vacuum cleaner attached to a car seat (no text or symbols)natural_image
Technical line drawing of a mechanical device with a lever and handle (no text or symbols)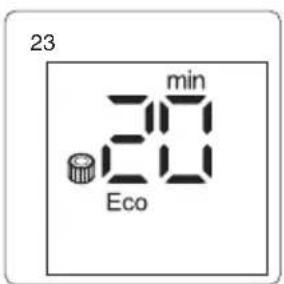
natural_image
Technical line drawing of a mechanical device with an arrow indicating rotation (no text or symbols)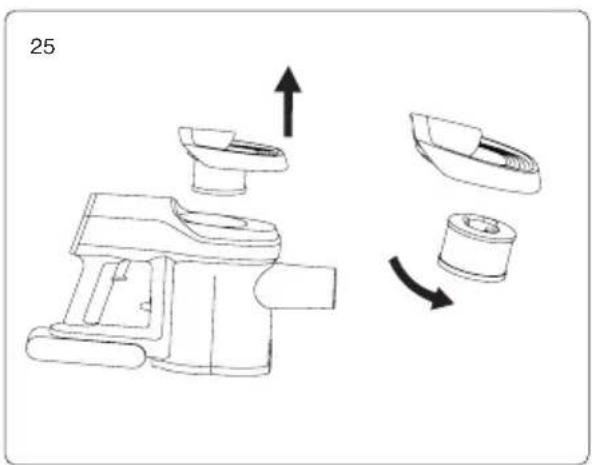
natural_image
Illustration of a water pump and a pulley system with a sun symbol (no text or labels)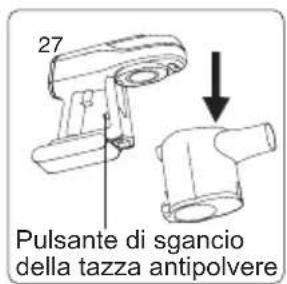
natural_image
Exploded view diagram of a mechanical component with multiple cylindrical parts and an arrow indicating direction (no text or symbols)natural_image
Line drawing of a handheld vacuum cleaner device (no text or symbols)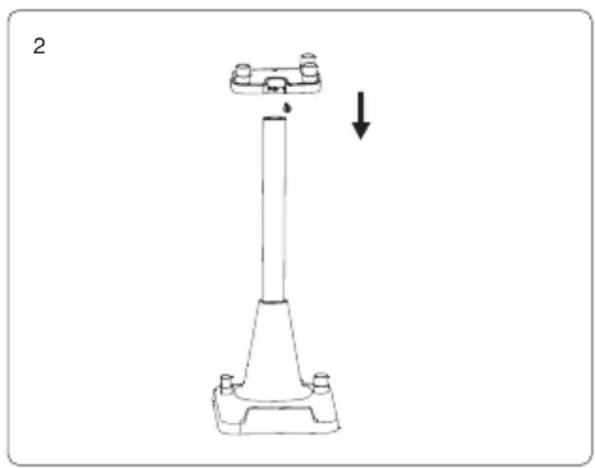
natural_image
Technical line drawing of a mechanical support structure with a downward arrow indicating force or motion (no text or symbols)natural_image
Technical line drawing of a mechanical device with an arrow indicating transformation (no text or symbols present)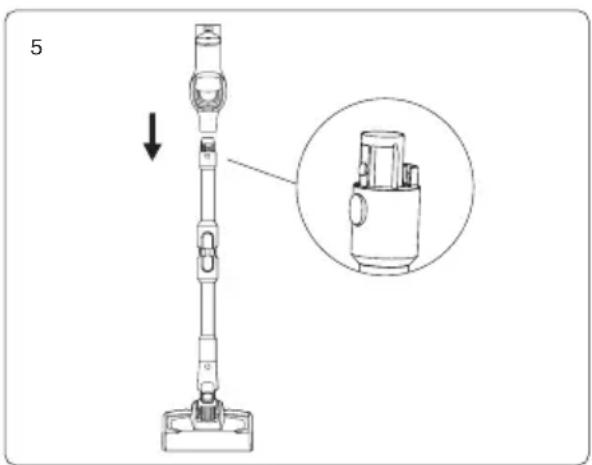
natural_image
Line drawing of a device with an open lid and a mounted sensor or sensor assembly, showing a step-down view (no text or symbols)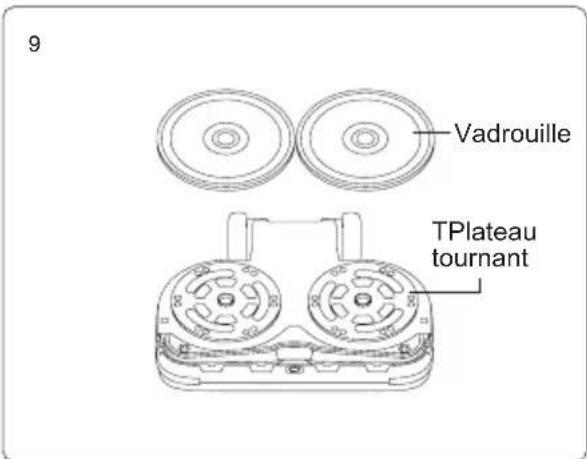

natural_image
Technical line drawings of various mechanical components, including a vacuum cleaner and a plug assembly (no text or labels)natural_image
Technical line drawing of a vacuum cleaner assembly with no visible text or symbols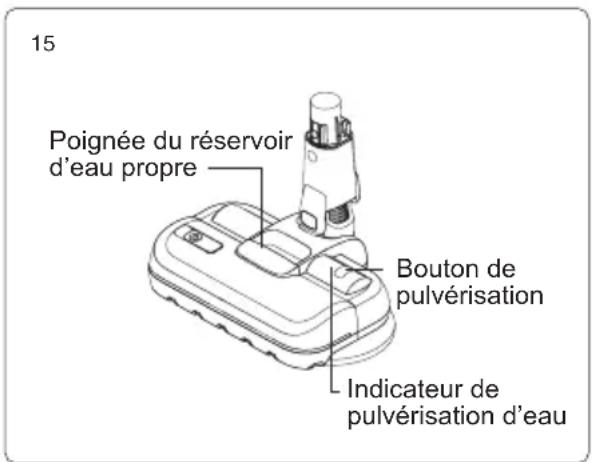
natural_image
Diagram of a mobile phone installing a car on a brick wall (no text or symbols)
natural_image
Line drawing of a hand gripping a small mechanical device against a brick wall (no text or symbols)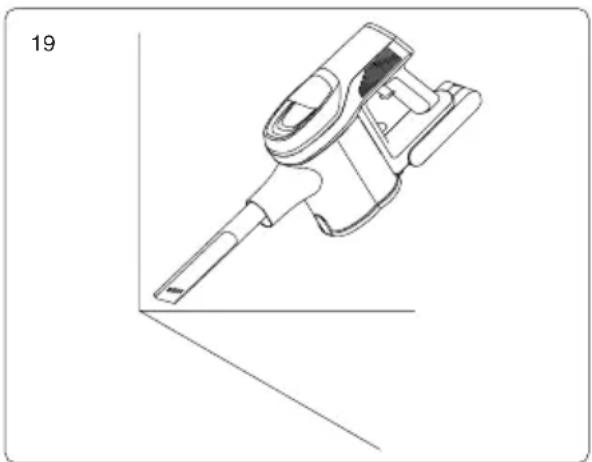
natural_image
Technical line drawing of a handheld device with a pointed tip and lever mechanism (no text or symbols)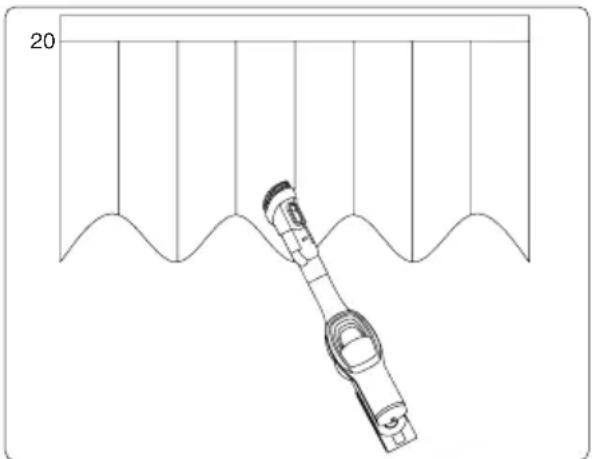
natural_image
Technical line drawing of a mechanical assembly with a bracket and curved components, no text or symbols present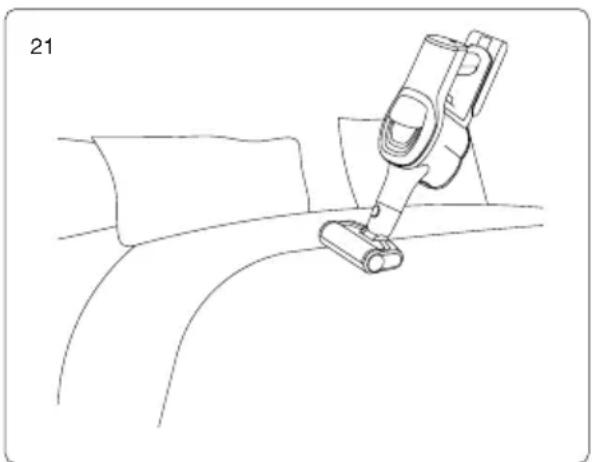
natural_image
Line drawing of a vacuum cleaner attached to a car seat (no text or symbols)natural_image
Technical line drawing of a handheld vacuum cleaner (no text or symbols)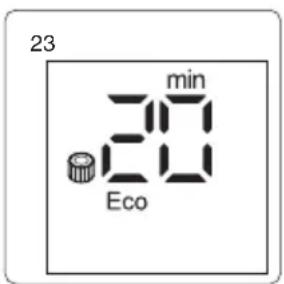
natural_image
Technical line drawing of a mechanical device with a rotating arrow indicating rotation (no text or symbols)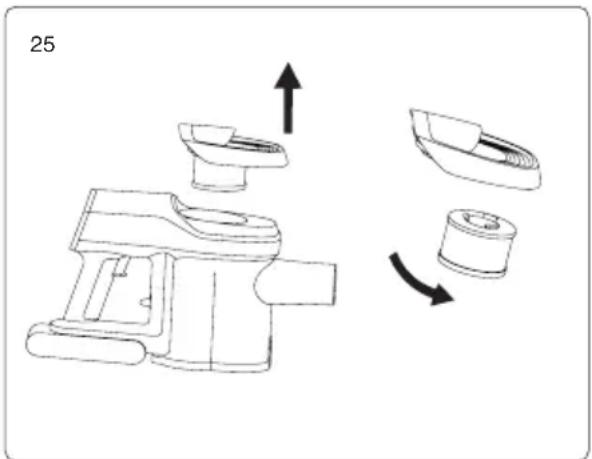
natural_image
Illustration of a water tap and a pulley with a sun symbol (no text or labels)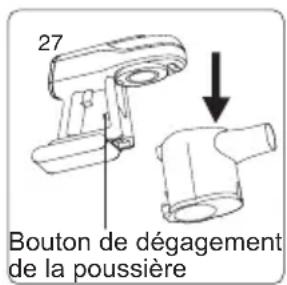
natural_image
Exploded view diagram of a mechanical component with multiple cylindrical parts and an arrow indicating direction (no text or symbols)Clean brushroll
Storage of Vacuum Cleaner
| Fabricant Kingclean Electric Co., Ltd | |
| Adresse | No.1 Xiangyang road, Suzhou New District,Jiangsu province, 215009, China |

Mise au rebut
natural_image
Three technical line drawings of a handheld device with no visible text or symbols16 17 18 19 21 22
natural_image
Technical line drawings of two mechanical components: a threaded rod and a flat tool (no text or symbols)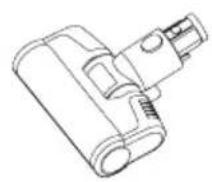
natural_image
Line drawing of a handheld device with a cylindrical sensor or probe inserted (no text or symbols)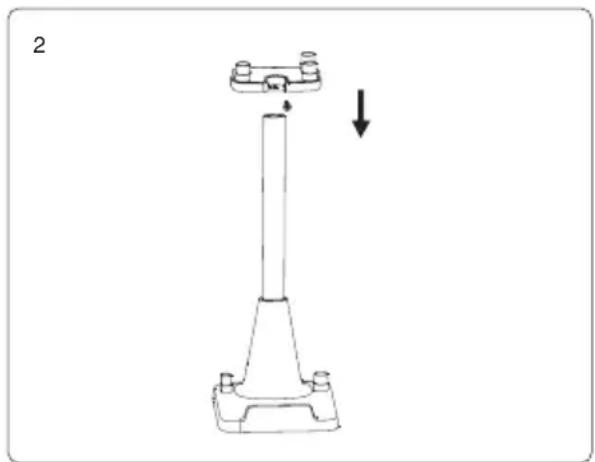
natural_image
Technical line drawing of a mechanical support structure with a downward arrow indicating force or motion (no text or symbols)natural_image
Technical line drawing of a mechanical device with an arrow indicating transformation (no text or symbols present)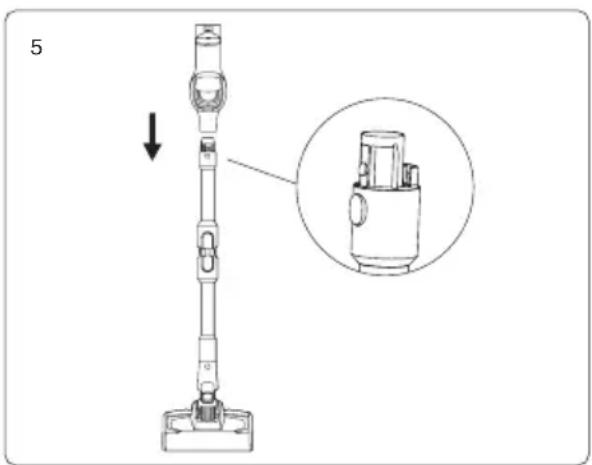
natural_image
Line drawing of a device with an open lid and a mounted sensor or sensor assembly (no text or symbols)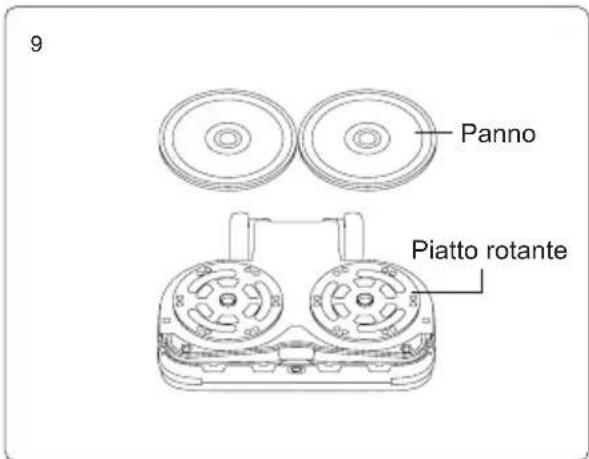
natural_image
Technical line drawings of various mechanical components, including a clip and plug assembly (no text or labels)natural_image
Line drawing of a device with a scroll wheel and attached case, showing a close-up of the handle (no text or symbols)12
natural_image
Technical line drawing of a handheld vacuum cleaner with attached device (no text or symbols)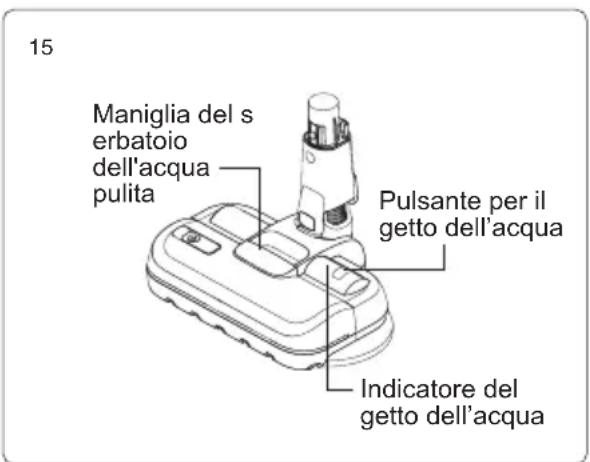
natural_image
Diagram of a hand using a tool to clean or install a component on a brick wall (no text or symbols)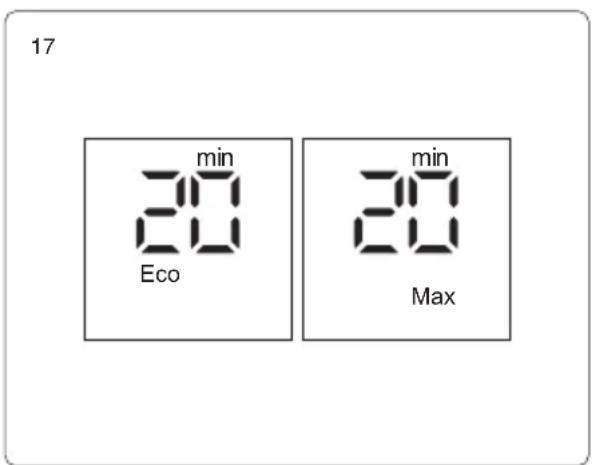
natural_image
Line drawing of a hand gripping a small mechanical device against a brick wall (no text or symbols)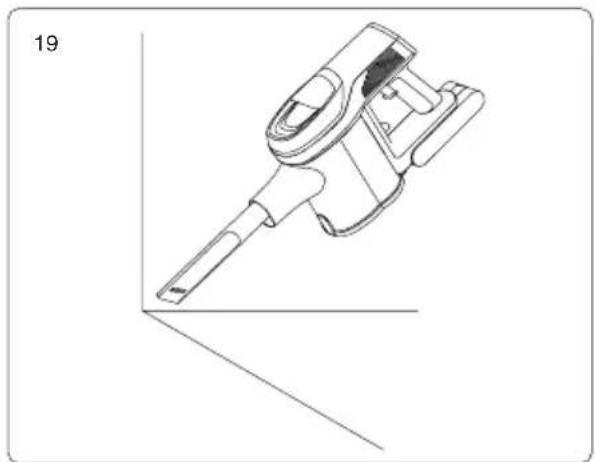
natural_image
Technical line drawing of a mechanical device with no visible text or symbols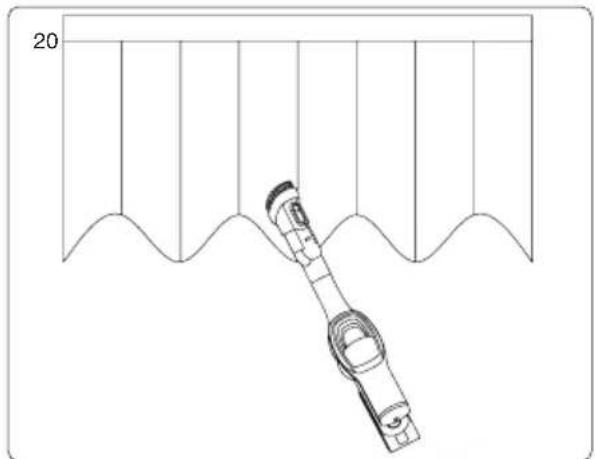
natural_image
Technical line drawing of a mechanical assembly with a bracket and curved components, no text or symbols present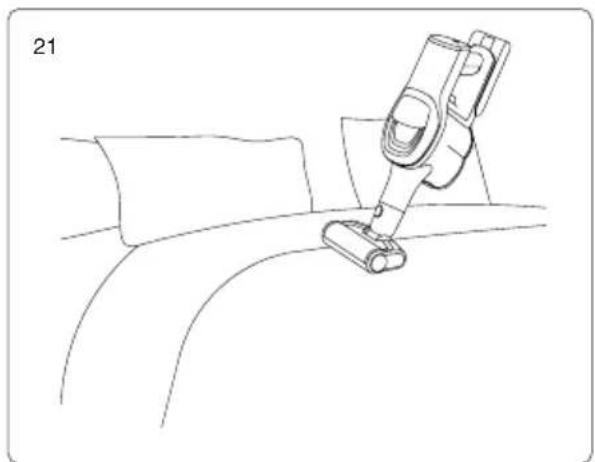
natural_image
Line drawing of a vacuum cleaner attached to a car seat (no text or symbols)natural_image
Technical line drawing of a handheld vacuum cleaner (no text or symbols)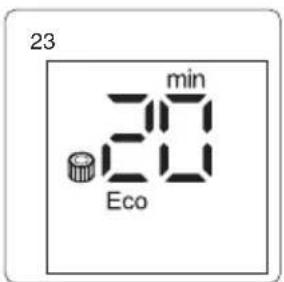
natural_image
Technical line drawing of a mechanical device with a rotating lever and arrow indicator (no text or symbols)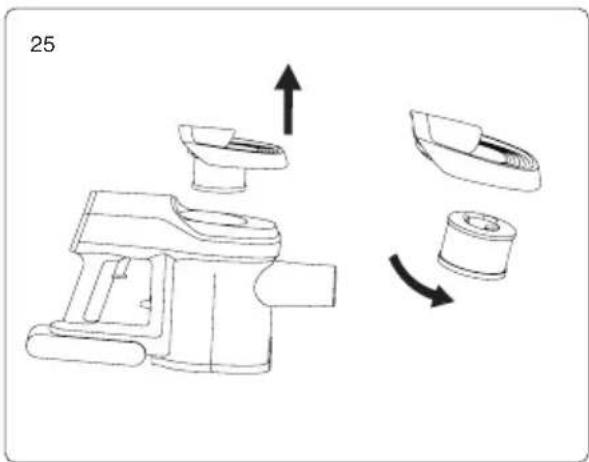

natural_image
Illustration of a water tap and a pulley with a sun symbol (no text or labels)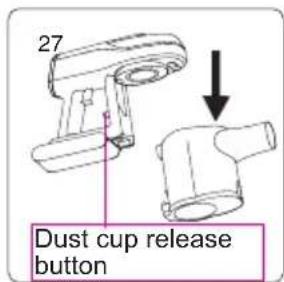
natural_image
Exploded view diagram of a mechanical component with multiple cylindrical parts and an arrow indicating direction (no text or symbols)natural_image
Line drawing of a handheld vacuum cleaner with a cylindrical sensor mounted on top (no text or symbols)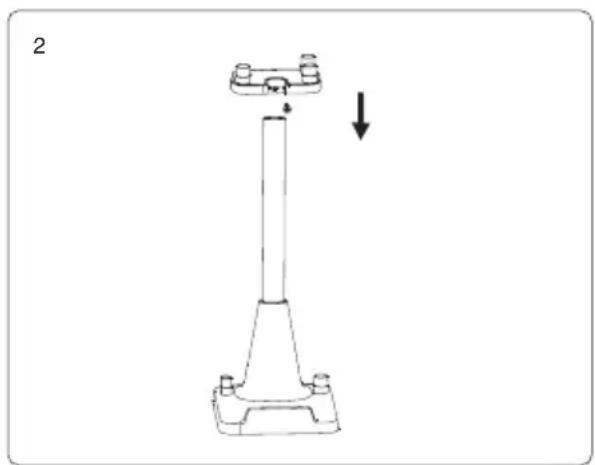
natural_image
Technical line drawing of a mechanical device with a vertical column and mounting base, showing a downward force arrow (no text or symbols)natural_image
Technical line drawing of a mechanical device with an arrow indicating transformation (no text or symbols present)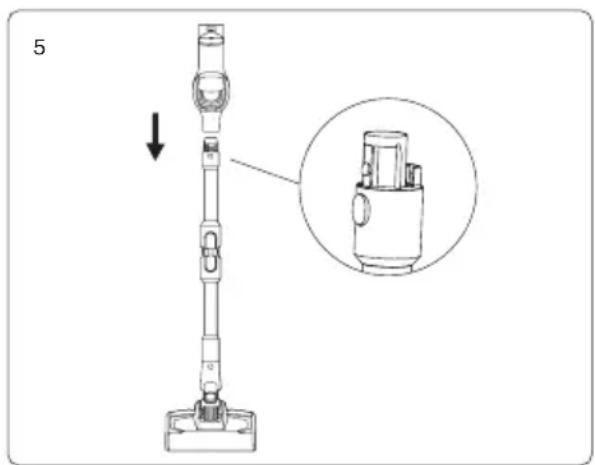
natural_image
Line drawing of a device with an open lid and a mounted sensor or sensor assembly (no text or symbols)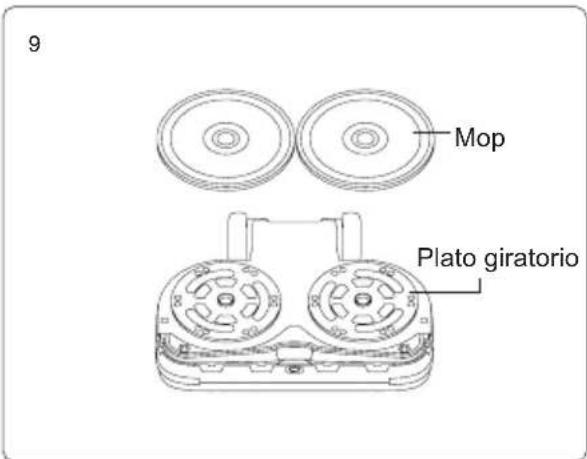
natural_image
Technical line drawings of various vacuum cleaner components (no text or labels)Accessories Connection List
Uso del vacío
Carga
natural_image
Line drawing of a device with a scroll wheel and attached case, showing a close-up of the handle (no text or symbols)- Turn on the vacuum cleaner, the wet polishing turntable will begin to rotate, and the machine work in Eco mode by default.
- After pressing the spray button, the water outlet indicator lights up, and the device begins spraying water to the wet polishing turntable. Pressing the mode button allows you to adjust water spray volume (Eco mode - less spray volume and Max mode for large spray volume).
- Press the spray button again to stop water spray, and water spray indicator will turn off.
Atención:
natural_image
Technical line drawing of a vacuum cleaner assembly with no visible text or symbols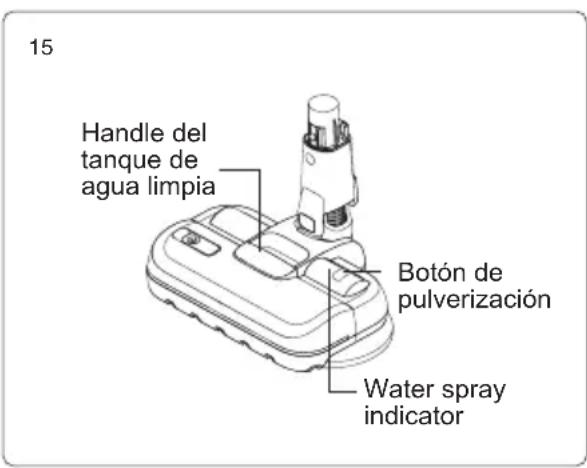
natural_image
Diagram of a mobile phone installing a wall-mounted device against a brick wall (no text or symbols)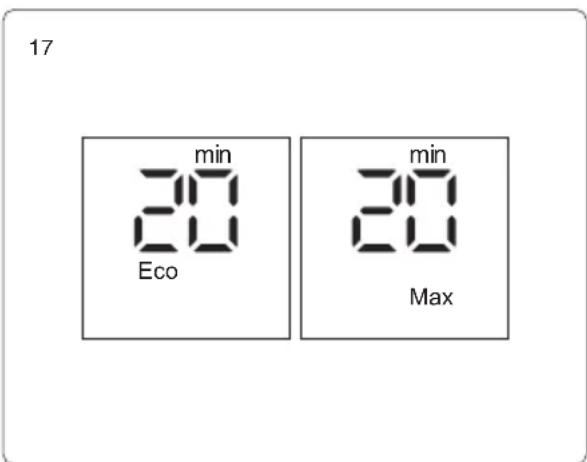
natural_image
Line drawing of a hand using a tool to lift a mechanical component against a brick wall (no text or symbols)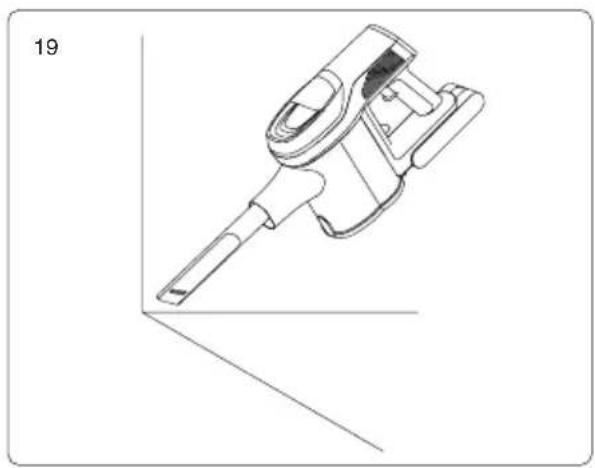
natural_image
Technical line drawing of a mechanical device with a pointed tip and handle, shown in 3D perspective (no text or symbols)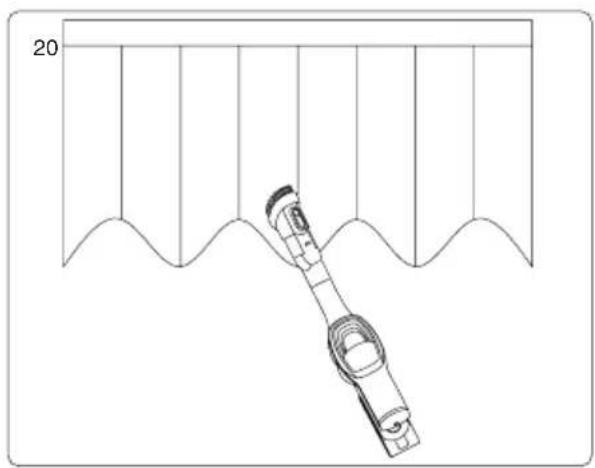
natural_image
Technical line drawing of a mechanical assembly with a lever and guide mechanism, no text or symbols present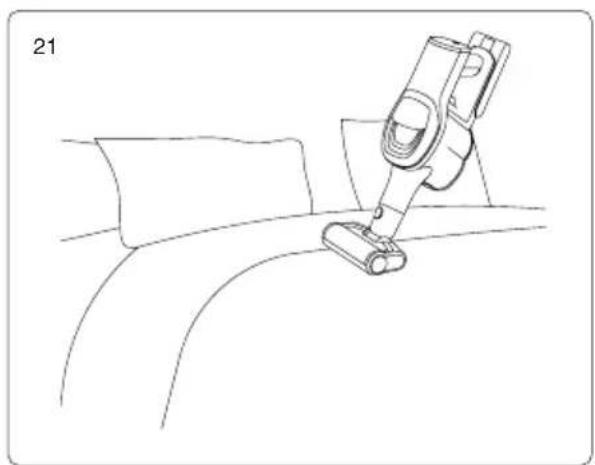
natural_image
Line drawing of a vacuum cleaner performing a lift on a curved surface (no text or symbols)Clean dust cup and filtration system
natural_image
Technical line drawing of a handheld vacuum cleaner (no text or symbols)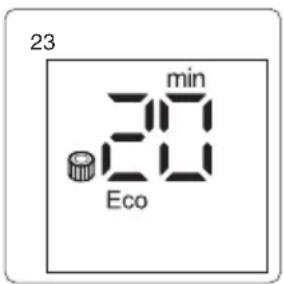
natural_image
Technical line drawing of a mechanical device with a lever and directional arrow (no text or symbols)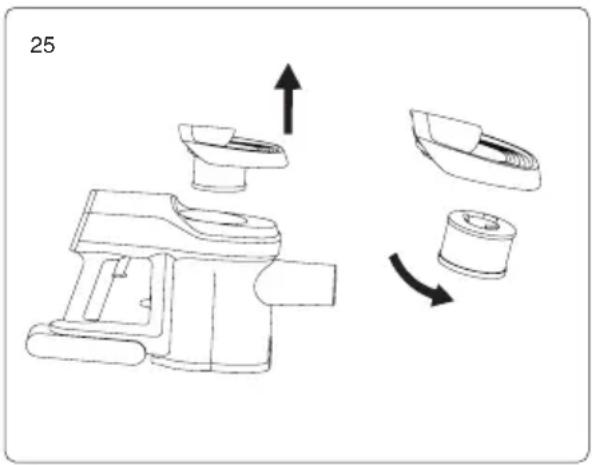
natural_image
Illustration of a water tap and a spool with sunlight (no text or symbols)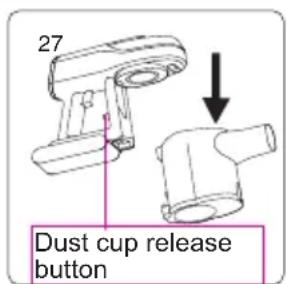
natural_image
Exploded view diagram of a mechanical component with multiple cylindrical parts and a central arrow indicating assembly (no text or symbols)Clean brushroll
natural_image
Line drawings of three different handheld devices: a cylindrical device, a handheld device with a handle, and a rectangular device (no text or symbols present)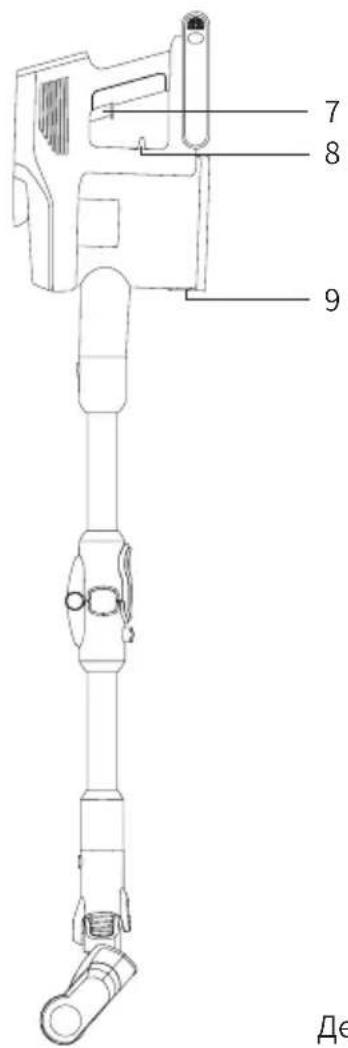
natural_image
Two technical illustrations of mechanical components: a threaded rod and a handle (no text or symbols)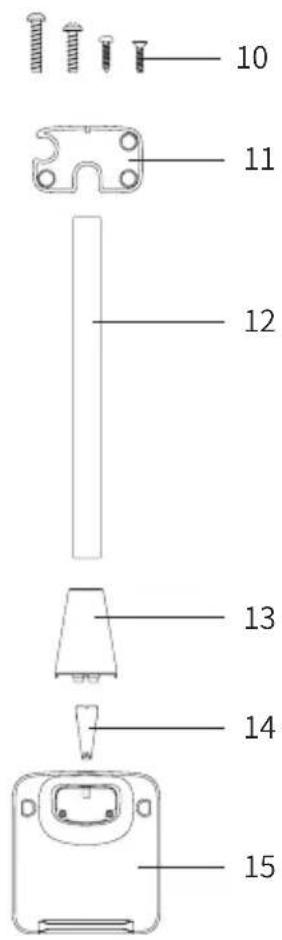
natural_image
Line drawing of a handheld vacuum cleaner with a cylindrical sensor (no text or symbols)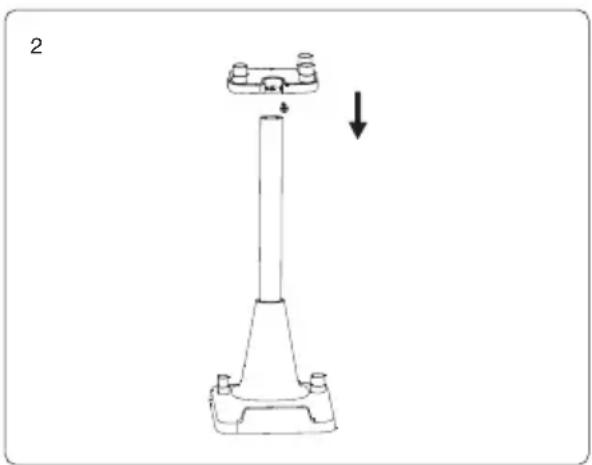
natural_image
Mechanical component diagram showing a vertical shaft with mounting holes and a downward arrow indicating force or motion (no text or symbols)natural_image
Technical diagram of a mechanical device with an inset close-up view showing a component detail (no text or symbols)4
natural_image
Technical line drawing of a mechanical component with an arrow indicating assembly or transformation (no text or symbols present)5
natural_image
Technical line drawing of a vertical mechanical device with an inset close-up view showing internal components (no text or symbols)6
natural_image
Diagram of a vertical vacuum cleaner with a magnified inset showing its internal structure (no text or symbols present)natural_image
Line drawing of a mechanical device with an upward arrow indicating motion (no text or symbols)9
natural_image
Technical line drawings of various mechanical components, including a brush and plug assembly (no text or labels)natural_image
Technical line drawing of a vacuum cleaner assembly with no visible text or symbols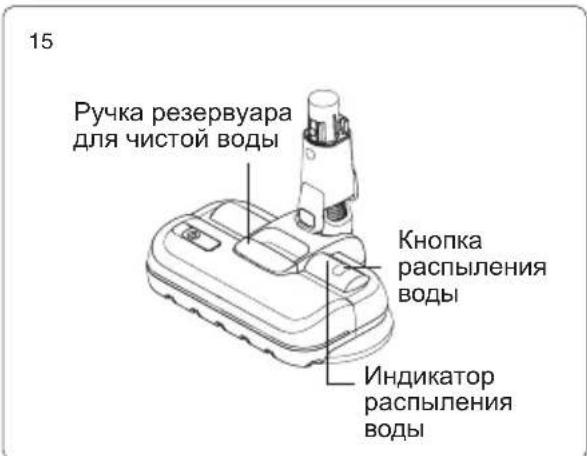
natural_image
Diagram of a mobile phone emitting sound waves into a brick wall (no text or symbols)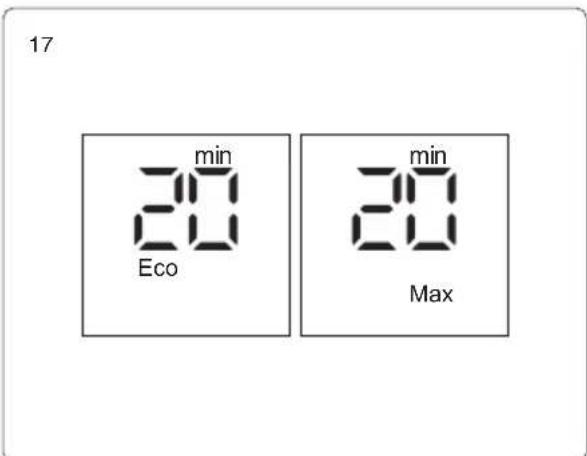
natural_image
Line drawing of a hand using a vacuum cleaner to clean or install a component on a brick wall (no text or symbols)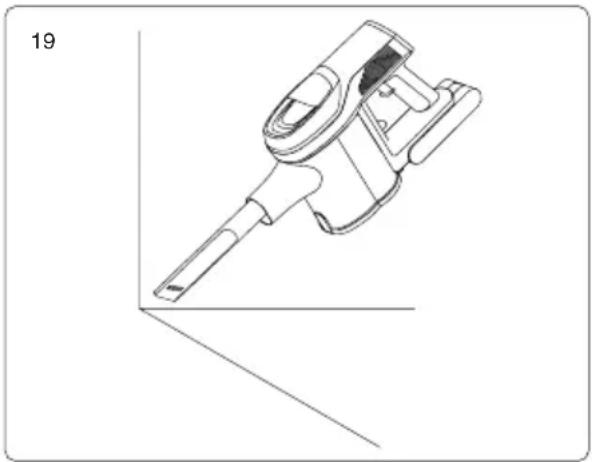
natural_image
Technical line drawing of a handheld electronic device with a pointed tip and handle (no text or symbols)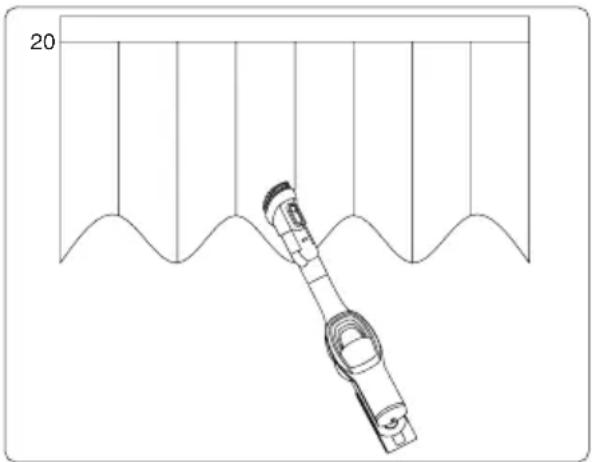
natural_image
Technical line drawing of a mechanical assembly with a curved component and vertical supports (no text or symbols)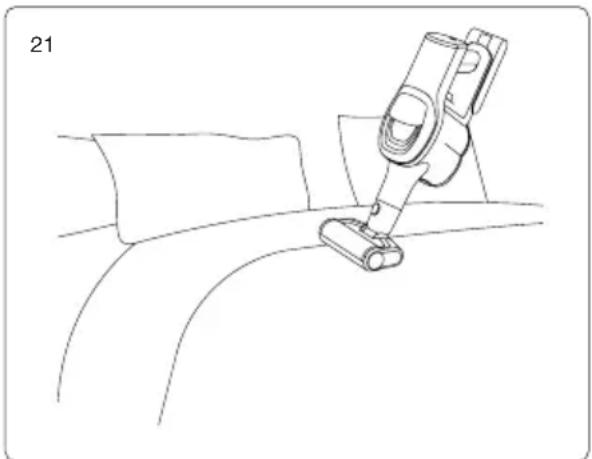
natural_image
Line drawing of a vacuum cleaner cleaning a car seat (no text or symbols)natural_image
Technical line drawing of a handheld vacuum cleaner (no text or symbols)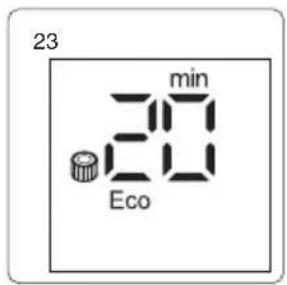
natural_image
Technical line drawing of a mechanical component with an arrow indicating rotation (no text or symbols)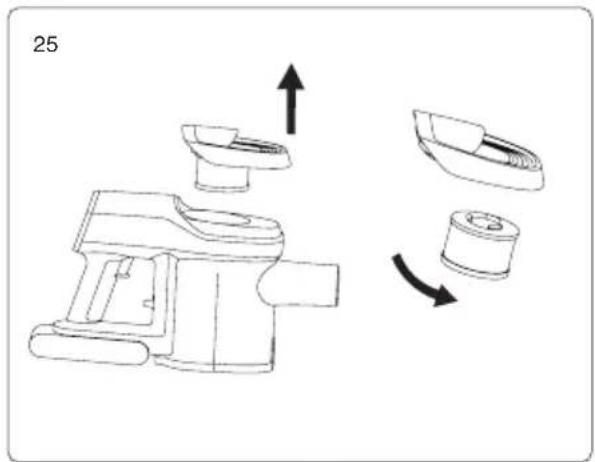
natural_image
Illustration of a water tap and a spool with sunlight (no text or symbols)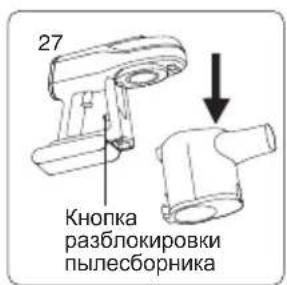
natural_image
Exploded view diagram of a mechanical assembly with multiple cylindrical components and a black arrow indicating direction (no text or labels)
- Contents
- Safety Notes
- Product Assembly
- Charging base assembly
- Assemble electric floor head with metal tube
- Assemble the battery pack and handheld vacuum cleaner
- Assemble metal tube and handheld vacuum
- Assemble and disassemble wet polishing head with the machine
- Assemble and disassemble the clean water tank of wet polishing head
- Assemble and disassemble the mop on the wet polishing head
- How to fill water in the clean water tank
- Assembly of accessories
- Use of Vacuum
- Charging
- Charging of vacuum cleaner
- Attention:
- Use of handheld vacuum and LED screen contents
- Use of flexible metal tube
- Use of wet polishing head
- Use of electric floor head
- Use of accessories
- Cleaning and Replacing Parts
- Clean dust cup and filtration system
- Steps of cleaning dust cup and filtration system:
- Clean brushroll
- Storage of Vacuum Cleaner
- Battery pack disassembly
- Trouble Shooting
- Manufacturer Information
- Disposal
- Battery packs/batteries:
- Warranty Information
- Użycie odkurzacza
- Ładowanie
- Uwaga:
- Achtung:
- Mise au rebut
- Uso del vacío
- Carga
- Atención:
Brand : JIMMY
Model : JV9 Pro Aqua
Category : Vacuum Cleaner