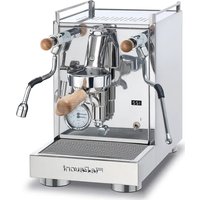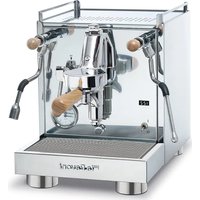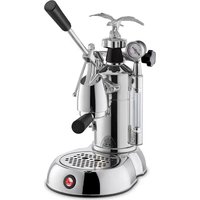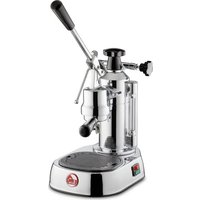
Diamantina 230V - Coffee machine LA PAVONI - Free user manual and instructions
Find the device manual for free Diamantina 230V LA PAVONI in PDF.


| Brand | La Pavoni |
| Model | Diamantina 230V |
| Product type | High-end domestic espresso machine |
| Supply voltage | 230 V |
| Pump pressure | 8-9 bar (adjustable) |
| Coffee boiler temperature | Adjustable from 80 °C to 133 °C (default 92 °C) |
| Steam boiler temperature | Adjustable from 110 °C to 133 °C (default 122 °C) |
| Heating type | Two independent boilers with PID control |
| Pressure control | BPPC system with manual real-time modulation lever |
| Main functions | Espresso coffee, hot water, steam, milk froth |
| Water supply | Removable tank or direct water line connection |
| Tank capacity | Approximately 1.8 L (estimated) |
| Cup warmer | Passive, top surface |
| Included accessories | Portafilters (double spout and Fascino), filters (1, 2 cups, Competition 16 g, 20 g, blind), tamper, doser, brush, connection and drain hoses |
| Material | Stainless steel and chrome-plated brass |
| Cleaning and maintenance | Regular cleaning of group head, nozzles and filters; periodic descaling; replacement of seal gasket |
| Safety | Automatic shut-off if water is absent, overheating protection, hot surface warning |
| Repairability | Genuine spare parts available, authorized after-sales service |
| Environmental standards | Compliant with WEEE directive 2012/19/EU |
| Intended use | Domestic and similar (staff kitchens, guest houses, hotels) |
| Number of manual pages | 192 |
Frequently Asked Questions - Diamantina 230V LA PAVONI
User questions about Diamantina 230V LA PAVONI
0 question about this device. Answer the ones you know or ask your own.
Ask a new question about this device
Download the instructions for your Coffee machine in PDF format for free! Find your manual Diamantina 230V - LA PAVONI and take your electronic device back in hand. On this page are published all the documents necessary for the use of your device. Diamantina 230V by LA PAVONI.
USER MANUAL Diamantina 230V LA PAVONI
natural_image
Interior view of a Swiss coffee machine with visible gauges and control panel (no text or symbols)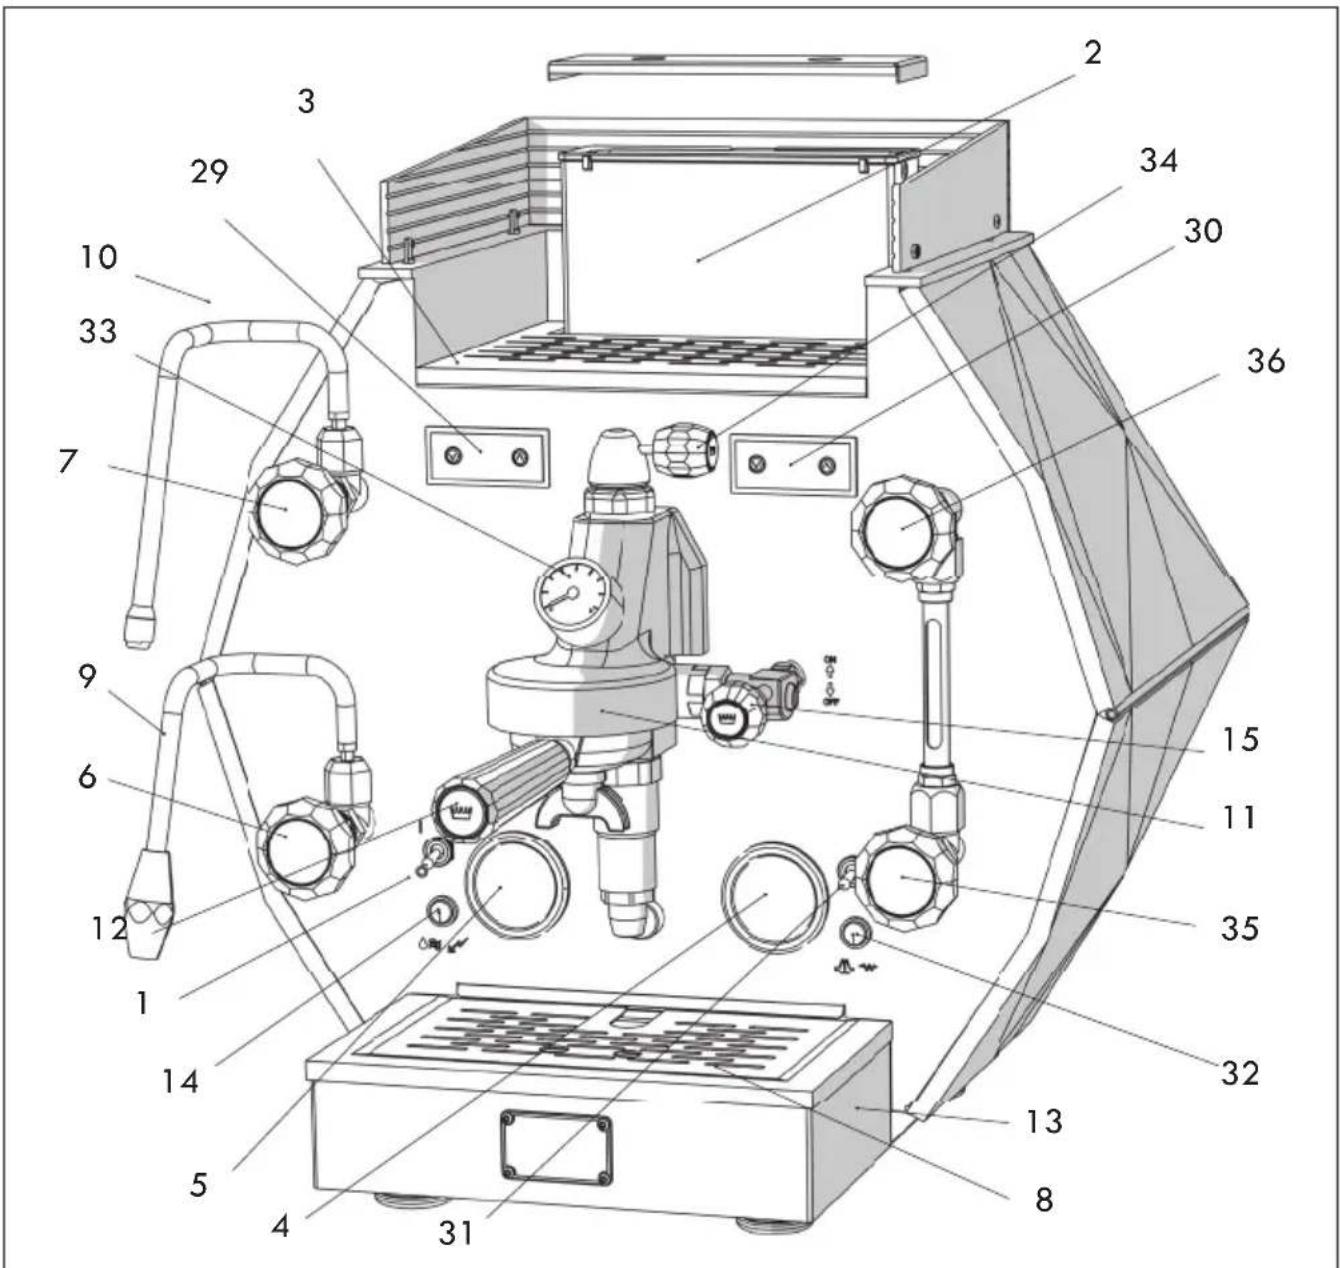
text_image
Technical diagram of a mechanical device with numbered components for identification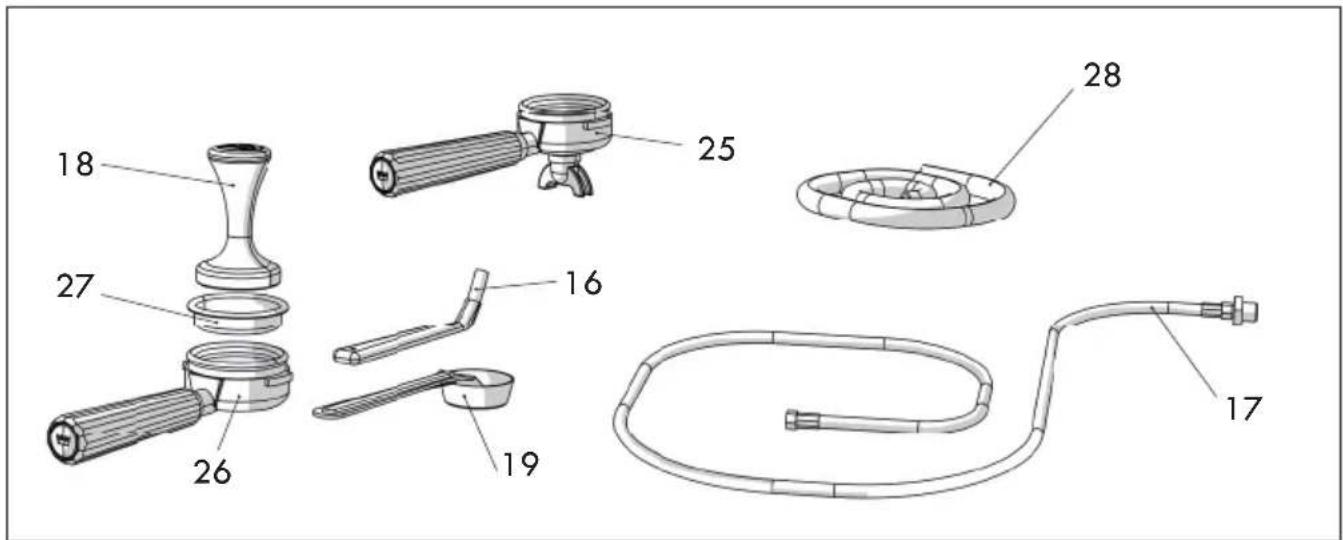
text_image
Technical diagram of a mechanical device with numbered parts, including handle, lever, and hose assembly.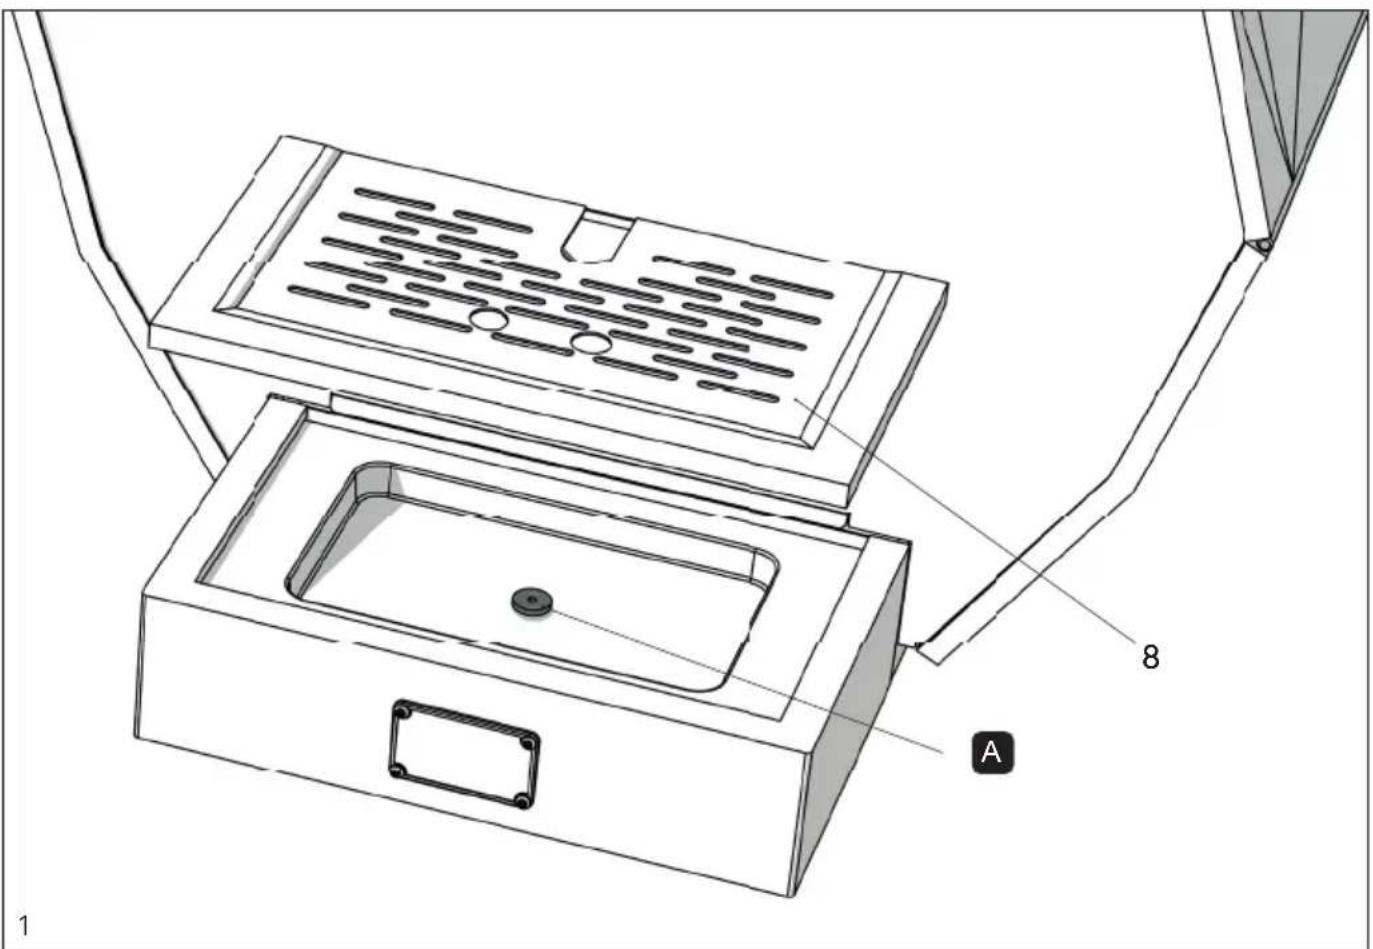
text_image
1 A 8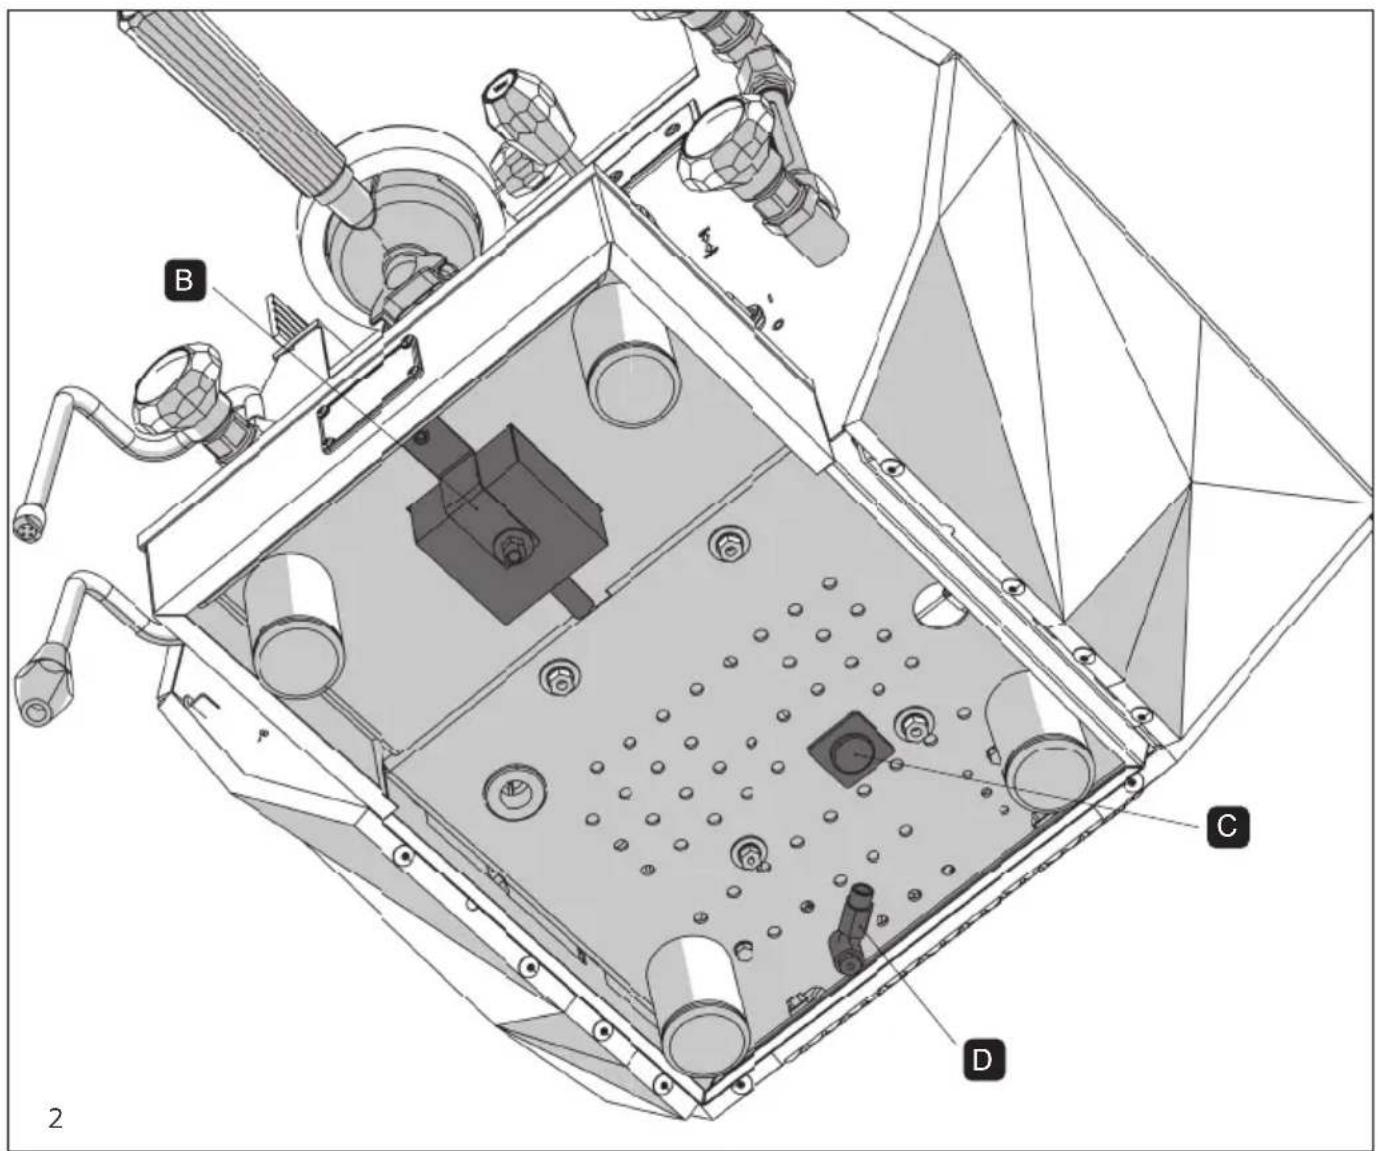
text_image
B C D 2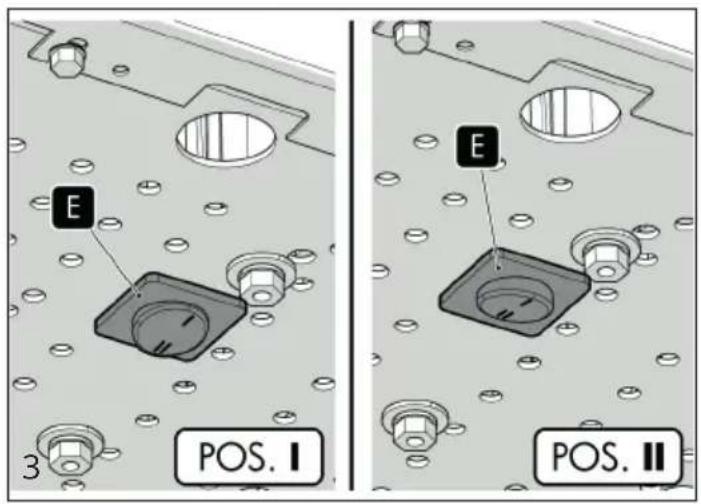
text_image
E E 3 POS. I POS. II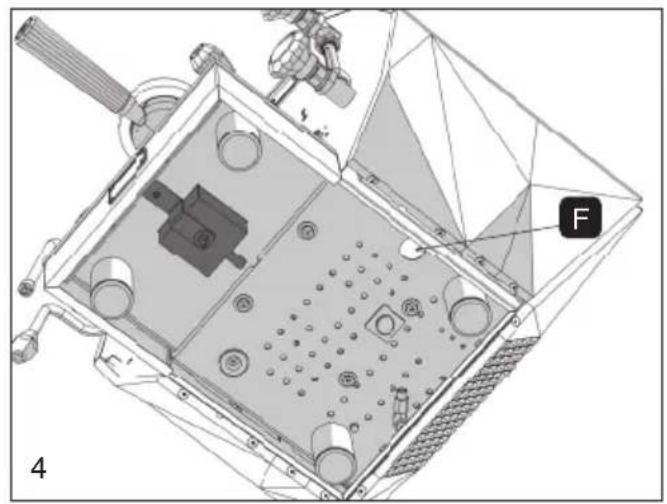
natural_image
Technical diagram of a mechanical device with labeled component 'F' and numbered part '4' (no readable text or symbols beyond labels)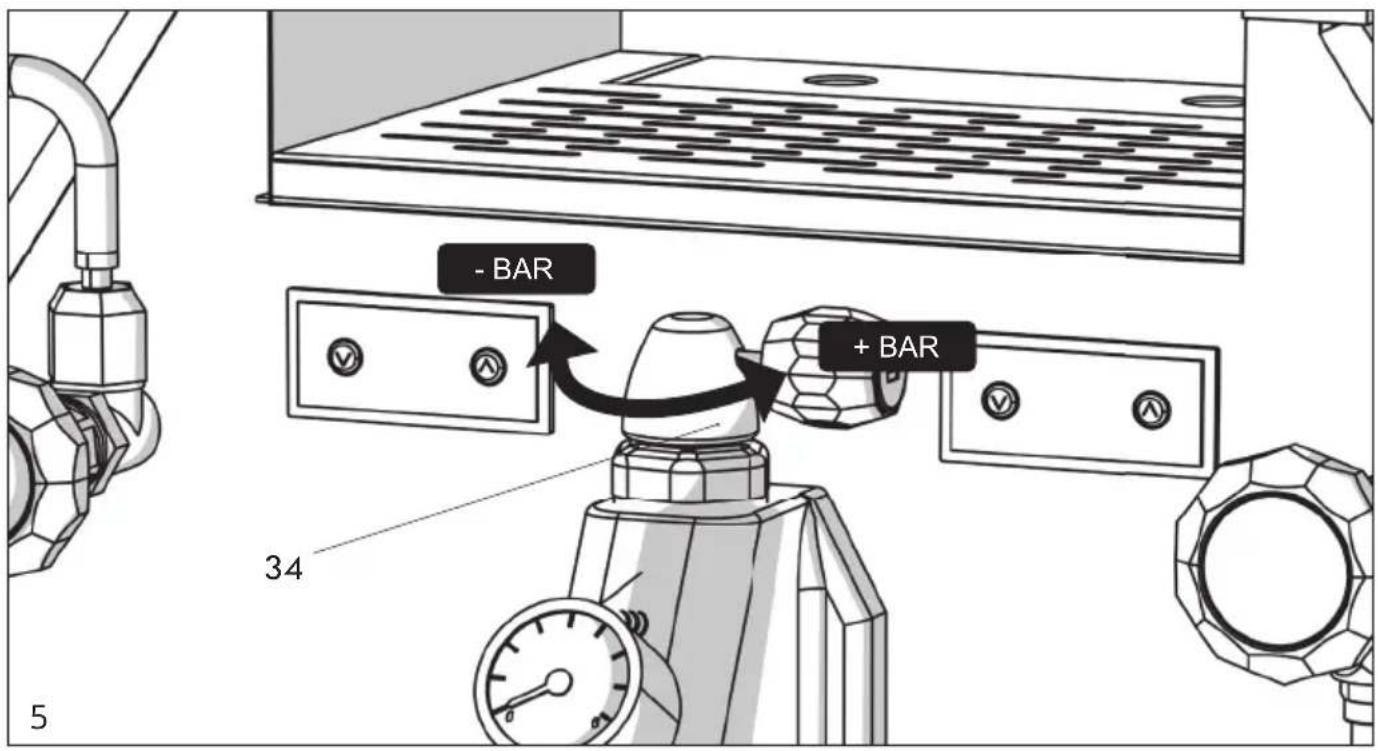
text_image
- BAR + BAR 34 5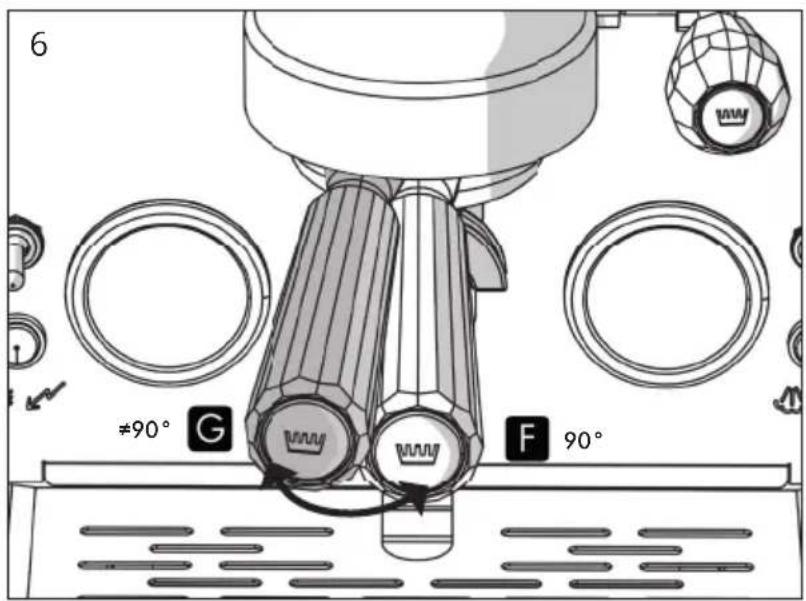
text_image
6 ≠90° G F 90°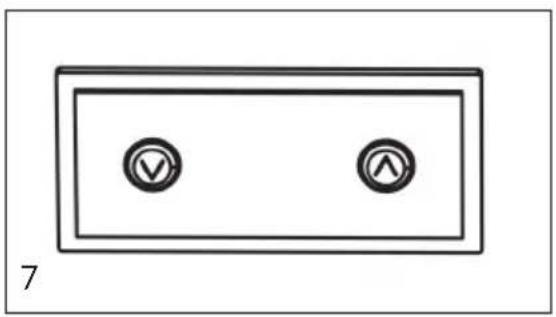
natural_image
Simple diagram of two circular buttons labeled with checkmarks and letter 'A', enclosed in a rectangular frame (no text or symbols beyond basic markings)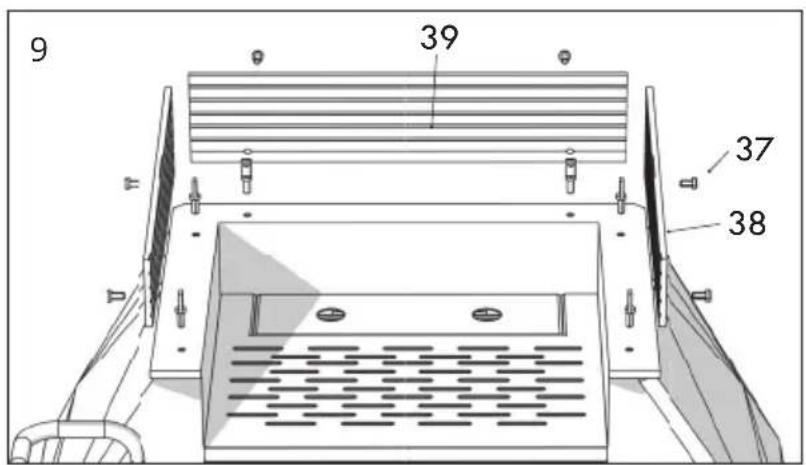
text_image
9 39 37 38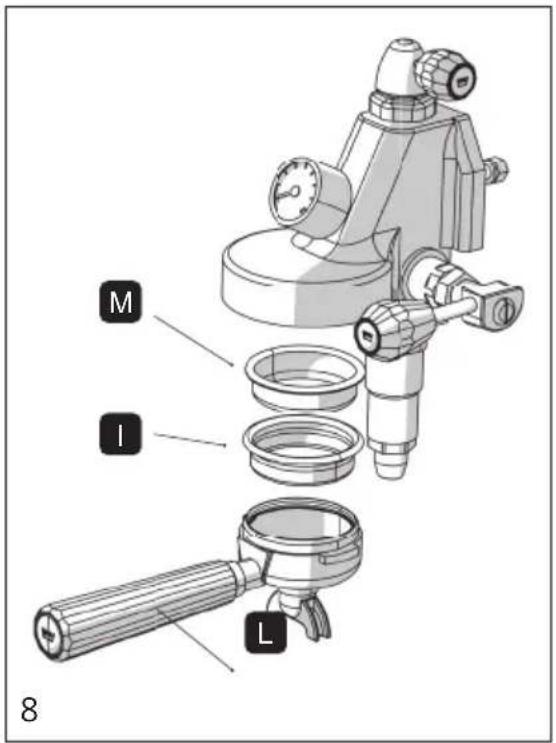
text_image
M I L 8
5. USO DELLA MACCHINA
PROBLEMA CAUSA SOLUZIONE
Instructions for use of models
LPSDIG03

Dear Customer,
Thank you for having purchased one of our products, which has been manufactured using the latest technological innovations. By carefully following some simple instructions regarding the correct use of our product in compliance with the essential safety instructions indicated in this manual, you will be able to obtain the best performance and enjoy the remarkable reliability of this product over the years. In case of faults, please contact one of our Service Centres that are at your disposal from now on.
SYMBOLS USED IN THIS MANUAL
Important information is indicated by these symbols. It is imperative that you comply with these instructions.

Please read the instructions manual carefully before using the appliance.

Caution! Particularly important and / or dangerous operations.

Information (useful for using the appliance).

Advice.

Operations that can be carried out by the user.

Operations that should only be carried out by a qualified technician.
CONTENTS
-
INTRODUCTION TO THE MANUAL
-
INSTRUCTIONS
2-1. IMPORTANT SAFEGUARDS 18
2-2. SAFETY INSTRUCTIONS 19
2-3. INTENDED USE OF THE MACHINE 20
2-4. DISPOSAL 20
2-5. RESIDUAL RISKS 21
- DESCRIPTION
3-1. PRODUCT DESCRIPTIAON 21
- STARTING THE MACHINE FOR THE FIRST TIME 21
4-1. CONNECTING TO THE WATER SUPPLY 21
4-2. ELECTRICAL CONNECTION AND FIRST USE 22
4-3. MANUAL BREWING PRESSURE ADJUSTMENT 23
4-4. SETTING THE TEMPERATURE 23
- USING THE MACHINE
5-1. PREPARING AND DISPENSING COFFEE 23
5-2. BREWING PRESSURE PROFILING CONTROL 24
5-3. DISPENSING HOT WATER 25
5-4. DISPENSING STEAM 25
- CLEANING AND MAINTENANCE
6-1. CLEANING THE STEAM AND HOT WATER NOZZLES 26
6-2. CLEANING THE GROUP HEAD AND SHOWER SCREENS 26
6-3. CLEANING THE FILTERS AND FILTER HOLDERS 26
6-4. CLEANING THE OUTSIDE OF THE MACHINE 26
6-5. REPLACING THE GROUP HEAD GASKET 26
- TROUBLESHOOTING

21
28
1. INTRODUCTION TO THE MANUAL
This instructions manual is an integral part of the machine. It should be read carefully and kept readily available for reference for the entire service life of the machine.
The manual contains information regarding the proper use of the machine, its cleaning and maintenance. It also provides information about operations to be carried out that require particular attention and possible residual risks.
The manual reflects the technological innovations at the time it was drafted. The manufacturer reserves the right to make any necessary technical modifications to its products and to update the manuals with no obligation to revise previous versions.
LA PAVONI S.p.A. declines any liability for damage or injury that may be caused directly or indirectly to people or property due to:
•the failure to comply with all the requirements of current safety regulations
- incorrect installation
• defective power supply
- improper or incorrect use of the machine
- uses other than those specified in this manual
- lack of or incorrect maintenance
- unauthorised modifications or repairs
- the use of non-original or non model-specific spare parts
- complete or partial failure to follow the instructions
- exceptional events
2. INSTRUCTIONS
2-1. IMPORTANT SAFEGUARDS
When using electrical appliances, basic safety precautions should always be followed, including the following:
- Read all Instructions.
- Do not touch hot surfaces. Use handles or knobs.
- To protect against fire, electric shock and injury to persons do not immerse cord, plugs in water or other liquid.
- Close supervision is necessary when any appliance is used by or near children.
- Unplug from outlet when not in use and before cleaning. Allow to cool before putting on or taking off parts, and before cleaning the appliance.
- Do not operate any appliance with a damaged cord or plug or after the appliance malfunctions, or has been damaged in any manner. Return appliance to the nearest authorized service facility for examination, repair or adjustment.
- The use of accessory attachments not recommended by the appliance manufacturer may result in fire, electric shock or injury to persons.
- Do not use outdoors.
- Do not let cord hang over edge of table or counter, or touch hot surfaces.
- Do not place on or near a hot gas or electric burner, or in a heated oven.
- Always attach plug to appliance first, then plug cord into the wall outlet. To disconnect, turn any control to "off," then remove plug from wall outlet.
- Do not use appliance for other than intended use.
13. SAVE THE INSTRUCTIONS

WARNING: To avoid the risk of injury, do not open the brew chamber during the brew process.
2-2. SAFETY INSTRUCTIONS
- The user must comply with the safety regulations in force in the country where the machine is used, in addition to using common sense and the instructions provided in this manual.
•To ensure that machine works correctly and provides a long service, we recommend that you make sure that the environmental conditions are correct (room temperature should be between 5°C and 35°C). Avoid using the machine in places where jets of water are used or in outdoor environments that are exposed to the weather (sun, rain etc.).
•After removing the machine from its packaging, make sure that it is intact and has not been damaged.
- The packaging should be taken to a proper waste disposal centre. Under no circumstances should it be left unattended where children, animals or unauthorized persons may have access to it.
- Before switching on the machine, make sure that the power supply indicated on the data plate, located under the base of the machine, is the same as the one used in your country.
•The appliance is not intended for use by persons (including children) with reduced physical, sensory or mental capabilities, or lack of experience and knowledge, unless they have been given supervised or instruction concerning use of the appliance by a responsible person for their safety.
- This appliance may be used by children from the age of 8 provided they are supervised or instructed on the safe use of the appliance and they understand the associated risks.
- Keep the appliance and its cord out of reach of children under the age of 8 years.
- Young children should be supervised to ensure that they do not play with the appliance.
- Do not immerse the machine in water.
- Put the machine in a safe position on a solid surface, away from heat sources and out of the reach of children.
- The machine must not be used in a recess.
- Before connecting or disconnecting the machine, make sure that the ON/OFF switch is in the OFF position.
- Do not use the machine if it is not working properly or if the power cable or plug is damaged. If the power cable is damaged, contact an authorised service centre.
- Do not touch the hot surfaces (boiler, group head, filter holder, steam supply nozzle) to avoid burns.
- Do not remove the filter holder while coffee is being dispensed to avoid possible burns.
• Under no circumstances place your hands under the group head or the steam supply nozzle as the liquids or steam delivered are hot and may cause burns.
- Do not use the coffee machine with parts or accessories of other manufacturers.
- Only use original spare parts. The use of spare parts not approved by the manufacturer could lead to fires, electric shocks or personal injury.
- Make sure there is water in the reservoir before using the coffee machine to avoid damaging the heating element.
•To reduce the risk of injury, do not drape cord over the counter top or table top where it can be pulled on by children or tripped over unintentionally.
- If the supply cord is damaged, it must
be replaced by the manufacturer or its service agent or a similarly qualified person in order to avoid a hazard.
- In the case of faults or malfunction, switch of the machine. Do not attempt to repair it yourself. Contact an authorised service centre to have any worn or damaged parts replaced with original spare parts.
- Unauthorised repairs or the use of non-original spare parts will void the warranty and relieve the manufacturer of all liability.
•The coffee machine must not be placed in a cabinet when in use. - Do not use the machine for uses other than the one for which it was designed.
- In case of fire, use carbon dioxide (CO2) fire extinguishers. Do not use water or steam extinguishers.
- Before carrying out cleaning or maintenance, switch off the machine by placing the ON/ OFF switch on the OFF position and remove the plug from the power socket without pulling the power cable.
- Never use harsh detergents or sharp tools to clean the machine. Only use a soft damp cloth.
- The surface of the heating elements remains hot after use and the outer casing of the machine can retain heat.
- Cleaning and maintenance must not be carried out by unsupervised children.
2-3. INTENDED USE OF THE MACHINE
This machine has been designed for the home preparation of espresso coffee using coffee blends, the production of hot water and/or steam, and the preparation of hot milk.
In order to use the machine properly, the user must carefully read and
understand the instructions provided in this manual.
This appliance is intended to be used in household and similar applications such as:
- Staff kitchen areas in shops, offices and other working environments;
- Farm houses
- By clients in hotels, motels and other residential type environments;
- Bed and Breakfast type environments
Any improper use of the machine will void the warranty and relieve the manufacturer of all liability for damage to property and / or injury to persons.
Improper use includes:
- any use other than the one specified in the instructions manual
- any intervention carried out on the appliance that does not comply with the instructions given in this manual;
- any use following unauthorized modifications to components or safety devices
•use of the appliance outdoors.
2-4. DISPOSAL
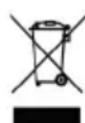
Electrical appliances must not be disposed of together with household waste. Devices marked with this symbol are subject to European Directive 2012/19/EU All waste electrical and electronic appliances must be disposed of separately from domestic waste and taken to authorised waste disposal facilities. Disposing of the used appliance correctly, will help to safeguard the environment and human health. For further information regarding the disposal of used appliances, please contact your local authority waste disposal department or the shop where the
appliance was purchased.
2-5. RESIDUAL RISKS

It is not possible to safeguard the user against direct jets of steam or hot water. He/she should therefore be extremely careful when using the machine to avoid scalds or burns.
The manufacturer declines any liability for damage to property or injury to people or animals, due to interventions on the machine by unqualified or unauthorized persons.
3. DESCRIPTION
3-1. PRODUCT DESCRIPTION
- ON/OFF switch (coffee boiler)
- Water tank
- Cup warmer
- Boiler pressure gauge
- Pump pressure gauge
- Hot water knob
- Steam knob
- Drip tray grid
- Hot water nozzle
- Steam nozzle
- Group head
- Filter holder
- Drip tray
- ON/OFF light and water tank level indicator
- Group head lever
- Cleaning brush
- Tube for connecting to the water supply
- Tamper (steel)
- Coffee scoop
- Filter - 1 cup
- Filter basket for 2 cups
- Competition filter 16 g
- Competition filter 20 g
- Filter holder - two spouts
- "Fascino" filter holder
-
Blind filter
-
Silicone water drainage hose
- Coffee boiler PID temperature controller
- Service boiler PID temperature controller
- Service boiler ON / OFF switch
- Service boiler ON/OFF indicator light
- Pressure gauge - BPPC (Brewing Pressure Profiling Control)
- "BPPC" adjustment lever
- Lower level glass knob
- Upper level glass knob
- Screws
- Side panel
- Rear panel
4. STARTING THE MACHINE FOR THE FIRST TIME
4-1. CONNECTING TO THE WATER SUPPLY
The machine can either be used with a water tank (2) or connected to the mains water supply using the hose provided (17).
In order to use the machine with a water tank (2), the switch (C) has to be in position "I" (this should be done with the machine switched off) (Fig. 2-3).
To use the machine connected to the water supply:
- Place the switch (C) to position "II" (this should be done with the machine switched off) (Fig. 2-3).
- Connect the hose (17) to the fitting (D) located under the machine and then connect it to the water supply (Fig. 2).

- It is recommended that you install a water softener on the machine water supply system.
- Make sure that the water in the water supply that you will be connecting the machine to is potable.
- This appliance should be connected to the water supply in compliance with the national Legislation of the country in which it is used.
- The maximum inlet pressure to the machine from the water supply must not exceed 0.65 MPa. If it is higher than 0.5 MPa (5 bar), it is recommended that you install a balanced pressure regulator for high pressures.
4-2. ELECTRICAL CONNECTION AND FIRST USE
To start the espresso coffee machine, carefully follow the instructions below:
- Open the package, take out the machine and make sure that it is not damaged.
- Place the machine on a level surface, remove the cover, take out the water tank (2) and rinse it.
- Fill the tank with clean water, put it back in its seat. Close the machine cover.
- If you connect the machine to the water supply, make sure that the water supply tap is open before switching on the machine.
•Water can be drained directly into a drainage outlet by removing the plug (A) from the drip tray (13) and connecting the silicon tube (28) to the drain conduit (B) (Fig. 1).

Before connecting the machine, make sure that the mains power voltage is the same as the one indicated on the data plate located under the base of the machine.
- Insert the plug into the power socket.
- Then take the side and rear panels (38-39) and screws (37) from the box. Use
a screwdriver to fasten the panels to the frame with the screws (Fig. 9).
- Before starting the machine, place the filter holder (12) into the group head (11); place a container under the group head and move the lever (15) upwards in order to fill the coffee boiler.
- Turn on the machine by placing the on / off switch (1) to position "I". Wait for approximately 2 seconds to allow the circuit to perform a check. The lamp (14) lights up to indicate that the machine is powered.
- As soon as water starts to come out of the group head (11) move the lever (15) downwards to stop delivery.
- Wait until the coffee boiler reaches the set temperature (92°) shown on the PID temperature controller (29).
- Then turn on the service boiler by placing the switch (31) to position "I". The light (32) turns on to indicate that the boiler is powered.
- The automatic water level device will start filling the service boiler with water until it reaches the pre-set level; the level of water in the boiler is monitored automatically and will be topped up automatically to the required level.
The water level inside the service boiler can be checked by opening the lower (35) and upper level (36) glass knobs.
- During start-up: when the boiler pressure gauge (4) indicates approximately 0.5 bar, slowly open the steam knob (7) to discharge any air that may be contained in the service boiler. Wait until steam starts to come out of the steam nozzle (10) before closing it.
- Wait for the service boiler to reach the working pressure (1.1 – 1.3 bar), checking the boiler pressure on the pressure gauge (4). The PID
temperature controller (29) is factory set to 122°.
- Once the working pressure has been reached, use the group head lever (15).
- Move the group head control lever (15) fully downwards to stop delivery.
•The machine is now ready for use.

If the water level is too low, the device automatically stops all machine functions.
4-3. MANUAL BREWING PRESSURE ADJUSTMENT
The brewing pressure can be adjusted manually by turning the pump pressure adjustment screw (F) (Fig. 4).
To check the pressure during delivery:
- Insert the filter holder containing the blind filter into the group head.
- Move the group head control lever (15) and read the pressure on the pump pressure gauge (4). The correct pressure is 8/9 bar.
- If the pressure indicated on the pressure gauge is not correct, turn the pump pressure adjustment screw (F) (Fig.4) clockwise to increase or anticlockwise to decrease the pump pressure.
4-4. SETTING THE TEMPERATURE
The models are fitted with two PID temperature controllers (29, 30). The PID temperature controllers regulate the temperature of both boilers, which are programmable and can be independently controlled. This system makes it possible to brew coffee at different temperatures. The PID temperature controller for the coffee boiler (29) is factory set to 92°C. To adjust the setting proceed as follows (Fig. 7):
- press the button; as soon as "PRG" appears on the display, press
the button ;
- when the temperature of the boiler appears on the display, press the ▼ and ▲ buttons to increase or decrease the temperature from a minimum of 80°C to a maximum of 133°C.
- 3 seconds after having pressed the last button, the value is memorized and the display indicates the temperature.
The PID temperature controller for the service boiler (30) is factory set to 122°C. To adjust the setting proceed as follows:
- press the button ▼; as soon as "PRG" appears on the display, press the button ▲;
- when the temperature of the boiler appears on the display, press the ▼ and ▲ buttons to increase or decrease the temperature from a minimum of 110°C to a maximum of 133°C.
- 3 seconds after having pressed the last button, the value is memorized and the display indicates the temperature.

- The PID temperature controller has been factory set to the right temperature for making an excellent espresso.
- If the temperature of the coffee boiler is set higher than 103^ , the display (29) will start to flash. This warns the user that the coffee will not be good if it is delivered at such a high temperature.
5. USING THE MACHINE
5-1. PREPARING AND DISPENSING COFFEE
Once you have carried out the operations described in section 4.1-4.2, the machine is ready for use.

Do not cover the cup-warming shelf with fabrics, felt etc.

- Once switched on, the machine takes about 15 minutes to heat up. The outside temperature can affect heating times.
- It is recommended that you place the filter holder in the group head before switching the machine on. This allows the filter holder to reach a perfect temperature.
To prepare coffee, proceed as follows:
- Place the required filter (22-23) into the filter holder (25-26).
- Fill the filter with the required amount of coffee for 1 or 2 cups (7-8 g – 14-16 g) according to the filter selected.
- Level the coffee and compact it using the tamper (18). Remove any coffee residues from the edge of the filter using the palm of your hand and insert the filter holder into the group head (11), moving it towards the right to secure it.
- Place the cups under the spouts and start to dispense coffee using the group head control lever (15). The coffee is dispensed by moving the group head lever (15) located on the control panel upwards.
- Once the required amount of coffee has been dispensed, move the group head lever (15) down to stop delivery.
•To dispense additional cups of coffee, remove the filter holder (12) from the group head (11) by moving it towards the left, empty the coffee grounds and repeat the steps described above.

Do not touch the group heads or the steam and hot water nozzles when the machine is in operation and do not place your hands under the group heads or pipes
during delivery in order to avoid possible scalding.

When the machine is new, the filter holder may not be aligned (perpendicular to the machine) as shown in Figure 3. However, this does not prevent the machine from working properly. After being used for a short time, the filter holder will gradually become settled in the correct position. G = Position of the closed filter holder when the machine is new H = Position of the closed filter holder after the machine has been in use for a short time.

•Coffee should be ground just before it is used. Once ground, coffee loses its flavour very quickly. If the coffee is too coarsely ground, the coffee will be light coloured and weak without froth and if the coffee is too finely ground the espresso will be dark and strong with little froth.
- Warm cups help maintain the coffee at the right temperature. We therefore recommended that before using them, you place the cups on the cup warmer shelf (3), which will be warmed by the heat given off from the boiler.
- The pump pressure can be read on the respective pressure gauge (5) during delivery.
- The correct pressure for making coffee is 8/9 bar.
5-2. BREWING PRESSURE PROFILING CONTROL
- The pressure gauge (33) mounted on the group head, allows the brewing pressure profile of the espresso to be read.
- This allows the user to make sure that the grinding, pressing and the amount
of the coffee in the filter is correct.
- If the brewing pressure is lower than the pump calibration pressure (9 bar factory setting), it means that the coffee has been ground too coarsely, that the coffee has not been compacted correctly, or the amount of coffee is insufficient.
•The machine is also equipped with the BPPC (Brewing Pressure Profiling Control) system and relative lever (34).
- The "BPPC" adjustment lever (34) allows you to modify the pressure exerted on the coffee in real time as it is being dispensed.
•To modify the pressure profile during brewing, move the adjustment lever (34) to the right or left respectively to increase or decrease the pressure (Fig.5).
- This allows you to control the coffee brewing process manually and to obtain the best possible result with every kind of coffee or blend.

If the adjustment lever (34) is facing towards the right (as in Fig. 5), the coffee brewing pressure will be the same as the pressure exerted by the pump (8-9 bar), seen on the relative pressure gauge (5).
It is not recommended to close the adjustment lever completely as the gauge pressure would indicate 0 bar and delivery would stop.
5-3. DISPENSING HOT WATER
- Before dispensing hot water, make sure that the service boiler is on (Switch (31) in position "I") and under pressure (Pressure gauge (4) indicates 1.1 -1.3 bar)
- Place a container under the nozzle (9).
- Turn the hot water knob (6)
anticlockwise to dispense hot water.
- When you have enough hot water, turn the knob (6) clockwise to stop delivery.

We recommend that you dispense a maximum of 200 ml of water.

To protect the heating element, the machine has a filling time-out of 25 seconds. If the filling time exceeds 25 seconds, both PID temperature controllers (29 – 30) are disabled until the service boiler has been completely filled.
5-4. DISPENSING STEAM
- Before dispensing steam, make sure that the service boiler is on (Switch (31) in position "I") and under pressure (Pressure gauge (4) indicates 1.1 -1.3 bar)
- Before heating any drinks, carefully dispense a small amount of steam from the steam nozzle (10) by turning the knob (7) anticlockwise to eliminate any condensation that may have formed in the boiler.
- Place the liquid to be prepared in a container, immerse the steam nozzle (10) into the liquid and slowly turn the steam knob (7) anticlockwise. The amount of steam delivered is proportional to how much you turn the knob. The more you open it, the greater will be the amount of steam delivered.
- When the required amount has been dispensed, turn the knob clockwise to stop delivery. Remove the container and clean the steam nozzle with a damp cloth.
To froth milk for a cappuccino:
- Place some cold milk into a container.
- Place the container with milk under steam nozzle (10) then immerse it a
few millimetres into the milk.
- Turn the steam knob (7) anticlockwise and slowly move the container upwards to obtain a creamier froth.
- Once the volume of milk has doubled, immerse the frothing nozzle completely and heat the milk.
- Stop the steam by turning the steam knob (7) clockwise.

Danger of burns! Spurts of hot water may be ejected when you first start to dispense steam. The nozzle can become extremely hot. Do not touch it directly with your hands.

After heating the liquid, it is recommended that you purge the steam pipe by opening the valve for a few seconds.
6. CLEANING AND MAINTENANCE

WARNING:
This appliance must not be immersed in water for cleaning
6-1. CLEANING THE STEAM AND HOT WATER NOZZLES
- To avoid altering the taste of the drinks to be heated and to prevent the holes at the end of the nozzles from becoming clogged, clean thoroughly with a damp cloth after each use and dispense a small amount of steam.
6-2. CLEANING THE GROUP HEAD AND SHOWER SCREENS
- Remove the filter holder from the group head and clean the group's gasket using the brush (16) provided.
- Place the blind filter (27) provided in the filter holder (25-26).
- Add a spoonful of coffee machine
cleaning powder and insert the filter holder into the group head.
- Use the lever (15) to start dispensing; stop dispensing after approximately 15-20 seconds.
- Start and stop delivery several times until clean water is dispensed, in order to remove coffee and limescale deposits.
- Remove the filter holder (24) and start dispensing several times in order to rinse the group head and eliminate any residues from the shower screens and the group head.

If the machine has not been used for a long time, we recommend that you allow water to flow out to remove any deposits.
6-3. CLEANING THE FILTERS AND FILTER HOLDERS
- Regularly check the holes in the filters in order to remove any coffee deposits.
- Place approximately one litre of boiling water and four teaspoons of coffee machine cleaner in a suitable container. Immerse the filters and filter holders in the solution for 20-30 minutes. Then rinse thoroughly under running water.
6-4. CLEANING THE OUTSIDE OF THE MACHINE
To keep the outer surface of the coffee machine in good condition, it should be cleaned regularly after use. Let the appliance cool down first. Clean with a soft, damp cloth.
6-5. REPLACING THE GROUP HEAD GASKET (Fig. 8)
If coffee leaks from around the edges of the filter holder (L) when it is dispensed, it may be due to an obstruction in the delivery hole of the filter-holder, in
which case the hole should be cleaned.
If the problem persists or if the filter holder moves significantly beyond the centre of the group head when it is being fitted, the group head gasket should be replaced.
To replace it, proceed as follows:
- Make sure that the machine is switched off and disconnect the power cable.
- Remove the gasket (I) and the shower screen (M), using a flat screwdriver as a lever.
•After having removed the gasket and shower screen, clean the seat properly before installing the new components. - Once the new components have been installed, insert the filter holder, without the filter, into the group head and move it in order to seat the gasket.
7. TROUBLESHOOTING
PROBLEM CAUSE SOLUTION
The machine does not work and the ON/OFF switch light does not turn on
- No power to the machine
- The machine is not plugged in correctly
-
The power cable is damaged
-
Switch the power on
- Insert the plug correctly into the power socket
- Contact an authorised service centre for replacement
The light on the ON/OFF switch is lit but the water does not heat up
- The service thermostats are not working
-
The heating element is broken or burnt out
-
Contact an authorised service centre
- Contact an authorised service centre
No coffee is dispensed
. No water in the tank 2. The coffee is too finely ground 3. There is too much coffee 4. The coffee has been compacted too much 5. The circuit has not been filled 6. Shower screen dirty
- Put water in the tank
- Replace with a coarser coffee blend
- Reduce the amount of coffee in the filter basket
- Tamp the coffee less
- See section 4 "Starting the machine for the first time"
- Clean or replace the shower screen
Loud noise coming from the pump
-
The pump is not primed
-
See section 4 "Starting the machine for the first time"
The coffee is too too quickly
- The coffee is too coarsely ground
- There is not enough coffee
- The coffee has not been compacted enough
-
The coffee is stale or unsuitable
-
The coffee should be ground more finely
- Increase the amount of coffee
- Tamp the coffee more
- Replace the coffee
The coffee is dispensed in drops
- The coffee is too finely ground
- There is too much coffee
-
The coffee has been compacted too much
-
The coffee should be ground more coarsely
- Reduce the amount of coffee
- Tamp the coffee less
| Coffee leaks between the group head and the filter holder | 1. The filter holder is not inserted correctly2. There is too much coffee in the filter basket3. The edge of the filter holder has not been cleaned4. The group head gasket is worn | 1. Insert it properly2. Reduce the amount of coffee3. Remove coffee residues from the edge of the filter holder and clean the group head gasket4. Contact an authorised service centre |
| No froth forms on the coffee | 1. The coffee blend is not suitable for this type of machine2. The grinding is unsuitable3. There is not enough coffee | 1. Replace the coffee2. Adjust the coffee grind3. Increase the amount of coffee and compact it properly |
| The coffee is too cold | 1. The machine had not reached the correct temperature2. The filter holder had not been pre-heated3. The cups have not been preheated4. The thermostat is not working within the required range5. The PID temperature controller (29) is not working within the required range | 1. Follow the instructions given in section 4.1-4.22. The filter holder should be heated at the same time as the water, see section 4.1-4.23. Heat the cups properly on the cup warmer (2)4. Contact an authorised service centre5. Set the value for the PID temperature controller (29) |
| The coffee is too hot 1. | The PID temperature controller (29) is not working within the required range | 1. Set the value for the PID temperature controller (29) |
| The machine does not dispense steam | 1. The circuit has not been filled2. The hole at the end of the steam nozzle is clogged3. No water in the tank | 1. See section 42. Clean the hole with a needle3. See section 4 |

-
INTRODUCTION AU MANUEL
-
AVERTISSEMENTS
2-1. CONSIGNES DE SÉCURITÉ IMPORTANTES 32
2-2. AVERTISSEMENTS DE SÉCURITÉ 33
2-3. USAGE PRÉVU DE LA MACHINE 34
2-4. ÉLIMINATION 35
2-5. RISQUES RÉSIDUELS 35
- DESCRIPTION
3-1. DESCRIPTION DU PRODUIT 35
- PREMIÈRE MISE EN SERVICE
4-1. RACCORDEMENT À L'EAU 36
4-2. BRANCHEMENT ÉLECTRIQUE ET PREMIÈRE UTILISATION 36
4-3. RÉGLAGE MANUEL DE LA PRESSION DE DISTRIBUTION 37
4-4. PROGRAMMATION DE LA TEMPÉRATURE 38
- UTILISATION DE LA MACHINE
5-1. PRÉPARATION ET DISTRIBUTION DE CAFÉ 38
5-2. CONTRÔLE DU PROFIL DE PRESSION DE DISTRIBUTION 39
5-3. DISTRIBUTION D'EAU CHAUDE 40
5-4. DISTRIBUTION DE VAPEUR 40
- NETTOYAGE ET ENTRETIEN
6-1. NETTOYAGE DES BUSES DE DISTRIBUTION DE VAPEUR ET EAU CHAUDE 41
6-2. NETTOYAGE CORPS GROUPE ET DOUCHETTES 41
6-3. NETTOYAGE DES FILTRES ET DES PORTE-FILTRES 41
6-4. NETTOYAGE DU CORPS 41
6-5. REMPLACEMENT DU JOINT D'ÉTANCHÉITÉ SOUS CORPS 42
- CAUSES DE DYSFONCTIONNEMENT OU ANOMALIES 43
1. INTRODUCTION AU MANUEL
2-1. VEILIGHEIDSWAARSCHUWINGEN
- in bed and breakfast-omgevingen.
3-1. BESCHRIJVING VAN HET PRODUCT
PROBLEEM OORZAAK OPLOSSING
INNEHÅLLSFÖRTECKNING
1. INTRODUKTION TILL BRUKSANVISNINGEN 104
2. FÖRESKRIFTER
104
2-1. SÄKERHETSFÖRESKRIFTER 104
2-2. AVSEDD ANVÄNDNING AV MASKINEN 106
2-3. BORTSKAFFANDE 106
2-4. KVARSTÅENDE RISKER 106
3. BESKRIVNING
106
3-1. BESKRIVNING AV PRODUKTEN 106
4. FÖRSTA BRUKTAGNINGEN
4-1. ANSLUTNING TILL VATTENSYSTEMET 107
4-2. ELEKTRISK ANSLUTNING OCH FÖRSTA ANVÄNDNINGSTILLFÄLLE 107
4-3. MANUELL JUSTERING AV DISPENSERINGSTRYCK 108
4-4. PROGRAMMERING AV TEMPERATUREN 108
5. ANVÄNDNING AV MASKINEN
5-1. TILLAGA OCH BRYGGA KAFFE 109
5-2. KONTROLLERA BRYGGTRYCKET 110
5-3. DISPENSERA VARMT VATTEN 111
5-4. DISPENSERA ÅNGA 111
6. RENGÖRING OCH UNDERHÅLL
6-1. RENGÖRING AV MUNSTYCKEN FÖR ÅNGA OCH VARMVATTEN 111
6-2. RENGÖRING AV BRYGGRUPP OCH MUNSTYCKEN 111
6-3. RENGÖRING AV FILTER OCH FILTERHÅLLARE 112
6-4. RENGÖRING AV HÖLJET 112
6-5. BYTE AV TÄTNINGEN 112
7. ORSAKER TILL FELFUNKTION OCH ANOMALIER 113
1. INTRODUKTION TILL BRUKSANVISNINGEN
•felaktig installation;