
Bar T 2V - Coffee machine LA PAVONI - Free user manual and instructions
Find the device manual for free Bar T 2V LA PAVONI in PDF.

| Product type | Professional espresso coffee machine |
| Model | Bar T 2V |
| Brand | La Pavoni |
| Number of groups | 2 |
| Power supply | 230 V single-phase or 400 V three-phase depending on configuration |
| Boiler operating pressure | 1,1 to 1,3 bar |
| Pump pressure | 8 to 9 bar |
| Water connection | Potable water supply with softener recommended |
| Main functions | Coffee dispensing, hot water, steam |
| Programming | Programmable volumetric dosing with pre-infusion |
| Cup warmer | Built-in electric, button-activated |
| Materials | Stainless steel, durable components |
| Daily cleaning | Rinse filters and portafilters with boiling water, clean steam wands |
| Weekly cleaning | Clean group body, shower screens, filters, drip tray |
| Boiler drain | Every 15 to 20 days to avoid bacteria and deposits |
| Gasket replacement | Gasket under group to replace if leakage at portafilter |
| Safety | Mandatory grounding, pressure switch, thermal protection |
| Spare parts | Original spare parts available through after-sales service |
| General information | Manual available in several languages on La Pavoni website |
Frequently Asked Questions - Bar T 2V LA PAVONI
User questions about Bar T 2V LA PAVONI
0 question about this device. Answer the ones you know or ask your own.
Ask a new question about this device
Download the instructions for your Coffee machine in PDF format for free! Find your manual Bar T 2V - LA PAVONI and take your electronic device back in hand. On this page are published all the documents necessary for the use of your device. Bar T 2V by LA PAVONI.
USER MANUAL Bar T 2V LA PAVONI
natural_image
Exterior view of a modern espresso machine (no visible text or symbols on the device body)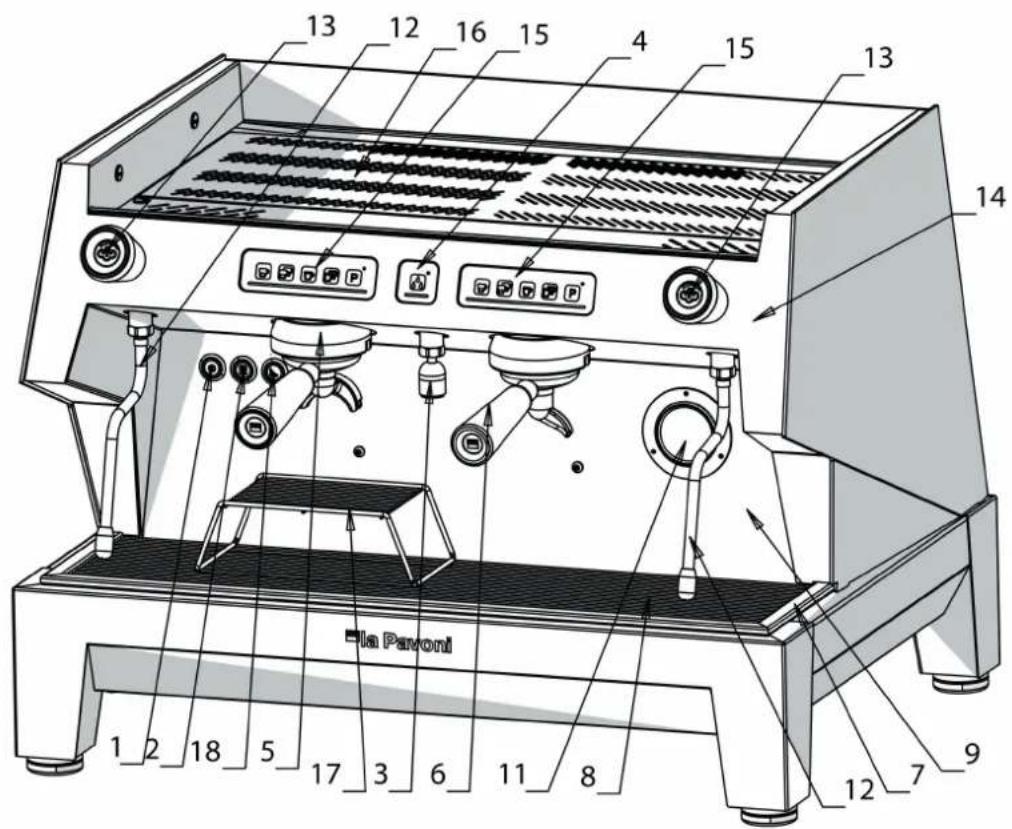
BAR T COMPACT - DIMENSIONI 595X560X560 (LxPxA)

natural_image
Illustration of a hand using a screwdriver to test a small component on an electronic device (no text or symbols present)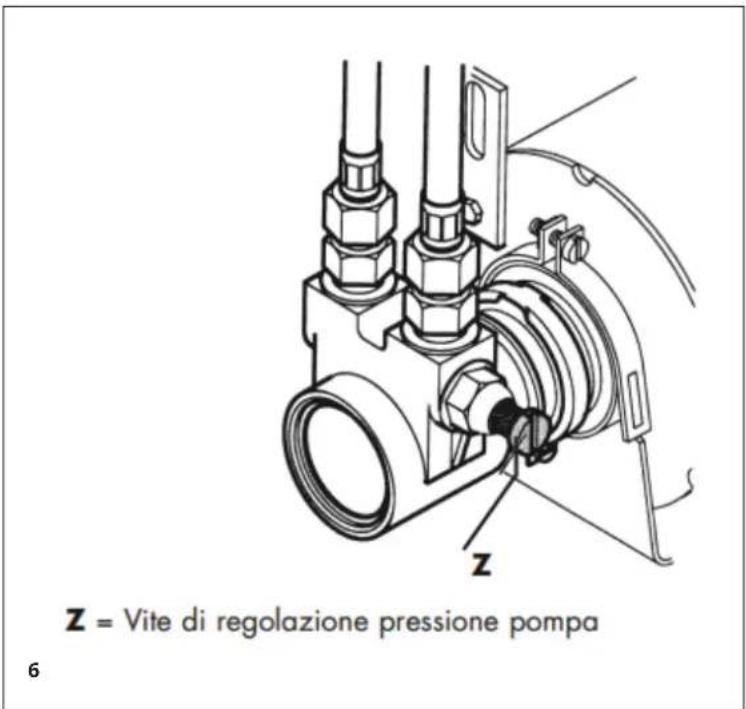
natural_image
Interior view of a bathroom sink with a light bulb and a triangular symbol on the wall (no text or symbols visible)
- It is recommend that this machine only be used by adults who have carefully read and understood this manual and all the safety indications contained in it.
- The user is responsible for third-party liability within the operating area.
•The installer, the user and the maintenance technician must notify the manufacturer of any defects or deterioration of the machine that may affect its initial level of safety.
- The installer must ensure that the ambient operating conditions are correct (the room temperature must be between 5^ and 25^ ) and, for reasons of hygiene and user safety, must avoid installing the machine in places where water jets are used.
•Installation must be carried out exclusively by authorised personnel who have specific technical knowledge, following the manufacturer's instructions and according to current regulations. The machine must be installed in premises where its use and maintenance are entrusted to qualified people.
- For safety reasons, worn or damaged parts must be replaced promptly and with original spare parts.
- Regularly check that the power cable is in good condition. If the power cable becomes damaged, contact an authorised service centre to have it replaced in order to avoid risks.
- Do not expose the machine to atmospheric agents (sun, rain etc.). In order to use the appliance correctly and for proper maintenance, the room temperature should be between 5^ and 25^
- If the machine remains unused for a long time at temperatures below 5^ (five degrees centigrade), it may seriously damage or break the boiler piping and the boiler itself: drain the water circuit completely if the machine is not going to be used for a long time.
- It is prohibited to remove the guards and/or safety devices on the machine.
•The packaging should be taken to a proper waste disposal centre. Under no circumstances should it be left unattended where children, animals or unauthorized persons may have access to it. The manufacturer declines any liability for damage to property or injury to people or animals, due to interventions on the machine by unqualified or unauthorized persons.
- Unauthorised repairs or the use of non-original
spare parts will void the warranty and relieve the manufacturer of all liability.
•The user must comply with the safety regulations in force in the country of installation in addition to using common sense and making sure that periodic maintenance is carried out properly.
•The user must not touch the machine if he/she has wet or damp feet, or use it when bare footed. Even if the machine is earthed, we recommend using a wooden platform and a circuit-breaker system that complies with the local regulations in order to avoid the risk of electric shocks as far as possible.
- Do not touch the boiler, the group heads, the filter-holder spouts, the hot water and steam nozzles with your hands or other parts of the body, since the liquids or steam dispensed are extremely hot and may cause scalding.
- Do not operate the machine if there is no water in the reservoir.
- Any obstructions may cause sudden jets of liquid or steam to be discharged and cause serious injuries. Use water filters and softeners to keep the water as clean as possible.
- In the case of faults or malfunction, switch off the machine. Do not attempt to repair it yourself. Contact an authorised service centre.
- Before carrying out cleaning or maintenance, disconnect the machine from the power supply using the main switch, turn off the mains switch and remove the plug from the power socket (without pulling the power cable); do not use water jets or detergents.
•Cups should be thoroughly dried before being placed on the shelf provided.
- This appliance must not be used by persons (including children) with reduced physical, sensory or mental capabilities or without sufficient experience and knowledge, unless appropriately supervised or instructed on the safe use of the appliance by a person responsible for their safety.
•Children must be supervised at all times to ensure they do not play with the appliance.
- Access to the service area should be limited to personnel who have knowledge and the practical experience of using the appliance, especially as regards safety and hygiene.
Instructions for use of models
BART
Dear Customer, Thank you for having purchased one of our products, which has been manufactured using the latest technological innovations. By carefully following some simple instructions regarding the correct use of our product in compliance with the essential safety instructions indicated in this manual, you will be able to obtain the best performance and enjoy the remarkable reliability of this product over the years. In case of faults, please contact one of our Service Centres that are at your disposal from now on.
SYMBOLS USED IN THIS MANUAL
Important information is indicated by these symbols. It is imperative that you comply with these instructions.


Please read the instructions manual carefully before using the appliance.

Caution! Particularly important and / or dangerous operations.

Information (useful for using the appliance).

Advice.

Operations that can be carried out by the user.

Operations that should only be carried out by a qualified technician.

PRODUCT END-OF-LIFE INSTRUCTIONS
This product complies with EU Directive 2002/96/EC. The symbol on the product or on its packaging indicates that this product may not be treated as household waste. It should be taken to an appropriate collection point for the recycling of electrical and electronic equipment provided by the local authorities. Alternatively, it can be returned to your retailer when you purchase a new equivalent appliance. The user is responsible for taking the appliance to the appropriate collection facilities at the end of its working life. Improper disposal of it may be punishable by law. The correct disposal of the old appliance for recycling, treatment and environmentally sustainable disposal will help prevent potential negative effects on the environment and human health, and will help recycle the materials that make up the appliance. For further details about recycling this product, please contact your local waste disposal service or the shop where you purchased it. The manufacturer and/or importer comply with their responsibilities regarding recycling, treatment and environmentally sustainable disposal both independently and by participating in collective back recycling schemes.
INDEX
-
INSTRUCTIONS MANUAL - USE AND STORAGE 20
-
MACHINE FUNCTION
-
INSTALLATION
3-1. CONNECTING TO THE WATER SUPPLY
3-2. ELECTRICAL CONNECTION
-
MACHINE DESCRIPTION
-
STARTING UP
5-1. PRESSURE SWITCH REGULATION
5-2. PUMP PRESSURE SETTING
-
COFFEE PREPARATION
-
COFFEE DOSE PROGRAMMING INSTRUCTIONS
7-1. COFFEE DOSE PROGRAMMING INSTRUCTIONS
7-2. PRE-INFUSION 24
-
COFFEE DELIVERY
-
HOT WATER DELIVERY
-
REPARATION OF OTHER DRINKS 24
10-1. MILK, CAPPUCCINO AND OTHER HOT DRINKS
10-2. HOT WATER DELIVERY
- MAINTENANCE AND CLEANING OPERATIONS 25
11-1. STEAM DELIVERY NOZZLE CLEANING
11-2. DAILY CLEANING OPERATIONS
12.WEEKLY CLEANING OPERATIONS 25
12-1. BREWING UNIT AND JET CLEANING
12-2. CLEANING THE FILTERS AND FILTER HOLDERS
12-3. CLEANING THE LOWER DRIP TRAY
12-4. CLEANING THE OUTSIDE OF THE MACHINE 25
-
REPLACING THE GROUP HEAD GASKET 25
-
REPLACING THE WATER IN THE BOILER 25
-
USING THE WATER SOFTENER 26
-
SCRAPPING THE MACHINE 26
-
TROUBLESHOOTING 27
1. INSTRUCTIONS MANUAL - USE AND STORAGE
This instructions manual is also available on the website www.lapavoni.com. This instructions manual is intended for the user, the owner of the machine and for the technician in charge of installation, and must always be available for reference.
The purpose of the instructions manual is to indicate the intended use of the machine according to its design, its technical characteristics and to provide instructions for its correct use, cleaning and regulation. It also provides important instructions regarding maintenance, residual risks and any operations that need to be carried out with particular care. This manual should be considered part of the machine and should be KEPT FOR FUTURE REFERENCE until the machine is scrapped. If it is lost or becomes damaged, you can request a replacement to the manufacturer or your dealer, indicating the machine model and serial number shown on the identification plate. This manual reflects the state of technology at the time it was written. The manufacturer reserves the right to make any necessary technical modifications to its products and to update the manuals with no obligation to revise previous versions.
LA PAVONI S.p.A. declines any liability for damage or injury that may be caused directly or indirectly to people or property due to:
•the failure to comply with all the requirements of current safety regulations
- incorrect installation
•defective power supply
- improper or incorrect use of the coffee machine
- use other than that specified in this publication
- lack of or incorrect scheduled and recommended maintenance
•unauthorised modifications or repairs
- the use of non-original or non model-specific spare parts
- complete or partial failure to follow the instructions
•exceptional events
2. MACHINE FUNCTION
This appliance has been designed for professional use to prepare espresso coffee using coffee blends and to dispense hot water and/or steam. Its components are made of non-toxic and durable materials and are easily accessible for cleaning and maintenance. In order for the machine to be used properly, the operator must have carefully read and understand the instructions provided in this booklet.
The noise emitted by the machine does not exceed 70dB.
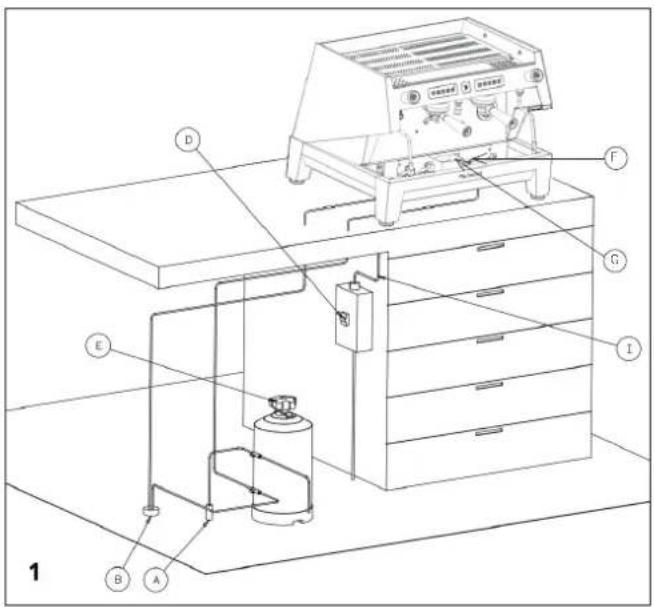
3. INSTALLATION
A. Water supply
B. Drain conduit
D. Circuit breaker
E. Water softener
F. Boiler supply tap
G. Drip tray
I. Power cable
Before installing, make sure that:
• there are no dents, bumps or deformations
- there are no wet areas or other signs that may indicate that the packaging has been exposed to bad weather
- there are no signs that it has been tampered with
After making sure that the machine has been transported correctly, proceed with the installation. Make sure that the machine can be installed on a horizontal surface suitable for supporting its weight, at a minimum height of 90 cm and that there is a clearance of at least 30 cm around the machine. Then install the machine, following the steps in the order described below.
3-1. CONNECTING TO THE WATER SUPPLY

The machine must be supplied with water having a hardness of greater than 8^ F. It is not possible to reuse previously used pipes and gaskets.

It is recommended that you install a water softener on the machine water supply system.
Make sure that the water in the water supply that you will be connecting the machine to is potable. This appliance should be connected to the water supply in compliance with the national legislation of the country in which it is used.
Only use the hose supplied with the machine, DO NOT USE OTHER HOSES.
The maximum inlet pressure to the machine from the water supply must not exceed 0,65MPa.
- Connect the water softener (E) to the water supply (A).

Before connecting the water softener to the machine, carry out a washing cycle until the water is clear and then connect the water softener to the machine.
Connect the drip tray (G) to the drain conduit (B). If the mains water pressure is higher than 0.5 Mpa (5 bar), it is recommended to install a balanced pressure regulator for high pressures (a device that prevents an increase in supply pressure from aff ecting the output pressure).
3-2. ELECTRICAL CONNECTION

Before connecting the machine to the power supply, make sure that the voltage is the same as that indicated on the CE plate.
Make sure that the mains supply is suitable for the power requirements of the machine. Connect to an earth socket that complies with current regulations. Make sure that the power cable is working correctly and that it complies with national and European safety regulations.
The user is responsible for installing a suitable safety switch (circuit breaker) on the power line to the machine according to the regulations in force in the country of use.
Connect the power cable (I) to the power line using an all-pole circuit breaker (D) with a contact separation distance of at least 3 mm to provide complete disconnection in category III overvoltage conditions.
To change voltage, please refer to the diagram on the box of the main switch.

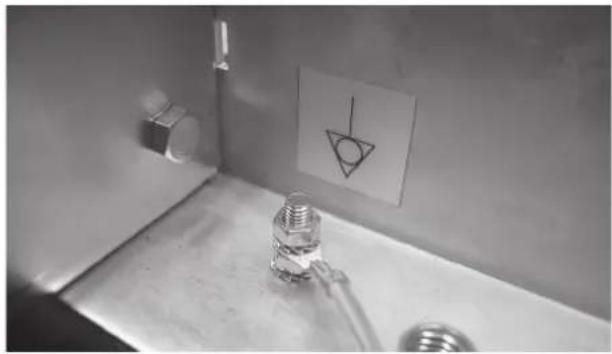
It is compulsory to connect the yellow/green cable to the earthing system of the premises.
The machine is fitted with an equipotential bonding terminal under the drip tray next to the following symbol The terminal can be used to
connect power cables from 2.5 mm to 6 mm. Use the cable lug supplied with the machine to make the connection.
natural_image
Interior view of a bathroom sink with a glass bulb, a small cube, and a wall-mounted diagram (no readable text or symbols)
The single-phase connection of the coffe machine is only allowed in premises that have an electrical system with an impedance adequate for the adsorbed current of the appliance.
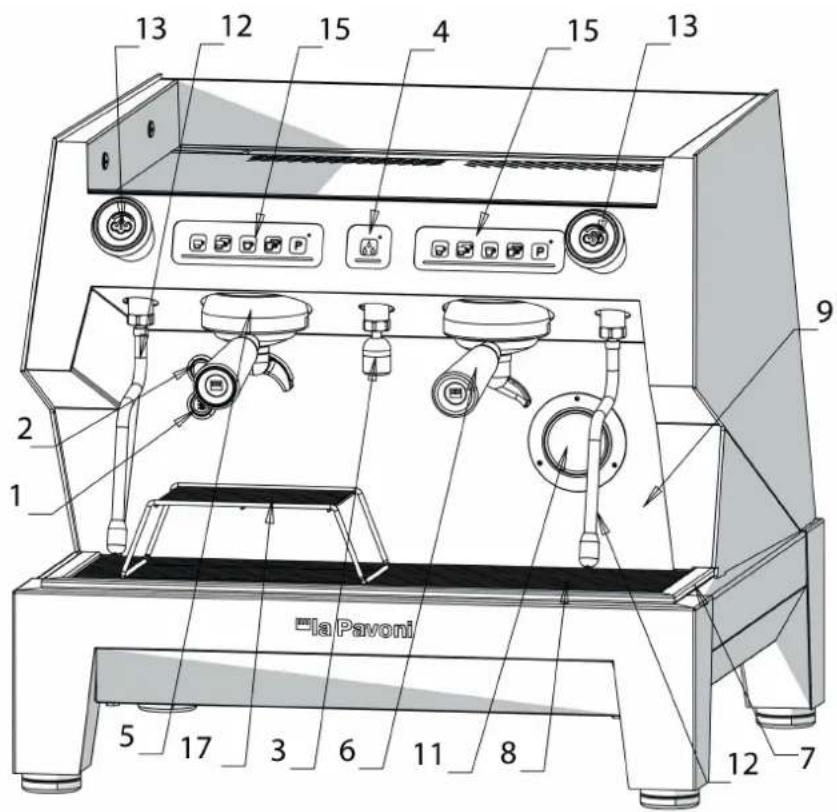
4. MACHINE DESCRIPTION
- ON / OFF switch
- Heater switch
- Hot water nozzle
- Hot water button
- Group head
- Filter holder
- Drip tray
- Drip tray grid
- Front panel
- Data plate
- Dual scale pressure gauge
- Steam nozzle
- Steam tap knob
- Front panel
- Group head control
- Cup warmer shelf
- Coff ee cup rest
- Cup warmer illuminated switch
5. STARTING THE MACHINE FOR THE FIRST TIME
- Once the hydraulic and electrical connections have been completed, the machine can be started up. Open the water tap (A).
- Turn off the circuit breaker (D).
- Press the power on button (1); the power on light will come on.
•The automatic water level device will start
filling the boiler with water until it reaches the pre-set level; the level of water in the boiler is checked automatically and will be topped up automatically to the required level.
- When filling the boiler for the first time, the filling timeout may be triggered (flashing of the LEDs on the keypads); this is normal because filling an empty boiler takes longer than the set safety timeout (120 s).
Switch the machine off and on again using the main power switch. The machine will continue to draw in water until it is full. N.B. This process may be repeated two or three times.

Do not switch on the heater power switch (2) until the boiler is filled to the correct level.
- When the automatic water filling process has finished, press the switch (2). This will switch on the heating element to heat the water.
- Wait for the machine to reach the operating pressure of 1.1 ÷ 1.3 bar, checking the pressure of the boiler on the pressure gauge (11). If the machine does not stabilise at the values indicated, you should adjust the pressure switch as indicated in paragraph 5.1.
- Check the pressure on the pump pressure gauge (11) by operating a group head with the filter holder inserted and full of properly ground, dosed and pressed coffee, to obtain an effective operating pressure of 8/9 bar. If you need to adjust the pump pressure, follow the instructions in paragraph 5.2.

If there is no water in the boiler when the machine is in operation, the heating element will fail. This must be replaced by an authorised service centre.
During start-up:
when the boiler pressure gauge (11) indicates approximately 0.5 bar, slowly open the steam knob/lever (13) to discharge any air that may be contained in the boiler. Wait until steam starts to come out of the steam nozzle (12) before closing it. Wait until the machine reaches the operating pressure and the correct thermal balance, after 35-45 minutes.

Do not press the hot water dispensing button or turn the tap before the correct operating pressure of 1.1 bar has been reached, indicated on the boiler pressure gauge.
Wait for the machine to reach the operating pressure of 1.1 ÷ 1.3 bar, checking the pressure of the boiler on the pressure gauge (11). If the machine does not stabilise at the values indicated, you should adjust the pressure switch as indicated in paragraph 5.1.
The machine is now ready for use.
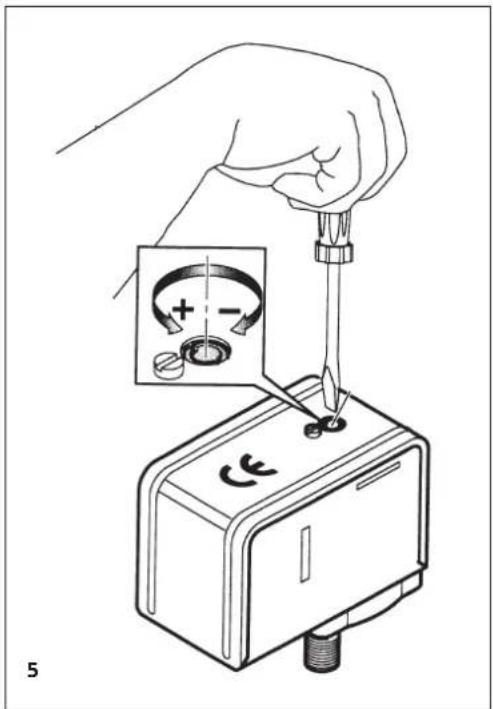
5-1. PRESSURE SWITCH
The function of the pressure switch shown in Fig. 5 is to maintain a constant pressure in the boiler by activating or deactivating the electric heating element.
This pressure switch is set to a value of 1.1 - 1.3 bar during the final test of the machine. However, if a specific application requires a different working pressure, the working range of the pressure switch can be modified using the adjusting screw (U): reducing the pressure reduces the temperature, increasing the pressure increases the water temperature. The direction of adjustment is indicated in the figure and on the pressure switch. The pressure changes by approximately 0.1 atm for each complete turn of the screw.

Caution! Disconnect the power supply before performing this operation.
5-2. CALIBRATING PUMP PRESSURE
- Insert the filter holder full of properly ground, dosed and pressed coffee into the group head. Turn on the switch or use the group head control keypad (15) and read the pressure on the pump pressure gauge (11).
- The correct pressure is 8/9 bar. If the reading on the pressure gauge is incorrect, turn the pump pressure adjustment screw Fig. 6 (Z) clockwise to increase the pressure or anti-clockwise to decrease the pressure. After regulating the pressure, check the pump setting by delivering one or more coffees.
6. PREPARING COFFEE
- To obtain a good cup of espresso coffee, it is important that you use good quality, well roasted and correctly ground coffee. Grinding is optimal when it takes 15-18 seconds for one cup and 30-35 seconds for two cups to be delivered.
- Coffee should be ground just before it is used. Once ground, coffee loses its flavour very quickly. If the coffee is too coarsely ground, the coffee will be light coloured and weak without
froth and if the coffee is too finely ground the espresso will be dark and strong with little froth.
- Warm cups help maintain the coff ee at the right temperature. We therefore recommended that before using them, you place the cups on the cup warmer shelf (16), which will be warmed by the heat given off from the boiler.
- The new BarT is fitted with an electric cup warmer, cups are pre-heated by pressing the button (18); the light inside the button will turn on to indicate that the cup warmer is in operation. Press the button (18) again to switch off the cup warmer.

Do not cover the cup-warming shelf with fabrics, felt etc.
- After placing the filter in the filter holder (6), add the quantity of ground coffee required for 1 or 2 cups (7 g - 14 g), level the coffee and compact it using the tamper. Remove any coffee residues from the edge of the filter using the palm of your hand and insert the filter holder into the group head (5), moving it towards the right to secure it.
- Place the cups under the spouts and start to dispense coffee using the group head control lever (15).
Once the required amount of coff ee has been dispensed, stop delivery using the group head control (15) and leave the filter-holder in place.
- To prepare additional cups of coffee, remove the filter holder (6) from the group head by moving it towards the left, empty the coffee grounds into the drawer and repeat the steps described above.

Do not touch the group heads or the steam and hot water nozzles when the machine is in operation and do not place your hands under the groups or nozzles during delivery in order to avoid possible scalding.
It is recommended to leave the fi lter holders, together with the fi lters and coff ee grounds, in the group head so that the fi lter holder will always be at the right temperature.
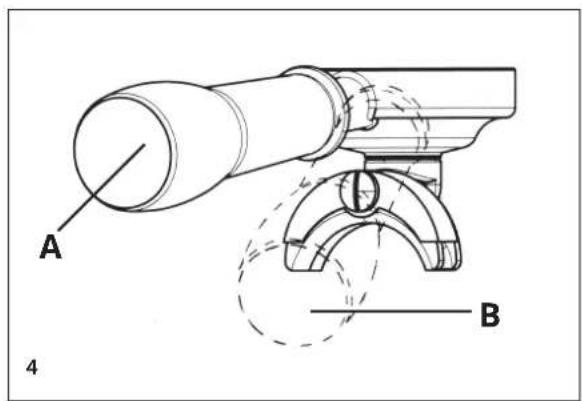
When the machine is new, the fi lter holder may not be aligned (perpendicular to the machine) as shown in the fi gure. However, this however does not prevent the machine from working properly. After being used for a short time, the fi lter holder will gradually become settled in the correct position.

When the machine is new, the fi lter holder may not be aligned (perpendicular to the machine) as shown in the fi gure. However, this however does not prevent the machine from working properly. After being used for a short time, the fi lter holder will gradually become settled in the correct position.
Fig. 4
A. Position of the closed filter holder when the machine is new.
B. Position of the closed filter holder after the machine has been in use for a short time.
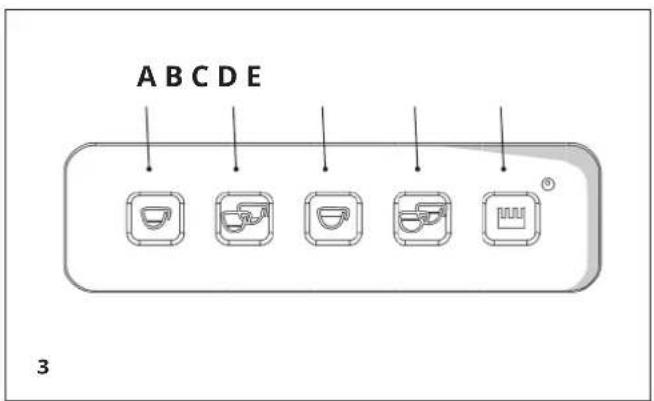
7. COFFEE DOSE PROGRAMMING INSTRUCTIONS
Model equipped with continuous delivery automatic group heads with automatic solenoid valves and programmable volumetric coffee dosage, microprocessor based digital membrane dispensing control, keypad with 4 coffee dosage selections and stop button for each group head.
7-1. COFFEE DOSE PROGRAMMING INSTRUCTIONS
Fig. 3 GROUP HEAD CONTROL Button functions:
A. 1 normal coffee
B. 2 normal coffees
C. 1 long coff ee
D. 2 long coffees
E. Stop group head controls / continuous delivery.
The button 📄) is used for continuous delivery and to stop delivery. Therefore the machine has a double function:
A. Pressing the button 🎨(E) places the machine in semi-automatic mode
B. Pressing the 4 selection buttons operates the machine in electronic volumetric dosing mode.
Pressing and holding the button 📄E) for a few seconds places the machine in programming mode. This is indicated by the slow fl ashing of the LED corresponding to the group head that is being programmed. Release the programming button (the LED will continue to fl ash); press the button of the group head on which you wish to program coff ee dosing. Once the required dose has been reached, press any button of the same group head to stop delivery. The dose will be stored in the memory and the machine will exit from programming mode (the fl ashing LED will switch off).
- This should be repeated for the remaining selection buttons of the various group heads. Repeat the same procedure if you wish to increase or decrease the set dose. Programming the first group head on the left will copy the settings onto the other group heads.
- The settings entered for group head 1 (via the first keypad) will be copied automatically to group head 2.
7-2. PRE-INFUSION
Our software allows confi guring the dosage so that the volumetrically controlled doses of coff ee is preceded by pre-infusion.
After time 1 (ON), coffee dispensing stops for time 2 (OFF) and then continues until the selected dose has been dispensed completely.
If you press one of the volumetric controlled dose buttons, the normal dispensing cycle is preceded by a short timed jet of water to dampen the coff ee dose before actual dispensing takes place. This function ensures the optimum use of the coff ee dose.
ACTIVATING PRE-INFUSION
Switch on the machine with the main switch, keeping button (A) of group head 1 pressed until the LED of button 🎨 (E) lights up. Switch the machine off and on again. Pre-infusion has been started.
DEACTIVATING PRE-INFUSION
Switch on the machine with the main switch, keeping the button (B) of group head 1 pressed until the LED of button (E) lights up. Switch the machine off and on again. Pre-infusion has been deactivated.
8. DISPENSING COFFEE
- To dispense coff ee, press the required button on the group head control (15), the green LED on the button (E) lights up. Coff ee delivery starts and stops automatically when the pre-programmed quantity is reached. The LED turns off to indicate the end of delivery.
- Delivery can be interrupted or the selection cancelled by pressing any of the group head control buttons (15).
- In addition to interrupting delivery and cancelling the selection, the button (E) also has a continuous delivery function. This means that the dose is not pre-set and that the group head will continue to deliver coffee until the button is
pressed again, which stops delivery.
- If the coff ee is too finely ground or if there is too much coff ee in the fi lter, no coff ee will be dispensed when one of the four coff ee dosage buttons (A, B, C, D) is pressed. After 45 seconds, the machine will automatically lock and the steady green LED will start fl ashing.
- To restart the machine, remove the fi Iter-holder and replace the coffee in the fi Iter basket. Press the main switch (1) to switch off the machine and then restart it.

We recommend that you dispense steam for a maximum of 60 seconds. To prevent the machine from blocking, if coffee does not start to be dispensed within 10 seconds, press one of the selector buttons to cancel the command, replace the coffee in the filter and repeat the dispensing procedure.

To prevent the machine from blocking, if coff ee does not start to be dispensed within 10 seconds, press one of the selector buttons to cancel the command, replace the coff ee in the filter and repeat the dispensing procedure.
9. DISPENSING HOT WATER
Place a container under the hot water delivery nozzle (3), press the hot water button (4); when the required amount of water is obtained, press the button again to stop dispensing.

We recommend that you dispense steam for a maximum of 60 seconds.
10. PREPARING OTHER DRINKS
10-1. MILK, CAPPUCCINO AND OTHER HOT DRINKS
Before heating any drinks, carefully dispense a small amount of steam from the steam nozzle (12) by turning the steam knob (13) anticlockwise to eliminate any condensation that may have formed in the boiler.
Place the liquid to be prepared in a container, immerse the steam nozzle (12) into the liquid and slowly turn the steam knob (13) anticlockwise.
Then open the steam knob completely to dispense a large quantity of steam that will bring the liquid to boiling point. To froth milk for a
cappuccino, half fi ll a tall narrow container with the milk to be prepared.
Immerse the steam nozzle (12) until it touches the bottom of the container and bring the milk almost to boiling. Move the container up and down with the tap open until you just touch the surface of the milk for a few seconds, until the froth has formed. To make a cappuccino, add the hot frothed milk to the hot coff ee that is already in the cup.
10-2. TEA, CAMOMILE TEA
Place a container under the hot water delivery nozzle (3), press the hot water button (4). When the required amount of water has been obtained, add the tea bag or drink sachet required for the preparation.
11. CLEANING AND MAINTENANCE
11-1. CLEANING THE STEAM NOZZLES
To avoid altering the taste of the drinks to be heated and to prevent the holes at the end of the steam nozzle from becoming clogged, we recommend cleaning the nozzle thoroughly after every use.
11-2. DAILY CLEANING
Rinse the fi Iter baskets and fi Iter-holders in boiling water to prevent scale or remove coffee deposits and clean the shower screens of the group heads.
12. WEEKLY CLEANING
12-1. CLEANING THE GROUP HEAD AND SHOWER SCREENS
Remove the fi lter holder from the group head. Place the membrane provided into the fi lter, add a spoonful of coff ee machine cleaning powder and insert the fi lter holder (6) into the group head to be cleaned (5). Use the group head control (15) to start dispensing and stop delivery after approximately 4-5 seconds. Start and stop delivery alternately for approximately one minute to remove coff ee and limescale deposits. Remove the membrane and start dispensing several times in order to rinse the group head. Dispense several cups to eliminate unpleasant tastes from the spouts and the group head. After hot water has remained in the pipes for a long time, allow water to flow downwards to remove any deposits.
12-2. CLEANING THE FILTERS AND FILTER HOLDERS
Regularly check the holes in the fi Iters in order to remove any coff ee deposits. Place approximately one litre of boiling water and four teaspoons of coff ee machine cleaner in a suitable container. Immerse the fi Iters and fi Iter holders in the solution for 20-30 minutes. Then rinse thoroughly under running water.
12-3. CLEANING THE LOWER DRIP TRAY
Remove the drip tray grid (8) and the drip tray (7). Remove any coffee residues from it.
12-4. CLEANING THE OUTSIDE OF THE MACHINE Use a damp, non-abrasive cloth, without alcohol or solvents, to avoid damaging the sides, the base and any painted parts.
IMPORTANT! The machine must not be immersed in water and should not be cleaned with jets of water.
13. REPLACING THE GROUP HEAD GASKET
If the coff ee leaks from around the edges of the fi Iter holder when it is dispensed, it may be due to an obstruction in the delivery hole of the fi Iter-holder, in which case the hole should be cleaned. If the problem persists or if the group head moves signifi cantly beyond the centre of the group head when it is being fi tted, the group head gasket should be replaced.
To replace it (Fig. 2), loosen the spout fi xing screw (E), remove the spout (C) and the sprayer (B). Then use a screwdriver as a lever to remove the round metal block (A) and then the gasket (D).
After having removed the gasket, thoroughly clean the seat before inserting the new gasket.
Then reinstall the components by following the above steps in reverse order.
14. REPLACING THE WATER IN THE BOILER
The water contained in the boiler should be replaced every 15-20 days in order to eliminate iron bacteria and various residues that build up due to water stagnation.
Turn off the main switch (1), remove the drip tray grid (8) and the lower drip tray (7). Open the drain tap located in the lower left opening (with the boiler under pressure) and allow the water to drain completely from the boiler. Close the tap and repeat the start-up procedure described in another section of this manual.
15. USING THE WATER SOFTENER

The following instructions apply to the water softener illustrated; if your appliance is different, follow the instructions supplied with the water softener.
Calcium and magnesium contained in the water circulating inside the boiler and the group head circuits damage the machine. The function of the softener is to dissolve the calcium and magnesium and make them settle out on the resins contained in the softener.
To prevent the build-up of deposits from saturating the resins, and thereby limiting their function, they should be regenerated at regular intervals according to the following criteria:
- 8-litre softener for water with a hardness of 40 French degrees:
- up to 400 cups of coffee/day, every 10 days
- up to 800 cups of coffee/day, every 5 days
- up to 1000 cups of coffee/day, every 3 days
- 12-litre softener for water with a hardness of 40 French degrees:
- up to 500 cups of coffee/day, every 15 days
- up to 1000 cups of coffee/day, every 7 days
- up to 1500 cups of coffee/day, every 5 days
- up to 2000 cups of coffee/day, every 3 days Delaying regeneration and therefore allowing scale to build-up, may affect the thermal and mechanical functions of the machine and the taste of the coffee. To regenerate the resins proceed as follows:
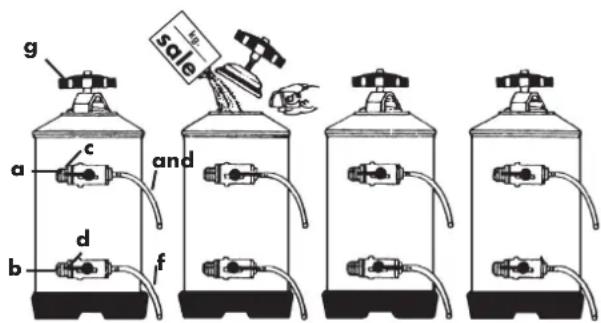
Place an empty container, having a capacity of at least two litres, under the pipe (e), turn the levers (c) and (d) to the right; unscrew the lid (g) and wait for the water to drain completely from the hose (e). Add 1.5 kg of cooking salt for the 8-litre model or 2 kg of salt for the 12-litre model. Replace the lid and turn the lever (c) from right to left; allow the salted water drain from the hose (f) until the water has become soft again (the cycle takes
approximately 90 minutes).
a Water inlet
b Water outlet
c Inlet tap
d Outlet tap
e Vacuum pipe
f Regeneration pipe
g Lid knob
- Do not use the machine during the regeneration cycle. It is recommended to disconnect the power supply to the pump, to prevent it operating dry.
- Wash the resins before connecting the softener to the machine by connecting to the water supply and allowing the water to run for five minutes.
16. SCRAPPING THE MACHINE
If you decide you no longer wish to use the machine because of wear or for other reasons, we recommend making it unusable by cutting the power cable after having removed the plug from the socket.
When scrapping the machine, we recommended separating the various parts according to their material (plastic, metal etc.). Then give the various parts of the machine to specialised companies for disposal.
17. TROUBLESHOOTING
| PROBLEMS | CAUSES | SOLUTIONS |
| The machine does not turn on 1. Mains power switch off2. Incorrect connection to the water supply | 1. Rotate the main switch to ON2. Contact qualified personnel to check the connection | |
| No water in the boiler 1. Water supply tap closed2. Pump filter clogged3. Pump motor not working | 1. Open water supply tap2. Replace the filter3. Contact qualified personnel | |
| Coffee not dispensed 1. Water supply tap closed2. Pump motor not working3. Control unit fuse blown4. Group head solenoid valve not working5. Group head control not working | 1. Open the water supply tap2. Contact qualified personnel3. Contact qualified personnel4. Contact qualified personnel5. Contact qualified personnel | |
| No steam comes out of the wands | 1. Too much water in the boiler2. Heating element damaged3. Sprayer clogged4. Heating element protection thermostat disconnected | 1. See specific problem2. Contact qualified personnel3. Clean the sprayer4. Contact qualified personnel |
| Too much water in the boiler 1. The pump motor does not switch off2. Hole in the heat exchanger3. Automatic filling solenoid valve blocked | 1. Contact qualified personnel2. Contact qualified personnel3. Contact qualified personnel | |
| Water leaking onto the counter 1. Drip tray dirty2. Drain hose clogged or disconnected3. Other leaks | 1. Clean the drip tray2. Replace the drain hose3. Contact qualified personnel | |
| Wet coffee grounds 1. Coffee ground too finely2. Group head has not warmed up yet3. Solenoid valve does not discharge | 1. Adjust grinding2. Wait for the machine to reach the required temperature3. Contact qualified personnel | |
| Coffee is dispensed too slowly 1. Coffee ground too finely2. Filter holder dirty3. Group head clogged4. Solenoid valve partially clogged | 1. Adjust grinding2. Replace the filter and clean the filter holder more frequently3. Contact qualified personnel4. Contact qualified personnel | |
Coffee is dispensed too quickly 1. Coffee ground too coarsely 1. Adjust grinding
The coffee dispensed is cold 1. Scale on the heat
exchangers or on the heating element
- Pressure switch contacts oxidised
- Electrical connection fault
- Heating element partially burnt out
-
Heating element protection thermostat disconnected
-
Contact qualified personnel
- Contact qualified personnel
- Contact qualified personnel
- Replace the heating element
- Contact qualified personnel
The coffee dispensed is too hot
-
Pressure switch calibration incorrect
-
Regulate the pressure switch using the screw provided (section 6.1)

AVERTISSEMENT DE SÉCURITÉ
natural_image
Close-up of a metallic fixture with a small inset diagram showing a triangle symbol (no readable text or labels)
- CAUSES DE NON-FONCTIONNEMENT
natural_image
Interior view of a kitchen sink with a glass bulb, a small cube, and a triangular symbol on the wall (no readable text or symbols)
natural_image
Close-up of a small mechanical component with a triangular symbol on its surface, placed on a workbench (no visible text or symbols)
-
- manufacturers manufacturers of Canada
natural_image
Interior view of a bathroom sink with a glass bottle and a wall-mounted diagram (no readable text or symbols)


- BART
- SYMBOLS USED IN THIS MANUAL
- PRODUCT END-OF-LIFE INSTRUCTIONS
- INDEX
- INSTRUCTIONS MANUAL - USE AND STORAGE
- MACHINE FUNCTION
- INSTALLATION
- 3-1. CONNECTING TO THE WATER SUPPLY
- 3-2. ELECTRICAL CONNECTION
- MACHINE DESCRIPTION
- STARTING THE MACHINE FOR THE FIRST TIME
- During start-up:
- 5-1. PRESSURE SWITCH
- 5-2. CALIBRATING PUMP PRESSURE
- PREPARING COFFEE
- Fig. 4
- COFFEE DOSE PROGRAMMING INSTRUCTIONS
- 7-1. COFFEE DOSE PROGRAMMING INSTRUCTIONS
- 7-2. PRE-INFUSION
- ACTIVATING PRE-INFUSION
- DEACTIVATING PRE-INFUSION
- DISPENSING COFFEE
- DISPENSING HOT WATER
- PREPARING OTHER DRINKS
- 10-1. MILK, CAPPUCCINO AND OTHER HOT DRINKS
- 10-2. TEA, CAMOMILE TEA
- CLEANING AND MAINTENANCE
- 11-1. CLEANING THE STEAM NOZZLES
- 11-2. DAILY CLEANING
- WEEKLY CLEANING
- 12-1. CLEANING THE GROUP HEAD AND SHOWER SCREENS
- 12-2. CLEANING THE FILTERS AND FILTER HOLDERS
- 12-3. CLEANING THE LOWER DRIP TRAY
- 12-4. CLEANING THE OUTSIDE OF THE MACHINE Use a damp, non-abrasive cloth, without alcohol or solvents, to avoid damaging the sides, the base and any painted parts.
- REPLACING THE GROUP HEAD GASKET
- REPLACING THE WATER IN THE BOILER
- USING THE WATER SOFTENER
- SCRAPPING THE MACHINE
- TROUBLESHOOTING
- AVERTISSEMENT DE SÉCURITÉ
Brand : LA PAVONI
Model : Bar T 2V
Category : Coffee machine