SHX70HS1200 - Heating SHX - Free user manual and instructions
Find the device manual for free SHX70HS1200 SHX in PDF.

User questions about SHX70HS1200 SHX
0 question about this device. Answer the ones you know or ask your own.
Ask a new question about this device
Download the instructions for your Heating in PDF format for free! Find your manual SHX70HS1200 - SHX and take your electronic device back in hand. On this page are published all the documents necessary for the use of your device. SHX70HS1200 by SHX.
USER MANUAL SHX70HS1200 SHX
natural_image
Exterior view of a modern outdoor heating element with a grid pattern and a small circular button (no text or symbols visible)HERZLICHEN GLÜCKWUNSCH!
VIELEN DANK, DASS SIE SICH FÜR DIESES PRODUKT VON SHX ENTSCHIEDEN HABEN.
other
| Label | Value | |---|---| | DE | 20 | | FR | 20 | | IT | 39 | | NL | 57 | | SE | 75 | | CZ | 93 | | SK | 111 | | RO | 130 | | EN | 147 | | PL | 165 | | SL | 184 | | HR | 202 |INHALTSVERZEICHNIS
Abbildung 2
natural_image
Technical line drawing of a mechanical component with a 50-degree angle标注 (no text or symbols on the diagram itself)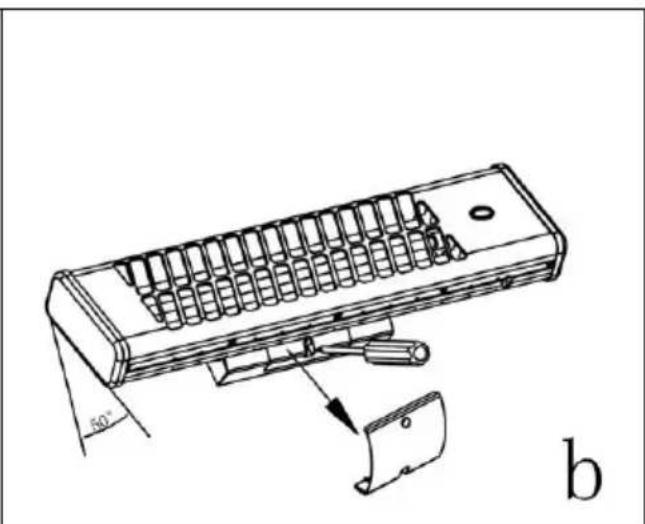
natural_image
Technical line drawing of a mechanical device with a 50-degree angle标注 and a separate view labeled 'b' (no text or symbols on the device itself)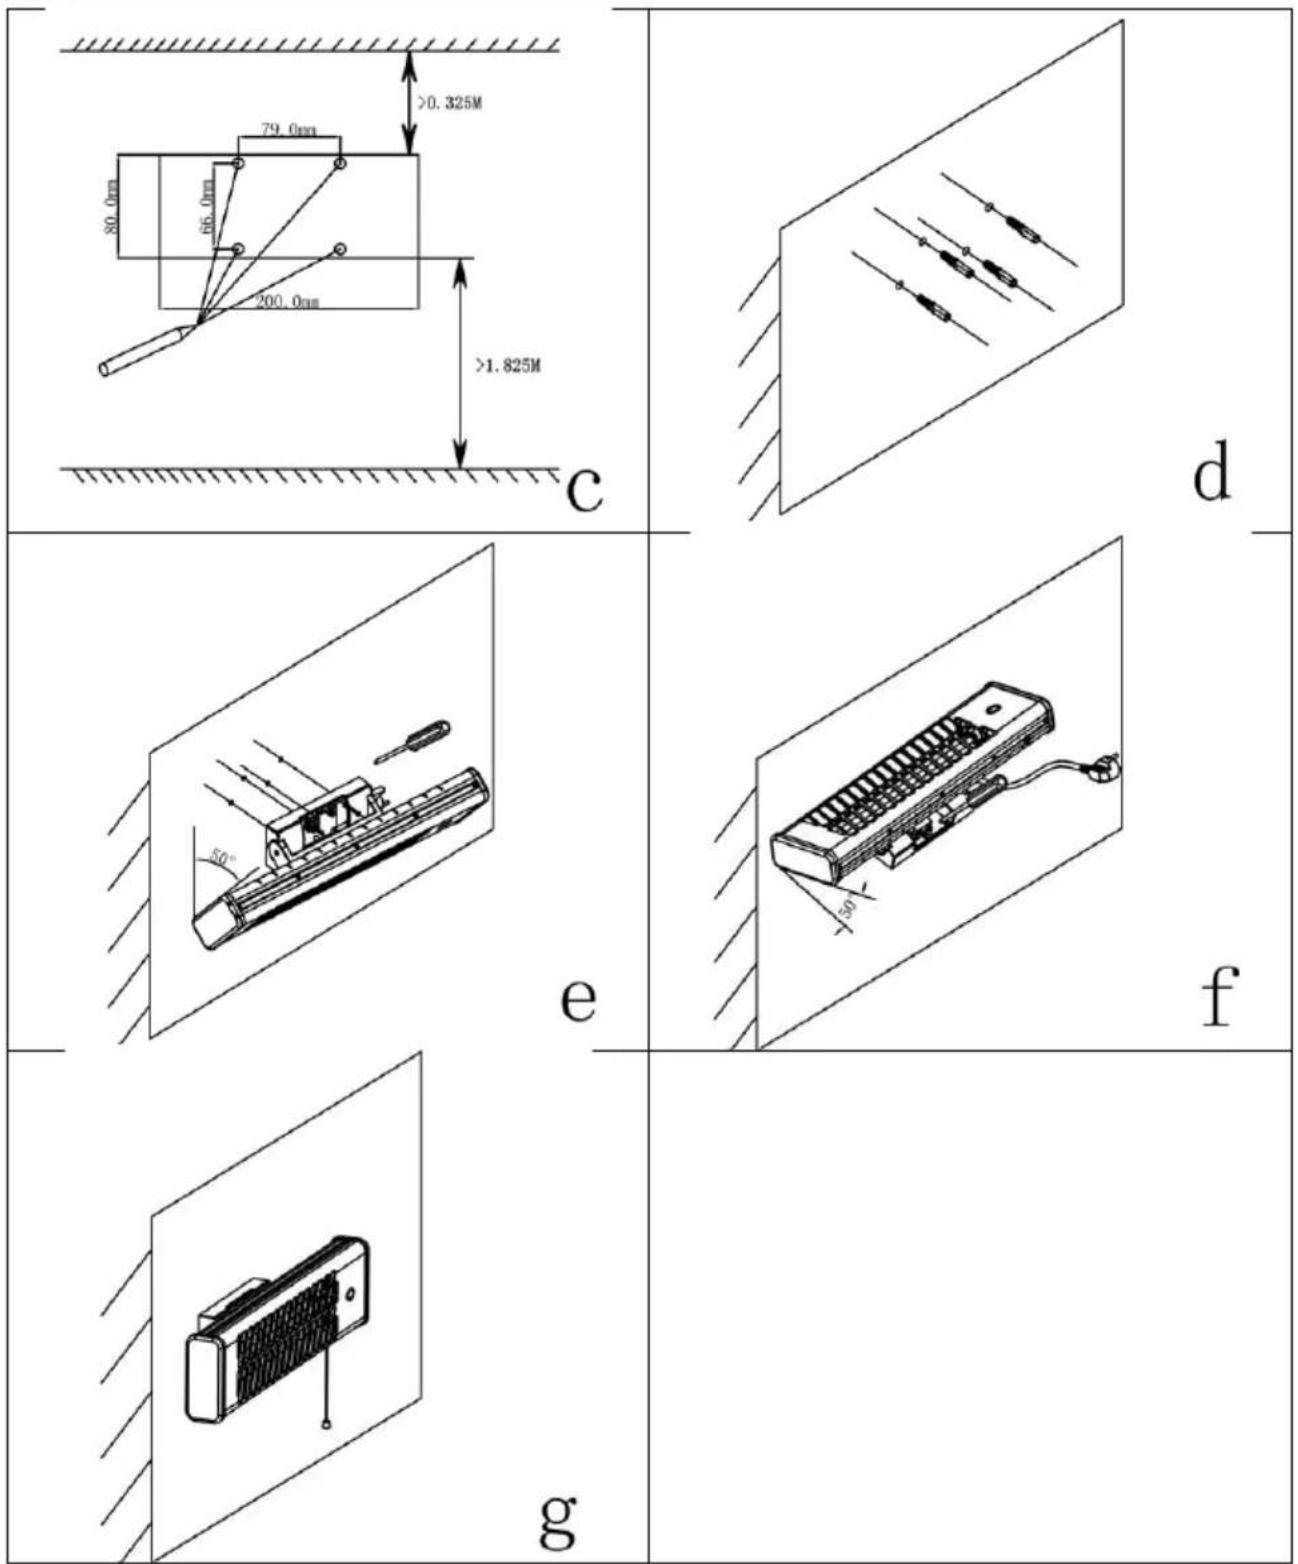
Abbildung 3
WICHTIG!
natural_image
Exterior view of a portable heating device with a grid of color scheme and a small button (no text or symbols visible)FÉLICITATIONS !
MERCI D'AVOIR CHOISI CE PRODUIT DE SHX.
TABLE DES MATIÈRES
Figure 2
natural_image
Technical line drawings of a mechanical component, labeled a and b, showing internal structure with 50° angle annotations (no text or symbols beyond labels)
Figure 3
IMPORTANT!
natural_image
Exterior view of a portable heating device with a grid of color scheme and a small button (no text or symbols visible)CONGRATULAZIONI!
GRAZIE PER AVER SCELTO QUESTO PRODOTTO DI SHX.

INDICE DEI CONTENUTI
IT
Figura 2
Praticare i fori e montare:
natural_image
Technical line drawing of a mechanical component with a 50-degree angle标注 (no text or symbols beyond the label)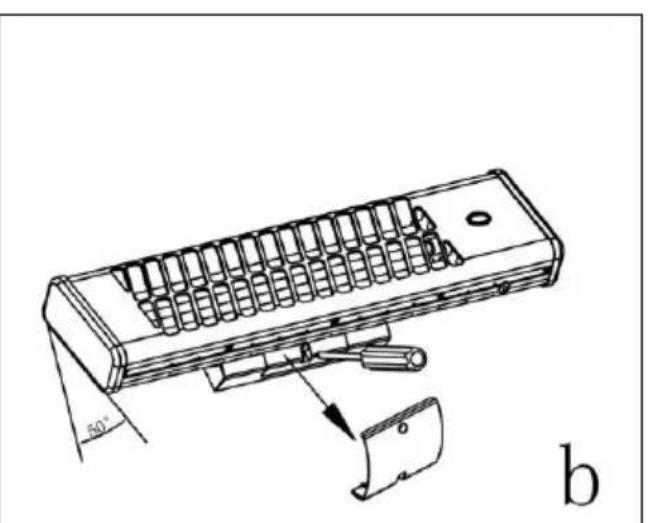
natural_image
Technical line drawing of a mechanical device with a 50-degree angle indicator and a separate view labeled 'b' (no text or symbols on the device itself)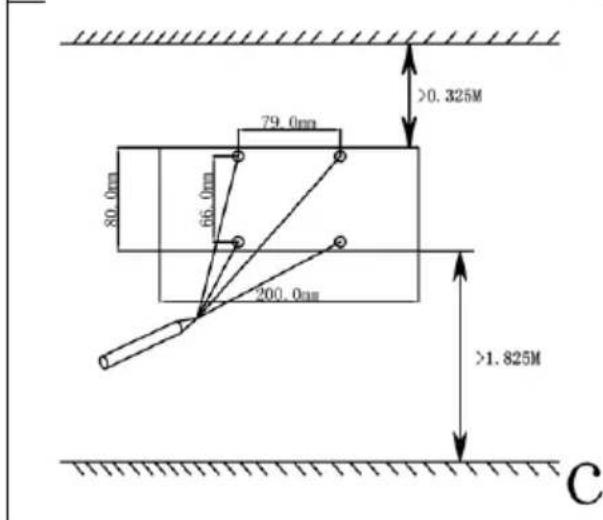
natural_image
Diagram of three parallel conductors with labeled terminals, placed on a tilted rectangular panel (no text or symbols present)

Figura 3
IMPORTANTE!
natural_image
Exterior view of a portable heating device with a grid of color scheme and a small button (no text or symbols visible)GEFELICITEERD!
BEDANKT VOOR HET KIEZEN VAN DIT PRODUCT VAN SHX.

INHOUDSOPGAVE

Figuur 2
natural_image
Technical line drawing of a heat exchanger or radiator component with a 50-degree angle indicator (no text or symbols present)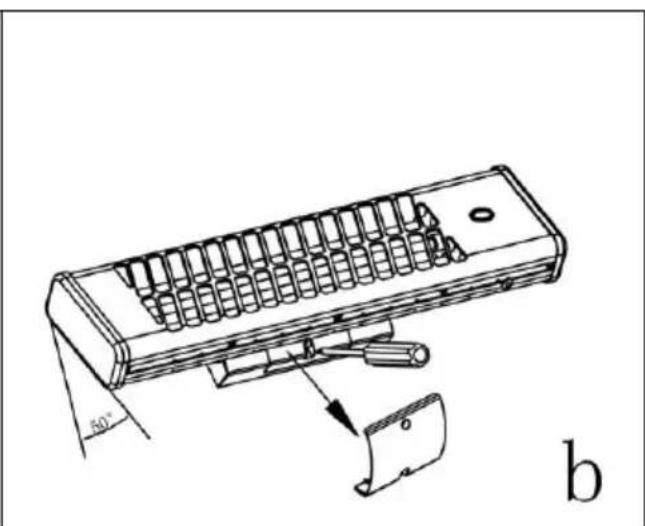
natural_image
Technical line drawing of a mechanical device with a 50-degree angle标注 and a separate view labeled 'b' (no text or symbols on the device itself)
Figuur 3
BELANGRIJK!
natural_image
Exterior view of a portable heating device with a grid of color scheme and a small button (no text or symbols visible)GRATTIS!
TACK FÖR ATT DU VALDE DENNA PRODUKT FRÅN SHX.

INNEHÅLLSFÖRTECKNING
SE
Figur 2
natural_image
Exterior view of a portable heating device with heat sinks and a switch (no text or symbols visible)GRATULUJEME!
DĚKUJEME, ŽE JSTE SI VYBRALI TENTO PRODUKT OD SPOLEČNOSTI SHX.

OBSAH
CZ
Obrázek 2
natural_image
Technical line drawing of a mechanical component with a 50-degree angle标注 (no text or symbols beyond the label)
natural_image
Technical line drawing of a mechanical device with a 50-degree angle标注 and a separate view labeled 'b' (no text or symbols on the diagram itself)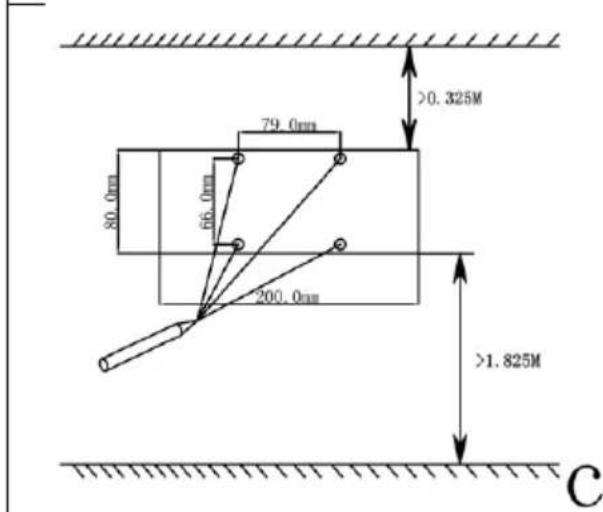

natural_image
Pure electrical circuit lines without any symbols
Obrázek 3
DŮLEŽITÉ!
natural_image
Exterior view of a modern heating water heater with a color grid and control knob (no text or symbols visible)GRATULUJEME!
ĎAKUJEME, ŽE STE SI VYBRALI TENTO PRODUKT OD SPOLOČNOSTI SHX.

OBSAH
SK
Obrázok 2
Vyvrtajte otvory a namontujte:
natural_image
Technical line drawing of a mechanical component with a 50-degree angle标注 (no text or symbols beyond the label)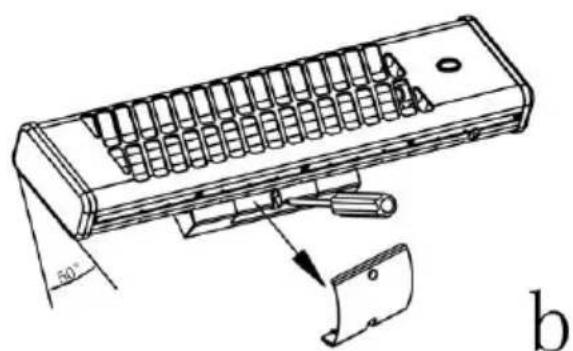
natural_image
Technical line drawing of a mechanical device with a 50-degree angle标注 and a separate view labeled 'b' (no text or symbols on the diagram itself)
natural_image
Pure electrical circuit lines without any symbols
Obrázok 3
DÔLEŽITÉ!
natural_image
Exterior view of a portable heating device with a grid of color scheme and a small button (no text or symbols visible)FELICITĂRI!
VĂ MULTUMIM CĂ AȚI ALES ACEST PRODUS DE LA SHX.

CUPRINS
RO
Figura 2
natural_image
Technical line drawing of a heat exchanger or cooling unit with a 50-degree angle indicator (no text or symbols present)
natural_image
Technical line drawing of a mechanical device with a 50-degree angle indicator and a separate view labeled 'b' (no text or symbols on the device itself)
Figura 3
IMPORTANT!
natural_image
Exterior view of a portable heating device with a grid of color scheme and control knob (no text or symbols visible)CONGRATULATIONS!
THANK YOU FOR CHOOSING THIS PRODUCT FROM SHX.
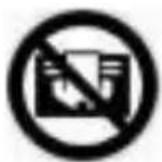
TABLE OF CONTENTS
| Important information on safety, location and electrical connection |
| Recycling, disposal, declaration of conformity |
| Scope of delivery |
| Description of the unit |
| Assembly |
| Commissioning and function |
| Cleaning and maintenance |
| Technical information |
| Warranty |
PLEASE READ THE OPERATING INSTRUCTIONS CAREFULLY BEFORE STARTING ASSEMBLY, INSTALLATION, OPERATION OR MAINTENANCE. PROTECT YOURSELF AND OTHERS BY FOLLOWING THE SAFETY INSTRUCTIONS. FAILURE TO FOLLOW INSTRUCTIONS COULD RESULT IN PERSONAL INJURY AND/OR PROPERTY DAMAGE AND/OR LOSS OF WARRANTY COVERAGE!
Intended use
This unit is splash-proof (IP24). This appliance is intended for heating in covered outdoor areas (e.g. terraces) or indoors. This appliance is suitable for occasional use and not for continuous operation. The appliance is intended for private use, not for commercial use. The unit may only be operated from 220-240 V AC/50-60 Hz (10/16A) earthed sockets.
Any use other than that described above will damage the unit. Furthermore, there is a risk of short circuit, fire or electric shock. The unit must not be converted, opened or modified.
IMPORTANT SAFETY, STANDARD AND ELECTRICAL CONNECTION INFORMATION
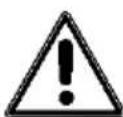
Safety notice
WARNING: This appliance is not equipped with a device to control the room temperature.
WARNING: The heater must not be used in small rooms occupied by persons who cannot leave the room independently unless constant supervision is provided.
WARNING: This appliance is intended exclusively for heating protected outdoor areas and must not be used for any other purpose.
WARNING: Do not spray!

- the unit is not suitable for continuous and precision operation
- Remove the appliance from its packaging and check that it is in perfect condition.
Keep children away from packaging material. There is a danger of choking if swallowed!
- Check whether the voltage supply in your household corresponds to the specification on the radiant heater.
- Check that the power cable and plug are undamaged before using the appliance.
- Always make sure that the appliance is switched off before disconnecting the power cable. Only switch on the appliance with dry hands. Otherwise: Risk of electric shock!
- Do not place flammable objects near the radiant heater and do not point the radiant heater at such objects. In the case of bed linen, paper, clothing and curtains, make sure that the radiant heater is placed or installed frontally at a distance of at least 1 metre. It is better to install the radiant heater to the side or with its back to such objects.
WARNING: Do not place near water (bathtub, pool, etc.).
-
To protect against electric shock, do not immerse the power cord or plug in water or other liquids.
-
Do not insert any foreign objects into the air outlets. Caution: Risk of electric shock/fire or damage!
-
Unplug the appliance when not in use. For the protection of your children, do not let the cable hang over the table.

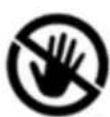
- do not put fingers or foreign objects through the grille during operation.
- Do not leave the appliance unattended.
- Do not use the radiant heater in the bathroom, laundry room or similar areas. Do not place the appliance near a bathtub or other water containers.
- no liability is accepted for damage resulting from failure to observe these operating instructions or from improper use.
- The heater must not be installed directly below a wall socket.
- This appliance must not be used by persons (including children) with physical or mental disabilities unless they are supervised or have been given supervision or instruction concerning use of the appliance by an adult for their own safety.
- Children and other persons in need of assistance must not play with the appliance.
- children younger than 3 years must be kept away from the appliance unless they are supervised at all times.
- children between 3 and 8 years of age may only switch the appliance on and off if they have been supervised or instructed in the safe use of the appliance and understand the resulting dangers, provided that the appliance is placed or installed in its normal position of use.
- connection, regulation, cleaning and user maintenance must not be carried out by children between 3 and 8 years of age. Children must not play with the appliance.
CAUTION: The unit is not intended to be operated with an external timer or a separate remote control system.
-
Always unplug the appliance from the mains when it is not supervised and before cleaning.
-
Allow the appliance to cool down completely before cleaning or storing it. The parts of the radiant heater such as the heating tube, the reflector and the surrounding metal parts can reach temperatures of more than 200^ C. Risk of injury from severe burns! Do not touch hot surfaces!
-
Do not make any changes to the unit. Do not replace the connecting cable yourself.
-
To avoid overloading a circuit, do not operate the radiant heater in a circuit with other appliances.
-
avoid using extension cords as they overheat more easily, creating a fire hazard.
-
The connection cable cannot be replaced. If the cable is damaged, the appliance must be disposed of.
-
Do not lay the connection cable under carpets and do not cover the cable. Make sure that no one can trip over the cable.
-
Do not wrap the connection cable around the unit.
-
Do not use the appliance in direct sunlight or near other heat sources. The appliance should not be exposed to outdoor weather conditions for long periods of time.
-
The minimum distance of the radiant heater to the floor must be 180 cm and to the other sides 40 cm to ensure sufficient distance of persons and animals to the appliance and to avoid burns. The heating element
must not point towards the ceiling, but always towards the zone to be heated.
- Do not cover the radiant heater under any circumstances to avoid overheating.
- Never install the radiant heater so that it can fall into a bathtub or other water container.
- The radiant heater must not be placed next to or on flammable or fusible objects and items such as wood, straw, curtains, furniture, bedding, clothing, paper, plastics, etc.
- Do not use the appliance in areas where petrol, varnish or other flammable liquids are stored.
- The radiant heater is hot when in use. To avoid burns, do not touch the appliance with bare skin.
Warning: The heater is not equipped with a room temperature control.
- When you want to move the radiant heater, always hold it by the stand and let it cool down first.
- If the heating element has been touched, remove fingerprints with a soft cloth and cleaning agent containing alcohol. Burnt-on dirt can cause malfunctions.
- Do not operate the radiant heater with wet or damp hands.
- Use of the appliance is not recommended for persons with reduced sensitivity to heat.

- extreme caution is required when the heater is used by or near children or impaired persons and whenever the heater is operated and left unattended.
- Do not leave the switched-on radiant heater unattended. When the radiant heater is not in use, unplug it.
- If there is visible damage to the appliance, do not use it.
ATTENTION | RISK OF INJURYThe unit becomes hot during operation!Never touch the appliance during operation→ this could cause serious BURNS. |
ATTENTION | FIRE HAZARDThe unit must not be covered during operation! |
ATTENTION | SAFETY DISTANCEKeep a safe distance of at least one metre from easily inflammable objects such as furniture, curtains, paper, etc.!LOCATIONAlways position the appliance so that the air can flow in and out unhindered.RISK OF BURNSThe appliance becomes very hot during use and can cause burns. Special care should be taken when children and vulnerable persons are present.RISK OF OVERHEATING |
Symbols on the unit
Symbol :
Meaning:
Attention! Do not cover! The symbol on the unit indicates that it is not permitted to hang objects (e.g. towels, clothes, etc.) above the unit or directly in front of it. The heater must not be covered to avoid overheating and fire hazard!
Recycling, disposal, declaration of conformity
 | RECYCLINGThe packaging materials can be recycled. Therefore, it is recommended to dispose of them in sorted waste. |
 | DISPOSALThe symbol "crossed-out dustbin" requires the separate disposal of waste electrical and electronic equipment (WEEE). Electrical and electronic equipment may contain hazardous and environmentally dangerous substances. Therefore, do not dispose of this in unsorted residual waste, but at a designated collection point for waste electrical and electronic equipment. By doing so, you will contribute to the protection of resources and the environment. For more information, please contact your dealer or local authorities. Directive 2012/19/EU |
 | DECLARATION OF CONFORMITYWe hereby confirm that this article complies with the basic requirements, regulations and directives of the EU. You can view the detailed declaration of conformity at any time under the following link:https://www.schuss-home.at/downloads |
Errors and technical modifications excepted.
Scope of delivery
- Radiant heater
- Operating instructions
■ Mounting accessories
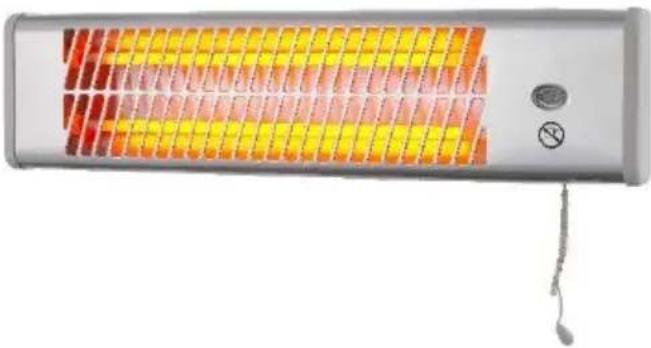
Description of the unit
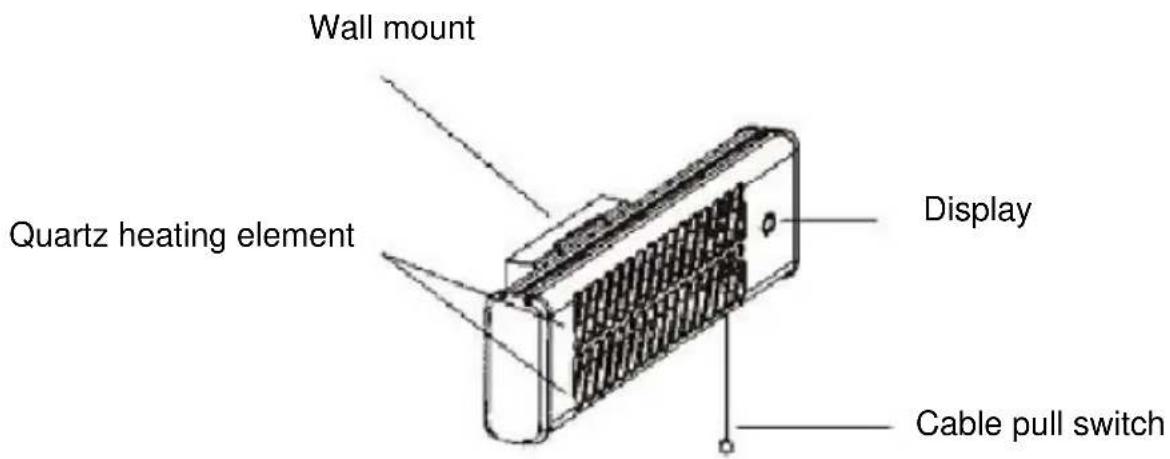
Figure 1
Assembly
The heater may only be mounted on the wall and operated in perfect condition.
Choose the right location:
- Do not place the heater directly under a power socket.
- The heater must be installed at least 1.8 metres above the floor.
- The heater must be installed at least 0.3 metres from the ceiling and 0.5 metres from the adjacent wall.
- If the heater is installed in a bathroom, the switches and controls must not be touched or within reach of the user in the bath or shower. The heater should be installed at least 1.0 metre away from the bathtub / shower.
- Do not place the heater so that it blows hot air directly onto walls or neighbouring objects.
- Position the heater according to the distances shown in figure 2 below.
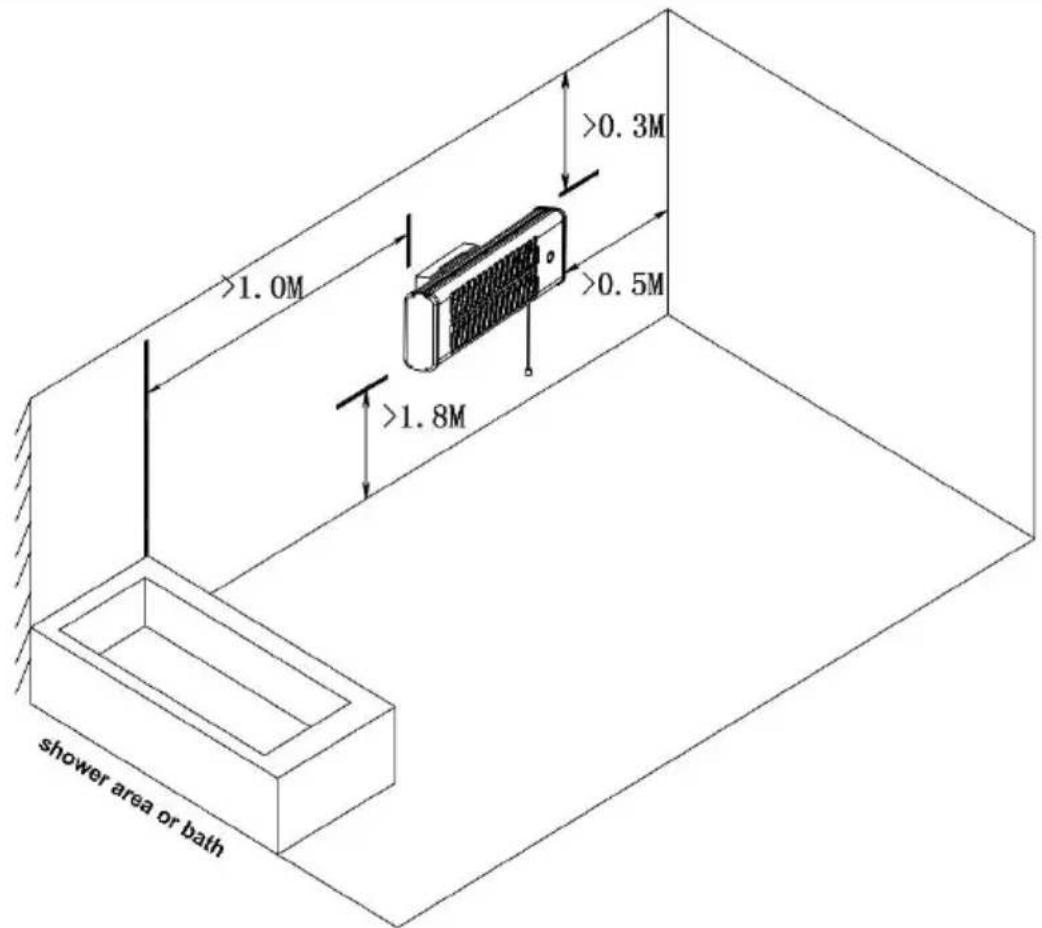
Figure 2
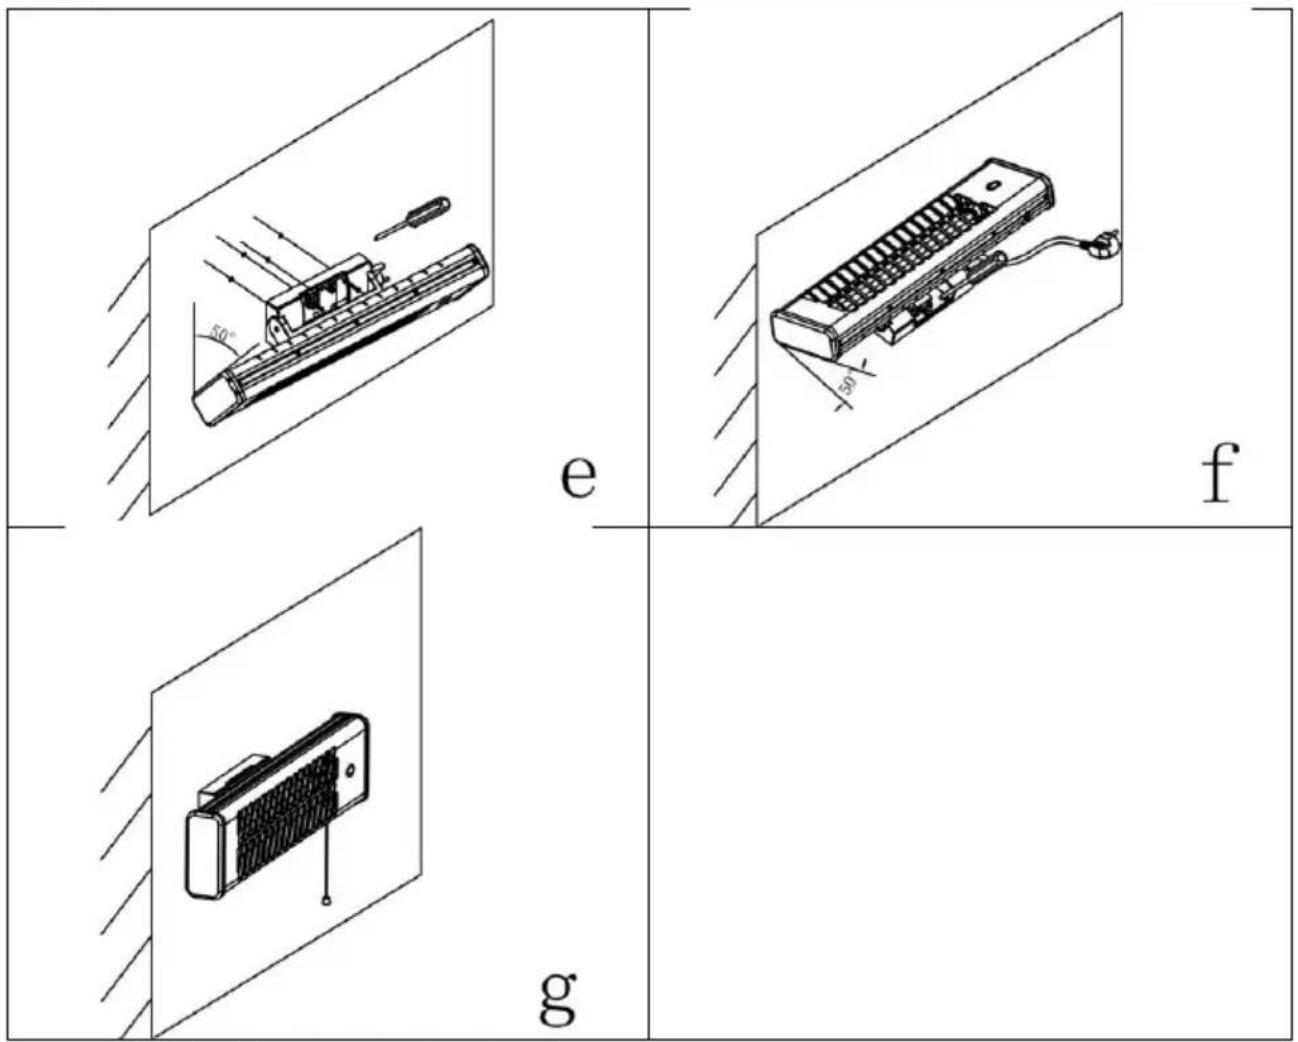
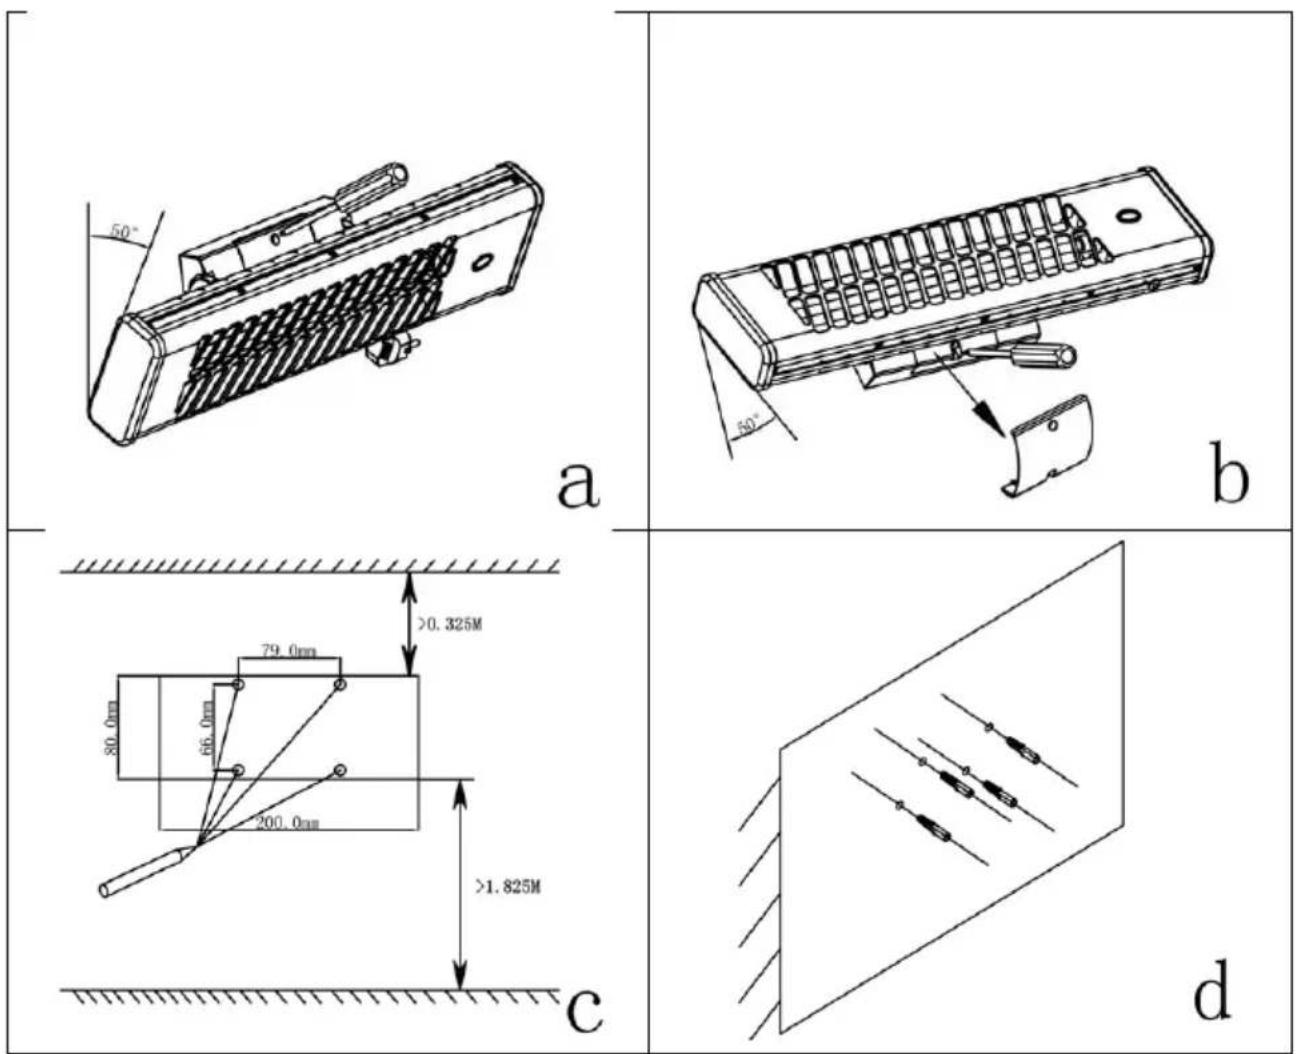
Drill holes and mount:
- Loosen and remove the screws on the top and bottom of the wall bracket (see figure 3a and 3b). Remove the wall bracket cover from the top of the heater. (See figure 3b).
- When the correct position is chosen, unfold the paper template measured against the product.
- Place the paper template according to the required height above the floor, i.e. at least 1.82 metres above the floor and at least 0.32 metres from the ceiling. (See figure 3c)
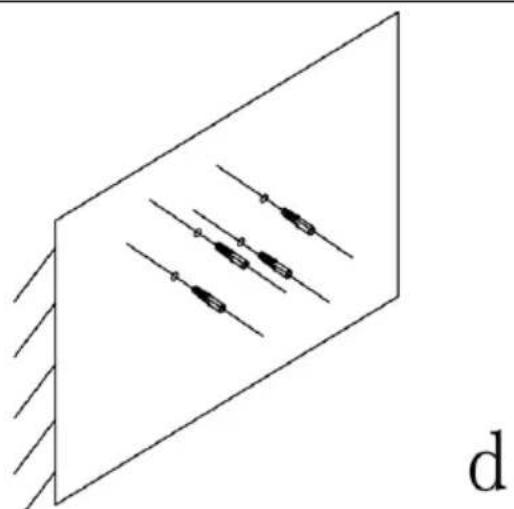
- Punched four holes on the paper template to take the drill holes for the wall bracket. Mark a cross in the centre of the hole to make the drilling more precise. (See figure 3c)
- Now remove the paper template and drill four holes in the cross with a drill bit with a diameter of 8 mm.

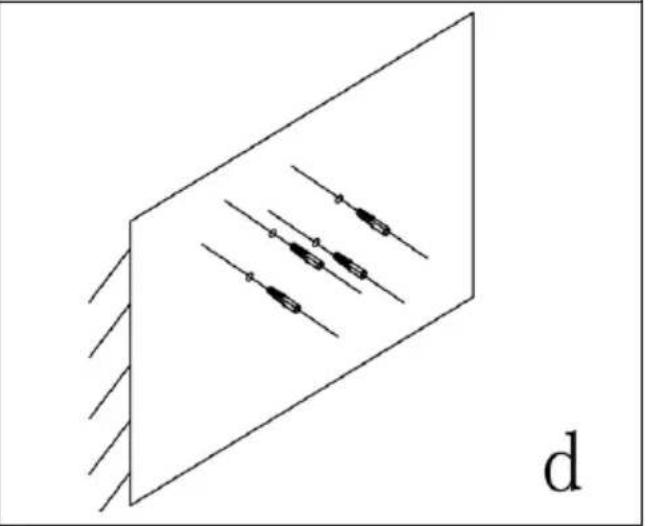
- Insert the four plastic pins supplied into the holes (see figure 3d).
- Hold on to the wall bracket and align the heater so that the grille faces you. Fold the heater all the way down. Fix the wall bracket and the heater to the wall by inserting the two screws provided through the two holes at the top of the wall bracket using a screwdriver. (See figure 3e). It is recommended to use a shorter screwdriver to get into the space between the wall bracket more easily.
- Swing the heater all the way up on the wall and then tighten it with the two screws on the bottom of the wall bracket. Now the heater is securely attached to the wall. (See figure 3f)
- Swivel the heater to the middle of its path. Replace the wall bracket cover from the top.
- Secure the cover with two screws.

natural_image
Technical line drawing of a mechanical component with a 50-degree angle标注 (no text or symbols beyond the label)
natural_image
Technical line drawing of a mechanical device with a 50-degree angle and a separate view labeled 'b' (no text or symbols on the diagram itself)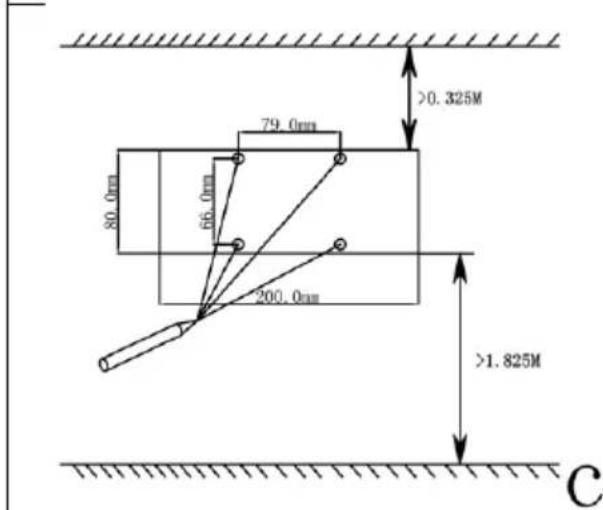

natural_image
Pure electrical circuit lines without any symbols

Figure 3
IMPORTANT!
During installation, special care must be taken not to touch the heating elements, as grease residues could be left on the heating rods, which would impair the heat radiation. After installing the heater, the mains cable must not touch the metal housing when in use.
Commissioning and function
NOTE: When the heater is switched on for the first time or when you switch it on after a long period of non-use, it is normal for the heater to give off some odour and fumes. This disappears when the heater has been in use for a short time.
Connect the heater to a power source with the same voltage, frequency and power as specified on the product's rating plate.
Pull the pull switch down to the position:
"0" to switch off the heating;
"1" for a heating power of 600 W;
"2" for 1200 W heating power
The position can be checked on the display (see figure 1).
ATTENTION
Do not place any objects on the radiant heater, such as clothes or towels.
Do not use this appliance near bathtubs, shower trays or other vessels containing water.
The housing of the unit is hot during operation!
Avoid any physical contact, it can cause serious injury. Allow the unit to cool down sufficiently before moving it to another location, cleaning it or touching it.
Cleaning and maintenance
The outside of the appliance must be cleaned regularly. Before cleaning, unplug the appliance and wait until it has cooled down completely.
- Clean the grilles from dust.
- Clean the unit with a moderately damp cloth.
- Never use harsh and abrasive cleaning agents, pot cleaners or steel wool, which will damage the appliance.
This appliance must not be disposed of with household waste at the end of its service life, but must be taken to a central collection point for the recycling of electrical and electronic household appliances!
TECHNICAL INFORMATION
| Item number: | SHX70HS1200 |
| Input voltage: | 220-240 V |
| Frequency: | 50-60 Hz |
| Max. Power: | 1200 W |
| Setting options | 0 - 600 - 1200 W |
| Protection class: | IP24 |
| Weight: | 1,2 kg |
| Dimensions: | 538 x 115 x 130 mm |
| Contact address for further information: | Schuss Home Electronic GmbHScheringgasse 3, A-1140 ViennaService line: +43 (1) 97 0 21www.schuss-home.at / www.shx.atFB-No: 236974t / FB-Court:Vienna |
Required information on electric single room heaters
| Item number SHX70HS1200 | ||||||
| Indication | Symbol | Value | Unit | Indication | Unit | |
| Heat output | Only for electric storage room heaters:Type of heat supply control | |||||
| Nominal heat output | P_nom | 1,20 | kW | Manual control of the heat supply with integrated thermostat | No | |
| Minimum heat output (guide value) | P_min | 0,60 | kW | Manual control of the heat supply with feedback of the room and/or outside temperature | No | |
| Maximum continuous heat output | P_max,c | 1,20 | kW | Electronic control of the heat supply with feedback of the room and/or outside temperature | No | |
| Auxiliary power consumption | Heat output with fan support | No | ||||
| At Nominal heat output | el_max | 0,000 | kW | Type of heat output/room temperature control | ||
| At Minimum heat output | el_min | 0,000 | kW | Single-stage heat output, no room temperature control | No | |
| At Standby mode | el_sB | 0,000 | kW | Two or more manually adjustable levels, no room temperature control | Yes | |
| Room temperature control with mechanical thermostat | No | |||||
| With electronic room temperature control | No | |||||
| Electronic room temperature control and time-of-day control | No | |||||
| Electronic room temperature control and weekday regulation | No | |||||
| Other regulatory options | ||||||
| Room temperature control with presence detection | No | |||||
| Room temperature control with open window detection | No | |||||
| With remote control option (WiFi) | No | |||||
| With adaptive control of the heating start | No | |||||
| With operating time limit | No | |||||
| With black ball sensor | No | |||||
| Contact details: | Schuss Home Electronic GmbH Scheringgasse 3 - 1140 Vienna -Austria https://www.schuss-home.at/ | |||||
GUARANTEE
With this quality product from SHX, you have made a decision for innovation, durability and reliability.
For this SHX unit we grant a warranty period of 2 years from the date of purchase valid in Austria and Germany! If, contrary to expectations, service work should nevertheless be necessary on your device during this period, we hereby guarantee to repair the device free of charge (spare parts and labour) or (at the discretion of Schuss) to exchange the product. Should neither repair nor exchange be possible for economic reasons, we reserve the right to issue a credit note for the current value.
In any case, please contact the customer hotline as a first step (see instruction manual - "Contact addresses for further information and service line").
We would like to point out that repair work which has not been carried out by authorised contract workshops will immediately terminate the validity of this guarantee.
This warranty does not cover:
- Damage due to non-observance of the operating instructions
• Repair or replacement of parts due to normal wear and tear
• Devices that are used - even only partially - for commercial purposes - Mechanically damaged equipment due to external influence (fall, impact, breakage, improper use, etc.) as well as wear and tear of an aesthetic nature.
• Equipment that has been improperly handled - Units that have not been opened by our authorised service workshop
• Consumer expectations not met - Damage attributable to force majeure, water, lightning, overvoltage
- Units where the type designation and/or serial number on the unit has been altered, erased, made illegible or removed.
• Defects due to extraordinary pollution - Services outside our authorised workshops, the transport costs to an authorised workshop or to us and back, as well as the associated risks.
We expressly point out that within the warranty period, a lump sum of € 60 (indexed basis CPI 2015, June 2020) will be charged in the event of operating errors or if no error was detected.
By providing a warranty service (repair or replacement of the unit), the absolute<
Warranty period of 2 years from date of purchase not extended.
The 2-year warranty is only valid on presentation of the purchase receipt (name and address of the dealer as well as the complete designation of the unit must be included) and the corresponding warranty certificate, on which the type of unit as well as the serial number (visible on the box and on the back or bottom of the unit) must be noted! Without the guarantee certificate, only the legal guarantee applies!
We expressly point out that the statutory warranty rights are not affected by this guarantee and continue undiminished.
Schuss Home Electronic GmbH and its vicarious agents shall only be liable for damages in the event of gross negligence or intent. Liability for loss of profit, expected but not realised savings, consequential damage and damage from third party claims is excluded in any case.
You will find the contact address of the respective service workshop on our homepage www.schuss-home.at.
Congratulations on your choice. We wish you much pleasure with your SHX unit!
ADDRESS
SHX Distribution
Schuss Home Electronic GmbH
A-1140 Wien, Scheringgasse 3
Tel.: +43 (0)1/ 970 21
Type designation:
Serial number:

INSTRUKCJA OBSŁUGI
Grzejnik ścienny
SHX70HS1200
natural_image
Exterior view of a portable heating device with a grid of color scheme and a small button (no text or symbols visible)GRATULACJE!
DZIEKUJEMY ZA WYBÓR TEGO PRODUKTU FIRMY SHX.

SPIS TREŚCI

Rysunek 2
natural_image
Technical line drawing of a mechanical component with a 50-degree angle标注 (no text or symbols beyond the label)
natural_image
Technical line drawing of a mechanical device with a 50-degree angle标注 and a separate view labeled 'b' (no text or symbols on the diagram itself)

natural_image
Pure electrical circuit lines without any symbols

Rysunek 3
WAŻNE!
natural_image
Exterior view of a portable heating device with a grid of color scheme and a small button (no text or symbols visible)ČESTITAMO!
HVALA, KER STE IZBRALI TA IZDELEK IZ SHX.

KAZALO VSEBINE
Slika 2
Izvrtajte luknje in jih namestite:
natural_image
Exterior view of a portable heating device with a grid of color scheme and a small button (no text or symbols visible)ČESTITAMO!
HVALA VAM ŠTO STE KUPILI OVAJ SHX PROIZVOD.

SADRŽAJ
HR
Slika 2
Izbušite i montirajte rupe:
- Otpustite i uklonite vijke na vrhu i dnu zidnog nosača (pogledajte sliku 3a i 3b). Uklonite poklopac zidnog nosača s vrha grijača. (Pogledajte sliku 3b).
- Kada odaberete pravo mjesto, rasklopite papirnati predložak u odnosu na proizvod.
- Papirnatu šablonu postavite prema potrebnoj visini iznad poda, odnosno najmanje 1,82 metra od poda i najmanje 0,32 metra od stropa. (Pogledajte sliku 3c)
- Četiri rupe su probušene na papirnatom predlošku za smještaj rupa za zidni nosač. Označite križ u sredini rupe kako bi bušenje bilo preciznije. (Pogledajte sliku 3c)
- Sada skinite papirnatu šablonu i izbušite četiri rupe u križu svrdlom promjera 8 mm.
- Umetnite četiri isporučene plastične igle u rupe (pogledajte sliku 3d).

- Držite zidni nosač i postavite grijač tako da je rešetka okrenuta prema vama. Preklopite grijač do kraja. Pričvrstite zidni nosač i grijač na zid umetanjem dva priložena vijka kroz dvije rupe na vrhu zidnog nosača pomoću odvijača. (Pogledajte sliku 3e). Preporučljivo je koristiti kraći odvijač kako biste lakše ušli u otvor zidnog nosača.
- Zakrenite grijač do kraja prema gore i zatim pritegnite dva vijka na dnu zidnog nosača. Grijalica je sada sigurno pričvršćena na zid. (Pogledajte sliku 3f)
- Zakrenite grijač prema središtu njegovog hoda. Vratite poklopac zidnog nosača odozgo.
- Pričvrstite poklopac s dva vijka.


Slika 3
VAŽNO!
Tijekom sastavljanja posebno treba paziti da se ne dodiruju grijaći elementi jer bi se na grijaćim šipkama mogli ostaviti ostaci masti koji bi umanjili toplinsko zračenje. Nakon postavljanja grijača, kabel za napajanje ne smije dodirivati metalno kućište kada je u uporabi.