Sky 4K - Drone Prixton - Free user manual and instructions
Find the device manual for free Sky 4K Prixton in PDF.

User questions about Sky 4K Prixton
0 question about this device. Answer the ones you know or ask your own.
Ask a new question about this device
Download the instructions for your Drone in PDF format for free! Find your manual Sky 4K - Prixton and take your electronic device back in hand. On this page are published all the documents necessary for the use of your device. Sky 4K by Prixton.
USER MANUAL Sky 4K Prixton
natural_image
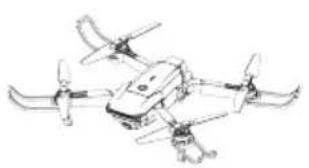
Line drawing of a quadcopter drone with four propellers and a central body (no text or symbols)DRONE MINI
CONOZCA SU DRON
text_image
Technical diagram of a multi-rotor drone with numbered components for identification① Carcasa superior
⑤ Brazo plegable
② Carcasa inferior
⑥ Batería
③ Hélice
⑦ Motor
natural_image
Line drawing of a quadcopter drone with four propellers and a pilot (no text or symbols)natural_image
Line drawing of a four-bladed drone with four propellers (no text or symbols)3. MONTAJE DE LAS PROTECCIONES
natural_image
Mechanical component diagram showing a lever mechanism with red arrows indicating motion (no text or symbols)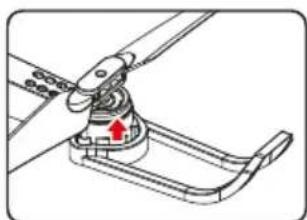
natural_image
Mechanical assembly diagram showing a lever mechanism with a red arrow indicating motion direction (no text or symbols)natural_image
Mechanical assembly diagram showing a turning tool interacting with a rotating fan or propeller (no text or symbols visible)natural_image
Technical diagram of a vehicle air intake manifold with a red arrow indicating a component (no text or symbols present)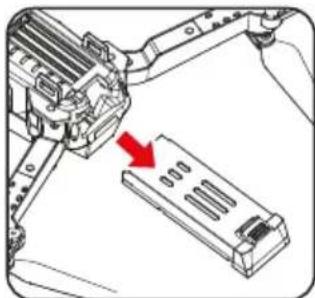
natural_image
Mechanical assembly diagram showing a lever interacting with a multi-chamber battery pack (no text or symbols visible)natural_image
Diagram showing two connected devices with red connectors, no text or symbols presentNOTA:
text_image
Diagram of a Drones 3D controller with numbered ports and labeled buttons for signal processing.natural_image
Diagram of a device with two antennas and a screwdriver, showing a red circular arrow indicating rotation (no text or symbols present)text_image
15V "AA" 15V "AA" 15V "AA"natural_image
Technical diagram showing two views of a device with circular components and directional arrows indicating motion (no text or symbols)natural_image
Top-down line drawing of a car front with no text or symbolsINICIAR EL VUELO
natural_image
Technical line drawing of a device casing with circular components and a red arrow indicating a specific point (no text or symbols present)natural_image
Diagram of a drone with directional arrows indicating flight or movement (no text or symbols)text_image
Diagram of a Drones device with labeled ports and directional arrows indicating control signals.text_image
Diagram of a drone with labeled directional arrows and numbered parts, likely illustrating flight or movement directions.NOTA:
text_image
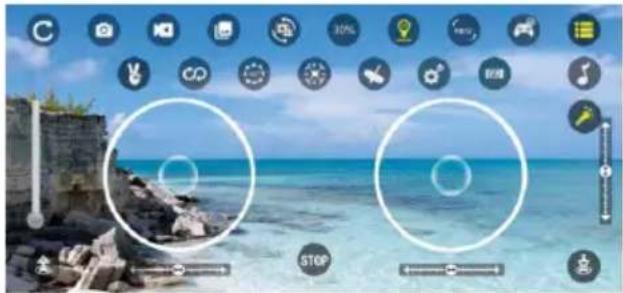
Screenshot of a digital interface with circular icons and status bar, featuring two circular target windows over a coastal scene.With a 2.4G frequency band for a long remote control distance, the drone allows multiple flights at the same time without any interference. Users can control it to fly, hover, and take photos/videos with the APP and WIFI connection on a smartphone

text_image
Technical diagram of a multi-rotor drone with numbered components for identification① Upper Casing
⑤ Arm
② Lower Casing
⑥ Battery
③ Propeller
⑦ Motor
④ Protective Guard
⑧ Camera
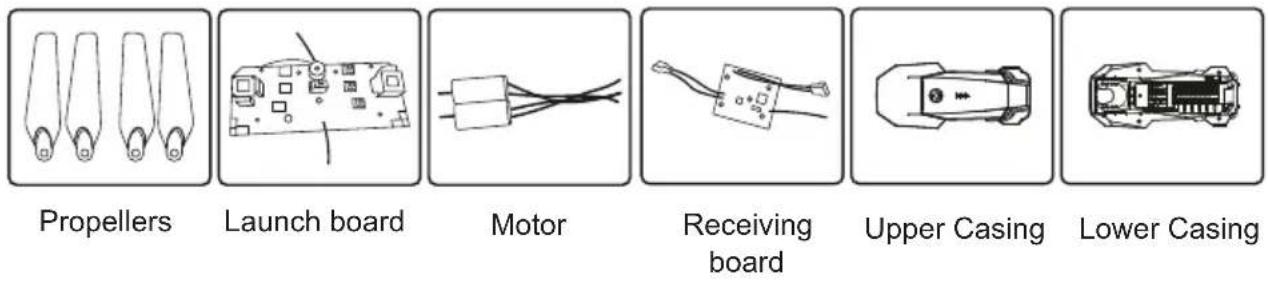
ACCESSORIES
natural_image
Line drawing of a quadcopter drone with propellers and control unit (no text or symbols)DRONE x1 (Battery Included)

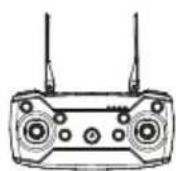
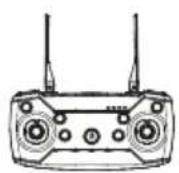
Remote Control x1
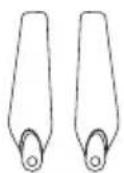
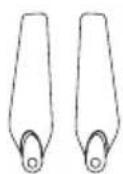
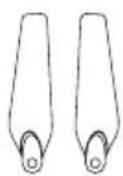
Backup Propellers x2
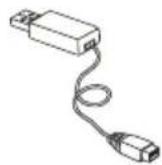
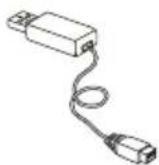
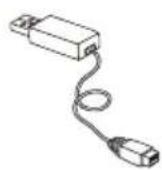
USB Charger x1
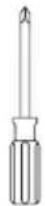
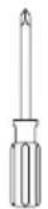
Screwdriver x1

User Manual x1
NOTES:
Please check the number of accessories carefully (as shown above). Please provide proof of purchase and contact the store for replacement of any missing parts.
OPTIONAL ACCESSORIES LIST
natural_image
Two technical illustrations: one showing a rectangular electronic component with internal slots, the other displaying four U-shaped metal brackets (no text or symbols)Battery
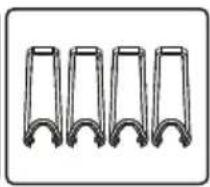
Protective Guard
NOTES:
If any of the above accessories are damaged during operation, you can contact the seller to purchase.
PRE-FLIGHT PREPARATION
1. FLIGHT ENVIRONMENT
Indoor : Spacious spaces away from barriers, crowds or pets are preferred.

Outdoor: Sunny, windless and breezy weathers are preferred.


Please keep the drone in sight during the flight and keep it away from barriers, high-tension cables, trees, and people.
Do not fly in extreme environments such as hotness, coldness, strong wind, or heavy rain.
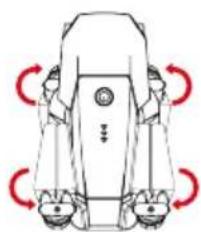
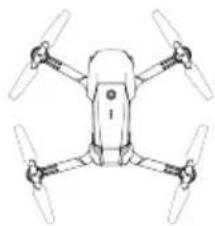
2. OPEN THE WINGS
OPENING STEPS
① Open the front arm (close to the camera)
Open the back arm
② Fold the back arm firstly and then the front arm when folding.
natural_image
Diagram of a robotic device with red curved arrows indicating rotational motion (no text or symbols)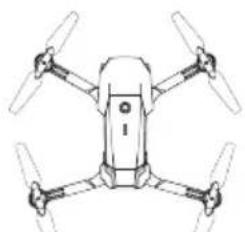
natural_image
Line drawing of a four-blade drone with no text or symbolsOpening arm
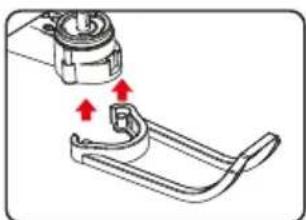
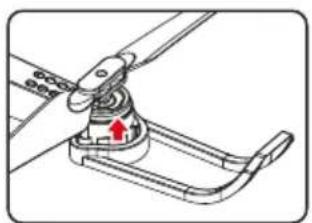
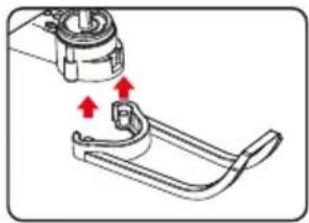
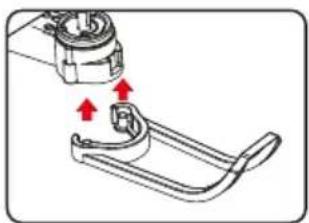
3. ASSEMBLNG PROTECTIVE GUARD

natural_image
Mechanical assembly diagram showing a clamp or bracket with red arrows indicating motion (no text or symbols)① Align the protective guard with the two holes below.
natural_image
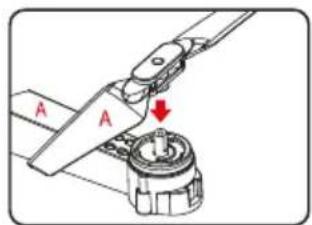
Mechanical assembly diagram showing a lever mechanism with a red arrow indicating motion direction (no text or symbols)② Press firmly on the arrow position.
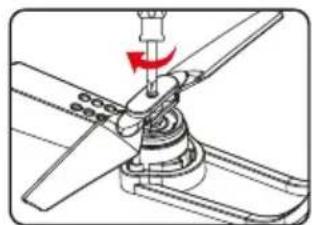
4. ASSEMBLING PROPELLERS
text_image
A A① Correspond the Propellers with the hex nuts of the crankshaft (The arm identification is consistent with the Propellers identification)
natural_image
Mechanical assembly diagram showing a turning tool interacting with a rotating component (no text or symbols visible)② Tighten the screws clockwise.
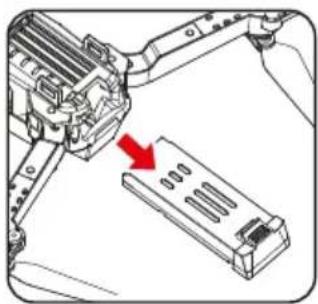
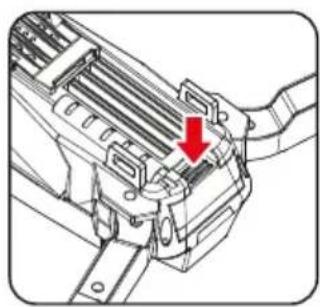
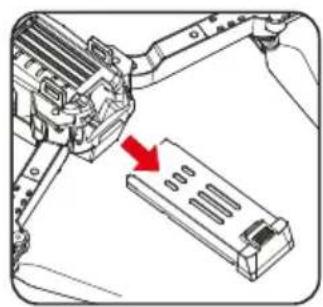
5. BATTERY CHARGING FOR DRONE
natural_image
Technical line drawing of a mechanical component with a red arrow indicating a specific feature (no text or symbols present)A. Remove the lithium battery from the bottom of the drone.
natural_image
Mechanical assembly diagram showing a robotic arm interacting with a multi-chamber device (no text or symbols visible)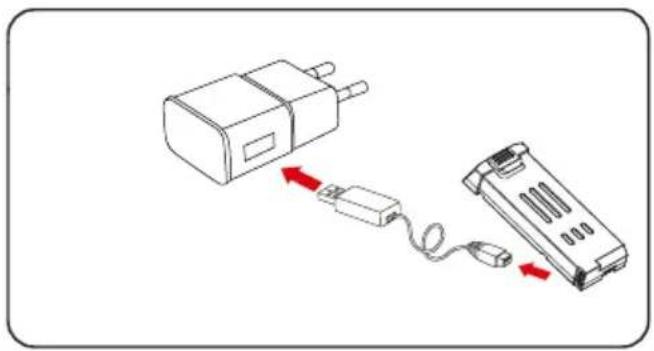
natural_image
Diagram showing a device connected to a battery pack with red arrows indicating connection (no text or symbols present)BATTERY INSTRUCTIONS
There is a certain risk when using lithium batteries.
NOTES:
LED lights turn red when charging and it will turn green when full charging completes. The charging time is about 150 minutes. The usage time is about 6 minutes.
It may cause fire, body injury, or property loss. Users must be aware of the risks and take full responsibility for using batteries improperly.
- If battery leakage occurs, please avoid contacting your eyes or skin with electrolytes. Once it happens, please wash your eyes with clean water and seek medical care immediately.
- Please remove the plug immediately if you sense any peculiar smell noise or smog.
Battery Charging
- Please use the charger from the original factory to ensure your safe usage.
- Do not charge the dilatant or outworn battery.
- Do not overcharge the battery. Please unplug the charger once fully charged.
- Do not charge the battery next to inflammable, such as carpet, timber floor, or wood furniture, or on the surface of electro-conductive objects. Please always keep an eye on the battery when charging.
- Do not charge battery which not cool down yet.
• The charging temperature should be between 0°C to 40C
Battery Recycling
- Do not dispose of the battery as daily rubbish. Please familiarize yourself with the local garbage disposal method and dispose of it according to the special requirement.
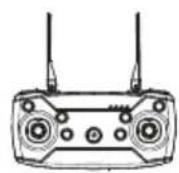
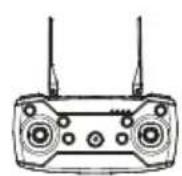
KNOW YOUR REMOTE CONTROL
- Parts of remote control

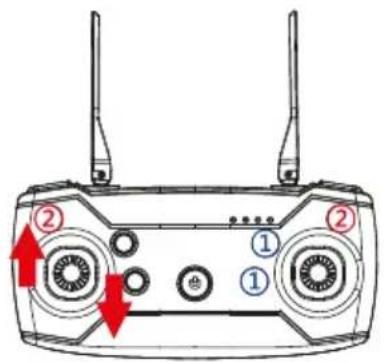
text_image
Diagram of a Drones 3D controller with labeled ports and wiring, showing front and side views with numbered labels.① Antenna
② Left side fly fine-tuning
③ Left joystick
④ One-key Ascend
⑤ One-key Landing
⑥ Power switch
⑦ Backward fine-turning
⑧ Forward fine-tuning
⑨ Right joystick
⑩ Right side fly fine-tuning
⑪ Headless Mode
⑫ High/low speed
⑬ One-key Flips&Rolls
⑭ One-key calibration
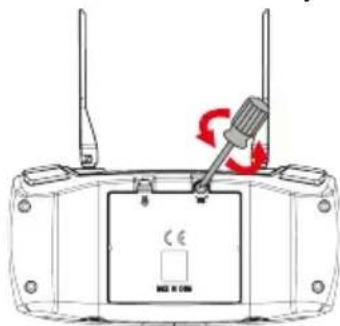
LITHIUM BATTERY INSTRUCTION
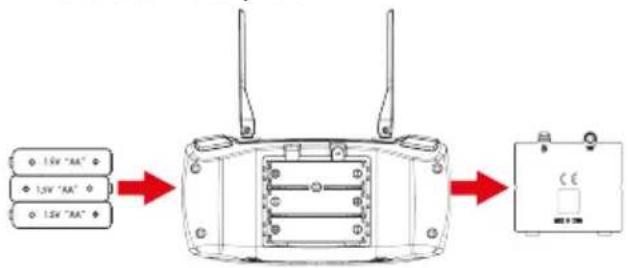
- Open the remote control battery cover
natural_image
Diagram of a device with two antennas and a screwdriver, showing a red circular arrow indicating rotation (no text or symbols present)- Remote control battery installation
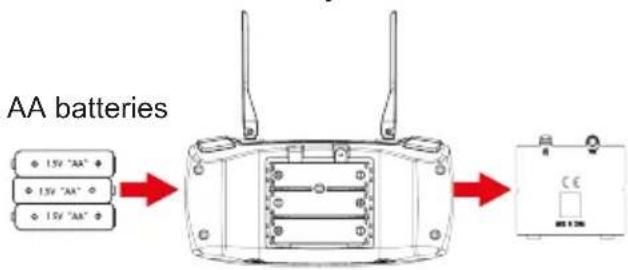
text_image
AA batteries 15V "AA" 15V "AA" 15V "AA"Open the battery cover and insert the 3 AA batteries correctly according to the electrode instructions. (Batteries not included)
NOTES:
- Make sure the battery are loaded correctly according to the polarity indications on the battery compartment.
- Please do not mix old and new batteries together.
- Please do not mix different types of batteries together.
SIGNAL CONNECTION OF TRANSMITTER AND RECEIVER
- Turn on the drone and place it on a level surface, the indicator light of the transmitter and the LED of the drone flashing.
- Push the throttle joystick to the highest point then push back to the lowest point, and when you hear two beeps, the indicator light of the transmitter and the LED of the drone become normally on, and the signal connection is completed.
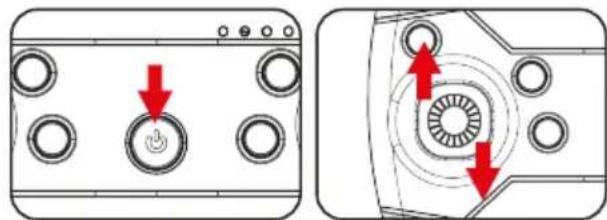
TRANSMITTER CALIBRATION
natural_image
Two technical diagrams showing a device with circular ports and directional arrows indicating motion or force (no text or symbols present)Apply transmitter calibration when the drone fails to take off vertically. Press the "One button calibration" button when the lights of the drone are on and then start flashing and keep it on again, the calibration is complete, and the drone must be placed on a horizontal surface in a steady state when the calibrations are conducted.
natural_image
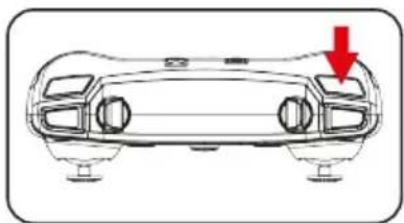
Front view of a car chassis with a red arrow indicating downward motion (no text or symbols)START YOUR FLIGHT
1. One-key Ascend
Press the "One-key Ascend" button, the drone blades rotate and automatically fly to a height of 1.5 meters.
natural_image
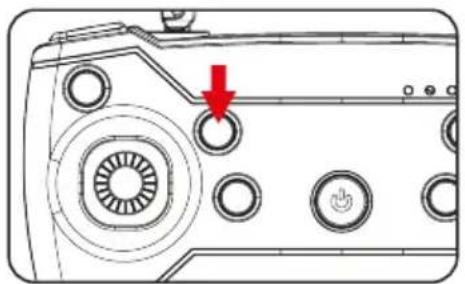
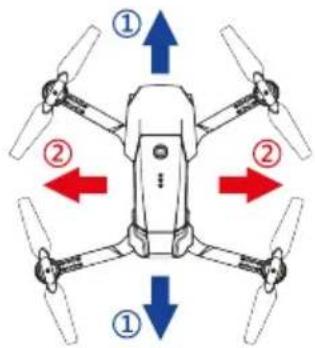
Diagram of a device's front panel with circular buttons and a red arrow pointing to a button (no text or symbols)2. Basic Flight
Use the left joystick to control the flight altitude and turn left/right, and the right joystick to control the forward, backward, left and right side flight directions.
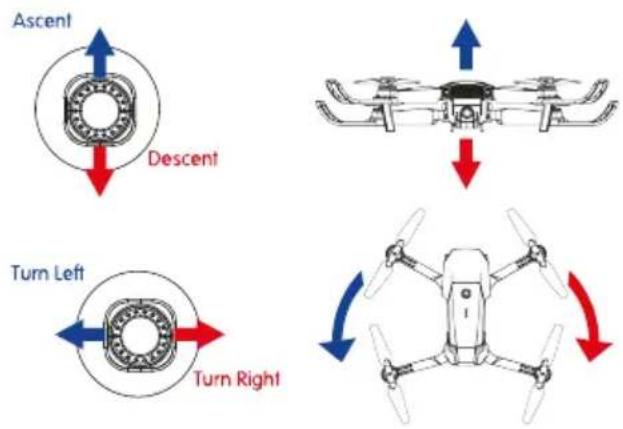
text_image
Ascent Descent Turn Left Turn RightRight joystick
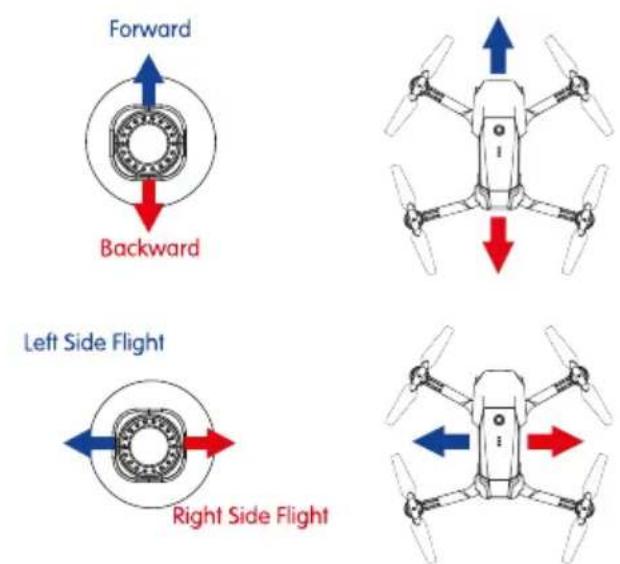
text_image
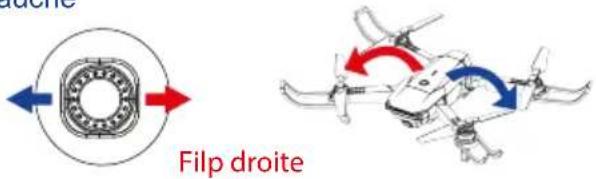
Forward Backward Left Side Flight Right Side FlightFlips & Rolls
When the drone is reaching more than 3 meters high, click "360° flips and rolls" and move the right joystick to a certain direction, the drone will rotate in that direction.
Right joystick
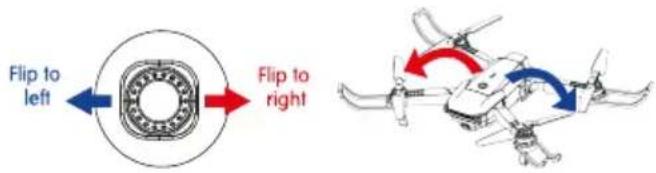
text_image
Flip to left Flip to rightHeadless Mode
The flight direction of the drone is subjected to the direction of remote control.
-
When the drone adjusts the frequency, the drone is default to common mode. Then the indicator light of the drone is normally on. When you press the headless function key of the remote control, the remote control beeps once and enters a headless state. When you press the headless function key again, you listen to a long beep sound and the drone exits the headless mode.
-
In the headless state, the operator doesn't need to identify the direction of the nose but control the drone according to the operating level of the remote control.
Hover
When you release the left joystick (throttle) after the ascent/descent action, the drone will hover at a certain height.
Left joystick
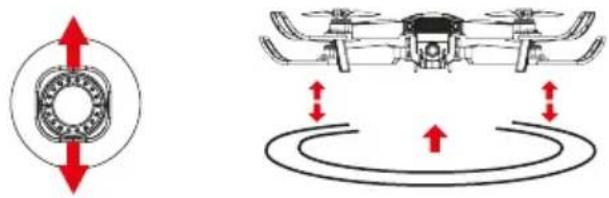
natural_image
Diagram showing a mechanical component with red directional arrows and a drone above its body, no text or symbols present.FINE-TUNING FUNCTION
When deviating from course, click "Fine-tuning" for calibration until the drone is back to normal.
text_image
Diagram of a Drones device with labeled ports and directional arrows indicating movement or control points.
Forward/Backward Fine-tuning

Left/Right Side Fly Fine-tuning
text_image
Diagram of a drone with labeled directional arrows and numbered parts, likely illustrating flight or movement directions.NOTES:
When the drone is within 30cm from the ground, it will be affected by the blade vortex made by itself and become unstable. This is the “ground effect”. The lower this drone is. The greater the effect will be.
FAQ
| PROBLEMS | CAUSES | SOLUTIONS |
| Control failure | Not connect with the quadcopter battery. | Connect the quad-copter battery in right way. |
| Too strong wind force. | Do not fly on windy days. The performance and the control of the quad-copter will be affected by the strong winds. | |
| Fail to ascend | The rotation speed of main blades is too slow. | Push up the throttle joystick. |
| The battery of the quadcopter is not fully charged. | Please full charge the quadcopter. | |
| Landing too soon | The throttle stick is pulled down too fast. | Pull down the throttle stick slowly to perform a smooth landing. |
| Out of control | Beyond the effective controlling distance. | Ensure operation within the controllable distance : remote control of 100 meters and WIFI control of 40-50 meters. |
Download and install mobile App
- Search "RC FPV" in "app store" or "Google Play" to download and install.
- Scan the QR code below to download and install.

Connection settings:
- Connect the power supply of the module, and the indicator light starts to flash, which indicates that the mobile phone is waiting to be connected.
- Open the mobile phone settings option, start WiFi, and search "WiFi_***" in the search list, click Connect until connected appears, which means the connection is successful.
- Open the software and click the "Start" icon to enter the real-time image transmission interface.
text_image
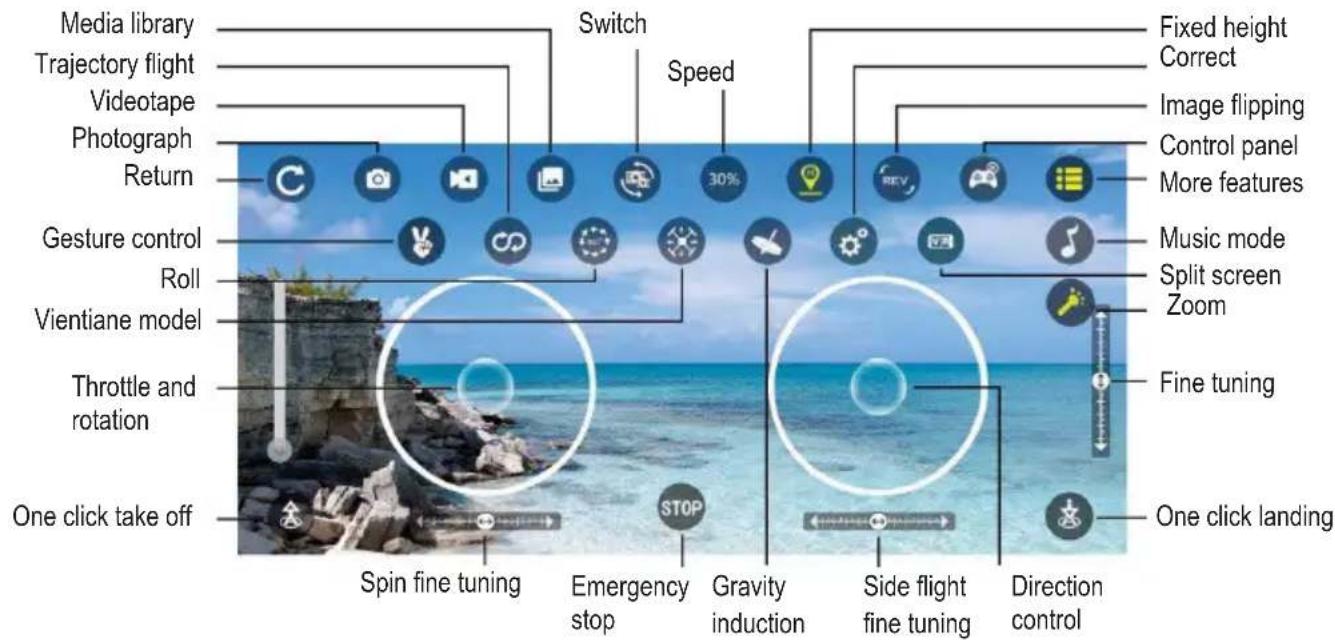
Mobile camera interface screenshot showing two circular target windows over a coastal scene with UI icons and control buttonsRC FPV Function description
text_image
Media library Trajectory flight Videotape Photograph Return Gesture control Roll Vientiane model Throttle and rotation One click take off Spin fine tuning Switch Speed 30% Fixed height Correct Image flipping Control panel More features Music mode Split screen Zoom Fine tuning One click landing Spin fine tuning Emergency stop Gravity induction Side flight fine tuning Direction controlWarranty Policy
This product complies with the warranty law in force in the country of purchase. When you have a problem that you can not solve, you must access the web www.prixton.com and click on the contact option to send us your assistance form.
These technical and electrical specifications are those of typical units and may be changed without prior notice in order to provide improved equipment.
Simplified EU Declaration of Conformity
We, La Trastienda Digital located in Avenida Cervantes 49, módulo 25, Basauri 48970, Bizkaia hereby declare that the following goods, imported and selling at European market:
| BRAND | MODEL DESCRIPTION | CATEGORY | |
| PRIXTON | SKY 4K | DRONE MINI | LEISURE |
Are in compliance with the EC Council Directive of 2014/53/EU (EM DIRECTIVE) and harmonized standards and with the board of the 16th of April 2014.
The complete text of the UE Declaration of conformity is available anytime at this website address:
www.prixton.com
LA TRASTIENDA DIGITAL
Note: The maximum RF power is 14 dB.
Note: The purpose of motor overheat protection is to take protective measures in the design, manufacture, installation and use of the motor. In the design, manufacture, installation and use of the motor. When the motor is operated under certain load and overheating conditions, it shall stop running. And it will return to normal when the temperature tends to be normal.
À PROPOS DE VOTRE DRONE
text_image
Technical diagram of a quadcopter drone with numbered parts for identificationnatural_image
Line drawing of a quadcopter drone with propellers and wings (no text or symbols)1 DRONE (Batterie incluse)
1 télécommande

2 hélices de rechange
natural_image
Diagram of a robotic device with red curved arrows indicating rotational or directional motion (no text or symbols)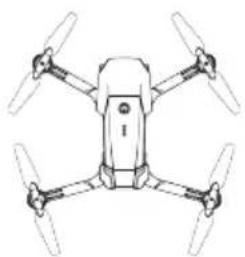
natural_image
Line drawing of a four-bladed drone with four propellers (no text or symbols)3. MONTAGE DES PROTECTIONS
natural_image
Mechanical component diagram showing a lever mechanism with red arrows indicating motion (no text or symbols)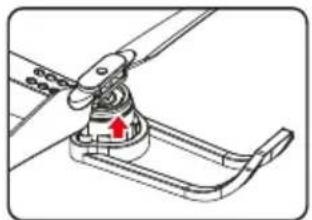
natural_image
Mechanical assembly diagram showing a clamp mechanism with a red arrow indicating motion (no text or symbols)natural_image
Mechanical assembly diagram showing a rotating component with a red arrow indicating motion (no text or symbols)natural_image
Technical diagram of a vehicle air intake system with a red arrow indicating a component (no text or symbols present)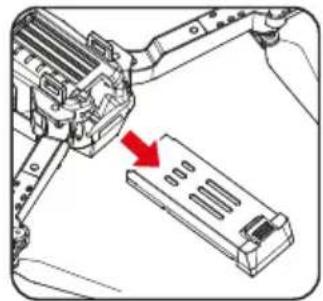
natural_image
Mechanical assembly diagram showing a bracket with a red arrow pointing to a component (no text or symbols present)natural_image
Diagram showing a battery connected to a plug and its internal cable, with red arrows indicating connection (no text or symbols present)REMARQUES :
text_image
Diagram of a Drones 3D controller with numbered ports and labeled buttons for signal or control.natural_image
Diagram of a device rear panel with a screwdriver and antenna, showing no text or symbols- Installation des piles AA
flowchart
graph LR
    A["1.5V "AA""] --> B["Device with two antennas"]
    C["1.5V "AA""] --> B
    D["1.5V "AA""] --> B
    B --> E["Output"]
text_image
Diagram showing a device with five circular ports and a central power button, with a red downward arrow indicating action or reset.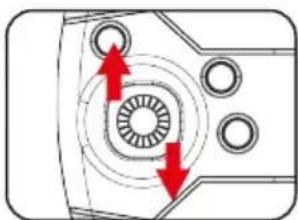
natural_image
Technical diagram of a mechanical component with concentric circles and directional arrows (no text or symbols)natural_image
Front view diagram of a car with a red arrow indicating downward motion (no text or symbols)COMMENCER LE VOL
REMARQUE :
natural_image
Technical diagram of a device's internal components with a red arrow pointing to a circular component (no text or symbols present)natural_image
Top-down view of a quadcopter drone with four propellers and directional arrows (blue, red) indicating top, bottom, left, and right sides respectively)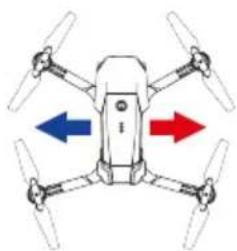
natural_image
Diagram of a drone with four propellers and directional arrows indicating flight or movement (no text or symbols)Commande de droite
Filp gauche
text_image
Fulp droitenatural_image
Diagram of a drone with directional arrows indicating flight or movement (no text or symbols)FONCTION D'AJUSTEMENT PENDANT LE VOL
text_image
Diagram of a drone's front panel with labeled ports and red arrows indicating input/output pointstext_image
Diagram of a drone with four propellers and directional arrows labeled ①, ②, ③ indicating orientation or movement.REMARQUES :
text_image
Screenshot of a digital camera interface with circular status indicators and UI controls, featuring a coastal scene with two white circles highlighting 'STOP' buttons.text_image
Technical diagram of a multi-rotor drone with numbered components for identification① Involucro superiore
⑤ Braccio
② Involucro inferiore
⑥ Batteria
③ Elica
⑦ Motore
natural_image
Line drawing of a quadcopter drone with four propellers and a small aircraft (no text or symbols)DRONE x1 (Batteria Inclusa)
Telecomando x1
natural_image
Mechanical component diagram showing a lever with red arrows indicating motion or force (no text or symbols)natural_image
Mechanical assembly diagram showing a lever mechanism with a red arrow indicating motion direction (no text or symbols present)natural_image
Mechanical assembly diagram showing a turning tool interacting with a rotating component (no text or symbols visible)natural_image
Technical line drawing of a mechanical component with a red arrow indicating a specific feature (no text or symbols present)natural_image
Mechanical assembly diagram showing a robotic arm interacting with a battery pack (no text or symbols visible)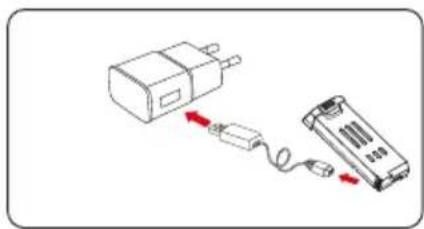
natural_image
Diagram showing two connected devices: a power adapter and a battery pack, with no visible text or symbols.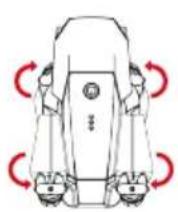
natural_image
Line drawing of a four-bladed drone with four propellers (no text or symbols)NOTE:
text_image
Diagram of a Drones device with numbered ports and labeled antennas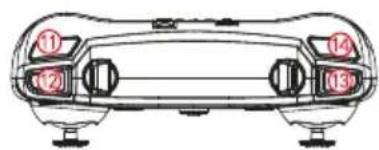
text_image
Diagram of a car front view with numbered labels pointing to key componentsnatural_image
Diagram of a device rear panel with screwdriver and antenna, showing internal components and red directional arrows (no text or symbols)text_image
Batterie AA 3-pin "AA" 3-pin "AA" 3-pin "AA"natural_image
Technical diagram showing two views of a device with circular components and red arrows indicating directional changes (no text or symbols present)natural_image
Front view diagram of a car with a red arrow indicating downward motion (no text or symbols)COMINCIARE A VOLARE
1. Tasto decollo
natural_image
Technical line drawing of a device's internal components with a red arrow pointing to a circular component (no text or symbols)2. Volo di base
natural_image
Top-down diagram of a drone with four propellers and two colored arrows indicating directional movement (no text or symbols)Flips & Rolls
natural_image
Diagram showing a circular component with red arrows pointing upward and a drone-like structure with red arrows indicating motion or force (no text or symbols)text_image
Diagram of a Drones device with labeled ports and red arrows indicating directional control points.text_image
Diagram of a drone with four propellers and directional arrows labeled ①, ②, ③ indicating orientation or movement.NOTE:
text_image
Screenshot of a digital interface with circular icons and UI controls, featuring a coastal scene with two white circles highlighting zones.text_image
Technical diagram of a multi-rotor drone with numbered components for identification① Oberes Gehäuse
natural_image
Line drawing of a quadcopter drone with four propellers and a small human figure (no text or symbols)natural_image
Top-down line drawing of a four-bladed drone with no text or symbolsnatural_image
Mechanical assembly diagram showing a clamp or bracket with red arrows indicating motion (no text or symbols)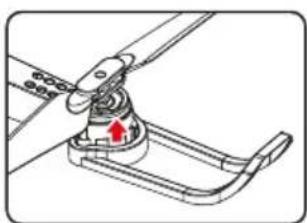
natural_image
Mechanical assembly diagram showing a lever mechanism with a red arrow indicating motion direction (no text or symbols)natural_image
Technical illustration of a mechanical assembly with a tool and red motion arrow (no text or symbols)natural_image
Mechanical component diagram showing a bracket with a red arrow indicating a specific part (no text or symbols present)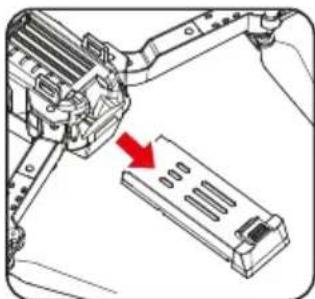
natural_image
Mechanical assembly diagram showing a lever mechanism interacting with a multi-compartment battery pack (no text or symbols visible)natural_image
Diagram showing two connected devices: a battery and a battery pack, with no visible text or symbols.ANMERKUNGEN:
text_image
Diagram of a drone's front panel with numbered labels pointing to key components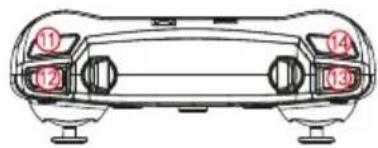
text_image
Diagram of a car front view with numbered labels pointing to key componentsnatural_image
Diagram of a device rear panel with a screwdriver and red circular arrows indicating rotation (no text or symbols)natural_image
Technical diagram of a device's front panel with circular ports and a red arrow pointing to a button (no text or symbols present)text_image
Flip to links Flip to rechtsnatural_image
Diagram showing a circular component with red arrows pointing upward and a drone-like structure with red arrows indicating motion or force (no text or symbols)text_image
Diagram of a Drones device with labeled ports and red arrows indicating directional control points.text_image
Diagram of a drone with labeled directional arrows and numbered parts, likely illustrating flight or navigation system.ANMERKUNGEN:
text_image
Mobile app interface screenshot showing camera control icons and a coastal scene with circular target windowsGarantiepolitik
text_image
Technical diagram of a multi-rotor drone with numbered parts for identification① Carcaça superior
⑤ Braço dobrável
② Carcaça inferior
⑥ Bateria
③ Hélice
⑦ Motor
natural_image
Line drawing of a quadcopter drone with four propellers and a small human figure (no text or symbols)DRONE x1 (Bateria incluída)
Comando de
controlo remoto x1
Hélices de reserva x2
Cabo de
carregamento x1
Chave de fendas x1
Manual do utilizador x1
natural_image
Line drawing of a four-bladed drone with no text or symbols3. MONTAGEM DAS PROTEÇÕES
natural_image
Mechanical component diagram showing a lever mechanism with red arrows indicating motion (no text or symbols)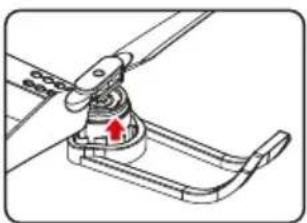
natural_image
Mechanical assembly diagram showing a lever mechanism with a red arrow indicating motion direction (no text or symbols present)natural_image
Mechanical assembly diagram showing a rotating component with a red arrow indicating motion (no text or symbols)natural_image
Technical diagram of a vehicle air intake manifold with a red arrow indicating a component (no text or symbols present)
natural_image
Mechanical assembly diagram showing a robotic arm interacting with a battery pack (no text or symbols visible)natural_image
Diagram showing a connected device with a battery and cable, no text or symbols presentNOTAS:
text_image
Diagram of a Drones device with numbered ports and labeled connectors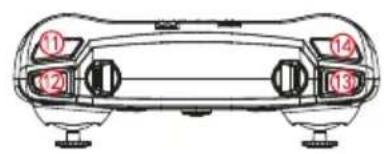
text_image
Diagram of a car front panel with numbered labels pointing to key componentsnatural_image
Diagram of a device with two antennas and a screwdriver, showing no text or symbolstext_image
15V "AA" 15V "AA" 15V "AA"natural_image
Two technical diagrams showing a device with circular ports and directional arrows indicating motion or force (no text or symbols present)natural_image
Front view line drawing of a car's front bumper with a red arrow indicating downward motion (no text or symbols)INICIAR O VOO
natural_image
Technical line drawing of a device's front panel with circular buttons and a red arrow pointing to a button (no text or symbols)natural_image
Two diagrams showing a circular mechanical component and a drone with red arrows indicating motion or force (no text or symbols)text_image
Diagram of a Drones 4 controller with labeled ports and red directional arrows indicating input/output ports.text_image
Diagram of a drone with four propellers and directional arrows indicating movement or force directions.NOTAS:
text_image
Screenshot of a digital camera interface with icons for settings, navigation, and stop controls over a coastal scene.Política de garantia
text_image
Technical diagram of a multi-rotor drone with numbered components for identification and assembly reference.① Bovenbehuizing
⑤ Opvouwbare arm
② Onderbehuizing
⑥ Accu
③ Rotor
⑦ Motor
④ Rotorbescherming
⑧ Camera
ACCESSOIRES
natural_image
Line drawing of a quadcopter drone with propellers and control arms (no text or symbols)DRONE x1 (Accu inbegrepen)
Afstandsbediening
x1
Reserverotor x2
Oplaadkabel x1

Schroevendraaier x1
natural_image
Top-down line drawing of a quadcopter drone with four propellers (no text or symbols)3.BESCHERMERS MONTEREN

natural_image
Mechanical assembly diagram showing a clamping mechanism with red arrows indicating motion (no text or symbols)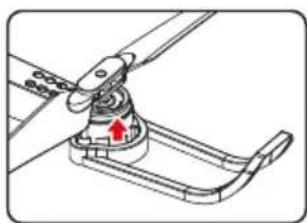
natural_image
Mechanical assembly diagram showing a lever mechanism with a red arrow indicating motion direction (no text or symbols present)natural_image
Diagram of a mechanical assembly with a tool and rotating component (no text or symbols)natural_image
Technical line drawing of a vehicle air intake manifold with a red arrow indicating a component (no text or symbols present)