Cinema Deluxe - Projector Prixton - Free user manual and instructions
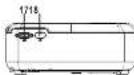
Find the device manual for free Cinema Deluxe Prixton in PDF.

| Product Type | Multimedia projector |
| Brand | Prixton |
| Model | Cinema Deluxe |
| Dimensions (approx.) | 20 x 15 x 8 cm |
| Weight (approx.) | 1.5 kg |
| Power Supply | DC 12V, 2A (power adapter included) |
| Power Consumption | Approximately 24 W |
| Native Resolution | Not specified (estimated HD 720p) |
| Brightness | Not specified (estimated 2000 lumens) |
| Lamp Life | Not specified (estimated 30000 h) |
| Connectivity | 2x HDMI, USB, Micro SD, AV, VGA, 3.5 mm headphone jack, Bluetooth |
| Wireless Functions | Wi-Fi (screen mirroring), Bluetooth audio |
| Keystone Correction | Manual (wheel) |
| Focus | Manual (wheel) |
| Built-in Speaker | Yes, mono |
| Remote Control | Yes, with batteries (not included) |
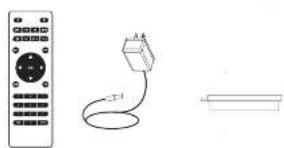
| Box Contents | Projector, lens cap, remote control, AV cable, HDMI cable, power adapter, user manual |
| Maintenance and Cleaning | Clean the lens with a soft, dry cloth. Do not use abrasive products or solvents. |
| Safety | Do not look directly at the light source. Unplug before cleaning. Use in a well-ventilated area. |
| Spare Parts and Repairability | Not specified by the manufacturer. Ceiling mount and screws not included. |
| Warranty | 2 years from the date of purchase |
| Declaration of Conformity | Directive 2014/53/EU |
Frequently Asked Questions - Cinema Deluxe Prixton
User questions about Cinema Deluxe Prixton
0 question about this device. Answer the ones you know or ask your own.
Ask a new question about this device
Download the instructions for your Projector in PDF format for free! Find your manual Cinema Deluxe - Prixton and take your electronic device back in hand. On this page are published all the documents necessary for the use of your device. Cinema Deluxe by Prixton.
USER MANUAL Cinema Deluxe Prixton
- pilas AAA, no inclutd as
AdaptedgeCA
Usage of controls or adjustments or performance of procedures other than those specified herein may result in hazardous radiation exposure.
This unit should not be adjusted or repaired by anyone except qualified service personnel.
Precautions before use:
KEEP THESE INSTRUCTIONS IN MIND
1Do not use this device near water.
- Clean only with a slightly damp cloth.
3.Do not cover or block any ventilation openings. When placing the device on a shelf, leave 5 cm
(2) free space around the whole device.
4.Install in accordance with the supplied user manual.
5* Don't step on or pinch the power adaptor. Be very careful, particularly near the plugs and the cable's exit point. Do not place heavy items on the power adaptor, which may damage it. Keep it a entire device out of children's reach! When playing with the power cable, they can seriously injure themselves.
- Unplug this device during lightning storms or when unused for a long period
7.Keep the device away from heat sources such as radiators, heaters, stoves, candles and other
heat-generating products or naked flame
B. A.void using the device near strong magnetic fields
9E electrostatic discharge can disturb normal usage of this device. If so, simply reset and restart the device following the instructions manual. Please file transmission logs with recorded
device allowing the installation of device to operate in a static-free environment.
10 Warning! Never insert an object into the product through the vents or openings. High voltage and low current are not allowed in this product. The product should be used for short circuit, internal parts. For the same reason, do not spill water or liquid on the product.
11 Do not use wet or moist areas such as bathrooms, steamy kitchens or near swimming pools. 12 Do not use this staining when condensation may occur.
12.DC NOT USE THIS DEVICE WHEN CONGENBATION MAY Occur
-
Although this device is manufactured with the utmost care and checked several times before leaving the factory, it is still possible that problems may occur, as with all electrical appliances. If you notice smoke, an excessive build-up of heat or any other unexpected phenomena, you should disconnect the plug from the main power socket immediately.
-
This device must operate on a power source as specified on the specification label. If you are not sure of the type of power supply used in your home, consult your 'dealer or local sower company.
16."The socket bundle must be lined near the equipment and must be easily accessible. 17." Do not overload out of sets or extension cords. Overloading can cause fire or electric shock. 17" Devices with class I construction should be connected to a main socket outlet with a protected earthed connection.
- Devices with class 2 construction do not require a earthed connection.
20* Always hold the plug when pulling it out of the main supply socket. Do not pull the power cord. This can cause a short circuit.
-
Avoid placing the device on any surfaces that may be subject to vibrations or shocks.
-
To clean the device, use a soft dry cloth. Do not use solvents or petrol based fluids. To remove severe stains, you may use a damp cloth with dilute detergent.
23.The supplier is not responsible for damage or lost data caused by malfunction, misuse, modification of the device or battery replacement.
-
Do not interrupt the connection when the device is formatting or transferring files. Otherwise, data may be corrupted or lost.
-
If the unit has U/S8 playback function, the usb memory stick should be plugged into the unit's USB port. Don't use an USB extension cable because it can cause interference resulting in falling data.
26.The apparatus shall not be exposed to dripping or splashing and must be filled with liquids, such as varves, are placed on or near the apparatus.
27* To completely disconnect the power input, the mains plug of the apparatus shall be disconnected from the mains, as the disconnect device is the mains plug of apparatus.
-
if the unit works with battery, Battery shall not be exposed to excessive heat such as sunshine, fire or the like.
-
Attention should be drawn to the environment's aspects of battery disposal
30 The apparatus can only be used in moderate extremely cold or climates warm environments should be avoided.
-
The rating label has been marked on the bottom or back panel of the apparatus.
-
This device is not intended for use by people (including children) with physical, sensory or mental disabilities; or a lack of experience and knowledge, unless they're under supervision or have received instructions about the correct use of the device by the person who is responsible for their safety.
-
This product is intended for non professional use only and not for commercial or industrial use. 34. Make sure the unit is adjusted to a stable position. Damage caused by using this product is an unstable position or by failure to follow any other warning or precaution contained within this . . . section of this manual will not be covered by warranty. 35. Never remove the casing of this apparatus.
36.Never place this apparatus on other electrical equipment.
37.Do not use or store this product in a place where it is subject to direct sunlight, heat, excess dust or vibration.
38.Do not allow children access to plastic bags.
39.0% use attachments/accessories specified by the manufacturer, 40. Refer all servicing to qualified service personnel. Servicing is required when the apparatus has been damaged in any way, such as the power supply cord or the plug, when liquid has been spilled or objects have fallen into the apparatus, when the apparatus has been exposed to rain or
moisture, does not operate normally, or has been dropped. 4)*Do not use a damaged power rod or plug or a loose output
42 Prolonged exposure to loud sounds from personal music players may lead to temporatry of permanent hearing loss.
Installation:
Unpack all parts and remove protective material
*Do not connect the unit to the mains before checking the mains voltage and before all stree connections have been made.
*These instructions are related only to products using power cable or AC power adaptor.
Packing Included:
Usage of controls or adjustments or performance of procedures other than those specified herein
This unit should not be adjusted or repaired by anyone except qualified service personnel.
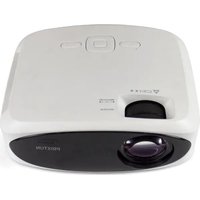
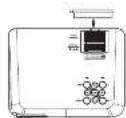
Remove & close the lens cover:
Your projector can be installed in four different configurations.
Cose the lens cover when unit not using
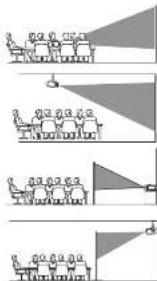
Placing your projector:
Your projector can be installed in four different configurations:
Front Table
Select this location with the projector placed near the floor in the center of the building. The projector is a common way to position the projector for quick setup and portability.
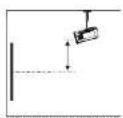
Front Ceiling
Select this location with the projector suspended upside-down
from the ceiling in front of the screen.
NOTE: A projector mount is required to install the projector in a ceiling.
Bear Table:
Select this location with the projector placed near the floor
behind the screen
NOTE: That a special rear projection screen is required.
RearCeiling
Select this location with the projector suspended upside down
from the ceiling behind the screen.
A
A projector mount is required to install the projector in a ceiling. A special rear projection screen is required.
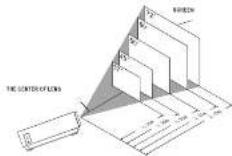
To reduce image distortion:
It is recommended to move the projector as close to center of screen,

Distance between the projector and screen:
Measure the distance between the projector and where you want to position the screen. This is the projection distance.
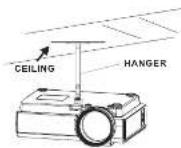
Placing your projector on ceiling:
When installing the projector in the ceiling, please purchase a projector mount recommended by an installation professional and follow the instructions that come with the mount.
Before installing the projector in the ceiling, please check to make sure the ceiling structure can support the weight of the projector and the mount. If in doubt, please ask the advice from an
NOTE: Projector mount and screws] not included.

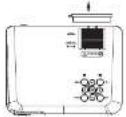
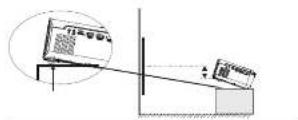
Adjust the vertical location:
Follow below picture to adjust the vertical location.

Adjust the focus and keystone
Follow below picture to adjust the focus and trapezoidal screen
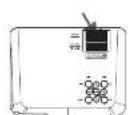
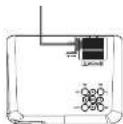
Adjust the focus by turning the knob while observing the image pixels near the center of the screen. Optima' focus is obtained when the pixels are clearly visible. Depending on the projected screen size, the focus near the screen edges may be less sharp than the screen center. For this projection, the camera should be positioned close to the center of the screen. The calibration angle, keystone correction will restore the distorted image to a rectangular or square shape.
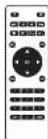
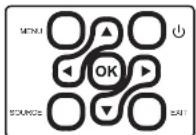
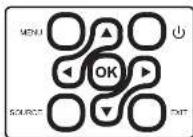
Controls of remote:


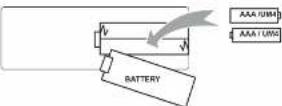
Install / Remove battery of remote
Remove the battery compartment cover on the back of your remote by carefully sliding to open. The battery cover can then be lifted away. Fit the correct batteries (2 X AAA batteries not in CL dec). Remove the battery cover from the cover and place it on the cover.
NOTES
Batteries shall not be exposed to excessive heat such as sunshine, fire
Only same or equivalent type batteries as recommend are to be used.
Do not dispose of batteries in fire, battery may explode or leak. Do not try to recharge a battery
DO not mix old and new batteries.
Do not mix alkaline, standard (carbon-zinc) or recharqable (n-cad, n-mh, etc) batteries
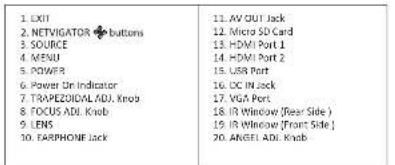
Controls of projector:
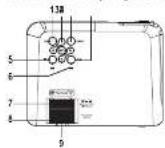
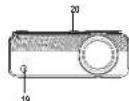
Main operation:
Controls

ArmatixO
Press to relocate the studymostly and make editing
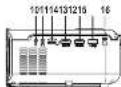
Connection Instructions
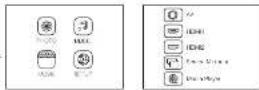
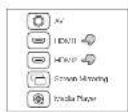
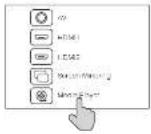
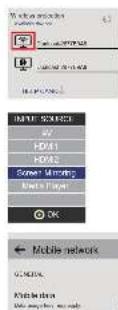
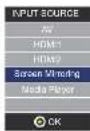
Select an input source
You will see the picture below when the projector is turned on.
You can choose between the different input sources (AV/HDMII
/HDM/2/Screen Mirroring/Media Player)by pressing the
Source button at the projector touch panel, or remote controller
You can connect different devices with the projector, according to
the following connection instructions.
351
35 36
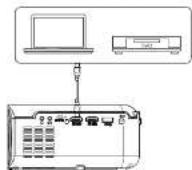
HDMI device connection
The projector can connect to devices with HDMI input function. It is compatible with
I 5.405
Tt you connect your devices to the projector via HDM1 port, please choose "HDM1" input source.
If you connect via the "HDMI 2" port, please choose the "HDMI 2" input source.
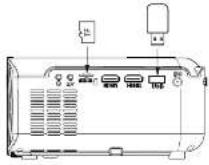
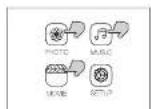
Multimedia connection
Insert USB / Micro 5D card (TF card) into the corresponding slots (as shown in the picture). Choose Media source, Select "Video", "Music", "Picture" to enter the content you want to play.
37
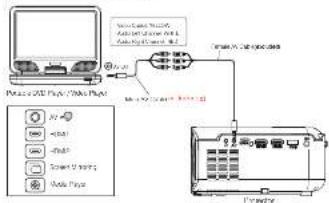
AV video device connection
Connect the projector AV interface with the AV cable, as is shown in the pictures.
Using Bluetooth playback
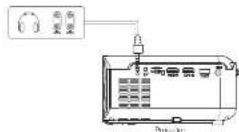
Audio devices connection
The projector can connect to a headphone and to a wired audio system using a 3.5mm jack (not included)
| Bluetooth OnOff | Bluetooth Off: Off until when the propellant light passes ON |
| Paing to Bluetooth Vennician Etrieval | Turn on Bluetooth: The propellant will stop charging for a hearty blueothocew device. choose one and continue to eactually with an automatically powered propellant with adjustable Bluetooth antenna in the top right position of the main black screen, and can be card through the Bluetooth receiver |
| Attention | |
| The Bluetooth function only supports nasal devices. Sensory probes, radio, ultraviolet sensors are important to prepare 1-1 About automatically connect. After the insertion the device will keep the port charging all the time when the Bluetooth connection is broken or unconnected. To ensure that you can hear from the propellant radio, we suggest you install the Bluetooth function and select the sound of the process. | |
| When you try to connect a new blue loth speaker please turn off the previous speaker and reenjoy your new blueothocew cctior for conllecting | |
38
Connect to Smartphone/Pad
| Commuter guide | Device Interaction | GIS User's Workshop | Shh WkI |
| Shchw DkH | |||
| Android App User's Workshop | Shh WkI | ||
| Shchw DkH | |||
| Shared Connections | USB to Lightning Cable USB to Method | ||
| Android App User's Workshop | USB to Lighting Cable Top Casks (should be connected in APP) |
1. Wireless Connection to Smartphone/Pad
For iOS device, considering there are two different operating environments:
A) with environment.
B) Without Wi-Fi environment.
A) IOS device with WiFi Environment (Recommended)
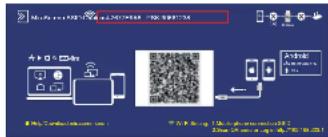
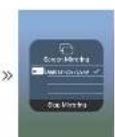
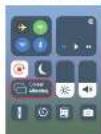
Step1. Turn on the projector and press the "source" button
on the remote control or projector's button.
Click to enter the "Screen Mirroring" on the projector.
(Loading time 5-10 seconds)
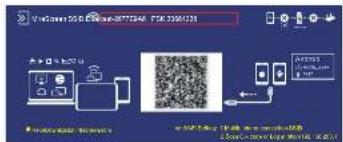
Step2: Open the WiFi function on your smartphone/pad,
and connect to the projector's SSID
(name and password showed on the screen)

3940
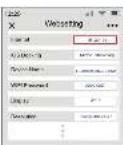
Step3: Enter the URL http://92168.2051.on the browser(or scan the QR code)
Step1:Connect your Home WiFi from the browser pages
B: iOS device without WiFi environment.
(Use the phone's network data)
Step1: Turn on the projector and press Enter.
the "source" button on the
remote control or projector's button.
Click to enter the
on the projector. (Loading time 5-10 seconds)

C
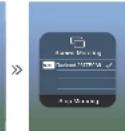
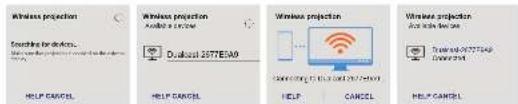
Step5: Open the Screen Mirroring on you phone, and choose the correct SSID name.

Then the connection is succeeded.

Tips: When you connect for the second time, Please make sure the phone is connected to the SSID.
Switch the projector to the "screen mirroring" page, and click the "screen mirroring" on your phone, the connection is successful.
Step2: Open the WiFi Function on your smartphone/pad, and connect to the projector's SSID(name and password showed on the screen).
Step3: Choose "Cellular Data" and turn on it.
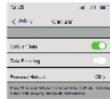
Step4: Open the Screen Mirroring, and choose the correct SSID name.
Then the connection is succeeded.


Step2: Open the WiFi function on your smartphone/pad, and connect to the projector's
SSID(name and password showed on the screen)

1.2 Wireless Connection to Android Phone. For Android device, considering there are two different operating environments: A) With WiFi environment. B) Without WiFi environment.
A:Android device with WiFi Environment, Step1:Turn on the projector and press the "source" button on the remote control or projector's button. Click to enter "Screen Mirroring" on the projector. (Loading time 5-10 seconds)
Step3: Enter the URL(http://192.168.203.1) on the browser or scan the QR code). Step4: Connect your home WiFi on the bi

Step5: Open the Multi-screen Miracasts' function on the Android device. Step 6: Choose the correct SSID name, then the connection is succeeded. Due to the diversification of Android Phone, when you open the Multi-screen function, there may appear two WiFi names. How to choose?
1 Choose the one with the WiFi logo. 2 If there is no WiFi icon, the first one is selected by default.
Tips: When you connect for the second time, switch the projector to the "Screen Mirroring" page, and click the "Screen Mirroring" on your phone; the connection is successful. (No need to perform the Step 1-4)
Android device Without WiFi environment (Using the phone's network data)
Step1: Turn on the projector and Open the 'source' with the remote control or projector's button. Click to enter the "Screen Mirroring" on the projector. (Loading time 5-10 seconds)
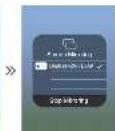
Step2: Click "WLAN" on your Android device, turn on the "WiFi-Scan" function, But do not connect any WiFi
Step3: Choose "Phone Network Data" and turn on it.
Step4: Open the Multi-screen/Miracast on your Android device, choose the correct SSID name. Then the connection is succeeded.
| Notes | |
| Conditions for WiH connection | Please make sure the home network environment is well conditions |
| The Name about Server Mirroring | Enter, control devices have different names for the Wireless TV display, such as Soren mirroring, Soren sharing, Vibal Soren etc. If you cannot find it, please contact your mobile phone supplier |
| Wireless connexon without WF | Please turn on the WiFi in your smartphone, but do not connect AnFi WF Otherwise it will affect the propietors's WiH Signal |
| Wireless connexon without WF | Please turn on the WiFi in your smartphone, but do not connect AnFi WF Otherwise it will affect the propietors's WiH Signal |
| ### | Set up when you scan the CH sensor icon the LHC in the broscen |
| X Wobbling | Use the IP connection to your home's WiH |
| ### | Get a name card to me (my name) |
| ### | Get a Password can be checked |
| ### | When you change the user's name and WI/ Password, you need to reset
the password. SD card and PDK will be replaced. Please make sure the s##### ####
#### ### your phone connection of it |
| ### | Get the home WiH smected, please set up the CH sensor to connect with |
| Hicldog | Get the connection is successful, please make sure that mobile phone network status is turned on |
| P######## | If all the ### are ###, please save the CH sensor to connect with |
| Get an ### card from the WiH device | |
2.Wired Connection to Smartphone/Pad
2.1 Wired Connection to iOS. (iPhone/Pad)
Step1: Turn on the projector and pres the 'source'
with the remote control or projector's button.
Click to enter the "Screen Mirroring" on the projector.
(Loading time 5-10 seconds)
Step2: Connect your IOS device with the projector's USB port via USB to
Lightning Cable
Step3: Click "Trust" and input your screen lock password. If no password, ignore it.
Step4: Then the connection is succeeded.
2.2 Wired Connection to Android Phone (Need to download the APP; Miraplug)
Step1: Turn on the projector and Open the "so
with the remote control or projector's button.
Click to enter the "Screen Mirroring" on the projector
(Loading time 5-10 seconds)

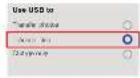
Step2: Connect your Android device with the projector's USB port via USB to Micro/Type C Cable. Step3: Choose USB Transfer Method(Transfer files) and open USB debugging.
Step4. Follow the prompts of the APP
11DownLoadMiraPlug;
12 Re- plug the USB Cable to activate the APP;
3Click Connect Bluetooth according to the prompt tone (Bluetooth name: PJ-BT); 4(Rank to L1 interface Then the connection is supported.


| Note | |
| When used in the text | The field will be mandatory for this property's value. Please specify the option, one or more times to show it. |
| Associating with the producer | The consumer must have a contact number where he/she can contact him/her (for example: phone number, fax number, etc). The customer should be informed of the reasons and that it is necessary to sign up on the business list. |
| Tips for website creation | A consumer must have a contact number, we suggest using the 12656 number to replace fax and the contact number are not valid for USB cases. |
| The contact number is automatically given and must be the same address for each document accurately please contact this property. | |
Using Projector Menu 1.0
Press button to enter projector menu Press again to previous status.
Use (a) buttons to select manual page.
This manuall oovd on 120 upes of view sreep
Picture Mode
Select Vivid, User Customl, Soft or Standard
Contrast, Brightness, etc
Set Picture Mode to "User" to adjust these settings
Color Temperature Select Worm Cool or Medium
Aspect Ratio
Select 169.43 or Auto
Noise Reduction
Select Off, Low, Middle, High or Default
| Color temper... (temperature) | |
| Customer define | Parameter |
| red | 0-100 |
| blue | 0-100 |
| green | 0-100 |
| Picture Mode | Standard |
| Contrast | 50 |
| Brightness | 50 |
| Color | 50 |
| Sharpness | 50 |
| Tint | 50 |
| Color Temperature Medium | |
| Aspect Ratio | Auto |
| Noise Reduction | Middle |
| Screen | |
Aspect Ratio
| 4:3 | The signal in a 4:3 aspect ratio projection image |
| 16:9 | The signal in a 16:9 aspect ratio projection image |
Using Projector Menu 2.0
Press button to enter projector menu. Press again to previous status
Use buttons to select manual page.
Sound Mode
Select Music, Movie, User (custom), Sports or Standard
Treble Bass
SetSoundMode to "User" to adjust these settings.
Balance
Adjust to
Surround Sound
Turn Surround Sound ON or OFF.
| Sound Mode - User | Parameter |
| Treble | 0-100 |
| Bass | 0-100 |
Using Projector Menu 3.0
Press button to enter projector menu. Press again to previous status
Use the buttons to select manual page.
This amount showed an eight upper of view screen.
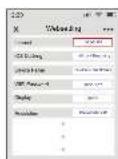
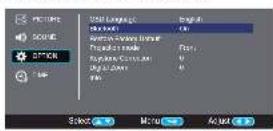
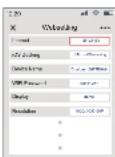
OSD Language
Select different language, Follow below figure.
Bluetooth
Select ON or OFF.
Display the unit information as below.
Sound Mode Standard
Trabie 5
Baa
Balance 0
Auto Volume Of
Surround Sown, Off
Using Projector Menu 4.0
Press button to enter projector menu. Press again to previous status.
(4)
This manual showed on right upper of view screen
Growth
C
Seer 1000000000000000000000000000000000000000000000000000
Select turn off:mer to Day Hour and Minutes
On Timer
Select turn on limiter Day Hour and Minutes.
Sleep Timer
Select sleep timer to Off, 10min, 20min, 30 min, 60min, 90min, 120min, 180min, 240min
Auto Sleep
Select auto sleep function to Never, 4 hour, 6 hour, 8 hour.
Troubleshooting
Before resorting the maintenance service, please kindly check by yourself with the following chart:
| No Image is Projected or a "No Signal"message is displayed | 1 Power light is on. If it is not on, check the projector is plugged into the mains, that the socket is switched on, and then press the power button on the projector. 2 Check the lens cover has been removed. 3. Check the cables are securely attached and installed as per the User Manual. 4. The image source may not be set correctly Press the Source button on the Control Panel or the Remotel, to select the correct setting. 5. Check in the Menu section under Video input signal to make sure that has been set correctly |
| The Lamp (Bulb) switches off after a period of time | Is the warning light indicator red? If so, the projector is overheating which turns the light off automatically. 1. Leave the projector to cool for a few moments. 2.Once covered, check nothing is blocking the ventilation vents. 3. Check the air filter is clean and clean if necessary. 4. Turn on the projector. If the issue persists please contact your support provider for further assistance. |
| The Image is wider at the top/bottom of the screen | This is called keystone and is due to the projection angle not being perpendicular to the screen. To correct use the projectors install keystone function to adjust the image. |
| Spots on the screen | Using a vacuum cleaner to clean the lens, if cleaning doesn't resolve things, please contact your support provider for further assistance. |
| The image brightness has faded | This could possible be caused by the ambient light in the room. If not the shadows are that you need to replace the lamp (bulb). |
Disclaimer
Upates to Fimra and for harnce components are made reguall. Therefore some of the nstion, specifc cions and picaes in this documentation may differ slightly from your particular situation. All items described in this du de or ilustration purposes only and may not apply to particular situation. No legal right or entitlements may be obtained from the description made in this manual.
Disposal of the Old Device
This symbol indicates that, the relevant electrical product or battery should not be disposed of as general "hazardous waste" in a tube. To ensure the correct waste treatment of the product and battery, please dispose them in accordance to any applicable local laws of requirement for disposal of electrical equipment or batteries. In so doing, you will help to conserve human resources and "rip down" the level of environmental protection in treatment and disposal of electrical waste (Waste Electric and Electronic Equipment Directive).
Warranty Policy
This product is guaranteed for 2 years from the date of purchase. When you have a problem that you cannot solve, you must proceed to the web www.prison.com and click on the contact option to send us your assistance form.
Simplified EU Declaration of Conformity
We. La Trastienda Digital located in Avencia Cervantes 49, modu o 25, Basaun 48970, Bixkalia hereby declare that the following goods, imported and selling at European market
| Brand | MODEL NAME | DESCRIPTION | Main category |
| Prixton | Cinema Deluxe | PROJECTOR | Computers |
Are in compliance with the EC Council Directive of 2014/53/EU (EM DIRECTIVE) and harmonized standards and with the board of the 16th of April 2014.
The complete text of the UEE Declaration of conformity is available anytime at this website address: www.priction.com
LA TRASTIENDA DIGITAL
Television channels (2 prices AAA,pp0,pp16uses)
Adaptateursecteur
m = 311
Marina
PENINS 10124, 65738, 19111, 19112, 19113, 19114, and 19115.
Source: Press to change media source mode
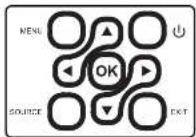
Power Pre-First position on the line Press and hold to power OFF.
Exit Press to return to a previous page or page 10.
Awards/OK
Please adjust to screen for this issue.
| Bluetooth 802.11c | http://en.wikipedia.org/wiki/Bluetooth_v2:en#section=1 |
| Jumboce Bluetooth automated receiver | Awardsed in Bluetooth's Jumboce pre-processor is to create a cheaper apparel Jumboce pre-processor selection a applet et commences in a new communication card, the pre-processor is to create a Jumboce Bluetooth Jumboce pre-processor is to create a Jumboce pre- processor, princt of you this is another from Jumboce Bluetooth. A proposition de la connecter automatiquelem. Awardsed in Jumboce pre-processor is to create a cheaper apparel Jumboce pre-processor selection a applet et commences in a new communication card, the pre-processor is to create a Jumboce Bluetooth Jumboce pre-processor is to create a Jumboce pre- processor, princt of you this is another from Jumboce Bluetooth. A proposition de la connecter automatiquelem. Awardsed in Jumboce pre-processor is a new apparel Jumboce pre-processor is to create a cheaper apparel Jumboce pre-processor is to create a Jumboce pre- processor, princt of you this is another from Jumboce Bluetooth. A proposition de la connecter automatiquelem. Awardsed in Jumboce pre-processor is to create a cheaper apparel Jumboce pre-processor is to create a Jumboce pre- processor, princt of you this is another from Jumboce Bluetooth. A proposition de la connecter automatiquelem. Awardsed in Jumboce pre-processor is to create a cheaper apparel Jumboce pre-processor is to create a Jumboce pre- processor, princt of you this is another from Jumboces Bluetooth 802.11c |
60
Connector au Smartphone/Pad
Step4. April to Screen Mirroring a sclegi II note corralto delTSSID.
OrlaconneseiRuscita

Step2: Abr la configuracion WHI sullo smartphone/padecorniti al ISSD del generatore.
(nome e password visuaizzati sulie schermo)
Procedure access on screen media and options.


Source: From a survey, media source mode.
Arrow20
Power
When to power or not?
Always, always or never (3)
Euk
Prove that det(A) = 0 Proof:
[
\begin{array}{l}
\text{det}(\mathbf{A}) = \text{det}(\mathbf{B}) = 0.
\end{array}
]
Tries to get more on (e-cren, monn) and make cololections.
remedy and make selections.
Power
Pee to prepa on
Pace and hold to:
powerOFF.
Pepre laeumr
aCC07paQc
2018年1月6日
Step 3: Tdk de URL: http://792168.2031 in the browser (or scan of QR code).
Step 4: Blank verinding met wu with internet network oo de browserpage.