JSB 18.0-EC C - Saw Flex - Free user manual and instructions
Find the device manual for free JSB 18.0-EC C Flex in PDF.

| Product type | Cordless jigsaw |
| Brand | Flex |
| Model | JSB 18.0-EC C |
| Battery voltage | 18 V (Li-Ion) |
| Compatible battery | AP18.0 (2.5 Ah or 5.0 Ah) |
| Weight (tool only) | Approx. 2.5 kg (depending on battery) |
| Variable speed | Yes, 5 positions + automatic adjustment (A) |
| Orbital action | 4 positions (0, 1, 2, 3) |
| Bevel cutting angle | 0° and 45° (left or right) |
| LED light | Yes, with memory function |
| Blade fixation | Tool-free, compatible with T-shank blades |
| Sound pressure level | LpA = 78 dB(A) |
| Sound power level | LWA = 89 dB(A) |
| Vibration (wood cutting) | ah,B < 3.4 m/s² |
| Vibration (metal cutting) | ah,M < 4.0 m/s² |
| Cutting capacity (wood) | Up to 100 mm (estimated) |
| Cutting capacity (metal) | Up to 10 mm (estimated) |
| Compatible materials | Wood, metal, plastic, tile, ceramic |
| Maintenance | Clean the ventilation slots regularly with dry compressed air |
| Safety | Read the manual; use hearing protection above 85 dB(A) |
| Spare parts and accessories | Available at www.flex-tools.com |
| Warranty | Conforms to European directives (CE) |
Frequently Asked Questions - JSB 18.0-EC C Flex
User questions about JSB 18.0-EC C Flex
0 question about this device. Answer the ones you know or ask your own.
Ask a new question about this device
Download the instructions for your Saw in PDF format for free! Find your manual JSB 18.0-EC C - Flex and take your electronic device back in hand. On this page are published all the documents necessary for the use of your device. JSB 18.0-EC C by Flex.
USER MANUAL JSB 18.0-EC C Flex
JS 18.0-EC JS 18.0-EC JSB 18.0-ECJSB 18.0-EC
natural_image
Technical line drawings of a two-part robotic device with no visible text or symbolsde Originalbetriebsanleitung 77
en Original operating instructions 1414
fr Notice d'instructions d'origine 2020
it Istruzioni per l'uso originali 2727
es Instrucciones de funcionamiento originales ..... 3434
pt Instruções de serviço originais 4141
nl Originele gebruiksaanwijzing 4848
da Originale driftsvejledning 5555
no Originale driftsanvisningen 6161
sv Originalbruksanvisning 6767
fi Alkuperäinen käyttöohjekirja 7373
el Auθεντικές οδηγίες χειρισμού 7979
tr Orijinal işletme kılavuzu 8686
pl Instrukcja oryginalna 9292
hu Eredeti üzemeltetési útmutató 9999
cs Originální návod k obsluze 106106
sk Originálny návod na obsluhu 112112
hr Originalna uputa za rad 118118
sl Izvirno navodilo za obratovanje 124124
ro Instructiuni de functionare originale 130130
bg Оригинално упътване за експлоатация ..... 136136
ru Оригинальная инструкция по эксплуатации ..... 143143
et Originaalkasutusjuhend 150150
It Originali naudojimo instrukcija 156156
Iv Lietošanas pamācības oriģināls 163163
ar 170170
ترجمة لارشادات التشفيل الأصلية
A
JSB 18.0-EC
JS 18.0-EC

B
| JS 18.0-EC JSB 18.0-EC | |||
| U Vdc 18 18 | |||
| n /min 800-35 | 00 350-3500 | ||
| m kg 2.1 2.2 | |||
| L_pA/K_pA | dB(A) | 78/5 | 87/5 |
| L_WA/K_WA | dB(A) | 89/5 | 98/5 |
| a_n/K_n | m/s ^2 | <4/1.5 | <4/1.5 |
| mm | 25.4 | 25.4 | |
C
natural_image
Technical line drawing of a device component with directional arrows indicating movement or force (no text or symbols)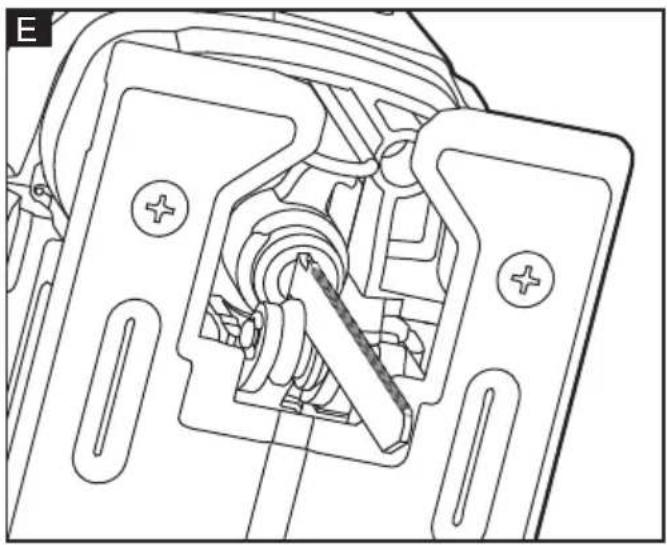
natural_image
Technical line drawing of a mechanical assembly with internal components and mounting holes (no text or symbols)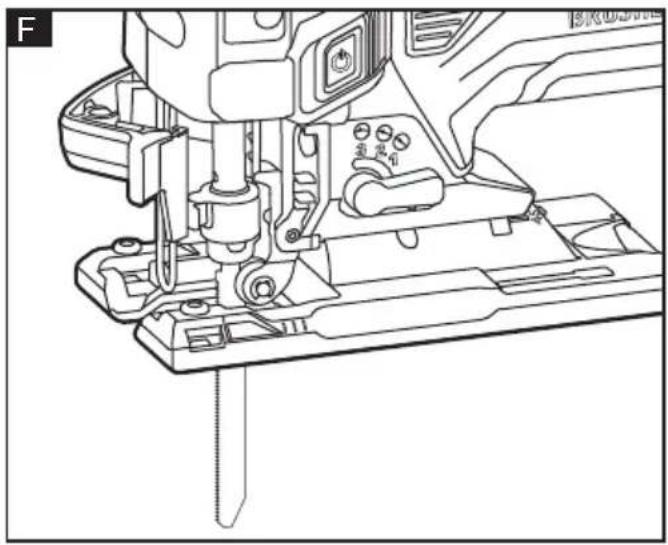
natural_image
Technical line drawing of a sewing machine component (no text or symbols visible)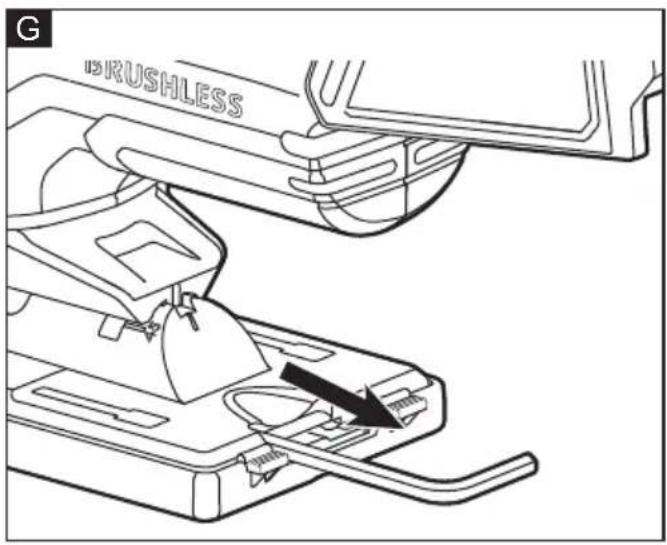
natural_image
Technical diagram of a mechanical device with internal components and directional arrow (no text or symbols)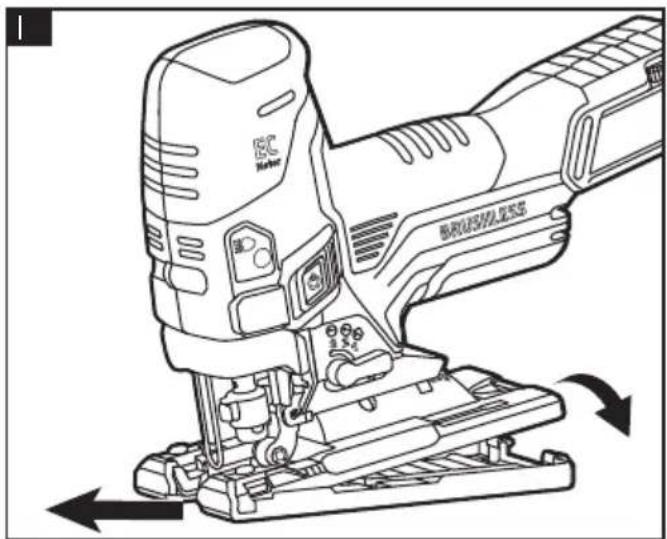
natural_image
Technical line drawing of a mechanical component with two circular annotations highlighting internal features (no text or symbols present)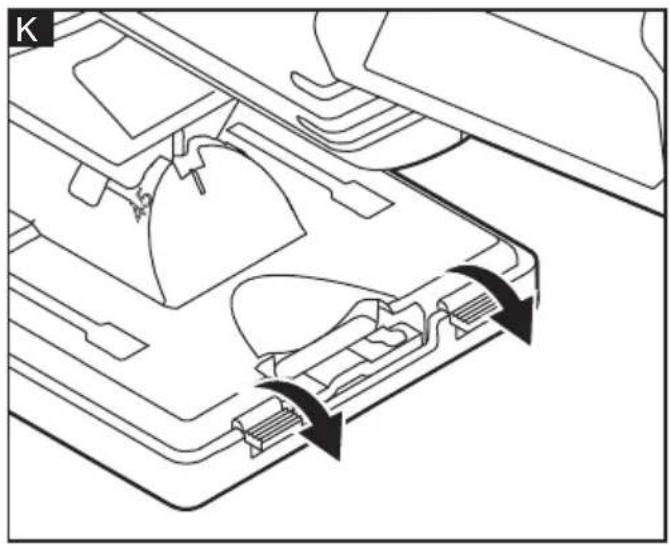
natural_image
Technical line drawing of a mechanical component with internal channels and arrows indicating motion (no text or symbols)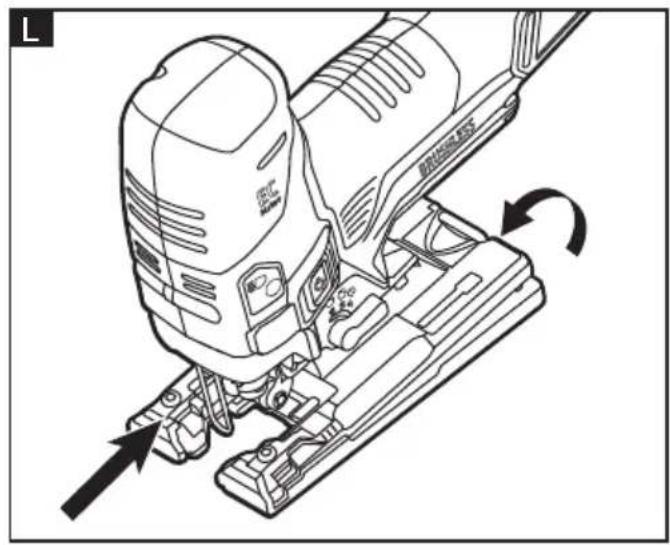
natural_image
Technical line drawing of a mechanical device with directional arrows indicating motion (no text or symbols)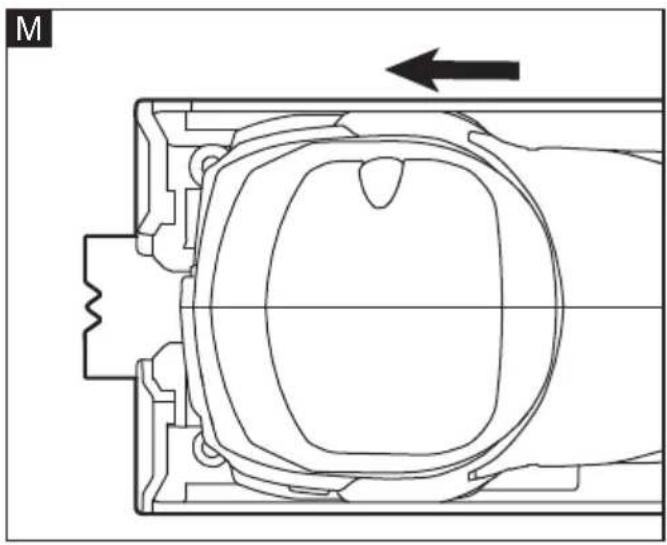
natural_image
Technical line drawing of a mechanical component with an arrow indicating direction (no text or symbols)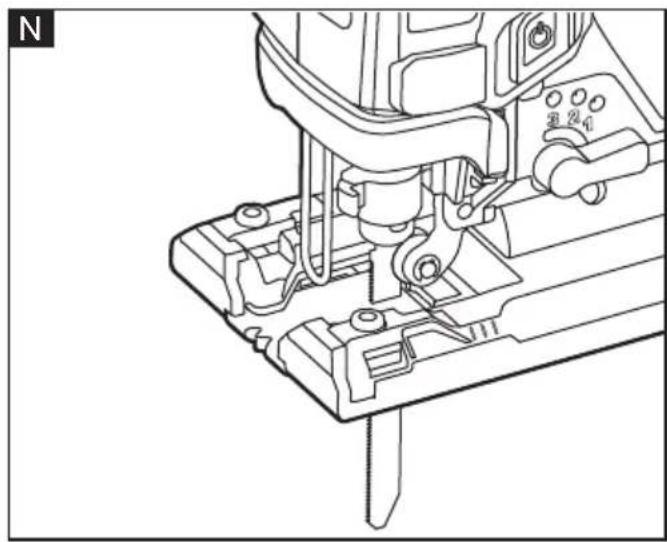
natural_image
Technical line drawing of a mechanical assembly with no visible text or symbols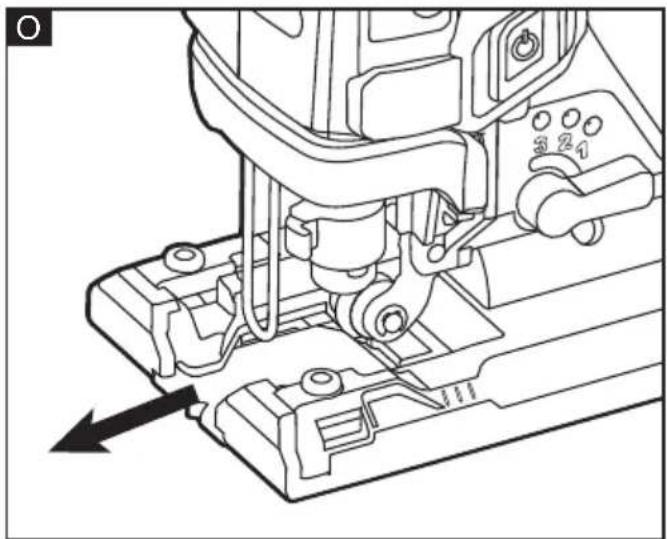
natural_image
Technical line drawing of a sewing machine component with no visible text or symbols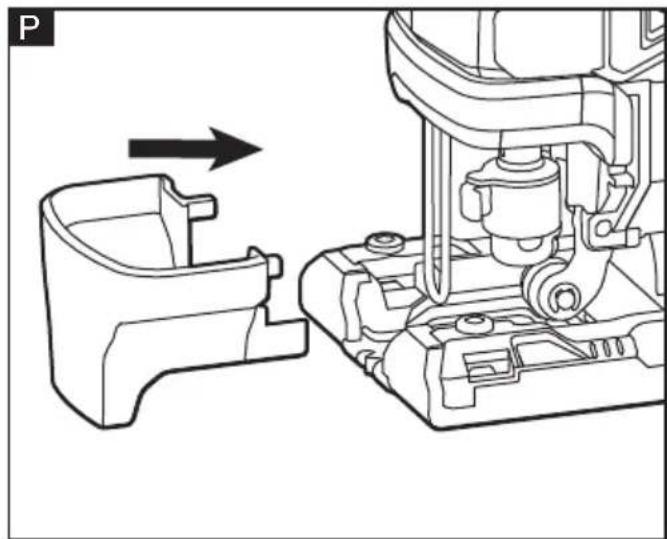
natural_image
Technical line drawing of a mechanical assembly with a component being inserted (no text or symbols)
natural_image
Technical line drawing of a mechanical assembly with no visible text or symbols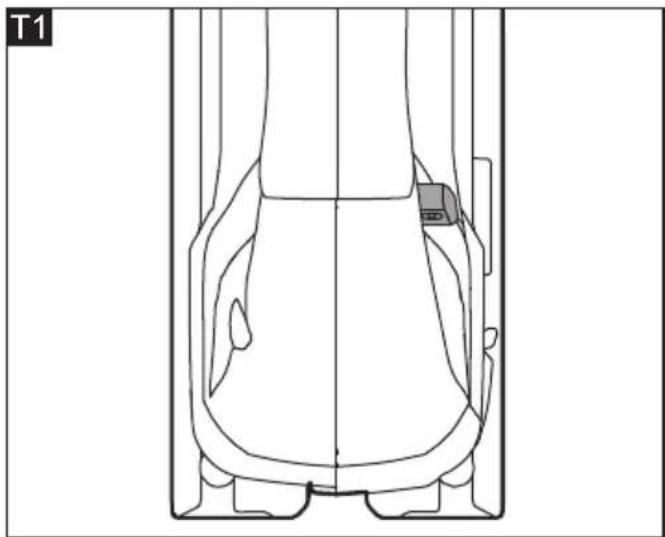
natural_image
Top-down schematic of a vehicle's internal structure, showing dashboard and seat components (no text or labels)
natural_image
Top-down schematic of a vehicle's internal body and seat structure (no text or labels)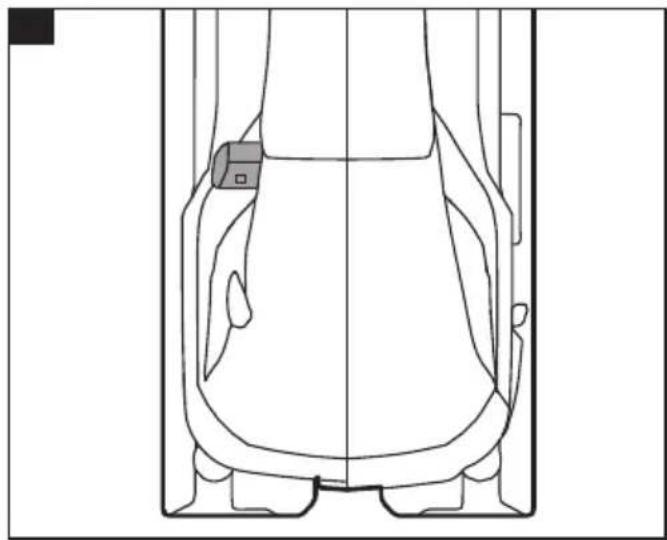
natural_image
Top-down line drawing of a human torso and shoulder (no text or symbols)
Peter Lameli
Technical Head

Klaus Peter Weinper
Head of Quality
Department (QD)
Symbols used in this manual Symbols used in this manual

WARNING!
WARNING!
Denotes impending danger. Non-observance of this warning may result in death or extremely severe injuries.

CAUTION!
CAUTION!
Denotes a possibly dangerous situation. Non-observance of this warning may result in slight injury or damage to property.

NOTE
NOTE
Denotes application tips and important information.
Symbols on the power tool Symbols

To reduce the risk of injury, read the operating instructions!

Disposal information for the old machine (see page 19)!
For your safety For your safety

WARNING!
WARNING!
Before using the power tool, please read and follow:
– these operating instructions,
- the "General safety instructions" on the handling of power tools in the enclosed booklet (leaflet-no.: 315.915),
- the currently valid site rules and the regulations for the prevention of accidents.
This power tool is state of the art and has been constructed in accordance with the acknowledged safety regulations.
Nevertheless, when in use, the power tool may be a danger to life and limb of the user or a third party, or the power tool or other property may be damaged.
The jigsaw may be used only
-asintended,
- in perfect working order.
Faults which impair safety must be repaired immediately.
Intended use Intended use
The jigsaw is designed
– for commercial use in industry and trade,
– for sawing metal, plastic and wood,
Safety warnings for jig saw Safety warnings
Hold the power tool by insulated gripping surfaces, when performing an operation where the cutting accessory may contact hidden wiring. Cutting accessory contacting a "live" wire may make exposed metal parts of the power tool "live" and could give the operator an electric shock.
Use clamps or another practical way to secure and support the workpiece to a stable platform. Holding the workpiece by hand or against your body leaves it unstable and may lead to loss of control.
on the power tool
Noise and vibration Noise and vibration
- The noise and vibration values have been determined in accordance with EN 62841. The A evaluated noise level of the power tool is typically:
- Sound pressure level L_pA : 78 dB(A);
- Sound power level L _WA : 89 dB(A);
- Uncertainty: K = 5.0 dB.
- Total vibration value:
- Emission value ah,B(cutting boards): <3.4 m/s ^2
- Emission value ah, M(cutting sheet metal): <4.0 m/s ^2
- Uncertainty: K=1.5 m/s ^2

CAUTION!
The indicated measurements refer to new power tools. Daily use causes the noise and vibration values to change.

NOTE
The vibration emission level given in this information sheet has been measured in accordance with a standardised test given in EN 62841 and may be used to compare one tool with another.
It may be used for a preliminary assessment of exposure. The declared vibration emission level represents the main applications of the tool. However if the tool is used for different applications, with different accessories or poorly maintained, the vibration emission may differ. This may significantly increase the exposure level over the total working period. For a precise estimation of the vibration load the times should also be considered during which the power tool is switched off or even running, but not actually
in use. This may significantly decrease the exposure level over the total working period. Identify additional safety measures to protect the operator from the effects of vibration such as: maintain the tool and the accessories, keep the hands warm, organisation of work patterns.

CAUTION!
CAUTION!
Wear ear protection at a sound pressure above 85 dB(A).
Technical specifications Technical
See figure B
Battery information:
| Battery | AP18.0(2.5Ah) | AP18.0(5.0Ah) |
| Weight of battery/kg | 0.42 0.72 | |
| Average battery life (depending on speed, tool diameter, load ...) /min | 5 | 10 |
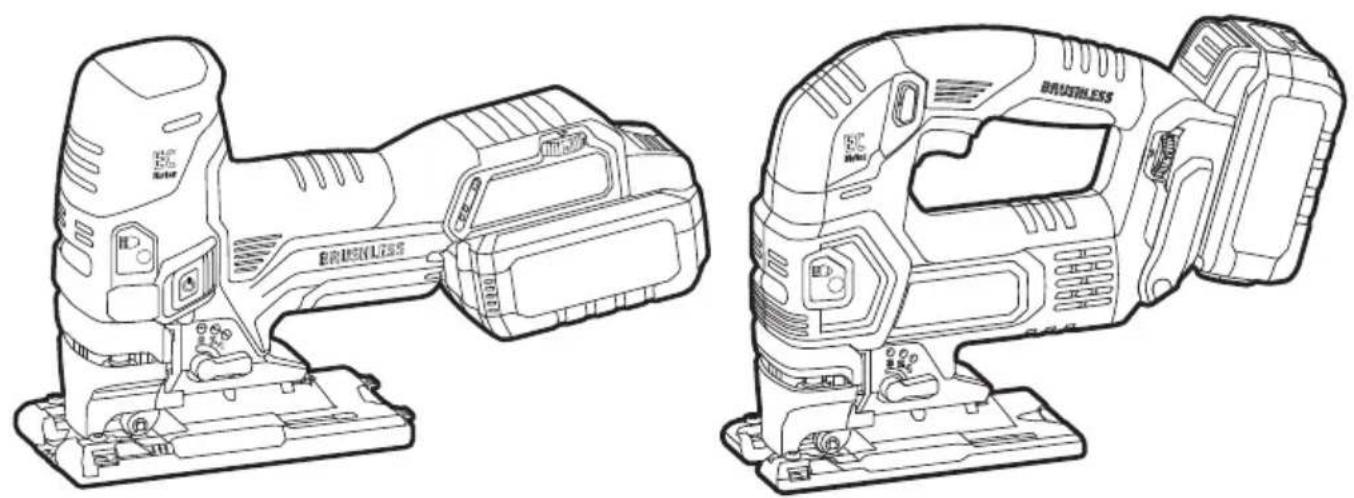
Overview Overview (see figure A)
The numbering of the product features refers to the illustration of the machine on the graphics page.
1 LED Light switch1 LED Light switch
2 Or/off switch 2 On/off switch
2a Lock button2a Lock button
3 Rating plate3 Rating plate
4 Speed control dial4 Speed control dial
5 State of charge indicator5 State of charge indic
6 Release button for battery6 Release button for
7 Li-ion battery (2.5 Ah or 5.0 Ah)7 Li-ion battery
8 LED light8 LED light
9 Tool-less blade change handle
10 Orbit-control level
11 Foot
12 Vacuum tube
Operating instructions

NOTE
When the power tool is switched off, the tool continues running briefly.
For further information on the manufacturer's products go to www.flex-tools.com.

WARNING!
Remove the battery before carrying out any work on the power tool.
Before switching on the power tool
Unpack the jigsaw and check that there are no missing or damaged parts.

NOTE
The batteries are not fully charged on delivery. Prior to initial operation, charge the batteries
full Refa to the charger operating manual.
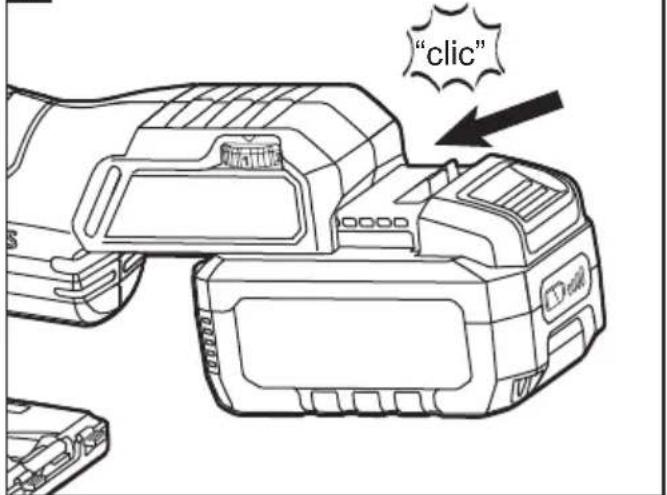
Inserting/replacing the battery
■ Press the charged battery 7 into the power tool until it clicks into place. (see figure C)
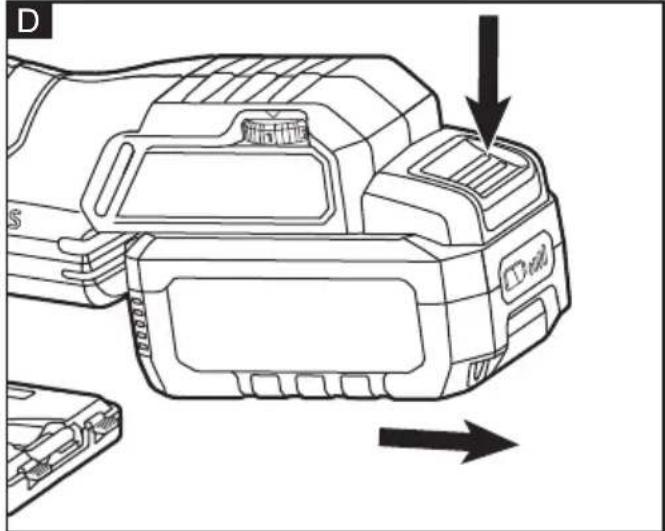
■ To remove, press the release button and pull out the battery (see figure D)

CAUTION!
When the device is not in use, protect the battery contacts. Loose metal parts may short-circuit the contacts; explosion and fire hazard!
Installing and Removing the Saw Blade

WARNING!
Always turn the tool off and remove the battery pack before making any adjustments or assembling parts.
To install the saw blade:
Insert the blade (with its teeth facing the cutting direction) into the slot of the tool-less blade handle as far as it can go. (see figure E) Pull down on the blade to verify that the blade is securely locked in place.
NOTICE:
Battenyinserting the saw blade, the back of
the blade must rest in the groove of the guide roller.
NOTICE:
The tool accepts most commonly available T-shank blades.
To remove the saw blade:
Rotating the tool-less blade handle and remove the saw blade. (see figure F)
Release the tool-less blade handle.

WARNING!
Use always protective gloves when removing the saw blade from the tool. The saw blade is sharp and may be hot after prolonged use.
Adjusting the Foot Bevel Angle Remove the hexagon wrench from the foot (see figure G). Adjusting the Foot Bevel Angle to different and equal positions and adapt to different needs and improve the service life.
To adjust the cutting angle
- Turn the tool upside down.
- Loosen the hex screw that secures the foot by the hexagon wrench.
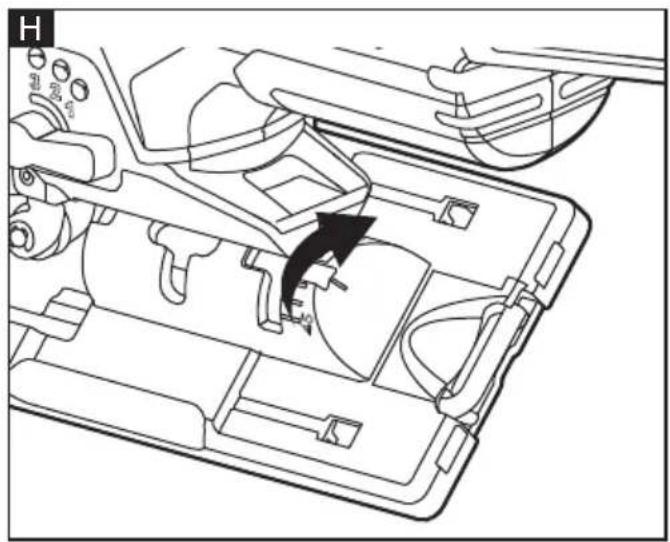
- Move the foot slightly forward and tilt it to the required angle (0° or 45°) using the scale (0° or 45°) that is marked on the base bracket.
- The foot has indents at 0^ and 45^ (tilt left or right) for easy angle setting. (see figure H).
Installing and disassembling of Installing and disassembling of accessories accessories Vacuum tube Vacuum tube
CAUTION!CAUTION!
Use the cover plate when cutting decorative veneers, plastics, etc. It protects sensitive or delicate surfaces from damage. Fit it on the back of the tool base
Cover plate Cover plate
Installation:
- First, the front part of the plate cover is snapped into the plate. (see figure I)
- Then the rear cover of the cover is aligned and then snapped in. (see figure J)
Disassembly:
- Firstly, the two card positions on the back of the plate cover are removed (see figure K)
- Then the bottom plate is turned down. After about 30^ , the front card position can be removed (see figure L).
Adapting boardAdapting board
Installation:
- Insert the adapting board from the front of the foot about a distance along the slot (a certain distance from the saw blade).
- When using the adapting board for the first time, insert the saw blade and switch on, align the foot surface, push the adapting board, and insert the adapting board along the slot (see Figure M) while the saw blade is sawed in the middle of the adapting board.
- A slit makes the adapting board and the saw blade fit properly to improve the cutting quality (see Figure N).
- When the adapting board is inserted, there are two limit positions, which
Disassembly:
- When the machine is off, remove the saw blade and pull out the adapting board directly (see Figure O).
Transparent Cover Transparent Cover
Installation: Insert the transparent cover from the front of the machine, snap the gearbox, and the limit post is aligned with the gearbox positioning groove. (see figure P).
Disassembly: Open the buckle (see figure Q), and remove the tranplant cover forward.
Vacuum tube Vacuum tube
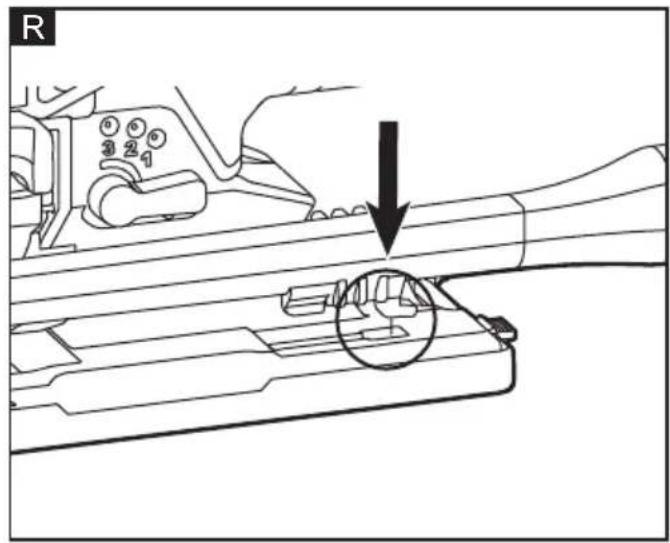
Installation:
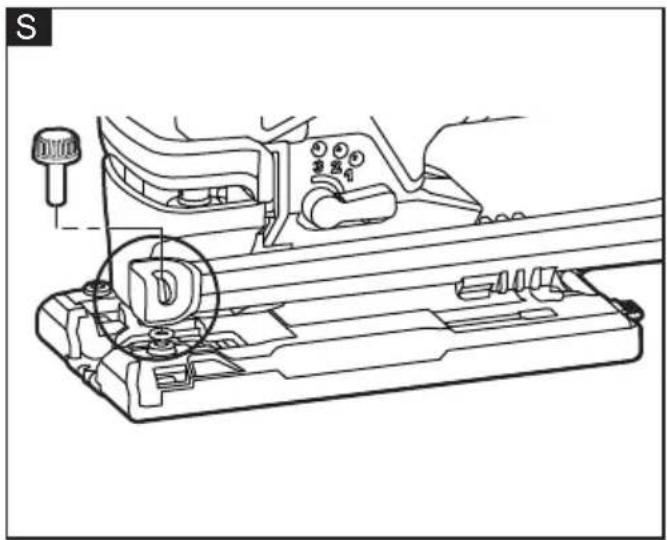
- Let the front of vacuum tube toward the saw blade, insert the middle snap into the slot on the bottom of the foot (see figure R),
- Push the vacuum tube backward, and align the front screw with the screw hole on the foot, screw the vacuum tube (see figure S).
- The vacuum tube can be mounted on either side of the right or left to accommodate cutting at different angles of the foot.
Disassembly:
- Loosen the screw and push the vacuum tube slightly forward to remove it directly.
Switching on and off Switching on and off JS 18.0-EC:
- Switching on: push the switch button forwards and release.
- Switching off : push the switch button forwards and release.
- The left and right switch buttons function are the same.
JSB 18.0-EC:
- Lock-off : Lock button to the far left. The on/off switch is locked and cannot be pressed. (see figure T1).
- On: Lock button moves to the middle so you can see it on the left and right. Now the on/off switch can be pressed to accelerate the machine. (see figure T2).
- Lock-on : With on/off switch fully pressed in and the lock button pushed to the far right, the on/off switch can be locked to the "on" position. Press the on/off switch again to release the lock(see figure T3).
LED LightLED Light
Your tool is equipped with an LED light, located on the front of the tool. This provides additional light on the surface of the workpiece for operation in lower-light areas.
The LED light will automatically turn on with a slight squeeze on the trigger switch before the tool starts running. It will turn off approximately 10 seconds after the trigger switch is released.
When the machine is equipped with a battery pack, the LED can be switched on and off as long as the LED switch (1) is pressed.
The LED light has a Memory function with save the last setting.
Speed adjusting dial Speed adjusting
The tool speed can be adjusted by turning the speed adjusting dial. You can get the highest speed at 5 and the lowest speed at 1.
Refer to the table to select the proper speed for the work piece to be cut. However, the appropriate speed may differ with the type or thickness of the workpiece. In general, higher speeds will allow you to cut workpieces faster but the service life of the blade will be reduced.
When the speed adjusting dial is in the position A, the tool automatically reduces the no-load speed to reduce the vibration under no-load.
Once the tool gets load, the tool speed reaches the highest value.
| Workpiece to be cut | Number on adjusting dial |
| Wood 4-A | |
| Mild steel 3-A | |
| Stainless steel 3-4 | |
| Aluminum 3-A | |
| plastics 1-4 |
Orbital-Action Settings Orbital-Action
Your tool is equipped with four orbital-action settings for optimal adaptation to the cutting speed, cutting capacity, cutting pattern, and the material being sawed.
The orbital action can be adjusted with the control lever:
The optimal orbital action setting for the respective application can be determined through practical testing. The following recommendations apply:
| Position | Cutting action | Applications |
| 0 | Straight line cutting action | For cutting mild steel, stainless steel and plastics. For clean cuts in wood and plywood |
| 1 | Small orbital action | For cutting mild steel, aluminum and hard wood |
| 2 | Medium orbital action | For cutting wood and plywood. For fast cutting in aluminum and mild steel. |
| 3 | Maximum orbital action | For fast cutting in wood and plywood |
NOTICE:NOTICE:
Always make test cuts in scrap material first to determine the best setting.
In order to reach full orbital action, the blade must be facing straight forward, the back of the blade must be resting in the groove of the roller, and the foot must be positioned all the way forward. Orbital action is not detectable when the saw is running freely. The saw must be cutting in order for orbital action to occur.
The cutting speed is easier to see when cutting thicker material.
Cutting Tips Cutting Tips

WARNING!
WARNING!
Before attaching the battery pack onto the tool, always check to determine that the switch performs properly and returns to the "OFF" position when released.

WARNING!
WARNING!
Always wear safety goggles or safety glasses with side shields during power tool operation or when blowing dust. If operation is dusty, also wearing dust mask.

WARNING!
To avoid loss of control and serious injury, make sure that the blade reaches the full desired speed before touching it to the workpiece.
Face the good side of the material down and secure it in a bench vise, or clamp it down. Draw cutting lines or designs on the side of the material facing towards you. Place the front edge of the saw foot on the workpiece and align the blade with the line to be cut. Hold the jig saw firmly,
turn it on, and press down to keep the saw foot flat against the work as you slowly push the saw into the workpiece in the direction of the cut. Gradually increase the cutting speed, cutting close to the line (unless you want to leave stock for finish sanding). You may have to adjust or relocate the vise or clamps as you cut to keep the work stable. Do not force the saw, or the blade teeth may rub and wear without cutting and the blade may break. Let the saw do most of the work. When following curves, cut slowly so that the blade can cut across the grain. This will give you an accurate cut and will prevent the blade from wandering.
Cutting with a StraightedgeCutting with
Always use a rough-cut blade when possible.
Clamp a straightedge onto the workpiece parallel to the line of cut and flush with the side of the saw foot.
Either a.) first mark the line of cut and then position the straightedge parallel and at the same distance as between the blade and the side edge of the foot or b.) first mark the side edge of the foot and then clamp the straightedge on the mark and parallel to the cut line As you cut, keep the saw-foot edge flush against the straightedge and flat on the workpiece.
Plunge Cutting Plunge Cutting
Plunge cutting is useful and time-saving in making rough openings in softer materials. It is not necessary to drill a hole for an inside or pocket cut.
Draw lines for the opening.
Hold the saw firmly and tilt it forward so that the toe of the saw foot rests on the work, but with the blade remains well clear of the work.
Start the motor, and then very gradually lower the blade while keeping the toe on the workpiece. When the blade touches the work, continue pressing down on the toe of the saw foot and slowly pivot the saw like a hinge until the blade cuts through and the foot rests flat on the work.
Saw ahead on the line of cut line.
NOTICE:NOTICE:
We do not recommend plunge cutting with a scroll blade.
To make sharp corners, cut up to the corner, then stop the saw and back up slightly before rounding the corner. After the opening is
complete, go back to each corner and cut it from the opposite direction to square it off.

WARNING!
WARNING!
Do not plunge cut into metal surfaces.
Metal Cutting Metal Cutting

WARNING!
WARNING!
Never use the wood-cutting blade for cutting metals. Failure to do so could result in serious personal injury.
Clamp the material when cutting metal.
Be sure to move the saw along slowly.
Use lower speeds.
Do not twist, bend, or force the blade.
If the straightedge bounces, use a blade with finer teeth.
If the blade seems clogged when cutting soft metal, use a blade with coarser teeth.
For easier cutting, lubricate the blade with a stick of cutting wax, if available, or with cutting oil when cutting steel.
Thin metal should be sandwiched between two pieces of wood or tightly clamped onto a single piece of wood (wood on top of the metal). Draw the cut lines or design on the upper piece of wood. When cutting aluminum extrusion or angle iron, clamp the work in a bench vise and saw close to the vise jaws.
When sawing tubing and the diameter is larger than the blade is deep, cut through the wall of the tubing and then insert the blade into the cut, rotating the tube as you saw.
Maintenance and care Maintenance and

WARNING!
WARNING!
Remove the battery before carrying out any work on the power tool.
CleaningCleaning
■Clean the power tool and grille in front of the vent slots regularly. Frequency of cleaning is dependent on the material and duration of use.
■Regularly blow out the housing interior and motor with dry compressed air.
Spare parts and accessories Spare parts ai
For other accessories, in particular tools and jig saw accessories, can be found in the manufacturer's catalogues.
Exploded drawings and spare-part lists can be found on our homepage: www.flex-tools.com.
Disposal information Disposal information
- mains operated power tool by removing the power cord,
- battery operated power tool by removing the battery.

EU countries only
Do not throw electric power tools into the household waste! In accordance with the European
Directive 2012/19/EU on Waste Electrical and Electronic Equipment and transposition into national law used electric power tools must be collected separately and recycled in an environmentally friendly manner.

Raw material recovery instead of waste Raw disposal.disposal.
Device, accessories and packaging should be recycled in an environmentally friendly manner. Plastic parts are identified for recycling according to material type.

WARNING!
WARNING!
Do not throw batteries into the household waste, fire or water. Do not open used batteries.
EU countries only:
In accordance with Directive 2006/66/EC defective or used batteries must be recycled.

NOTE
NOTE
Please ask your dealer about disposal options!

Declaration of Conformity Declaration
We as the manufacturer: FLEX FLEX
Elektrowerkzeuge GmbH Elektrowerkzeuge GmbH, Bu Bahnhofstr. 15, 71711 Steinheim, Germany Bahnhofs declare under our sole responsibility, that the product(s) described under „Technical specifications“ fulfills all the relevant provisions of The Supply of Machinery (Safety) The Supply of Ma Regulations Regulations S.I. 2008/1597 and also fulfill all the relevant provisions of the following UK Regulations:
Electromagnetic Compatibility Regulations Electromag S.I. 2016/1091, The Restriction of the Use of The Res Certain Hazardous Substances in Electrical Certain H
material recovery instead of waste and Electronic Equipment Regulations
S.I. 2012/3032 and are manufactured in accordance with the following designated Standards:
BS EN 62841-1:2015, BS EN 62841-2-11:2018, BS EN 55014-1:2017, BS EN 55014-2:2015
Place of declaration: Steinheim, Germany. Responsible person: Peter Lameli, Technical Director – FLEX-Elektrowerkzeuge GmbH
Contact details for Great Britain: FLEX Power Tools Limited, Unit 8 Anglo Office Park, Lincoln Road, HP 12, 3RH Buckinghamshire, United Kingdom.
CE -Declaration of Conformity-Declaration

Peter Lameli Technical Head
Klaus Peter Weinper Head of Quality Department (QD)
We declare under our sole responsibility that the product described under “Technical specifications” conforms to the following standards or normative documents:
EN 62841 in accordance with the regulations of the directives 2014/30/EU, 2006/42/EC, 2011/65/EU.
Responsible for technical documents:
Peter Lameli Technical Head

Klaus Peter Weinper Head of Quality Department (QD)
12.05.2021
Exemption from liability
The manufacturer and his representative are not liable for any damage and lost profit due to interruption in business caused by the product or by an unusable product. The manufacturer and his representative are not liable for any damage which was caused by improper use of the power tool or by use of the power tool with products from other manufacturers.

Peter Lameli
Technical Head

Klaus Peter Weinper
Head of Quality
Department (QD)
7 Li-ion accu (2,5 Ah of 5,0 Ah)7 Li-ion accu (2,5 Ah
8 Led-lamp
OPMERKING: OPMERKING:
OPMERKING: OPMERKING:
OPMERKING: OPMERKING:
OPMERKING: OPMERKING:

Peter Lameli
Technical Head

Klaus Peter Weinper
Head of Quality
Department (QD)

Peter Lameli
Technical Head

Klaus Peter Weinper
Head of Quality
Department (QD)

Peter Lameli
Technical Head

Klaus Peter Weinper
Head of Quality
Department (QD)
| Battery | AP18.0(2.5Ah) | AP18.0(5.0Ah) |
| Weight of battery/kg | 0.42 0.72 | |
| Average battery life (depending on speed, tool diameter, load ...)/min | 5 | 10 |
INDSTERAlter 5,0 Ah)

Peter Lameli
Technical Head

Klaus Peter Weinper
Head of Quality
Department (QD)
Peter Lameli Technical Head
Klaus Peter Weinper Head of Quality Department (QD)

VAROITUS!
VAROITUS!

Peter Lameli
Technical Head

Klaus Peter Weinper
Head of Quality
Department (QD)
8 LED lamba8 LED lamba

Peter Lameli
Technical Head

Klaus Peter Weinper
Head of Quality
Department (QD)
Lampka LED Lampka LED
Peter Lameli Technical Head
Klaus Peter Weinper Head of Quality Department (QD)
15, D-71711 Steinheim/Murr

Peter Lameli Technical Head
Klaus Peter Weinper Head of Quality Department (QD)
Peter Lameli Technical Head

Klaus Peter Weinper Head of Quality Department (QD)

Peter Lameli
Technical Head

Klaus Peter Weinper
Head of Quality
Department (QD)
Regulator brzine Regulator brzine
Brzina alata može se podesiti okretanjem kotačića za regulaciju brzine. Najviša brzina je na broju 5, a najniža na broju 1.
Pogledajte tablicu pa odaberite odgovarajuću brzinu za izrađevinu koju ćete rezati. Međutim, odgovarajuća brzina može se razlikovati ovisno o vrsti i debljini izrađevine. Općenito gledano, veće brzine omogućuju brže rezanje izrađevina, ali životni vijek lista se pritom smanjuje.

Peter Lameli
Technical Head

Klaus Peter Weinper
Head of Quality
Department (QD)
Upute za zbrinjavanje Upute za zbrinjavanje

UPOZORENJEI
UPOZORENJE!
Hrup in tresljaji Hrup in tresljaji
7 Li-ionski akumulator (2,5 A ali 5,0 A ali 6,0 A)
8 LED-lučkáka
9 Ročaj za menjavo rezila brez orodja
10 Raven nadzora orbite
11 Noga
12 Vakuumska cev
Navodila za uporabo

OPOMBA

Peter Lameli
Technical Head

Klaus Peter Weinper
Head of Quality
Department (QD)

Peter Lameli
Technical Head

Klaus Peter Weinper
Head of Quality
Department (QD)

Peter Lameli
Technical Head

Klaus Peter Weinper
Head of Quality
Department (QD)

Peter Lameli
Technical Head

Klaus Peter Weinper
Head of Quality
Department (QD)

Peter Lameli
Technical Head

Klaus Peter Weinper
Head of Quality
Department (QD)
⚠️ BRĪDINĀJUMS! BRĪDINĀJUMS!
⚠️ BRĪDINĀJUMS! BRĪDINĀJUMS!
⚠️ BRĪDINĀJUMS! BRĪDINĀJUMS!
⚠️ BRĪDINĀJUMS! BRĪDINĀJUMS!
⚠️ BRĪDINĀJUMS! BRĪDINĀJUMS!
⚠️ BRĪDINĀJUMS! BRĪDINĀJUMS!
⚠️ BRĪDINĀJUMS! BRĪDINĀJUMS!
⚠️ BRĪDINĀJUMS! BRĪDINĀJUMS!
Pirms uzsākat darbu ar elektroinstrumentu iznemiet akumulatoru.
Tirišana Tirišana
⚠️ BRĪDINĀJUMS! BRĪDINĀJUMS!
Deaktivizējiet nolietotus elektroinstrumentus:
⚠️ BRĪDINĀJUMS! BRĪDINĀJUMS!

Peter Lameli
Technical Head

Klaus Peter Weinper
Head of Quality
Department (QD)
m = 311
info@flex-tools.com info@flex-tools.com
www.flex-tools.comwww.flex-tools.com