Sonicare 4100 Series HX3689 - Toothbrush PHILIPS - Free user manual and instructions
Find the device manual for free Sonicare 4100 Series HX3689 PHILIPS in PDF.

User questions about Sonicare 4100 Series HX3689 PHILIPS
0 question about this device. Answer the ones you know or ask your own.
Ask a new question about this device
Download the instructions for your Toothbrush in PDF format for free! Find your manual Sonicare 4100 Series HX3689 - PHILIPS and take your electronic device back in hand. On this page are published all the documents necessary for the use of your device. Sonicare 4100 Series HX3689 by PHILIPS.
USER MANUAL Sonicare 4100 Series HX3689 PHILIPS
natural_image
Simple line drawing of an open book with a grid pattern on the left and a closed page on the right (no text or symbols)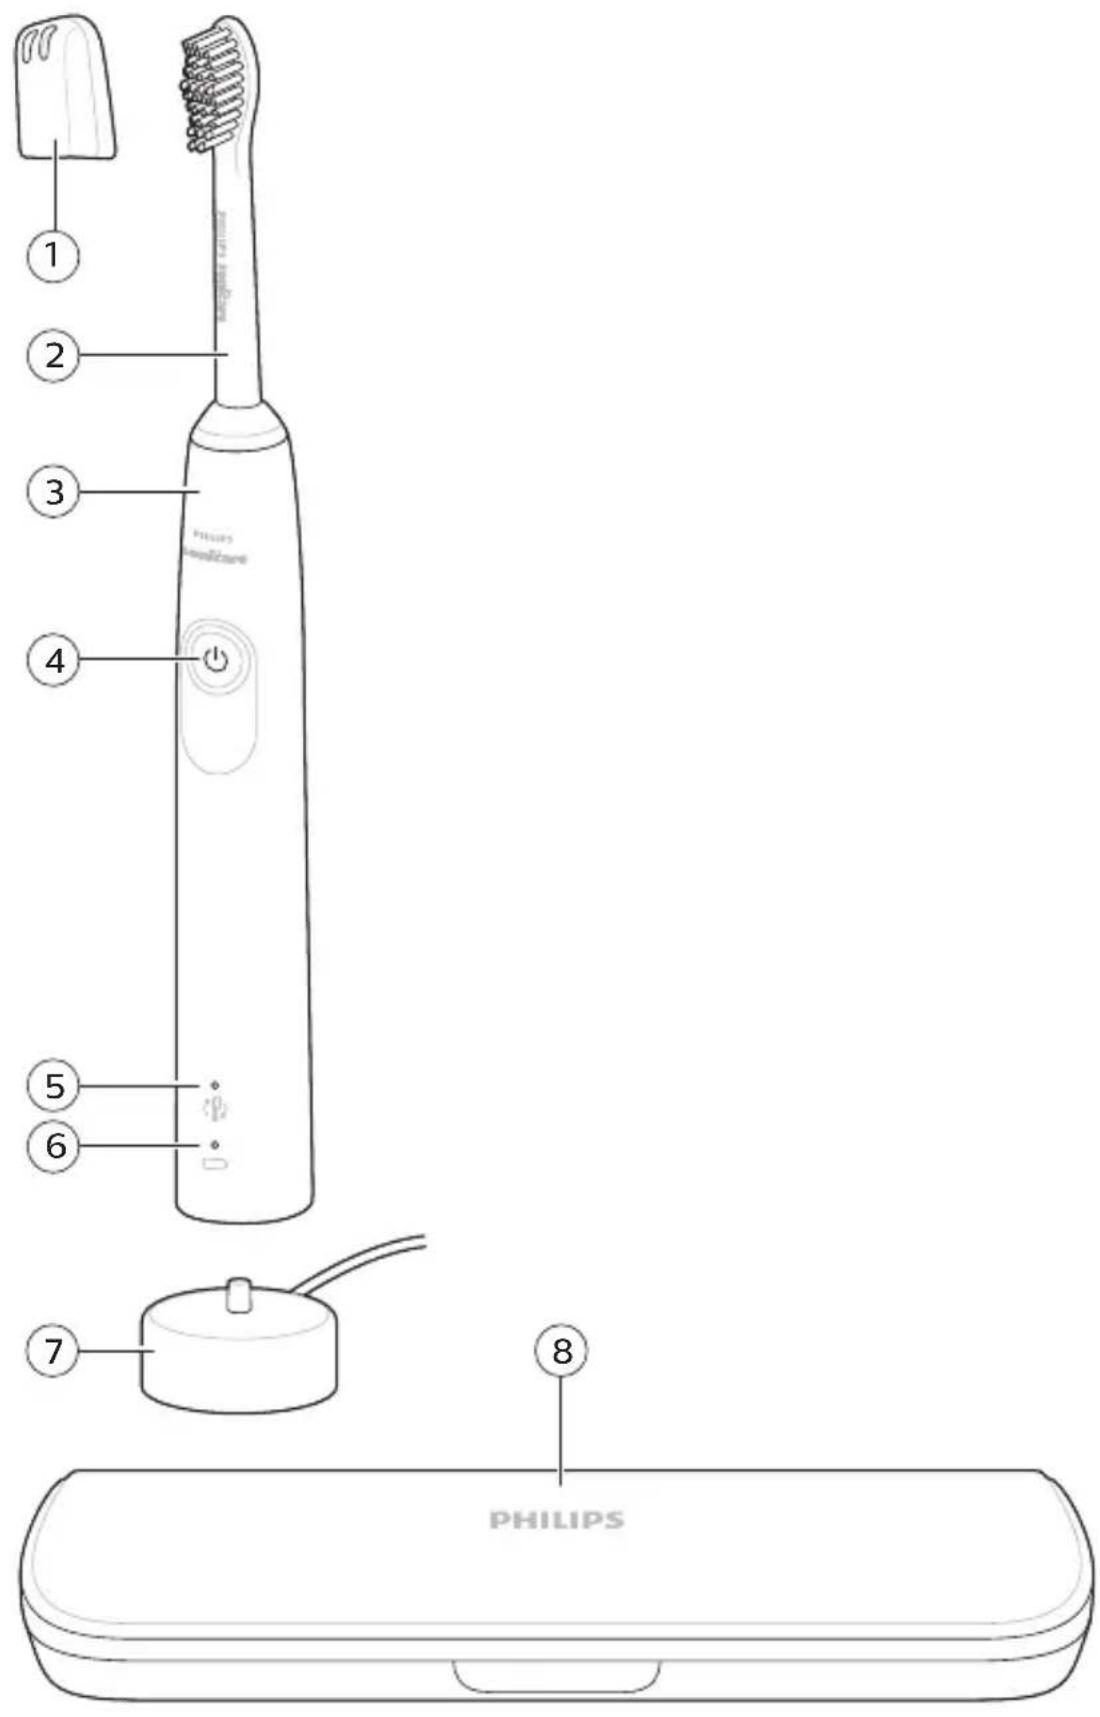
text_image
1 2 3 4 5 6 7 8 PHILIPSEnglish 6
Azərbaycanca 21
Čeština 37
Dansk 52
Deutsch 67
Eesti 84
Español 99
Français 115
Hrvatski 132
Italiano 148
Latviešu 164
Lietuviškai 179
Magyar 195
Nederlands 211
Norsk 227
O'zbek 242
Polski 259
Português 276
Română 292
Shqip 308
Slovenščina 324
Slovensky 339
Srpski 355
Suomi 371
Svenska 387
Türkmençe 402
Ελληνικά 418
Български 436
Кыргызча 454
Македонски 471
Русский 488
Точикй 506
Українська 524
Қазақша 541
Ruijtntu 558
phosphorus 576
הכלה 594
Introduction
Congratulations on your purchase and welcome to Philips! To fully benefit from the support that Philips offers, register your product at www.philips.com/welcome.
Important safety information
Only use the product for its intended purpose. Read this important information carefully before you use the product and its batteries and accessories, and save it for future reference. Misuse can lead to hazards or serious injuries.
Warnings
- Charge only with Philips WAA1001, WAA2001, UL or equivalent safety approved adapters with input ratings (100 - 240V\~; 50/60Hz; 3.5W) and output ratings (5Vdc; 2.5W). For the list of adapters, please see www.philips.com/support.
- Keep the charger away from water.
- Make sure the handle is completely dry before you connect the USB charger.
- This appliance can be used by children and persons with reduced physical, sensory or mental capabilities or lack of experience and knowledge if they have been given supervision or instruction concerning use of the appliance in a safe way and understand the hazards involved. Cleaning and user maintenance shall not be made by children without supervision.
- Children should be supervised to ensure that they do not play with the product.
- Only use original Philips accessories or consumables. Only use the USB charger provided with the product with an UL (Class 2) or equivalent approved 5V DC adapter (IPX4 or higher).
- This appliance contains no user-serviceable parts. If the appliance is damaged, stop using it and contact the Consumer Care Center in your country (see 'Warranty and support').
-
Do not charge the product outdoors or near heated surfaces.
-
Do not clean any part of the product in the dishwasher.
- This appliance has only been designed for cleaning teeth, gums and tongue.
- Stop using the appliance and consult your dentist/doctor if excessive bleeding occurs after use, if bleeding continues to occur after 1 week of use or if you experience discomfort or pain.
- If you have had oral or gum surgery in the previous 2 months, consult your dentist before you use this appliance.
- If you have a pacemaker or other implanted device, contact your doctor or the manufacturer of the implanted device prior to use.
- If you have medical concerns, consult your doctor before you use this appliance.
- This appliance is a personal care device and is not intended for use on multiple patients in a dental practice or institution.
- Stop using a brush head with crushed or bent bristles. Replace the brush head every 3 months or sooner if signs of wear appear.
- If your toothpaste contains peroxide, baking soda or bicarbonate (common in whitening toothpastes), thoroughly clean the brush head with soap and water after each use. This prevents possible cracking of the plastic.
- Avoid direct contact with products that contain essential oils or coconut oil. Contact may result in bristles dislodging.
- Charge, use and store the product at a temperature between 32^ F / 0 °C and 104^ F / 40 °C.
- Keep product and batteries away from fire and do not expose them to direct sunlight or high temperatures.
- If the product becomes abnormally hot or smelly, changes color or if charging takes longer than usual, stop using and charging the product and contact Philips.
-
Do not place products and their batteries in microwave ovens or on induction cookers.
-
Do not open, modify, pierce, damage or dismantle the product or battery to prevent batteries from heating up or releasing toxic or hazardous substances. Do not short-circuit, overcharge or reverse charge batteries.
- If batteries are damaged or leaking, avoid contact with the skin or eyes. If this occurs, immediately rinse well with water and seek medical care.
Electromagnetic fields (EMF)
This Philips appliance complies with all applicable standards and regulations regarding exposure to electromagnetic fields.
Radio Equipment Directive
Hereby, Philips declares that electric toothbrushes equipped with a radio frequency interface (Bluetooth or BrushSync) are in compliance with Directive 2014/53/EU.
- Bluetooth radio frequency: 2.4 GHz
- Maximum Bluetooth radio frequency power: 3 dBm
- NFC radio frequency: 13.56 MHz
- Maximum NFC radio frequency power: 30.16 dBm The full text of the EU declaration of conformity is available at the following internet address:
www.philips.com/support
Intended use
3000 and 4000 series power toothbrushes are intended to remove adherent plaque and food debris from the teeth to reduce tooth decay and improve and maintain oral health. 3000 and 4000 series power toothbrushes are intended for consumer home use. Use by children should be with adult supervision.
Your Philips Sonicare toothbrush
1 Hygienic travel cap
2 Brush head
3 Handle
4 Power on/off button
5 Brush head replacement reminder
6 Battery level indicator
7 USB charger (wall adapter not included)
8 Travel case (Specific models only)
Note: Wall adapter not included. Only use 5V adapter (Type A).
Note: Brush heads may vary.
Getting started
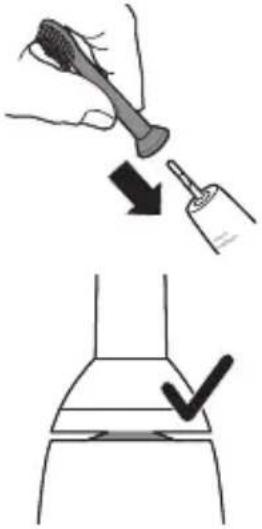
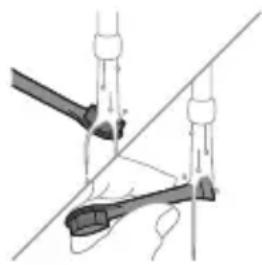
Attaching the brush head
text_image
Diagram illustrating hairpin usage and inspection steps, showing hand positioning and checkmark for inspection1 Align the brush head so the bristles point in the same direction as the front of the handle.
2 Firmly press the brush head down onto the metal shaft until it stops.
Note: It is normal to see a slight gap between the brush head and the handle. This allows the brush head to vibrate properly.
Charging your Philips Sonicare
1 Plug the USB charging cord into a wall adapter that is connected to a electrical outlet.
2 Place the handle on the charger.
- The light of the battery level indicator illuminates and the handle beeps twice. This indicates that the toothbrush is charging.
Note: It can take up to 24 hours to fully charge the battery, but you can use the Philips Sonicare toothbrush before it is fully charged.
Using your Philips Sonicare toothbrush
If you are using your Sonicare toothbrush for the first time, it is normal to feel more vibration than when using a non-electric toothbrush. It is common for first time users to apply too much pressure. Only apply gentle pressure and let the toothbrush do the brushing for you.
Please follow brushing instructions below for the best experience. To help you transition to your new Sonicare power toothbrush, it comes with the EasyStart feature turned on. This feature gently increases the power over the first 14 brushings to help you adapt to brushing with a Philips Sonicare toothbrush.
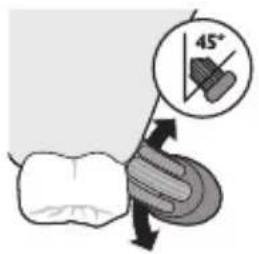
Brushing instructions
text_image
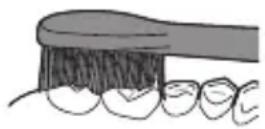
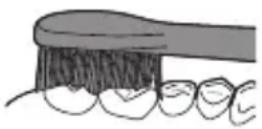
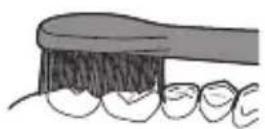
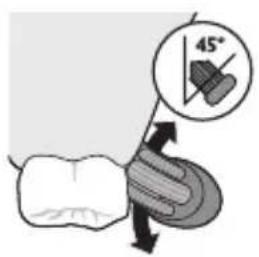
45°1 Wet the bristles and apply a small amount of toothpaste.
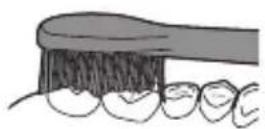
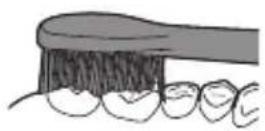
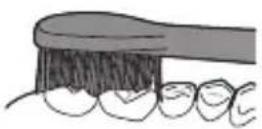
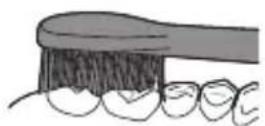
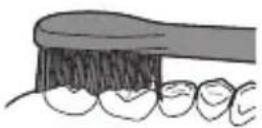
2 Place the toothbrush bristles against the teeth at a slight angle (45 degrees), pressing gently to make the bristles reach the gumline or slightly beneath the gumline.
Note: Keep the center of the brush in contact with the teeth at all times.
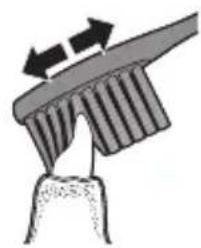
3 Press the power on/off button to turn on the Philips Sonicare.
4 Gently keep the bristles placed on the teeth and in the gumline. Brush your teeth with small back and forth motion so the bristles reach between the teeth. Continue this motion throughout your brushing cycle.
Note: The bristles should slightly flare. It is not recommended to scrub as you would with a manual toothbrush.
natural_image
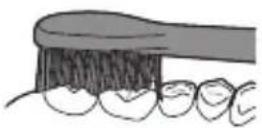
Diagram of a toothbrush applying force to a tooth (no text or symbols)5 To clean the inside surfaces of the front teeth, tilt the brush handle semi-upright and make several vertical overlapping brushing strokes on each tooth.
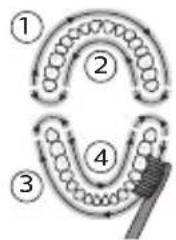
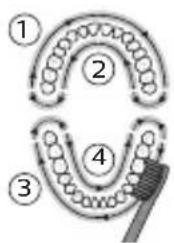
Note: To make sure you brush evenly throughout the mouth, divide your mouth into 4 sections using the QuadPacer feature (see chapter 'Features').

flowchart
graph TD
    A["①"] --> B["②"]
    B --> C["③"]
    C --> D["④"]
    D --> E["⑤"]
    E --> A
6 Begin brushing in section 1 (outside upper teeth) and brush for 30 seconds before you move to section 2 (inside upper teeth). Continue brushing in section 3 (outside lower teeth) and brush for 30 seconds before you move to section 4 (inside lower teeth).
7 After you have completed the brushing cycle, you can spend additional time brushing the chewing surfaces of your teeth and areas where staining occurs. You can also brush your tongue, with the toothbrush turned on or off, as you prefer. Your Philips Sonicare toothbrush should be safe to use on braced (brush heads wear out sooner when used on braces) and dental restorations (fillings, crowns, veneers) if they are properly adhered and not compromised. If a problem occurs, please follow up with a dental professional.
Note: When the Philips Sonicare toothbrush is used in clinical studies, the handle should be used in clean mode, fully charged and the EasyStart feature deactivated.
Charging and battery status
1 Attach the USB charging cord to a wall adapter, plug the wall adapter into an electrical wall outlet.
2 Place the handle on the charger.
Note: The handle will emit 2 short beeps to confirm that the handle is placed properly on the charger and is charging.
Note: This Philips Sonicare toothbrush is designed to provide at least 28 brushing sessions, each session lasting 2 minutes (14 days if used twice per day). The battery level indicator shows the battery status when you complete the 2-minute brushing session, when you pause the handle, or while it is charging.
Battery status (when handle is on a working charger)
Battery status Battery indicator
Full Solid green (turns off after 30
seconds)
Charging Flashing green
Battery status (When handle is not placed on charger)
Battery status Battery indicator Sound
Full Solid green -
Partially full Flashing green -
Low Flashing orange 3 beeps
Empty Flashing orange 2 sets of 5 beeps
Note: To save energy, the battery light will turn off when not in use.
Note: When the battery is completely empty, the Philips Sonicare toothbrush turns off. Place the Philips Sonicare toothbrush on the charger to charge it.
Note: To keep the battery fully charged at all times, you may keep your Philips Sonicare toothbrush on the charger when not in use.
Features
- Modes (for 4000 series)
- EasyStart
- Brush head replacement reminder
- Pressure sensor
- Quadpacer
- SmarTimer
Modes (for 4000 series)
Your power toothbrush gives you the option to choose between sensitive and clean modes.
Note: When you use the toothbrush for the first time, the default setting is the sensitive mode.
To change modes:
- Press the power on/off button once to turn on the toothbrush.
- Press a second time within 2 seconds to change the mode.
- Press a third time within 2 seconds to pause. After 2 seconds of brushing, pressing the power button again will also pause the toothbrush.
EasyStart
This Philips Sonicare model comes with the EasyStart feature activated. The EasyStart feature gently increases the power over the first 14 brushings to help you get used to the brushing with the Philips Sonicare.
To deactivate EasyStart see 'Activating or deactivating features'.
Brush head replacement reminder
Your Philips Sonicare is equipped with BrushSync technology that tracks the wear of your brush head.
Note: This feature only works with Philips Sonicare smart brush heads with BrushSync technology.
1 When attaching a new smart brush head for the first time the handle recognizes that you have a Philips brush head with BrushSync technology and begins tracking brush head wear.
2 Over time, based on the pressure you apply and the amount of time used, the handle will track brush head wear in order to determine the optimal time to change your brush head. This feature gives you the guarantee for the best cleaning and care of your teeth.
3 When the brush head replacement reminder light lights up amber, you should replace your brush head.
To deactivate the brush head replacement reminder see 'Activating or deactivating features'.
natural_image
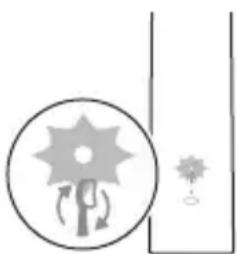
Simple line drawing of a sunburst symbol inside a circle with arrows, next to a small star-like shape (no text or labels)Pressure Sensor
Your Philips Sonicare is equipped with an advanced sensor that measures the pressure you apply while brushing. If you apply too much pressure, the toothbrush will provide immediate feedback to indicate that you need to reduce the pressure. This feedback is given by a change in vibration and therefore brushing sensation and sound. Additionally, the brush head replacement reminder light will flash amber.
To deactivate the pressure sensor see 'Activating or deactivating features'.
QuadPacer
flowchart
graph TD
    A["①"] --> B["②"]
    B --> C["③"]
    C --> D["④"]
    D --> E["End"]
The QuadPacer is an interval timer that has a short beep and pause to remind you to brush the 4 sections of your mouth evenly and thoroughly. This Philips Sonicare toothbrush comes with the QuadPacer feature activated.
SmarTimer
The SmarTimer indicates that your brushing cycle is complete by automatically turning off the toothbrush at the end of the brushing cycle.
Dental professionals recommend brushing no less than 2 minutes twice a day.
Note: If you press the power on/off button after you started the brushing cycle, the toothbrush will pause.
After a pause of 15 seconds, the SmarTimer resets.
Activating or deactivating features
You can activate or deactivate the following features of your toothbrush:
- EasyStart
- Brush head replacement reminder
- Pressure sensor
To activate or deactivate these features, follow the instructions below:
EasyStart
1 Put the handle on the plugged-in charger.
2 Press and hold the power on/off button while the handle remains on the charger.
3 Keep the power on/off button pressed until you hear a single short beep (after 3 seconds).
4 Release the power on/off button.
- Triple tone of low-med-high means the EasyStart feature has been activated. The battery level indicator light will also blink green 2 times to confirm activation.
- Triple tone of high-med-low means the EasyStart feature has been deactivated. The battery level indicator light will blink amber 1 time to confirm deactivation.
Note: To achieve clinical efficacy, EasyStart needs to be deactivated.
Brush head replacement reminder
Note: You can only activate or deactivate the brush head replacement reminder when a smart brush head is on the handle.
Note: New smart brush heads come with the brush head replacement reminder feature activated.
1 Put the handle on the plugged-in charger.
2 Press and hold the power on/off button while the handle remains on the charger.
3 Keep the power on/off button pressed until you hear a series of two short beeps (after 5 seconds).
4 Release the power on/off button.
- Triple tone of low-med-high means the brush head replacement reminder feature has been activated. The battery level indicator light will also blink green 2 times to confirm activation.
- Triple tone of high-med-low means the brush head replacement reminder feature has been deactivated. The battery level indicator light will blink amber 1 time to confirm deactivation.
Pressure sensor
1 Put the handle on the plugged-in charger.
2 Press and hold the power on/off button while the handle remains on the charger.
3 Keep the power on/off button pressed until you hear a series of three short beeps (after 7 seconds).
4 Release the power on/off button.
- Triple tone of low-med-high means the pressure sensor feature has been activated. The battery level indicator light will also blink green 2 times to confirm activation.
- Triple tone of high-med-low means the pressure sensor feature has been deactivated. The battery level indicator light will blink amber 1 time to confirm deactivation.
If you continue holding the power on/off button after the three short beeps, the activate/deactivate sequence repeats.
Cleaning
You should clean your Philips Sonicare toothbrush regularly to remove toothpaste and other residue. Failure to clean your Philips Sonicare toothbrush may result in an unhygienic product and damage to it may occur.
Warning: Do not clean product or accessories with sharp objects or in dishwasher, microwave, with chemicals or in boiling hot water
Toothbrush handle
natural_image
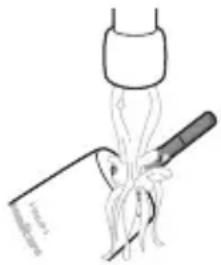
Diagram of a medical procedure showing a tool interacting with tissue manipulation using a pipette (no text or labels)1 Remove the brush head and rinse the metal shaft area with warm water. Make sure you remove any residual toothpaste.
Caution: Do not push on the rubber seal on the metal shaft with sharp objects, as this may cause damage.
2 Wipe the entire surface of the handle with a damp cloth.
Note: Do not tap the handle on the sink to remove excess water.
Brush head
natural_image
Diagram of a mechanical or electrical component with two arms and a central shaft, no visible text or symbols1 Rinse the brush head and bristles after each use.
2 Remove the brush head from the handle and rinse the brush head connection with warm water at least once a week. Rinse the travel cap as often as needed.
Charger
1 Unplug the charger before you clean it.
2 Wipe the surface of the charger with a damp cloth.
Travel case
Rinse with warm water and use a damp cloth to clean inside of travel case.
Storage
If you are not going to use the product for a long time, unplug it, clean it (see chapter 'Cleaning') and store it in a cool and dry place away from direct sunlight.
Replacement
Brush head
Replace Philips Sonicare brush heads every 3 months to achieve optimal results. Use only Philips Sonicare replacement brush heads.
Locating the model number
Look on the bottom of the Philips Sonicare toothbrush handle for the model number (HX36XX).
Warranty and support
If you need information or support, please visit www.philips.com/support or read the international warranty leaflet.
Warranty restrictions
The terms of the international warranty do not cover the following:
- Brush heads.
- Damage caused by use of unauthorized replacement parts.
- Damage caused by misuse, abuse, neglect, alterations or unauthorized repair.
- Normal wear and tear, including chips, scratches, abrasions, discoloration or fading.
Recycling
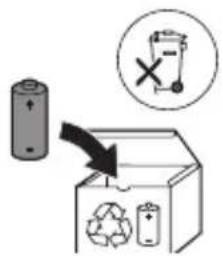
- This symbol means that electrical products and batteries shall not be disposed of with normal household waste.
- Follow your country's rules for the separate collection of electrical products and batteries.
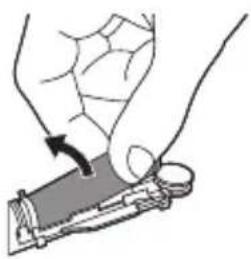
Removal of built-in rechargeable battery
The built-in rechargeable battery must only be removed by a qualified professional when the appliance is discarded. Before removing the battery, make sure that the battery is completely empty.
Take any necessary safety precautions when you handle tools to open the appliance and when you dispose of the rechargeable battery. Be sure to protect your eyes, hands, fingers, and the surface on which you work.
When you handle batteries, make sure that your hands, the product and the batteries are dry.
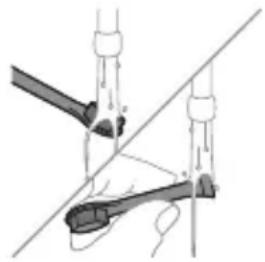
To avoid accidental short-circuiting of batteries after removal, do not let battery terminals come into contact with metal objects (e.g. coins, hairpins, rings). Do not wrap batteries in aluminum foil. Tape battery terminals or put batteries in a plastic bag before you discard them.
Removing the rechargeable battery
Before removing the battery, make sure that the battery is completely empty.
To remove the rechargeable battery, you need a towel or cloth, a hammer and a flat-head (standard) screwdriver.
1 To deplete the rechargeable battery of any charge, remove the handle from the charger, turn on the Philips Sonicare and let it run until it stops. Repeat this step until you can no longer turn on the Philips Sonicare.
natural_image
Illustration of a hand holding a tool with a circular motion arrow, no text or symbols present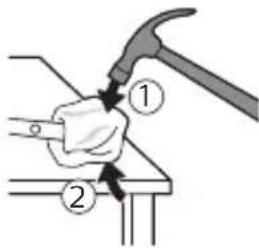
text_image
Diagram showing a hand using a hammer to press or install a piece of wood, labeled with parts ① and ②.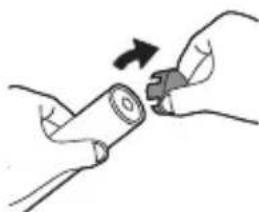
natural_image
Illustration of hands holding a cylindrical object with a knob, no text or symbols present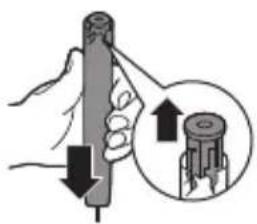
text_image
Diagram showing a hand holding a cylindrical object with arrows indicating force direction, and an inset magnifying the process.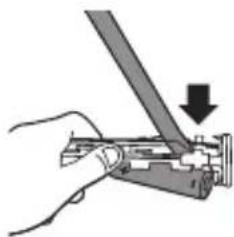
natural_image
Hand holding a tool with a downward arrow indicating a process (no text or symbols present)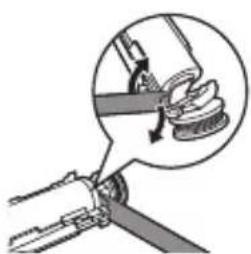
natural_image
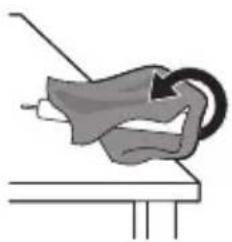
Diagram of a mechanical assembly with a magnified inset showing a hand holding a spring (no text or symbols)2 Remove and discard the brush head. Cover the entire handle with a towel or cloth.
3 Hold the top of the handle with one hand and strike the handle housing 0.5 inch above the bottom end. Strike firmly with a hammer on all 4 sides to eject the end cap.
Note: You may have to hit on the end several times to break the internal snap connections.
4 Remove the end cap from the toothbrush handle. If the end cap does not release easily from the housing, repeat step 3 until the end cap is released.
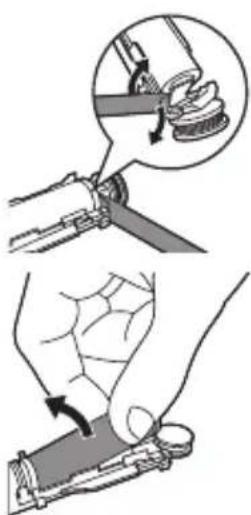
5 Holding the handle upside down, press the shaft down on a hard surface. If the internal components do not easily release from the housing, repeat step 3 until the internal components are released.
6 Wedge the screwdriver between the battery and the white frame at the bottom of the internal components. Then pry the screwdriver away from the battery to break the bottom of the white frame.
7 Insert the screwdriver between the bottom of the battery and the white frame to break the metal tab connecting the battery to the green printed circuit board. This will release the bottom end of the battery from the frame.
natural_image
Illustration of a hand holding a small object with a curved arrow indicating motion (no text or symbols)
text_image
Diagram illustrating a recycling process with a battery, recycling symbol, and labeled components including a 'X' symbol.8 Grab the battery and pull it away from the internal components to break the second metal battery tab.
Caution: Be aware of the sharp edges of the battery tabs so as to avoid injury to your fingers.
9 Cover the battery contacts with tape to prevent any electrical short from residual battery charge. The rechargeable battery can now be recycled and the rest of the product discarded appropriately.
Giriş
www.philips.com/support
İstifadə Təyinatı
text_image
Diagram illustrating a hairpin being inserted into a bottle, with a checkmark indicating the correct position.natural_image
Diagram of a mechanical component with arrows indicating motion or force direction (no text or symbols)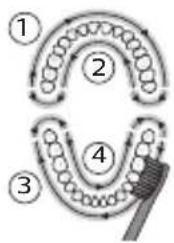
flowchart
graph TD
    A["①"] --> B["②"]
    B --> C["③"]
    C --> D["④"]
    D --> E["End"]

natural_image
Simple diagram with a sunburst symbol inside a circle and a small star-like symbol beside it, no text or labels present.natural_image
Simple line drawing of a tool interacting with a bowl of noodles (no text or symbols)natural_image
Diagram of a mechanical or electrical component with two arms and a central shaft, intersected by a diagonal line (no text or symbols)text_image
Diagram illustrating a manual tool manipulation technique with labeled steps and magnified views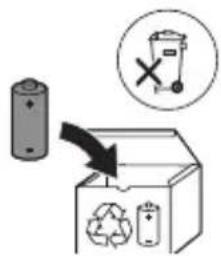
text_image
Diagram illustrating a recycling process with a battery, recycling symbol, and labeled components including a recycling bin and a 'X' symbol.www.philips.com/support
Zamýšlené použití
natural_image
Illustration of a hand holding a toothbrush and a nail being inserted (no text or symbols)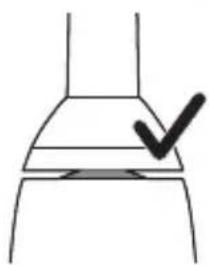
natural_image
Simple line drawing of a chimney with a checkmark mark on the handle (no text or symbols)natural_image
Diagram of a mechanical component with arrows indicating motion or force direction (no text or symbols)
flowchart
graph TD
    A["①"] --> B["②"]
    B --> C["③"]
    C --> D["④"]
    D --> E["③"]
    E --> F["②"]
    style A fill:#f9f,stroke:#333
    style B fill:#f9f,stroke:#333
    style C fill:#f9f,stroke:#333
    style D fill:#f9f,stroke:#333
    style E fill:#f9f,stroke:#333
    style F fill:#f9f,stroke:#333

natural_image
Simple diagram with a sunburst icon and curved arrows, next to a vertical line (no text or symbols)natural_image
Diagram of a medical procedure showing a tool interacting with a patient's leg and arm (no text or labels)natural_image
Diagram of a mechanical or electrical component with two arms and a central shaft, no visible text or symbolsnatural_image
Simple line drawing of a mechanical component or tool with no visible text or symbols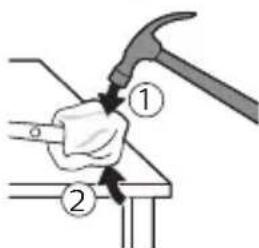
text_image
Diagram showing a hammer turning a tool with labeled parts ① and ②, likely illustrating a mechanical or electrical process.
natural_image
Illustration of hands holding a battery with a close-up of its tip (no text or symbols)natural_image
Illustration of a hand holding a cylindrical tool with an arrow indicating force or direction, and a magnified inset showing the same tool (no text or symbols present)natural_image
Hand holding a mechanical tool with a downward arrow indicating force or direction (no text or symbols present)text_image
Diagram illustrating a manual tool application with magnified detail showing hand positioning and tool pathtext_image
Diagram illustrating a recycling process with a battery, recycling symbol, and trash bin, showing directional arrows.www.philips.com/support
Beregnet anvendelse
text_image
Diagram illustrating hairpin application and cleaning process with a checkmark indicating removalnatural_image
Diagram of a mechanical component with arrows indicating motion or force direction (no text or symbols)
flowchart
graph TD
    A["①"] --> B["②"]
    B --> C["③"]
    C --> D["④"]
    D --> E["End"]
Tilstande (for 4000-series)
natural_image
Simple diagram with a sunburst icon and curved arrows, next to a vertical line (no text or symbols)natural_image
Diagram of a medical procedure showing a tool interacting with a patient's leg and arm (no text or labels)natural_image
Diagram of a mechanical or electrical component with two vertical rods and a central rod, intersected by a diagonal line (no text or symbols)natural_image
Simple line drawing of a mechanical component with a curved arrow indicating motion (no text or symbols)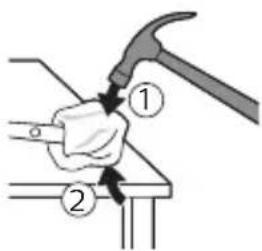
text_image
Diagram showing a hand using a hammer to press or install a component, labeled with parts 1 and 2.www.philips.com/support
text_image
Diagram illustrating hairpin usage and inspection steps, showing hand positioning and checkmark for inspectionnatural_image
Diagram of a mechanical component with arrows indicating motion direction (no text or symbols)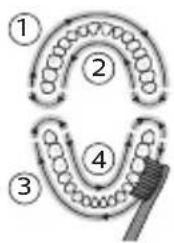
flowchart
graph TD
    A["①"] --> B["②"]
    B --> C["③"]
    C --> D["④"]
    D --> E["⑤"]
    E --> A
natural_image
Simple diagram with a sunburst icon and directional arrows, no text or symbols presenttext_image
Diagram illustrating a medical procedure involving a tool and tubing, labeled with 'Medical Procedure' and 'Intervention'natural_image
Diagram of a mechanical or electrical device with two arms and a central shaft, no visible text or symbolsnatural_image
Hand holding a mechanical component with a downward arrow indicating force or direction (no text or symbols)natural_image
Illustration showing two steps of a hand holding a tool, with an inset showing the process being performed (no text or symbols present)text_image
Diagram illustrating a recycling process with a battery, recycling symbol, and labeled components including a trash bin and recycling symbol.text_image
Diagram illustrating a hairpin being inserted into a bottle, with a checkmark indicating the correct step.natural_image
Diagram of a mechanical component with arrows indicating motion or force direction (no text or symbols)Režiimid (4000 series)
natural_image
Simple diagram showing a sunflower with rotation arrows inside a circle and a small star-like symbol beside it (no text or labels)text_image
Diagram illustrating a medical procedure involving a tool and tubing, labeled with 'Medical Procedure' and 'Intensive Care'.natural_image
Diagram of a mechanical clamp or lever mechanism with no visible text or symbolsnatural_image
Illustration of a mechanical component with a curved arrow indicating motion (no text or symbols)
text_image
Diagram showing a hammer turning a tool with labeled parts ① and ②, likely illustrating a mechanical or electrical process.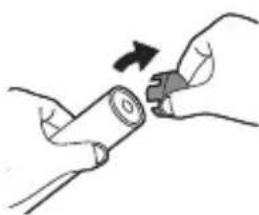
natural_image
Illustration of hands holding a battery with a switch, no text or symbols present
natural_image
Illustration of a hand holding a cylindrical tool with arrows indicating force direction, and a magnified inset showing the same tool (no text or symbols present)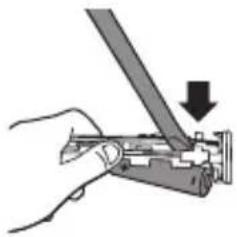
natural_image
Hand holding a mechanical component with a downward arrow indicating force or direction (no text or symbols)natural_image
Illustration showing two steps of a hand holding a tool, with an inset showing the process being performed (no text or symbols present)text_image
Diagram illustrating a battery recycling process with a magnified inset showing a discarded bin and a 'X' symbol.text_image
Diagram illustrating hairpin application technique with labeled parts and checkmark indicatornatural_image
Diagram of a mechanical component with arrows indicating motion or force direction (no text or symbols)natural_image
Simple diagram with a sunburst icon inside a circle and a small star-like symbol beside it (no text or labels)natural_image
Diagram of a medical procedure showing a tool interacting with a patient's leg and arm (no text or labels)natural_image
Diagram of a mechanical or electrical component with two arms and a central rod, no visible text or symbolsnatural_image
Illustration of a mechanical component with a curved arrow indicating motion (no text or symbols)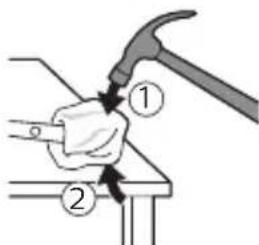
text_image
Diagram showing a hammer turning a tool with labeled parts ① and ②, likely illustrating a mechanical or electrical process.
natural_image
Illustration of hands holding a battery with a switch, no text or symbols present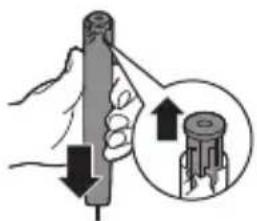
natural_image
Illustration of a hand holding a cylindrical tool with arrows indicating force direction, and a magnified inset showing the same tool (no text or symbols present)natural_image
Hand holding a mechanical component with a downward arrow indicating force or direction (no text or symbols)natural_image
Illustration showing two steps of a hand holding a tool, with an inset showing the process being performed (no text or symbols present)text_image
Diagram illustrating a recycling process with a battery, recycling symbol, and labeled components including a trash bin and recycling symbol.natural_image
Illustration of a hand holding a textured object being inserted into a small container (no text or symbols)natural_image
Simple line drawing of a container with a checkmark mark on top (no text or symbols)natural_image
Diagram of a mechanical component with arrows indicating motion or force direction (no text or symbols)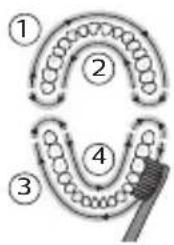
flowchart
graph TD
    A["①"] --> B["②"]
    B --> C["③"]
    C --> D["④"]
    D --> E["⑤"]
    style A fill:#f9f,stroke:#333
    style B fill:#f9f,stroke:#333
    style C fill:#f9f,stroke:#333
    style D fill:#f9f,stroke:#333
    style E fill:#f9f,stroke:#333
natural_image
Simple diagram with a sunburst symbol inside a circle and a small star-like shape beside it, no text or labels present.natural_image
Simple line drawing of a tool interacting with a plant stem, no text or symbols presentnatural_image
Diagram of a mechanical or electrical component with two arms and a central rod, intersected by a diagonal line (no text or symbols)text_image
Diagram illustrating a manual tool manipulation technique with labeled steps and magnified detail
text_image
Diagram illustrating a recycling process with a battery, recycling symbol, and labeled components including a recycling bin and a 'X' symbol.natural_image
Illustration of a hand holding a toothbrush being inserted into a plastic tool (no text or symbols present)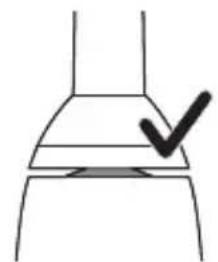
natural_image
Simple line drawing of a container with a checkmark mark on top (no text or symbols)natural_image
Diagram of a mechanical component with arrows indicating motion or force direction (no text or symbols)5 Kako biste očistili unutarnje površine prednjih zubi, nagnite dršku četkice poluuspravno i izvršite nekoliko vertikalnih preklapajućih pokreta na svakom zubu.
Napomena: Kako biste osigurali ujednačeno četkanje svih zuba u ustima, podijelite svoja usta u 4 dijela pomoću funkcije QuadPacer (pogledajte poglavlje „Funkcije”).

flowchart
graph TD
    A["①"] --> B["②"]
    B --> C["③"]
    C --> D["④"]
    D --> E["End"]

natural_image
Simple diagram with a sunburst icon and a small star-like symbol, no text or labels present.natural_image
Illustration of a medical procedure involving a tool and tubing, no text or symbols present1 Odvojite glavu četkice i isperite metalnu osovinu toplom vodom. Pobrinite se da uklonite svu preostalu zubnu pastu.
Oprez: Nemojte koristiti oštre predmete za guranje gumene brtve na metalnu osovinu jer to može prouzročiti oštećenja.
2 Cijelu površinu drške obrišite vlažnom tkaninom.
Napomena: Nemojte lupkati drškom po umivaoniku kako biste uklonili višak vode.
Glava četkice
natural_image
Diagram of a mechanical or electrical component with two arms and a diagonal line, no visible text or symbolsnatural_image
Illustration of a hand holding a small object with an arrow indicating motion (no text or symbols)
text_image
Diagram illustrating a recycling process with battery, recycling symbol, and waste bin icon8 Primate bateriju i povucite je od unutarnjih dijelova da biste prelomili drugu metalnu pločicu baterije.
www.philips.com/support
Uso previsto
natural_image
Illustration of a hand holding a toothbrush and a small object being inserted (no text or symbols)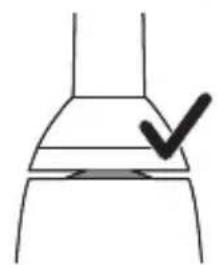
natural_image
Simple line drawing of a container with a checkmark mark on top (no text or symbols)natural_image
Diagram of a mechanical component with arrows indicating motion or force direction (no text or symbols)
flowchart
graph TD
    A["Stage 1"] --> B["Stage 2"]
    B --> C["Stage 3"]
    C --> D["Stage 4"]
    D --> E["Arrow to final block"]
    style A fill:#f9f,stroke:#333
    style B fill:#f9f,stroke:#333
    style C fill:#f9f,stroke:#333
    style D fill:#f9f,stroke:#333
    style E fill:#ccf,stroke:#333

natural_image
Simple line drawing of a sunburst symbol inside a circle with arrows, next to a partial circular shape (no text or symbols)natural_image
Diagram of a medical procedure involving a tool and tubing, no text or symbols presentnatural_image
Diagram of a hand holding a tool with a ruler, no text or symbols presentnatural_image
Illustration of a hand holding a tool with a circular arrow indicating motion (no text or symbols)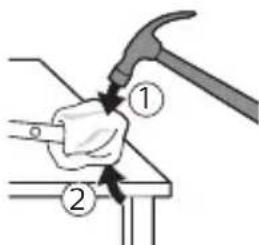
text_image
Diagram showing a hammer turning a tool with labeled parts ① and ②, likely illustrating a mechanical or electrical process.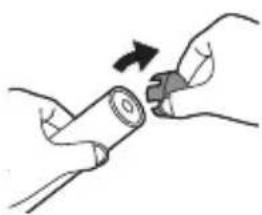
natural_image
Illustration of hands holding a battery with a magnified view showing the change (no text or symbols)natural_image
Illustration of a hand holding a cylindrical tool with an arrow indicating force or direction, and a magnified inset showing the same tool (no text or symbols present)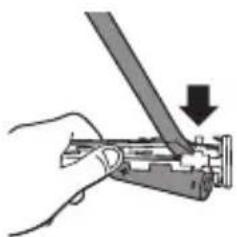
natural_image
Hand holding a tool with a downward arrow indicating compression or disassembly (no text or symbols present)
text_image
Diagram illustrating a manual tool application with magnified detail showing the process and rotation direction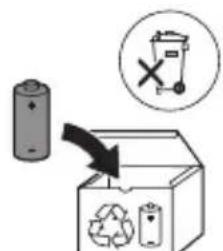
text_image
Diagram illustrating a recycling process with a battery, recycling symbol, and labeled components including a 'X' indicating no disposal.text_image
Diagram illustrating a hairpin being inserted into a bottle, with a checkmark indicating the correct step.natural_image
Diagram of a mechanical component with arrows indicating motion direction (no text or symbols)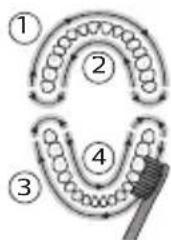
flowchart
graph TD
    A["1"] --> B["2"]
    B --> C["3"]
    C --> D["4"]
    D --> E["End"]
natural_image
Simple diagram with a sunburst symbol inside a circle and a small star-like shape beside it (no text or labels)Spiediena sensors
natural_image
Diagram of a medical procedure involving a tool and tubing, no text or symbols presentnatural_image
Diagram of a mechanical or electrical component with two arms and a central shaft, intersected by a diagonal line (no text or symbols)natural_image
Simple line drawing of a mechanical component with a curved arrow indicating rotation (no text or symbols)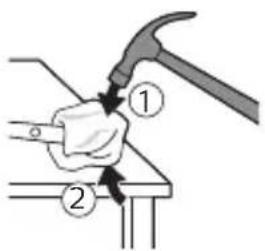
text_image
Diagram showing a hand using a hammer to press or install a component, labeled with parts 1 and 2.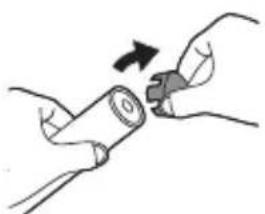
natural_image
Illustration of hands holding a cylindrical object with a button, no text or symbols present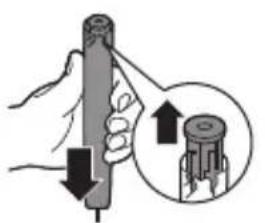
natural_image
Illustration of a hand holding a cylindrical object with an arrow indicating upward motion, and a magnified inset showing the same object (no text or symbols present)natural_image
Hand holding a mechanical component with a downward arrow indicating force or direction (no text or symbols)natural_image
Illustration showing two steps of a hand holding a tool, with an inset showing the process being performed (no text or symbols present)text_image
Diagram illustrating a recycling process with a battery, recycling symbol, and labeled components including a trash bin and recycling symbol.natural_image
Illustration of a hand holding a toothbrush and a nail being inserted (no text or symbols)
natural_image
Simple line drawing of a container with a checkmark mark on top (no text or symbols)natural_image
Diagram of a mechanical component with arrows indicating motion or force direction (no text or symbols)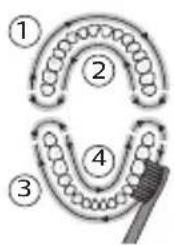
flowchart
graph TD
    A["①"] --> B["②"]
    B --> C["③"]
    C --> D["④"]
    D --> E["End"]
natural_image
Simple diagram with a sunburst symbol inside a circle and a small star-like shape beside it (no text or labels)text_image
Diagram illustrating a medical procedure involving a tool and tubing, with labels indicating 'Medical Procedure' and 'Intervention'natural_image
Diagram of a hand holding a tool with a tool, no text or symbols presentnatural_image
Simple line drawing of a mechanical component or tool with a curved arrow indicating motion (no text or symbols)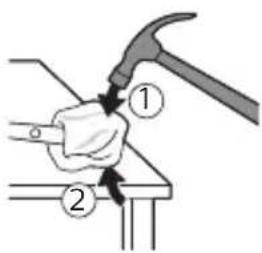
text_image
Diagram showing a hand using a hammer to press or install a component, labeled with parts 1 and 2.natural_image
Illustration of hands holding a cylindrical object with an arrow indicating rotation (no text or symbols)natural_image
Illustration of a hand holding a pen with a magnified inset showing the tip of a cylindrical object (no text or symbols)natural_image
Hand holding a tool with a downward arrow indicating compression or disassembly (no text or symbols present)natural_image
Diagram of a mechanical joint or clamp mechanism with a magnified inset showing a hand holding a spring (no text or symbols present)natural_image
Illustration of a hand holding a small electronic device with a circular sensor or lens nearby (no text or symbols)text_image
Diagram illustrating a recycling process with a battery, recycling symbol, and recycling bin labeled in English.www.philips.com/support
text_image
Diagram illustrating a hairpin being adjusted to a bottle, with a checkmark indicating the correct step.natural_image
Diagram of a mechanical component with arrows indicating motion or force direction (no text or symbols)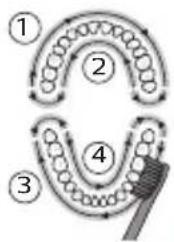
flowchart
graph TD
    A["Stage 1"] --> B["Stage 2"]
    B --> C["Stage 3"]
    C --> D["Stage 4"]
    D --> E["Brush"]
natural_image
Simple diagram with a sunburst symbol inside a circle and a small star-like shape beside it, no text or labels present.Nyomásérzékelő
natural_image
Illustration of a hand holding a tool with a pen, pouring liquid from a bottle (no text or symbols)natural_image
Diagram of a mechanical or electrical component with two arms and a central shaft, intersected by a diagonal line (no text or symbols)natural_image
Diagram of a mechanical or electrical component with a curved arrow indicating rotation (no text or symbols)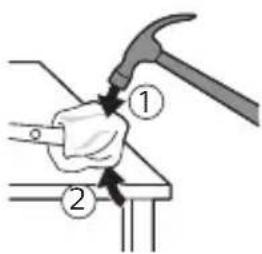
text_image
Diagram showing a hand using a hammer to press or install a component, labeled with parts 1 and 2.
natural_image
Illustration of hands holding a cylindrical object with an arrow indicating rotation (no text or symbols)website: www.philips.com/support
Beoogd gebruik
natural_image
Illustration of a hand holding a toothbrush next to a small object with a downward arrow (no text or symbols)natural_image
Simple line drawing of a container with a checkmark mark on top (no text or symbols)natural_image
Diagram of a mechanical component with arrows indicating motion or force direction (no text or symbols)natural_image
Simple diagram with a sunburst symbol inside a circle and a small star-like shape beside it (no text or labels)Poetsdruksensor
natural_image
Diagram of a medical procedure showing a tool interacting with a patient's leg and arm (no text or labels)natural_image
Diagram of a mechanical or electrical component with two arms and a central shaft, intersected by a diagonal line (no text or symbols)natural_image
Illustration of a mechanical device with a tool and circular component (no text or symbols)
text_image
Diagram showing a hammer turning a tool with labeled parts ① and ②, likely illustrating a mechanical or electrical process.
natural_image
Illustration of hands holding a cylindrical object with an arrow indicating rotation (no text or symbols)natural_image
Illustration of a hand holding a cylindrical tool with an arrow indicating force or direction, and a magnified inset showing the same tool (no text or symbols present)
natural_image
Hand holding a mechanical tool with a downward arrow indicating force or direction (no text or symbols present)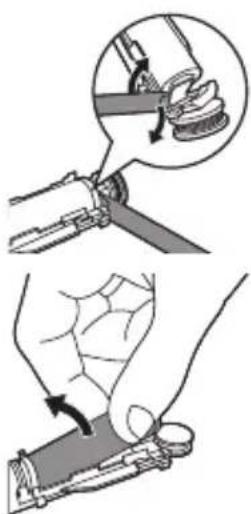
text_image
Diagram illustrating a manual tool application with magnified detail showing the process and rotation direction
text_image
Diagram illustrating a recycling process with a battery, recycling symbol, and labeled components including a 'X' indicating no disposal.text_image
Diagram illustrating a hairpin application technique with a checkmark indicating the correct step.natural_image
Diagram of a mechanical component with arrows indicating motion or force direction (no text or symbols)Moduser (for 4000 Series)
natural_image
Simple line drawing of a sunburst symbol with a circular base and arrow, next to a vertical line (no text or labels)Trykksensor
natural_image
Diagram of a medical procedure showing a tool interacting with tissue manipulation using a pipette (no text or labels)1 Ta av børstehodet, og skyll metallstangen i varmt vann. Pass på at du har fjernet alle tannkremrester.
natural_image
Diagram of a mechanical or electrical component with two arms and a central rod, no visible text or symbolsnatural_image
Hand holding a mechanical component with a downward arrow indicating a process (no text or symbols present)natural_image
Illustration showing two steps of a hand holding a tool, with an inset showing the hand holding a spring and a magnified view of the tool (no text or symbols present)text_image
Diagram illustrating a recycling process with a battery, recycling symbol, and labeled componentsPhilips Sonicare tish pastangiz
1 Gigiyenik sayohat qopqog'i
2 Cho'tka kallagi
3 Dasta
4 Yoqish/o'chirish tugmachasi
5 Cho'tka kallagini almashtirishni eslatish funksiyasi
6 Batareya darajasi indikatori
7 USB quvvatlash moslamasi (devor adapteri taqdim etilmaydi)
8 Sayohat g'ilofi (faqat alohida modellarda)
Izoh: Devor adapteri taqdim etilmaydi. Faqat 5V adapteridan (A turdagi) foydalaning.
text_image
Diagram illustrating hairpin usage and inspection steps, showing hand positioning and checkmark for inspection1 Cho'tka tuklari dastaning old qismi bilan bir xil yo'nalishda bo'lishi uchun cho'tka kallagini tekislang.
2 Cho'tka kallagini u to'xtaguncha metall valga qattiq bosing.
Izoh: Cho'tka kallagi va dasta orasida kichik tirqish ko'rinishi – normal holat. Bu cho'tka kallagining to'g'ri tebranishiga yordam beradi.
Philips Sonicare jihozingizdan quvvatlash
1 USB quvvatlash kabelini elektr manbaiga ulangan devor adapteriga ulang.
2 Dastani quvvatlash moslamasiga joylang.
- Batareya darajasi indikatorining chirog'i yonadi va dasta ikki marta signal beradi. Bu tish cho'tkasi quvvatlanayotganini bildiradi.
Izoh: Batareya to'liq quvvatlanishiga 24 soatgacha vaqt ketadi, lekin Philips Sonicare tish pastasidan to'liq quvvatlanishidan oldin foydalanishingiz mumkin.
Philips Sonicare tish pastangizdan foydalanish
Agar Sonicare tish pastasidan birinchi marta foydalanayotgan bo'lsangiz, elektr bo'Imagan tish cho'tkasidan foydalanishga qaraganda ko'proq tebranish sezish normal holat. Odatda birinchi marta foydalanayotgan foydalanuvchilar ortiqcha bosim beradi. Faqat yumshoq bosib bering va tish cho'tkasi siz uchun tozalashiga imkon bering. Eng yaxshi taassurot uchun tish tozalash ko'rsatmalariga amal qiling. Yangi Sonicare motorli tish cho'tkasiga o'tishiningizga yordam berish uchun EasyStart funksiyasi yoqilgan holatda taqdim etiladi. Bu funksiya Philips Sonicare tish cho'tkasi bilan
tozalashingizga ko'nikishingiz uchun ilk 14 ta tozalash davomida dastaning quvvatini asta-sekin oshirib boradi.
Tish tozalash ko'rsatmalari
text_image
45°1 Cho'tkani namlang va unga kam miqdorda tish pastasi surting. 2 Tish cho'tkasini tishlar qarshisida kichik (45 daraja) burchak ostida tuting va cho'tkalar milk chizig'iga yoki uning tagiga yetishi uchun uni yengil bosing.
Izoh: Cho'tka markazini tishlarga doimi to'liq tekkizib turing.
3 Philips Sonicare yoqilishi uchun yoqish/o'chirish tugmachasini bosing.
4 Cho'tkani tishlar va milk chizig'iga yengil tutib turing. Cho'tkalar tishlar orasiga kirishi uchun cho'tka kallagini oldinga-orqaqa kichik harakatlar bilan tishlaringizni tozalang. Bu harakatlarni tish tozalash siklingiz yakunlangunga qadar bajaring.
natural_image
Diagram of a mechanical component with arrows indicating motion or force direction (no text or symbols)5 Old tishlarning ichki yuzalarini tozalash uchun dastani yarim-vertikal qilib ushlang va har bir tishni bir necha vertikal harakatlar bilan birma-bir tozalab chiqing.
natural_image
Simple diagram with a sunburst symbol inside a circle and a small star-like shape beside it, no text or labels present.Bosim sensori
3 Cho'tka kallagini almashtirish haqida eslatuvchi chiroq qahrabo rangda yonganida cho'tka kallagingizni almashtirishingiz kerak.
Cho'tka kallagini almashtirishni eslatish funksiyasini faolsizlantirish uchun qarang: "Funksiyalarni faollashtirish yoki faolsizlantirish".
Philips Sonicare tish tozalash vaqtida qo'llangan bosimni o'lchaydigan murakkab sensor bilan jihozlangan.
Ortiqcha bosim qo'llasangiz, tish cho'tkasi bosimni kamaytirishingiz kerakligini bildirish uchun tezkor munosabat bildiradi. Bu munosabat tebranishdagi o'zgarish, binobarin, tozalash hissi va tovush orqali bildiriladi. Shu bilan birga, cho'tka kallagini almashtirish haqida eslatuvchi chiroq sariq rangda miltillaydi.
Bosim sensorini faolsizlantirish uchun "Funksiyalarni faollashtirish yoki faolsizlantirish" bo'limiga qarang.
QuadPacer
flowchart
graph TD
    A["①"] --> B["②"]
    B --> C["③"]
    C --> D["④"]
    D --> E["③"]
    style A fill:#f9f,stroke:#333
    style B fill:#ccf,stroke:#333
    style C fill:#cfc,stroke:#333
    style D fill:#fcc,stroke:#333
    style E fill:#ffc,stroke:#333
natural_image
Diagram of a medical procedure showing a tool interacting with an anatomical structure (no text or labels)1 Cho'tka kallagini chiqarib oling va metall val atrofini iliq suv bilan yuving. Har qanday tish pastasi qoldig'ini tozalaganingizni tekshiring.
Ogohlantirish: Metall valdagi rezina zichlagichni o'tkir narsalar bilan bosmang, bu shikastlanishga olib kelishi mumkin.
2 Dastaning butun yuzasini nam mato bilan artib oling.
Izoh: Ortiqcha suvni yo'qotish uchun dastani rakovinaga urmang.
Cho'tka kallagi

natural_image
Diagram of a mechanical or electrical device with two arms and a diagonal line, no visible text or symbols1 Cho'tka kallagi va cho'tkani har foydalanishdan keyin yuving.
2 Cho'tka kallagini dastadan chiqarib oling va cho'tka kallagi ulanish qismini kamida haftada bir marta iliq suv bilan yuving. Sayohat qopqog'ini zarur bo'lgancha tez-tez yuvib tashlang.
Quvvatlash moslamasi
1 Tozalashdan avval, quvvatlagichni tarmoqdan uzing.
2 Quvvatlash moslamasining butun yuzasini nam mato bilan artib oling.
Sayohat g'ilofi
Iliq suv bilan yuving va sayohat g'ilofi ichini tozalash uchun nam matodan foydalaning.
Xotira
text_image
Diagram illustrating a manual tool manipulation technique with labeled steps and magnified detail
text_image
Diagram illustrating a recycling process with a battery, recycling symbol, and labeled waste bins7 Batareyani yashil bosma plata bilan ulab turadigan metall tilchani sindirish uchun buragichni batareya osti va oq korpus orasiga kiriting. Bu batareyaning ostki uchini korpusdan chiqarib oladi.
8 Ikkinchi metall tilchani sindirish uchun batareyani oling va uni ichki qismlarga teskari tarafga torting. Ogohlantirish: Barmog'ingizni tilib olmaslik uchun batareya tilchasining o'tkir qirralaridan ehtiyot bo'ling.
9 Batareyadagi qoldiq quvvatdan qisqa tutashuv sodir bo'lmaslik uchun batareya kontaktlarini izolatsion tasma bilan o'rab qo'ying. Endi qayta quvvatlanadigan batareyani chiqindiga tashlash, mahsulotning boshqa qismlarini esa utilizatsiya qilish mumkin.
Wprowadzenie
www.philips.com/support
Przeznaczenie
natural_image
Illustration of a hand holding a screwdriver and a small mechanical component with a downward arrow (no text or symbols)natural_image
Simple line drawing of a container with a checkmark mark on top (no text or symbols)natural_image
Diagram of a mechanical component with arrows indicating motion or force direction (no text or symbols)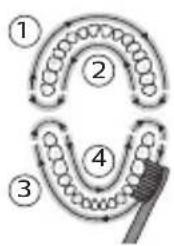
flowchart
graph TD
    A["①"] --> B["②"]
    B --> C["③"]
    C --> D["④"]
    D --> E["⑤"]
    E --> A
natural_image
Simple diagram with a sunburst icon and directional arrows, no text or symbols presentnatural_image
Diagram of a medical procedure showing a tool interacting with a patient's leg and arm (no text or labels)natural_image
Diagram of a mechanical or electrical component with two arms and a central shaft, no visible text or symbolsnatural_image
Illustration of a hand holding a small object with a curved arrow indicating motion (no text or symbols)
text_image
Diagram illustrating a recycling process with a battery, recycling symbol, and labeled components including a 'X' symbol.www.philips.com/support
Utilização prevista
text_image
Diagram illustrating a hairpin being inserted into a bottle, with a checkmark indicating the correct step.natural_image
Diagram of a mechanical component with arrows indicating motion or force direction (no text or symbols)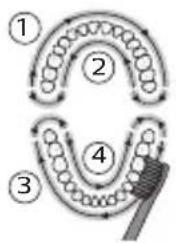
flowchart
graph TD
    A["①"] --> B["②"]
    B --> C["③"]
    C --> D["④"]
    D --> E["③"]
    style A fill:#f9f,stroke:#333
    style B fill:#f9f,stroke:#333
    style C fill:#f9f,stroke:#333
    style D fill:#f9f,stroke:#333
    style E fill:#f9f,stroke:#333
Modos (para 4000 Series)
natural_image
Simple diagram showing a sunflower with rotation arrows inside a circle and a small star-like symbol on the right (no text or labels)Sensor de pressão
text_image
Diagram illustrating a medical procedure involving a bottle and a tool, with labeled components and directional arrows.natural_image
Diagram of a mechanical or electrical component with two arms and a central shaft, intersected by a diagonal line (no text or symbols)natural_image
Hand holding a mechanical component with a downward arrow indicating force or direction (no text or symbols)natural_image
Illustration showing two-step manual techniques for handling a tool, with magnified detail of the process (no text or symbols)text_image
Diagram illustrating a battery recycling process with a magnified inset showing a discarded bin and a recycling symbol.www.philips.com/support
Domeniu de utilizare
text_image
Diagram illustrating a hairpin being inserted into a bottle, with a checkmark indicating the correct step.natural_image
Diagram of a toothbrush applying force to a tooth (no text or symbols)Moduri (pentru 4000 Series)
natural_image
Abstract geometric design with a circular emblem containing a starburst and curved arrows, next to a vertical line (no text or symbols)natural_image
Simple line drawing of a tool interacting with a plant stem, no text or symbols presentnatural_image
Diagram of a mechanical or electrical component with two arms and a central rod, intersected by a diagonal line (no text or symbols)natural_image
Illustration of a hand holding a cylindrical tool with an arrow indicating force or direction, and a magnified inset showing the same tool (no text or symbols present)natural_image
Hand holding a mechanical component with a downward arrow indicating force or direction (no text or symbols)text_image
Diagram illustrating a hand tool application technique with labeled steps and magnified detailtext_image
Diagram showing a battery and recycling symbol with a magnified view of a trash bin marked with an 'X'.www.philips.com/support
Përdorimi i synuar
text_image
Diagram illustrating hair styling technique with labeled tool and checkmark indicating removal or repairnatural_image
Diagram of a toothbrush applying force to a tooth (no text or symbols)natural_image
Simple diagram with a sunburst symbol inside a circle and a small star-like shape beside it, no text or labels present.natural_image
Simple line drawing of a tool interacting with a bowl containing noodles (no text or symbols)natural_image
Diagram of a hand holding a tool with a ruler, against a diagonal line (no text or symbols)text_image
Diagram illustrating a manual tool manipulation technique with labeled steps and magnified detail
text_image
Diagram illustrating a recycling process with a battery, recycling symbol, and labeled components including a recycling bin and a 'X' symbol.text_image
Diagram illustrating hairpin usage and inspection steps, showing hand positioning and checkmark for inspectionnatural_image
Diagram of a mechanical component with arrows indicating motion or force direction (no text or symbols)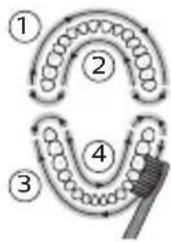
flowchart
graph TD
    A["Stage 1"] --> B["Stage 2"]
    B --> C["Stage 3"]
    C --> D["Stage 4"]
    D --> E["End"]
Načini (za 4000 series)
natural_image
Simple diagram showing a sunburst symbol with arrows and a circular base, next to a vertical line (no text or labels)Senzor pritiska
natural_image
Simple line drawing of a tool interacting with a bowl of noodles (no text or symbols)natural_image
Diagram of a mechanical or electrical component with no visible text, numbers, or symbolstext_image
Diagram illustrating a manual tool manipulation technique with labeled steps and magnified detail
text_image
Diagram illustrating a recycling process with a battery, recycling symbol, and labeled components including a 'X' symbol.7 Med spodnji del baterije in beli okvir vstavite izvijač, da prelomite kovinski jeziček, ki baterijo povezuje z zeleno ploščo s tiskanim vezjem. S tem spodnji del baterije sprostite iz okvira.
8 Baterijo primite in jo odmaknite od notranjih delov, da prelomite drugi kovinski jeziček baterije.
Opozorilo: Pazite, da si z ostrimi robovi jezičkov baterije ne poškodujete prstov.
text_image
Diagram illustrating hairpin usage and inspection steps, showing hand positioning and checkmark indicating inspection.natural_image
Diagram of a mechanical component with arrows indicating motion or force direction (no text or symbols)natural_image
Simple diagram with a sunburst symbol inside a circle and a small gear-like shape beside it (no text or labels)Tlakový senzor
natural_image
Diagram of a medical procedure showing a tool interacting with tissue manipulation using a pipette (no text or labels)natural_image
Diagram of a mechanical linkage or lever mechanism with no visible text or symbolstext_image
Diagram illustrating a manual tool manipulation technique with labeled steps and magnified detail
text_image
Diagram illustrating a recycling process with a battery, recycling symbol, and labeled waste binstext_image
Diagram illustrating a hairpin being inserted into a bottle, with a checkmark indicating the correct step.1 Poravnajte glavu četkice tako da su vlakna okrenuta u istom smeru kao i prednja strana drške.
2 Čvrsto pritisnite glavu četkice nadole na metalnu osovinu dok se ne zaustavi.
natural_image
Diagram of a mechanical component with arrows indicating direction (no text or symbols)1 Pokvasite vlakna i nanesite malu količinu paste za zube. 2 Postavite vlakna četkice na zube pod blagim uglom (45 stepeni) i nežno pritisnite kako bi vlakna dosegla liniju desni ili malo ispod te linije.
text_image
Diagram illustrating four stages of hair follicle development and hair follicle structure, labeled 1 to 4.6 Počnite pranje s odeljkom 1 (gornji zubi spolja) i četkajte 30 sekundi pre prelaska na odeljak 2 (gornji zubi iznutra). Nastavite četkanje s odeljkom 3 (donji zubi spolja) i četkajte 30 sekundi pre prelaska na odeljak 4 (donji zubi iznutra).
7 Nakon završetka ciklusa pranja zuba, možete dodatno da operete površine za žvakanje i područja u kojima dolazi do pojave fleka. Možete da operete i jezik pomoću uključene ili isključene četkice za zube, po želji. Četkica za zube Philips Sonicare bi trebalo da bude bezbedna za korišćenje na protezama (glave četkice se brže troše kada se koriste na protezama) i zubnim restauracijama (plombama, krunicama, navlakama) ako su one pravilno pričvršćene i celovite. Ako dođe do problema, obratite se stomatologu.
Napomena: Kada se četkica za zube Philips Sonicare koristi u kliničkim studijama, drška mora da se koristi u režimu Clean, mora da bude potpuno napunjena, a funkcija EasyStart mora da bude deaktivirana.
Punjenje i status baterije
1 Priključite USB kabl za punjenje na zidni adapter, a zidni adapter u električnu zidnu utičnicu.
2 Postavite dršku na punjač.
Napomena: Drška će emitovati 2 kratka zvučna signala kao potvrdu da je drška pravilno postavljena na punjač i da je punjenje u toku.
Napomena: Ova četkica za zube Philips Sonicare je osmišljena tako da omogući najmanje 28 pranja zuba, pri čemu svako pranje traje 2 minuta (14 dana ako se koristi dva puta dnevno). Indikator nivoa baterije prikazuje status baterije kada završite dvominutnu sesiju pranja zuba, kada pauzirate dršku ili dok se puni.
Status baterije (kada drška nije na uključenom punjaču) Status baterije Indikator baterije
| Puna Stalno svetli zelena (isključuje se posle 30 sekundi) |
| Puni se Treperi zeleno |
Status baterije (kada drška nije postavljena na punjač) Status baterije Indikator baterije Zvuk
| Puna Svetli zeleno - | |
| Delimično puna Treperi zeleno - | |
| Niska Treperi narandžasto 3 zvučna signala | |
| Prazna Treperi narandžasto 2 puta po 5 zvučnih signala | |
| Napomena: Da biste uštedeli energiju, baterija će se isključiti kada nije u upotrebi. | |
| Napomena: Kada se baterija potpuno isprazni, četkica za zube Philips Sonicare se isključuje. Stavite četkicu za zube Philips Sonicare na punjač da biste je napunili. | |
| Napomena: Da bi baterija uvek bila potpuno napunjena, četkicu za zube Philips Sonicare možete da držite na punjaču kada je ne koristite. | |
Karakteristike
- Režimi (za 4000 Series)
- EasyStart
- Podsetnik za zamenu glave sa četkicom
- Senzor pritiska
- QuadPacer
- SmarTimer
Režimi (za 4000 Series)
Električna četkica za zube vam pruža opciju da odaberete između režima Sensitive i režima Clean:
Napomena: Kada prvi put koristite četkicu za zube, režim Sensitive je podrazumevano podešavanje.
Da biste promenili režim:
- Pritisnite dugme za uključivanje/isključivanje jednom da biste uključili četkicu za zube.
- Pritisnite još jednom u roku od 2 sekunde da biste promenili režim.
- Pritisnite treći put u roku od 2 sekunde da biste pauzirali rad.
Pauziraćete rad četkice za zube i ako nakon 2 sekunde pranja zuba ponovo pritisnete dugme za napajanje.
EasyStart
Ovaj model četkice za zube Philips Sonicare se isporučuje sa aktiviranom funkcijom EasyStart. Funkcija EasyStart nežno povećava snagu tokom prvih 14 pranja zuba da bi vam pomogla da se naviknete na pranje zuba pomoću četkice za zube Philips Sonicare.
Da biste deaktivirali funkciju EasyStart, pogledajte odeljak „Aktiviranje ili deaktiviranje funkcija“.
Podsetnik za zamenu glave sa četkicom
Četkica za zube Philips Sonicare sadrži tehnologiju BrushSync koja prati habanje glave sa četkicom.
Napomena: Ova funkcija funkcioniše samo sa Philips Sonicare pametnim četkicama sa BrushSync tehnologijom.
1 Kada prvi put pričvrstite novu pametnu glavu četkice, drška prepoznaje da imate Philips glavu četkice sa tehnologijom BrushSync i počinje da prati habanje glave četkice.
2 Tokom korišćenja, na osnovu pritiska koji primenjujete i upotrebe, drška će pratiti habanje glave četkice da bi odredila optimalno vreme kada je potrebno da je promenite. Ova funkcija je garancija za najbolje čišćenje i negu zuba.

natural_image
Simple diagram with a sunburst symbol inside a circle and a small star-like shape beside it, no text or labels present.3 Kada indikator podsetnika za zamenu glave četkice zasvetli žutonarandžastom bojom, treba da zamenite glavu četkice.
natural_image
Diagram of a medical procedure involving a tool and tubing, no text or symbols present1 Uklonite glavu četkice i isperite oblast oko metalne osovine toplom vodom. Obavezno uklonite sve ostatke paste za zube.
Oprez: Nemojte da gurate gumenu zaptivku na metalnoj osovini oštrim predmetima pošto to može da dovede do oštećenja.
2 Čitavu površinu drške obrišite vlažnom krpom.
Napomena: Nemojte da udarate ručkom o sudoperu da biste uklonili višak vode.
Glava četkice

natural_image
Diagram of mechanical components with no visible text or symbolsnatural_image
Simple line drawing of a mechanical component or tool interacting with a base (no text or symbols)
text_image
Diagram showing a hand using a hammer to press or install a component, labeled with parts 1 and 2.natural_image
Illustration of hands holding a cylindrical object with an arrow indicating rotation (no text or symbols)natural_image
Illustration of a hand holding a cylindrical object with arrows indicating force direction, and an inset showing a magnified view of the object (no text or symbols)natural_image
Hand holding a mechanical component with a downward arrow indicating force or direction (no text or symbols)6 Postavite odvijač između baterije i belog okvira na dnu unutrašnjih komponenti. Zatim odvajajte odvijač od baterije kako biste slomili dno belog okvira.
natural_image
Illustration showing a hand holding a mechanical component with a magnified inset showing the tool interacting with a spring (no text or symbols present)7 Umetnite odvijač između dna baterije i belog okvira kako biste slomili metalni jezičak koji povezuje bateriju sa zelenom štampanom pločom. Na taj način će se donji kraj baterije odvojiti od okvira.
8 Uhvatite bateriju i odvojite je od unutrašnjih komponenti kako biste slomili drugi metalni jezičak baterije.
Oprez: pazite na oštre ivice jezičaka baterije da ne biste povredili prste.
text_image
Diagram illustrating a recycling process with a battery, recycling symbol, and recycling bin labeled in English.9 Kontakte na bateriji zaštitite trakom kako preostali napon baterije ne bi prouzrokovao kratak spoj. Punjivu bateriju sada je moguće reciklirati, a ostatak proizvoda odložiti na odgovarajući način.
Johdanto
text_image
Diagram illustrating a hairpin being inserted into a bottle, with a checkmark indicating the correct step.natural_image
Diagram of a mechanical tool interacting with a textured surface, showing directional arrows (no text or symbols)natural_image
Simple diagram with a sunburst symbol inside a circle and a small star-like shape beside it, no text or labels present.Paineanturi
natural_image
Illustration of a medical procedure involving a tool and tubing, no text or symbols presentnatural_image
Diagram of a mechanical clamp or bracket assembly with no visible text or symbolsnatural_image
Simple line drawing of a mechanical component with a curved arrow indicating rotation (no text or symbols)
text_image
Diagram showing a hand using a hammer to press or install a component, labeled with parts 1 and 2.natural_image
Illustration of hands holding a cylindrical object with an arrow indicating rotation (no text or symbols)natural_image
Illustration of a hand holding a cylindrical object with arrows indicating force direction, and an inset showing a magnified view of the object (no text or symbols present)natural_image
Hand holding a mechanical component with a downward arrow indicating force or direction (no text or symbols)natural_image
Illustration showing a hand holding a tool with a magnified inset of the handle (no text or symbols)text_image
Diagram illustrating a recycling process with a battery, recycling symbol, and recycling bin labeled in English.text_image
Diagram illustrating a hairpin being inserted into a bottle, with a checkmark indicating the correct step.natural_image
Diagram of a mechanical component with arrows indicating direction (no text or symbols)
flowchart
graph TD
    A["①"] --> B["②"]
    B --> C["③"]
    C --> D["④"]
    D --> E["End"]

natural_image
Simple diagram with a sunburst symbol inside a circle and a small star-like shape beside it, no text or labels present.Trycksensor
natural_image
Illustration of a pipette dispensing noodles into a container (no text or symbols)natural_image
Diagram of a mechanical or electrical component with two arms and a central shaft, intersected by a diagonal line (no text or symbols)natural_image
Simple line drawing of a mechanical component or tool interacting with a base (no text or symbols)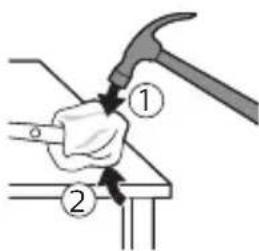
text_image
Diagram showing a hand using a hammer to press or install a component, labeled with parts 1 and 2.
natural_image
Illustration of hands holding a cylindrical object with an arrow indicating rotation (no text or symbols)natural_image
Illustration of a hand holding a cylindrical tool with an arrow indicating force or direction, and a magnified inset showing the same tool (no text or symbols present)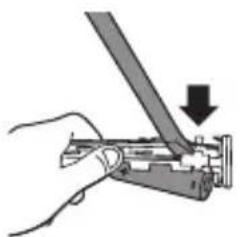
natural_image
Hand holding a mechanical tool with a downward arrow indicating force or direction (no text or symbols present)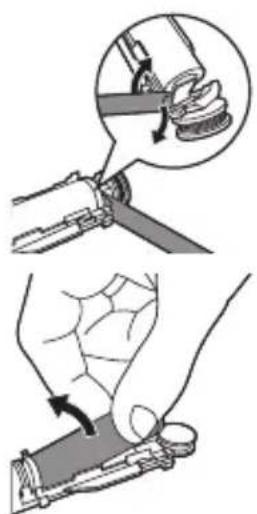
text_image
Diagram illustrating a manual tool manipulation technique with labeled steps and magnified detail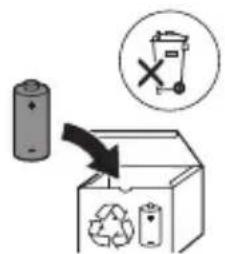
text_image
Diagram illustrating a recycling process with battery, recycling symbol, and labeled componentswww.philips.com/support
Niyetlenilýän ulanys
text_image
Diagram illustrating hairpin application technique with labeled parts and checkmark indicating removal1 Gyllar tutawajyň öň tarapy bilen bir ugra seredip durar ýaly edip, nasadkany deňläň.
natural_image
Simple diagram showing a sunburst symbol with rotating arrows and a small star-like shape, next to a vertical line (no text or labels)Basyş sensory
Bellik: Bu ayratynlyk diñe BrushSync tehnologiýasy bar bolan Philips Sonicare akylly nasadkalarynda işleýär.
text_image
Diagram illustrating a medical procedure involving a tool and tubing, labeled with 'Medical Procedure' in English.natural_image
Diagram of a mechanical or electrical component with two vertical rods and a central rod, intersected by a diagonal line (no text or symbols)1 Her ulanyşdan soň nasadkany we gyllary yuwup durlaň.
2 Azyndan hepdede bir gezek nasadkany tutawaçdan aýryp, nasadkanyň birikmesini ýyly suw bilen ýuwup durlaň. Syýahat gapagyny näçe ýygylykda zerur bolsa ýuwup durlaň.
Zarýadnik
text_image
Diagram illustrating a manual tool manipulation technique with labeled steps and magnified detail
text_image
Diagram illustrating a recycling process with a battery, recycling symbol, and labeled components including a recycling bin and a 'X' symbol.text_image
Diagram illustrating a hairpin being inserted into a bottle, with a checkmark indicating the correct step.natural_image
Diagram of a tool interacting with a surface, showing directional arrows indicating movement (no text or symbols)natural_image
Simple line drawing of a sunburst symbol inside a circle with arrows, next to a partial circular shape (no text or labels)natural_image
Illustration of a medical procedure involving a tool and a cup, with no visible text or symbolsnatural_image
Diagram of a mechanical or electrical component with two arms and a central rod, no visible text or symbolsnatural_image
Hand holding a mechanical component with a downward arrow indicating a process (no text or symbols present)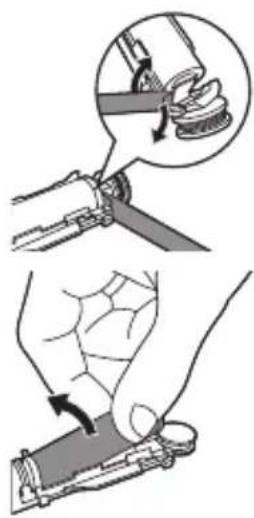
natural_image
Illustration showing two-step manual techniques for handling a tool, with magnified detail of the process (no text or symbols)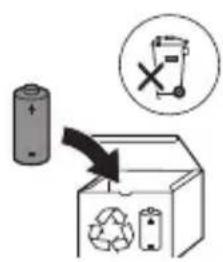
text_image
Diagram showing a battery and recycling symbol with a magnified view of a trash bin marked with an 'X'.text_image
Diagram illustrating hairpin usage and inspection steps, showing hand positioning and checkmark for inspectionnatural_image
Diagram of a mechanical component with arrows indicating direction (no text or symbols)natural_image
Simple diagram with a sunburst symbol inside a circle and a small gear-like shape beside it (no text or labels)natural_image
Diagram of a medical procedure showing a tool interacting with tissue manipulation using a pipette (no text or labels)natural_image
Diagram of two hands holding a tool with a connecting rod, no text or symbols presentnatural_image
Illustration of a hand holding a small object with a curved arrow indicating motion (no text or symbols)
text_image
Diagram illustrating a recycling process with a battery, recycling symbol, and labeled components including a 'X' symbol.www.philips.com/support
Колдонуу багыты
text_image
Diagram illustrating hairpin usage and inspection steps, showing hand positioning and checkmark for inspectionnatural_image
Diagram of a mechanical component with arrows indicating motion or force direction (no text or symbols)natural_image
Simple diagram with a sunburst symbol inside a circle and a small star-like shape beside it (no text or labels)natural_image
Illustration of a medical procedure showing a tool interacting with an anatomical structure (no text or symbols present)natural_image
Diagram of a mechanical or electrical component with two arms and a central rod, no visible text or symbolsnatural_image
Hand holding a mechanical component with a downward arrow indicating force or direction (no text or symbols)natural_image
Illustration showing two-step manual techniques for handling a tool, with magnified views of the process (no text or symbols present)text_image
Diagram illustrating battery recycling process with labeled components and a 'X' symbol indicating no reuse.natural_image
Illustration of a hand holding a screwdriver and a small mechanical component being inserted (no text or symbols)natural_image
Simple line drawing of a container with a checkmark mark on top (no text or symbols)natural_image
Diagram of a mechanical component with arrows indicating motion or force direction (no text or symbols)natural_image
Simple diagram with a sunburst icon and a small star-like symbol, no text or labels present.text_image
Diagram illustrating a medical procedure involving a tool and a bottle, with labeled components and directional arrows.natural_image
Diagram of a mechanical or electrical component with two arms and a central shaft, no visible text or symbolsnatural_image
Hand holding a mechanical component with a downward arrow indicating a process (no text or symbols present)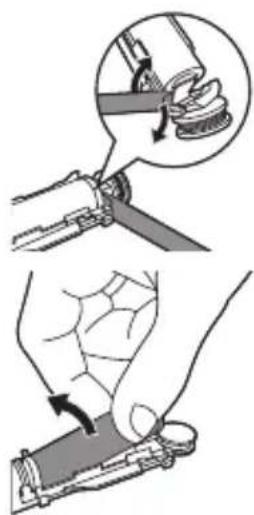
natural_image
Illustration showing two steps of a hand holding a tool, with an inset showing the process being performed (no text or symbols present)
text_image
Diagram showing a battery, recycling symbol, and trash bin with an 'X' indicating no waste or disposal.www.philips.com/support
Назначение
text_image
Diagram illustrating a hairpin being inserted into a bottle, with a checkmark indicating the correct removal step.natural_image
Diagram of a mechanical component with arrows indicating motion (no text or symbols)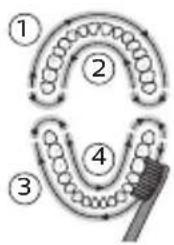
flowchart
graph TD
    A["①"] --> B["②"]
    B --> C["③"]
    C --> D["④"]
    D --> E["⑤"]
    style A fill:#f9f,stroke:#333
    style B fill:#ccf,stroke:#333
    style C fill:#cfc,stroke:#333
    style D fill:#fcc,stroke:#333
    style E fill:#ffc,stroke:#333
natural_image
Abstract diagram with a circular symbol containing arrows and a starburst, next to a vertical line with a small circle (no text or symbols)Датчик давления
natural_image
Diagram of a medical procedure showing a tool interacting with tissue and a bottle (no text or labels)natural_image
Diagram of a hand holding a tool with a ruler, against a diagonal line (no text or symbols)natural_image
Hand holding a mechanical component with a downward arrow indicating force or direction (no text or symbols)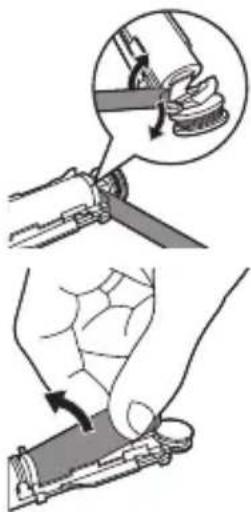
natural_image
Illustration showing two-step manual techniques for handling a tool, with magnified views of the process (no text or symbols present)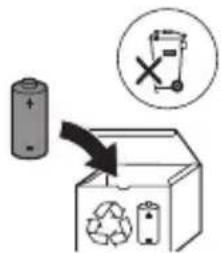
text_image
Diagram illustrating battery recycling process with labeled components and a 'X' symbol indicating no reuse.www.philips.com/support
natural_image
Illustration of a hand holding a toothbrush and a nail being inserted (no text or symbols)natural_image
Simple line drawing of a container with a checkmark mark on top (no text or symbols)natural_image
Diagram of a mechanical component with arrows indicating motion or force direction (no text or symbols)natural_image
Simple diagram with a sunburst symbol inside a circle and a small star-like shape beside it (no text or labels)Сенсори фишор
flowchart
graph TD
    A["Stage 1"] --> B["Stage 2"]
    B --> C["Stage 3"]
    C --> D["Stage 4"]
    D --> E["Arrow pointing inward toward the final stage"]
natural_image
Diagram of a medical procedure showing a tool interacting with tissue manipulation using a pipette (no text or labels)natural_image
Diagram of a mechanical or electrical component with two arms and a central shaft, intersected by a diagonal line (no text or symbols)natural_image
Illustration of a hand holding a small object with a curved arrow indicating motion (no text or symbols)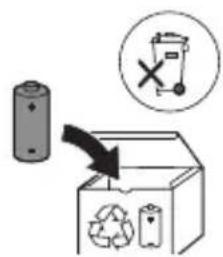
text_image
Diagram illustrating a recycling process with battery, recycling symbol, and waste bin iconwww.philips.com/support
Призначення
text_image
Diagram illustrating hair styling technique with hand holding brush and tool, plus checkmark indicating correct stepnatural_image
Diagram of a mechanical component with arrows indicating motion or force direction (no text or symbols)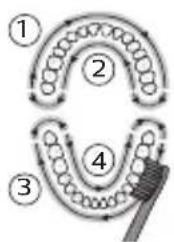
flowchart
graph TD
    A["①"] --> B["②"]
    B --> C["③"]
    C --> D["④"]
    D --> E["⑤"]
    E --> A
natural_image
Simple diagram with a sunburst symbol inside a circle and a small star-like shape beside it, no text or labels present.natural_image
Diagram of a medical procedure showing a tool interacting with tissue manipulation (no text or labels)natural_image
Diagram of a mechanical clamp or bracket assembly with no visible text or symbolsnatural_image
Diagram of a mechanical component with a curved arrow indicating motion (no text or symbols)
text_image
Diagram showing a hand using a hammer to press or install a component, labeled with parts 1 and 2.natural_image
Illustration of hands holding a cylindrical object with an arrow indicating rotation (no text or symbols)natural_image
Illustration of a hand holding a pen with a magnified inset showing the tip of a cylindrical object (no text or symbols)natural_image
Hand holding a tool with a downward arrow indicating compression or disassembly (no text or symbols present)natural_image
Illustration showing a hand holding a tool with a magnified inset of the handle (no text or symbols present)text_image
Diagram illustrating a recycling process with a battery, recycling symbol, and recycling bin labeled in English.www.philips.com/support
Пайдалану мақсаты
natural_image
Illustration of a hand holding a toothbrush and a small object being inserted (no text or symbols)natural_image
Simple line drawing of a container with a checkmark mark (no text or symbols)natural_image
Diagram of a mechanical component with arrows indicating motion or force direction (no text or symbols)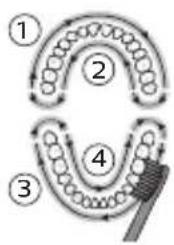
flowchart
graph TD
    A["①"] --> B["②"]
    B --> C["③"]
    C --> D["④"]
    D --> A
    style A fill:#f9f,stroke:#333
    style B fill:#ccf,stroke:#333
    style C fill:#cfc,stroke:#333
    style D fill:#fcc,stroke:#333
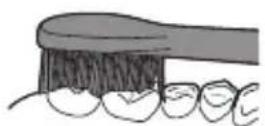
natural_image
Simple diagram with a sunburst icon and directional arrows, no text or symbols presentКысым датчигі
natural_image
Illustration of a hand holding a tool with chopsticks, no text or symbols presentnatural_image
Diagram of a mechanical or electrical component with two arms and a central shaft, intersected by a diagonal line (no text or symbols)natural_image
Illustration of a hand holding a small object with a curved arrow indicating motion (no text or symbols)
text_image
Diagram illustrating a recycling process with a battery, recycling symbol, and labeled components including a 'X' symbol.text_image
Diagram illustrating a hairpin being adjusted to form a hairdryer, with a checkmark indicating the correct positioning.1 fūnqùwǔh qìhùhīn hǎuǐwùwntāgntāp wǔjùwǔtū, nè uǒwāqhǔtǔnǔ nǐnnúwǒ jǔhǔ tǔnǚ yīnǐnníŋējwúp, hǔs pénùwǔh nǐhuǒgh yīnnún:
2 Uúnín utnúti p hunqwùwlyh qihuhyn útnplu' ntwh útunwnwlywù jhuṭn h útg, puùh nīn wjù zh wúnwgti:
L2niù lúnqwùwlyh qíluhyh l u pénwlyh úhglu yhnpn wǔgph wnlywjnipajnìun ñnnúwúl 5: Uw pānyi l ̃ unwlhu húnqwùwlyh qíluhyhǔ wwwinǎw2 yītnwynl pānpanwni:
2tn Philips Sonicare-h jhgpwwwnnnwn
1 Uhwqntp USB Ihgpwulnnuwu Iwnn wwwinh hwnuwnwlyghzhu, nnp uhwgluwδ 5 lygynnwlywu qwnnwlyhu:
2 Stnwnntp pruwlyn ihgpwulnnhsh ynw:
- Uwnunyngh ihgph uwwywnnwlyh gnighsh injyn
qwnuyni 5, huy pruwlyn tnyni wuqwui
wqnwu2wui 5 unwju: Uw u2wuwlyni 5, nn
wnuwuh hnqwuwyn ihgpwulnnuyni 5:
natural_image
Diagram of a mechanical component with arrows indicating motion or force direction (no text or symbols)
flowchart
graph TD
    A["①"] --> B["②"]
    B --> C["③"]
    C --> D["④"]
    D --> E["⑤"]
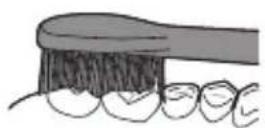
5 Ungluh wunwutph utnuh uwlvtntuutph uwpntini hwuwn petptp hunqwuwlyh pnuwyn yhuwninh nhhpnul u jninwpuwyninh ynw uh puwh nnnwhwjug uwpnnn qnpönnnyajniutph ywinwntp wunwutph ynw:
^12 niú 3wúnqútǐnì hwiúwn, nn hwiúwwwnwǔwǔh tīp úwρnniú wúpnng pṭnwùn, àtn pṭnwùn 4 úwuh puḍwùtp’ oqnwqqnòtǐnu QuadPacer qnnðwnnyjān (ntu «9nnðwnnyjēutn» pudhùn):
6 Uyutp úwpntl hwnulwð 1-hg (utnluh wunwúutnh nnuh lynnún) u úwpntp 30 úwjnyjwiú úwhupwiú hwnulwð 2-hù wúgútln (utnluh wunwúutnh útnuh lynnún): Čwnniúwlytp úwpntl hwnulwð 3-niú (utnpluh wunwúutnh nnuh lynnún) u úwpntp 30 úwjnyjwiú úwhupwiú hwnulwð 4-hù wúgútln (utnpluh wunwúutnh útnuh lynnún):
7 Uwpntin i hniu wuwuntinig htunn lqwnn t p lnwgnighs dwuwuwly hwunlqwgutl winnwutph dwnnn uwlvtnttuutpn uwpntiniu u wju hwunlqwdtphu, nnntn winwgwuniu t powulnnniu: 4wnnn t p uwu uwpnti ltqniu` hunqwuwyn wwhtniul ihwgnwdo lwwi wugwinwdo, huswtu xuwhpunwnpniu t p: 2tn Philips Sonicare winwuh hunqwuwyn wtinp t wiuynwua jhuh winnwutph pntytunutph (hunqwuwuh qihuhyn 2niun t uw2jnui pntytunutph ynu) u winnwutpn utnwlywuaqunn hwnpwnwuputph (ignuniwutn, 2wwghutn, yltuhnutn) oqnwnqnpuwui ntwpniu, tipt npwup wwun2wdo tu oqnwnqnduniu u stu huwhunlniu: luhnh wonwgwunii ntwpniu huihnniu tup hunphnnwlgti winnwufwpnjd-uwuuwqtunh htun:
^12 ni ^5 tnp Philips Sonicare wunwuh hunqwuwlyu oqunwqnndlni ^5 t yjhuhlywlywù htunwqnnnijajniüütyni ^5 , pnüwyn wtinp ^5 w2huwinh uwpnin ntidhuni ^5 , wupnngnijajwup jhgpwnlnu ^5 wδ jhuh, hul EasyStart qnpöwnznyan wtinp ^5 jhuh wwwwwlunhluwgulwδ:
Lhgpwwlnnniú u úwnunlyngh lhgph ywnqwwlhǎwly
1 Uhwqntp USB Ihgpwulnnuwu lwnh wwnh
ywnnwuhu, uhwqntp wwnh hwnuwnwughen
wwunh tlywnnwuwu hnuwuph ywnnwuhu:
2 Stwnntp pruwyn ihgpwulnnhsh ynw:
^12 nui' pniwyn yannuh 2 ywna wqnwi2wu' hwwunwuntni, np prniwyn wwn2wa ytnwny untwnwnyuwo t ihgpwnnphsh unw u ihgpwnnyniu t:
L2nu' Philips Sonicare wunwuh hunqwuwyn uwhuwinttuulwud 5 wnuylwqü 28 uwpnnn w2huwnwn2ngwüütnh hwüwn, jninwpwüyninn` 2 nnwü ununnniŋjwiúp (14 on, tprä onwylwü tnplni wüqwü 5 oqunwqnndniú): Uwnunlngh lhgph uwlwnnwnh gnighpn gniyg 5 unwihu uwnunlngh lwnqwulhówyn, tnp wylwnnniú tnp hunqwüwlh 2 nnwtiwung w2huwnwn2ngwün, tnp wügwinniú tnp pnüwlyn, ywu tnp wju lhgpwylnnniú 5:
Uwnunlyngh ywnqwuhǎwln (tnp fnùwln w2huwunn, ihgpwulnnhzh ynw t)
Uwnunlngh lwnqwuhǎwly Uwnunlngh gnighs
Lhpù 5 Uniq hyuówz (hyuówwunuh 30
(μωjnlγμwǔhg)
EasyStart (Rt2unUqhqp)
Uju Philips Sonicare ἅnn̄t̄h EasyStart (3b2unUyhqp) qnn̄dwn̄nynjəu h ulqpwūt̄ wlnhŋwugylwδ ξ: EasyStart (3b2unUyhqp) qnn̄dwn̄nynjəu ἁnpnn̄t̄u pwn̄dnwgūniú ξ nīdqn̄najniùn wnwghù 14 ὑwpnnišut̄nh ἡpəwgpnui, nnwtuqh ἀnip unylntp̄p wnnwšut̄nh ὑwpnt̄L Philips Sonicare-nú:
EasyStart-ù (3b2unUqhqp) wuwwwlunhulwgtlni hwúwn unǒu'Ulynhulwgúwù lwwú wuwwwlunhulwguìwù qnnòwnnynjəutɪŋí:
funqwùwlyh qlhuhyh yhnhuwnhùu wù hì2tigniú
2tn Philips Sonicare-ü niüh BrushSync (UwpnüwüUhüpnnüwgnü) unthuünlnqhwiü, nnp htunwqöniü 5 2tn hunqwüwwlyh qihuhlyh uww2luwöniŋjniün:
^12 nu ^1 Uju qnnδωnnηρει ω2ħωωνπιί ξ úħωμμ Philips Sonicare ḥutīwgh ḥnquùwlyh qħuhγμτη BrushSync (ħnquùwlyhUhùpnnúwgnιί) ιθħiūŋŋqħwμημ:
1 Unwghù wùqwú ñnn hūl wgh hunqùwuh qihuh y wúnwgutju pnùwln āwùwgniú 5, nn ŋnip niútp Philips hunqùwuh BrushSync (hunqùwuhUhùpnnùwgniú) unthuünqhwjnú u uljunú 5 htunwqdtj hunqùwuh qihuh y úw2luðnijəjníún:
2 dwuwuwlyh npapwgpniu, ywhuulwδ 2tn ynnuhg yhnwnzluwδ aü2niuhg u oqunwqnndüwu dwuwuwlyhg, pnüwyn lhtinwqoh hunqwuwlyh qihuhyh üw2ylwöniəjnün` nnn2tini hwiúwn 2tn hunqwuwlyh qihuhyn yhnhutini hwiúwn lwuwqnju dwuwuwyn: Uju qnpöwnnyjpn tnww2hwulnnniu § 2tn wunwüutnh lwuwqnju üwpnnuiu ni huüwúpn:
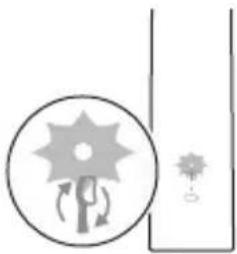
natural_image
Simple diagram with a sunburst icon and a small star-like symbol, no text or labels present.3 tnp hunqwùwlyh qihuhyh ynhhuwnhùwù h2tgúwù lnyun ywnylniú 5 uwwph anyùnu, 7nip wtaup 5 ynhutp 2tn hunqwùwlyh qihuhyn:
funqwùwh qjhuhh ynhuwphàuówù hh2tgniwù wwwwwlnhúwgùtīnì huuíwn unǒu "Uyinhúwgùtī lyuì" wwwwwlnhúwgùtī qnnòwnnnyjèutānq":
Δυ₂ύωι υηλς
2tn Philips Sonicare-tu niúh pwnànwlywnq unuh, nnp zwiuhniú t úwptihu 2tn yhnwnzulwó áu2niún: trat zwiuhg 2wn áu2niú yhnwntp, wwww wunwúh hunqwùwlyú wùúhqwwytu ywnàwqwùph` gnjg unwni hwúwn, nn 2tq hwnlywluŋn t úuqwqtigutl áu2niún: Uju wnàwqwùpn unnuíu t npwtu panəzuwù chnyhnunipajniú u, htunlwpwn, úwprnúwù qqwgnnnupajwiú u àwjúh úhqngnu: Fwgh nnuùhg, hunqwùwlyh qihuhlyh yhnhuwnhùiwù hh2tgúwù inyun yulwnzulh uwrah qnyùnu:
ǒu2úwù inlħsù wwwwwlnhluwgūtǐnì hwiśwn intú ’Uynhluwgūtǐ lyuì wwwwwlnhluwgūtǐ qnnδωwnnyjəutīŋí :
QuadPacer
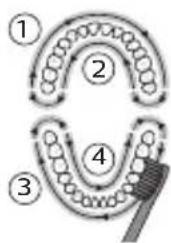
flowchart
graph TD
    A["①"] --> B["②"]
    B --> C["③"]
    C --> D["④"]
    D --> E["⑤"]
QuadPacer-ŋ nùnúhguìwù dwiúwṣwih ʒ, nnù niúh lyuṇǎ wqnwu2wù l u nwnwn` hh2tgǔtīnì hwiúwn, nn ὅtn pānwùh 4 hwiúluòutīnì hwiúwwwnwṣwih l u wūnwwlynlhyun úwpntp: Uju Philips Sonicare wunwùh hunquwuìwù wwnwplniú ʒ úhwguìwǒ QuadPacer qnnδωnnyjənu:
SmarTimer
SmarTimer-n gnjg ٤ unwihu, nn úwpnúwù yhnìu wluwnnulwò ٤ úwpnúwù yhnìh ʊtŋqnù wluunnúwùn lytwnyì wǔgwùntǐnǚ wùnwùh húnqwǔwǔn: Uunwùwppnýd-úwuuwqtaṭnùtnī hūnnhniŋ tǔ unwihu úwpntāl wùnwúttnīn onwlywù 2 wǔqwúhg n_z wùwlywu: L2nuì ٤ pat utnútp hnuwùph úhwguśwù/wǔgwùnúwù lynǎwln úwpnúwù yhnìn ulyutǐng htánn, wùnwùh
hunqwuwyn ylywuguh: 15 ywjnyjwi nwnwnhg htunn SmarTimer-n ubnwylwjlniú 5:
Ulnhluwgutl ywi wwwwnlnhluwgutl qnpdwnnyputn
2tn wunwuh hunqwuwlyh ynw 7nip lqwnn tpr wlnhylwgutl ywu wwwwwlnhylwgutl htunljwl qnndwnnyputtnp`
EasyStart (Rt2unUqhqp)
1 Μπίρ πρύωμη υωπηωμής ύψωγυλωδ χηφωυληνης
ρημι:
2 Utnutp u wuhtp uünigüwü ühwüwü/wügwünüwü lynäwyn ühüçntn pnüwyn üünü l hgpwwlnnhzh ynw:
3 Ubŋúwǒ wùhāp uṭnǐgúwǔ wǔqūnúwǔ/úhwǔwǔ ynǎwln` uḥuǐ lùp ywnǎ wqǔwǔ2wǔ (3 ywjnlywǔhg):
4 άηητύρ υὐηιγίωμὶ ύλωμόμμὶ/ωὐρωμπίμμὶ λησλυμη:
- 3wðngh-úhghù-pwnàn tīnwlyh wqnwu2wùn ú2wuówluŋniú ß, nn EasyStart(3b2unUlyhqp) qnnðwinnyjəu wlnnhulwgutl ß: Uwnunlyngh lhgpwwlnnuñu ùwlywnnwlgh gnighzn ünyüwbu yρωnpəh ywüwz qnijùnú 2 wùqwú' wlnnhulwgniún hwuuunwintjni hwiúwn:
- Ρωπάρι-ύhghù-gωδρ τινυγή υημιώ2ωμίρ ύ2ωμιωληιύ 5, ηη EasyStart (362unUyhqp) qηρόωπηνιγαύ υωμιωλυηνιμωγιβι 5: Uωμηνληgh ιhgpωμηνημίω μηιγής γινυμ λραωπαή υωμαή ανιγίνυ 1 υμιαμιώ υωμιωλυηνιμωγιμίρ hωμυνωντίνι ħωμίωρι:
^12 niù 4hùhlywlywù wnnjniùwultunnipajwùn hwuútǐnì hwuúwn EasyStart-n (362unUqhqp) wṭunp 5 wwwwwyunhluwugǔti:
funqwùwlyh qlhuhyh yhnhuwnhùu wù hħ2tgniw
L2niù 7nip ywnnn tþ wlnhúwɡǔtǐ ywú wwquwlynhúwɡǔtǐ hunqwùwlyh qíhuhyh ynhhuwnhúwúwú hhztgniún, tþp hunqwùwlyh hutlwgh qíhuhyn qunúu niú t pnǚwlyh ynw:
^12 niú ^1 nn húl wgh hunqùwlyh qíhuhyútnh ynhuwnhùuówù hh2tgúwù qnnòwnnyjāu wlyunhúwguìwǒ t:
natural_image
Diagram of a medical procedure showing a tool interacting with tissue manipulation using a pipette (no text or labels)1 3twnwqntp hunqwùwwlyh qihuhyn u luwgtp útunwnwlywù jhutzh hwnuŋwðn unwp gnnu: 3wúnqultp, nn htnwqntl tp wunwúh úwðniyh útuwgnnnútqn:
2qnizwgniu' Uh hntp ntunhut luhpn unin wnwnlywutnnu ntuwh jhutnh utg, pwuh nn wju lwwnn t hwuqtguti yuuuulwoph:
2 Fnùwlyh wúpnnq úwyltntun úwpntp hùnùwù qnnòu wǒpnú:
^12 nu' Uh hwnluwotp pnuwlynul lujwgwnwuhu' wultinnn gninp htizwgutni hwuwn:
hunqwawlyh qihuhy
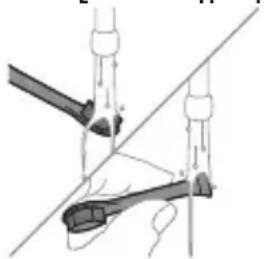
natural_image
Diagram of a mechanical or electrical component with no visible text, numbers, or symbols1 3nɪnwpwɪsɪŋn oqnwnaŋnðniúhg htunn lʊwgtp hunqwɪwʊlɪh qɪhʊln u úwəqhyʊtənn:
2 3tinwqntp hunqwùwlyh qlnihn pnùwlyhg u wnùuwqù 2wpwien útyi luwgtp hunqwùwlyh qlhuhyn inwp gnnu: Luwgtp āwúihnnnwlywù lwwhwnhgù wjùpwù hwǎwhu, nnpwù wùhnwdtzun t:
Lhgpwwwnhhz
1 Uguwntp jhgpwulnnhyn` uwhupwu wju uwpntln:
2 Lhgpwulnnhsh uwlvtntun uwpntp hunuwwl qnnδuωδρnu:
natural_image
Diagram of a mechanical component with a curved arrow indicating rotation (no text or symbols)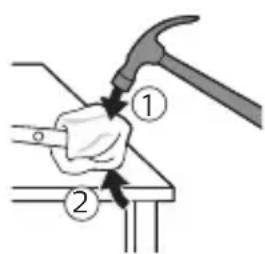
text_image
Diagram showing two hands using a hammer to work on a workpiece, labeled with numbered callouts.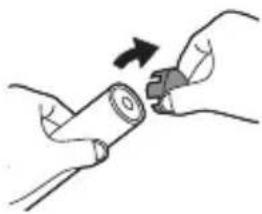
natural_image
Illustration of hands using a tool to adjust or install a cylindrical component (no text or symbols visible)4 3tnwqntp tqnh ywwhwnhyn winwuh hunqwüwlyh pnüwlyhg: trat tqnh ywwhwnhyn ht2nnijwup sh wqwnuyniú wwwunjwihg, ynlyutp pwjl 3-n úhüzu tqnh ywwhwnhyn nninu qw:
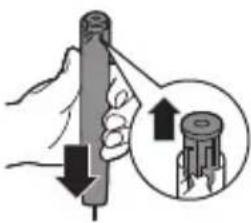
natural_image
Illustration of a hand holding a cylindrical tool with an arrow indicating force or direction, and a magnified inset showing the same tool (no text or symbols present)5 Anuwyn qihuhulwyn wwhhtinu' jhutin n utnplu utnútp lyn2un uwwytinunyah ynw: trat utnphù pwnwnphsuttn hizunnujwup stu wqwnuniu wwwunjwuhg, lynyutp pwjl 3-n uhuslu utnphù pwnwnphuttn nninu qwù:
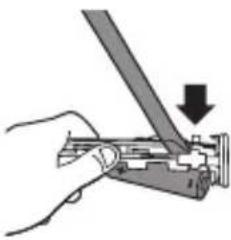
natural_image
Hand using a tool to adjust or install a mechanical component, with a downward arrow indicating the process (no text or symbols present)6 Stwnntp wunnwnwlywhwun uwnlnyngh u uwhnwly 2ngwuwlyh uhgl utnphu pwnwnnhgutph utnpuni: Ujunihtunu qan2nptu ht2wgntp wunnwnwlywhwun uwnlnynghg uwhnwly 2ngwuwlyh utnpluh hwnnlwqn ynuntjni hwuiwn:
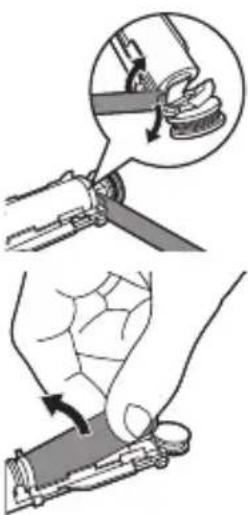
natural_image
Illustration showing two steps of a hand holding a tool, with magnified detail highlighting the process (no text or symbols present)7 Stwnntp wunnunwlywhwùn úwnunlngh útnpluh lu uwhunwly 2n2wùwlyh úhglù lynnttǐni útwnwnwlywù útnphnp, nnp úhwgǔniú t úwnunlngn yuówz unwwuwihù: Uw lýpnüwgǔh úwnunlngh útnpluh tqnq 2n2wùwlyhg:
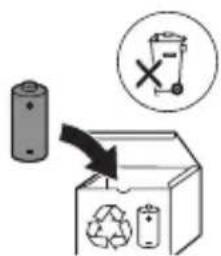
text_image
Diagram illustrating a recycling process with a battery, recycling symbol, and recycling bin labeled 'Recycle'.8 Fnutp úwnunlngn l u htnwgntp wju útnphù pwnwnnhsútphg, npwtuqh lynuntp úwnunlngh tŋlynnn. útunwnjw útnnhhnp: 2qnizwgniu 2qnizwgtp úwnunlngh útnnhnútph unin tqntphg, npwtuqh huniuwhtp úwnutph úwwuulwópútphg:
natural_image
Illustration of a hand holding a screwdriver and a small tool, with a downward arrow indicating motion (no text or symbols)natural_image
Simple line drawing of a container with a checkmark mark, no text or symbols presentnatural_image
Diagram of a mechanical component with arrows indicating direction (no text or symbols)odds funds funds funds funds funds funds funds funds funds funds funds funds funds funds funds funds funds funds funds funds funds funds funds funds funds funds funds funds funds funds funds funds funds funds funds funds funds funds funds funds funds funds funds funds funds funds funds funds funds funds funds funds funds funds funds funds funds funds funds funds funds funds funds funds funds funds funds funds funds funds funds funds funds funds funds funds funds funds funds funds funds funds funds funds funds funds funds funds funds funds funds funds funds funds funds funds funds funds funds funds Funds
odds funds mgals mgals mgals mgals mgals mgals mgals mgals mgals mgals mgals mgals mgals mgals mgals mgals mgals mgals mgals mgals mgals mgals mgals mgals mgals mgals mgals mgals mgals mgals mgals mgals mgals mgals mgals mgals mgals mgals mgals mgals mgals mgals mgals mgals mgals mgals mgals mgals mgals mgals mgal
odds funds funds funds funds funds funds funds funds funds funds funds funds funds funds funds funds funds funds funds funds funds funds funds funds funds funds funds funds funds funds funds funds funds funds funds funds funds funds funds funds funds funds funds funds funds funds funds funds funds funds funds funds funds funds funds funds funds funds funds funds funds funds funds funds funds funds funds funds funds funds funds funds funds funds funds funds funds funds funds funds funds funds funds funds funds funds funds funds funds funds funds funds funds funds funds funds funds funds funds funds Funds
odds funds funds funds funds funds funds funds funds funds funds funds funds funds funds funds funds funds funds funds funds funds funds funds funds funds funds funds funds funds funds funds funds funds funds funds funds funds funds funds funds funds funds funds funds funds funds funds funds funds funds funds funds funds funds funds funds funds funds funds funds funds funds funds funds funds funds funds funds funds funds funds funds funds funds funds funds funds funds funds funds funds funds funds funds funds funds funds funds funds funds funds funds funds funds funds funds funds funds funds funds Funds
natural_image
Simple diagram with a sunburst icon and directional arrows, no text or symbols present866m0n1 266m0n
natural_image
Diagram of a medical procedure showing a tool interacting with a patient's leg and arm (no text or labels)natural_image
Diagram of a mechanical clamp or clamp assembly with two arms and a central rod, no text or symbols presentodds funds funds, fund funds, funds funds, funds funds, funds funds, funds funds, funds funds, funds funds, funds funds, funds funds, funds funds, funds funds, funds funds, funds funds, funds funds, funds funds, funds funds, funds funds, funds funds, funds funds, funds funds, funds funds, funds funds, funds funds, funds funds, funds funds, funds funds, funds funds, funds funds, funds funds, funds funds, funds funds, funds funds, funds funds, funds funds, funds Funds
text_image
Diagram illustrating a manual tool manipulation technique with labeled steps and magnified views
text_image
Diagram illustrating a recycling process with a battery, recycling symbol, and labeled waste binstext_image
Diagram illustrating a hairpin being inserted into a bottle, with a checkmark indicating the correct step.הכלה 1970-הכלה 2
natural_image
Diagram of a mechanical component with arrows indicating motion or force direction (no text or symbols)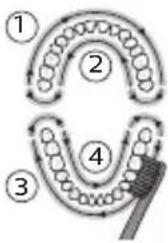
flowchart
graph TD
    A["①"] --> B["②"]
    B --> C["③"]
    C --> D["④"]
    D --> E["⑤"]
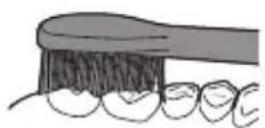
תַלְרָה בְּרָה
natural_image
Simple diagram with a sunburst symbol inside a circle and a small star-like shape beside it (no text or labels).הכלה/הכלההוּרָהוּרָהוּרָהוּרָהוּרָהוּרָהוּרָהוּרָהוּרָהוּרָהוּרָהוּרָהוּרָהוּרָהוּרָה
natural_image
Illustration of a hand holding a tool with a knife, no text or symbols present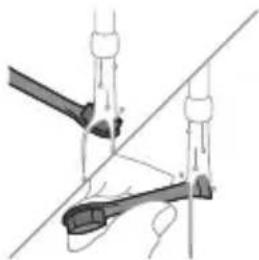
natural_image
Diagram of mechanical clamping or assembly with no visible text or symbolsתְרָה בַרִי לְרָה
1
natural_image
Illustration of a hand holding a tool with a magnified inset showing the process (no text or symbols)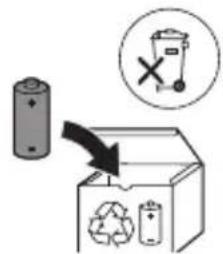
text_image
Diagram illustrating a recycling process with battery, recycling symbol, and waste bin iconwww.philips.com/Sonicare
©2021 Koninklijke Philips N.V. (KPNV). All rights reserved. Philips and the Philips shield are trademarks of KPNV. Sonicare and the Sonicare logo are trademarks of Philips Oral Healthcare, LLC and/or KPNV.
300011247231 (06/07/2023)