
OTV 55GQU-5023P - TV OK - Free user manual and instructions
Find the device manual for free OTV 55GQU-5023P OK in PDF.

| Brand | OK |
| Model | OTV 55GQU-5023P |
| Product type | LED TV 4K Ultra HD |
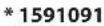
| Screen size (diagonal) | 55 inches (139 cm) |
| Screen resolution | 3840 x 2160 pixels (4K UHD) |
| Dimensions (without stand) | 123.2 x 71.2 x 8.1 cm (estimated) |
| Weight (without stand) | Approximately 17 kg |
| Power supply | 220-240 V~, 50/60 Hz |
| Power consumption (standby) | < 0.5 W |
| Power consumption (max) | 120 W (estimated) |
| Energy efficiency class | Class G (estimated for 55" 4K) |
| Integrated TV tuners | DVB-T/T2, DVB-C, DVB-S/S2, ATV |
| Operating system | Google TV |
| Main features | Built-in Chromecast, Google Assistant, Wi-Fi 5 GHz, Bluetooth, parental control, sleep timer |
| Connectivity | Wi-Fi (2.4/5 GHz), Bluetooth 4.2, Ethernet (RJ45), HDMI (x3), USB (x2), optical audio output, headphone jack, RF antenna |
| Audio power | 2 x 8 W (estimated) |
| Wall mount compatibility | Yes (VESA 400 x 200 mm, estimated) |
| Care and cleaning | Use a soft, damp cloth; avoid detergents and solvents |
| Remote control batteries | 2 AAA batteries (included) |
| Operating temperature | +10 °C to +35 °C |
| Operating humidity | 80% max (at 25 °C) |
| Spare parts / repairability | No user-serviceable parts; contact the manufacturer or an authorized service center |
| General information | Double insulation (Class II), CE declaration, box contents: TV, stand, remote control, batteries, quick start guide, warranty card |
Frequently Asked Questions - OTV 55GQU-5023P OK
User questions about OTV 55GQU-5023P OK
0 question about this device. Answer the ones you know or ask your own.
Ask a new question about this device
Download the instructions for your TV in PDF format for free! Find your manual OTV 55GQU-5023P - OK and take your electronic device back in hand. On this page are published all the documents necessary for the use of your device. OTV 55GQU-5023P by OK.
USER MANUAL OTV 55GQU-5023P OK
natural_image
Front view of a modern black flat-screen TV with a visible 'ok' logo on the front screen (no text or symbols on screen)DE
The terms HDMI, HDMI High-Definition Multimedia Interface, HDMI Trade dress and the HDMI Logos are trademarks or registered trademarks of HDMI Licensing Administrator, Inc.

The DVB logo is the registered trademark of the Digital Video Broadcasting - DVB - project.

Dolby, Dolby Vision, Dolby Atmos, Dolby Audio, and the double-D symbol are trademarks of Dolby Laboratories Licensing Corporation. Manufactured under license from Dolby Laboratories. Confidential unpublished works. Copyright © 1992–2022 Dolby Laboratories. All rights reserved.

Covered by one or more claims of the HEVC patents listed at patentlist. accessadvance.com.


Google TV is the name of this device's software experience and a trademark of Google LLC. Google, YouTube, and Chromecast built-in are trademarks of Google LLC.

The Bluetooth ^® word mark and logos are registered trademarks owned by Bluetooth SIG, Inc.
In order to prevent fire always keep candles and other open flames away from this product.

\~ Wechselstrom
natural_image
Simple line drawing of a rectangular panel with two legs and a power button, no text or symbols present.Important safety instructions
Please, read these safety instructions and respect the following warnings before the appliance is operated.
The Imtron GmbH assumes no liability for damage to the product, for property damage or for personal injury due to careless or improper usage of the product, or usage of product which does not meet the manufacturer's specified purpose.

The lightning flash with arrowhead symbol, within an equilateral triangle, is intended to alert the user to the presence of uninsulated "dangerous voltage" within the products enclosure that may be of sufficient magnitude to constitute a risk of electric shock.

The exclamation point within an equilateral triangle is intended to alert the user to the presence of important operating and maintenance (servicing) instructions in the literature accompanying the appliance.
In order to prevent fire always keep candles and other open flames away from this product.

\~ Alternating Current
This equipment is a Class II or double insulated electrical appliance. It has been designed in such a way that it does not require a safety connection to electrical earth.
- Television sets with 43" size screens or more must be lifted and carried by at least two people.
- This TV does not contain any parts which could be repaired by the user. In case of a fault, contact the manufacturer or the authorised service agent. Contact with certain parts inside the TV might endanger your life. The guarantee does not extend to faults caused by repairs carried out by unauthorized third parties.
- Do not remove the rear part of the appliance.
- This appliance is designed for the receiving and reproduction of video and sound signals. Any other use is strictly forbidden.
- Do not expose the TV to dripping or splashing liquid.
- To disconnect the TV from mains please unplug the mains plug from the mains socket.
- If the supply cord is damaged, it must be replaced by the manufacturer, a service agent or similarly qualified persons in order to avoid a hazard.
- The suggested distance to watch HD TV is approximately three times longer than the screen diagonal size. Reflections on the screen from other light sources can make the quality of the picture worse.
- Ensure the TV has sufficient ventilation and is not close to other appliances and other pieces of furniture.
• Install the product at least 5 cm from the wall for ventilation. - Ensure that the ventilation openings are clear of items such as newspapers, table-cloths, curtains, etc.
-
The TV set is designed to be used in a moderate climate.
-
The TV set is designed exclusively for operation in a dry place. When using the TV outside, please, make sure it is protected against moisture (rain, splashing water). Never expose to moisture.
- Do not place any objects, containers filled with liquids, such as vases, etc. on the TV. These containers might get pushed over, which would endanger electric safety. Place the TV exclusively on flat and stable surfaces. Do not place any objects such as newspaper or blankets, etc. on or under the TV.
- Make sure the appliance does not stand on any power cables as they might get damaged. Mobile phones and other devices such as WLAN adapters, monitoring cameras with wireless signal transmission, etc. might cause electromagnetic interference and they should not be placed near the appliance.
- Do not place the appliance near heating elements or in a place with direct sunlight as it has a negative effect on cooling of the appliance. Heat storage is dangerous and it can seriously reduce the lifetime of the appliance. In order to ensure the safety, ask a qualified person to remove the dirt from the appliance.
- Try to prevent damage to the mains cable or mains adapter. The appliance can only be connected with the supplied mains cable/adapter.
- Storms are dangerous for all electric appliances. If the mains or aerial wiring is struck by lightening the appliance might get damaged, even if it is turned off. You should disconnect all the cables and connectors of the appliance before a storm.
- To clean the screen of the appliance use only a damp and soft cloth. Use only clean water, never detergents and in no case use solvents.
- Position the TV close to the wall to avoid the possibility of it falling when pushed.
- WARNING - Never place a television set in an unstable location. A television set may fall, causing serious personal injury or death. Many injuries, particularly to children, can be avoided by taking simple precautions such as:
- Use cabinets or stands recommended by the manufacturer of the television set.
- Only use furniture that can safely support the television set.
- Ensure the television set is not overhanging the edge of the supporting furniture.
- Not place the television set on tall furniture (for example, cupboards or bookcases) without anchoring both the furniture and the television set to a suitable support.
- Not place the television set on cloth or other materials that may be located between the television set and supporting furniture.
- Educate children about the dangers of climbing on furniture to reach the television set or its controls.
- Ensure that children do not climb or hang onto the TV.
- If your existing television set is being retained and relocated, the same considerations as above should be applied.
- The software on your TV and the OSD layout can be changed without notice.
• TV operating conditions:
- temperature from +10 to +35 °C
- humidity no more than 80% (at a temperature of 25 °C)
- atmospheric pressure from 86 to 106 kPa (from 650 to 800 mmHg)
Warning:
- When turning off the set, use the standby button on the remote control. By long pressing of this button, TV will turn off and enter the energy saving standby mode to meet the eco-design requirements. This mode is default one.
- For the electrostatic discharge (ESD) test of EN55035, it was found that manual operation by Standby button ON/OFF switch is needed to resume normal operation as intended after the test.
- Do not use TV set directly after unpacking. Wait until TV warms up to the room temperature before using it.
- Never connect any external devices to a live appliance. Switch off not only the TV but also the devices which are being connected! Plug the
TV plug into the wall socket after connecting any external devices and the aerial!
• Always make sure there is free access to the TV mains plug.
- The appliance is not designed for a use in a workplace fitted with monitors.
- The systematic use of headphones at high volume might lead to irreversible hearing damage.
- Ensure environmental disposal of this appliance and any components including batteries. When in doubt, please, contact your local authority for details of recycling.
- While installing the appliance, do not forget that furniture surfaces are treated with various varnishes, plastics, etc. or they might be polished. The chemicals contained in these products might have a reaction with the TV stand. This could result in bits of the material sticking to the furniture surface, which are difficult to remove, if not impossible.
- The screen of your TV has been produced under top quality conditions and was checked in detail for faulty pixels several times. Due to the technological properties of the manufacturing process, it is not possible to eliminate the existence of a small number of faulty points on the screen (even with maximum care while in production). These faulty pixels are not considered faults in terms of guarantee conditions, if their extent is not greater than the boundaries defined by DIN norm.
- The manufacturer cannot be held responsible, or be liable, for customer service-related issues related to the third party content or services. Any questions, comments or service-related inquiries relating to the third party content or service should be made directly to the applicable content or service provider.
- There are a variety of reasons you may be unable to access content or services from the device unrelated to the device itself, including, but not limited to, power failure, the Internet connection, or failure to configure your device correctly. Manufacturer, its directors, officers, employees, agents, contractors and affiliates shall not be liable to you or any third party with respect to such failures or maintenance outages, regardless of cause or whether or not it could have been avoided.
- All third party content or services accessible via this device is provided to you on an "as-is" and "as available" basis and manufacturer and its affiliates make no warranty or representation of any kind to you, either express or implied, including, without limitation, any warranties of merchantability, non-infringement, fitness for a particular purpose or any warranties of suitability, availability, accuracy, completeness, security, title, usefulness, lack of negligence or error-free or uninterrupted operation or use of the content or services provided to you or that the content or services will meet your requirements or expectations.
- Manufacturer is not an agent of and assumes no responsibility for the acts or omissions of third party content or service providers, nor any aspect of the content or service related to such third party providers.
- In no event will manufacturer and/or its affiliates be liable to you or any third party for any direct, indirect, special, incidental, punitive, consequential or other damages, whether the theory of liability is based on contract, tort, negligence, breach of warranty, strict liability or otherwise and whether or not manufacturer and/or its affiliates have been advised of the possibility of such damages.
- This product contains technology subject to certain intellectual property rights of Microsoft. Use or distribution of this technology outside of this product is prohibited without the appropriate license(s) from Microsoft.
- Content owners use Microsoft PlayReady™ content access technology to protect their intellectual property, including copyrighted content. This device uses PlayReady technology to access PlayReady-protected content and/or WMDRM-protected content. If the device fails to properly enforce restrictions on content usage, content owners may require Microsoft to revoke the device's ability to consume PlayReady-protected content. Revocation should not affect unprotected content or content protected by other content access technologies. Content owners may require you to upgrade
PlayReady to access their content. If you decline an upgrade, you will not be able to access content that requires the upgrade.
Important information regarding use of video games, computers, captions and other fixed image displays.
- The extended use of fixed image program material can cause a permanent "shadow image" on the LCD screen (this is sometimes incorrectly referred to as "burnout to the screen"). This shadow image is then permanently visible on the screen in the background. It is irreversible damage. You can avoid such a damage by following instructions below:
- Reduce the brightness/contrast setting to a minimum viewing level.
- Do not display the fixed image for a long period of time. Avoid displaying of:
» Teletext time and charts,
» TV/DVD menu, e.g. DVD contents,
» In the „Pause“ mode (hold): Do not use this mode for a long time, e.g. while watching a DVD or a video.
» Turn off the appliance if you are not using it.
CE Statement:
- Imtron GmbH hereby declares that the OTV 55GQU-5023P complies with the EU directive 2014/53/EU. Click on the following link to read the full text of the EU Declaration of Conformity: http://de.ok-online.com/nc/de/suche.html
This equipment may be operated in all EU countries.
The 5 GHz WLAN(Wi-Fi) function of this equipment may only be operated indoors.
Wi-Fi max transmitter power:
100 mW at 2,412 GHz – 2,462 GHz
100 mW at 5,150 GHz – 5,350 GHz
100 mW at 5,470 GHz – 5,725 GHz
100 mW at 5,725 GHz – 5,850 GHz
BT max transmitter power: 10 mW at 2,402 GHz – 2,480 GHz.
- Channel coverage
DVB-T: 177.5 MHz \~ 226.5 MHz
474 MHz \~ 858 MHz
DVB-C: 113 MHz\~858 MHz
DVB-S/S2: 950 MHz \~ 2150 MHz
ATV: 46MHz \~ 862 MHz
- Software version: Mon Jul 17 09:31:42 CST 2023 or higher
What is included in the box
Supply of this TV includes following parts:
- 1x TV • 1x TV stand installation packet
• 1x Remote control • 1x Quick Start Guide - 2x AAA batteries • 1x Warranty card
Attaching the Stand
Please refer to the instructions at the end of this guide.
Wall mounting the TV
Install the wall mounting bracket to the television as advised by the bracket manufacturer.
Connections
For instructions on connecting external devices, please turn to the last page of this guide.
Getting started - initial set up
- If rubber parts, foam parts or tape are attached to the TV frame, please remove them gently.
- Using the RF cable (not included), connect the TV to the TV Aerial wall socket.
- For connecting to the Internet with a wired connection connect a Cat 5/Ethernet cable (not included) from the TV to your broadband modem/router.
- Insert the batteries supplied into the Remote control.
- Connect the power cable to the Electrical outlet.
- Then press Standby button to power on TV.
- After turning the TV on, you will be welcomed by the First Time Installation menu.
- Please select language for TV menu.
- Please set desired settings in remaining screens of First installation menu.
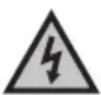
TV standby button
The TV is equipped with a single button located at the bottom of the LED light.
natural_image
Simple line drawing of a rectangular panel with two legs and a power button, no text or symbols present.STANDBY – Standby Power On/Off
Choosing Mode Input/Source
To switch between the different input/connections.
Using the buttons on the remote control:
- Press and hold the ☐ (TV guide) button. The input menu is displayed.
- Press [▲] or [▼] to select the input you require.
- Press [OK].
TV Menu navigation
Use the (▲/▼/◄/►) buttons to focus on the desired item. Press the OK button to select the item currently in focus. Press the ← (back) button to go back one step in the menu. Press and hold the ← (back) button to leave menu. Press the ↑ (home) button to enter the TV Home menu.
Electronic instruction manual
To access more useful information directly from your TV, you can launch the online manual by following these steps:
- Press the home button on your remote.
- Using the cursor, navigate downwards to "Your apps".
- From the list of apps, locate and select "Instruction Manual."
NOTE: Please ensure that your TV is connected to the internet in order to use this electronic manual.
USB Media playback notice
This TV supports playback of a wide variety of file types from a USB drive. However, for data security reasons, Google limit the supported file system types.
To playback any media from a USB storage drive, the USB drive must be formatted to a FAT16 or FAT32 file system. NTFS is not supported.
Channel list
The channel list on your TV is where you can access all of your available TV channels in one convenient location. Follow these instructions to access and manage your channel list:
- Press the ⓗ (home) button on your remote control to open the home screen.
- Select "Live TV" from the list of apps on your home screen.
- Make sure you are on a digital TV input (antenna, cable or satellite).
- Press the OK button to open the channel list.
- Use the arrow buttons on the remote to browse through the list of available channels.
- Press the OK button on the remote to select a channel and start watching.
Moving channels in the channel list
Moving channels within the channel list on your TV can be a useful way to organize your favorite channels or place them in a more convenient order. To move channels within the channel list, follow these steps:
- Navigate to the channel list as described above.
- Press the red button.
- Select [Channel Move] from the menu.
-
Use the OK button to select one or more channels you want to move.
-
Use the arrow buttons to move the cursor to where you want to move the selected channels.
- Press the blue button.
- All selected channels are grouped and moved to the cursor position.
Swapping channel positions in the channel list
You can also swap position of two channels:
- Navigate to the channel list as described above.
- Press the red button.
- Select [Channel Swap] from the menu.
- Select channel you wish to swap and press the OK button.
- Then select second channel to be swapped and press OK.
- The position of the 2 channels is swapped.
Note that some channels may not be movable depending on your TV provider's settings.
Favourites list
The favourites list on your TV gives you quick access to your most-watched TV channels. Follow these instructions to access and manage your favourites list:
Adding channels to your favourites list
- Press the home) button on the remote control to open the home screen.
- Select "Live TV" from the list of apps on your home screen.
- Make sure you are on a digital TV input (antenna, cable or satellite).
- Press the OK button to open channel list.
- Move the cursor to the channel you want to add to your favourites.
- Press the blue button and select one or more favourites lists where you wish to add the channel.
- Press the ← (back) button to return to the channel list. A heart symbol will appear next to the channel that is in the favourites list.
To add more channels to your favourites, repeat steps 5 - 7.
Using the favourites list
By default, when you press OK while watching live TV, the standard channel list is displayed. If you want the favourites list to be displayed instead, follow these steps:
- Make sure you are on a digital TV input (antenna, cable or satellite).
- Press the OK button to open the channel list.
- Press the yellow button to open the channel list type selection.
- Scroll down and select [Favorites], then select one of the 4 available favourite channel lists.
- Now, each time you press the OK button, the corresponding favourites list will open.
NOTE: If you later want to change the OK button function to a different favourites list or a different channel list, repeat the above steps and select the desired channel/favourite list in step 4.
Removing channels from your favourites list
- Ensure you are on input of digital TV (Antenna, Cable or Satellite).
- Press the OK button to open channel list.
- Move the cursor to the channel you want to remove from your favourites.
-
Press the blue button and then deselect the favourites list from which you want to remove this channel.
-
Press the ← (back) button to return to channel list.
To remove additional channels from your favourites, repeat steps 3 - 5.
Changing settings on your TV
By adjusting the settings on your TV, you can personalize your TV experience, optimize audio and video quality, and ensure that your TV is tailored to your preferences. Here's how you can access and adjust the settings:
- Press the (home) button on your remote control.
- Select the ⚙ (settings) icon in the top right corner of the screen.
- The Quick settings menu appears. Keep the cursor on the Settings symbol and press the OK button again to enter the Settings menu.
The following items are available in the settings menu:
[Channels & Inputs] – Through this menu, you can tune the TV channels on the selected tuner and also adjust settings related to inputs, such as input renaming or HDMI CEC settings.
[Display & Sound] – Settings for picture and sound. In this menu, you can select one of the preset picture and sound profiles or manually adjust the settings.
[Network & Internet] – Manage your internet and network connections. This includes Wi-Fi setup, Ethernet configuration, and other network-related options.
[Accounts & sign-in] – Add and manage your Google TV accounts. Having different accounts gives each user a more customized and personalized viewing experience, along with increased privacy, personalized recommendations, and better control over content and settings. You can also create kids' profiles with parental control and the ability to set screen time limits.
[Privacy] – Settings related to data collection, voice search and payments on Google Play.
[Apps] – Settings and information about installed apps. You can also set permissions for each app individually, such as access to media files or contacts on your phone.
[System] – Various settings related to the TV system, such as: Date & Time, TV menu language, power & energy, settings for casting from mobile devices and more.
[Remotes & Accessories] – Use this menu to add a new Bluetooth accessory, such as a Bluetooth headphones or Bluetooth keyboard, or to pair a voice remote with the TV.
Live TV Menu
While you are watching any input (TV, HDMI etc.) press the MENU button on your remote to open the Live TV menu.
Through this menu, you can easily access the most commonly used settings such as picture, screen aspect ratio, sound and more.
Chromecast built-in
The Chromecast built-in feature on your TV allows you to easily stream content from your phone, tablet, or computer to your TV. Follow these instructions to use Chromecast built-in on your Google TV:
- Make sure your TV and the device you want to cast from are both connected to the same Wi-Fi network.
- On your device, open the app you want to cast from, such as YouTube or Netflix.
- Look for the ☐ (cast) icon in the app, which looks like a rectangle with a Wi-Fi signal in the corner.
-
Tap the 📋 (cast) icon and select your TV from the list of available devices.
-
The content will start playing on your TV.
If you want to stop casting, simply tap the 📄 (cast) icon again and select "Stop casting".
In addition to casting from individual apps, you can also use your TV to mirror your entire device screen. Follow these steps to use screen mirroring:
- On your device, open the settings app and navigate to the "Screen mirroring" or "Cast screen" option.
- Select your TV from the list of available devices.
- Your device screen will now be mirrored on your TV.
To stop screen mirroring, simply navigate back to the "Screen mirroring" or "Cast screen" option on your device and select "Stop mirroring".
Note that some apps may not support casting or screen mirroring, and that the quality of the stream may be affected by the strength of your Wi-Fi connection. If you have trouble using Chromecast built-in on your Google TV, make sure your devices are connected to the same network and that you are following the correct steps.
Google Assistant
Google Assistant is a powerful feature on your Google TV that allows you to control your TV using voice commands. Here are some examples of how you can use Google Assistant on your Google TV:
- To start using Google Assistant, press and hold the (microphone) button on your remote.
- Then speak into the microphone.
- You can use Google Assistant to search for content, open apps, adjust volume, and more. For example, you can say "Play some action movie" or "Open YouTube".
- You can also use Google Assistant to control smart home devices that are compatible with your Google account. For example, you can say "Turn off the lights" or "Set the thermostat to 21 degrees".
- If you have multiple Google accounts set up on your Google TV, you can switch between them by saying "Switch account" followed by your preferred account.
Google Assistant can make it easier and more convenient to control your TV and other smart devices in your home.
NOTE: Google Assistant requires an Internet connection. Google Assistant is not available in certain languages and countries/regions.
Pairing the remote control with the TV
For Google Assistant to work with your voice remote, you must first pair the remote with the TV:
- Press the (home) button, then select [Settings] and press OK.
- The Quick settings menu appears. Keep the cursor on the Settings symbol and press the OK button again to enter the Settings menu.
- Then select [Remotes & Accessories] > [Pair accessory].
- Follow the on-screen instructions to pair the remote control with the TV.
- The name of your remote will appear on the TV Screen. Press OK to confirm the pairing.
Downloading new apps
Your TV comes with a variety of pre-installed apps, but you may want to download additional apps to customize your viewing experience. Here's how you can download more apps on your Google TV:
- Press the home (home) button on your remote control to open the home screen.
- Navigate to the [Apps] section on the home screen.
- Use the search bar at the top of the screen to search for the app you want to download. You can also browse through categories or top charts to find popular apps.
- Select the app you want to download.
-
If the app is free, select [Install] to start the download. If the app is not free, select the price and follow the prompts to complete the purchase.
-
Once the app is downloaded, you can find it in the [Apps] section on your home screen.
Note that some apps may not be compatible with your TV or may not be available in your country. If you have trouble downloading an app, check the app's compatibility and availability information.
You can also download apps to your Google TV using your phone or computer. To do this, navigate to the Google Play Store on your phone or computer and select the app you want to download. Then, select your Google TV from the list of available devices and follow the prompts to complete the download.
Parental control
This TV offers a variety of parental control options that allow you to restrict access to certain content and apps. By setting up parental controls on your TV, you can help ensure that your children are only accessing age-appropriate content and using the device in a safe and responsible manner. Here's how you can set up parental controls on your TV:
- While watching live TV, press the MENU button.
- Select [Parental controls] from the list of options.
- Enter the PIN code that you created during first time installation of TV. You can change these options in the Parental Control menu:
[Channels Blocked] – Block specified TV channels.
[Program Restrictions] – You can enable program restrictions based on the rating of the broadcast content. In the [Ratings] menu, you can specify restrictions based on age.
[Inputs Blocked] – Selected inputs will be locked in the Sources menu and 4-digit password will be required to switch to them.
[Change PIN] – Change your 4-digit password.
Note that parental controls are not foolproof and may not catch all inappropriate content. It's important to monitor your children's use of the TV and talk to them about safe and responsible viewing habits.
Sleep timer
The sleep timer feature on your TV allows you to set a time limit for your TV to turn off automatically, which is a useful feature if you like to watch TV before going to bed. Here's how you can use the sleep timer on your Google TV:
- Press the Ⓞ (home) button on your remote control.
- Select the ⚙ (settings) icon in the top right corner of the screen.
- The Quick settings menu appears. Keep the cursor on the Settings symbol and press the OK button again to enter the Settings menu.
- Scroll down and select [System] > [Power & Energy] > [Power] > [Sleep Timer].
- Choose the amount of time you want your TV to stay on before turning off automatically. You can choose from preset options, such as 30 minutes or 60 minutes.
Your Google TV will now automatically turn off after the specified amount of time has passed. If you turn off your TV manually before the timer expires, the timer will be canceled.
Factory reset
Before disposing of, reselling or gifting the TV, a factory reset is required. Otherwise, unauthorised persons could gain access to your personal data. Performing a factory reset on the TV will restore the device to its original factory settings, erasing all data, settings, and personalization. Please note that this process will delete all apps, accounts, and data associated with your Google TV. Here's how to do a factory reset:
-
Press the Ⓞ (home) button on your remote control.
-
Go to [Settings] > [System] > [About] > [Reset].
- Then confirm [Factory Reset]
- Select and confirm [Factory Reset] once more.
- Select and confirm [Erase everything].
After the last step, the factory reset is performed, and you are greeted by the first installation screen when the TV restarts.
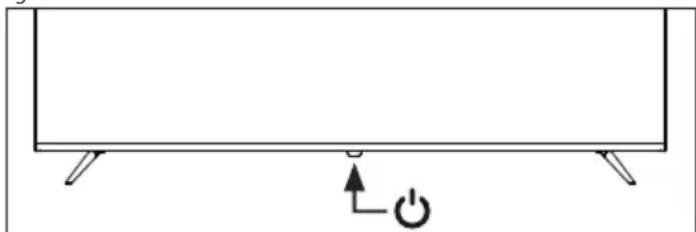
Remote control
- STANDBY – Switch on the TV when in standby or vice versa. By long pressing of this button, the set will display a menu offering power down option to energy saving standby mode.
- MUTE - Mutes the sound or vice versa.
- NUMBER BUTTONS 0-9 - Direct TV channel selection.
- INFO – Press once to view information about the programme you are currently watching. Press again to view detailed information. Press ▶ while the information panel is displayed to view information about the upcoming programme.
- LAST WATCHED CHANNEL – Skip to the previously watched channel in Live TV mode.
- REWIND – Playback in rewind mode. Press multiple times to change the rewind speed.
- PLAY/PAUSE - Play/pause media.
- FAST FORWARD – Playback in fast forward mode. Press multiple times to change the playback speed.
- PREVIOUS TRACK – Skip to the previous track/media file.
- STOP – Stop playback.
- NEXT TRACK – Skip to the next track/media file.
- TEXT - Turns teletext on/off.
- ASPECT – Changes the aspect ratio of the current video content.
- SUBTITLE – Turns on/off subtitles at the bottom of the screen.
- MTS – Opens the audio track menu.
- COLOUR BUTTONS – Execute corresponding function at that time.
- PROFILE – Switches between different user profiles.
- MICROPHONE – Press and hold to use your voice to access entertainment, control smart devices, get answers on screen, and more.
- SETTINGS – Opens the Settings menu.
- (▲/▼/◄/►/OK) – Allows you to navigate the on-screen menus and adjust the system settings to your preferences.
- BACK – Short press: Step back in the menu. Long press: Exit the currently displayed menu.
- HOME – Displays the TV's Home menu.
- LIVE GUIDE – Short press: Opens the 7-day TV guide (digital TV mode). Long press: Displays the list of inputs.
- VOL +/- - Increases/decreases the sound level.
- MENU – Displays LIVE TV menu. This button only works for external sources (TV, HDMI, etc.). It will not work in the Home menu.
- CH +/- - Switches to the next/previous channel in the sequence.
- YOUTUBE – Access to the YouTube app.
- NETFLIX – Access to the Netflix app.
- PRIME VIDEO – Access to the Prime Video app.
- FAV APP – Long press: A list of apps opens. Select the app you want to assign to the FAV APP button for quick access. Short press: Launches the remembered app.
In order to prevent fire always keep candles and other open flames away from this product.

natural_image
Simple line drawing of a rectangular panel with supports and a power button, no text or symbols presentIn order to prevent fire always keep candles and other open flames away from this product.

\~ Váltakozó áram
natural_image
Simple line drawing of a rectangular panel with two legs and a power button, no text or symbols present.In order to prevent fi re always keep candles and other open fl ames away from this product.

\~ Wisselstroom
natural_image
Simple line drawing of a rectangular panel with two legs and a power button, no text or symbols present.In order to prevent fire always keep candles and other open flames away from this product.

\~ Prąd przemienny
natural_image
Simple line drawing of a rectangular panel with two legs and a power button, no text or symbols present.In order to prevent fire always keep candles and other open flames away from this product.

\~ Corrente alternata
natural_image
Simple line drawing of a rectangular panel with two legs and a power button, no text or symbols present.STANDBY - Accensione/spegnimento in standby
In order to prevent fire always keep candles and other open flames away from this product.

\~ Corriente alterna
natural_image
Simple line drawing of a rectangular panel with two legs and a power button, no text or symbols present.In order to prevent fire always keep candles and other open flames away from this product.

\~ Corrente alternada
natural_image
Simple line drawing of a rectangular panel with two legs and a power button, no text or symbols present.A Technical specification
 |
 |
 |
 |
 |
 |
 |
 |
 |
 |
  |
 |
 |
 |
 |
 |
 |
 |
| Model | TUNER | HDMI Input | USB Input | Antenna Input | Satellite Input | CI Card Input | Mini AV - CVBS Video + Audio input | Optical Audio output | 3.5 mm headphones output | RJ45 (Ethernet) |
| OTV 55GQU-5023P T/T2/C/S2 | x4 x2 x1 x1 x1 x1 x1 x1 | x1 |
| A Technische Angaben | DEUTSCH | |||
| B Modell Spannung | F Stromverbrauch: (SDR/HDR/Standby); EEI (SDR/HDR) | |||
| C Musikleistung Nennleistung | ||||
| A Spécification technique | FRANÇAIS | |||
| B Modèle Tension | F Consommation d'énergie: (SDR/HDR/Standby); EEI (SDR/HDR) | |||
| C Puissance audio Puissance nominale | ||||
| A Müszaki jellemzók | MAGYAR | |||
| B Modell Feszültség | F Teljesítményfelvétel: (SDR/HDR/Készenlét); EEI (SDR/HDR) | |||
| C Hang teljesítmény | E Jévleges teljesítmény | |||
| A Technische specificaties | NEDERLANDS | |||
| B Model Spanning | F Energieverbruik: (SDR/HDR/Standby); EEI (SDR/HDR) | |||
| C Audio vermogen | E Lominale vermogen | |||
| A Dane techniczne | POLSKI | |||
| B Model Napięcie | F Pobór mocy: (SDR/HDR/Tryb czuwania); EEI (SDR/HDR) | |||
| C Moc dźwięku Moc znamionowa | ||||
| A Specifiche tecniche | ITALIANO | |||
| B Modello | D /oltaggio | F Consumo energetico: (SDR/HDR/Standby); EEI (SDR/HDR) | ||
| C Potenza audio | E Potenza nominale | |||
| A Especificación técnica | ESPAÑOL | |||
| B Modelo Voltaje | F Consumo de electricidad: (SDR/HDR/En espera); EEI (SDR/HDR) | |||
| C Potencia de audio Potencia nominal | ||||
| A Especificação técnica | PORTUGUES | |||
| B Modelo Voltagem | F Consumo energético: (SDR/HDR/Standby); EEI (SDR/HDR) | |||
| C Potência de áudio Potência nominal | ||||
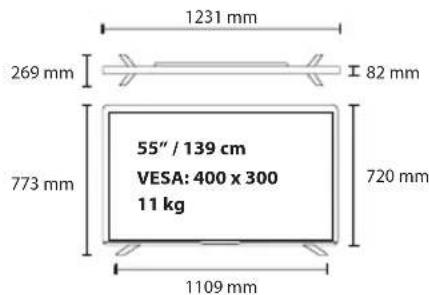
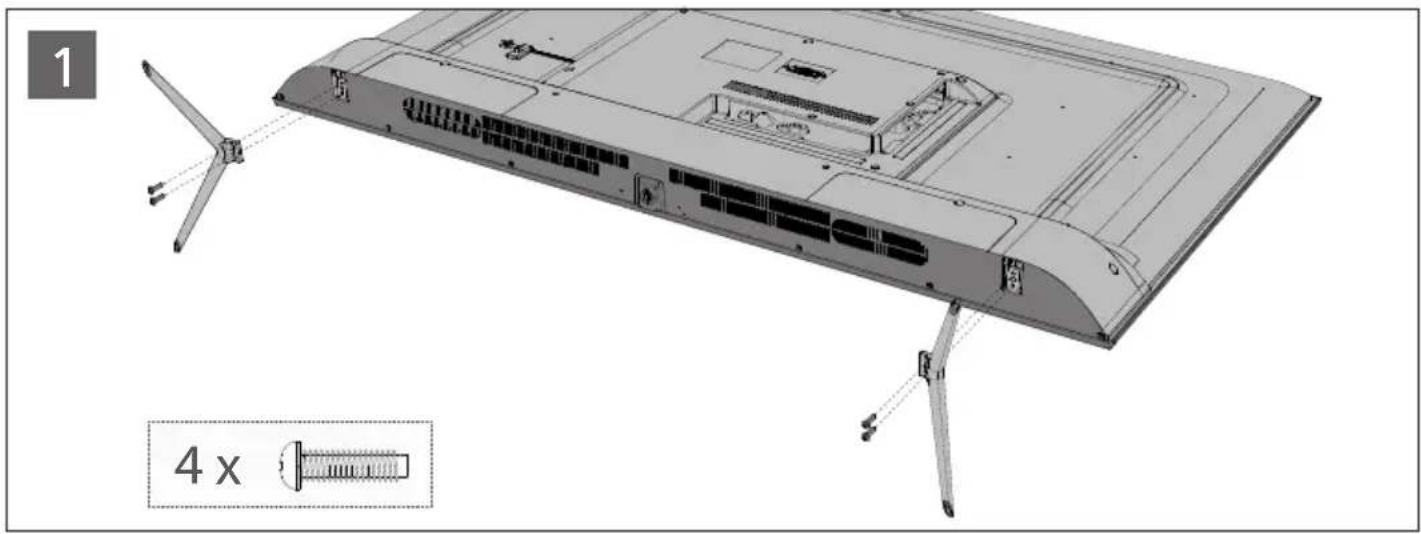
Stand Installation | Stand Installation | Ständermontage | Installation du support | Állvány felszerelése | Installatie voet | Instalacja podstawy | Installazione supporto | Instalación del soporte | Instalação do Suporte

natural_image
Technical diagram of a mechanical component with two symmetric supports and internal channels (no text or symbols)English: To assemble the base stand to the TV you will need a cross head screwdriver. To avoid damage to the TV screen during assembly ensure the TV is placed on a soft flat surface with the LCD screen facing downwards.
OKP/QSG/0001
OTV 55GQU-5023P_20230804_V10

- In order to prevent fire always keep candles and other open flames away from this product.
- \~ Wechselstrom
- Important safety instructions
- Please, read these safety instructions and respect the following warnings before the appliance is operated.
- Warning:
- Important information regarding use of video games, computers, captions and other fixed image displays.
- CE Statement:
- What is included in the box
- Supply of this TV includes following parts:
- Attaching the Stand
- Wall mounting the TV
- Connections
- Getting started - initial set up
- TV standby button
- Choosing Mode Input/Source
- TV Menu navigation
- Electronic instruction manual
- USB Media playback notice
- Channel list
- Moving channels in the channel list
- Swapping channel positions in the channel list
- Favourites list
- Adding channels to your favourites list
- Using the favourites list
- Removing channels from your favourites list
- Changing settings on your TV
- Live TV Menu
- Chromecast built-in
- Google Assistant
- Pairing the remote control with the TV
- Downloading new apps
- Parental control
- Sleep timer
- Factory reset
- Remote control
- In order to prevent fi re always keep candles and other open fl ames away from this product.
- \~ Corriente alterna
- \~ Corrente alternada
- Stand Installation | Stand Installation | Ständermontage | Installation du support | Állvány felszerelése | Installatie voet | Instalacja podstawy | Installazione supporto | Instalación del soporte | Instalação do Suporte
Brand : OK
Model : OTV 55GQU-5023P
Category : TV