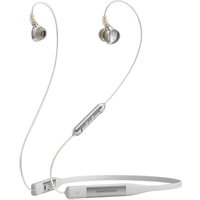
Xelento wireless 2nd generation - Earphones BEYERDYNAMIC - Free user manual and instructions
Find the device manual for free Xelento wireless 2nd generation BEYERDYNAMIC in PDF.


| Brand | Beyerdynamic |
| Model | Xelento wireless 2nd generation |
| Product type | Wireless in-ear headphones |
| Connectivity | Bluetooth (2400 - 2483.5 MHz, power 10 dBm) |
| Supported audio codecs | LHDC, aptX HD, aptX Adaptive, aptX, AAC, SBC |
| Bluetooth profiles | A2DP, HFP/HSP, AVRCP |
| Battery type | Lithium-ion 3.7 V, 125 mAh |
| Included ear tips | 10 pairs (7 silicone, 3 Comply Tx-500 foam) |
| Included cables | 3.5 mm jack cable with remote, USB-C cable (USB-A to C) |
| Earpiece connectors | Detachable MMCX connectors |
| Control functions | Play/pause, volume, call, voice assistant, multipoint |
| Dedicated app | MIY App (MOSAYC sound customization, statistics) |
| Enhancement mode | Activation of an additional DAC/Amp for optimized sound |
| Cleaning | Microfiber cloth, ear tips washable with warm water and mild soap |
| Operating temperature | -10 °C to +60 °C |
| Storage temperature | +10 °C to +45 °C |
| After-sales service | service@beyerdynamic.de |
| Warranty | Online registration at global.beyerdynamic.com/service/registration |
| Spare parts | Ear tips, cerumen filters, cable (www.beyerdynamic.com/service) |
Frequently Asked Questions - Xelento wireless 2nd generation BEYERDYNAMIC
User questions about Xelento wireless 2nd generation BEYERDYNAMIC
0 question about this device. Answer the ones you know or ask your own.
Ask a new question about this device
Download the instructions for your Earphones in PDF format for free! Find your manual Xelento wireless 2nd generation - BEYERDYNAMIC and take your electronic device back in hand. On this page are published all the documents necessary for the use of your device. Xelento wireless 2nd generation by BEYERDYNAMIC.
USER MANUAL Xelento wireless 2nd generation BEYERDYNAMIC
Operating instructions
CONTENTS
SAFETY INSTRUCTIONS....3
Intended use....3
Adjusting the volume....3
Reducing perception of ambient noise......4
Changed acoustic perception....4
Cleaning dirty eartips....4
Damage from liquids....4
Risk of swallowing....4
Power and connecting cable....4
Using the batteries....4
Environmental conditions....5
ABOUT THIS MANUAL ....5
SCOPE OF DELIVERY ....5
PRODUCT OVERVIEW......6
FIRST STEPS 6
Using and fitting the eartips....6
Replacing eartips....8
Eartip care....9
INSERTING AND WEARING
XELENTO WIRELESS....9
Cable clip....9
ATTACHING AND CHANGING THE CABLE ..... 10
CHARGING THE BATTERY ....11
BEYERDYNAMIC MIY APP....11
SOFTWARE-UPDATE....11
COMPATIBILITY WITH PLAYBACK DEVICES....12
SUPPORTED AUDIO CODECS....12
OPERATION 13
Control elements....13
Operating instructions....13
Switching on and off....13
Connecting to a device via Bluetooth ......13
Multipoint operation....15
Adjusting the volume....16
Playing media....16
Calling up a virtual assistant....16
Making a call 17
Activating and deactivating
voice messages 17
Resetting to factory settings 17
Switching enhancement mode on/off .....18
Overview of operating functions
on the Bluetooth ® receiver....18
Overview of LED displays 19
Help with problems / FAQ....19
Operation in remote mode
with jack connecting cable....20
CLEANING....23
DISPOSAL....23
EU DECLARATION OF CONFORMITY ......23
TECHNICAL SPECIFICATIONS....24
SERVICE 24
SPARE PARTS....24
PRODUCT REGISTRATION 24
WARRANTY CONDITIONS......24
REGISTERED TRADEMARKS......25
FCC / IC REGULATION....25
Thank you for choosing Xelento wireless (2nd generation) in-ear headphones.
SAFETY INSTRUCTIONS
▶ Please read these instructions carefully and completely before using the product.
▶ Please observe all instructions given, especially those concerning the safe use of the product.
▶ Do not use the product if it is defective.
The company beyerdynamic GmbH & Co. KG accepts no liability for damage to the product or injury to persons caused by careless, improper or incorrect use of the product, or by use for purposes not specified by the manufacturer.
Intended use
Only use the product as described in this product manual. beyerdynamic accepts no liability for damage to the product or injury to persons caused by careless, improper or incorrect use of the product, or by use for purposes not specified by the manufacturer.
beyerdynamic is not liable for damage to USB devices that do not comply with the USB specifications.
beyerdynamic is not liable for damage resulting from connection interruptions due to batteries being empty or too old, or due to exceeding the Bluetooth ® transmission range.
Please also observe the relevant country-specific regulations before using the product.
Adjusting the volume
High volumes and long listening times can permanently damage your hearing. Because in-ear headphones sit directly in the ear canal, there is an increased risk of hearing damage.
Before inserting the earphones, set the volume to minimum. Only increase the volume after inserting the earphones.
▶ Do not use the in-ear headphones at high volume for a long time. When listening and speaking normally with in-ear headphones, your own voice should still be perceptible.
In case of tinnitus, decrease the volume. If necessary, consult a doctor.
▶ Please note that excessively high volumes and long listening times may cause hearing damage. Hearing impairments are irreversible, so always make sure that the volume is appropriate. It is advisable to keep listening times at high volumes as short as possible.
The headphones are not suitable for children under 12 years of age due to the possible high sound pressure level.
▶ Do not use the headphones at full volume for more than three hours a week.
You can use the beyerdynamic MIY App to personalise the Bluetooth® headphones. The app's "Statistics" function records the sound pressure level your ears are exposed to over time. However, it only refers to the sound pressure level generated through the headphones' speakers and not to that from external sources of noise.
Reducing perception of ambient noise
In-ear headphones drastically reduce perception of ambient noise. Using in-ear headphones in road traffic can be potentially dangerous. The user's hearing must not be impaired to the extent that it causes road safety risks.
▶ Do not use the in-ear headphones within the action area of potentially dangerous machines and tools.
- Avoid using in-ear headphones in situations where hearing must not be impaired – particularly in road traffic, when crossing a level crossing or on a construction site.
Changed acoustic perception
For many people, wearing in-ear headphones takes some getting used to because the acoustic perception of their own voice and body as well as the inner ear sounds that occur while walking is different from the “normal” situation without in-ear headphones. However, this initially strange sensation usually diminishes after wearing them for a while.
Cleaning dirty eartips
Dirt on the eartips and the formation of a warm and humid climate in the ear canal can cause germs to multiply, which can increase the risk of an ear canal infection.
▶ Regularly clean the eartips.
Damage from liquids
Liquid penetration can damage the earphones.
▶ Make sure that no liquids penetrate the earphones (e.g. when cleaning).
Solvent-based or aggressive cleaning agents can damage the surfaces of the earphones or the cable.
▶ Do not use solvent-based or aggressive cleaning agents.
Risk of swallowing
▶ Keep small parts, such as product, packaging and accessories, away from children and pets. They constitute a choking hazard if swallowed.
Power and connecting cable
Use only the cable we supply to connect the unit for both charging and connecting to a laptop.
Using the batteries
Danger from heat, water and mechanical stress
Excessive heat, water and mechanical stress may cause explosion, heat, fire, smoke or fumes. Injuries and irreversible damage to the battery may result.
▶ Do not expose the battery to excessive heat, direct sunlight or fire. There is a risk of explosion, fire, smoke or gas.
▶ Do not subject the battery to mechanical stress (e.g. crushing). This may cause irreversible damage to the battery, or explosion or injury.
▶ Do not open the housing or remove the battery.
▶ Only use a USB 2.0/3.0 standard-compliant 5 V power supply to charge the battery via the integrated USB Type-C port.
Storing the battery
If the battery is not going to be used for an extended period, set the charge level to approximately 50 % of the maximum capacity and store it at temperatures up to max. 30 °C.
Environmental conditions
▶ Do not expose the product to rain, snow, liquids or moisture.
ABOUT THIS MANUAL
This manual describes the product's most important functions.
The information in this manual refers to the default settings of the software. A newer version may be available.
For remarks on the software update, see "SOFTWARE-UPDATE" on page 15.
SCOPE OF DELIVERY
- Xelento in-ear headphones (2nd generation), left and right earphones
- Bluetooth® receiver with remote control
- Connecting cable with remote control, 3.5 mm 4-pole jack
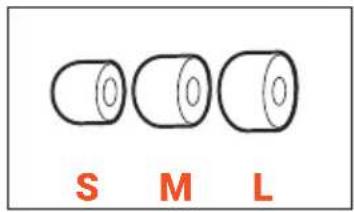
• USB cable (USB-A to USB-C) - Seven pairs of silicone eartips
- Three pairs of foam eartips (type Comply™ Tx-500)
- Two cable clips
- Storage case
- Spare wax guard
- Microfibre cleaning cloth
- Quick Start Guide and Compliance Booklet
PRODUCT OVERVIEW
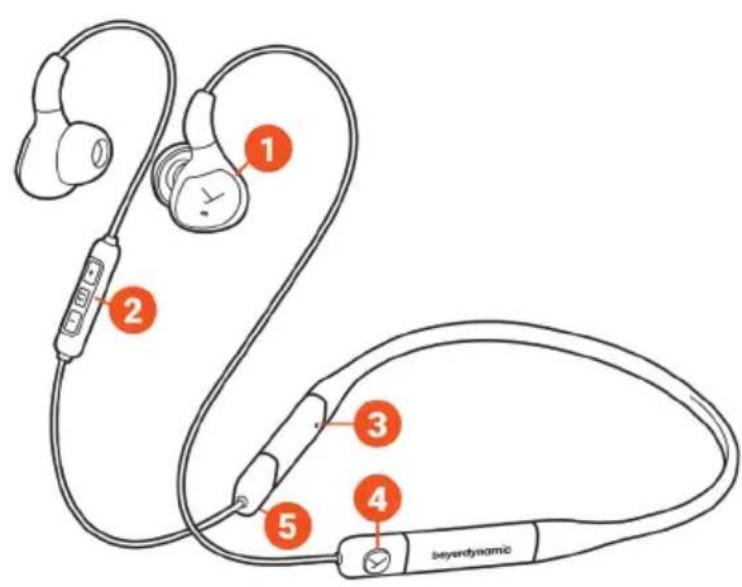




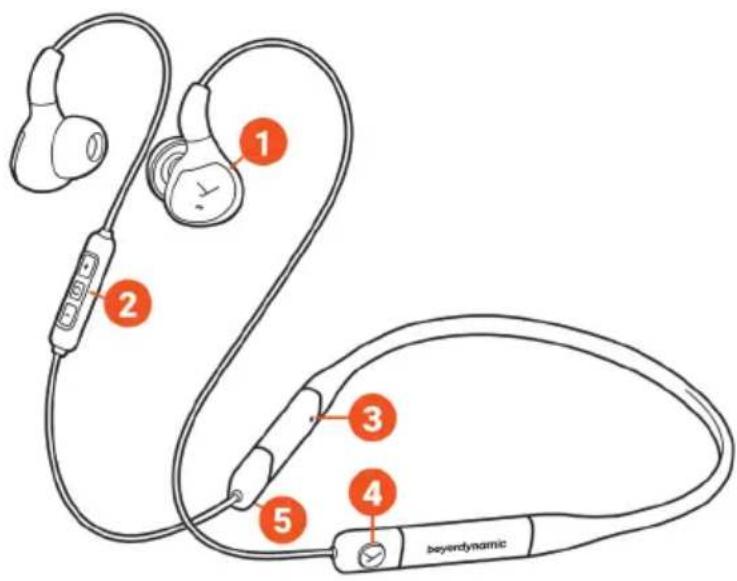
1 Earphones with replaceable eartips
2 Remote control with:
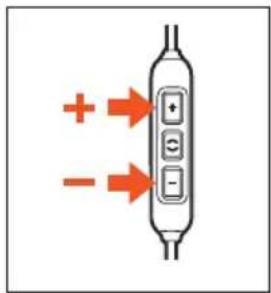
- [+] / [-] Volume up / volume down
- () Multifunction button (middle button)
- Microphone on the back
3 Status LED
4 On/off button
5 USB-C port for cable (underneath)
FIRST STEPS.
Using and fitting the eartips
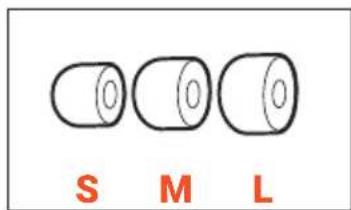
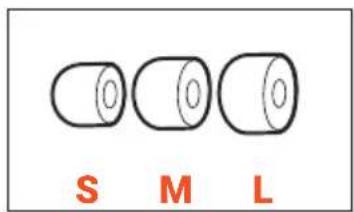
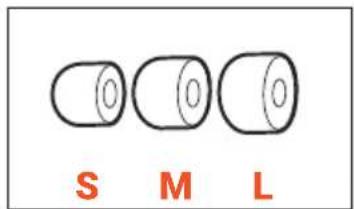
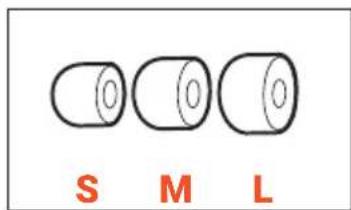
So that you can choose the best possible fit and comfort, your Xelento in-ear headphones come with eartips in ten different sizes and two different materials.
Every ear is unique, and the size of the eartip required may vary from one ear to another.
Please take the time to try out different sizes and pick the most suitable one – it's worth the effort!
Silicone eartips
2x each:
Size:
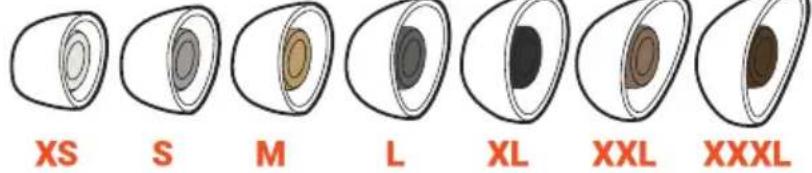
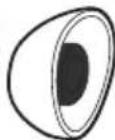
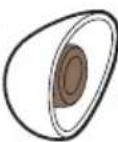
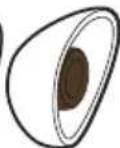
The sizes XS to XXXL are marked on the shaft of the silicone eartips.
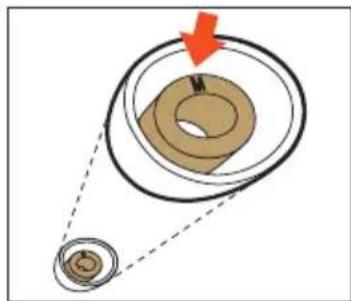
Comply™ foam eartips
2x each:
Size:
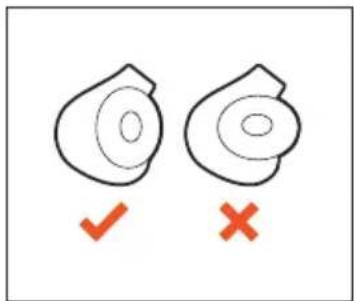
Fitting the silicone eartips
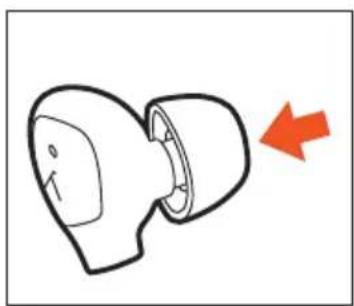
Carefully place the silicone eartips on the housings.
The oval opening of the eartip follows the oval shape of the housing.
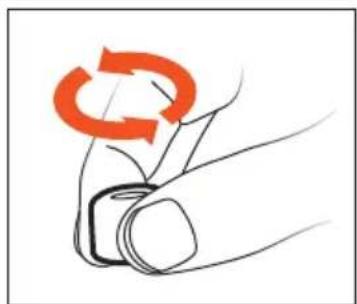
Adjusting and fitting Comply™ eartips
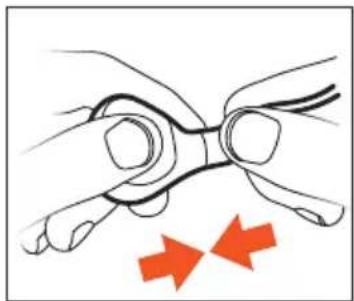
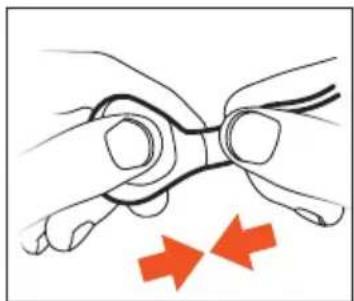
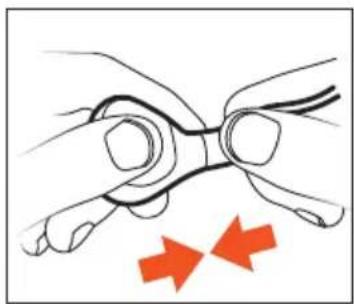
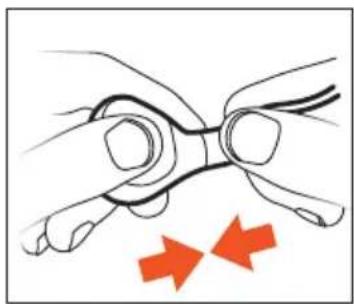
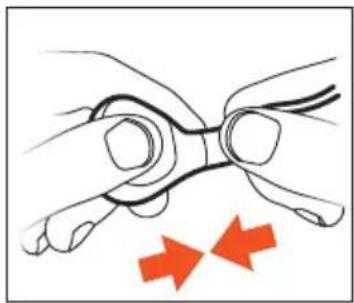
Before inserting, roll the eartip attached to the earphone tightly lengthwise between your fingers.
After insertion, the eartips expand again and provide good support for the earphone, even when you are moving.
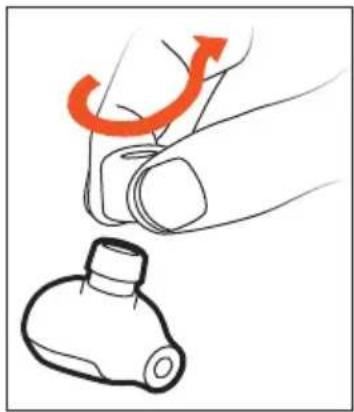
Removing Comply™ eartips
To remove Comply™ eartips, squeeze them firmly and pull them off the housing with a slight twisting motion.
Replacing eartips
If you are using them regularly, we recommend changing the eartips every three months. Replacement silicone eartips can be ordered from the beyerdynamic spare parts shop: www.beyerdynamic.com/service/spare-parts
Replacement Comply™ foam eartips, together with dealers where you can order the eartips, can be found online at: www.complyfoam.com
Eartip types used: Tx-500
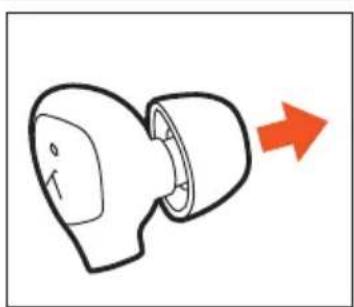
- Carefully remove the eartip from the earphone.
Dirty sound outlets can be cleaned by replacing the small wax guard grilles.
▶ Use the enclosed microfibre cleaning cloth to clean the earphone's sound outlet of residues.
▶ Make sure that no liquid flows into the outlet.
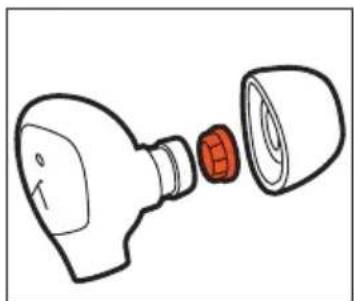
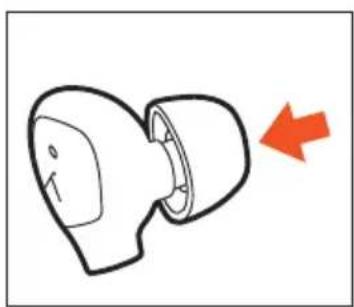
- Put the new eartip on the earphone.
Eartip care
The eartips on your in-ear headphones should be cleaned regularly and then dried with the microfibre cleaning cloth provided.
For cleaning instructions, see "Cleaning" on page 27.
INSERTING AND WEARING XELENTO WIRELESS
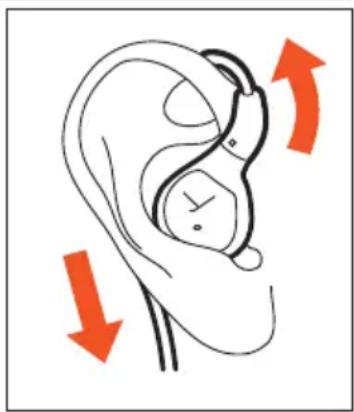
Due to the anatomical shape of the earphone housing, the cable of the Xelento wireless is routed behind the ear. This way of wearing the earphones effectively suppresses cable noise, and the earphones sit firmly in the ear even when the cable is pulled.
▶ Insert the earphones into your ears and guide the cable upwards behind your ears.
The right-hand cable end has a small, raised dot to mark the right-hand side.
Cable clip
You can use the cable clip supplied to secure the jack lead of your Xelento wireless in-ear headphones.
This prevents the cable from getting tangled and avoids unwanted noise when using the microphone, for example, while talking on the phone.
ATTACHING AND CHANGING THE CABLE
Xelento wireless in-ear headphones have plug-in cables on the earphone housings with standard MMCX connectors with locking mechanisms.
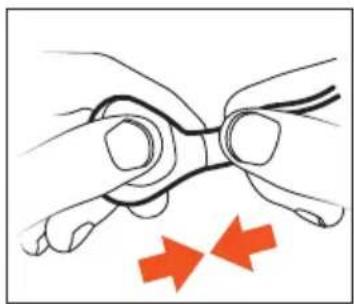
When detaching or attaching the cable on the Xelento wireless earphones or the play-back device, always hold the cable by the connector to avoid damaging the cable or earphones. Do not pull directly on the cable!
Detaching / attaching the cable on the earphone
-
To detach or attach the cable, hold the in-ear headphones by the earphone housing and the plug. Never pull directly on the cable! The cable or the earphone may be damaged if you do!
-
Detach the cable.
-
Attach the cable.
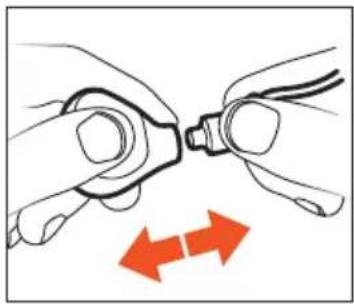
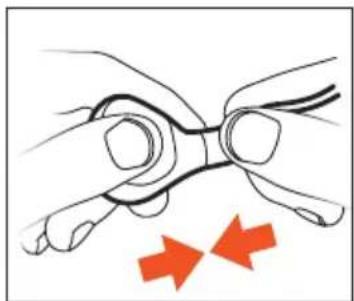
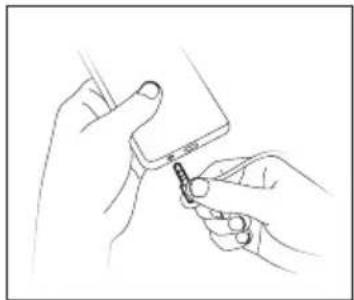
Detaching / attaching the jack lead on the playback device
▶ Hold the lead by the jack plug and detach or attach.
CHARGING THE BATTERY
We recommend you use only the supplied USB cable to charge the battery.
- Using the USB charging cable supplied, connect the in-ear headphones to any standard-compliant live USB-A-compatible socket (e.g. USB power supply).
- Remove the USB charging cable after charging.
LED display of charge level:
Flashing red: Battery 0–30 % full
Flashing yellow: Battery 30–70 % full
Flashing green: Battery 70–99 % full
Steady green: Battery 100 % full
Remarks on the life of Li-ion batteries
- When fully charged, disconnect the USB cable from the charger and the product.
- CAUTION! High temperatures, especially with a high charge level, can cause irreversible damage.
- If the battery is not used or is stored for extended periods of time, it is recommended to charge it to approx. 50 % and store it at no more than 20 °C.
- Switch off the battery-powered product after use.
BEYERDYNAMIC MIY APP
The MIY App from beyerdynamic can be downloaded from the App Store or Google Play.
The MIY App from beyerdynamic is constantly evolving so you can tailor your Xelento wireless to your needs with useful functions such as MOSAYC sound personalisation, tracking statistics of your daily listening habits and other settings. If you use the MOSAYC sound personalisation, your Xelento wireless will sound even better.

SOFTWARE-UPDATE
Software updates are easily available via the MIY App.
COMPATIBILITY WITH PLAYBACK DEVICES
Xelento wireless is compatible with Bluetooth® playback devices that support the following profiles:
• A2DP (for audio transmission)
• HFP/HSP (for phone operation and voice assistants)
• AVRCP (for control signal transmission)
All associated functions are only available if they are supported by the playback device.
SUPPORTED AUDIO CODECS
Within the A2DP profile, XELENTO wireless supports the LHDC, aptX™ HD, aptX™ Adaptive, aptX™, AAC and SBC audio codecs. The best audio quality is offered by LHDC.
Please note that only the codecs available in the playback device can be used for audio transmission.
Xelento wireless suggests the audio codec to the playback device in the following order:
- LHDC
- aptX TM HD
- aptX TM Adaptive
- aptX TM
- AAC
- SBC
Most playback devices do not show which codec is actively in use.
OPERATION
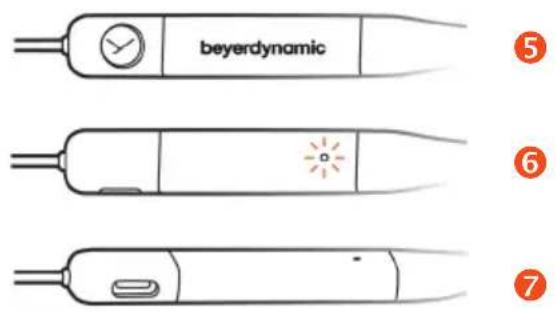
Control elements
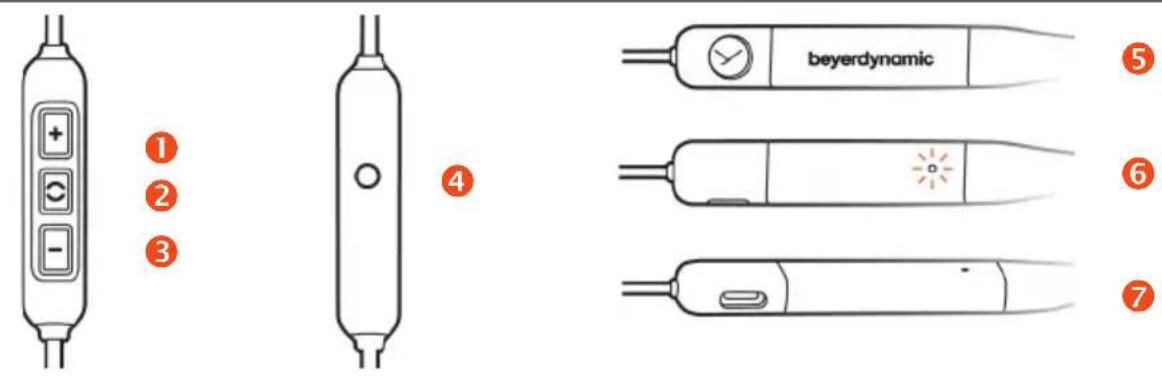
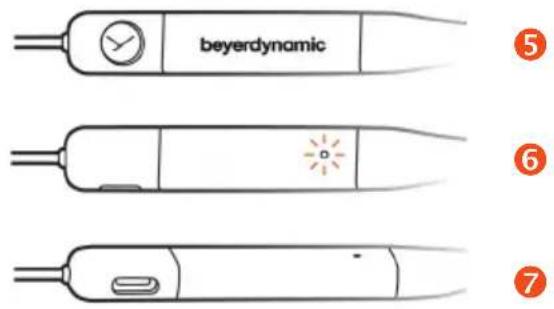
Remote control Carrying handle
1 Increase volume (volume-up button)
2 Multifunction button (middle button)
3 Decrease volume (volume-down button)
4 Microphone
5 On/off button
6 Status LED
7 USB port
Operating instructions
Please note that not every smartphone or tablet supports all remote control functions.
The media playback functions described depend on the particular playback device and its software and may not all be available. Xelento wireless only sends control signals that are compliant with the Bluetooth® standard.
Please contact the relevant manufacturer for further details.
Switching on and off
▶ Press and hold the on/off button for 2 seconds (☐) to switch on your Xelento wireless.
▶ Press and hold the on/off button for 4 seconds ( ) to switch off your Xelento wireless.
Connecting to a device via Bluetooth®
Before you can use the in-ear headphones for the first time, you must pair them with your mobile phone or another Bluetooth®-enabled device. The pairing procedure may differ depending on the playback device.
▶ Please refer to the corresponding operating instructions of the playback device.
Pairing
√ Xelento wireless is switched off.
- Press and hold the on/off button for 6 seconds (☐) to start pairing mode via Bluetooth®. Status LED slowly flashes alternately blue and red.
- Activate the Bluetooth® function on the playback device and search for new devices if necessary.
- In the Bluetooth® menu of the playback device, in the pairing list, select "Xelento wireless (2nd gen.)" from the available devices to connect the two devices.
After a successful connection, the status LED briefly flashes blue every 7 sec. Each time the device is switched on again, the devices will connect as soon as they are within range of each other.

If the Bluetooth® connection has been lost, the LED briefly flashes blue every 3 sec.
Performing Google Fast Pair
√ Xelento wireless is switched off.
- Press and hold the on/off button for 6 seconds (☐) to start pairing mode via Bluetooth®. Status LED slowly flashes alternately blue and red.
- In pairing mode, place Xelento wireless near a Fast-Pair-enabled smartphone.
- Tap on the smartphone to establish the connection.
Deleting the pairing list
If there are already several playback devices in the list of your Xelento wireless, and it cannot be paired with another new playback device, the list is full and should be cleared so that the new playback device can be added.
√ Xelento wireless is switched off.
▶ Press and hold the on/off button for >10 seconds(
The list of already paired Bluetooth ® devices (maximum 8) is deleted, and the in-ear headphones switch to Bluetooth ® connection mode.
Multipoint operation
Xelento wireless can be paired with up to eight Bluetooth ® -enabled devices.
Active connections are possible with up to two devices at a time. However, playback of music and phone operation is only possible with one device at a time. Phone operation has priority over playback of music, i.e. playback of music is interrupted during phone calls.
Priority list when using the playback devices (PD):
Priority Profile Playback devices (PD)
1 HFP (phone operation) PD 1 (device used first)
2 HFP (phone operation) PD 2 (device used second)
3 A2DP (playback of music) PD 1 (device used first)
4 A2DP (playback of music) PD 2 (device used second)
Setting multipoint
- Connect Xelento wireless with the first device (see "Connecting to a device via Bluetooth®" on page 17).
- Deactivate the Bluetooth ® connection on the first device.
- Switch off Xelento wireless.
- Connect Xelento wireless with the second device (see "Connecting to a device via Bluetooth®" on page 17).
- Reactivate the Bluetooth ® connection of the first device, which automatically connects to Xelento wireless.
- Once both devices are paired with the in-ear headphones, the in-ear headphones automatically connect with both devices every time they are switched on.
Using multipoint
√ You have connected Xelento wireless to two devices and activated media playback.
▶ Briefly press the middle button once (●) to accept an incoming call.
√ You have connected Xelento wireless to two devices and have just ended a call.
▶ Briefly press the middle button once (●) to restart the media playback that was last played.
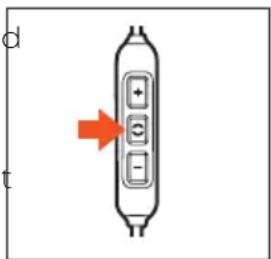
Adjusting the volume
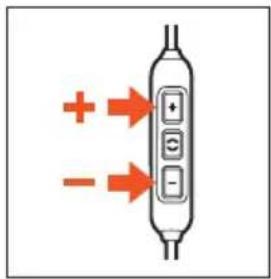
To increase volume
In stages: briefly press the volume-up button (
▶ Continuously: press and hold the volume-up button (☐).
A signal tone indicates maximum volume reached.
To decrease volume
In stages: briefly press the volume-down button (
▶ Continuously: press and hold the volume-down button (☐).
A signal tone indicates minimum volume reached.
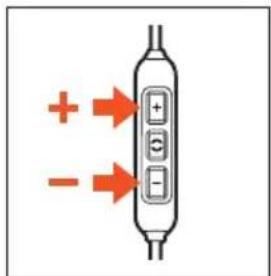
Playing media
To start / stop media playback
▶ Briefly press the middle button once to start or stop media playback.
To play the next track
▶ Briefly press the middle button twice.
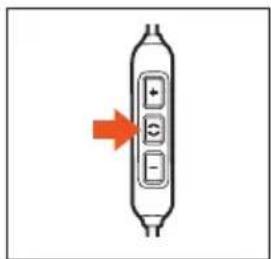
To play the previous track
▶ Briefly press the middle button three times
Fast forward
▶ Press the middle button twice, holding it down the second time (● ).
Rewind
▶ Press the middle button three times, holding it down the third time (●●—).
Calling up a virtual assistant
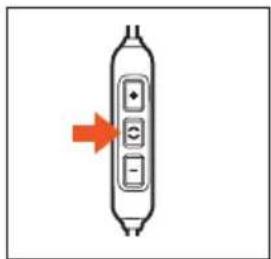
▶ Press and hold the middle button for 2 seconds() to call up a virtual assistant (Siri, Google Assistant etc.).
To use the Alexa virtual assistant, it must be successfully installed on the playback device and selected once in the eMIY App.
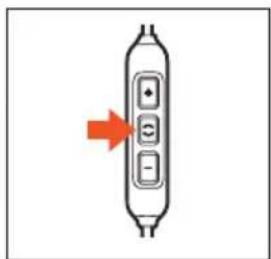
Making a call
During the call, make sure you do not cover the opening for the microphone on the back of the remote control.
Accept / finish a call
▶ Briefly press the middle button to accept an incoming call or to hang up.
Reject a call
▶ Press and hold the middle button for 2 seconds.
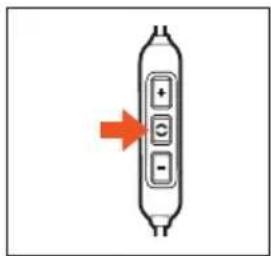
Switch between two calls (toggling)
▶ Briefly press the middle button twice.
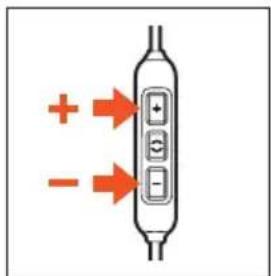
Increase the volume
In stages: briefly press the volume-up button (
▶ Continuously: press and hold the volume-up button (☐).
Decrease the volume
In stages: briefly press the volume-down button (
▶ Continuously: press and hold the volume-down button (●).
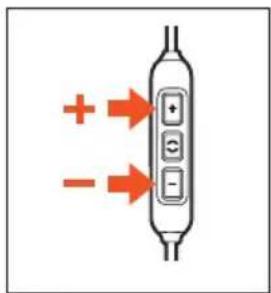
Activating and deactivating voice messages
√ Xelento wireless is switched on.
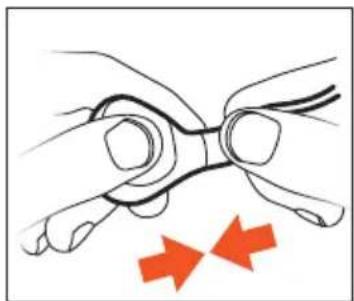
▶ Press and hold the volume-up button and the middle button together for 2 seconds.
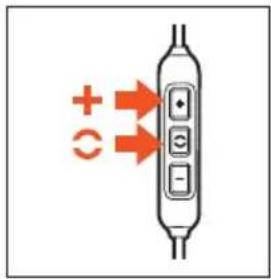
Resetting to factory settings
√ Xelento wireless is switched on.
▶ Press and hold the volume-up button and the volume-down button together for 4 seconds.
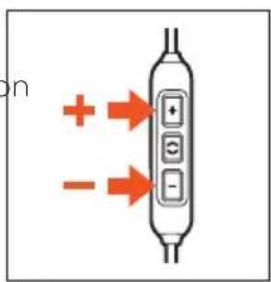
Switching enhancement mode on/off
The enhancement mode optimises the sound through an additional DAC/amp.
√ Xelento wireless is switched on.
▶ Briefly press the on/off button (●) to activate or deactivate the enhancement mode for particularly high sound fidelity.
The function is switched on when the headphones are delivered.
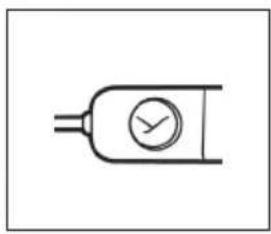
Overview of operating functions on the Bluetooth® receiver
| OPERATING FUNCTIONS OPERATION | |
| Increase volume | ▶ Press volume-up button |
| Decrease volume | ▶ Press volume-down button |
| Switch on ▶ Press on/off button for 2 sec ( [IMAGE] ) | |
| Switch off ▶ Press on/off button for 4 sec ( [IMAGE] ) | |
| Start / stop media playback ▶ Briefly press middle button 1x ( ) | ● |
| Jump to next track | ▶ Briefly press middle button 2x (●●) |
| Jump to previous track | ▶ Briefly press middle button 3x (●●●) |
| Fast forward | ▶ Press middle button 2x and hold (● [IMAGE]) |
| Rewind | ▶ Press middle button 3x and hold ( [IMAGE] ) |
| Accept / end a call | ▶ Briefly press middle button 1x (●) |
| Reject an incoming call | ▶ Press middle button for 2 sec ( [IMAGE] ) |
| Toggle (switch between two calls) | ▶ Briefly press middle button 2x (●●) |
| Calling up a virtual assistant | ▶ Press middle button for 2 sec ( [IMAGE] ) |
| Switch to pairing mode | ▶ Press and hold on/off button for 6 sec ( [IMAGE] ) |
| Delete pairing list | ▶ Press and hold on/off button for >10 sec ( [IMAGE] ) |
| SETTINGS | OPERATION |
| Switch voice messages on or off | ► Press and hold middle button and volume-up button together for 2 sec ( [●] ) |
| Reset to factory settings | ► Press and hold volume-up button and volume-down button together for 4 sec ( [●] ) |
| Switch on/off enhancement mode | ► Briefly press on/off button 1x (●) |
Overview of LED displays
LED DISPLAY FUNCTION
| Flashes red/yellow/green Charging |
| Steady green light Fully charged |
| Lights up once red for 1.5 sec Switch off |
| Flashes rapidly red Battery almost empty |
| Slowly flashes alternately blue and red Bluetooth® pairing mode active |
| Briefly flashes blue every 7 sec Bluetooth® connection active |
| Briefly flashes blue every 3 sec Bluetooth® connection lost |
| Briefly flashes white every 7 sec Media playback active (LHDC, aptXTM HD) |
| Briefly flashes blue every 7 sec Media playback (other codecs) |
| Flashes rapidly blue Incoming call |
| Briefly flashes blue every 7 sec Call active |
| Lights up pink 3x per sec Software update mode active |
Help with problems / FAQ
Xelento wireless cannot be switched on.
| Battery is empty or almost empty | ▶ Charge the battery. |
| No audio output. | |
| There is no Bluetooth® connection | ▶ Connect Xelento wireless with the playback device. |
Xelento wireless does not appear in the available Bluetooth ® devices in the playback device
| Xelento wireless is switched off | ► Switch on Xelento wireless. |
| Xelento wireless is not in pairing mode | ► Place Xelento wireless in pairing mode. |
| There is already a Bluetooth® connection to another playback device | ► Disconnect the Bluetooth® connection to the other and place Xelento wireless near the desired device. |
Playback is too quiet, even though it is set to maximum on Xelento wireless.
| The audio signal being played back is too quiet. | ▶ Set playback volume on the playback device to maximum. |
The sound is harsh and the bass reproduction too low.
| Insufficient seal on the eartips. | ▶ Try out alternative left and right eartips until sound is ideal. |
The wireless range is too low, or the connection is disrupted.
| There is interference with other devices. | ▶ Keep away from WLAN routers and microwave ovens. ▶ Do not stand between playback device and Xelento wireless. |
Answers to the most common problems and questions can be found at the following online address: support.beyerdynamic.com
Operation in remote mode with jack connecting cable
Remote control
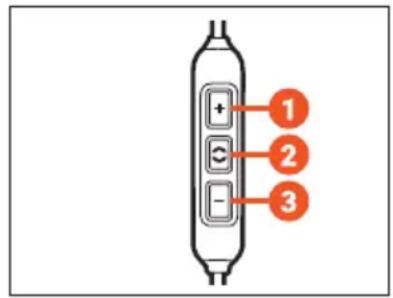
The enclosed connecting cable with the jack plug (cable for remote operation) contains a remote control with three buttons and a microphone.
Buttons on the remote control
- Increase volume (volume-up button)
- Multifunction button (middle button)
- Decrease volume (volume-down button)
Compatibility with playback devices
On compatible smartphones and tablets, you can use this remote control to control calls, media playback and volume.
Please note that not every playback device supports all remote control functions.
▶ Please contact the relevant manufacturer for further details.
▶ Refer to the operating instructions of the device to which the product is to be connected.
Playing media
To start / stop playback:
▶ Briefly press the middle button to start or stop the media playback
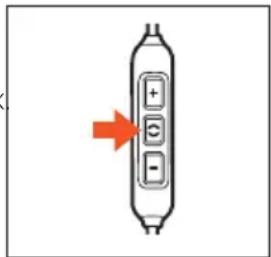
Depending on the playback device and the operating system and/or software version, there may be further media playback functions that can be controlled by the middle button.
Please contact the relevant manufacturer for further details.
Adjusting the volume
To increase volume
In stages: briefly press the volume-up button (
▶ Continuously: press and hold the volume-up button (☐).
To decrease volume
In stages: briefly press the volume-down button (
▶ Continuously: press and hold the volume-down button (☐).
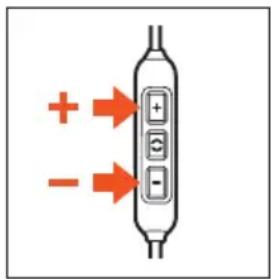
Please note that not every playback device has this function.
On smartphones and tablets with an Android system, it is necessary for the playback device to support the Wired Audio Headset Specification:
https://source.android.com/devices/accessories/headset/plug-headset-spec
For more details, please contact the manufacturer of the playback device.
Making a call
Accept / finish a call
▶ Briefly press the middle button to accept an incoming call or to hang up.
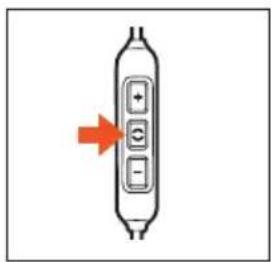
During the call, make sure you do not cover the opening for the microphone on the back of the remote control.
Depending on the playback device and the operating system and/or software version, there may be further call control functions that can be controlled by the middle button. For example, it is probably possible to call up a virtual assistant (e.g. Siri or Google Assistant) with the middle button.
Please contact the relevant manufacturer for further details.
Calling up a virtual assistant
▶ Press and hold the middle button for 2 seconds ( ) to call up a virtual assistant (Siri, Google Assistant etc.).
CLEANING
To clean the earphones and cables, simply rub them with a dry cloth. Ideally, you should use the enclosed microfibre cleaning cloth. For more stubborn soiling, we recommend using an alcohol-based cleaning agent.
▶ Do not use water to clean the earphones.
▶ Make sure that no liquid enters the housing or the transducer.
▶ Do not use any other solvent-based or aggressive cleaners, as these may damage the surface.
▶ Dirty sound outlets can be cleaned by removing the small wax guard grilles. The wax guard grilles can be removed and cleaned in lukewarm water with a mild detergent (e.g. soap) or replaced with the spare metal grilles supplied if necessary. Before reassembling the earphones, make sure that there is no liquid or dirt on the individual components, particularly in the earphones.
If the eartips are very dirty, remove them and clean them in lukewarm water with a mild detergent (e.g. soap).
▶ Store the in-ear headphones in the enclosed case when not in use.
DISPOSAL
This symbol on the product, in the operating instructions or on the packaging means that the electrical and electronic devices must be disposed of separately from household waste at the end of their life cycle.
▶ Always dispose of used devices in accordance with the regulations in force.
For further information, please contact your local authority or the dealer from whom the product was purchased.

Battery disposal
Both disposable and rechargeable batteries must be disposed of separately from the product after use in accordance with the regulations in force. They must not be disposed of in household waste.
Both disposable and rechargeable batteries must be discharged and removed before disposal.
IMPORTANT: Non-destructive removal of either disposable or rechargeable batteries by the end user is not possible with this product. Please contact beyerdynamic or consult independent specialists.
▶ You can find instructions for battery removal online at www.beyerdynamic.com/xelento-wireless (for qualified personnel only).
EU DECLARATION OF CONFORMITY
beyerdynamic hereby declares that this radio transmission device complies with the EU Directive 2014/53/EU and the EU Directive 2011/65/EU.
The full text of the EU Declaration of Conformity can be found online at: www.beyerdynamic.com/cod.
TECHNICAL SPECIFICATIONS
| Bluetooth® frequency range | 2,400–2,483.5 MHz |
| Transmitting power | 10 dBm |
| Operating temperature range -10 to +60 °C | |
| Charging temperature range | +10 to +45 °C |
| Battery type: lithium-ion battery 3.7 V, 125 mAh |
▶ More detailed information on the technical data can be found online at: www.beyerdynamic.com/xelento-wireless.
SERVICE
If service is required, please contact an authorised specialist or:
beyerdynamic service and logistics centre
Email: service@beyerdynamic.de
Do not open the in-ear headphones yourself under any circumstances, otherwise you could lose all warranty claims.
SPARE PARTS
Additional, optional accessories and spare parts can be found at: www.beyerdynamic.com/service
The Comply™ eartips Tx-500 can be found at: www.complyfoam.com
PRODUCT REGISTRATION
You can register your Xelento wireless in-ear headphones online at global.beyerdynamic.com/service/registration.
WARRANTY CONDITIONS
beyerdynamic provides a limited guarantee for the original beyerdynamic product you have purchased.
- You can find detailed information about beyerdynamic's warranty conditions online at global.beyerdynamic.com/service/warranty.
REGISTERED TRADEMARKS
Use of the “Made for Apple” badge indicates an accessory has been designed to connect specifically to the Appleproduct(s) identified in the badge and that the accessory has been certified by the developer to meet Apple performance standards. Apple assumes no responsibility for the operation of this device or its compliance with safety and regulatory requirements. App Store is a service mark of Apple Inc.
Qualcomm ® is a trademark of Qualcomm Incorporated, registered in the United States and other countries. aptX ™ is a trademark of Qualcomm Technologies International, Ltd. registered in the United States and other countries.
The Bluetooth ® word mark and logos are registered trademarks of Bluetooth ® SIG, Inc. any use of such marks by beyerdynamic is under licence. Other trademarks and trade names belong to their respective owners.
USB type A, USB type B and USB type C are trademarks of USB Implementers.
FCC / IC REGULATION
FCC ID: OSDPIE21B
Canada IC: 3628C-PIE21B
NOTICE:
This device complies with Part 15 of the FCC Rules [and with Industry Canada licence-exempt RSS standard(s)].
Operation is subject to the following two conditions:
(1) this device may not cause harmful interference, and
(2) his device must accept any interference received, including interference that may cause undesired operation.
Le présent appareil est conforme aux CNR d'Industrie Canada applicables aux appareils radio exempts de licence. L'exploitation est autorisée aux deux conditions suivantes:
Changes or modifications made to this equipment not expressly approved by beyerdynamic may void the FCC authorization to operate this equipment.
Radiofrequency radiation exposure information:
For body worn operation, this phone has been tested and meets the FCC RF exposure guidelines when used with the beyerdynamic accessories supplied or designated for this product. Use of other accessories may not ensure compliance with FCC RF exposure guidelines.
Note: This equipment has been tested and found to comply with the limits for a Class B digital device, pursuant to part 15 of the FCC Rules
These limits are designed to provide reasonable protection against harmful interference in a residential installation. This equipment generates, uses and can radiate radio frequency energy and, if not installed and used in accordance with the instructions, may cause harmful interference to radio communications. However, there is no guarantee that interference will not occur in a particular installation.
If this equipment does cause harmful interference to radio or television reception, which can be determined by turning the equipment off and on, the user is encouraged to try to correct the interference by one or more of the following measures:
Reorient or relocate the receiving antenna.
Increase the separation between the equipment and receiver.
Connect the equipment into an outlet on a circuit different from that to which the receiver is connected.
Consult the dealer or an experienced radio/TV technician for help.
CAUTION: Changes or modifications not expressly approved by the manufacturer responsible for compliance could void the user's authority to operate the equipment.
Made in Germany
This device should not be modified (otherwise the granted designation number will become invalid.

beyerdynamic
Xelento wireless
- Generation
Bedienungsanleitung
INHALT
XELENTO WIRELESS EINSETZEN
UND TRAGEN....39
Kabelklammer....39
ANSCHLIESSEN UND KABEL WECHSELN......40
AKKUS AUFLADEN 41
BEYERDYNAMIC MIY APP....41
SOFTWARE-UPDATE....41


Kabelklammer
- Kabel anschließen.
AKKUS AUFLADEN
Multipoint-Betrieb
Medien wiedergeben
Telefonieren
https://source.android.com/devices/accessories/headset/plug-headset-spec
REINIGUNG
Akkus entsorgen
www.beyerdynamic.com/service
VUE D'ENSEMBLE DU PRODUIT....62
PREMIÈRES ÉTAPES......63
MISE EN PLACE ET PORT DU XELENTO WIRELESS....65
Pince-câble....66
RACCORDEMENT ET REMPLACEMENT DU CÂBLE 66
CHARGER LES BATTERIES....67
APPLICATION MIY APP DE BEYERDYNAMIC...68
MISE À JOUR DU LOGICIEL ......68
COMPATIBILITÉ AVEC LES LECTEURS ...... 68
CODECS AUDIOS SUPPORTÉS......68
COMMANDE....69
DÉCLARATION DE CONFORMITÉ UE....81
CARACTÉRISTIQUES TECHNIQUES ......81
SERVICE APRÈS-VENTE 81
PIÈCES DE RECHANGE ....82
ENREGISTREMENT DU PRODUIT....82
CONDITIONS DE GARANTIE......82
MARQUES....82
VUE D'ENSEMBLE DU PRODUIT




Embouts en mousse Comply™
2 de chaque :
Taille :
Retirer les embouts Comply™
Entretien des embouts
MISE EN PLACE ET PORT DU XELENTO WIRELESS
Pince-câble
- Raccordez le câble.
CHARGER LES BATTERIES
Mode Multipoint
Régler le volume sonore
Augmenter le volume sonore
Téléphoner
Activer/Désactiver le Mode amélioration
source.android.com/devices/accessories/headset/plug-headset-spec
NETTOYAGE
DÉCLARATION DE CONFORMITÉ UE
CONDITIONS DE GARANTIE


Comprimir la almohadilla Comply™ y colocarla
COLOCAR Y LLEVAR LOS XELENTO WIRELESS
Pinza para el cable
CARGA DE BATERÍAS
Control remoto Diadema
Servicio Multipoint
Ajuste del volumen
Subir el volumen
Reproducción
Llamar por teléfono
LIMPIEZA
www.beyerdynamic.com/service
Encontrará las almohadillas Comply™ Tx-500 en: www.complyfoam.com
REGISTRO DEL PRODUCTO


Inserti Comply™ in schiuma espansa
2 per ogni set:
Misura:
Clip raccogli-cavo
MESSA IN CARICA DELLE BATTERIE
Funzione Multipoint
Telefonate
source.android.com/devices/accessories/headset/plug-headset-spec
PULIZIA
GARANTIVILLKOR....159
VARUMÄRKEN....159


Kabelklämma
- Anslut kabeln.
LADDA BATTERIER
Koppla med en enhet via Bluetooth®
Om Bluetooth®-anslutningen har tappats, blinkar LED-lampan blått var tredje sekund.
Radera parkopplingslista
Använda multipoint
Ställa in volymen
Höja volymen
Spela upp media
Öppna personliga assistenter
Ringa
Slå på/av Enhancement Mode
Enhancement Mode blir ljudoptimerat med en extra DAC/Amp.
RENGÖRING
Kassera batterier
XELENTO WIRELESSの装着と着用....169
ケーブルクランプ....169
接続およびケーブル交換....170
バッテリーの 充電 171
BEYERDYNAMIC MIY APP ....171
ソフトウェアのアップデート……171
再生デバイスとの互換性....172
Comply™スポンジ製イヤーピース
2個ずつ:
サイズ:
シリコン製イヤーピースの装着
Comply™イヤーピースの適合と装着
Comply™イヤービースの取り外し
イヤーピースの交換
www.beyerdynamic.com/service/spare-parts
イヤーピースのお手入れ
ケーブルクランプ
- ケーブルを接続します。
バッテリー の充電
音量設定
音量を上げる
メディアの再生
メディア再生の開始/停止
早送り
音声応答の有効化/無効化
工場設定にリセットする
エンハンスメントモードのオン/オフ
Comply Comply耳筒套 泡沫耳筒套
每组 2 个:
尺寸:
使用硅胶耳筒套使用硅胶耳筒套
▶ 小心地将硅胶耳筒套套在耳机外壳上。
调整与佩戴 Comply™ 耳筒套
去除 Comply™ 耳筒套
更换耳筒套更换耳筒套
www.beyerdynamic.com/service/spare-parts
- 将新耳筒套套在耳机上。
维护耳筒套维护耳筒套
耳机线夹耳机线夹
- 连接耳机线。
为电池充电为电池充电
与设备建立 Bluetooth® 连接
删除配对列表
多点联动多点联动
音量调节音量调节
提高音量提高音量
媒体播放媒体播放
启动/结束媒体播放启动/结束媒体播放
调用个人助手调用个人助手
通话通话
激活或禁用语音提示激活或禁用语音提示
√ Xelento wireless 已启动。
重置为出厂设置重置为出厂设置
√ Xelento wireless 已启动。
启用/禁用增强模式启用/禁用增强模式
source.android.com/devices/accessories/headset/plug-headset-spec
更多详细信息请咨询播放设备生产商。
通话通话
接受/结束呼叫接受/结束呼叫
▶ 短按中间按键,(以接听或结束通话。

清洁清洁
电池废弃处理电池废弃处理
www.beyerdynamic.com/service/spare-parts
مشبک الكابل
إجراء مكالمة هاتفية
∴ m = 3/11
:Wired Audio Headset Specification
source.android.com/devices/accessories/headset/plug-headset-spec
الënظيف
For further distributors worldwide, please go to www.beyerdynamic.com
Non-contractual illustrations. Subject to change without notice.
Xelento wireless (2nd generation) · (09.22)


Qualcomm' aptX
Adaptive




R 202-DGK017
Complies with IDA Standards Dealer's Licence No. DA107819


- CONTENTS
- SAFETY INSTRUCTIONS....3
- ABOUT THIS MANUAL ....5
- SCOPE OF DELIVERY ....5
- PRODUCT OVERVIEW......6
- FIRST STEPS 6
- INSERTING AND WEARING
- XELENTO WIRELESS....9
- ATTACHING AND CHANGING THE CABLE ..... 10
- CHARGING THE BATTERY ....11
- BEYERDYNAMIC MIY APP....11
- SOFTWARE-UPDATE....11
- COMPATIBILITY WITH PLAYBACK DEVICES....12
- SUPPORTED AUDIO CODECS....12
- OPERATION 13
- CLEANING....23
- DISPOSAL....23
- EU DECLARATION OF CONFORMITY ......23
- TECHNICAL SPECIFICATIONS....24
- SERVICE 24
- SPARE PARTS....24
- PRODUCT REGISTRATION 24
- WARRANTY CONDITIONS......24
- REGISTERED TRADEMARKS......25
- FCC / IC REGULATION....25
- SAFETY INSTRUCTIONS
- INTENDED USE
- ADJUSTING THE VOLUME
- REDUCING PERCEPTION OF AMBIENT NOISE
- CHANGED ACOUSTIC PERCEPTION
- CLEANING DIRTY EARTIPS
- DAMAGE FROM LIQUIDS
- RISK OF SWALLOWING
- POWER AND CONNECTING CABLE
- USING THE BATTERIES
- DANGER FROM HEAT, WATER AND MECHANICAL STRESS
- STORING THE BATTERY
- ENVIRONMENTAL CONDITIONS
- ABOUT THIS MANUAL
- SCOPE OF DELIVERY
- PRODUCT OVERVIEW
- FIRST STEPS
- USING AND FITTING THE EARTIPS
- SILICONE EARTIPS
- COMPLY™ FOAM EARTIPS
- FITTING THE SILICONE EARTIPS
- ADJUSTING AND FITTING COMPLY™ EARTIPS
- REMOVING COMPLY™ EARTIPS
- REPLACING EARTIPS
- EARTIP CARE
- INSERTING AND WEARING XELENTO WIRELESS
- CABLE CLIP
- ATTACHING AND CHANGING THE CABLE
- DETACHING / ATTACHING THE CABLE ON THE EARPHONE
- DETACHING / ATTACHING THE JACK LEAD ON THE PLAYBACK DEVICE
- CHARGING THE BATTERY
- LED DISPLAY OF CHARGE LEVEL
- REMARKS ON THE LIFE OF LI-ION BATTERIES
- BEYERDYNAMIC MIY APP
- SOFTWARE-UPDATE
- COMPATIBILITY WITH PLAYBACK DEVICES
- SUPPORTED AUDIO CODECS
- OPERATION
- CONTROL ELEMENTS
- OPERATING INSTRUCTIONS
- SWITCHING ON AND OFF
- CONNECTING TO A DEVICE VIA BLUETOOTH®
- PAIRING
- PERFORMING GOOGLE FAST PAIR
- DELETING THE PAIRING LIST
- MULTIPOINT OPERATION
- PRIORITY PROFILE PLAYBACK DEVICES (PD)
- SETTING MULTIPOINT
- USING MULTIPOINT
- TO INCREASE VOLUME
- TO DECREASE VOLUME
- PLAYING MEDIA
- TO START / STOP MEDIA PLAYBACK
- TO PLAY THE NEXT TRACK
- TO PLAY THE PREVIOUS TRACK
- FAST FORWARD
- REWIND
- CALLING UP A VIRTUAL ASSISTANT
- MAKING A CALL
- ACCEPT / FINISH A CALL
- REJECT A CALL
- SWITCH BETWEEN TWO CALLS (TOGGLING)
- INCREASE THE VOLUME
- DECREASE THE VOLUME
- ACTIVATING AND DEACTIVATING VOICE MESSAGES
- RESETTING TO FACTORY SETTINGS
- SWITCHING ENHANCEMENT MODE ON/OFF
- OVERVIEW OF OPERATING FUNCTIONS ON THE BLUETOOTH® RECEIVER
- OVERVIEW OF LED DISPLAYS
- HELP WITH PROBLEMS / FAQ
- OPERATION IN REMOTE MODE WITH JACK CONNECTING CABLE
- REMOTE CONTROL
- BUTTONS ON THE REMOTE CONTROL
- TO START / STOP PLAYBACK
- CLEANING
- DISPOSAL
- BATTERY DISPOSAL
- EU DECLARATION OF CONFORMITY
- TECHNICAL SPECIFICATIONS
- SERVICE
- SPARE PARTS
- PRODUCT REGISTRATION
- WARRANTY CONDITIONS
- REGISTERED TRADEMARKS
- FCC / IC REGULATION
- NOTICE
- RADIOFREQUENCY RADIATION EXPOSURE INFORMATION
- XELENTO WIRELESS
- INHALT
- XELENTO WIRELESS EINSETZEN
- UND TRAGEN....39
- ANSCHLIESSEN UND KABEL WECHSELN......40
- AKKUS AUFLADEN 41
- BEYERDYNAMIC MIY APP....41
- SOFTWARE-UPDATE....41
- KABELKLAMMER
- AKKUS AUFLADEN
- MULTIPOINT-BETRIEB
- MEDIEN WIEDERGEBEN
- TELEFONIEREN
- REINIGUNG
- AKKUS ENTSORGEN
- VUE D'ENSEMBLE DU PRODUIT....62
- PREMIÈRES ÉTAPES......63
- MISE EN PLACE ET PORT DU XELENTO WIRELESS....65
- RACCORDEMENT ET REMPLACEMENT DU CÂBLE 66
- APPLICATION MIY APP DE BEYERDYNAMIC...68
- COMPATIBILITÉ AVEC LES LECTEURS ...... 68
- CODECS AUDIOS SUPPORTÉS......68
- COMMANDE....69
- DÉCLARATION DE CONFORMITÉ UE....81
- CARACTÉRISTIQUES TECHNIQUES ......81
- VUE D'ENSEMBLE DU PRODUIT
- EMBOUTS EN MOUSSE COMPLY™
- RETIRER LES EMBOUTS COMPLY™
- ENTRETIEN DES EMBOUTS
- MISE EN PLACE ET PORT DU XELENTO WIRELESS
- PINCE-CÂBLE
- CHARGER LES BATTERIES
- MODE MULTIPOINT
- RÉGLER LE VOLUME SONORE
- AUGMENTER LE VOLUME SONORE
- TÉLÉPHONER
- ACTIVER/DÉSACTIVER LE MODE AMÉLIORATION
- NETTOYAGE
- DÉCLARATION DE CONFORMITÉ UE
- CONDITIONS DE GARANTIE
- COMPRIMIR LA ALMOHADILLA COMPLY™ Y COLOCARLA
- COLOCAR Y LLEVAR LOS XELENTO WIRELESS
- PINZA PARA EL CABLE
- CARGA DE BATERÍAS
- SERVICIO MULTIPOINT
- AJUSTE DEL VOLUMEN
- SUBIR EL VOLUMEN
- REPRODUCCIÓN
- LLAMAR POR TELÉFONO
- LIMPIEZA
- REGISTRO DEL PRODUCTO
- INSERTI COMPLY™ IN SCHIUMA ESPANSA
- CLIP RACCOGLI-CAVO
- MESSA IN CARICA DELLE BATTERIE
- FUNZIONE MULTIPOINT
- TELEFONATE
- PULIZIA
- GARANTIVILLKOR....159
- VARUMÄRKEN....159
- KABELKLÄMMA
- LADDA BATTERIER
- KOPPLA MED EN ENHET VIA BLUETOOTH®
- RADERA PARKOPPLINGSLISTA
- ANVÄNDA MULTIPOINT
- STÄLLA IN VOLYMEN
- HÖJA VOLYMEN
- SPELA UPP MEDIA
- ÖPPNA PERSONLIGA ASSISTENTER
- RINGA
- SLÅ PÅ/AV ENHANCEMENT MODE
- RENGÖRING
- KASSERA BATTERIER
- XELENTO WIRELESSの装着と着用....169
- 接続およびケーブル交換....170
- バッテリーの 充電 171
- BEYERDYNAMIC MIY APP ....171
- 再生デバイスとの互換性....172
- COMPLY™スポンジ製イヤーピース
- シリコン製イヤーピースの装着
- COMPLY™イヤーピースの適合と装着
- COMPLY™イヤービースの取り外し
- イヤーピースの交換
- イヤーピースのお手入れ
- ケーブルクランプ
- バッテリー の充電
- 音量設定
- 音量を上げる
- メディアの再生
- メディア再生の開始/停止
- 早送り
- 音声応答の有効化/無効化
- 工場設定にリセットする
- エンハンスメントモードのオン/オフ
- COMPLY COMPLY耳筒套 泡沫耳筒套
- 使用硅胶耳筒套使用硅胶耳筒套
- 调整与佩戴 COMPLY™ 耳筒套
- 更换耳筒套更换耳筒套
- 维护耳筒套维护耳筒套
- 耳机线夹耳机线夹
- 为电池充电为电池充电
- 与设备建立 BLUETOOTH® 连接
- 删除配对列表
- 多点联动多点联动
- 音量调节音量调节
- 提高音量提高音量
- 媒体播放媒体播放
- 调用个人助手调用个人助手
- 通话通话
- 激活或禁用语音提示激活或禁用语音提示
- 重置为出厂设置重置为出厂设置
- 启用/禁用增强模式启用/禁用增强模式
- 清洁清洁
- 电池废弃处理电池废弃处理
- إجراء مكالمة هاتفية
- الËNظيف
Brand : BEYERDYNAMIC
Model : Xelento wireless 2nd generation
Category : Earphones