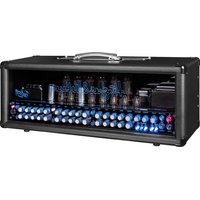
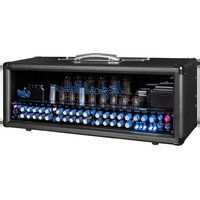
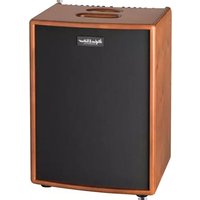
Black Spirit 200 - Guitar amp HUGHES & KETTNER - Free user manual and instructions
Find the device manual for free Black Spirit 200 HUGHES & KETTNER in PDF.

| Product type | Electric guitar amplifier |
| Model | Black Spirit 200 Floor |
| Brand | Hughes & Kettner |
| Dimensions (W x H x D) | 450 x 70 x 255 mm |
| Weight | 4.1 kg |
| Power supply | 100-240 V, 50-60 Hz, max. consumption 300 W |
| Output power | 200 W (switchable 200/20/2 W) |
| Speaker impedance | 8-16 ohms |
| Channels | 4 channels (Clean, Crunch, Lead, Ultra) with individual settings |
| Presets | 128 memory locations, accessible via Preset, Stompbox or Direct 7 modes |
| Built-in effects | Reverb, Delay (Tap Tempo), Modulation (Chorus, Flanger, Phaser, Tremolo), Noise Gate |
| Connections | 6.35 mm jack input, FX Loop (Send/Return), Aux In (mini-jack), Monitor In (XLR), Headphone/Line Out, Red Box AE+ (XLR), Speaker Out, MIDI In/Out (7/5 pin), Bluetooth |
| Bluetooth | Audio streaming and connection to mobile app (iOS/Android) |
| MIDI | Control via program change and real-time controllers, 20 V phantom power on MIDI In |
| DI output | Red Box AE+ with 8 cabinet simulations (selectable) and Mic/Line level |
| Maintenance | Clean with a dry cloth; do not open the casing; entrust any repairs to qualified personnel |
| Safety | Do not expose to moisture, disconnect before maintenance, use only the supplied power cord, replace fuses with IEC127 (5x20 mm) types by a professional |
| Spare parts | Internal fuse T 4 A L (not user-replaceable); optional accessories: expression pedal, footswitch |
| General information | Analog amplifier with digital control; built-in MIDI pedalboard; remote control app; normal hiss noise in standby (low consumption <0.5 W) |
Frequently Asked Questions - Black Spirit 200 HUGHES & KETTNER
User questions about Black Spirit 200 HUGHES & KETTNER
0 question about this device. Answer the ones you know or ask your own.
Ask a new question about this device
Download the instructions for your Guitar amp in PDF format for free! Find your manual Black Spirit 200 - HUGHES & KETTNER and take your electronic device back in hand. On this page are published all the documents necessary for the use of your device. Black Spirit 200 by HUGHES & KETTNER.
USER MANUAL Black Spirit 200 HUGHES & KETTNER
Hughes & Kettner® TECHNOLOGY OF TONE
Black Spirit 200
FLOOR
Manual 1.0
Important Safety Instructions! Read before connecting!
This product has been built by the manufacturer in accordance with IEC 62368-1 and left the factory in safe working order. To maintain this condition and ensure non-risk operation, the user must follow the advice and warning comments found in the operating instructions. The unit conforms to Protection Class 1 (protectively earthed). If this product shall be used in vehicles, ships or aircraft or at altitudes exceeding 2000 m above sea level, take care of the relevant safety regulations which may exceed the IEC 62368-1 requirements.
WARNING: To prevent the risk of fire and shock hazard, do not expose this appliance to moisture or rain. Do not open case – no user serviceable parts inside. Refer service to qualified service personnel.

This symbol, wherever it appears, alerts you to sense of uninsulated dangerous voltage inside closure – voltage that may be sufficient to quite a risk of shock.

This symbol, wherever it appears, alerts you to sense of externally accessible hazardous
voltage. External wiring connected to any terminal marked with this symbol must be a "ready made cable" complying with the manufacturers recommendations, or must be a wiring installed by instructed persons only.

This symbol, wherever it appears, alerts you to want operating and maintenance instructions in companying literature. Read the manual.

This symbol, wherever it appears, tells you: Take lot surface! To prevent burns you must not

All electrical and electronic products including
batteries should be disposed of separately from the municipal waste stream via designated collection facilities appointed by the government or the local authorities.

Read these instructions. Keep these instructions.
Follow all warnings and instructions marked on the product and in this manual.
- Do not use this product near water. Do not place the product near water, baths, wash basins, kitchen sinks, wet areas, swimming pools or damp rooms.
- Do not place objects containing liquid on the product – vases, glasses, bottles etc.
- Clean only with dry cloth.
- Do not remove any covers or sections of the housing.
- The set operating voltage of the product must match the local mains supply voltage. If you are not sure of the type of power available consult your dealer or local power company.
- To reduce the risk of electrical shock, the grounding of this product must be maintained. Use only the power supply cord provided with this product, and maintain the function of the center (grounding) pin of the mains connection at any time. Do not defeat the safety purpose of the polarized or grounding-type plug.
-
Do not defeat the safety purpose of the polarized or grounding-type plug. A polarized plug has two blades with one wider than the other. A grounding type plug has two blades and a third grounding prong. The wide blade or the third prong are provided for your safety. If the provided plug does not fit into your outlet, consult an electrician for replacement of the obsolete outlet.
-
Protect the power cord from being walked on or pinched particularly at plugs, convenience receptacles, and the point where they exit from the device! Power supply cords should always be handled carefully. Periodically check cords for cuts or sign of stress, especially at the plug and the point where the cord exits the device.
- Never use a damaged power cord.
- Unplug this product during lightning storms or when unused for long periods of time.
- This product can be fully disconnected from mains only by pulling the mains plug at the unit or the wall socket. The product must be placed in such a way at any time, that disconnecting from mains is easily possible.
- Fuses: Replace with IEC127 (5x20mm) type and rated fuse only! It is prohibited to use "patched fuses" or to short the fuse-holder. Replacing any kind of fuses must only be carried out by qualified service personal.
- Refer all servicing to qualified service personnel. Servicing is required when the unit has been damaged in any way, such as:
- When the power cord or plug is damaged or frayed.
- If liquid has been spilled or objects have fallen into the product.
- If the product has been exposed to rain or moisture.
- If the product does not operate normally when the operating instructions are followed.
- If the product has been dropped or the cabinet has been damaged.
- Do not connect external speakers to this product with an impedance lower than the rated impedance given on the product or in this manual. Use only cables with sufficient cross section according to the local safety regulations.
- Keep away from direct sunlight.
- Do not install near heat sources such as radiators, heat registers, stoves or other devices that produce heat.
- This apparatus is for moderate climates areas use, not suitable for use in tropical climates countries.
- Do not block any ventilation openings. Install in accordance with manufacturer's instructions. This product must not be placed in a built-in installation such as a rack unless proper ventilation is provided.
- Always allow a cold device to warm up to ambient temperature, when being moved into a room. Condensation can form inside it and damage the product, when being used without warming up.
- Do not place naked flame sources, such as lighted candles on the product.
- The device must be positioned at least 20 cm/8" away from walls with free air space in between, and there must be free air space of at least 50 cm / 20" immediately above the unit within which no object(s) may be placed or positioned.
- Make sure that the device is always placed on a solid, flat surface.
- Use only with the cart, stand, tripod, bracket or table specified by the manufacturer or sold with the product. When a cart is used, use caution when moving the carl/product combination to avoid injury from tip-over.
- Use only accessories recommended by the manufacturer, this applies for all kind of accessories, for example protective covers, transport bags, stands, wall or ceiling mounting equipment. In case of attaching any kind of accessories to the product, always follow the instructions for use, provided by the manufacturer. Never use fixing points on the product other than specified by the manufacturer.
- This appliance is NOT suitable to be used by any person or persons (including children) with limited physical, sensorial or mental ability, or by persons with insufficient experience and/or knowledge to operate such an appliance. Children under 4 years
of age must be kept away from this appliance at all times.
- Never push objects of any kind into this product through cabinet slots as they may touch dangerous voltage points or short out parts that could result in risk of fire or electric shock.
- This product is capable of delivering sound pressure levels in excess of 90 dB, which may cause permanent hearing damage! Exposure to extremely high noise levels may cause a permanent hearing loss. Wear hearing protection if continuously exposed to such high levels.
• The manufacturer only guarantees the safety,
reliability and efficiency of this product if: - Assembly, extension, re-adjustment, modifications or repairs are carried out by the manufacturer or by persons authorized to do so.
- The electrical installation of the relevant area complices with the requirements of IEC (ANSI) specifications.
- The unit is used in accordance with the operating instructions.
- The grounding of the center pin of the mains plug is maintained to reduce the risk of shock.
Things to do before operating the amp
- Please read these instructions carefully, particularly the notes on safety, before operating the amp.
- The manufacturer disclaims any liability on responsibility whatsoever for any damage or defect to this and other devices resulting from misuse.
- Before you plug this amp into a mains power outlet, make sure its Power switche is off and that the voltage rating indicated on its rear panel matches your local mains current.
- A word of warning before you fire up your Black Spirit 200 Floor: It's loud, and high volume levels can cause hearing damage. To avoid very loud and unwelcome surprises, make a habit of backing the Volume knob of the guitar connected to the Black Spirit 200 Floor all the way down before switching on the amp!
Black Spirit 200 FLOOR
1 Quick-Start Guide....3
2 The Fundamentals of Handling Black Spirit 200 Floor .... 3
3 Control Features 6
4 Connections 7
5 Presets 9
6 Bluetooth ^ 10
7 MIDI 11
8 Technical Data 13
Heads up: Black Spirit 200 Floor comes with a universal power supply that works reliably at any mains voltage worldwide and maintains the sound quality wherever you go. When the amp is connected to a mains outlet, it will consume a tiny amount of power – less than 0.5 watts – even when it is switched off. Every seven seconds or so, it will issue a soft chirping sound that is only audible in a very quiet environment. This does not constitute a material defect that can or needs to be repaired. If this sound bothers you, we recommend that you plug the amp into a switchable extension socket so you can flip its switch to cut off the power supply to the amp.
1 Quick-Start Guide
On page 86 to 88 of this manual, you'll find example setups showing you how to connect the amp for playing live and recording.
Mains In: Connect the factory-included power cord to this socket. Make sure the mains power outlet is grounded before you plug in the amp! Running your amp on non-grounded outlets is a safety hazard and may cause audible noise and hum.
Speaker Out: Black Spirit 200 Floor provides speaker connection options ranging from classic cabinets for a guitar amp to passive PA speaker systems. Everything you need to know about this you'll find in chapter 4, Connections.
Bluetooth: The amp does not pair up with other devices automatically. read chapter 6, Bluetooth, to learn more connecting via Bluetooth.
Power button: Press and hold this button for two seconds to power up the amp. Press and hold it for three seconds to switch it off.
Heads up: In the event of a power outage, the amp will come back online automatically when power is restored.
Phones/Line: Connect headphones to this 6.3 mm (1/4") jack output or feed a line signal to any stereo multimedia input, such as a hi-fi system, if you don't use the speaker out.
2 The Fundamentals of Handling Black Spirit 200 Floor
Black Spirit 200 Floor is an advanced electric guitar amplifier with an integrated MIDI board, but there is more to it than that. It also pairs a purely analog sound generator with digital control and storage options. Though it handles much like any other analog amp, there are a few things you need to bear in mind:
- Although Black Spirit 200 Floor is an analog amplifier, all its switching and controlling functions apart from the Master knob are programmable.
- Some knobs and switches are assigned different functions in different operating modes.
- You can store and access all settings in 128 memory slots.
2.1 How the knobs work
Black Spirit 200 Floor is a four-channel amp. All four channels are controlled by the same set of knobs. Your choice of channel determines the knob's assignment. For example, when you choose the Clean channel via the chicken-head selector switch explained in detail in section 3.1, the Gain knob determines the Clean channel's gain level. This means the channels are independently adjustable and no knobs need to be shared.
Heads up: The knobs look and feel like standard-issue pots with a 300-degree control range and left and right stops. But there's a difference
that may take some time getting used to: The knob setting programmed in a preset is independent of the knob's physical position. In other words, when you switch from one preset to another, the knob's actual
may not reflect the setting programmed in the preset, and you may well hear something other than what you're seeing would suggest. The knob will respond like any other conventional pot as soon as you move it. The Store LED in the Master section tells you the knob setting stored in the preset. It lights up when the physical position of the knob corresponds to the preset setting.
Heads up: You may hear a soft background noise when twisting knobs. This sound is made by the Programmable Resistor Network, or PRN™, as it switches its 256 resistors. Each of these smart rotary controls consists of 256 individual resistors in serial array, 256 switches, and a memory with the ability to save and recall every switch's position.
2.2 The Black Spirit 200 Floor app for iPads and Android devices
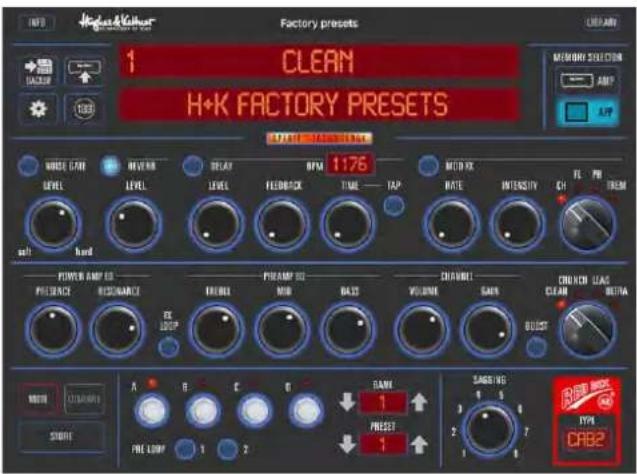
All controls and buttons on Black Spirit 200 Floor are MIDI-enabled, so we programmed an app that makes the most of MIDI to extend the amp's capabilities.
This app lets you:
- Give every preset a unique name
• Visually monitor all parameters in real time - Remotely control all parameters in real time
- Save presets in the App
- Download and upload presets to and from the amp
- Share presets via email or text messages.
- Create and organize preset lists.
Available at the Apple App Store and at Google Play, this free app connects to Black Spirit 200 Floor via Bluetooth. For more on this, see chapter 6, Bluetooth.
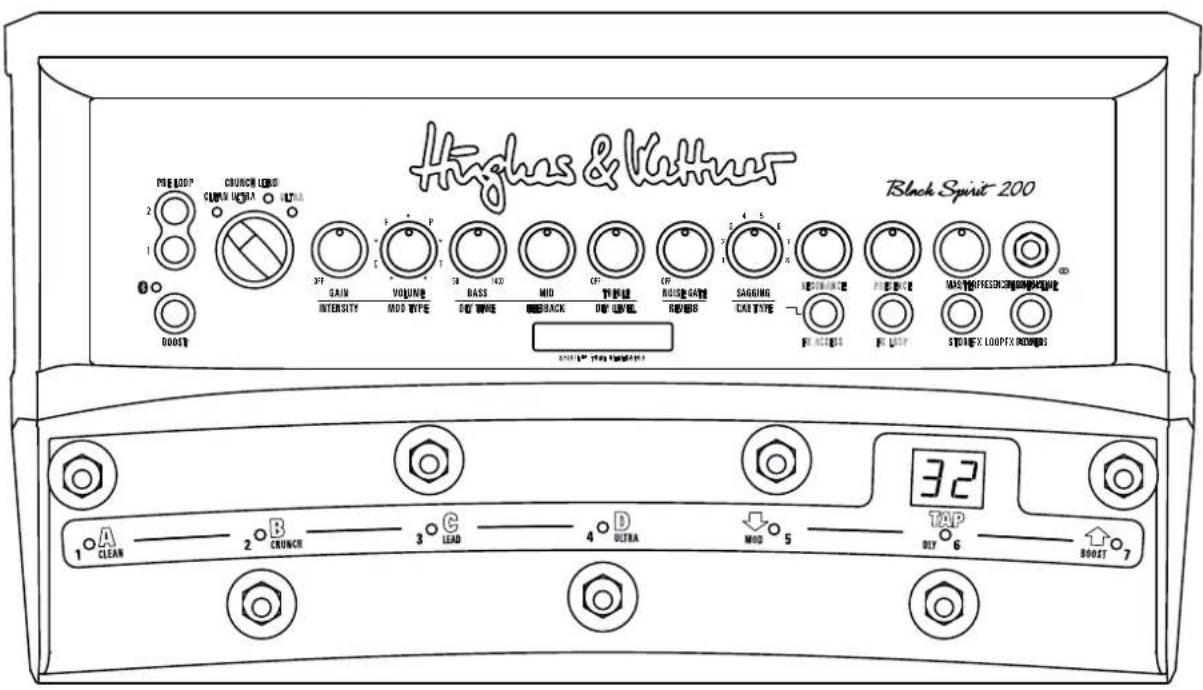
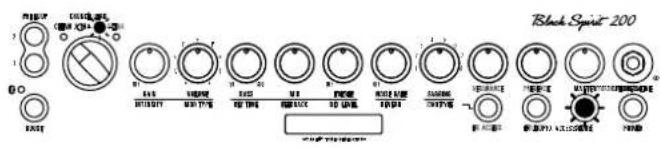
3 Control Features
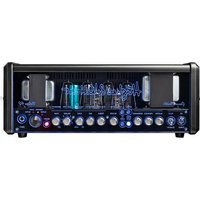
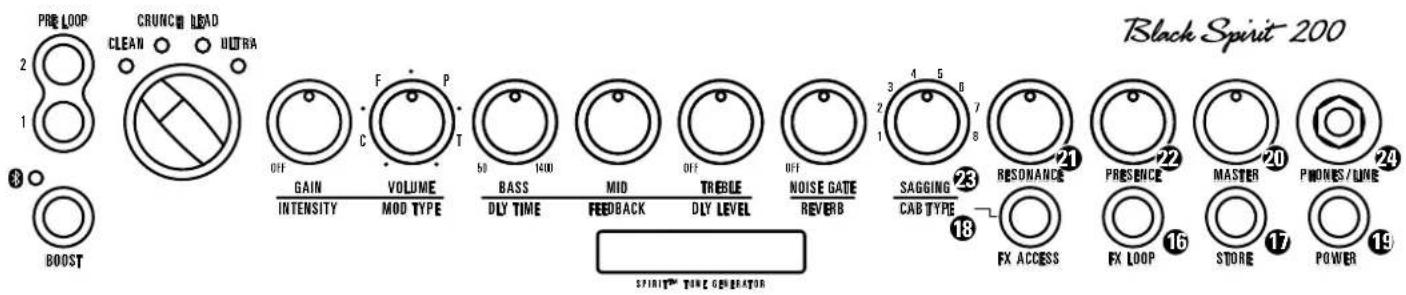
3.1 The channel section
Black Spirit 200 Floor sports four channels, each voiced very differently and accessible via a chicken-head selector switch. The power amp feedback circuit, which has a formative hand in shaping your tone, is also reconfigured during channel switching. The programmable knobs afford you full access to all sound parameters on every channel. We even painstakingly fine-tuned the knobs' control ranges and characteristics to match the selected channel's voicing.
① Input: Connect your guitar to this input using a shielded cord equipped with 6.3 mm (1/4") jack plugs. It is located on the left of the amp.
② Gain: The Gain knob determines input sensitivity and therefore the preamp's saturation level. It is your most important sound-sculpting tool alongside the Boost and Sagging controls.
3 Clean Channel: Black Spirit 200 Floor's Clean channel certainly merits its name. It delivers sparkling fresh sounds and offers tons of headroom. It's worth your while to experiment with different Gain and Sagging settings in combination with the switchable Boost.
4 Crunch Channel: Your first stop for classic overdrive at its finest. This channel sweeps the sonic spectrum from clean to mean, and countless tones in between. In this channel, Boost brings up speci frequencies and ladles on an extra helping of gain to lend your tone a harder-rocking edge.
5 Lead Channel: This channel's masterfully musical compression sends those riffs and licks flying off your fingertips. In this channel, Boost increases compression and gives you more fluid gain for lead lines.
6 Ultra Channel: Get your high-gain tone right here. The Ultra channel's top end slices, dices, but never sacrifices its thunderous low end for raging metal riffs and larger-than-life lead tone. Dropped tuning conjures a quasi-religious experience.
⑦ Boost: Boost targets specific frequency ranges in your tone and kicks them up a notch. This yields even more assertive, creamier, or punchier tone, depending on the channel.
8 Bass, Mid, Treble: The three-band voicing section's sound-shaping action is fine-tuned for each channel, and it specifically addre frequency ranges that define each channel's characteristic tone.
Heads up: These are classic passive tone controls that influence one another. For example, if you crank the Mid knob, the Bass knob will be less effective than when you back the Mid knob down. Presence and Resonance are independent of the three-band voicing controls; that is, their action remains unaffected by the other knobs' settings.
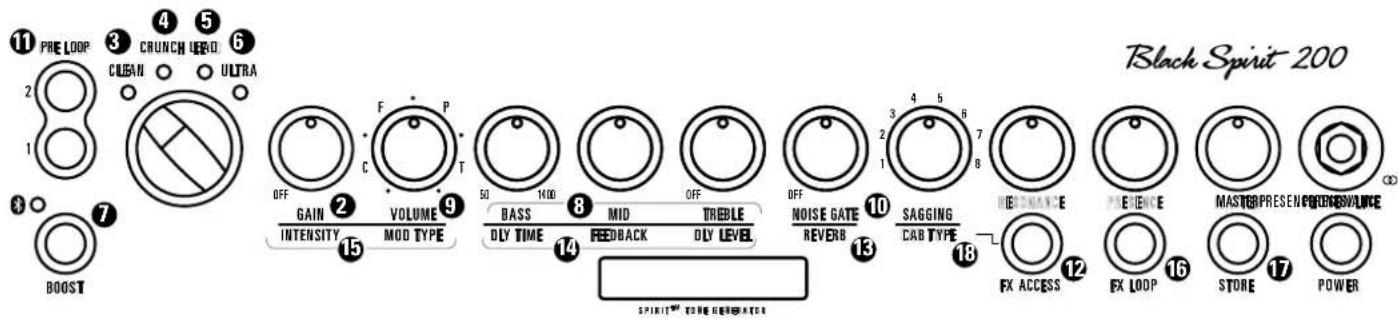
⑨ Volume: Use the Volume knob to adjust preset levels and adjust their relative balance to other presets.
Heads up: Unlike a conventional Volume control, this knob bring the level all the way down; it merely boosts or cuts the given level. The 12 o'clock position is the best starting point for adjusting volume.
Caution: Please don't use this knob to control the amp's overall output level – that's the Master knob's job (see chapter 3.3)!
10 Noise Gate: This knob controls the noise gate's sensitivity. The noise gate's IDB™ technology automatically adapts the standard attack and threshold parameters. Turning the knob all the way down – that is, counterclockwise as far as it will go – bypasses the noise gate. The further you turn up the noise gate, the more aggressively it responds. Set it to 9 o'clock if you want it to open up at very soft signal levels. The further you twist the knob to the right, the harder the noise gate kicks in and cuts off signals. The noise gate's sensitivity setting can be stored within each preset.
① Pre Loop: Pre Loop buttons 1 and 2 located next to the chicken-head selector switch activate the two Pre Loops on the left of the amp. See section 4.2 for more on using and programming these loops.
3.2 The effects section
Black Spirit 200 Floor offers three independent effects modules, with Reverb, Delay and Modulation effects and a Noise Gate. You can use them all at the same time.
Heads up: The far left knob positions of the Reverb, Dly Level, and Intensity knobs bypass the given effect. Twisting those knobs counterclockwise to the far left dials the given effect module out of the signal path.
12 FX Access: Press the FX Access button to access Reverb, Delay and Modulation effects. It will start flashing. Now the amp is in FX mode, with the channel control knobs serving to adjust effects. Press FX Access again to exit FX mode. It stops flashing and the amp returns to normal operating mode with the knobs serving as tone controls.
Reverb: Black Spirit 200 Floor's digital reverb matches the warmth and musicality of classic spring reverbs. A genuine improvement over its analog ancestors, it automatically adjusts the reverb tail – the higher the Reverb volume setting, the longer the reverb time.
14 Delay: The Delay module's Dly Level, Feedback and Dly Time knobs afford you total control over all parameters.
does not
- Dly Level: Adjusts the volume of repetitions, sweeping from all the way off to just as loud as the original signal.
- Feedback: Adjusts the number of repetitions from one to infinite.
- Dly Time: Adjusts the time to the next repetition from 50 milliseconds to 1.4 seconds. When you're tapping in delay time on Black Spirit 200 Floor's Tap button (see 5.1), the effect adopts the new time after your second tap. The Tap LED flashes for about five seconds in sync with the beat to give you a visual indication of delay time. The Tap function only works when the Delay is active. If the Delay is off – or more accurately, bypassed – the effect will not adopt your Tap tempo.
⑮ Modulation FX: This module serves up four modulation effects – Chorus, Flanger, Phaser, and Tremolo.
- Mod Type: Each effect is assigned to one quarter of this knob's control range. The first quarter addresses Chorus, the second addresses Flanger, the third addresses Phaser, and the final quarter addresses Tremolo. You can adjust the modulation effect's rate within its assigned quarter. The more you turn Mod Type up, the faster the rate gets.
- Intensity: This knob adjusts the volume of the modulation effects.
16 FX Loop: This serial loop lets you patch in external effects devices: connect the Send jack in the FX Loop section on the amp's rear panel to your effects processor's input and the Return jack to the processor's output. The FX Loop button activates and deactivates the loop.
⑰ Store: Use the Store button to save your settings to a preset. For more info on this function, read section 5.2, Programming Presets.
⑱ Cab Type: This knob selects one of eight painstakingly designed cabinet emulations for the Red Box AE+ Out on the back of the amp. See section 4.1, Red Box AE+, for more on this. On the rear panel, you can switch the output level from Mic to Line On to match the level to whatever device you wish to address. The Red Box AE+ is the perfect medium for sending your sound to the PA, monitoring system or a recording device. With the Red Box AE+ tweaking your tone for you, there's no need to fuss with microphones or negotiate with sound techs.
| No. Cabinet types: | |
| 1 1x12" Modern Thiele Port | |
| 2 | 2x12" Modern Front Port |
| 3 2x12" Vintage Open Back | |
| 4 4x10" Alnico Open Back | |
| 5 4x12" Vintage Cab | |
| 6 4x12" British Cab | |
| 7 4x12" Modern Cab | |
| 8 4x12" American Cab | |
Heads up: The amp assigns the selected Cab Type emulation to the Red Box and Phones outputs. It does not assign the emulation to the Speaker Out when a conventional cab is connected to it, the logic being that you don't want a cabinet emulation when you're driving real speaker cabinets. A cabinet emulation will work with the Speaker Out if you opt to connect fullrange cabinets. See section 4.1 for more on this.
3.2 The Master Section
19 Power button: Press and hold this button for two seconds to power up the amp. Press and hold it for three seconds to switch the amp off.
Note: In case of a power failure the amp will power up automatically again
20 Master: As the name suggests, this knob puts the power amp and its volume level at your thumb and forefinger's command. Handle it carefully and you will enjoy a gratifying rather than an agonizing aural experience. Master also adjusts the volume for the Phones output. Browse on down to paragraph 24 of this section to learn more.
Heads up: Unlike with Hughes & Kettner tube amplifiers, the level of Black Spirit 200 Floor's Red Box out is not affected by the setting of the Master control (see 4.1 Red Box AF+).
Another heads up: The Master knob is not programmable like channel and effect controls. It works as any conventional knob would, and its end to plug into a typical home stereo system's left and right aux inputs system. You can also connect this output to any mixing desk using a cord
physical position indicates the actual setting. It's always a good idea to back the Master knob off by twisting it to the far left posit powering the amp up.
21 Resonance: Set the Resonance knob to 12 o'clock, and you will hear the normal resonance created by the amp-and-cabinet combination. Twisting it counterclockwise dampens the speakers' and the cabinet's resonance for a looser, softer sound that sweetens up your clean tone. Turning the knob clockwise intensifies resonance for a tighter, punchier low end that works well with distorted sounds.
22 Presence: This knob controls the amount of harmonic overtones generated by the amp – the higher the setting, the more intense the effect.
Heads up: You can save your Resonance and Presence settings in any preset or use these them globally, as you would the Master volume knob, so they remain in force when switching presets. Read section 7.2 if you wish to use Resonance and Presence globally.
23 Sagging: This knob, alongside Gain and Boost, is the most powerful tool in your kit for dialing in fresh and inspiring tone. It affords you total control over the power amp's saturation levels and response at any volume. Nudge it to dial in just the right amount of cream or sweep it through the control range to tap into decades of great tone. You have eight positions to choose from – the higher you go, the greater the sag and the more saturated the power amp.
24 Phones/Line: Connect standard headphones equipped with a 6.3 mm (1/4") jack plug to this output. You can also use it feed a line signal to any stereo multimedia device, including hi-fi systems. Your dealer should stock the right adapters or cables. For example, you need a cable with a stereo TRS jack at one end to connect it to the Phones output of your Black Spirit 200 Floor, and two RCA or cinch connectors on the other end to plug into a typical home stereo system's left and right aux inputs system. You can also connect this output to any mixing desk using a cord

sporting two mono 6.3 mm (1/4") jack plugs or two XLR connectors. Be sure to pan the mixing console's inputs hard left and right to enjoy the full stereo effect.
Heads up: Plugging a cord into the front panel Phones output switches the Speaker Out off.
Heads up again: The Phones output delivers a natural-sounding right/left stereo signal to your headphones. The mono Red Box out is the better choice for feeding your signal to a mixing desk for most applications on stage and in the studio. Read section 4.1, Red Box AE+, for more on this.
3.4 Controllers
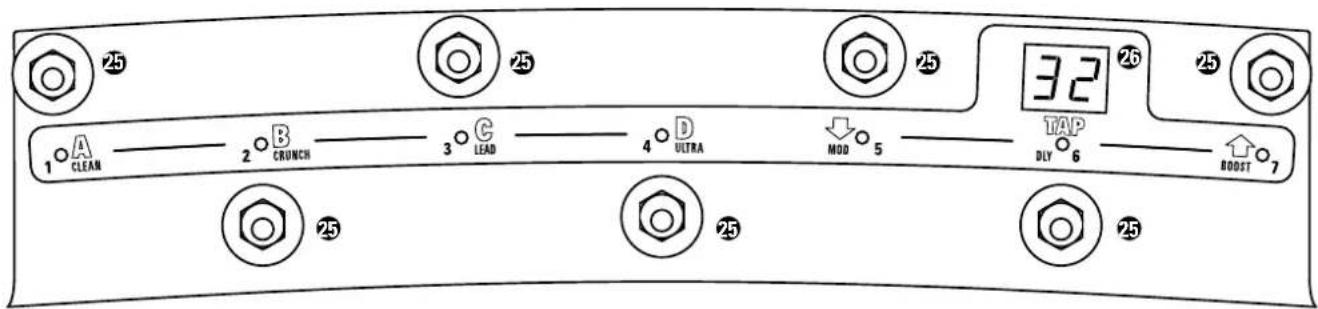
Controlling the amp with the footswitches is an exercise in convenience. You can operate the amp in three modes, Preset, Stompbox and Direct 7. To learn more about them, see chapter 5, Presets.
25 Footswitches: Use Black Spirit 200 Floor's seven footswitches to access and program sounds. The buttons' assignments and functions vary from mode to mode as shown in the table below.
| Preset | A | B | C | D | ↓ | TAP | ↑ |
| Stompbox | CLEAN | CRUNCH | LEAD | ULTRA | MOD | DLY | BOOST |
| Direct 7 | 1 | 2 | 3 | 4 | 5 | 6 | 7 |
26 Display: The display's read-out also varies from mode to mode. In Preset mode, it indicates the selected bank (1-32). It reads "Sb" in Stompbox mode and "7P" in Direct-7 mode.
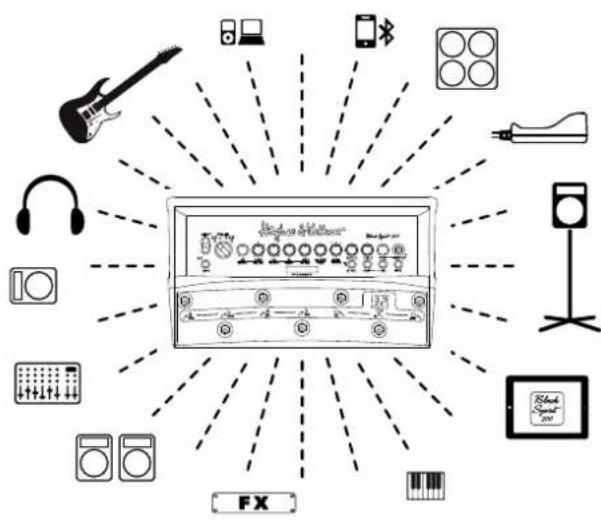
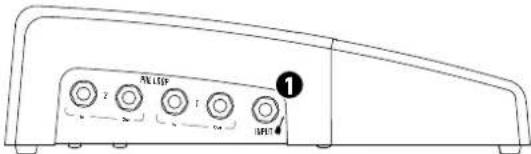
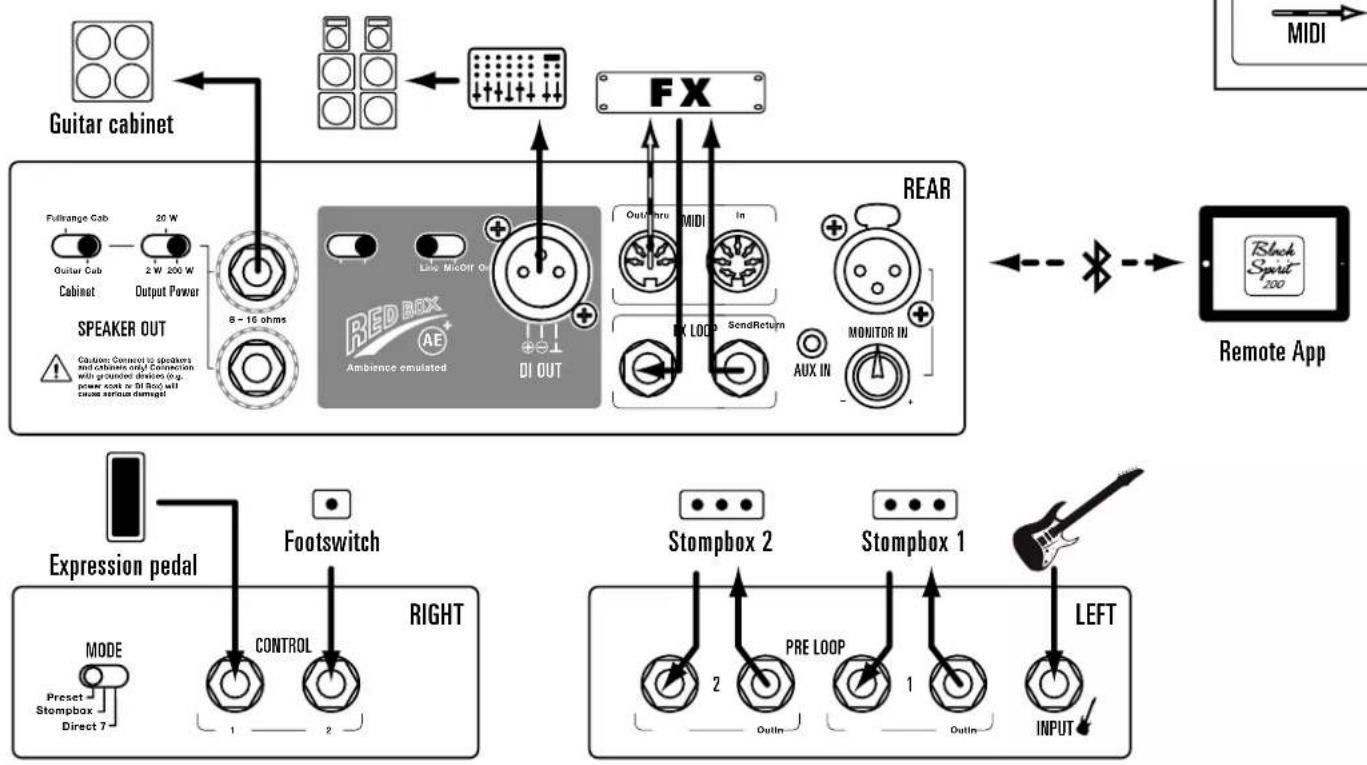
4 Connections
4.1 Rear panel
① Speaker Out: Black Spirit 200 Floor is designed to drive speaker cabinets with impedances of 8 or 16 ohms. You can connect conventional cabs made for guitar amps as well as fullrange speakers.
A few basics on connecting speakers
Caution: If you wish to connect two speaker cabinets, always make sure they are of the same type – either two guitar amp cabinets or two fullrange enclosures. NEVER mix the two by connecting one of each type! If you want to connect two cabinets, make sure the impedance of each cabinet is 16 ohms, as the overall impedance is halved to 8 ohms in a parallel circuit. This applies to both guitar cabinets and fullrange enclosures.
The Hughes & Kettner TS 112 Pro, TM 112 and TM 212 come highly recommended. Each has an impedance of 16 ohms and a parallel output that lets you connect a second speaker of the same type.
- Output Power: You can step down from 200 watts to 20 watts and 2 watts with this selector. This nifty switch turn Black Spirit 200 Floor into your sonic Swiss Army Knife. Use it for anything from woodshedding in your bedroom with a small cab to driving a 4x12" cab at a raging 200 watts.
- Cabinet: Versatility is what this unique feature is all about. Set it to Guitar Cab to connect standard guitar cabinets. Set it to Fullrange Cab position to drive any passive – that is, non-powered – fullrange speaker. The Red Box AE+In serves up great sound for fullrange enclosures, including a selection of cabinet emulations, at a whopping 200 watts. If toting your cab to and from the rehearsal room is not your idea of fun, simply hook Black Spirit 200 Floor up to your home stereo system, studio monitors or PA speakers. We promise it'll still sound and feel just like a real guitar cabinet.

Caution: Be sure to connect the Speaker Out to speakers and cabinets only! Connecting this output to grounded devices such as a power soak or DI box) is sure to cause serious damage.
② Red Box AE+ DI Out: The original Red Box has been the industry standard tool for capturing the sound of guitar amps without using microphones since Hughes & Kettner invented it in 1988. The Red Box delivers unvarying sound quality at every gig or recording session, putting an end to crosstalk with other instruments and the hassles of experimenting with microphone placement. The Red Box AE+ is the latest version of the award-winning speaker simulator.
The DSP-powered Ambience Emulation delivers a perfect mix of authentic cabinet ambience and that ultra-direct attack of purely analog tone. We've added some great new Red Box features to Black Spirit 200 Floor, guaranteed to make life onstage and in the studio even peachier.
- Red Box Mic/Line: Be sure to set the Red Box to the proper level. We recommend using the Line setting when running long cables to send the signal over greater distances, for example, at gigs. The higher output compensates for the signal level lost along the way. If the mixing console or soundcard/audio interface lacks XLR inputs, you will need an XLR to 6.3 mm (1/4") jack adapter, which should be readily available stores. Please make sure the Red Box is set to Line when it is connected to 6.3 mm (1/4") jack inputs.
- On/Off: When you switch the cabinet emulation off, the Red Box out sends an unfiltered signal for use with your favorite cabinet and microphone simulation software or processor.
Heads up: Red Box AE+ offers eight painstakingly designed cabinet emulations. Select them on the front panel and store your setting with any preset.

③ FX Loop
- FX Send: Connect the FX Send to your external effects processor's input.
- FX Return: Connect the FX Return to your external effects processor's output.
Tip: If you're a stompbox user, you may want to try the four-cord method: For devices that work best plugged into the front end of the amp, simply connect the guitar to the input of the first pedal in the chain, and the last pedal's output to the amp's Input. Now do the same for devices that work best in the FX loop: Connect the pedal's output to the amp's FX Return and the amp's FX Send to the pedal's input. This lets you route chorused, phased and other modulated signals into Black Spirit 200 Floor's preamp and patch in time-based effects such as reverb and delay after the preamp.
4 MIDI
- MIDI In: Black Spirit 200's MIDI In port is a seven-pin socket that provides 20 volts of DC phantom power via the two additional pins. This lets you connect the Hughes & Kettner FSM-432 MIDI board or the Hughes & Kettner WMI-1 WiFi MIDI interface to the amp without having to fuss with yet another power supply. Use cables with standard five-pin connectors to plug in other MIDI devices.
- MIDI Out/Thru: This routing option forwards signals patched into the MIDI In to other devices. You can connect any external MIDI-enabled signal processor that you wish to switch synchronously with Black Spirit 200 Floor.
5 Aux In: This port lets you connect any music player to play along with backing tracks and jam to your favorite tunes. The amp blends the Aux In signal with your guitar's signal. You can also use it to connect drum machines or other instruments. The Aux In signal is routed in full-fledged stereo quality to the Phones/Line output, and in mono to the Speaker Out when it is set to Fullrange Cab (see 3.1 for more info). This lets you connect your home stereo system to the Phones out. You can even plug straight into a passive PA speaker to jam with any track that strikes your fancy – no outboard mixer required.
6 Monitor In: This input is designed for guitarists who do not use a conventional guitar cab on stage, instead working with FRFR speaker cabinets plugged directly into the Speaker Out or sending the signal elsewhere via the Phones out. This lets you hear your band's mix as sent to your personal FRFR cab or in-ear system by your tech. The advantage of this is that you don't need a second monitor on stage to hear the rest of your band. The Mix knob located below the Monitor In port lets you adjust this signal's relative level – that is, how much of it you want to hear in your personal mix. You're free to dial in the balance of monitor and amp sound as you see fit, and you don't need to fuss with an outboard mixer to do so.
7 AES: EC Commission Regulation no. 1275/2008 requires electronic devices to be equipped with a power-saving function that switch the device after a specified period of non-use. Your Black Spirit 200 Floor does this with a circuit called AES. The mini switch next to the speaker jack enables and disables this auto shutdown feature.
The amp ships with the mini switch toggled to the left to enable AES. In this mode, the amp shuts down if it's left to idle continuously around 90 minutes. Any kind of input signal, even a softly played note, will bring the amp back on line, resetting its internal auto shutdown clock to the 90-minute timeout period. If AES shuts the amp down, you can wake it up by flipping the Power switch off and back on again. Slide the mini switch to the right if you wish to deactivate AES. Then it longer shut down automatically if it's left to idle for 90 minutes.
4.2 Connections on the Left
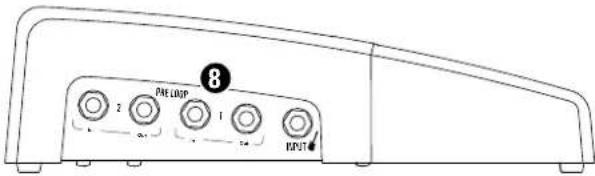
8 Pre Loop 1 + 2: Plug pedals that don't normally belong in the FX loop into this port. By this we mean boosters, overdrives, compress boxes, modulation effects and the like that you want to insert between the guitar and the amp's front. These programmable Pre Loops give you a tremendous tonal advantage. They let you use your favorite pedals selectively, dropping them into the signal path only when y certain presets. When deactivated, these loops are removed from the signal path altogether so they cannot color your amp's tone. Activate Pre Loops on the front of the amp. See section 3.1 for more on this.
Heads up: When you're playing without pedals connected to the amp and call up a preset with an activated Pre Loop, your signal will go nowhere when it hits the loop because there's no pedal there to accept it. The signal chain is severed and your signal will drop out.
4.3 Connections and control features on the right
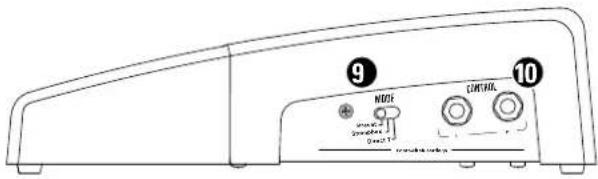
9 Mode: Use this sliding switch to set the amp to Preset, Stompbox or Direct 7 mode. See section 5.1 for more on this.
Tip: You can also footswitch Stompbox and Direct 7 modes on and off without engaging the sliding switch. Press and hold the following combinations of buttons for two seconds to do this:
• TAP + B = Stompbox mode on/off
• TAP + Bank Up = Direct 7 mode on/off
Heads up: Whatever mode the sliding switch is set to when you switch the amp off will be activated when you switch the amp back on again.
10 Control 1 +2: You can connect expression pedals – we like the Yamaha FC 7 – or simple footswitches such as the recommended Hughes & Kettner FS-1 to both connectors to assign more control functions to Black Spirit 200 Floor. This lets you control all programmable functions of the Black Spirit 200 Floor remotely, in real time. For example, you could vary the amount of reverb with an expression pedal, turn the Noise Gate on and off with your foot, or adjust the gain level on the fly with a pedal without taking your hands off the guitar. Experience teaches that guitarists like to activate and deactivate the Boost function via footswitch without having to switch presets, and adjust the volume level with a pedal. This is why we assigned Control 1 to Boost and Control 2 to Volume. Read section 7.4 if you wish to change these factory defaults and assign other functions to Control 1 and 2.
5 Presets
5.1 Accessing Presets
You can select Black Spirit 200's presets of Floor on the amp, via MIDI or in an app connected via Bluetooth. You have three modes for accessing presets. Select the desire mode using the sliding switch on the right or a combination of buttons.
| Preset | A | B | C | D | ↓ | TAP | ↑ |
| Stompbox | CLEAN | CRUNCH | LEAD | ULTRA | MOD | DLY | BOOST |
| Direct 7 | 1 | 2 | 3 | 4 | 5 | 6 | 7 |
1 Preset mode:
Preset mode offers 128 presets, divided into 32 banks of 4 presets each. Use Preset buttons A, B, C, D and the Bank Up/Down buttons with the arrows pointing up and down to call up presets.
Preset buttons A, B, C, D: Presets within a bank activate directly, that is, you can switch straight from A to B within the same bank. The LEDs above the A, B, C, and D buttons indicate the selected preset.
Bank Up/Down :
In Preset mode, Black Spirit 200 Floor's display always shows the currently selected bank number. To activate a preset in another bank, you have to first preselect this bank using the Up/Down buttons. The currently selected preset stays activated while you're doing this so you can keep playing with the same sound. This preselected bank number will flash in the display until you active a new preset in the target bank by pressing one of the A, B, C or D Preset buttons. The amp will not switch to the newly selected preset until you do this.
Tap: Tap offers you a quick, convenient way of adjusting delay time. It's particularly handy on stage: simply tap your foot on the Tap button in time with the beat to match the delay time to the tempo. See section 3.1 for more info.
2 Stompbox mode:
The display reads "Sb" when you move the sliding switch to Stompbox mode. In this mode, the FSM-432 MK III's buttons serve to switch channels directly rather than select presets. They also let you and deactivate Modulation effects, Delay and Boost independently at the touch of a button. In this mode, the connected amp works just like a conventional setup with an amp and outboard pedals and stompboxes.
The four buttons A, B, C, D are now assigned to the amp's four Clean, Crunch, Lead and Ultra channels. The amp remembers the Gain, Volume, Bass, Mid, Treble, Sagging, Resonance and Presence settings automatically for every channel, so you don't have to store them manually. It does this in Stompbox mode only. This mode is independent of Preset mode, changes made here will not erase or overwrite any of its presets.
Heads up: I however, you can store your settings even in Stompbox mode. Simply press and hold Store for more than three seconds, and the amp will store the current settings to the preset most recently selected in Preset mode before you switched over to Stompbox mode. You can easily select a new memory slot if you do not wish to overwrite the most recently selected preset. To do so, slide the Mode switch over to Preset mode, briefly press the Store button, and then select a memory slot using the Up/Down buttons and the preset A, B, C, or D buttons.
The onboard effects, FX loop and Noise Gate are global control features in Stompbox Mode. In other words, their settings apply to all channels. You can switch Modulation FX, Delay and Boost on and off separately using the Mod, Delay and Boost buttons. You can also adjust the Reverb via an added footswitch or pedal connected to one of the Controller inputs on Black Spirit 200 Floor. Read section 7.4 to learn more.
Heads up: Generally speaking, we recommend using Stompbox mode when you're working with a few basic sounds and just want to switch channels on the fly. Preset mode is the better option when you're working with a fixed set list and want to program the various sounds in a certain order. But what if you want to have it both ways – that is, the Stompbox mode's direct switching options while the amp is in Preset mode? Then simply connect additional footswitches to the Controller inputs (see also section 7.4).
3 Direct 7 mode:
In Direct 7 mode, you can assign one preset to each of the seven buttons on the built-in MIDI board to access seven presets directly without having to change banks. You do not need to program and save new presets to this end. Simple assign your favorite presets or the main presets for the next
gig to the seven buttons. First, select the desired preset in Preset mode, select Direct 7 mode, and then press and hold one of the seven buttons for two seconds. This assigns the preset to that button.
5.2 Programming presets
1 Preset mode:
Programming a preset is simple. Once you dial in the sound you want to hear, the Store button lets you save the settings for every knob and switch apart from the Master Volume knob in a preset. This is pretty m playing an amp with 128 channels, each with its own Gain, Volume, EQ and even effects settings.
Storing settings by overwriting the currently selected preset
An easy way to store edited settings is to simply overwrite the most recently selected preset. To do this, press and hold the Store button for about two seconds until its light flashes briefly and then extinguishes. Release the Store button, and your settings will be stored.
Storing settings by selecting a new memory slot
If you do not wish to overwrite the current preset, you can instead select a new memory slot by pressing the Store button once to activate it. The Store LED lights up to indicate that Black Spirit 200 Floor is primed. Now you have to tell the amp where to save the current settings. Use the Up/Down buttons to select a MIDI bank number from 1 to 32; the bank number indicator on the display will blink. Then activate one of the four A, B, C or D preset buttons. The display will stop flashing, the Store button LED will extinguish, and the preset is saved to the selected memory slot.
Heads up: In Preset mode, when you edit presets that you have also assigned to Direct 7 mode, these changes will be audible in both Preset and Direct 7 modes, and vice versa.
Let's say you assign preset 12 B of bank 12 – a clean sound with reverb – to button 1 in Direct 7 mode. You later decide to dial back the reverb amount in Preset 12 B and save your changes in Preset mode. In that case, your edit will affect the preset assigned to position 1 in Direct 7 mode so it ends up with less reverb.
2 Stompbox mode:
In Stompbox mode, the amp automatically remembers channel settings without you having to save them. The effects and Red Box settings are global, meaning that they apply everywhere.
3 Direct 7 mode:
You can also save changes in Direct 7 mode without having to switch to Preset mode. Simply press and hold the Store button to this end.
Heads up: If you edit a preset in Direct 7 mode, these changes will also affect that preset in Preset mode.
6 Bluetooth®
Black Spirit 200 Floor features Bluetooth to stream audio and connect to the remote app. See section 2.2 for more on this. The amp pairs with just one device at a time, so you can't connect a second audio streaming device when you're using the app. However, you can stream audio and remote control Black Spirit 200 Floor simultaneously from the same device. Use the analog Aux In jack if you wish to patch in audio signals from a device other than the one paired via Bluetooth.
Heads up: You have to reset Bluetooth to pair the amp with a new device. If the Bluetooth connection to the app drops out, close the app and relaunch it.
The LED next to the Bluetooth icon indicates the status of the Bluetooth connection.

1 Bluetooth Status LED:
- An extinguished LED means Bluetooth is deactivated.
- A slowly flashing LED means Black Spirit 200 Floor is scanning for devices.
- A steadily illuminated LED up means Black Spirit 200 Floor is paired with a mobile device.
- A rapidly flashing LED means the connection dropped out.
2 Activating/connecting: Press and hold Boost for three seconds to activate Bluetooth. The Bluetooth LED will start flashing slowly as Black Spirit 200 Floor scans for mobile devices. Be sure to enable Bluetooth on the target device. Black Spirit 200 Floor will show up on the list of Bluetooth devices alongside your particular amp's four-digit ID. Select "Hughes & Kettner Black Spirit XXXX." The amp's Bluetooth LED stops flashing and remains on when the two devices pair up.
3 Disconnecting/deactivating Bluetooth: Press and hold Boost until the Bluetooth LED extinguishes to deactivate Bluetooth.
4 Connecting to a new device: Black Spirit 200 Floor remembers the most recently connected mobile device. It starts scanning and connecting automatically when you power the amp up or enable Bluetooth. This prevents it from inadvertently connecting with other devices and ensures only your mobile device can stream audio or control the amp remotely. Here's how to pair it with another device:
- Disable Bluetooth on the most recently connected device or switch it off.
- Enable Bluetooth on the amp. The LED will start flashing slowly.
- Press and hold Boost for seven seconds until the Bluetooth LED flashes rapidly five times and then extinguishes. Press and hold Boost again for three seconds. The LED will again start flashing slowly as the amp scans for and finds the new device.
- Enable Bluetooth on your new device and select the amp. The two should now pair up.
Heads up: A factory reset also resets Bluetooth, so you will have to reconnect the amp.
5 Bluetooth audio streaming: You can stream audio to your Black Spirit 200 Floor to play along to your favorite songs. The Aux In signal is routed in full-fledged stereo quality to the Phones/Line output, and in mono to the Speaker Out when it is set to Fullrange Cab (see section 4.1 to learn more). This lets you connect your home stereo system to the Phones out. You can even plug straight into a passive PA speaker to jam with any track that strikes your fancy – no outboard mixer required.
7 MIDI
If you wish to control Black Spirit 200 Floor via MIDI, the controller sending MIDI commands and the amp receiving these commands have to be on the same MIDI channel. The amp ships with MIDI channel 1 and Omni On activated. If Black Spirit 200 Floor does not respond properly to program change messages, change the MIDI channel setting.
7.1 Setting MIDI channels and switching Omni On/Off
Press and hold FX Access and FX Loop simultaneously for three seconds. The Store button will light up. This assigns special programming functions to the following LEDs and buttons:
- Boost lights up to indicate Black Spirit 200 Floor is configured to receive incoming program changes via all MIDI channels. Omni On is the default. If the LED does not light up, the amp receives messages via the selected channel only (Omni Off). Simply press the Boost button to switch Omni modes.
- FX Loop now serves as a +1/up button, while FX Access now serves as a -1/down button. Use these buttons to change the MIDI channel.
- When configuring MIDI channels, the four Channel LEDs serve to indicate the MIDI channels. Consult the table below for the MIDI channel assignments. They show what in tech-speak is called binary code:
| MIDI Channel | Clean Crunch | Lead Ultra | ||
| 1 = | ○ | ○ | ○ | ○ |
| 2 = | ○ | ○ | ○ | ● |
| 3 = | ○ | ○ | ● | ○ |
| 4 = | ○ | ○ | ● | ● |
| 5 = | ○ | ● | ○ | ○ |
| 6 = | ○ | ● | ○ | ● |
| 7 = | ○ | ● | ● | ○ |
| 8 = | ○ | ● | ● | ● |
| 9 = | ● | ○ | ○ | ○ |
| 10 = | ● | ○ | ○ | ● |
| 11 = | ● | ○ | ● | ○ |
| 12 = | ● | ○ | ● | ● |
| 13 = | ● | ● | ○ | ○ |
| 14 = | ● | ● | ○ | ● |
| 15 = | ● | ● | ● | ○ |
| 16 = | ● | ● | ● | ● |
Press and hold the Store button for three seconds to save the settings and quit MIDI setup mode. The amp is now back in normal operating mode.
7.2 Global Settings
If you press the Store and FX Loop buttons simultaneously for three seconds, the Store button will start flashing. The following LEDs and buttons on the amp will then serve special programming purposes:
- FX Access: This indicates the status of Global EQ mode. The button lights up when Global EQ mode is active. To deactivate it, press the FX Access button again.
- FX Loop: This indicates the status of Global Cabinet Type mode. The button lights up when Global Cabinet Type mode is active. To deactivate it, press FX Loop again.
Press and hold the Store button for three seconds to save your settings and quit Global Settings mode. The amp is now back in normal operating mode.
7.3 MIDI implementation chart / controller list
In addition to controlling all switching functions via MIDI program changes, you can also change the parameters of every editable function of the amp in real time via MIDI control changes. The following chart shows the editable functions and the corresponding controller numbers:
| Controller number | Function |
| 1 Modulation Intensity | |
| 4 | Delay Time, 128 steps, 51 ms to 1360 ms |
| 7 | V o l u m |
| 9 Mute On/Off. | Mute remains on until you switch channels, adjust the volume, or shut down and power up the amp. |
| 12 | Mod FX Type |
| 20 | Gain (soft) |
| 21 | Bass |
| 22 | Mid |
| 23 | Treble |
| 24 | Resonance |
| 25 | Presence |
| 26 | Modulation Speed (always adjusts the active modulation effect) |
| 27 | Delay Feedback |
| 28 | Delay Volume |
| 29 | Reverb Volume |
| 31 | Channel Switching (4 sectors) |
| 52 | Mod FX On/Off |
| 53 | Delay On/Off |
| 54 | Reverb On/Off |
| 55 | FX Loop On/Off |
| 56 | Gain (hard) |
| 57 | Volume (hard) |
| 58 | Cabinet Type (8 sectors) |
| 59 | Sagging (8 sectors) |
| 62 | Noise Gate Sensitivity |
| 63 | Noise Gate On/Off |
| 64 | Boost On/Off |
7.4 Assigning a remote controlled function (controller number) to the Control 1 and Control 2 inputs
You can assign different controller numbers to the Control 1 and 2 ports and use connected footswitches or expression pedals to adjust settings in real time. See the MIDI implementation chart/controller list above and the assigned functions for more on this. As you can gather from this table, controller number 007 adjusts volume, preferably via an expression pedal. A footswitch can serve to switch Boost on and off via controller number 064.
Setting a MIDI value to 0 by switching a connected footswitch to the off position or moving an expression pedal to the heel-down position is the same thing as turning a knob to the far left or setting a button to the off position. Setting a MIDI value to 127 by switching a connected footswitch to the on position or flooring an expression pedal to put it in the toe-down position and is the same thing as turning a knob to the far right or setting a button on the amp to the on position. There is one exception to this rule:
The volume level stored with the preset always determines the volume control range's upper limit. Let's say you stored a volume level with the knob set to the 12 o'clock or center position. In that case, you will only be able to adjust the volume up to that center-position level. The idea behind this is that when playing live, this lets you adjust the volume of a preset just like you would with a conventional volume pedal.
Heads up: The amp ignores the expression pedal's position when you switch to another preset. For example, if you give the expression pedal a nudge to back off the volume level and then call up another preset, the amp's volume will jump to the level stored in the preset. If you wish to remote control the overall volume across all presets Black Spirit 200 Floor – in other words, if you want to control the Master knob from afar – we recommended inserting an analog, low-impedance volume pedal into the FX loop.
- Control 1: To access Edit mode, press and hold the Tap and D buttons simultaneously until the display shows the controller number and the dot behind the second digit starts flashing. You can now change the controller numbers using the Up/Down buttons. Store the selected controller number by pressing D. The dot stops flashing, and the amp returns to normal mode.
- Control 2: Press and hold Tap and C until the display shows the controller number and the dot behind the first digit starts flashing, then release the buttons. Change the controller number just as you would for Control 1. Store and quit Edit mode by pressing the C button.

7.5 Factory reset
A factory reset is a seldom-needed feature. Nonetheless, please read these instructions carefully to ensure you don't accidentally delete your presets. You can perform a factory reset by doing the following: Press and hold both Store and FX Access for three seconds while switching the amp on. Both buttons will flash to indicate the factory reset. Wait until the channel LEDs stops flashing, at which point the amp will return to normal operating mode. You will have to re-connect Bluetooth after a factory reset. See chapter 6 for more on this.
Caution: Please note that this procedure is a last-resort option. It will reset all settings, including the presets and the basic MIDI configuration.
8 Technical Data
Black Spirit 200 Floor
| Max. power consumption 300 W | |
| Mains input voltage 100 - 240 V, 50 - 60 Hz | |
| Mains voltage tolerance range +/-10% | |
| Ambient operating temperature range 0° to +35°C | |
| Mains fuse (internal) T 4 A (not user serviceable) | |
| Input jack 6.3 mm (1/4"), unbalanced, 1 MOhms | |
| Sensitivity (Clean, w/o Boost, all knobs at 12 o'clock, Master maxed) | -16 dBV |
| Max. input level (without Boost) 0 dBV | |
| FX Send jack 6.3 mm (1/4"), unbalanced, 220 Ohms | |
| Nominal level (Clean, w/o Boost, all knobs at 12 o'clock) | -10 dBV |
| Max. Level +5 dBV | |
| FX Return jack 6.3 mm (1/4"), unbalanced, 20 kOhms | |
| Sensitivity (Clean, w/o Boost, all knobs at 12 o'clock) | +1 dBV |
| Sensitivity (Clean, w/o Boost, all knobs at 12 o'clock, Master maxed) | -13 dBV |
| Max. input level +7 dBV | |
| Aux In mini jack 3.5 mm stereo, 20 kOhms | |
| Sensitivity (Master at 12 o'clock) | 0 dBV |
| Sensitivity (Master maxed) | -16 dBV |
| Max. input level +6 dBV | |
| Monitor In | XLR, balanced, 10 kOhm |
| Sensitivity (Master and Level knobs at 12 o'clock) | 0 dBV |
| Sensitivity (Master and Level knobs maxed) | -20 dBV |
| Max. input (+/- Level all the way down) | +30 dB |
| Phones/Line jack | 6.3 mm (1/4") stereo, 50 Ohms |
| Nominal level (Clean, w/o Boost, all knobs at 12 o'clock) | -9 dBV |
| Nominal level (Clean, w/o Boost, all knobs at 12 o'clock, Master maxed) | +6 dBV |
| Max. level | +13 dBV |
| Red Box AE+ Out | XLR, balanced, 1240 Ohms |
| Max. level | +10 dBV |
| Speaker Out jack | 6.3 mm (1/4"), bridged mode, mono, 8-16 Ohms |
| Power output | 200 watts |
| MIDI In | 7-pin, 20 V DC phantom power (150 mA), 5-pin compatible |
| MIDI Out/Thru | 5-pin |
| Dimensions (W x H x D) | 450 x 70 x 255 mm |
| Weight | 4.1 kg / 8.9 lbs |
Apple, the Apple logo and iPad are trademarks of Apple Inc., registered in the U.S. and other countries. App Store is a service mark of Apple Inc.
Bluetooth
The Bluetooth® word mark and logos are registered trademarks owned by Bluetooth SIG, Inc. and any use of such marks by Stamer Musikanlagen GmbH is under license.
All mentioned trademarks and copyrights belong to their respective owners.
For the USA:
This device complies with part 15 of the FCC Rules. Operation is subject to the following two conditions: (1) This device may not cause harmful interference, and (2) this device must accept any interference received, including interference that may cause undesired operation.
This equipment complies with FCC radiation exposure limits set forth for an uncontrolled environment. End users must follow the specific operating instructions for satisfying RF exposure compliance. This transmitter meets both portable and mobile limits as demonstrated in the RF Exposure Analysis. This transmitter must not be co-located or operating in conjunction with any other antenna or transmitter except in accordance with FCC multi-transmitter product procedures.
For Canada:
This device complies with Industry Canada licence-exempt RSS standard(s). Operation is subject to the following two conditions: (1) this device may not cause interference, and (2) this device must accept any interference, including interference that may cause undesired operation of the device.
Under Industry Canada regulations, this radio transmitter may only operate using an antenna of a type and maximum (or lesser) gain approved for the transmitter by Industry Canada. To reduce potential radio interference to other users, the antenna type and its gain should be so chosen that the equivalent isotropically radiated power (e.i.r.p.) is not more than that necessary for successful communication.
| No. Cabinet Types | |
| 1 1x12" Modern Thiele-Port | |
| 2 | 2x12" Modern Front-Port |
| 3 2x12" Vintage Open Back | |
| 4 4x10" Alnico Open Back | |
| 5 4x12" Vintage Cab | |
| 6 4x12" British Cab | |
| 7 4x12" Modern Cab | |
| 8 4x12" American Cab | |
| MIDI-Kanal | Clean | Crunch | Lead | Ultra |
| 1 = | ○ | ○ | ○ | ○ |
| 2 = | ○ | ○ | ○ | ● |
| 3 = | ○ | ○ | ● | ○ |
| 4 = | ○ | ○ | ● | ● |
| 5 = | ○ | ● | ○ | ○ |
| 6 = | ○ | ● | ○ | ● |
| 7 = | ○ | ● | ● | ○ |
| 8 = | ○ | ● | ● | ● |
| 9 = | ● | ○ | ○ | ○ |
| 10 = | ● | ○ | ○ | ● |
| 11 = | ● | ○ | ● | ○ |
| 12 = | ● | ○ | ● | ● |
| 13 = | ● | ● | ○ | ○ |
| 14 = | ● | ● | ○ | ● |
| 15 = | ● | ● | ● | ○ |
| 16 = | ● | ● | ● | ● |

| Stompbox | CLEAN | CRUNCH | LEAD | ULTRA | MOD | DLY | BOOST |
| Direct 7 | 1 | 2 | 3 | 4 | 5 | 6 | 7 |
| Canale MIDI | Clean Crunch | Lead Ultra | ||
| 1 = | ○ | ○ | ○ | ○ |
| 2 = | ○ | ○ | ○ | ● |
| 3 = | ○ | ○ | ● | ○ |
| 4 = | ○ | ○ | ● | ● |
| 5 = | ○ | ● | ○ | ○ |
| 6 = | ○ | ● | ○ | ● |
| 7 = | ○ | ● | ● | ○ |
| 8 = | ○ | ● | ● | ● |
| 9 = | ● | ○ | ○ | ○ |
| 10 = | ● | ○ | ○ | ● |
| 11 = | ● | ○ | ● | ○ |
| 12 = | ● | ○ | ● | ● |
| 13 = | ● | ● | ○ | ○ |
| 14 = | ● | ● | ○ | ● |
| 15 = | ● | ● | ● | ○ |
| 16 = | ● | ● | ● | ● |
| Canal MIDI Clean Crunch Lead Ultra | ||||
| 1 = | ○ | ○ | ○ | ○ |
| 2 = | ○ | ○ | ○ | ● |
| 3 = | ○ | ○ | ● | ○ |
| 4 = | ○ | ○ | ● | ● |
| 5 = | ○ | ● | ○ | ○ |
| 6 = | ○ | ● | ○ | ● |
| 7 = | ○ | ● | ● | ○ |
| 8 = | ○ | ● | ● | ● |
| 9 = | ● | ○ | ○ | ○ |
| 10 = | ● | ○ | ○ | ● |
| 11 = | ● | ○ | ● | ○ |
| 12 = | ● | ○ | ● | ● |
| 13 = | ● | ● | ○ | ○ |
| 14 = | ● | ● | ○ | ● |
| 15 = | ● | ● | ● | ○ |
| 16 = | ● | ● | ● | ● |
23 SAGGING
Red Box Mic/Line
⑧ PRE LOOP 1 + 2
| MIDIチャンネル | Clean | Crunch | Lead | Ultra |
| 1 = | ○ | ○ | ○ | ○ |
| 2 = | ○ | ○ | ○ | ● |
| 3 = | ○ | ○ | ● | ○ |
| 4 = | ○ | ○ | ● | ● |
| 5 = | ○ | ● | ○ | ○ |
| 6 = | ○ | ● | ○ | ● |
| 7 = | ○ | ● | ● | ○ |
| 8 = | ○ | ● | ● | ● |
| 9 = | ● | ○ | ○ | ○ |
| 10 = | ● | ○ | ○ | ● |
| 11 = | ● | ○ | ● | ○ |
| 12 = | ● | ○ | ● | ● |
| 13 = | ● | ● | ○ | ○ |
| 14 = | ● | ● | ○ | ● |
| 15 = | ● | ● | ● | ○ |
| 16 = | ● | ● | ● | ● |
Magdeburger Str.8, 66606 St. Wendel, Germany

② Gain
22 Presence
| MIDI 通道 Clean Crunch Lead Ultra | ||||
| 1 = | ○ | ○ | ○ | ○ |
| 2 = | ○ | ○ | ○ | ● |
| 3 = | ○ | ○ | ● | ○ |
| 4 = | ○ | ○ | ● | ● |
| 5 = | ○ | ● | ○ | ○ |
| 6 = | ○ | ● | ○ | ● |
| 7 = | ○ | ● | ● | ○ |
| 8 = | ○ | ● | ● | ● |
| 9 = | ● | ○ | ○ | ○ |
| 10 = | ● | ○ | ○ | ● |
| 11 = | ● | ○ | ● | ○ |
| 12 = | ● | ○ | ● | ● |
| 13 = | ● | ● | ○ | ○ |
| 14 = | ● | ● | ○ | ● |
| 15 = | ● | ● | ● | ○ |
| 16 = | ● | ● | ● | ● |
Example 1: Standard live setup with guitar cabinet
flowchart
graph TD
    A["Guitar cabinet"] --> B["Speaker OUT"]
    B --> C["Extruder"]
    C --> D["Backhaul"]
    D --> E["Remote App"]
    E --> F["Output"]
    C --> G["Di Out"]
    G --> H["Stombox 1"]
    H --> I["Left"]
    C --> J["Stombox 2"]
    J --> K["Output"]
    style A fill:#f9f,stroke:#333
    style B fill:#ccf,stroke:#333
    style C fill:#cfc,stroke:#333
    style D fill:#fcc,stroke:#333
    style E fill:#ffc,stroke:#333
    style F fill:#cff,stroke:#333
    style G fill:#ffc,stroke:#333
    style H fill:#cfc,stroke:#333
    style I fill:#fcc,stroke:#333
Example 2: Live mono FRFR setup with passive speaker for monitoring
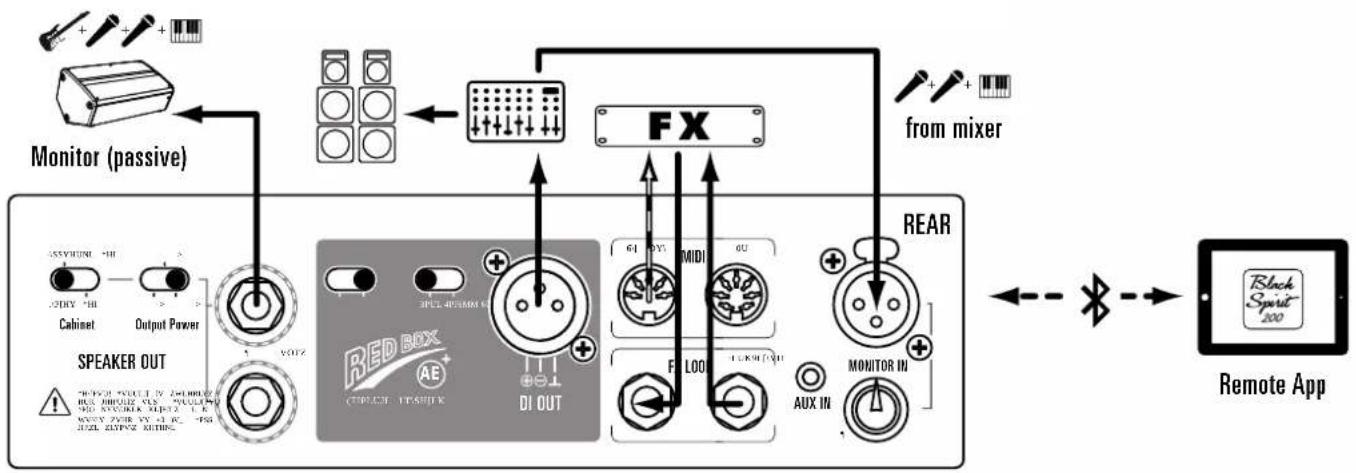
flowchart
graph TD
    A["Speaker Out"] --> B["Cabinet"]
    A --> C["Output Power"]
    A --> D["Monitor (passive)"]
    D --> E["FX"]
    E --> F["REAR"]
    F --> G["Remote App"]
    G --> H["Black Sport 200"]
Example 3: Live stereo FRFR setup with powered speaker for monitoring
flowchart
graph TD
    A["Speaker OUT"] --> B["Full Range Cab"]
    B --> C["Cabinet"]
    C --> D["20 W"]
    D --> E["Output Power 2 W 200 W"]
    E --> F["8 - 16 ohms"]
    F --> G["Line: Mid Off On"]
    G --> H["DI OUT"]
    H --> I["Out/bru"]
    H --> J["MIDI In"]
    H --> K["PK Loco SendReturn"]
    K --> L["AUX IN"]
    L --> M["MONITOR IN"]
    M --> N["FRONT"]
    N --> O["MONITOR (powered)"]
    O --> P["PHONES/LINE"]
    P --> Q["FRONT"]
    Q --> R["FRONT"]
    R --> S["FRONT"]
    S --> T["FRONT"]
    T --> U["FRONT"]
    U --> V["FRONT"]
    V --> W["FRONT"]
    W --> X["FRONT"]
    X --> Y["FRONT"]
    Y --> Z["FRONT"]
    Z --> AA["FRONT"]
    AA --> AB["FRONT"]
    AB --> AC["FRONT"]
    AC --> AD["FRONT"]
    AD --> AE["FRONT"]
Example 4: Basic home setup for jamming to play-alongs
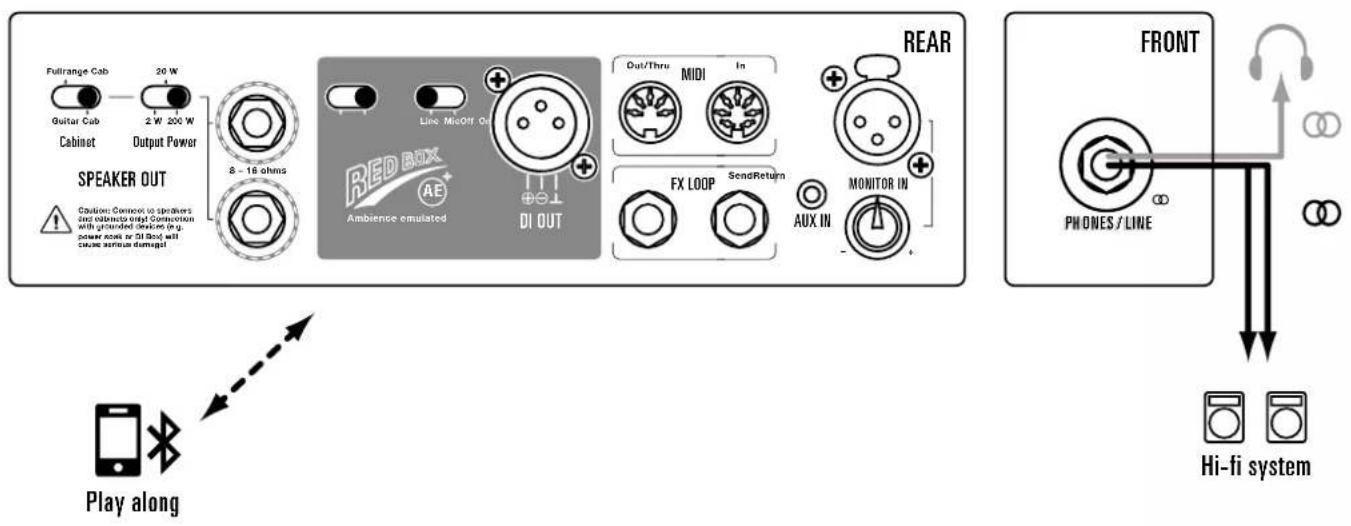
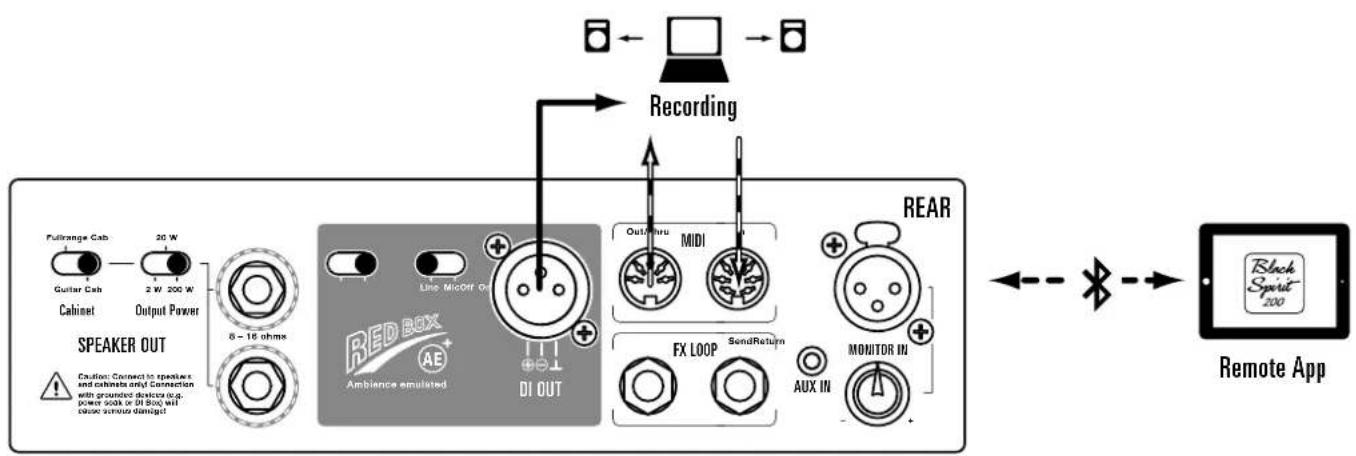
Example 5: Recording setup
flowchart
graph TD
    A["Cable"] --> B["Wireless"]
    B --> C["MIDI"]
    style A fill:#f9f,stroke:#333
    style B fill:#ccf,stroke:#333
    style C fill:#cfc,stroke:#333
flowchart
graph LR
    A["SPEAKER OUT"] --> B["Fullrange Cab"]
    B --> C["Cabinet"]
    C --> D["20 W"]
    D --> E["Output Power"]
    E --> F["8-16 ohms"]
    F --> G["Line Micoff On"]
    G --> H["DI OUT"]
    H --> I["Out/Inu"]
    I --> J["MIDI"]
    J --> K["FX LOOP"]
    K --> L["SendReturn"]
    L --> M["AUX IN"]
    M --> N["MONITOR IN"]
    N --> O["REAR"]
    O --> P["Remote App"]
    P --> Q["Black Spirit 200"]
Hughes & Kettner
Postfach 1509
66595 St. Wendel
Germany
Tel: +49 (0) 68 51 - 905 0
Fax: +49 (0) 68 51 - 905 103
International Inquiries:
Fax: +49 - 68 51 - 905 200
hkinternational@hughes-and-kettner.com
www.hughes-and-kettner.com
facebook.com/hughesandkettner
Copyright 09/2019 by Music & Sales GmbH.
Subject to change without notice.