ERA 2 - Guitar amp HUGHES & KETTNER - Free user manual and instructions
Find the device manual for free ERA 2 HUGHES & KETTNER in PDF.

| Brand | Hughes & Kettner |
| Model | ERA 2 |
| Product type | Guitar and vocal amplifier |
| Dimensions (W x H x D) | 350 x 475 x 290 mm |
| Weight | 14.45 kg (black) / 14.10 kg (wood) |
| Mains power | 220-240 V AC or 100-120 V AC, ±10% |
| Power consumption | 0.6 A (220-240 V) / 1 A (100-120 V) |
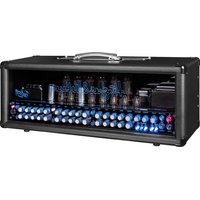
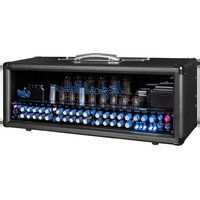
| Output power | 400 W (class D) |
| Speakers | 2x 8" woofers/midrange + 1x 1" tweeter, 2-way, sealed enclosure |
| Frequency response | 70 Hz - 15 kHz (-3 dB) |
| Input channels | 2 combo inputs (jack/XLR) + 1 CH3 input (mini-jack) + 1 CH4/Loop input (jack) |
| Phantom power | +9 V (instrument) / +24 V (micro) |
| Equalization | 2 modes (EQ1/EQ2), bass, mid, treble adjustable |
| Built-in effects | 16 programs: reverbs, delays, chorus, flanger and combinations |
| Outputs | DI Out (XLR), Line Out (jack), Optical Out (Toslink), Headphone (jack), Tuner (jack) |
| Special functions | Shape, -10 dB, Mute, Auto Sleep, footswitch input |
| Cleaning | Dry cloth only |
| Protection class | Class 1 (grounded) |
| Repairability | Have it serviced by a qualified specialist |
| Included accessories | Power cable, user manual |
Frequently Asked Questions - ERA 2 HUGHES & KETTNER
User questions about ERA 2 HUGHES & KETTNER
0 question about this device. Answer the ones you know or ask your own.
Ask a new question about this device
Download the instructions for your Guitar amp in PDF format for free! Find your manual ERA 2 - HUGHES & KETTNER and take your electronic device back in hand. On this page are published all the documents necessary for the use of your device. ERA 2 by HUGHES & KETTNER.
USER MANUAL ERA 2 HUGHES & KETTNER
Hughes & Kettner ACOUSTICS
era
SERIES

Manual 1.2
era 1
era 2
Important Safety Instructions! Read before connecting!
This product has been built by the manufacturer in accordance with IEC 60065 and left the factory in safe working order. To maintain this condition and ensure non-risk operation, the user must follow the advice and warning comments found in the operating instructions. The unit conforms to Protection Class 1 (protectively earthed). If this product shall be used in vehicles, ships or aircraft or at altitudes exceeding 2000 m above sea level, take care of the relevant safety regulations which may exceed the IEC 60065 requirements.
WARNING: To prevent the risk of fire and shock hazard, do not expose this appliance to moisture or rain. Do not open case – no user serviceable parts inside. Refer service to qualified service personnel.

This symbol, wherever it appears, alerts you to presence of uninsulated dangerous voltage inside closure – voltage that may be sufficient to substitute a risk of shock.

This symbol, wherever it appears, alerts you to presence of externally accessible hazardous e. External wiring connected to any terminal d with this symbol must be a “ready made complying with the manufacturers mendations, or must be a wiring installed by cted persons only.

This symbol, wherever it appears, alerts you to want operating and maintenance instructions in companying literature. Read the manual.

This symbol, wherever it appears, tells you: are! Hot surface! To prevent burns you must much.

All electrical and electronic products including series should be disposed of separately from the principal waste stream via designated collection series appointed by the government or the local authorities.

Read these instructions. Keep these actions. Follow all warnings and instructions on the product and in this manual.
- Do not use this product near water. Do not place the product near water, baths, wash basins, kitchen sinks, wet areas, swimming pools or damp rooms.
- Do not place objects containing liquid on the product – vases, glasses, bottles etc.
- Clean only with dry cloth.
- Do not remove any covers or sections of the housing.
- The set operating voltage of the product must match the local mains supply voltage. If you are not sure of the type of power available consult your dealer or local power company.
-
To reduce the risk of electrical shock, the grounding of this product must be maintained. Use only the power supply cord provided with this product, and maintain the function of the center (grounding) pin of the mains connection at any time. Do not defeat the safety purpose of the polarized or grounding-type plug.
-
Do not defeat the safety purpose of the polarized or grounding-type plug. A polarized plug has two blades with one wider than the other. A grounding type plug has two blades and a third grounding prong. The wide blade or the third prong are provided for your safety. If the provided plug does not fit into your outlet, consult an electrician for replacement of the obsolete outlet.
- Protect the power cord from being walked on or pinched particularly at plugs, convenience receptacles, and the point where they exit from the device! Power supply cords should always be handled carefully. Periodically check cords for cuts or sign of stress, especially at the plug and the point where the cord exits the device.
- Never use a damaged power cord.
- Unplug this product during lightning storms or when unused for long periods of time.
- This product can be fully disconnected from mains only by pulling the mains plug at the unit or the wall socket. The product must be placed in such a way at any time, that disconnecting from mains is easily possible.
- Fuses: Replace with IEC127 (5x20mm) type and rated fuse only! It is prohibited to use "patched fuses" or to short the fuse-holder. Replacing any kind of fuses must only be carried out by qualified service personal.
- Refer all servicing to qualified service personnel. Servicing is required when the unit has been damaged in any way, such as:
- When the power cord or plug is damaged or frayed.
- If liquid has been spilled or objects have fallen into the product.
- If the product has been exposed to rain or moisture.
- If the product does not operate normally when the operating instructions are followed.
- If the product has been dropped or the cabinet has been damaged.
- Do not connect external speakers to this product with an impedance lower than the rated impedance given on the product or in this manual. Use only cables with sufficient cross section according to the local safety regulations.
- Keep away from direct sunlight.
- Do not install near heat sources such as radiators, heat registers, stoves or other devices that produce heat.
- This apparatus is for moderate climates areas use, not suitable for use in tropical climates countries.
- Do not block any ventilation openings. Install in accordance with manufacturer's instructions. This product must not be placed in a built-in installation such as a rack unless proper ventilation is provided.
- Always allow a cold device to warm up to ambient temperature, when being moved into a room. Condensation can form inside it and damage the product, when being used without warming up.
- Do not place naked flame sources, such as lighted candles on the product.
- The device must be positioned at least 20 cm/8" away from walls with free air space inbetween, and there must be free air space of at least 50 cm / 20" immediately above the unit within which no object(s) may be placed or positioned.
-
Use only with the cart, stand, tripod, bracket or table specified by the manufacturer or sold with the product. When a cart is used, use caution when moving the cart/product combination to avoid injury from tip-over.
-
Use only accessories recommended by the manufacturer, this applies for all kind of accessories, for example protective covers, transport bags, stands, wall or ceiling mounting equipment. In case of attaching any kind of accessories to the product, always follow the instructions for use, provided by the manufacturer. Never use fixing points on the product other than specified by the manufacturer.
- This appliance is NOT suitable to be used by any person or persons (including children) with limited physical, sensorial or mental ability, or by persons with insufficient experience and/or knowledge to operate such an appliance. Children under 4 years of age must be kept away from this appliance at all times.
- Never push objects of any kind into this product through cabinet slots as they may touch dangerous voltage points or short out parts that could result in risk of fire or electric shock.
- This product is capable of delivering sound pressure levels in excess of 90 dB, which may cause permanent hearing damage! Exposure to extremely high noise levels may cause a permanent hearing loss. Wear hearing protection if continuously exposed to such high levels.
- The manufacturer only guarantees the safety, reliability and efficiency of this product if:
- Assembly, extension, re-adjustment, modifications or repairs are carried out by the manufacturer or by persons authorized to do so.
- The electrical installation of the relevant area complies with the requirements of IEC (ANSI) specifications.
- The unit is used in accordance with the operating instructions.
- The grounding of the center pin of the mains plug is maintained to reduce the risk of shock.
Things to do before operating the amp
- Please read these instructions carefully, particularly the notes on safety, before operating the amp.
- The manufacturer disclaims any liability on responsibility whatsoever for any damage or defect to this and other devices resulting from misuse.
- Before you plug this amp into a mains power outlet, make sure its Power and Standby switches are off and that the voltage rating indicated on its rear panel matches your local mains current.
- A word of warning before you fire up your era 1/era2: It's loud, and high volume levels can cause hearing damage. To avoid very loud and unwelcome surprises, make a habit of backing the Volume knob of the guitar connected to the era 1/era2: all the way down before switching on the amp!
era
HUGHES & KETTNER ACOUSTICS
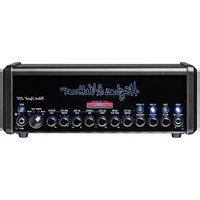
1 Connections and Control Features
The era1/era2 features two identical independent channels (CH 1 and CH 2) for instruments and vocals, a third input (CH 3) for outboard signal sources such as an MP3 player, and a fourth input (CH 4) for external effects, a mixing console or pre-amped instruments.
It also provides a versatile DI Out, an adjustable Line Out, a Channel Out (via FX Send), a headphones output (Phones) and an Optical gives you an arsenal of very practical outputs that will get the job done right for live performances, recording sessions and any other professional gig.
Heads up: To avoid loud surprises, make a habit of turning the Volume knob in the Master section all the way down—that is, as far left as it will go—before powering up the amp.
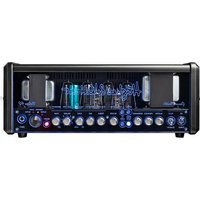
1.1 Top Panel
CH 1 / CH 2
The following descriptions of features 1 through 11 apply to both identical channels CH 1 and CH 2.
1 Clip
This LED lights up to let you know that the incoming signal is overdriving the input stage of the given channel, CH 1 or CH 2. It's not a problem if it flashes briefly or flickers, but if it stays on for any length of time you will have to turn the Gain knob to the left to reduce the amplification doesn't solve the problem, you can reduce the gain further by pressing the -10 dB button. If both Clip LEDs light up at the same time, one of the inputs of CH 3 or CH 4 is saturated. An occasional brief flashing or flickering does not pose a problem, but if they light up continuously you will have to reduce the level at the signal's source device. Turn it down until the two Clip LEDs extinguish.
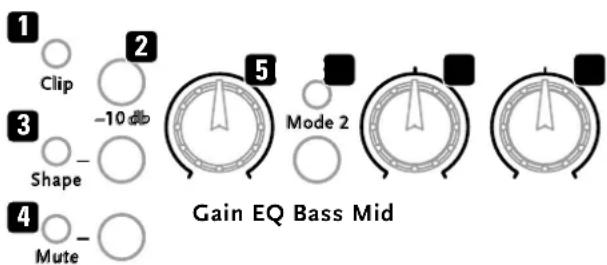
2 -10 dB
This switchable -10 dB pad serves to cut input gain. Push it when Clip lights up to tell you incoming signal is overdriving the input stage and the LED light does not extinguish when you back off the Gain knob. Button up (not pressed) = deactivated Button down (pressed) = activated
3 Shape
This button activates a pre-EQ that slightly cuts the midrange and boosts the top end to accentuate the fundamental bass and lower midrange frequencies and bring out the overtones. Try both options, with or without Shape, to see which voicing works best for you. The LED next to the button lights up when Shape is activated.
4 Mute
Push this button to silence the given channel, CH 1 or CH 2. The signal will then be routed exclusively to the Tuner output. The LED next to the button lights up when Mute is activated. If a footswitch is connected, button will not function. Muting the amp can then only be performed via the footswitch (see also 23: Footswitch).
5 Gain
This knob adjusts the input's gain level to suit the incoming instrument or mic signal.
6 EQ/Mode 2
This button selects EQ modes. This very special feature of the 1/era2 gives you two fully independent sets of tone controls called EQ Mode 1 and EQ Mode 2 with different variable frequencies for the two channels CH 1 and CH 2. The Mode 2 LED lights up when EQ Mode 2 is activated.
EQ Fundamentals
The tone controls of a conventional EQ section boost or cut fixed frequencies. That is not the case with the era 1/era2, where the Bass, Mid and Treble knobs address different frequencies as determined by the selected EQ mode. This gives you a far greater range of sound-shaping options. For example, you could use different EQs for different instruments. Learning by doing works best: Try adjusting the Bass, Mid and Treble knobs in both modes to discover which EQ voices your instrument best and feels good to you. That's what this is all about—finding the tone and response that works for you.
Note: The era1/era2 is designed to reinforce your instrument's sound so that the amplified signal sounds exactly like your instrument and no other, only louder. That unique sound is to remain intact even when you adjust the EQ. These controls are voiced so that they don't color the natural
sound of your instrument. In some cases, their effect may be more subtle than is normally the case with standard EQs.
Hands-on tips
Steel-string vs. nylon-strings acoustic guitars:
The EQ Mode 1 tone controls favor steel strings and are usually more effective at voicing the frequencies of that type of guitar. The EQ Mode 2 tone controls excel at shaping the sound of guitars with nylon strings.
Using a microphone to amplify your voice:
If you have a low voice, the EQ Mode 1 tone controls are generally the better choice for shaping its frequencies. The EQ Mode 2 tone controls tend to favor higher voices. This gives you an idea of where to start, but again, your best bet is to just try it out.
7 Bass
This knob cuts and boosts bass frequencies by + / - 10 The knob has no effect on frequency response when set to the center or 12 o'clock position.
8 Mid
This knob cuts and boosts midrange frequencies by + / - 6 dB (peak EQ). The knob has no effect on frequency response when set to the center or 12 o'clock position.
9 Treble
This knob cuts and boosts treble frequencies by +/- 10 dB (peak EQ). The knob has no effect on frequency response when set to the center or 12 o'clock position.
10 FX Preset
This rotary selector activates one of 16 effect programs below).
| No. Effect Description Variables* | |||
| 1 | Reverb Room Dark | Short reverb, heavy HF damping shorter or longer | |
| 2 | Reverb Room Bright | Short reverb, light HF damping shorter or longer | |
| 3 | Reverb Hall Warm | Medium reverb, warm HF damping | shorter or longer |
| 4 | Reverb Hall Bright | Medium reverb, slight HF damping | shorter or longer |
| 5 | Reverb Church | Long reverb, slight HF damping shorter or longer | |
| 6 | Delay Short | Single echo, slapback at 80 ms DT: 20 – 170 ms | |
| 7 | Delay Mid | Multiple repeats, 170 ms DT: 20 – 170 ms | |
| 8 | Delay Long** | Multiple repeats, 800 ms | DT: 170 – 800 ms |
| 9 | Delay + Pan Delay** | DT: 140 ms + 660 ms | DT: 140 ms + (140–660) ms |
| 10 | Delay + Reverb | DT: 170 ms, medium reverb | DT: 20 – 170 ms |
| 11 | Chorus | Rate: 0.3 Hz | Rate: 0,1 – 10 Hz |
| 12 | Chorus + Reverb | Chorus no. 11, medium reverb, reverb level 80% | Reverb level |
| 13 | Chorus + Delay | Chorus no. 11, DT 170 ms | DT: 20 – 170 ms |
| 14 | Flanger | Rate: 0.4 Hz | Rate: 0.1 – 10 Hz |
| 15 | Flanger + Reverb | Flanger no. 14; medium reverb, reverb level 80% | Reverb level |
| 16 | Flanger + Delay | Flanger no. 14; DT 170 ms | DT: 20 – 170 ms |
* These parameters may be adjusted individually, see 11: "Customizing FX presets"

Bass

Mid

Treble

FX Preset
10

FX Vol.
**Heads up: FX no. 8 and 9 cannot be used separately on channels CH 1 and CH 2, nor adjusted separately for each channel (for more on this, see "Customizing FX presets"). Changes to FX parameters here are effective across both channels, regardless of the channel in which they are made.
"DT" stands for delay time, or the time between echoes / repeats.
"HF damping" attenuates the high-frequency (HF) components in the reverb signal to take the harsh edge off and achieve a warmer, fatter tone.
"ms" is shorthand for milliseconds.
dP (peak EQ).
This knob adjusts the volume of the selected effect preset. Turn it to the far left to bypass the FX section and remove presets from the signal path.
Customizing FX presets
The era1/era2 has a hidden function that lets you adjust presets' parameters. This can even be done separately with most FX types for each channel. Here's how to adjust parameters:
- Use the FX Preset (10) selector to dial in the preset (no. 1-16) that you wish to edit in the given channel.
- Press EQ/Mode 2 for three seconds. Mode 2 LED flashes to indicate the amp is now ready for programming.
- Turn the Aux In knob to adjust the selected parameter (see the FX parameter table's last column).
(See Totore view changes, press EQ/Mode 2 for three seconds, until the Mode 2 LED lights up continuously.
5. To exit without saving changes, press EQ/Mode 2 briefly to return your amp to its standard operating mode. The Mode 2 LED will flash briefly to confirm the cancellation.
Note: Only one effects preset can be customized at a time. If the FX Preset (10) selector is moved during the programming process, this will cause any changes to be cancelled (Mode 2 LED will flash quickly).
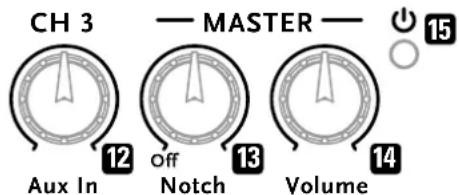
CH 3
12 Aux In
This knob adjusts the volume of the connected signal source. Section 1.2, Rear Panel CH 3/Input, explains how to connect a playback device.
MASTER
13 Notch
This knob adjusts a notch filter that lets you tame resonance, feedback and other interference frequencies by addressing and attenuating a specific target frequency. First you'll have to find the frequency that's giving you trouble by slowly turning the knob, which ranges from 40 to 180 Hz. The filter cuts that frequency as soon as you dial it in. Turn the knob to the far left to bypass the notch filter. This takes the filter out of the circuit so that it no longer affects the amp's frequency response.
14 Volume
This knob adjusts the amp's overall volume.
15 On/Off LED
This indicator lights up when the amp is on.
1.2 Rear Panel
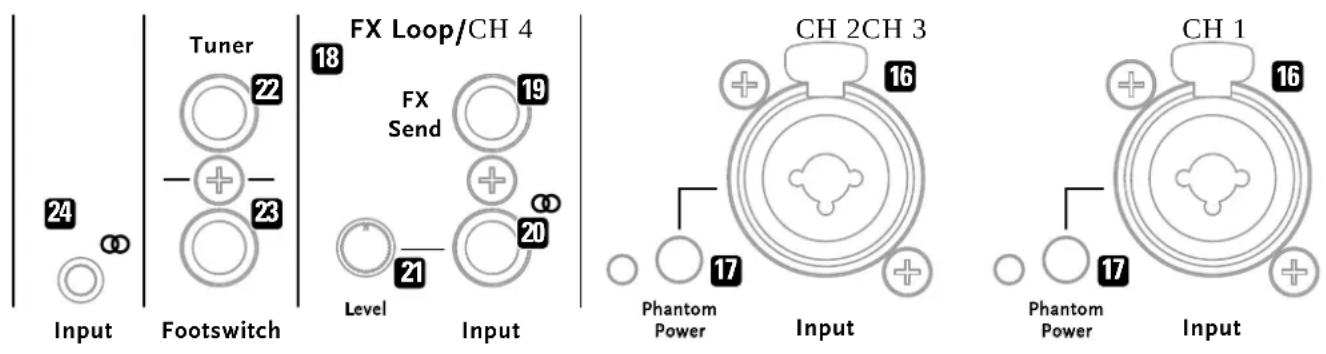
16 Input CH 1 and CH 2
These two ports are combination instrument/microphone inputs. When you plug in a 6.3 mm/1/4" instrument jack plug or an XLR mic connector, the era1/era2 automatically detects the connector type and activates a preamp designed for an instrument or microphone.
The jack is configured as an unbalanced input for instruments with passive or active pickups when you insert a cable fitted with a jack plug.
For unbalanced instrument signals, you will need a (mono or stereo) 6.3 mm/1/4" music instrument cable. Quality matters, so be sure to always use a well-made cable that does not pick up interference or otherwise degrade your sound.
The port is configured as a balanced input for dynamic and condenser microphones when you plug in a cable fitted with an XLR connector.
For balanced microphone signals, you will need an XLR microp cable. Quality matters, so be sure to always use a well-made cable that does not pick up interference or otherwise degrade your sound.
17 Phantom Power
Switch this button on to route phantom power to an instrument (9 V) or mic (24 V) that is plugged into the input and requires a power supply. The LED lights up when you do. Switch phantom power off for an instrument or mic that does not need this power supply. The LED will extinguish.
Heads up: Be sure to check if the connected mic or instrument requires and can handle phantom power. If not, it may be damaged. This is often the case with dynamic microphones made anywhere from 20 to 30 of more years ago. In case of doubt, please contact the manufacturer of the device you wish to connect!
FAQ about 24-volt phantom power:
Doesn't my condenser mic require 48 volts?
If you review the specifications of semi-pro and professional microphone preamps made by various manufacturers, you'll find 9, 12, 15, 24 and 48 volts indicated for their phantom power supply. Users can hardly be blamed if they find this confusing. Bar a few exceptions, condenser microphones will work just fine at an operating voltage between 12 and 48 volts. The mic's circuitry won't detect any difference between 24 and 48 volts, so the variance in phantom power will have no effect on its dynamic response. Whatever voltage supply you choose, know this: It is important that the phantom power supply delivers the voltage stipulated by statutory regulations. Rest assure that era series amplifiers comply with this standard.
18 FX Loop/CH 4
A parallel FX Loop. Connect FX Send (19) to the external effect device's input and Input (20) to the device's output. Alternatively, you could use the input of era 1/era2's fourth channel, CH 4, as an FX return.
19 FX Send
Use this CH 1 and CH 2 stereo 6.3 mm/1/4" output jack to address an external effect device. FX Send carries an unbalanced, line signal (post EQ and without internal effects), so this jack may also be used as a channel output, say, to route the signal to a mixing console for analog recording or the like. If you plug in a mono rather than a stereo cable, you can use FX Send as an output only for CH 1.
20 Input
Do this stereo 6.3 mm/1/4" input jack to patch in a signal from an outboard effects device (in combination with FX Send in an FX loop). This jack can also serve as a CH 4 input for other line-level signal sources, for example, a pre-amplified instrument that doesn't need EQ, a mixing console, a drum computer, and so on.
21 Level
Turn this knob to adjust the level of this section's Input (20).
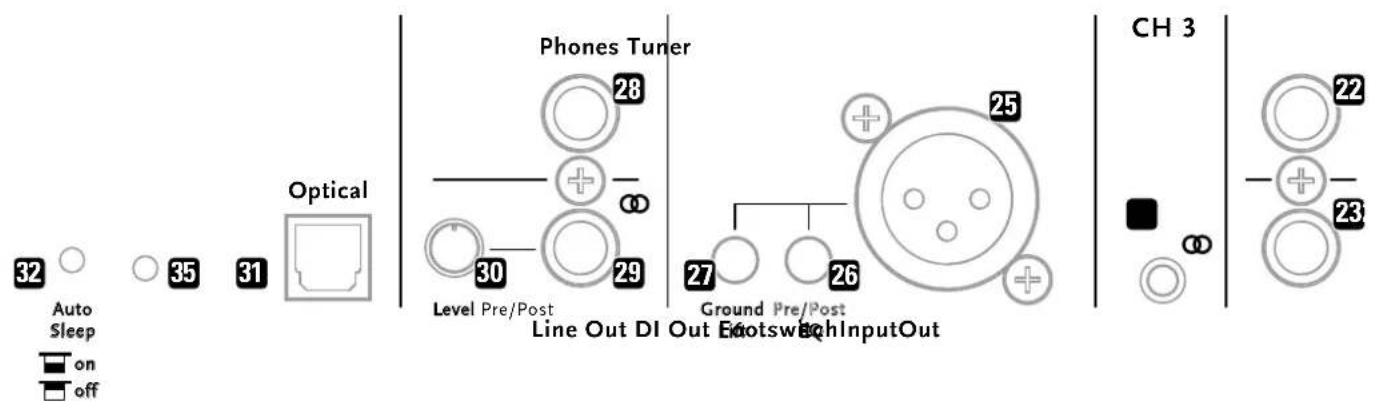
2 Tuner
If you wish to connect a tuner, use this 6.3 mm/1/4" mono jack. This bus remains active when you mute the era 1/era2.
2 Footswitch
This 6.3 mm/1/4" stereo jack accepts an optionally available two-way footswitch such as the Hughes & Kettner FS-2. The first button mutes the amp (LED 1 on the FS-2 lights up). The second button switches the onboard effects off and on (LED 2 on the FS-2 lights up when they're switched off). For more on internal effects, see section 1.1, Top Panel, FX Preset and FX Vol.
24 Input CH 3
This 3.5 mm stereo mini jack serves as the input for an external audio source such as a smartphone, MP3 player, etc.
2: DI Out
This balanced XLR output sends the CH 1 and CH 2 channels' balanced preamp signal to another destination, say, a PA's mixing signal is dry—that is, without internal effects and the FX loop/CH 4 added in—and it may be tapped before or after the EQ section. FYI: A balanced signal is less susceptible to interference when using long cables to co greater distances.
2: Pre/Post EQ
This button determines at which point in the bus the DI Out signal is tapped, before or after the tone controls (pre and thus without EQ or post and therefore with EQ).
Button up (not pressed) = before the EQ section Button down (pressed) = after the EQ section
2 Ground Lift
When activated, the Ground Lift button severs the ground connection (pin 1). This is a standard feature designed to eliminate humming or buzzing caused by ground loops. In the event of annoying hum or buzz, press this button to put a stop to it.
Button up (not pressed) = deactivated Button down (pressed) = activated
28 Phones
This 6.3 mm/1/4" stereo jack is the built-in stereo headphone amp's output. The era 1/era2's loudspeaker is muted when you plug in headphones. This output delivers the full package—a composite of the signals of CH 1 and CH 2, of a playback device connected to CH 3, of internal effects, and the FX loop/CH 4 bus. This means you can enjoy the era 1/era2's full sonic
glory isoyour Headset when you've muted the amp by plugging phones in.
29 Line Out
this 6.3 mm/1/4" stereo output jack sends the unbalanced, line-level, stereo preamp CH 1 and 2 signal to a mixing console, recording device, or the like. This is a post-EQ composite signal that includes internal effects as well as the CH 3 and FX Loop/CH 4 signals.
30 Line Out Level
Turn this knob to adjust the Line Out signal's level, independently from the Master Volume.
31 Optical Out
This optical S/PDIF Toslink audio output sends the era1/era2's master audio signal to target devices equipped with an optical Toslink input. This signal will serve you well for recording purposes. Typical target devices are computer soundcards, digital mixing consoles, audio interfaces and stereo systems.
Toslink is an electrically nonconductive optical fiber. That means no ground loops (and no hum). It is also insensitive to electrical and magnetic interference.
32 Auto Sleep
Commission Regulation (EC) no. 1275/2008 requires electronic devices to be equipped with a power-saving function that switches off the
after a specified period of non-use. That's what the era 1/era2's Auto Sleep does. Auto Sleep can be activated and deactivated using a thin, pointed object to press the recessed button next to the speaker jack.

Button up (not pressed) = deactivated
Button down (pressed) = activated
The era1/era2 ships with Auto Sleep activated, so the amp will shut down if it's left to idle continuously for around 90 minutes. If Auto Sleep shuts the amp down, you can wake it up by flipping the Power switch off and back on again.
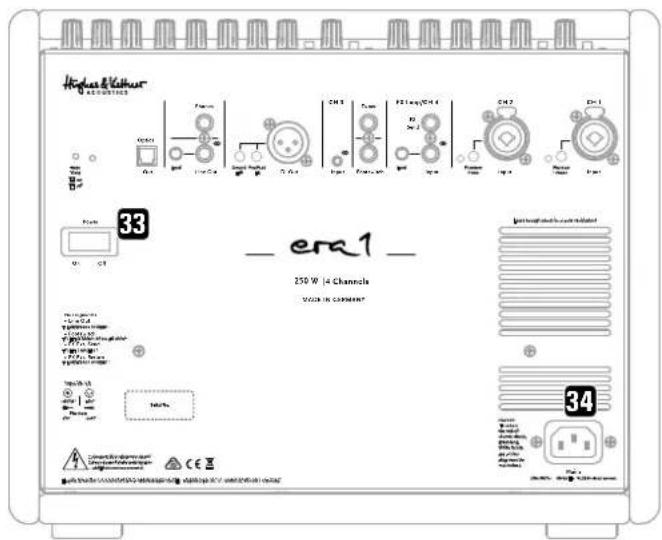
33 Power
Set this switch to On to get the mains power flowing and to Off to cut it off again.
34 Mains
Connect the factory-included power cord (Mains Lead) to this socket. Before you power the amp up, make sure the voltage rating indicated on the device matches your local mains current.
35 Factory Reset
To trigger a factory reset, use a thin, pointed object such as a paper clip to press and hold for five seconds the recessed button in the round hole next to Auto Sleep. The LEDs on the control panel will flash twice to confirm that the amp's factory settings have been restored.
2 Standard Setup and Cable Connections
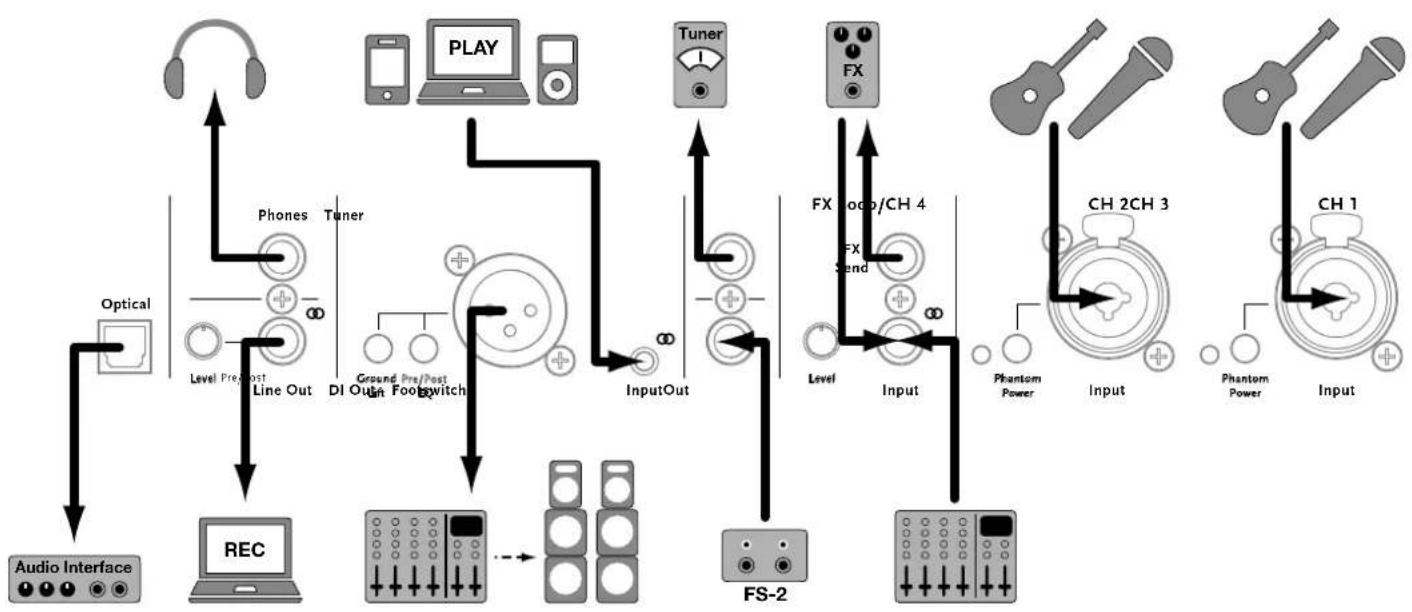
flowchart
graph TD
    A["Audio Interface"] --> B["REC"]
    B --> C["Play"]
    C --> D["Tuner"]
    D --> E["Input Out"]
    E --> F["FX 2CH 3"]
    F --> G["Input"]
    G --> H["Phantom Power"]
    H --> I["Input"]
    I --> J["Ch 1"]
    J --> K["Input"]
    K --> L["Phantom Power"]
    L --> M["Input"]
    M --> N["Level"]
    N --> O["Ground Pre/Post On Foot Switch"]
    O --> P["Di Out"]
    P --> Q["Phone Post Line Out"]
    Q --> R["Optical"]
    R --> S["Audio Interface"]
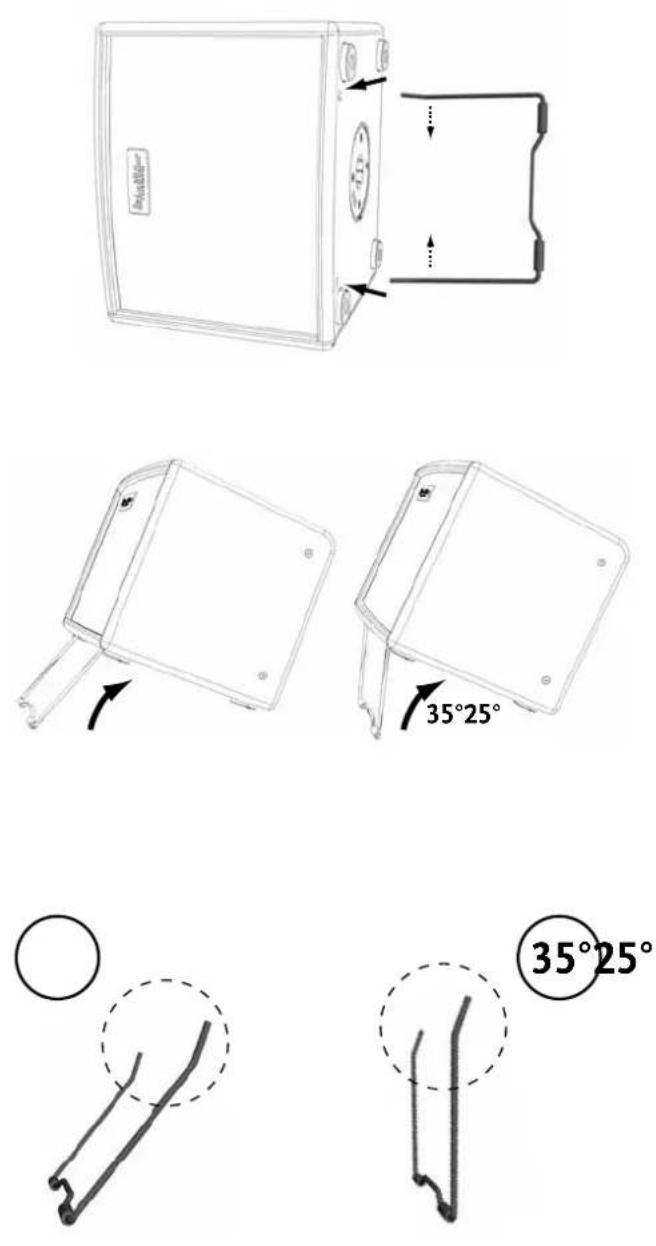
3 Tilt Stand
Gently squeeze the tips of the tilt stand's two legs and insert them into these sleeves. Make sure they are seated firmly. The tension from the compressed tips prevents the legs from slipping out of the sleeves.
era 1
era 2

4 Technical Specifications
Inputs
| Input CH 1 / CH 2 – Instrument | Jack plug 6.3 mm (1/4")Tip = (+), Ring = phantom power or gnd,sleeve = gnd |
| Input Impedance 2.2 M-ohms, unbalanced | |
| Gain Range 0 – 30 dB | |
| Max. Input Level +17 dBu | @ line out, 1 kHz, THD+N <1% |
| S/N Ratio >92 dB | @ line out, 22 Hz – 22 kHz, input shorted,Gain = 0 dB, re +4 dBu>89 dB@ power amp out, 22 Hz – 22 kHz, inputshorted, Gain = 0 dB, re +36 dBu |
| EIN –113 dBu | @ line out, 22 Hz – 22 kHz, input shorted,Gain – 30 dB–113 dBu@ power amp out |
| Dynamic Range >105 dB | @ line out, 22 Hz – 22 kHz, input shorted,Gain – 0 dB>89 dB@ power amp out |
| Phantom Power +9 Volts | |
| Input CH 1 / CH 2 – Microphone | XLRPin 2 = (+) |
| Input Impedance 1 kOhm, balanced | |
| Gain Range 0 – 46 dB | |
| Max. Input Level +8 dBu | @ line out, 1 kHz, THD+N <1% |
| CMRR >71 dB | Rs – 200 ohms, 100 Hz, Gain – 46 dB,re –4 dBu |
| S/N Ratio >92 dBu | @ line out, 22 Hz – 22 kHz, input open,Gain = 0 dB, re +4 dBu |
| EIN –121 dBu | @ line out, 22 Hz – 22 kHz, input open,Gain – 46 dB |
| Dynamic Range >100 dB | @ line out, 22 Hz – 22 kHz, input open,Gain – 0 dB |
| Phantom Power +24 Volt | |
| Input CH 3 | Mini jack 3.5 mm stereoTip=left channel, Ring=right channel |
| FX Loop / CH 4 – Input | Jack plug 6.3 mm (1/4") stereoTip=left channel, Ring=right channelMax Input Level: +10 dBu |
Outputs
| FX Send | Jack plug 6.3 mm (1/4") stereoTip = CH 1, Ring = CH 2Max Output Level: +10 dBu |
| Line Out | Jack plug 6.3 mm (1/4") stereoMax Output Level: +10 dBu, unbalanced, 2 kOhm Load, THD+N <1% |
| Optical Out | S/PDIF Toslink, 24 bit/48 kHz |
| DI Out | XLRPIN 2-(+), Max Output Level: -10 dBu, unbalanced,, 2 kOhm Load, THD-N <1% |
| Footswitch | Jack plug 6.3 mm (1/4") stereoTip - CH 1/2 mute, Ring - internal fx mute |
| Tuner | Jack plug 6.3 mm (1/4") mono |
| Phones Out | Jack plug 6.3 mm (1/4") stereoTip=left channel, Ring=right channel |
Equalizer
| Bass | +/-10 dB peak EQ@ 80 Hz (Mode 2: @ 110 Hz) |
| Mid | +/-6 dB peak EQ@ 700 Hz (Mode 2: @ 1200 Hz) |
| Treble | +/-10 dB peak EQ@ 10 kHz (Mode 2: @ 12 kHz) |
General
| Mains voltage tolerance range | +/-10% |
| Ambient operating temperature range | 0° to +35°C |
| Current consumption pursuant to EN 60065* | 0.6 A / 220-240 V AC1 A / 100-120 V AC |
| Power Amplifier | Class D |
| Output Power 250 W (era 1) | 400 W (era 2) |
| Output Voltage | 70 V peak |
era 1:
| Speaker System | 1x 8" woofer + 1x 1" dome tweeter2-way passive, closed box design;70 Hz - 15 kHz (-3 dB) |
era 2:
| Speaker System | 2x 8" woofer + 1x 1" dome tweeter2-way passive, closed box design;70 Hz - 15 kHz (-3 dB) |
Size
era 1:
| Dimensions (WxHxD) | 350 x 285 x 290 mm13-13/16 x 11-15/64 x 11-27/64" |
| Weight | 10.75 kg / 23.7 lbs. (black)9.85 kg / 21.7 lbs. (wood) |
era 2:
| Dimensions (WxHxD) | 350 x 475 x 290 mm13-13/16 x 18-45/64 x 11-27/64" |
| Weight | 14.45 kg / 31.9 lbs. (black)14.10 kg / 31.1 lbs. (wood) |
* Current consumption (mains power) was measured at the internal amplifier's output at 1/8 power by inputting a sine wave as specified in the EN60065 standard. This value represents the average current drawn from the mains grid when operating the system with standard music signals.
HUGHES & KETTNER ACOUSTICS
2 -10 dB
21 Input
HUGHES & KETTNER ACOUSTICS
2 Footswitch
HUGHES & KETTNER ACOUSTICS
2 -10 dB
20 Input
era 2

| Bass | +/-10 dB caratteristica Peak @ 80 Hz (Mode 2: @ 110 Hz) |
| Mid | +/-6 dB caratteristica Peak @ 700 Hz (Mode 2: @ 1200 Hz) |
| Treble | +/-10 dB caratteristica Peak @ 10 kHz (Mode 2: @ 12 kHz) |
HUGHES & KETTNER ACOUSTICS
2 -10 dB
HUGHES & KETTNER ACOUSTICS
1接続とコントロール
24 Input CH 3
International Inquiries:
Fax: +49 - 68 51 - 905 200
hkinternational@hughes-and-kettner.com
www.hughes-and-kettner.com

facebook.com/hughesandkettner
Copyright 12/2017 by Music & Sales GmbH. Subject to change without notice.