
LaptopBar NB21 - Lamp BENQ - Free user manual and instructions
Find the device manual for free LaptopBar NB21 BENQ in PDF.

| Product type | Laptop lamp |
| Brand | BenQ |
| Model | LaptopBar NB21 (NB21_C) |
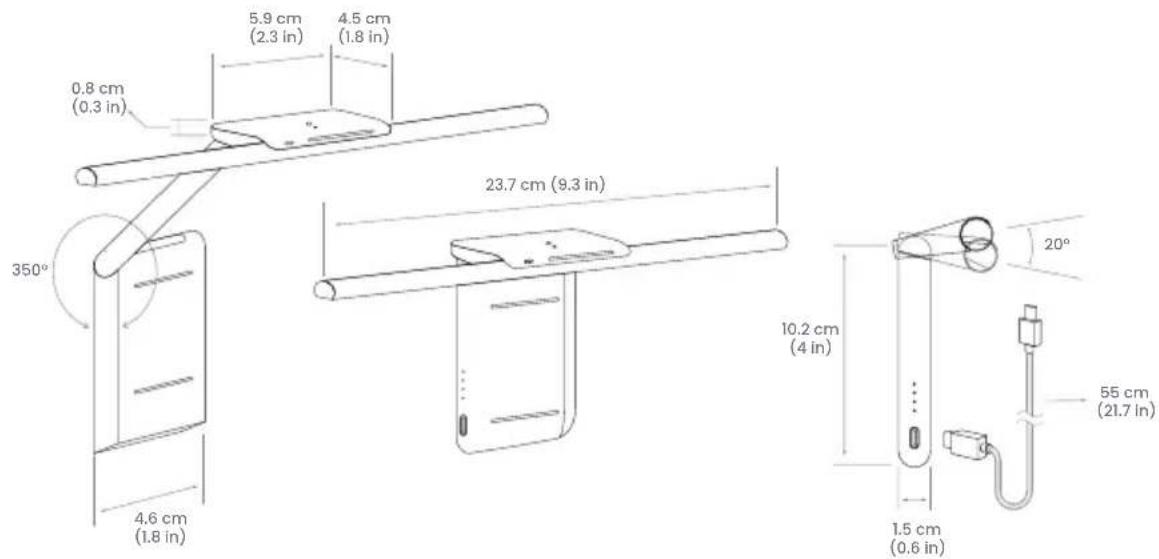
| Dimensions (L x H x D) | 23.7 x 4.5 x 10.2 cm |
| Power supply | USB-C, 5V DC, 1.5A (do not use with USB-A) |
| Battery | Built-in rechargeable lithium battery, runtime ~100 min at max brightness, charging time ~150 min |
| Power consumption | 7.5 W max |
| Color temperature | 2700 K - 5700 K, adjustable via touch slider |
| On/Off | Gesture sensor: wave hand within 2 cm |
| Auto dimming mode | Yes, with ambient light sensor and customizable adjustment |
| Mounting | Magnetic, via magnetic patch on laptop lid |
| Package contents | Lamp head, lamp body, USB-C cable, 2 magnetic patches, quick start guide, instruction card, storage pouch, cleaning cloth, warranty information |
| Maintenance | Wipe with a soft, lint-free cloth slightly dampened with a mild detergent; do not use alcohol or solvents |
| Safety | Do not use in humid environments, do not disassemble, do not expose to shocks or extreme temperatures |
| Light source replacement | By an authorized service agent or qualified person only |
| Warranty | Refer to the provided warranty information |
Frequently Asked Questions - LaptopBar NB21 BENQ
User questions about LaptopBar NB21 BENQ
0 question about this device. Answer the ones you know or ask your own.
Ask a new question about this device
Download the instructions for your Lamp in PDF format for free! Find your manual LaptopBar NB21 - BENQ and take your electronic device back in hand. On this page are published all the documents necessary for the use of your device. LaptopBar NB21 by BENQ.
USER MANUAL LaptopBar NB21 BENQ
© 2023 BenQ Corporation.
All rights reserved. Rights of modification reserved.
Package Contents
Check the packaging for the following items. If any is missing or damaged, please contact the place of purchase immediately.
- LaptopBar lamp head x 1
- Magnetic patch x 2
- Storage pouch x 1
- LaptopBar lamp body x 1
- Quick Start Guide x 1
- Cleaning cloth x 1
- USB-C power cable x 1
- Instructions Card for the
- Warranty Information x 1
Magnetic Patch x 1

The illustrations in this guide are for your reference only and may look different from the appearance of the actual product.
For Your Safety
- This product is not suitable for charging with a USB-A port.
- Use only the supplied USB-C power cable and connect only to USB-C port power (5V DC, 1.5A). Otherwise the lamp will fail to work normally or result in a fire hazard.
- In order to prevent damages to the lamp, do not hang or place any objects on the lamp.
- This product is suitable for indoor use only.
- Route the USB-C power cable so as to avoid it from being pinched by items placed upon it or against it.
- The light source of this lamp shall only be replaced by the manufacturer's service agent or a similar qualified person.
-
This lamp has a built-in rechargeable lithium battery in the lamp body. Please pay special attention to the following items when using the lamp:
-
Do not subject the lamp body to impact, drop, or place it in a high/low temperature environment (such as near a fire (heat) source or in a closed car under the sun), so as to avoid fire caused by battery damage or high heat or explosion.
- If the lamp is not used for a long time, charge it at least once a month to avoid battery damage due to over-discharge.
- Rechargeable batteries are consumables and their capacity will gradually decrease with time and the number of times they are used. This is a normal phenomenon.
- When traveling by air, remember to put this lamp in your carry-on luggage, not in checked luggage.

CAUTION
- In case of the following situations, unplug the lamp from the USB-C port immediately and contact the authorized service center or a qualified service person for inspection or repair:
- When the outer casing of the lamp is broken
- When there are strange odors coming from the lamp
- When the LED light source flickers
- When the insulation of the USB-C cable is damaged or frayed, and the metal strings inside can be seen
- Do not use the lamp in a humid environment (like in a bathroom). Otherwise the components inside may short-circuit and result in hazards.
- Never disassemble the lamp or remove any components from it, as doing so may result in hazards and will void the product warranty.
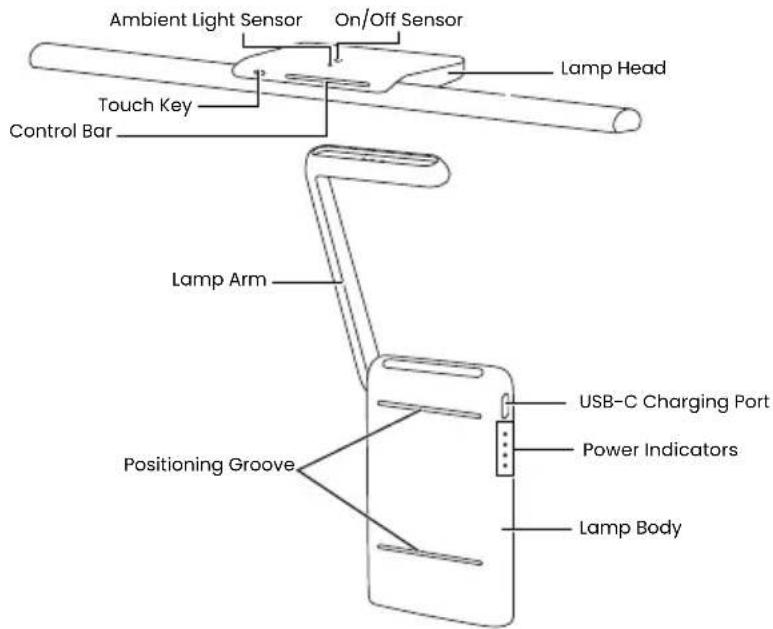
Parts of the Lamp
Refer to the figure below for the name of each part of the lamp.
Installation
Affixing the Magnetic Patch
This lamp employs magnetic technology to attach the lamp body to the lid of your laptop computer. Follow the instructions below to affix the magnetic patch included in the package to the lid of your laptop for attaching the lamp body.
-
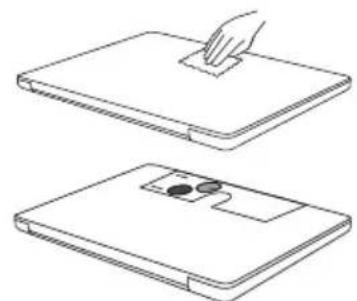
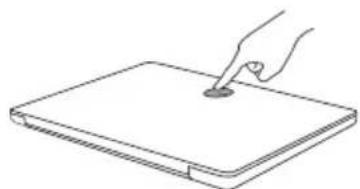
Close the lid of the laptop computer. Use the cleaning cloth included to clean the lid and make sure that there is no grease and dust residue so as not to affect the firmness of the magnetic patch.
-
Align the Instructions Card for the Magnetic Patch with the top edge of the lid of the laptop computer (non-hinge side) and position the semi-circular positioning opening so that it is in the center of the lid.
-
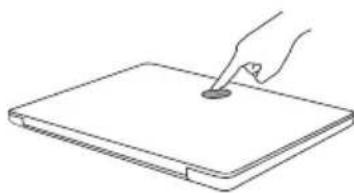
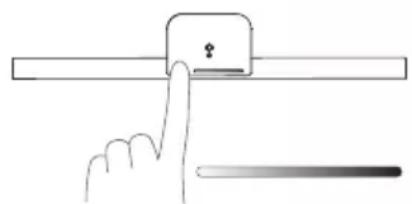
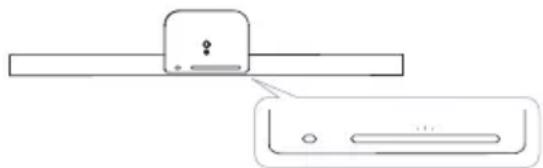
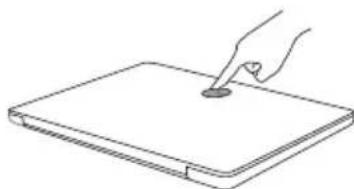
Peel off the liner on the back of the magnetic patch and then place it in the semi-circular positioning opening. When affixing the magnetic patch, note that the lower edge of the magnetic patch must face the hinge of the laptop computer and press the magnetic patch evenly with your fingertips.
-
After affixing the magnetic patch, let it rest for 20 minutes. During this period, do not place the lamp body on the magnetic patch so as not to affect its firmness.
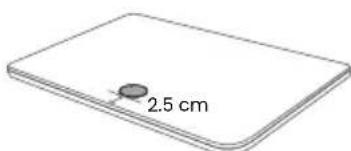
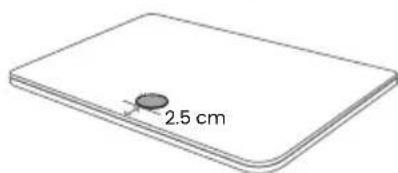
If there is no Instructions Card for the Magnetic Patch for affixing and positioning the magnetic patch, refer to the position of the magnetic patch as shown in the figure (2.5 cm from the edge of the lid of the laptop computer).
natural_image
Line drawings of two views of a laptop with a hand pressing the cover (no text or symbols)
natural_image
Line drawing of a hand using a pen to press or mark on a flat surface (no text or symbols)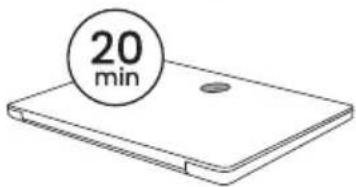
The magnetic patch cannot be removed and affixed repeatedly. If you will not use this lamp in the future and want to remove the magnetic patch, follow the steps below:
- Close the lid of the laptop computer.
-
Lift off the lower edge of the magnetic patch to reveal the black tab.
-
While pressing the magnetic patch with your fingers, pull down the black tab horizontally to completely tear off and remove the magnetic patch.

Installing the Lamp Body and Lamp Head
This lamp provides two installation forms for the lamp body. Choose one according to your preferred light effect.
Folded Form
- Open the lid of the laptop computer.
-
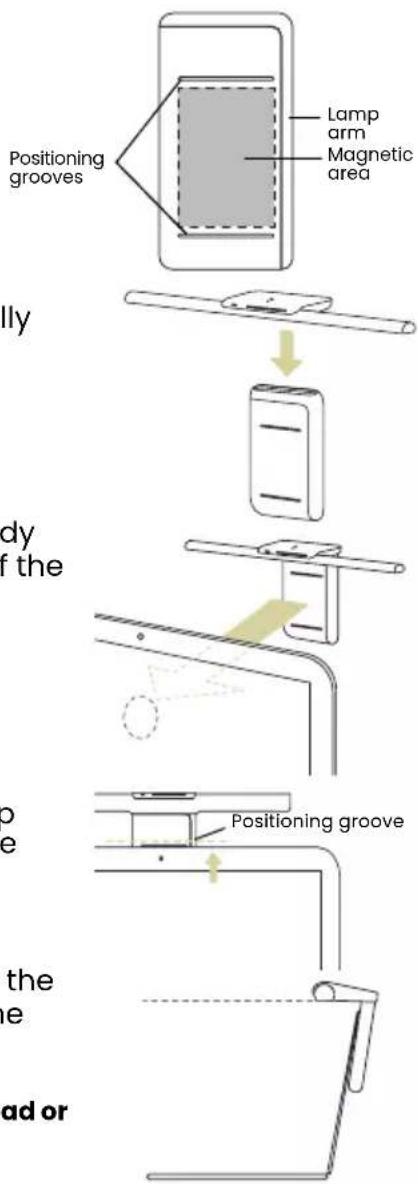
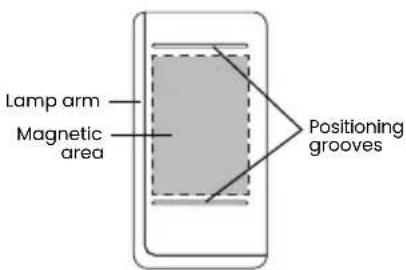
Facing the screen of the laptop computer, hold the lamp body so that the side of the lamp body with two positioning grooves faces you and make the lamp arm on the right side of the lamp body.
-
Place the lamp head on the upper end of the lamp body so that the lamp head is magnetically attached to the lamp body.
-
Place the lamp head on the upper end of the lamp body so that the lamp head is magnetically attached to the lamp body.
-
Slowly move the magnetic area on the lamp body towards the magnetic patch affixed on the lid of the laptop computer until the lamp body is firmly attached to the magnetic patch.
-
Adjust the position of the lamp body so that the positioning groove on the upper end of the lamp body is flush with the upper edge of the lid of the laptop computer.
-
Adjust the angle of the lamp head according to the needs. The larger the angle of the lamp head, the better the light effect.
-
Place the lamp head on the upper end of the lamp body so that the lamp head is magnetically attached to the lamp body.
- Slowly move the magnetic area on the lamp body towards the magnetic patch affixed on the lid of the laptop computer until the lamp body is firmly attached to the magnetic patch.
- Adjust the position of the lamp body so that the positioning groove on the upper end of the lamp body is flush with the upper edge of the lid of the laptop computer.
- Adjust the angle of the lamp head according to the needs. The larger the angle of the lamp head, the better the light effect.
If your eyes will look directly at the light source, it is recommended that you reduce the angle of the lamp head or change to the Extended Form.
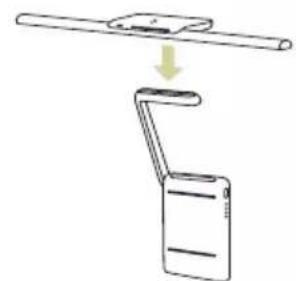
Extended Form
- Open the lid of the laptop computer.
-
Facing the screen of the laptop computer, hold the lamp body so that the side of the lamp body with two positioning grooves faces you, and make the lamp arm on the left side of the lamp body.
-
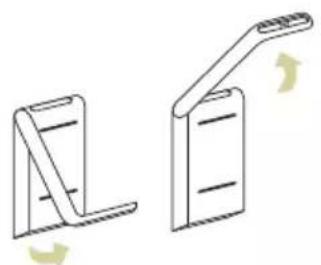
Rotate the lamp arm forward (upward) to the angle shown in the figure.
- Place the lamp head on the lamp arm so that the lamp head is magnetically attached to the lamp arm.
natural_image
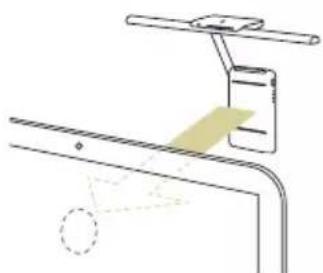
Two technical line drawings of a folding stand or bracket, showing different angles and fold movements (no text or symbols)- Slowly move the magnetic area on the lamp body towards the magnetic patch affixed on the lid of the laptop computer until the lamp body is firmly attached to the magnetic patch.
natural_image
Diagram showing a mechanical assembly with a shaft and a folded paper or clip (no text or symbols)- Adjust the position of the lamp body so that the positioning groove on the upper end of the lamp body is flush with the upper edge of the lid of the laptop computer.
natural_image
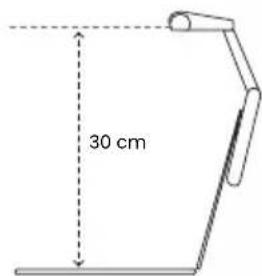
Technical line drawing of a mechanical assembly with no visible text or symbols- Adjust the angle of the lamp arm and the lamp head as required. It is recommended that the light-emitting surface of the lamp head be parallel to the desktop surface and positioned above the hinge of the laptop computer.

Connecting the Power Cord (Charging)
Fully charge the lamp before using it for the first time. Connect one end of the included USB-C power cable to the USB-C charging port on the lamp body and the other end to the USB-C port of your laptop computer or charger to start charging.

- This lamp is not suitable for charging with a USB-A port. Insufficient power supply will cause the lamp to flicker.
- Connect only to a USB-C port that can provide power above 5V/1.5A to ensure that the charging function works properly.
- This lamp cannot be used as a mobile power supply so do not connect any other devices to the USB-C charging port on the lamp body.
- After fully charged, the lamp can provide about 100 minutes of use time when the color temperature is set to the middle and the brightness is set to the brightest level.
- If the battery is exhausted, it will take about 150 minutes to fully charge the battery using a USB-C port with a power supply above 5V/1.5A.
- When charging, remove the lamp head from the lamp body to achieve a faster charging speed.
- If you use the lamp while turning it on and charging it at the same time, it will take more than 150 minutes to fully charge the battery. The higher the lamp's brightness, the less wattage is left for charging, and the time to fully charge the battery increases accordingly.
Power Indicators
There are 4 power indicators on the lamp body to display the charging status and the remaining power level of the battery. Refer to the following table for the status and meaning of the power indicators:
| Status Meaning/Troubleshooting guide | |
| Powering up (remaining power level: 3) | |
| Charging (charged power level: 2) | |
| Battery is exhausted. | |
| Error occurred during charging. Use the included USB-C cable and connect to a USB-C port that supplies power above 5V/1.5A. | |
| Battery temperature is abnormal. Stop using the lamp, the light will stop flashing after the temperature returns to normal, and the lamp can be used again. | |
| Internal error. Stop using the lamp and contact customer service personnel for assistance. | |
Using the Lamp
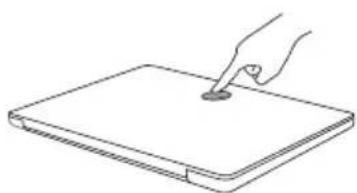
Turning On/Off the Lamp
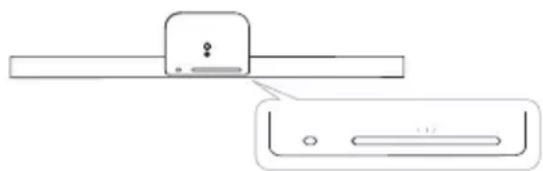
Slightly wave your palm within about 2 cm from the On/Off Sensor on the top of the lamp head to turn on/off the lamp.

The lamp will memorize the setting before power off. Detach the lamp head from the lamp body to turn off the power. Attach the lamp head to the lamp body to turn on the power.

- If the lamp is turned on before the power is turned off, the lamp will automatically light up after the power is turned on, and the brightness and color temperature level before the power is turned off will be memorized.
- If the lamp is off before the power is turned off, the lamp will remain off after the power is turned on.
- If the lamp is in the Auto Dimmer Mode and turned on before turning off the power, it will automatically turn on and enter the Auto Dimmer Mode after turning on the power.
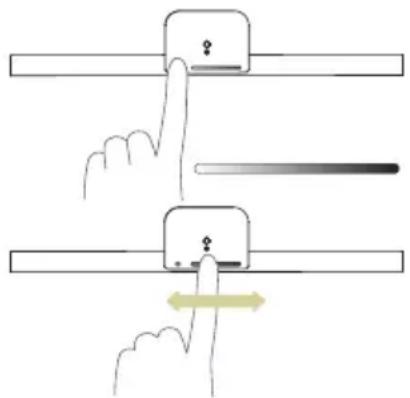
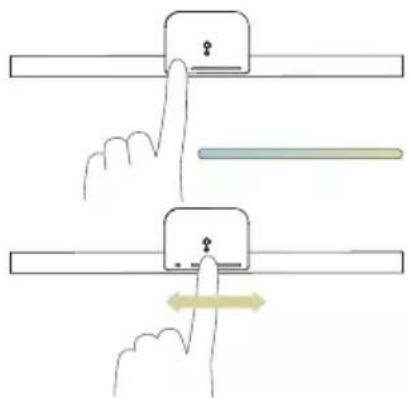
Adjusting Brightness and Color Temperature
Adjusting Brightness
- When the lamp is on, touch the Touch Key with your finger and the Control Bar will display a white > black gradient state.

When the brightness is at the lowest level, the Control Bar shows a short bar of white light.
- Swipe your finger on the Control Bar. Swipe left to decrease brightness, right to increase brightness.
Adjusting Color Temperature
-
When the lamp is on, touch the Touch Key with your finger and the Control Bar will display a blue > yellow gradient state.
-
Swipe your finger on the Control Bar. Swipe to the left to lower the color temperature (the light turns warm and yellowish) and swipe to the right to increase the color temperature (the light turns cold and whitish). The adjustment range of color temperature is 2700K-5700K.

Using the Auto Dimmer Mode
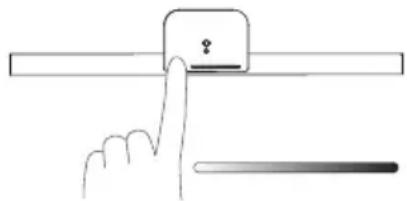
When the lamp is on, press and hold the Touch Key with your finger for about 2 seconds and the Touch Key will light up white, indicating that it has entered the Auto Dimmer Mode. In this mode, the lamp will continuously detect the ambient lighting condition through the built-in ambient light sensor and automatically adjust the brightness of the lamp to an appropriate level. The color temperature will remain in the level before you enter this mode.
natural_image
Illustration of a hand pressing a button on a horizontal bar with a ruler beside it (no text or symbols)- Do not block the ambient light sensor on the lamp. Otherwise the Auto Dimmer Mode will not function properly.
- The Auto Dimmer Mode will exit automatically and the Touch Key will go off when you touch the Touch Key or Control Bar.
Personalized Auto Dimmer Mode Setting
In the Auto Dimmer Mode, if you don't like the factory setting of the lamp's brightness level, you can follow the steps below to set up the brightness level according to your preference so that the lamp can automatically adjust the brightness to your preferred level.
- Place the lamp on your laptop computer.
-
Slightly wave your palm within about 2 cm from the On/Off Sensor above the lamp head to turn on the lamp.
-
Press and hold the Touch Key and Control Bar with two fingers at the same time for about 2 seconds. If the Control Bar flashes white three times, it means that you have successfully entered the setup mode.
-
The Touch Key will start blinking. At this time, swipe your finger on the Control Bar to select the brightness level of your preference: swipe to the left to decrease the brightness, and swipe to the right to increase the brightness.
-
10 seconds after your finger leaves the Control Bar, the Control Bar will flash white three times indicating that the setup is complete and the lamp has successfully memorized your preferred brightness level. Then press and hold the Touch Key for 2 seconds
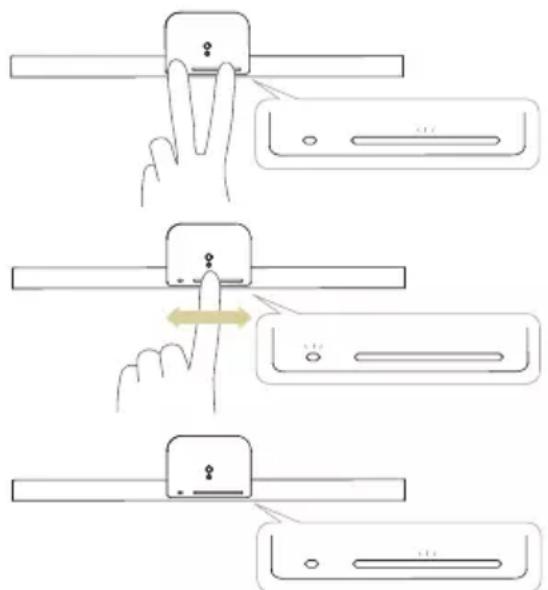
to enter the Auto Dimmer Mode. The lamp will rautomatically adjust the brightness to your preferred level.
- If you want to change the personalized Auto Dimmer Mode setting, repeat the steps 1\~5 above to re-adjust to your preferred brightness level.
- If you want to reset the Auto Dimmer Mode to the factory setting, repeat steps 1\~5 above and select the lowest brightness level in step 4.
Storage
Follow the steps below to store the lamp in the included storage pouch.
- Remove the USB-C power cable.
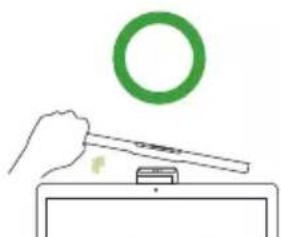
- Detach the lamp head from the lamp body or lamp arm. When detaching, tilt the lamp head to the left or right before the removal. Avoid pressing the lamp head forward or lifting it backward so as not to damage the rotating part of the lamp head.
natural_image
Simple line drawing of a hand holding a tool near a small object, with a green ring above (no text or symbols)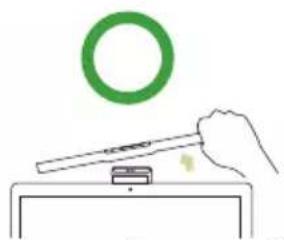
natural_image
Simple line drawing of a hand using a tool to interact with a green ring above a small object (no text or symbols)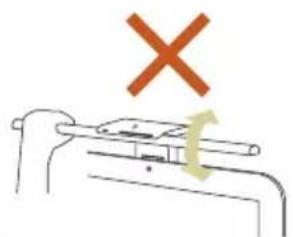
natural_image
Simple line drawing of a mechanical component with a red X mark above it and a green curved arrow below (no text or symbols)- Place the lamp head on the magnetic area of the lamp body as shown in the figure.
Ensure that the lamp tube faces the same side as the USB-C charging port on the lamp body.
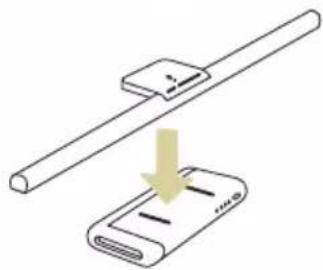
natural_image
Illustration of a device being inserted into a cable, showing a downward arrow indicating compression or disassembly (no text or symbols present)- Put the USB-C power cord, lamp head and lamp body in the storage space of the pouch.
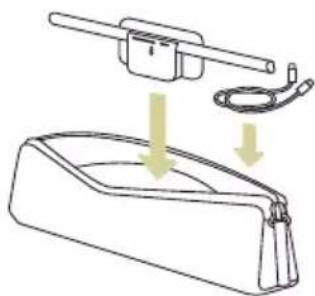
natural_image
Diagram showing a mechanical device with a handle and cable, partially submerged in a container (no text or symbols)Maintenance and Troubleshooting
- Turn off the lamp first, and unplug the lamp from the USB-C port. Wipe any smears or dusts off the lamp's outer casing using a soft, lint-free cloth lightly moistened with a mild detergent solvent. Do not use alcohol or any other chemical solvents like kerosene, naphtha and so on, as the lamp's casing may become damaged.
- Do not rinse the lamp or any of its components directly with water.
- If the lamp does not turn on, check to make sure that there are no loose connections between the USB-C cable and USB-C ports.
- If the problem persists, please contact the original place of purchase for help.
Specifications
| Model | NB21_C |
| DC power input | 5V (SELV) |
| Power consumption | 7.5W Max. |
| Dimensions | 23.7 x 4.5 x 10.2 cm |
natural_image
Line drawings of two electronic devices with a hand placed on top (no text or symbols)
natural_image
Line drawing of a hand using a tool to press or mark on a flat surface (no text or symbols)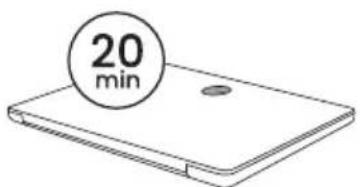
natural_image
Simple line drawing of a bent metal bracket with a dashed line indicating a reference point (no text or symbols)Forme étendue
natural_image
Two mechanical lever diagrams showing different configurations (no text or symbols)natural_image
Diagram showing a mechanical assembly with a rod above and a bracket below, no text or symbols present.natural_image
Technical line drawing of a mechanical assembly with no visible text or symbols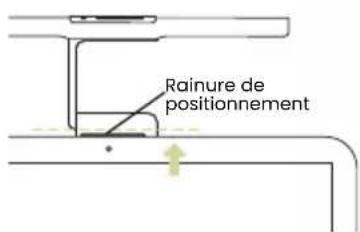
natural_image
Simple line drawing of a hand pressing a button on a horizontal bar, with a separate ruler partially visible (no text or symbols)natural_image
Simple line drawing of a hand pressing a button on a horizontal bar, with no text or symbols present.natural_image
Illustration of a hand pressing a button on a horizontal bar with a pointer (no text or symbols)natural_image
Line drawing of a hand pressing a button on a horizontal bar, with a separate rectangular panel showing a slot (no text or symbols)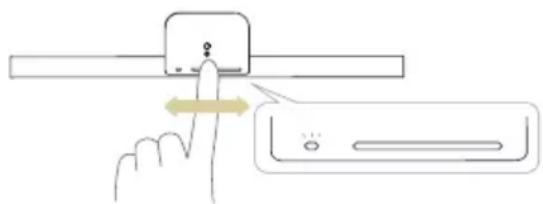
natural_image
Simple line drawing of a device with a handle and a rectangular panel, no text or symbols presentnatural_image
Illustration of a hand holding a pen above a small object, with a green ring above (no text or symbols)
natural_image
Simple line drawing of a hand using a tool to interact with a green ring above a tray (no text or symbols)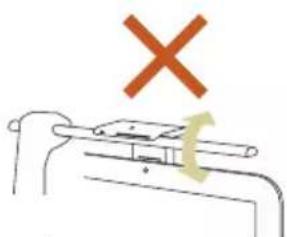
natural_image
Simple line drawing of a mechanical component with a cross mark above it (no text or symbols)natural_image
Diagram showing a mechanical assembly with a rod and a device, no text or symbols presentnatural_image
Diagram showing a device being inserted into a container with arrows indicating process flow (no text or symbols)natural_image
Line drawing of a hand pressing down on a flat surface (no text or symbols)natural_image
Line drawing of a flat electronic device casing with two circular cutouts (no text or symbols)natural_image
Line drawing of a hand using a tool to press or mark on a flat surface (no text or symbols)
natural_image
Simple line drawing of a rectangular object with a circular hole and dimension label '2.5 cm' (no other text or symbols)natural_image
Simple line drawing of a bracket with a dashed line indicating a reference point (no text or symbols)Erweiterte Form
natural_image
Two line drawings of a folding chair or ladder mechanism, showing different angles and motion directions (no text or symbols)natural_image
Diagram showing a device being lifted or lowered, with no visible text or symbolsnatural_image
Technical line drawing of a mechanical assembly with no visible text or symbols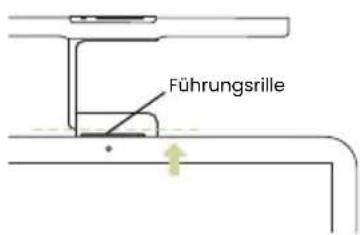
natural_image
Illustration of a hand pressing a button on a horizontal bar with a pointer (no text or symbols)
natural_image
Hand pointing at a device with bidirectional arrow indicating left-hand rule (no text or symbols)natural_image
Hand pointing at a key inserted into a horizontal bar, with a separate line below showing a blurred object (no text or symbols)natural_image
Hand pressing a button on a horizontal bar with a yellow directional arrow (no text or symbols)natural_image
Illustration of a hand pressing a button on a horizontal bar with a question mark, next to a ruler (no text or symbols)natural_image
Line drawing of a hand holding a rectangular object with a handle, next to a rectangular device (no text or symbols)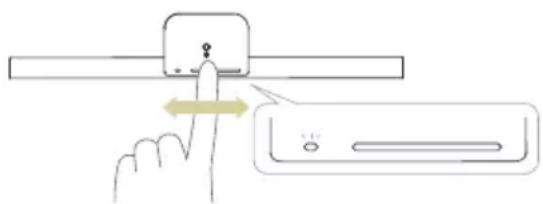
natural_image
Simple line drawing of a device with a handle and a rectangular panel, no text or symbols presentnatural_image
Diagram showing a mechanical assembly with a rod and a partially assembled device (no text or symbols)natural_image
Diagram showing a device being placed into a container with a cable, no text or symbols presentnatural_image
Line drawing of two views of a flat electronic device with a hand placed on top (no text or symbols)natural_image
Line drawing of a hand pressing down on a flat surface (no text or symbols)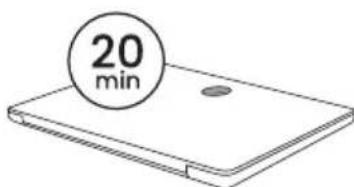
natural_image
Simple line drawing of a bent metal bracket with a dashed line indicating a reference point (no text or symbols)Uitgeklapte vorm
natural_image
Two mechanical lever diagrams showing different configurations (no text or symbols)natural_image
Simple line drawing of a mechanical assembly with a lever and handle (no text or symbols)natural_image
Pure technical line drawing of a mechanical assembly without any text, numbers, or symbols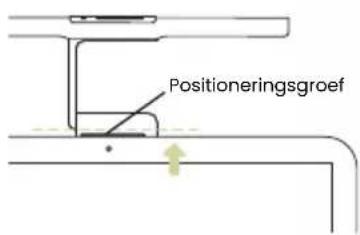
natural_image
Simple line drawing of a hand pressing a button on a horizontal bar, with a separate tool partially visible below (no text or symbols)natural_image
Simple line drawing of a hand pressing a button on a horizontal bar, with no text or symbols present.natural_image
Illustration of a hand pressing a button on a horizontal bar with a pointer (no text or symbols)natural_image
Diagram showing a mechanical assembly with a rod and a device, no text or symbols presentnatural_image
Diagram of a medical or laboratory procedure showing a device being inserted into a container with liquid, indicated by arrows (no text or symbols present)natural_image
Line drawing of a hand pressing down on a flat surface (no text or symbols)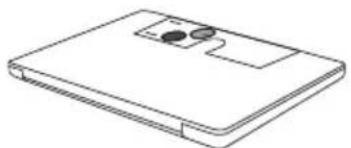
natural_image
Line drawing of a rectangular electronic device with two circular components on top (no text or symbols)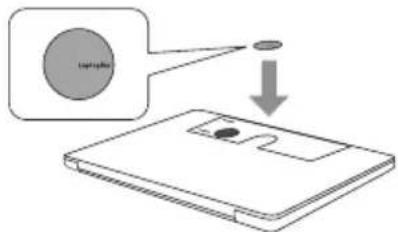
natural_image
Line drawing of a hand using a tool to press or mark on a flat surface (no text or symbols)
natural_image
Illustration showing three-step hand-drawn steps: adding a pencil, adjusting a circular object with an arrow, and removing a curved object (no text or symbols)安裝燈體與燈頭
使用自動調光模式
natural_image
Hand pointing at a button on a horizontal bar, with a separate tool below (no text or symbols)

natural_image
Illustration of a hand using a tool to interact with a green ring above a small object on a stand (no text or symbols)
natural_image
Simple line drawing of a hand using a tool to interact with a green ring above a device (no text or symbols)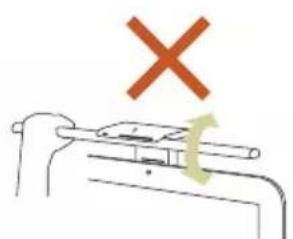
natural_image
Simple line drawing of a mechanical device with a red X mark above it and a green curved arrow below (no text or symbols)natural_image
Diagram showing a device being processed with a ruler and a magnified view of its internal structure (no text or symbols)natural_image
Diagram showing a mechanical device with a handle and cable, connected to a container with arrows indicating motion (no text or symbols)一般保養與故障診斷
natural_image
Line drawing of two views of a laptop with a hand inserting a pad to the cover (no text or symbols)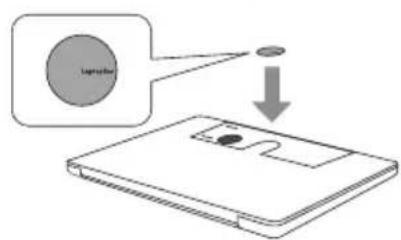
natural_image
Line drawing of a hand using a tool to press or mark on a flat surface (no text or symbols)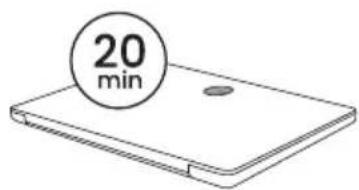
色温度調整
自動調光モード
natural_image
Hand pointing at a button on a horizontal bar, with a separate blurred bar below (no text or symbols)
natural_image
Diagram showing a mechanical assembly with a rod and a device, no text or symbols presentnatural_image
Diagram showing a device being inserted into a container with a cable, no text or symbols present故障・お手入れ
- Package Contents
- For Your Safety
- Parts of the Lamp
- Installation
- Affixing the Magnetic Patch
- Installing the Lamp Body and Lamp Head
- Folded Form
- Extended Form
- Connecting the Power Cord (Charging)
- Power Indicators
- Using the Lamp
- Turning On/Off the Lamp
- Adjusting Brightness and Color Temperature
- Adjusting Brightness
- Adjusting Color Temperature
- Using the Auto Dimmer Mode
- Personalized Auto Dimmer Mode Setting
- Storage
- Maintenance and Troubleshooting
- Specifications
- Forme étendue
- Erweiterte Form
- Uitgeklapte vorm
- 安裝燈體與燈頭
- 使用自動調光模式
- 一般保養與故障診斷
- 色温度調整
- 自動調光モード
- 故障・お手入れ
Brand : BENQ
Model : LaptopBar NB21
Category : Lamp