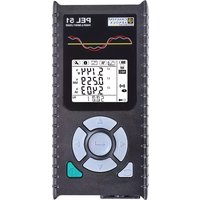
PEL51 - Measuring equipment CHAUVIN ARNOUX - Free user manual and instructions
Find the device manual for free PEL51 CHAUVIN ARNOUX in PDF.


| Product type | Power and energy recorder |
| Brand | Chauvin Arnoux |
| Model | PEL51 |
| Display | Backlit LCD |
| Power supply | Internal rechargeable battery (5 h charge) or mains via C8 adapter |
| SD card capacity | Up to 32 GB (SD, SDHC, SDXC, FAT32 format) |
| Connectivity | Wi-Fi (access point or router) |
| Data transfer | SD card or Wi-Fi via PEL Transfer software |
| Main functions | Power analysis, electrical quantity recording, energy meters |
| Charging temperature | 0 °C to 40 °C |
| Control keys | On/Off, Navigation, Selection |
| Included software | PEL Transfer (downloadable at www.chauvin-arnoux.com) |
| Maintenance | Clean with a dry cloth, avoid moisture |
| Safety | Do not use with the SD card slot open |
| Included accessories | Formatted SD card, C8 power adapter |
| Current sensors | External sensors (configurable transformation ratio) |
| Compatibility | Windows PC with PEL Transfer software |
Frequently Asked Questions - PEL51 CHAUVIN ARNOUX
User questions about PEL51 CHAUVIN ARNOUX
0 question about this device. Answer the ones you know or ask your own.
Ask a new question about this device
Download the instructions for your Measuring equipment in PDF format for free! Find your manual PEL51 - CHAUVIN ARNOUX and take your electronic device back in hand. On this page are published all the documents necessary for the use of your device. PEL51 by CHAUVIN ARNOUX.
USER MANUAL PEL51 CHAUVIN ARNOUX
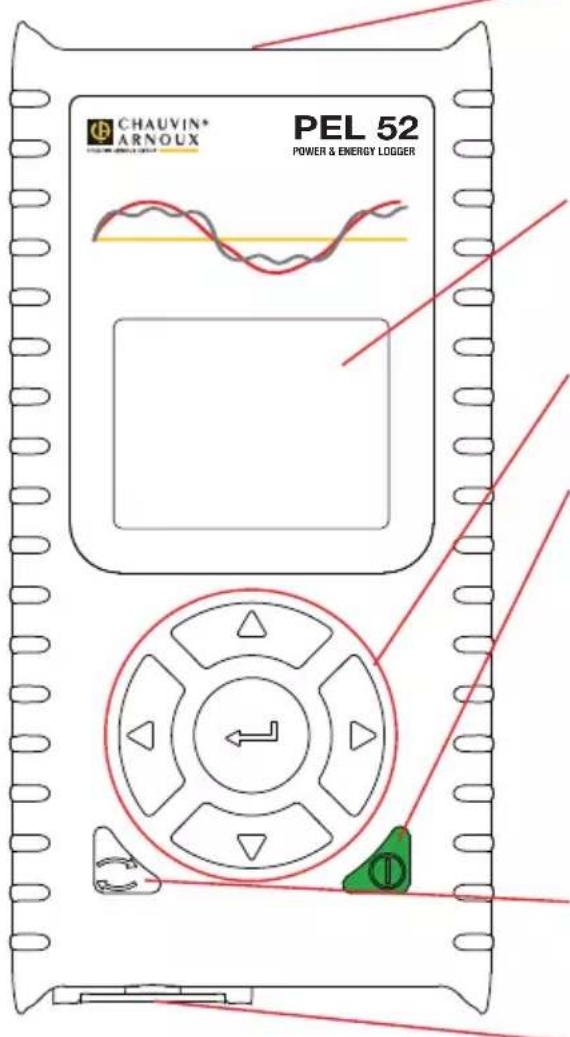
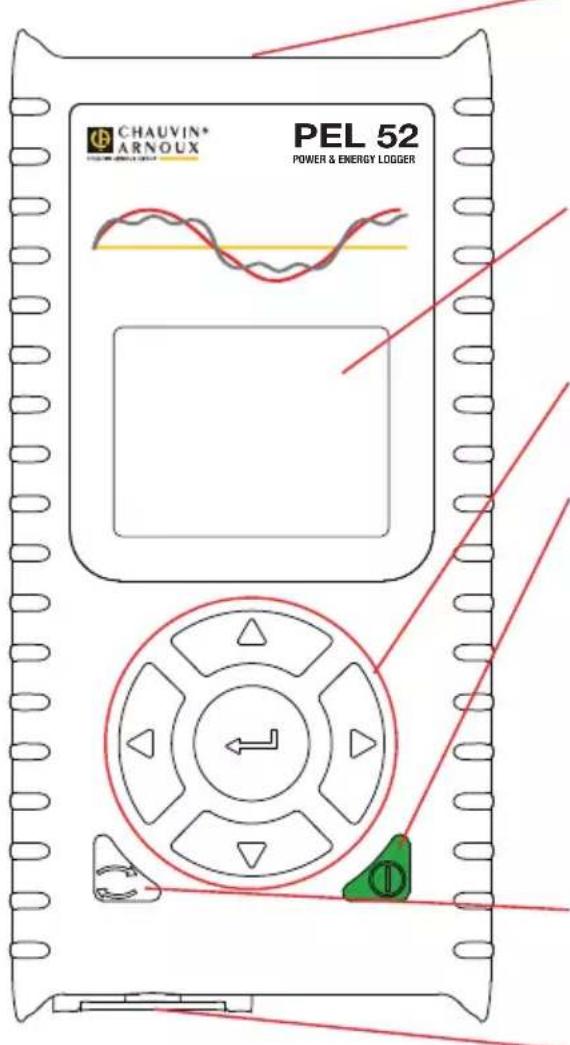
Measuring terminals.
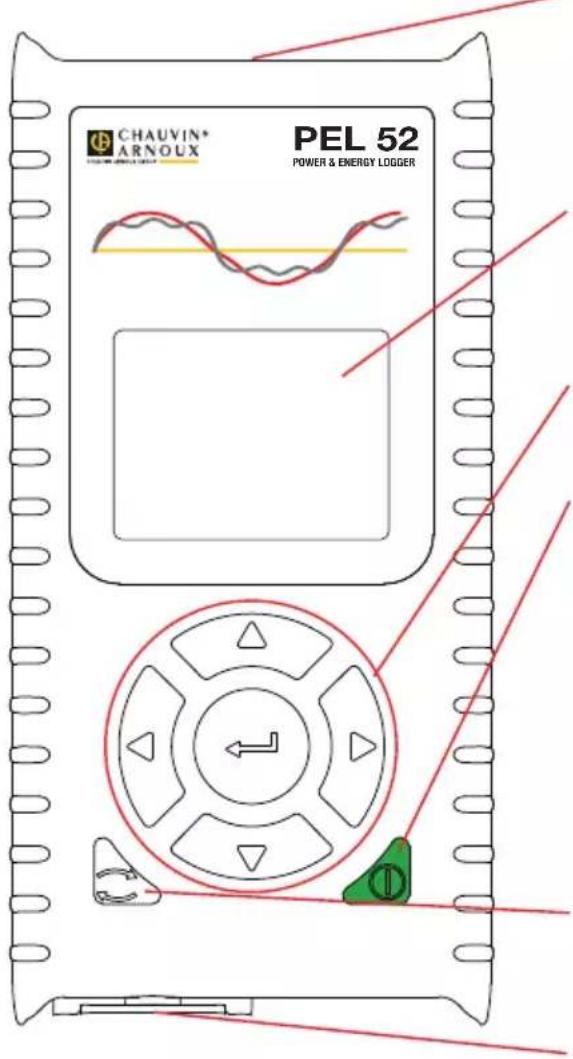
Backlit LCD display.
Navigation keys.
On/Off button.
To turn on the device, connect it to the network at terminals V1 and N. Or press on the On/Off button until the device turns on.
To turn the device off, press on the On/Off button until the device turns off.
You cannot turn the PEL off while it is connected to a power source or while a recording is in progress or pending.
Select button.
It starts or stops a recording and allows wifi mode to be chosen.
SD card slot.
SD CARD
The PEL accepts SD, SDHC and SDXC cards formatted FAT32, up to 32 GB capacity.
The PEL is delivered with a formatted SD card. If you want to install a new SD card:
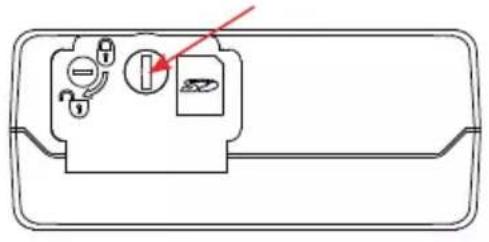
Unlock the elastomeric cap marker by turning the screw a quarter turn.
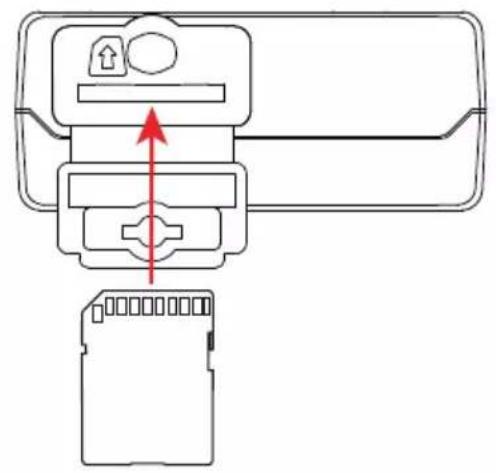
Press the SD card that is in the device then remove it.
i Do not remove the SD card if there is a recording in progress.
Check that the new SD card is not locked.
It is preferable to format the SD card in the device using PEL Transfer software, otherwise format it using a PC.
Insert the new card and press it in all the way.
Replace the elastomeric protective cap.
The PEL must not be used when the SD card slot is open.
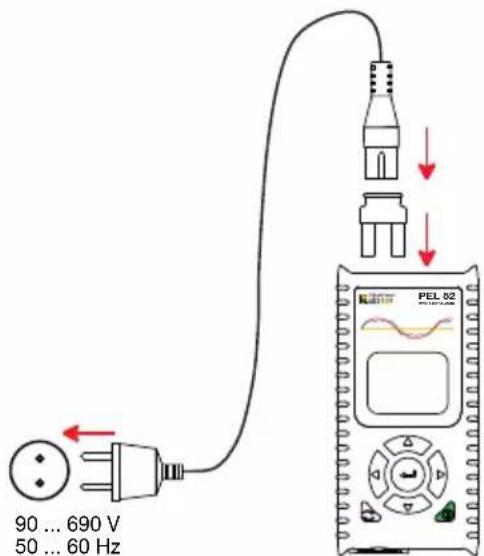
CHARGING THE BATTERY
Before first use, first fully charge the battery at a temperature between 0 and 40°C .
Connect the C8 / banana adapter between the V1 and N terminals
Plug the power cord into the adapter and mains power.
The device turns on.
The symbol indicates the battery state of charge. It takes about 5 hours to charge a discharged battery.
INSTALLING PEL TRANSFER
Download the latest version of PEL Transfer from our website: www.chauvin-arnoux.com.
Launch setup.exe.
Then follow the installation instructions.
Refer to the operating instructions for full installation details.
CONNECTING THE DEVICE TO THE PC
Connect the PEL's voltage inputs to the mains supply. The device turns on.
■ Enable the wifi access point WFI AP of the device in the configuration menu
For the wifi to operate, the battery must be sufficiently charged (or)
Connect the PEL to your PC via wifi.
Double click the PEL icon on the desktop to open PEL Transfer.
Select the Add device icon on the toolbar, then PEL51 or PEL52, then wifi in access point.
When the connection with the device is established, its name should be displayed on the left side of the window in the PEL Network folder tree.
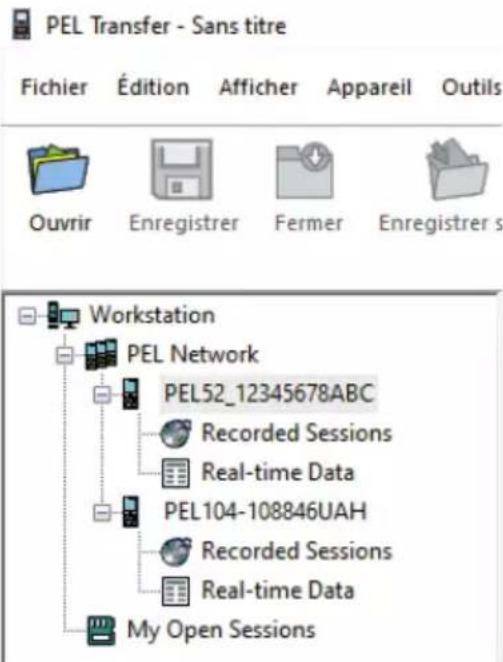
Refer to the operating instructions for a VIFI ST connection.
DEVICE CONFIGURATION
To configure your PEL, select the device in the PEL network.
Open the Configure Device dialogue box by clicking the Configure icon in the toolbar, in the Device menu or in the Status area.
This dialogue box has several tabs:
General: to give the device a name, set the automatic turn off delay, choose the refreshing of maximum values, lock the device Select key, prevent battery charging on measurement, set a device configuration password, set date and time, format the SD card, etc.
Communication: options relating to the wifi connection.
■ Measurement: to select the distribution system.
Current sensor: to select the transformation ratio of the current sensors and the number of turns, if necessary.
Recording: to select recording parameters.
Meters: to reset the energy meters to zero.
Click OK to load the new configuration into the device.
START A RECORDING (ON / OFF)
To start a recording, do one of the following:
In PEL Transfer: Select the appropriate option in the Recording tab of the Configuration dialogue box. The device can be configured to trigger a recording either at a future date and time, or immediately after completing the device configuration.
On the device: Press the Select key. The device displays START. Confirm with the ← key. The REGol blinks.
To stop a recording, do one of the following:
In PEL Transfer: In the menu, select Device > Stop recording.
On the device: Press the Select key. The device displays STOP. Confirm with the key. The tool disappears.
VIEWING THE RECORDING
Recorded data can be transferred to the PC in two ways for viewing and for generating reports:
The SD card can be removed from the device and connected to the PC using the supplied SD card reader. Start PEL Transfer, select the Open command in the File menu, point to the ICP file with the desired session number on the SD card and select Open.
- Direct link between the PC and the PEL (wifi). Start PEL Transfer, open a connection to the device, select it (make sure wifi is enabled) in the navigation tree, then select Recorded Sessions. Double click the desired recording session. Once the download has finished, select the downloaded test and click Open in the Download dialogue box.
In both cases, the session is added to My Open Sessions in the navigation tree. The data can then be displayed.
USER MANUAL
Go to our website to download the user manual for your device:
www.chauvin-arnoux.com
Search with the name of your device. Once the device is found, go to its page. The user manual is on the right. Download it.
Messbuchsen
INSTALLATION AV PEL TRANSFER
INSTALLACE SOFTWARE PEL TRANSFER
Stahnete sinejnovji vezi softaru PEL Transfer z našich webovych stránek: www.chauvin-arnoux.com.
TALLENNUKSEN ALOITTAMINEN (ON/OFF)
INSTALLATIE VAN PEL TRANSFER
Download de LASTe versie van PEL Transfer op once website: www.chauvin-arnoux.com.
Start setup.exe.
Volg daarna de installment-instructions.
CONFIGURATIE VAN HET APPARAAT
INSTALLACJA PEL TRANSFER
CIHAZIN PC'YE BAGLANMASI
a PEL wwnuwnu
P P P P P P P P P P P P P P P P P P P P P P P P P P P P P P P P P P P P P P P P P P P P P P P P P P P P P P P P P P P P P P P P P P P P P P P P P P P P P P P P P P P P P P P P P P P P P P P P P
anau wuaunu uuaaunu anu uauupe PEL51 u a PEL52 uauuuaanauu
■ 1
PEL Tranfer 1an an 1w 1w PKI wannnnaeauuauauauauauau
PEL (nu wifi) uu uu PEL Transfer uuuuuaauauauauauauauauauauauauauauauauauauauauauauauauauauauauauauauauauauauauau
uynnnaaannnnnneennnnnnnnnnnnnnnnnnnnnnnnnnnnnnnnnnnnnnnnnnnnnnnnnnnnnnnnnnnnnnnnnnnnnnnnnnnnnnnnnnnnnnnnnnnnnnnnnnnnnnnnnnnnnnnnnnnnnn
gianr
y
https://www.chauvin-arnoux.com/COM/CA/doc/User_manual_th_PEL51_52.pdf
Cac cac dau cuc dau cuoi do luong.

- ON/OFF BUTTON
- SELECT BUTTON
- SD CARD
- CHARGING THE BATTERY
- INSTALLING PEL TRANSFER
- CONNECTING THE DEVICE TO THE PC
- DEVICE CONFIGURATION
- START A RECORDING (ON / OFF)
- VIEWING THE RECORDING
- USER MANUAL
- INSTALLATION AV PEL TRANSFER
- INSTALLACE SOFTWARE PEL TRANSFER
- TALLENNUKSEN ALOITTAMINEN (ON/OFF)
- INSTALLATIE VAN PEL TRANSFER
- CONFIGURATIE VAN HET APPARAAT
- INSTALLACJA PEL TRANSFER
- CIHAZIN PC'YE BAGLANMASI
- GIANR
Brand : CHAUVIN ARNOUX
Model : PEL51
Category : Measuring equipment