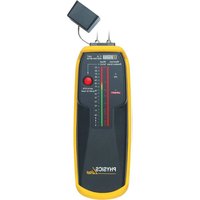
C.A 847 - Measuring equipment CHAUVIN ARNOUX - Free user manual and instructions
Find the device manual for free C.A 847 CHAUVIN ARNOUX in PDF.


| Product Type | Moisture meter for materials (wood and building materials) |
| Brand | Chauvin Arnoux |
| Model | C.A 847 |
| Category | Measuring equipment |
| Dimensions | 195 x 60.5 x 38 mm |
| Weight | 160 g including battery |
| Power supply | 9 V battery type 6LR61 or 6LF22 |
| Battery life | 30 hours |
| Measuring range | 0 to 100% wood moisture or H.B.E. |
| Display | 20 LEDs on 2 scales: 6 to 23% and 24 to 100% |
| Accuracy | ± 2 LEDs |
| Measurement principle | Measurement of electrical impedance between two electrodes |
| Main functions | Wood moisture measurement (6 to 100%) and equivalent wood moisture (H.B.E.) for other materials |
| Low battery indicator | LOW BAT light |
| Maintenance and cleaning | Clean the casing with a cloth slightly dampened with soapy water, rinse with clean water. Do not use solvent. |
| Safety | CAT III 24 V AC/DC per EN61010-1 |
| Electromagnetic compatibility | Emission and immunity in industrial environment per EN61326-1 |
| Operating temperature | 0 to 50 °C, RH < 80% |
| Storage temperature | -20 to +60 °C, RH 0 to 80% (without battery) |
| Spare parts and repairability | Replacement battery: 9 V type 6LR61/6LF22 (ref. P01100732). Repairs via Chauvin Arnoux agency or Manumesure technical center. |
| Metrological verification | Recommended annually, possible in COFRAC accredited laboratories or Manumesure centers. |
| Package contents | C.A 847, yellow shockproof case, 9 V battery, operating instructions |
Frequently Asked Questions - C.A 847 CHAUVIN ARNOUX
User questions about C.A 847 CHAUVIN ARNOUX
0 question about this device. Answer the ones you know or ask your own.
Ask a new question about this device
Download the instructions for your Measuring equipment in PDF format for free! Find your manual C.A 847 - CHAUVIN ARNOUX and take your electronic device back in hand. On this page are published all the documents necessary for the use of your device. C.A 847 by CHAUVIN ARNOUX.
USER MANUAL C.A 847 CHAUVIN ARNOUX
Signifi cation of the symbol

WARNING, risk of DANGER! The operator must refer to these instructions whenever this danger symbol appears the device.
Definition of CAT III
Measurement category III corresponds to measurements on building installations.
Example: distribution panel, circuit-breakers, machines or fixed industrial devices.
Thank you for purchasing this CA 847 materials moisture meter. To obtain the best possible service from your instrument:
■ Read these operating instructions carefully
■ Comply with the precautions for use

PRECAUTIONS FOR USE

To prevent the risk of injury, always replace the touch prod protection cap after use.
WARRANTY
Our guarantee is applicable, unless otherwise stated, for twelve months following the date of supply of the equipment (extract from our General Sales Conditions, available on request).
English 7
Deutsch 12
Italiano 17
Español 22
CONTENTS
-
PRESENTATION ....8
-
GENERAL COMMENTS ON MOISTURE IN MATERIALS .....8
-
DESCRIPTION ....8
-
USE 9
4.1. Procedure 9
4.2. Measuring precautions 9
-
CHARACTERISTICS ......9
-
MAINTENANCE ....10
6.1. Changing the battery ....10
6.2. Cleaning the casing ....10
6.3. Metrological Checks 10
6.4. Repair ....10
-
TO ORDER 10
-
APPENDIX ....11
1. PRESENTATION
The C.A 847 moisture meter is designed to measure the level of moisture in wood and construction materials such as plaster and roughcast, etc. The measurement principal is as follows: an electric current is passed through the two electrodes in order to measure the impedance variation due to the moisture in the material. The instrument immediately translates the measurement into a humidity %.
For wood, the instrument gives a direct reading of the level of moisture in the wood, expressed as a % of H2O between 6% and 100%.
For other construction materials, the instrument determines the wood moisture equivalent (WME).
2. GENERAL COMMENTS ON MOISTURE IN MATERIALS
Moisture meters are generally calibrated for wood which is the construction material with the best-known moisture levels, over and above which the material starts to deteriorate.
In fact, under a level of around 16%, wood is considered dry and will not deteriorate (no rot, retention of mechanical qualities, etc.).
Between around 16 and 19%, the acceptable amount of moisture is reached and signs of deterioration may start to appear.
Finally, over and above 20%, the wood is considered to be damp and signs of deterioration will obviously appear in time unless measures are taken to reduce the level of moisture.
For other materials, a wood equivalence is used by establishing the WME (wood moisture equivalent) which is the level of moisture reached by wood, equal to that of the material being measured.
Interpretation of the measurement is facilitated since the threshold percentage for transition from a “dry” to a “humid” condition is the same: between 16 and 20%.
3. DESCRIPTION
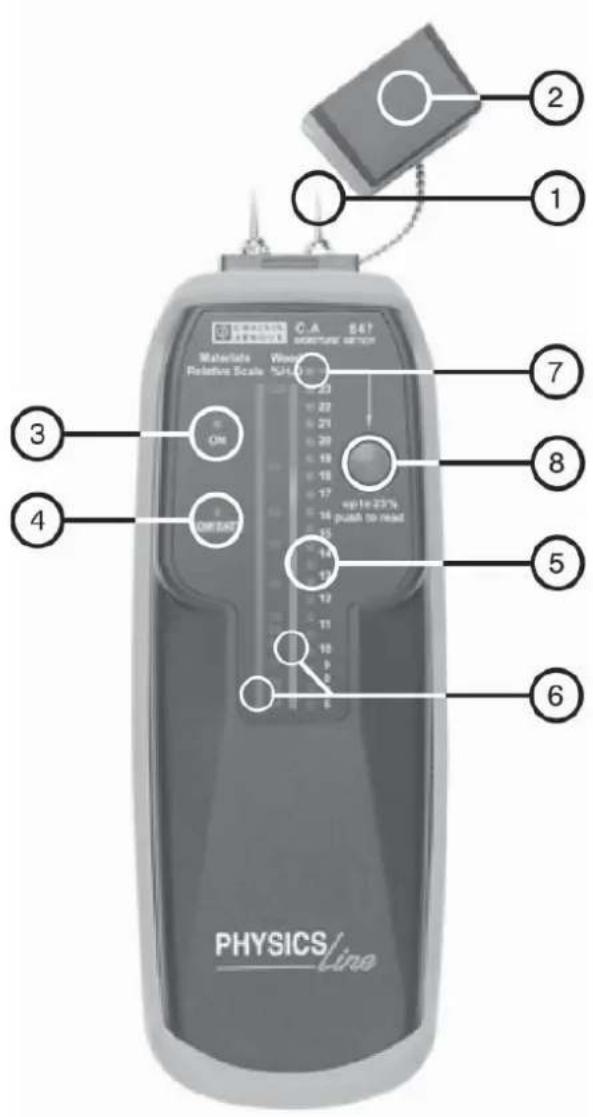
See the Appendix in Chapter 8 at the end of operating instructions
- Measurement prods to be inserted into the material
- Protective cover (protects the prods and switches the instrument off)
- "On" light which shows when the instrument is on or off
- "Low batt" light, which indicates when the battery is low
- 20 moisture level indicator lamps
- Scale graduated as a % of moisture in wood or W.M.E., associated with a coloured barchart that shows the difference between a dry and humid condition
- Lamp indicating a level of >23%
- When indicator lamp 7 is lit, you should press the red button to obtain a correct reading
4. USE
4.1. Procedure
- Remove the protective cover from the prods. Then switches the instrument on; you will notice the "on" indicator lamp lights up. Note that the measuring prods may cause injury if not handled with caution.
- Insert the prods fi mly into the material and read the measurement result: For wood, insert the prods so that the current circulates parallel to the wood fi bres. If the material moisture level is less than 6% , none of the LEDs light up. If the percentage is between 6 and 23% , take the reading directly from the right-hand column opposite the LED which is lit. If the percentage is over 23% , the top LED will light up, indicating that you should press on the red button on the front of the instrument. Then read the percentage (between 24 and 100% ) indicated in the left-hand column opposite the LED which is lit. Since the measurement result depends on the density and nature of the material, its value is essentially one of comparison between the dry and moist condition of this material.
- To switch the instrument off, simply replace the protective cover.
- If the "Low Batt." LED stays continuously lit, this means the battery should be changed straight away.
4.2. Measuring precautions
The surface of the material must be dry otherwise the measurement result will be incorrect. It is in fact the internal percentage of moisture in the material that we wish to determine.
5. CHARACTERISTICS
■ Measurement range: 0 to 100% of moisture in the wood or W.M.E..
■ Display: 20 LEDS on 2 scales: 6 to 23% and 24 to 100%
Accuracy : ± 2 LEDS
■ Battery status: "low batt." LED lights up when the battery power supply is not sufficient to take a correct measurement
■ Power supply: 9V battery (6LR61 or 6F22 type)
■ Size / weight: 195 x 60.5 x 38 mm / 160 g with battery
■ Utilisation environment: 0 to 50 °C, <80% R.H.
■ Storage environment: -20 to +60°C, 0 to 80% R.H., without the battery
■ Operating sufficiency: 30 hours
■ Safety: Cat III 24 V AC/DC as per EN61010-1
■ Electromagnetic compatibility
■ Emissions and immunity in an industrial setting compliant with EN61326-1
6. MAINTENANCE
Only use specified spare parts for maintenance purposes. The manufacturer cannot accept any responsibility for accidents occurring following repairs carried out outside its after-sales department or approved maintenance network.
6.1. Changing the battery
■ The battery must be replaced as soon as the "low batt" LED lights up
■ Remove the yellow protective casing without removing the prod protection cover (the instrument remains switched off).
■ Unscrew, then remove by pushing the battery lid backwards
■ Replace the old battery with a 9V battery (6LR61 or 6LF22 type)
6.2. Cleaning the casing
Clean the unit with a cloth and a little soapy water. Clean off with a damp cloth.
⚠️ Do not use solvents.
6.3. Metrological Checks
Like all measuring or testing devices, the instrument must be checked regularly.
This instrument should be checked at least once a year. For checking and calibration, contact one of our accredited metrology laboratories (information and contact details available on request), at our Chauvin Arnoux subsidiary or the branch in your country.
6.4. Repair
For all repairs under guarantee or outside guarantee, please return the device to your distributor.
7. TO ORDER
C.A 847 P01156302Z
Supplied with a shockproof cover, a 9V battery and these operating instructions.
Spare parts :
9V battery P01100732
- APPENDIX

03 - 2013

Brand : CHAUVIN ARNOUX
Model : C.A 847
Category : Measuring equipment