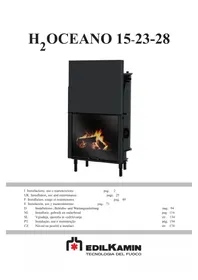
H2OCEANO - Fireplace EDILKAMIN - Free user manual and instructions
Find the device manual for free H2OCEANO EDILKAMIN in PDF.


| Product type | Thermocheminee (wood-burning fireplace with water heat exchanger) |
| Brand | Edilkamin |
| Model | H2OCEANO (available in 15, 23, 28) |
| Nominal thermal output (model 15) | 16 kW (including 9 kW to water) |
| Nominal thermal output (model 23) | 23 kW (including 13.3 kW to water) |
| Nominal thermal output (model 28) | 28 kW (including 17.5 kW to water) |
| Energy efficiency (model 15) | 83.1 % (gross PCI) |
| Energy efficiency (model 23) | 82.2 % (gross PCI) |
| Energy efficiency (model 28) | 81.5 % (gross PCI) |
| Energy efficiency class | A+ (according to EU 2015/1185 and 2015/1186) |
| Fuel | Wood (moisture content < 25 %) |
| Dimensions (model 15) L x D x H | 74 x 62 x 135 cm (without feet) |
| Dimensions (model 23) L x D x H | 88 x 68 x 147 cm (without feet) |
| Dimensions (model 28) L x D x H | 106 x 83 x 147 cm (without feet) |
| Weight (model 15) | 251 kg (including packaging) |
| Weight (model 23) | 303 kg (including packaging) |
| Weight (model 28) | 308 kg (including packaging) |
| Water capacity (model 15) | 75 litres |
| Water capacity (model 23) | 100 litres |
| Water capacity (model 28) | 130 litres |
| Heatable volume (model 15) | 415 m³ |
| Heatable volume (model 23) | 600 m³ |
| Heatable volume (model 28) | 730 m³ |
| Maximum operating pressure | 1.5 bar |
| Flue outlet diameter (model 15) | 18 cm |
| Flue outlet diameter (model 23) | 22 cm |
| Flue outlet diameter (model 28) | 25 cm |
| External air intake (diameter) | 12.5 cm |
| Installation connection (male) | 1 inch |
| Reference standard | EN 13229 |
| Main functions | Water heating via wood combustion, distribution to radiators, underfloor heating, domestic hot water production (with optional kits), natural convection |
| Maintenance and cleaning | Periodic cleaning of the firebox (scaling) and the glass (when cold with a suitable product like GlassKamin). Sweep the flue annually. |
| Safety | Safety valve (pressure 1.5 bar), thermal relief valve (95 °C), overheat alarm, automatic flue gas bypass. Never operate without water. Installation mandatory by authorized technician. |
| Spare parts and repairability | Hydraulic kits available (Kit 1 to 6, N3, N3BIS), electronic regulator, valves, heat exchangers, cold handle, door frame, raising feet, rotisserie. |
| General information | Manufacturer: EDILKAMIN S.p.A., Via Mascagni 7, 20045 Lainate (MI) - Italy. Website: www.edilkamin.com. Warranty: commissioning mandatory by dealer. Declared conform to EU 305/2011 (CPR). |
Frequently Asked Questions - H2OCEANO EDILKAMIN
User questions about H2OCEANO EDILKAMIN
0 question about this device. Answer the ones you know or ask your own.
Ask a new question about this device
Download the instructions for your Fireplace in PDF format for free! Find your manual H2OCEANO - EDILKAMIN and take your electronic device back in hand. On this page are published all the documents necessary for the use of your device. H2OCEANO by EDILKAMIN.
USER MANUAL H2OCEANO EDILKAMIN
UK Installation, use and maintenance
F Installation, usage et maintenance
20435435435435435435435435435435435435435435435435435435435435435435435435435435435435435435435435435435
Fax:396298762400700
maw
www.ebiann.oom
Capatae € 4.100.000 am. veen
Seceke:20151NinaVoP
20045 Lalnate (MI) - ITALY
www.edilkamin.com
mail@edilkamin.com
Direttore Generale
Paolo Gusella

EDILKAMIN
TECNOLOGIA DEL FUOCO
Edkame S p A.
Congratulations and thank you for choosing our product.
Please read this document carefully before you use this product in order to obtain the best performance in complete safety.
For further details or assistance, please contact the DEALER where you purchased the product or visit our website www.edilkamin.com. and click on DEALERS.
Please note that a qualified dealer MUST install the fireplace as is stipulated in the Italian Ministerial Decree No. 37 ex Italian Law No. 46/90.
For installations implemented outside Italy, please refer to the local regulations in the country of use.
NOTE
- After having unpacked the boiler-fireplace, ensure that its contents are complete and intact ("cold hand" handle, guarantee booklet, glove, technical data sheet/CD).
In case of anomalies please contact the dealer where you purchased the product immediately.
You will need to present a copy of the warranty booklet and valid proof of purchase.
- Commissioning/ testing
Commissioning and testing must be performed by the DEALER. Failure to do so will void the warranty.
Commissioning, as specified in standard UNI 10683 consists in a series inspections to be performed with the boiler-fireplace installed in order to ascertain the correct operation of the system and its compliance to applicable regulations. - Incorrect installation, incorrect maintenance, or improper use of the product, shall relieve the manufacturer from any damage resulting from the use of this product.
- the proof of purchase tag, necessary for identifying the boiler-fireplace, is located:
- on the top of the package
- in the warranty booklet found inside the firebox
- on the nameplate affixed on the right side of the device;
This documentation must be saved for identification together with the valid proof of purchase receipt. The data contained therein must be reported when requesting information and made available should servicing be required; - All images are for illustration purposes only; actual products may vary.
The undersigned EDILKAMIN S.p.a. with head office headquarters at Via Vincenzo Monti 47 - 20122 Milano - Italy - VAT 0192220192
Declaressunderitsownresponsabilityasfollows:
The wood Thermo Fireplaces illustrated below conforms to Regulation EU 305/2011 (CPR) and to the harmonised European Standard EN 13229:2001 - A1:2003 - A2:2004 - AC:2006 - AC:2007
THE WOOD THERMO FIREPLACES, trademark EDILKAMIN, called H2OCEANO 15-23-28
YEAR OF MANUFACTURE: Ref. Data nameplate Declaration of performance (DoP - EK 078-079-080) Ref. Data nameplate
EDILKAMIN S.p.a. will decline all responsibility of malfunctioning or damage to the equipment in case of unauthorized substitution, assembly or modifications of any sort on the said equipment on the part of non-EDILKAMIN personnel.
TECHNICALAND HEATING SPECIFICATIONS
H2OCEANO is designed to heat water by the combustion of wood in the hearth.
The water contained in the thermo fireplace is heated and sent into the heating system (radiators, heated towel rails, underfloor heating panels) and also heats the room in which it is located via natural convection radiation.
The thermo fireplace MUST NEVER FUNCTION WITHOUT WATER IN THE SYSTEM.
The water heats up, circulating in the cavity that runs around the entire semi-circular wall and dome of the hearth.
The hollow space is constructed in thick steel sheet.
The hearth is closed in the front by a door that slides up and down and side to side for cleaning the glass.
INNOVATIVE PATENTED ASH GRILLE
This allows for the distribution of primary combustion air not only from the bottom up, but also horizontally to achieve high oxygenation of the flame, better combustion and increased power.
"GASKET-SAVING"DOOR
During sliding, the door remains slightly ajar from thermo fireplace inlet in order to protect the gaskets. In the closed position the door is perfectly flanked against the thermo fireplace to ensure maximum sealing and therefore optimal performance. The handle is removable or it can be fixed to the door (see pg. 29)
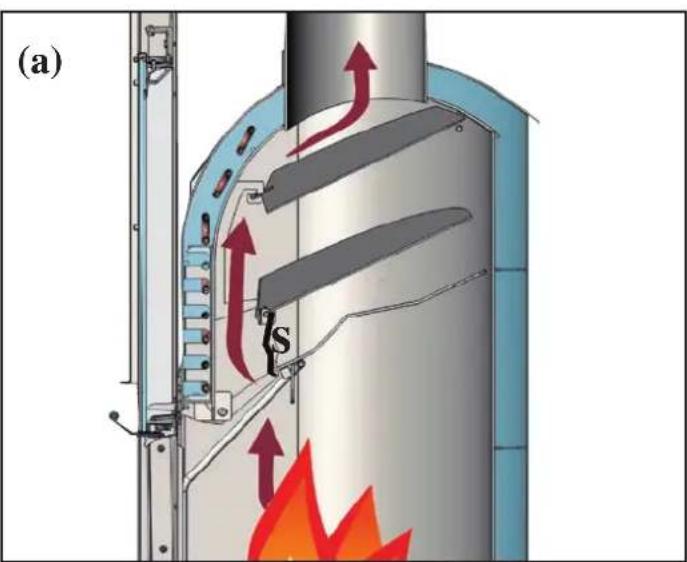
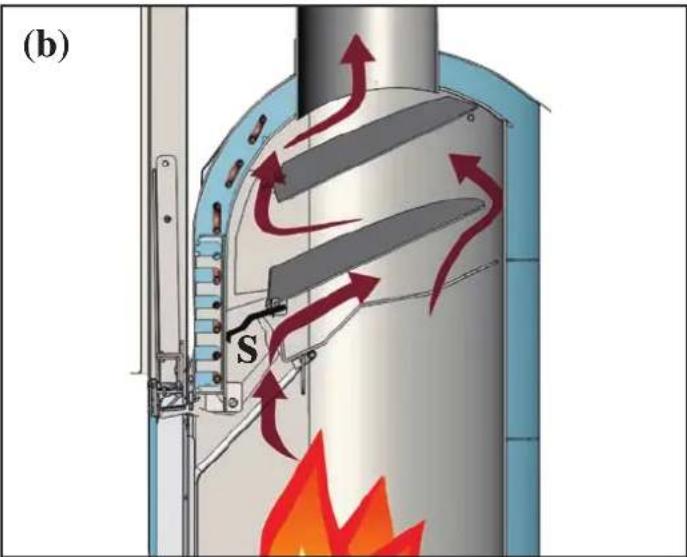
AUTOMATIC SMOKE BY-PASS
When turning on with the frame open, to facilitate combustion start-up, the smoke damper (S) remains in the opening position so that smoke can directly and easily reach the chimney flue.
When combustion has been started up, the smoke damper also closes automatically when the door is closed (S - fig. b). In this mode, before reaching the chimney flue, the smoke deviates in such a way to lap and give off heat to the water in an efficient manner.
The by-pass is automatically controlled by the door's movement.
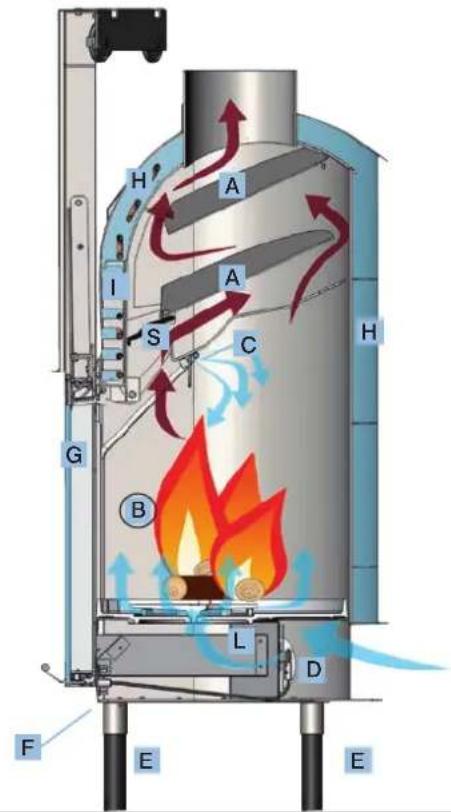
A Deflectors/Ceilings
B Grill motor housing
C Post-Combustion
Automatic external air inlet adjustment valve (optional)
E Possibility of applying adjustable feet (optional)
F Calibration for automatic adjustment of combustion air
G Up/down sliding door
H Enveloping cavity for water containment
Safety coil for thermal relief (CS version)
Primary combustion air distribution ash grille
S Smoke diversion damper
SAFETY INFORMATION
IMPORTANT: ONLY THERMO FIREPLACES WITH COILS DRIVEN BY A THERMAL RELIEF VALVE SHOULD BE INSTALLED ON CLOSED TANK SY
STEMS (version marked with the abbreviation CS).
- The installer is responsible for the correct installation of the system, which is to be compliant with UNI standards 10683 - 9615/90 - 10412:2
- All must be performed by qualified personnel according to Ministerial Decree 37 ex Law 46/90
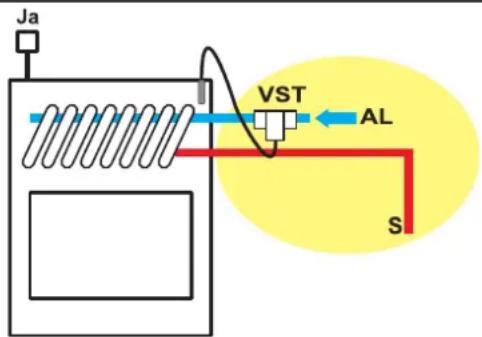
The thermal relief valve (TRV - provided by Edilkamin) must be connected to the cooling circuit (AL) with a minimum pressure of 1.5 bar.
JA = automatic relief valve
S = drain
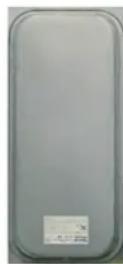
Litres ?
- The heating system must include an expansion tank dedicated only to the thermo fireplace, evaluated based on the volume of water present in the system itself (an expansion tank shared with other generators is not allowed).
1 Year
The safety and thermal relief valves must be checked at least once a year by qualified personnel according to Ministerial Decree 37 ex Law 46/90.
H_2OCEANO MUST NEVER BE MADE TO OPERATE WITHOUT WATER IN THE SYSTEM.
MUST BE MADE WITH A PRESSURE OF ABOUT 1.5 BAR.
IT CAN BE DAMAGED IF IT IS IGNITED WITH NO WATER IN THE SYSTEM.
- The thermo fireplace is designed to heat water by means of wood combustion in the hearth.
- The only hazards that can derive from using the thermo fireplace pertain to non-compliance with the installation instructions, direct contact with live electrical parts (inside), contact made with the fire and hot parts or foreign substances being put in the fireplace.
- For the thermo fireplace to function properly installation must be carried out according to the instructions given in this booklet and the door must only be opened to refill the hearth with wood.
- Never put foreign substances in the hearth.
- Whilst functioning, the door must never be opened. In fact, combustion is fully automatic and requires no manual intervention.
- Do not use flammable products to clean the smoke channel (the flue section connecting the boiler-fireplace smoke outlet to the chimney flue).
- The glass can be cleaned when COLD with a suitable product (e.g. GlassKamin) and a cloth. Do not clean when hot.
- The exhaust pipes and the door become very hot when the thermo fireplace is used.
- Do not place anything that is not heat resistant close to the thermo fireplace.
- NEVER use liquid fuel to ignite the thermo fireplace or to rekindle the embers.
- Do not obstruct the external air inlets in the room where the fireplace is installed or the air inlets of the thermo fireplace itself.
- Do not wet the thermo fireplace and do not go near the electrical parts of the system with wet hands.
- Do not use reducers on the smoke exhaust pipes.
- The thermo fireplace must be installed in a place that is suitable against fire hazards and equipped with all that is required (power and air inlets/outlets) for it to function properly and safely.
GENERAL SAFETY REGULATIONS
IN CASE OF INSTALLATION ON OPEN TANK SYSTEMS
The connections, commissioning and verification of proper operation of the thermo fireplace must be carried out by qualified personnel, who can implement all connections in accordance with the laws in force, particularly with Italian D.M 37 Law No. 46/90, apart from complying with these instructions.
For installations implemented outside Italy, please refer to the local regulations in the country of use.
The thermo fireplace and the system are filled with water that flows from the water inlet pipe (the diameter must not be less than 18mm ) to the open expansion tank.
All the vents of the radiators must be opened during this phase so as to prevent air pockets from forming in the system, which would obstruct the circulation of water.
NB:
- The open tank should be positioned at a height greater than 3m higher than the highest component of the primary circuit and less than 15m from the edge of the thermo fireplace.
- In any case, the tank must be high enough to create a greater pressure than that produced by the pump (circulator).
- The system must never be filled directly from the water mains as the pressure may be greater than that stipulated on the data plate of the thermo fireplace, with resulting damage to the thermo fireplace itself.
- The safety pipe to the expansion tank must allow the water to flow freely without shut-off valves and be appropriately insulated to prevent the water inside from freezing, which would compromise the connection.
- The water inlet pipe must not have taps nor curves.
The maximum operating pressure must not exceed 1.5 bar - The testing pressure is 3 bar.
- It is a good idea to add an anti-freeze liquid to the water contained in the system or to observe standard UNI 8065.
- Never ignite the fire in the thermo fireplace (not even as a test) unless the system is filled with water as this could cause irreparable damage.
- Connect the drains of the thermal relief valve (TRV) and the safety valve (SV) (diagrams are found on the following pages).
- The flow test of the system must be carried out with the expansion tank open.
- It is recommended to install a 6 bar safety valve on the hot sanitary water circuit so as to drain any excessive increase in the volume of the water in the heat exchanger.
- Place all the components of the system (circulator, heat exchanger, valves, etc.) in easily accessible points for routine and special maintenance procedures.
IN CASE OF INSTALLATION ON CLOSED TANK SYSTEMS
(provisions in addition to those provided for open tank systems)
- Be careful not to exceed 1.5 bar when filling the system.
- Only if a thermal relief valve actuates the coil can the fireplace be installed on a CLOSED TANK system (version marked with the abbreviation CS).
- When connecting a thermo fireplace to an existing system, an assessment must be made regarding a need for another CLOSED TANK on the system.
- The upstream pressure of the cooling circuit must be at least 1.5 bar (UNI 10412/2 point 6.2).
WATER TREATMENT
If need be, antifreeze, descending and anticorrosive solutions are to be added to the water.
A softener must be used if the hardness of the water used to refill and top-up the system exceeds 35^ (French degrees).
Please refer to UNI 8065-1989 standard (water treatment in domestic heating systems).
DIMENSIONS
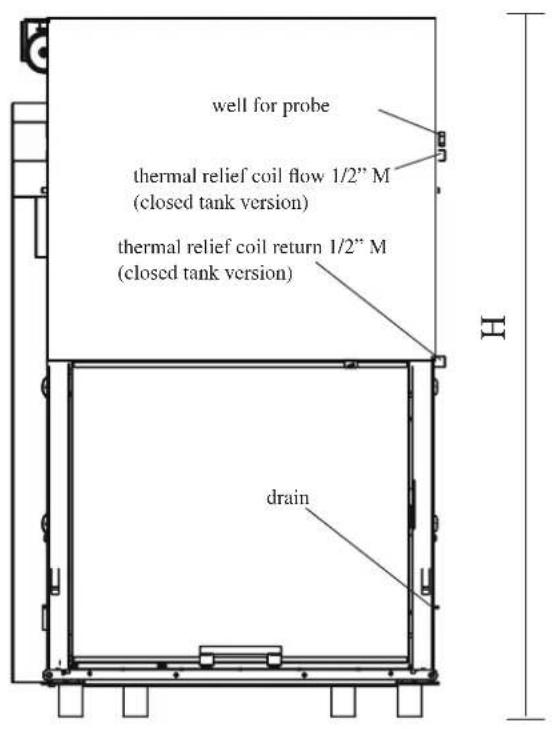
FRONTSIDE
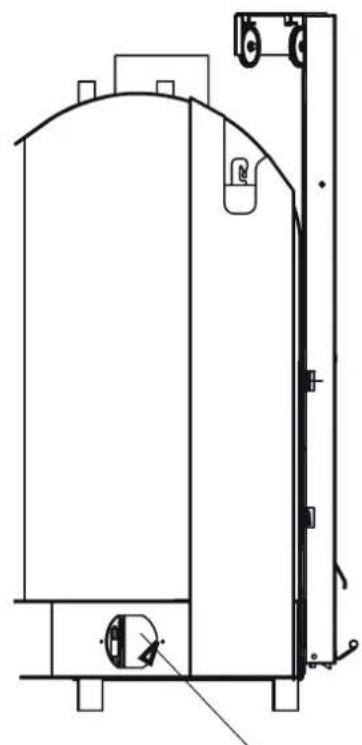
combustion air
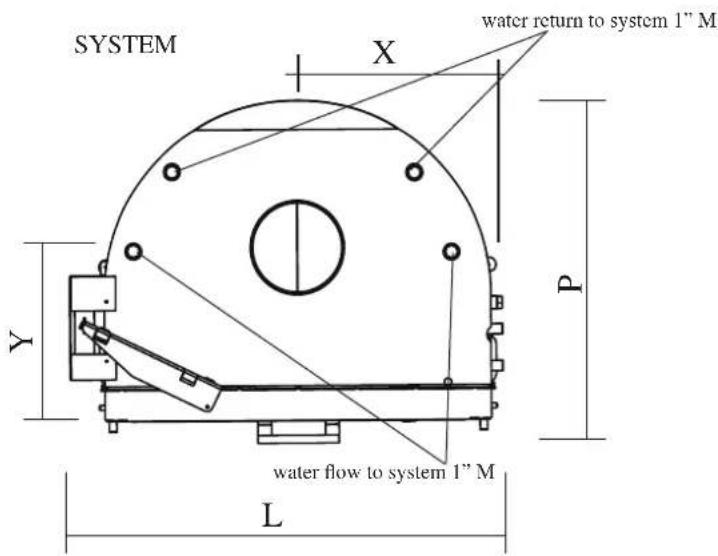
| H2OCEANO 15 - 15/CS H2OCEANO 23 - 23/CS H2OCEANO 28 - 28/CS | ||||
| L 74 88 106 cm | ||||
| P 62 68 83 cm | ||||
| H | 135 without feet (with feet + 14 cm) | 147 without feet (with feet + 14 cm) | 147 without feet (with feet + 14 cm) | cm |
| X 34 34 51 cm | ||||
| Y 36 37 50 cm | ||||
| internal hearth dimensions | 50x38 60x50 78x60 cm | |||
THE INLET AND OUTLET PIPES MUST BE CROSSED FOR THIS TO FUNCTION PROPERLY
TECHNICAL AND HEATING SPECIFICATIONS
| 15-15/CS 2 | 3-23/CS 28 | 28/CS | ||
| Thermal output (burnt) 19,3 27,9 34,4 kW | ||||
| Rated power 16 23 28 kW | ||||
| Water heating power 9 13,3 17,5 kW | ||||
| Approx. overall efficiency 83,1 82,3 81,5 % | ||||
| Class efficiency (EN 303-5) > 3 > 3 > 3 - | ||||
| ø female smoke outlet | 18 22 25 | cm | ||
| Maximum operating pressure | 1,5 | 1,5 | 1,5 | bar |
| Fuel consumption | 4,2 | 6,1 | 75 | kg/h |
| Water capacity | 75 | 100 | 130 | litres |
| Heating capacity * | 415 | 600 | 730 | m3 |
| Weight including packing 251 303 308 kg | ||||
| Hot sanitary water production (kit 1-3 - N3 - N3bis)** | 13-14 | 13-14 | 13-14 | litres/min |
| ø external air inlet | 12,5 12,5 | 12,5 | cm | |
| System return (male) | 1" | 1" | 1" | inches |
| System flow (male) | 1" | 1" | 1" | inches |
N.B.: DATA PROJECT (Refer to standard EN 13229)
- The heatable room dimensions are calculated on the basis home insulation in compliance with Italian law 10/91, and subsequent changes together with an expected heat output of 33Kcal/m^3 per hour.
- It is also important to consider the position of the boiler-fireplace in the room to be heated.
THE DIAMETER OF THE CHIMNEY FLUE TO BE USED MUST BE ASSESSED BY THE INSTALLER ACCORDING TO THE HEIGHT OF THE CHIMNEY FLUE ITSELF.
The data shown above is purely indicative.
EDILKAMIN s.p.a. reserves the right to change the products at its discretion without notice.
TECHNICAL AND HEATING ECODESIGN

EDILKAMIN
TECNOLOGIA DEL FUOCO
Edgarmin S.
20045 Lainale (M), via P Massagni 7
1039029376215-103902937621400000
邮编:200100
www.562.com
Indirect heating functionality yes
Direct heat output (space heat output) 8,4 kW
Indirect heat output (space heat output) 8,2 kW
CPR harmonised standard EN 13229
| Fuel Preferred fuel | (unique) | Space heating emissions at nominal heat output | Space heating emissions at minimum heat outputOnly required if correction factors \( F(2) \) or \( F(3) \) are applied. | |||
| (*) PM = particulate matter; OGCs = organic gaseous compounds, CO = carbon monoxide, NOx = nitrogen oxides. | ||||||
| PM OGC CO NOx PM | OGC | CO | NOx | |||
| mg/m3at 13%02 | mg/m3at 13%02 | |||||
| Wood with moisture content < 25 % | yes | 16 | 59 | 1181 | 101 | |
Observe the specific precautions for installation, assembly and maintenance indicated in the manual accompanying the product
| Up to 1/1/2022 | |
| n, [%] | 73,1 |
| EEI [%] | 110 |
| Energy Efficiency Class | A+ |
| From 01/01/2022 | |
| n. [%] 73,1 | |
| EEI [%] | 110 |
| Energy Efficiency Class | A+ |
Calculations according to the council commission regulation (EU) 2015/1186 and 2015/1185
Characteristics when operating with the preferred fuel
$$ E E I = \left(\eta_ {2, m} - B L F\right) - 10 \% + F (2) + F (3) - F (4) - F (5) $$
$$ \eta_ {s} = \eta_ {S, \text {on}} - 10 \% + F (2) + F (3) - F (4) - F (5) $$
$$ B F = 1, 4 5 $$
$$ \eta_ {S, a n} = \eta_ {t h, n a m} $$
F5 not of relevance
| Heat output | |||
| Item | Symbol | Value | Unit |
| Nominal heat output | Pnom | 16,6 | kW |
| Minimum heat output (indicative) | Pmin | N.A. | kw |
| Auxiliary electricity consumption | |||
| Item | Symbol | Value | Unit |
| At nominal heat output | eHax | 0,0 | kW |
| At minimum heat output | eEmin | 0,0 | kW |
| In standby mode | eIst | 0,0 | kW |
$$ F(4) = CC \cdot \frac{0.2\cdot e l_{max} + 0.8\cdot e l_{min} + 1.3\cdot e l_{sb}}{P_{nom}}\cdot 100[\% ] $$
| Useful efficiency (NCV as received) | |||
| Item | Symbol | Value | Unit |
| Useful efficiency at nominal heat output | ηth,com | 83,1 | % |
| Useful efficiency at minimum heat output (indicative) | ηth,min | N.A. % | |
| Type of heat output/room temperature control (select one) | |
| single stage heat output, no room temperature control | NO |
| two or more manual stages, no room temperature control | NO |
| with mechanical thermostat room temperature control | NO |
| with electronic room temperature control | NO |
| with electronic room temperature control plus day timer | NO |
| with electronic room temperature control plus week timer | NO |
F (2)
0,0%
up to 2022
| F (2) | 0,0 % | from 2022 |
| Other control options (multiple selections possible) | ||
| room temperature control, with presence detection | NO | |
| room temperature control, with open window | NO | |
| detection | ||
| with distance control option | NO | |
F(3)
0,0%
up to 2022
F(3)
0,0%
from 2022
Contact details
Name and address of the manufacturer
EDILKAMIN S.P.A.
Via Mascagni 7
20045 Lainate (MI) - ITALY
www.edilkamin.com
mail@edilkamln.com
Legal Representative
Paolo Gusella
TECHNICAL AND HEATING ECODESIGN

EDILKAMIN TECHNOLOGY DEL FUCO
Ediskanin S.p.A.
20045 Laniae (MI), Via P. Moscagni 7
Tel.: +38 02 937621
Fax: +39 02 93762 4003000
mail@ediskanin.com
www.ediskanin.com
Capitae € 4,100.00 int. vers.
Sede legale:
20154 Milano, Via P. Moscag 8
Reg. Imp. di Milano 02/0222012
REA n°78388
Cod. Fisica e Partita / A/0192220192
EXIGENCES D'INFORMATIONS APPLICABLES AUX DISPOSITIFS DE CHAUFFAGE DÉCENTRALISÉS À COMBUSTIBLE SOLIDE - RÉGULATION (EU) 2015/1185 E 2015/1186
Cod. Fiscal e Partial IVA 0019222K192
EXIGENCES D'INFORMATIONS APPLICABLES AUX DISPOSITIONS DE CHAUFFAGE DÉCENTRALISÉS À COMBUSTIBLE SOLIDE -
RÉGULATION (EU) 2015/1185 E 2015/1186
Other than that described in this documentation, you are also asked to note the following UNI standards:
- No. 10683 - firewood heat generators:
installation requirements - No. 9615/90 - calculating the internal dimensions of fireplaces
- No. 10412:2 - hot water heating systems.
Specific safety requirements for systems provided with residential solid fuel burning appliances and combined boiler, not exceeding a total nominal heat input of 35kW
Particularly:
- Before carrying out any assembly it is important to verify compatibility of the appliance, as stipulated in UNI 10683 standard, paragraphs 4.1/4.1.1/4.1.2.
- When assembly is completed, the installer must implement "start-up operations" and issue documentation as required by UNI 10683 standard in paragraphs 4.6 and 5, respectively.
- The connections, commissioning and verification of proper operation of the thermo fireplace must be carried out by qualified personnel, who can implement the electrical and plumbing connections as required by UNI standards 10683, paragraph 4.5 and 10412:2, apart from complying with these assembly instructions.
Verification must be carried out with the fireplace on and after having been on for a couple of hours, before covering the thermo fireplace, so that you can intervene if need be. After which, the finishing operations such as: - setting-up the fireplace mantel
- mounting the fireplace covering
- pilasters, painting, etc.
are carried out, once the tests are completed successfully. Consequently, EDILKAMIN does not accept responsibility for expenses deriving from demolition as well as construction even if either occurs as a result, after having replaced any damaged parts of the thermo fireplace.
EXTERNAL AIR INLET
An external connection with a 12,5cm diameter crosssection throughout (refer to the technical table) is absolutely necessary for the thermo fireplace to function properly and is therefore imperative for this to be implemented.
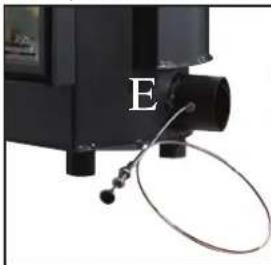
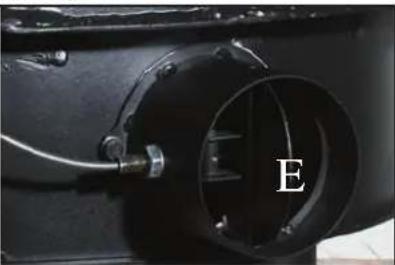
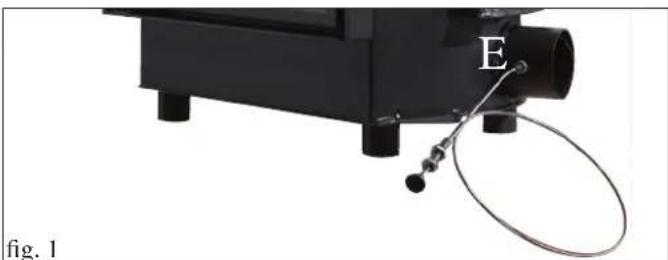
This connection must link the air adjustment mechanism (E), delivered separately. The mechanism, delivered separately, can be assembled either right or left of the thermo fireplace. Connection can be made with a flexible aluminium pipe. Ensure that the points where there may be dispersion of air are sealed well. The air adjustment mechanism (E) can be removed and mounted on the right side of the thermo fireplace. It is recommended to place a protection grille on the outer part of the air inlet channel, however, ensure that this does not reduce the cross-section. For distances longer than 3m or with bends, increase the given cross-section by a minimum of 10% to a maximum of 20% . The intake of external air must enter at floor level (it cannot enter from above).
CHIMNEY FLUES AND CHIMNEYPOT
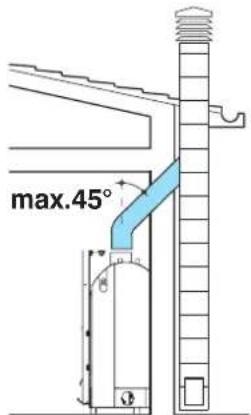
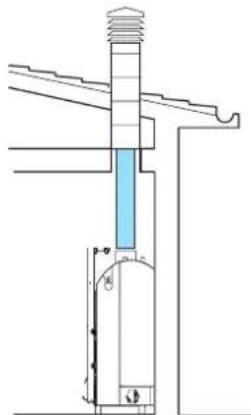
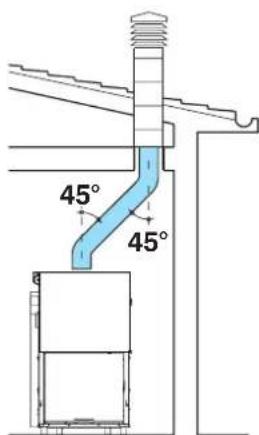
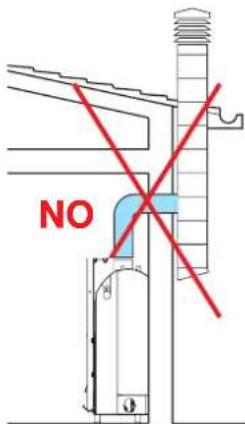
The thermo fireplace smoke outlet has a circular crosssection so that stainless steel pipes can be used. If the chimney flue inlet is not vertically above the thermo fireplace, the connection from the fireplace to the flue must not have a narrowing section or inclinations greater than 45^ (fig. 1-2-3-4).
If the chimney flue is not brand new or too big, it is recommended to fit in stainless tubes of an appropriate diameter and with suitable insulation.
If the chimney flue is installed outside, it is recommended to use an insulated, double walled, stainless steel flue.
The characteristics of the construction must be suitable to withstand a smoke temperature of at least 450^ , with particular reference to the mechanical resistance, insulation and the gas tight scaling.
The junction of the steel flue inlet and the smoke outlet of the fireplace must be sealed with high temperature mastic.
The fundamental characteristics of the chimncypot are:
- an internal cross-section at the base, which is the same as that of the chimney flue.
- an outlet cross-section which is no smaller than twice that of the chimney flue.
- its position must be high enough to catch the wind and avoid downdraft areas in turbulent wind.
In addition to that mentioned above, please consider the indications stipulated in UNI 10683/2005 standard, paragraph 4.2: "connection to the smoke outlet system" and its subsections.
1
2
3
4
INSTALLATION
If combining with a pre-fabricated Edilkamin covering, to define the exact positioning of the thermo fireplace, it is important to take the chosen covering model into consideration.
The positioning is implemented according to the model chosen (refer to the installation instructions found inside the packaging of each thermo fireplace covering).
Always ensure the thermo fireplace is level during the installation process.
- Drill a hole into the wall or the flooring for the external air intake and connect the air adjustment mechanism to the hole as described in the chapter called "external air inlet".
- Use a stainless steel flue to connect the thermo fireplace to the chimney flue, adhering with the diameters indicated in the specifications table and the guidelines given in the chapter called "chimney flues".
- Verify that all moving parts function properly before setting the thermo fireplace covering in place.
- This system must be tested and ignited for the first time before the covering is set in place.
INSTALLATION COVERING, FIREPLACE MANTEL AND VENTILATION OUTLETS
The base of the thermo fireplace covering must allow the internal air to be recycled. Therefore, suitable slots or apertures must be made for the air to pass through. Parts of the thermo fireplace covering that are made of marble, stone and bricks must be mounted with a small gap between them and the fireplace so as to prevent possible breakage due to expansion and excessive overheating.
Wooden parts must be protected by fire resistant panels and
no part must touch the thermo fireplace, on the contrary, there must be an appropriate distance of at least 1cm to allow the air to flow, preventing heat accumulation. The fireplace mantel can be made of fireproof plasterboard panels or gypsum board and, however, of completely fireproof material. Air should be allowed to flow inside the fireplace mantel (through the gap between the door and the beam). Through convective motion, the air will flow out from the grille installed at the top, resulting in heat recovery and preventing excessive overheating.
The fireplace mantel must have appropriate openings to carry out maintenance on the fittings.
In addition to that mentioned above, please consider the indications stipulated in the UNI 10683 standard, paragraphs 4.4 and 4.7: "insulation, finishing, fireplace covering and safety recommendations".
Insulating mats must be applied when using an installation KIT so as to protect it from the heat radiation emitted by the thermo fireplace.
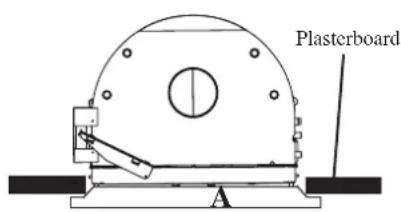
INLET FRAME (OPTIONAL)
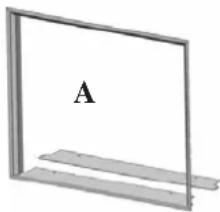
To facilitate coupling with the covering's components, the thermo fireplace can be fitted with a frame (A) to be applied on the front of the inlet.
INSTRUCTIONS FOR USE
Practical advice
It is recommended to keep the radiators closed in the room where the thermo fireplace is installed; The heat emitted from the outlet may be sufficient to heat.
- An incomplete combustion process causes excessive fouling on the heat exchanger pipe.
To prevent this you must:
- burn dry wood.
- ensure the hearth contains a bed of embers and burning carbon before adding more wood.
- place larger logs together with smaller ones.
- make sure the temperature of the return water is at least 50^ (use temperature control valve).
Igniting the fireplace
- Ensure that at least one radiator is always open.
- Actuate the switches of the electronic regulator.
- Place a pile of medium-thin dry wood in the thermo fireplace and ignite the fire.
- Wait a few minutes until it reaches sufficient combustion.
- Close the door
- Set the thermostat on the electronic regulator (^*) at a temperature between 50 and 70^ .
NOTE: There may be a slight smell of paint the first few times it is ignited, however, this will disappear quickly.
3-way valve
- During ignition the 3-way valve (^) diverts the flow of water, forcing it to return directly to the thermo fireplace; when the set temperature is reached, the 3- way valve (^) diverts the flow to the system (does not depend on the kit installed).
By-pass damper
- When the door is closed, the by-pass damper automatically diverts smoke, thus improving efficiency.
- When the door is opened, the damper bypass opens automatically, allowing the smoke to reach the smoke flue directly, preventing it from coming out of the inlet.
Thermal Relief Valve
If the water temperature exceeds 90^ (e.g. because of too much wood being placed in the hearth) the thermal relief valve will be activated and the acoustic signal triggered.
In this case you must proceed as follows:
Do not load additional fuel and wait for the temperature to fall below 80^ checking the warning lights on the electronic regulator. The hot water tap can be opened to speed up the cooling process if the thermo fireplace is equipped with a hot sanitary water production KIT.
INSTRUCTIONS FOR USE
External air regulation
The control, via the dedicated damper (E- fig. 1) located on the external air intake, regulates the quantity of primary air necessary for combustion.
Push the knob to close the external air intake; pull the knob to open the external air intake.
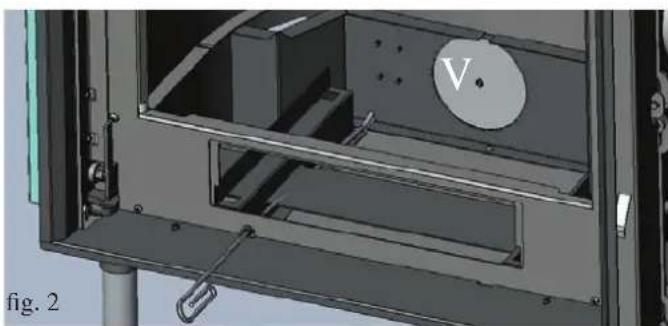
OPTIONAL THERMOSTATIC VALVE (FIG.2) Manual adjustment of combustion air (to be carried out during installation)
To obtain the desired water temperature, manually calibrate the thermostatic valve.
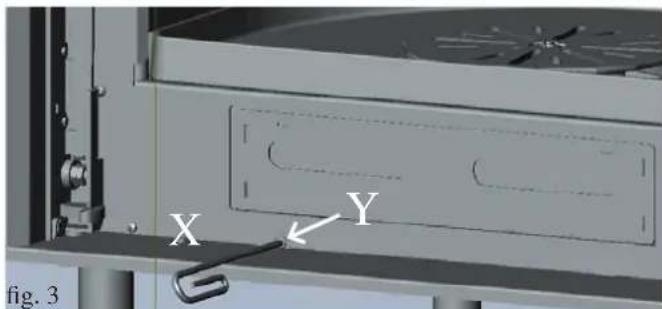
Using the Allen supplied (X - fig. 3) it is possible to regulate the thermostatic valve using the screw located just below the ash pan (Y - fig. 3).
- Screw on RT: combustion air on minimum
- Screw all the way to the LT: combustion air on maximum
- obviously, all intermediate settings are possible
NOTE: If a thermostatic valve must be installed, you must remove the manual air intake damper by removing the valve and the cable with the knob (E-fig. 1).
Automatic adjustment of combustion air
The combustion air is captured by the external air intake via the outlet (E - fig. 1) and reaches the hearth through the ash grille. This is adjusted using valve V (fig. 2).
If the temperature inside the hearth is low, compared to that set during calibration, the valve automatically positions itself in the open position and vice versa, it closes when the temperature is high.
This allows the right quantity of wood to be consumed for the set thermal comfort to be reached and unnecessary waste is avoided.
NOTE: when the thermostatic valve fully closes the combustion air inlet completely (the temperature in the hearth is very high), limited but sufficient access is allowed for the air to enter and keep the glass clean.
Installation of thermostatic valve "V" is optional.
All operations must be performed with the thermo fireplace off and fully cooled.
The mains power must also be disconnected.
Proceed as follows:
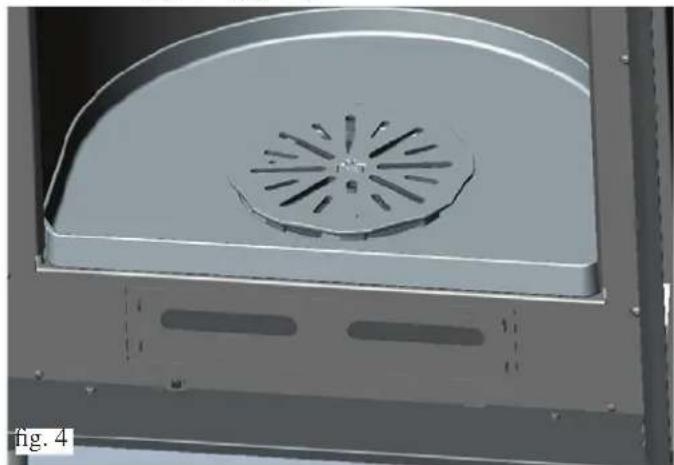
- Open the door and block it in the open position in order to easily work inside the hearth (fig. 4).
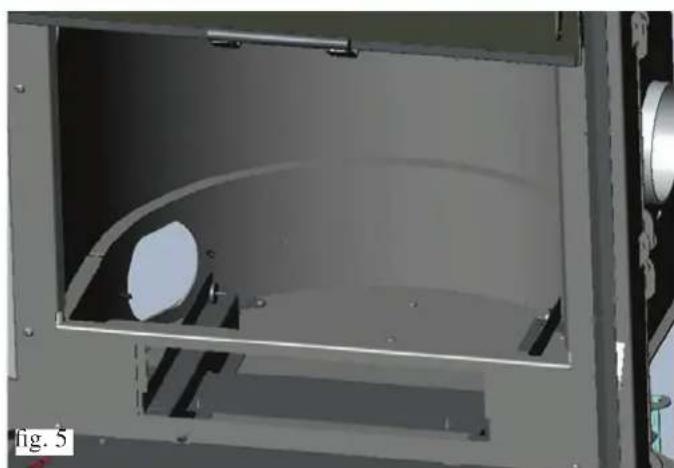
- Remove the following components (fig. 5):
- ash pan
cast iron grille - hearth base
Note: The hearth base is only on rested on the gasket, therefore to remove it simply lift it up (keep in mind that if the thermo fireplace has been used for a long period of time there may be significant adhesion between hearth base and hearth).
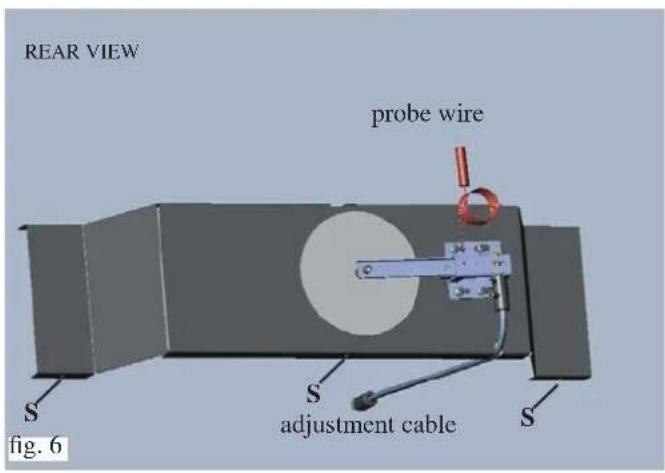
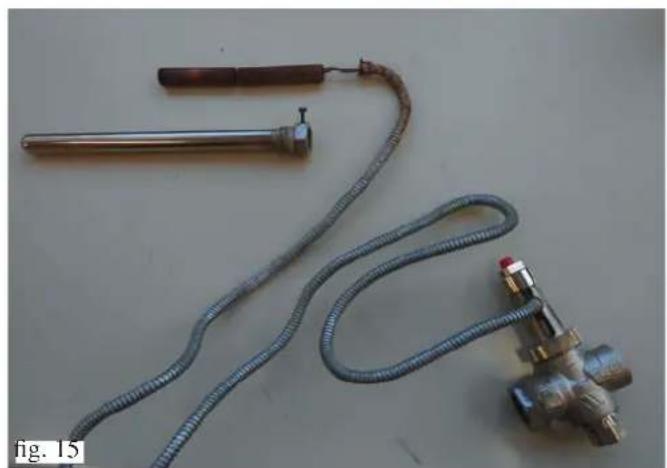
- Install the pre-assembled thermostatic valve on the fixing pate (fig. 6 - pg. 31).
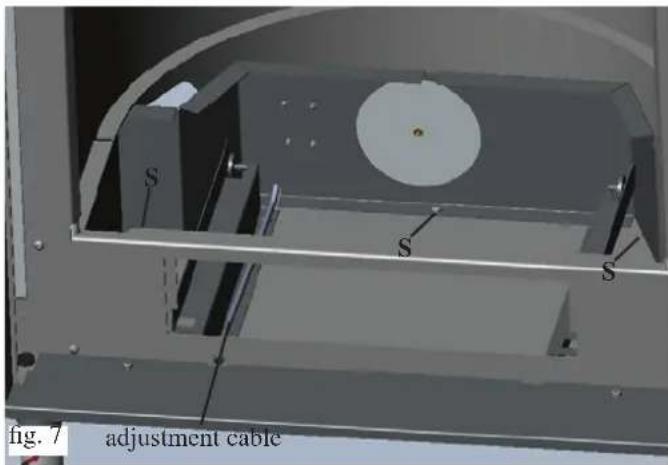
- Secure the plate with the three screws supplied (S) to the bottom of the hearth (fig. 7 - pg. 31).
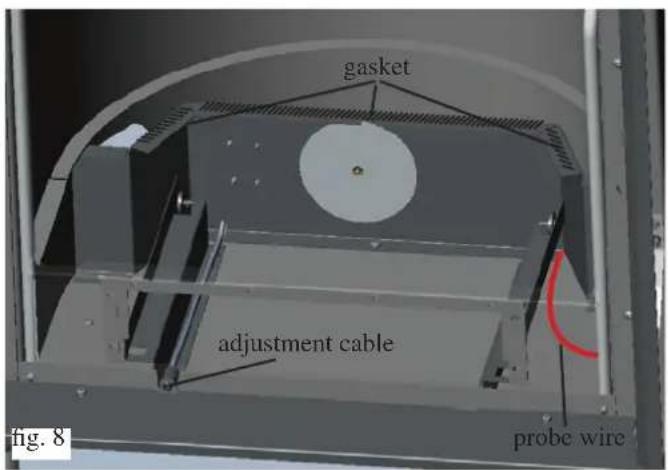
Before fixing, make sure to pass the adjustment cable and the probe wire through the prepared slots.
- The adjustment cable must be inserted into the front hole under the ash pan (fig. 8 - pg. 31), and secured in position using the elastic ring supplied.
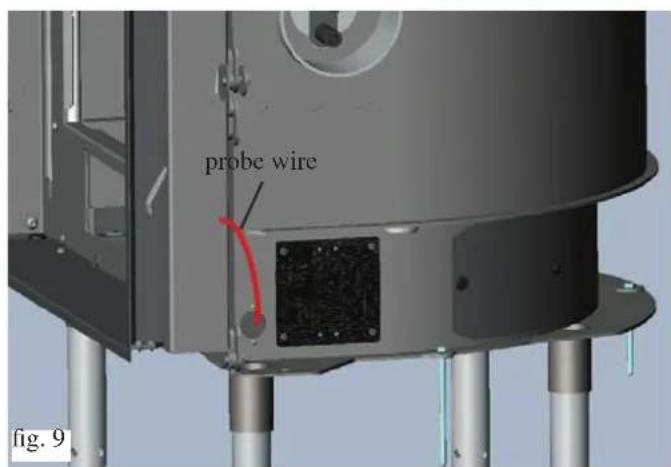
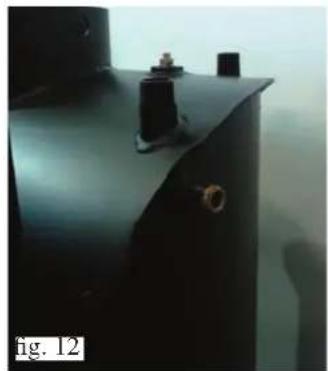
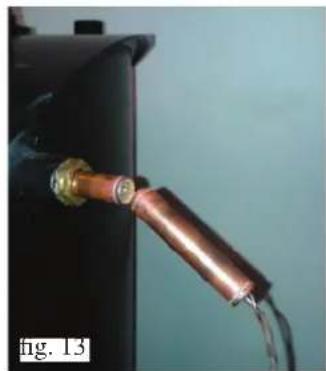
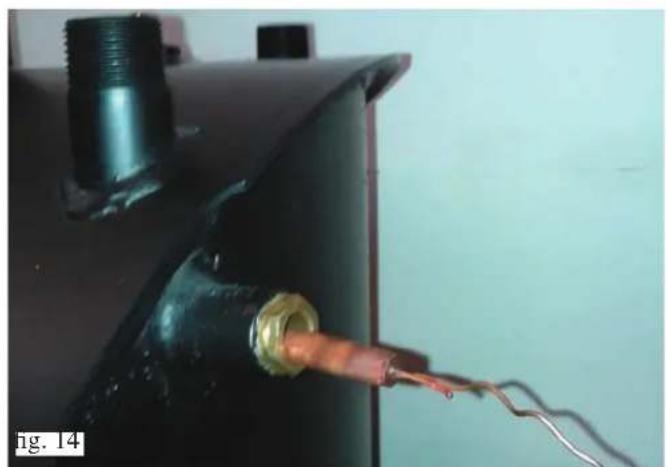
- The probe wire must be unwound along the right side of the ash pan proceeding then to the outside of the thermo fireplace (fig. 9 - pg. 31 via the hole on the right side.
- At this point insert the probe in the well on the thermo fireplace (pg. 26).
Before putting back the hearth base check the wear condition of the gasket (if necessary replace it) and insert the gasket on the perimeter of the fixing plate of the thermostatic valve (fig. 8 - pg. 31).
INSTRUCTIONS FOR USE
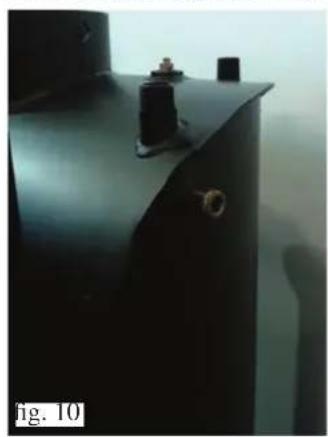
Probe positioning for OPEN TANK version
Probe positioning for CLOSED TANK version
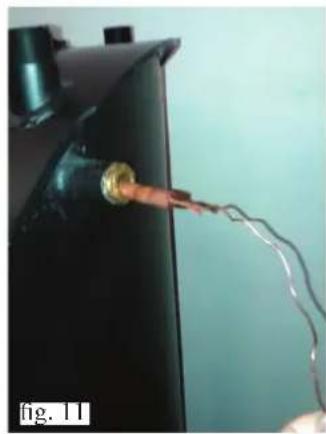
First insert the probe for the temperature relief valve, then the probe for the thermostatic valve.
INSTRUCTIONS FOR USE
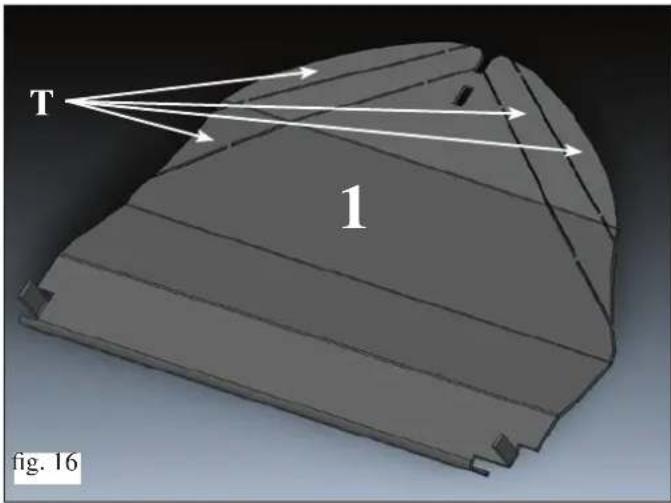
Adaptation to the characteristics of the draft in the chimney (fig. 16).
In case of low draft when you can find a few of smoke coming back opening the door, please proceed as following:
- Dismantle the metal baffles (1)
- Remove one or more precut parts(T) till the problem is over.
Door opening
- Use the provided removable handle to open the door (fig. 17).
- The same handle can be fixed to the door using the 2 grub screws supplied.
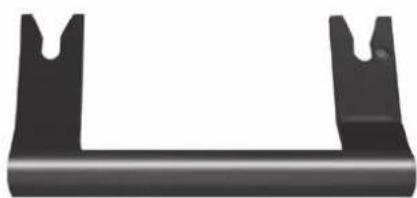
fig.17
Installing counterbalances
The latch door is equipped with counterbalances which ensure smooth movements as well as closure of the door.
The counterbalances can be regulated by adding platte/s (additional counterbalances) that are supplied with the thermo fireplace (P - fig. 18).

MAINTENANCE
Cleaning the hearth
-
The soot deposits that tend to accumulate on the internal walls of the hearth decrease the efficiency of heat transfer.
-
It is therefore necessary to clean the fireplace regularly, by bringing the water temperature to 80 / 85^ to soften the fouling and then remove this with a steel spatula.
Glass cleaning
- Use an appropriate spray for ceramic glass to clean the glass (Glasskamin - Edilakmin)..
- The glass must be cleaned when cold.
- For the opening swing of the door it is necessary to bring it in the closed position.
- Insert the "cold handle" door handle on the latch between the structure and the door and turn to open (fig. 19).

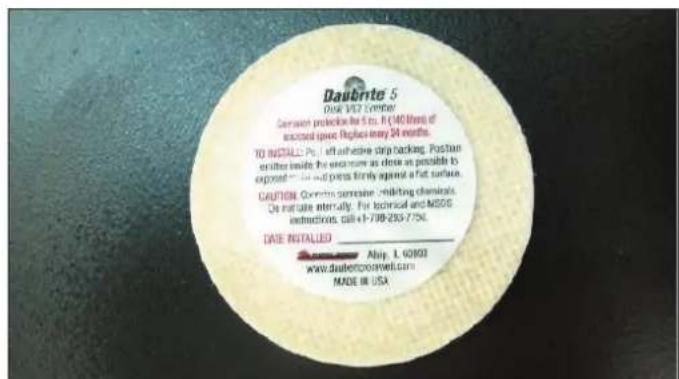
The product is supplied with two anti-corrosion discs (one on the outside and one on the inside of the combustion chamber). They must be removed during unpacking and disposed of as normal waste.
SYSTEM FOR AN OPEN TANK INSTALLATION
AN EXAMPLE OF A HYDRAULIC SYSTEM FOR A THERMO FIREPLACE WITH HOT SANITARY WATER PRODUCTION USING KIT 1
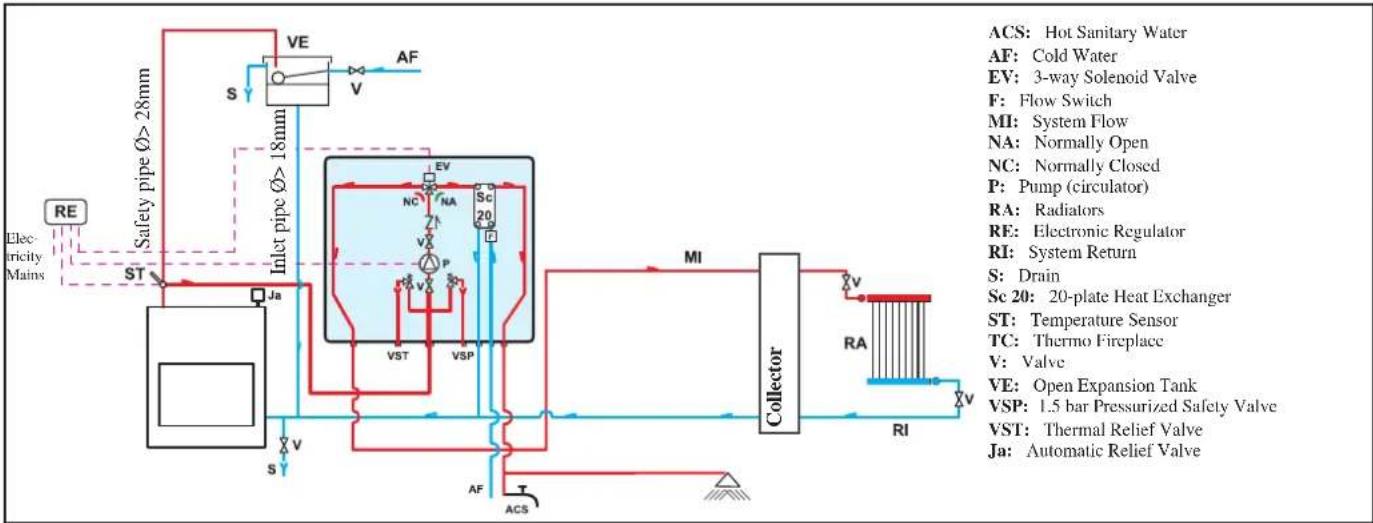
Kit 1 is designed to facilitate the work carried out by the installers. In fact, it consists of all the necessary components for the product to be properly installed.
NB: insulating mats must be applied so that the components of the kit are well-protected from the heat radiation emitted by the thermo-fireplace.
SELECTOR FUNCTIONS
Selector: OFF Everything is switched off
Selector: MAN Driven Circulator
Valve is set
Selector: AUTO Circulator is set
Valve is set
Alarm selection No acoustic signal in the
OFF position
KIT1
code 261880
SYSTEM FOR AN OPEN TANK INSTALLATION
AN EXAMPLE OF A HYDRAULIC SYSTEM FOR A THERMO FIREPLACE THAT DOES NOT PRODUCE HOT SANITARY WATER BUT HAS A WALL MOUNTED BOILER USING KIT 2
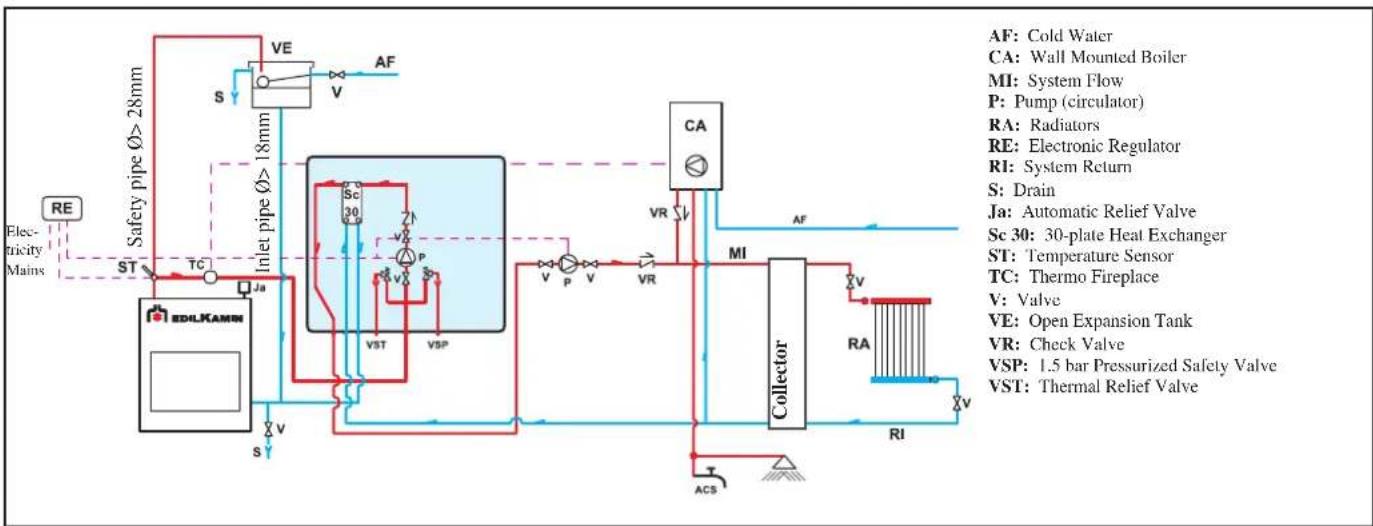
Kit 2 is designed to facilitate the work carried out by the installers. In fact, it consists of all the necessary components for the product to be properly installed.
NB: insulating mats must be applied so that the components of the kit are well-protected from the heat radiation emitted by the thermo-fireplace.
SELECTOR FUNCTIONS
Selector: OFF Everything is switched off
Selector: MAN Driven Circulator
Valve is set
Selector: AUTO Circulator is set
Valve is set
Alarm selection No acoustic signal in the
OFF position
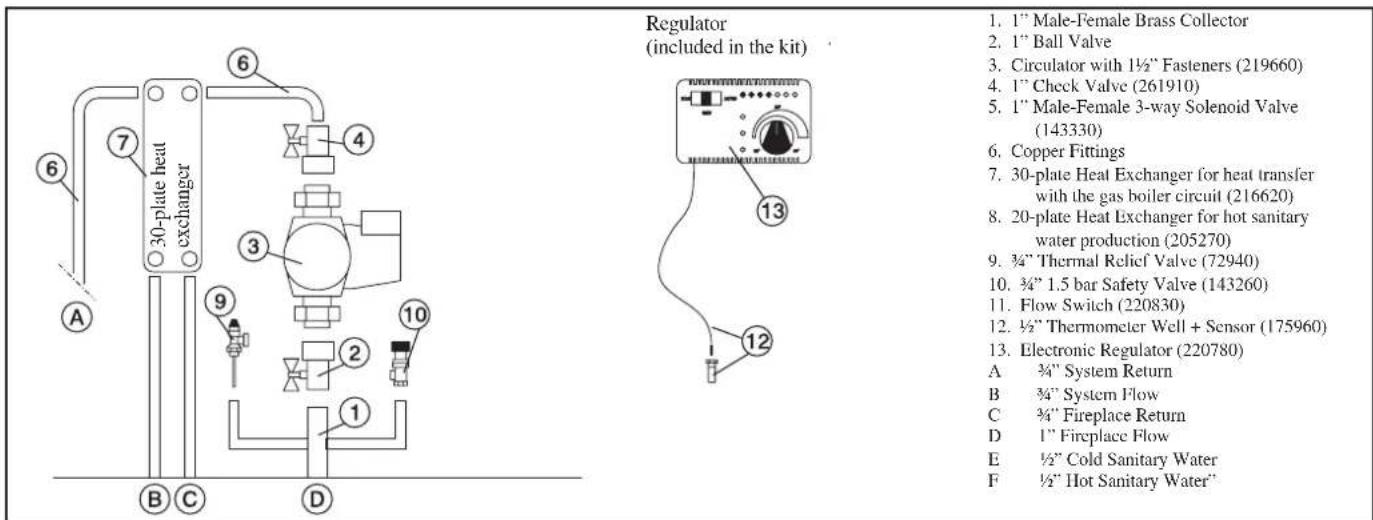
KIT2 code 261890
SYSTEM FOR AN OPEN TANK INSTALLATION
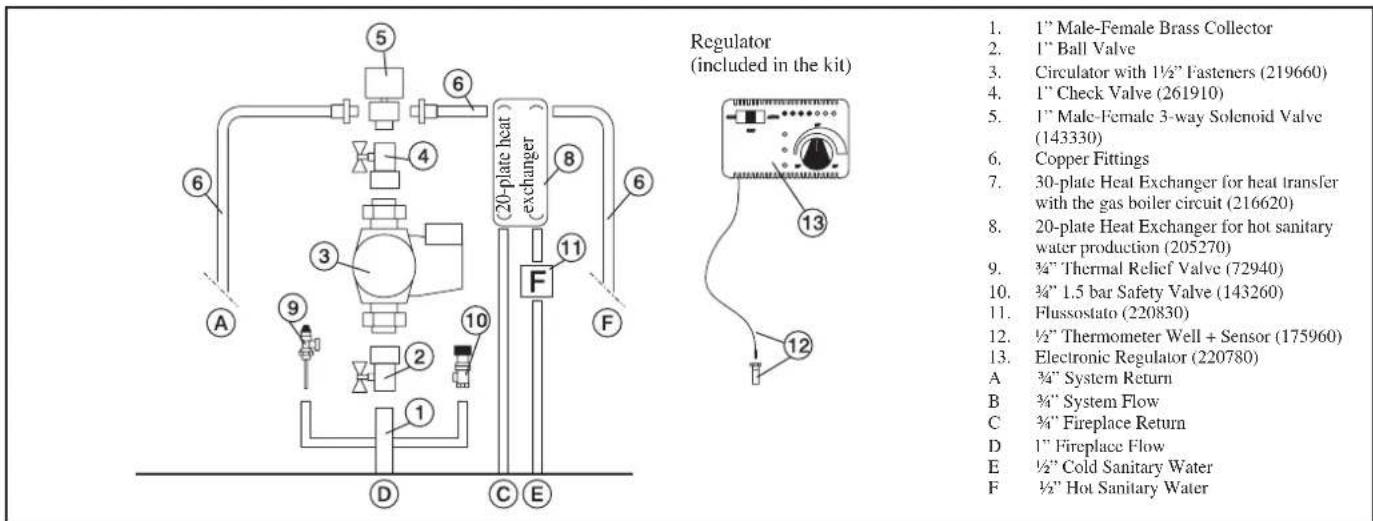
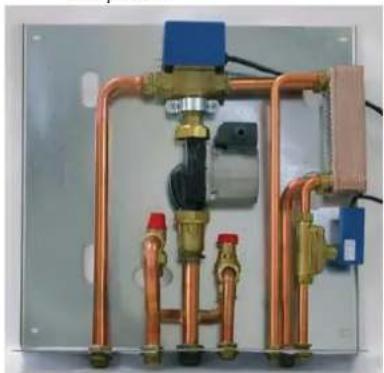
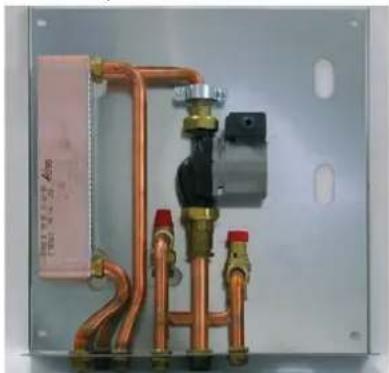
AN EXAMPLE OF A HYDRAULIC SYSTEM FOR A THERMO FIREPLACEITH HOT SANITARY WATER PRODUCTION AND A WALL MOUNTED BOILER USING KIT 3
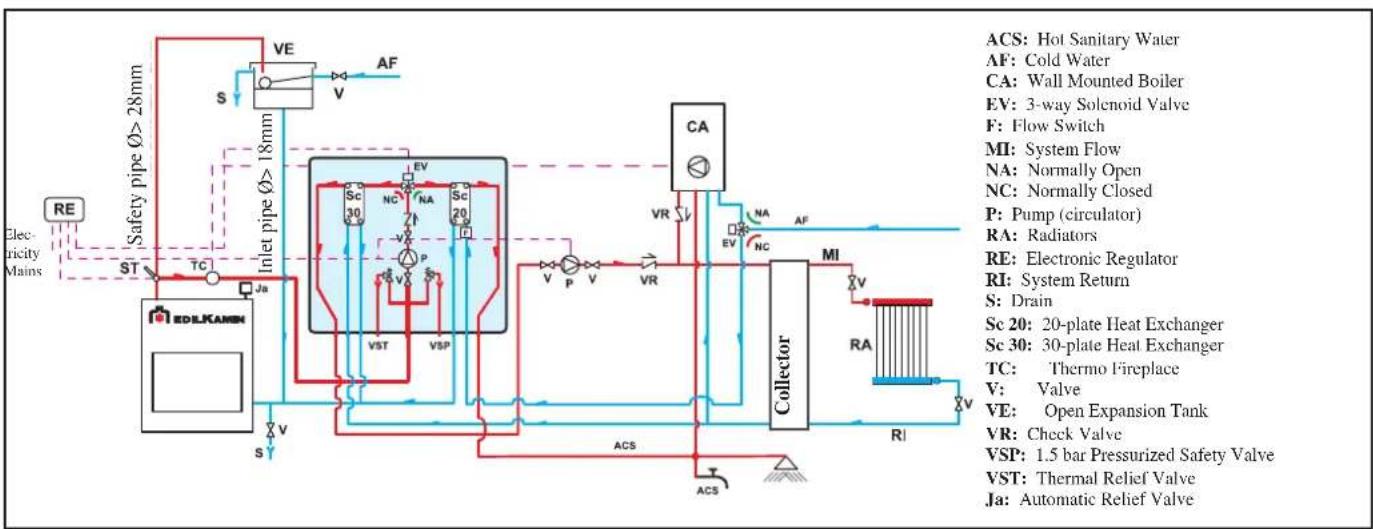
Kit 3 is designed to facilitate the work carried out by the installers. In fact, it consists of all the necessary components for the product to be properly installed.
NB: insulating mats must be applied so that the components of the kit are well-protected from the heat radiation emitted by the thermo-fireplace.
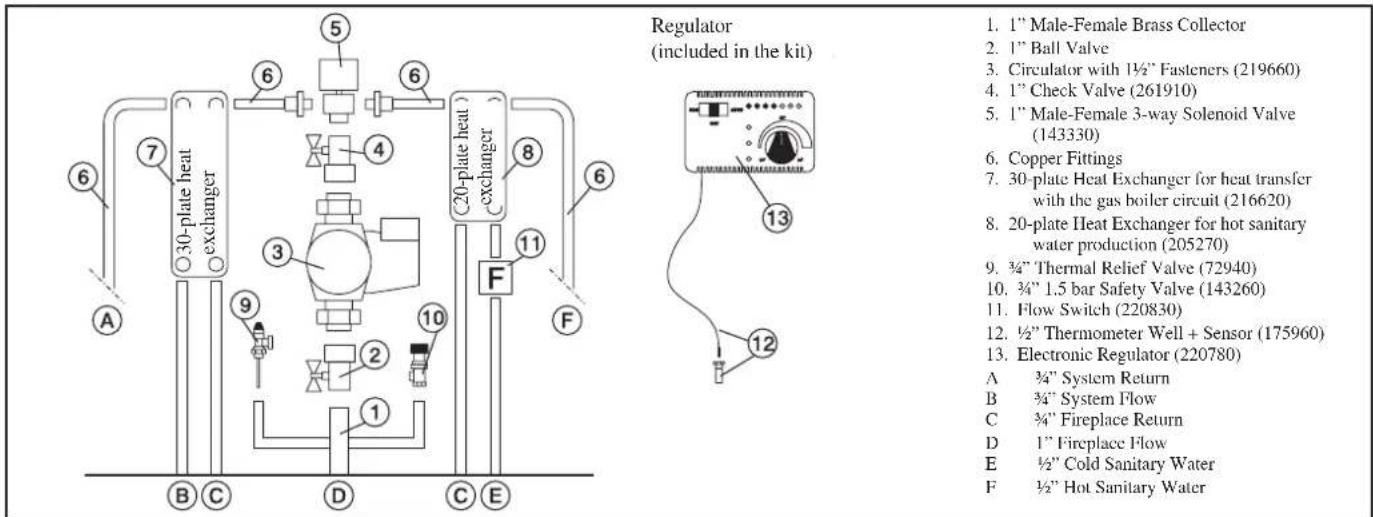
- 1" Male-Female Brass Collector
2.1"BallValve - Circulator with 112 Fasteners (219660)
- 1" Check Valve (261910)
- 1" Male-Female 3-way Solenoid Valve (143330)
- Copper Fittings
- 30-plate Heat Exchanger for heat transfer with the gas boiler circuit (216620)
- 20-plate Heat Exchanger for hot sanitary water production (205270)
- 34^ Thermal Relief Valve (72940)
- 34" 1.5 bar Safety Valve (143260)
- Flow Switch (220830)
- 12 "Thermometer Well + Sensor (175960)
- Electronic Regulator (220780)
A 34" System Return
B 34 System Flow
C 34"Fireplace Return
D 1"Fireplace Flow
E 12" Cold Sanitary Water
F 12" Hot Sanitary Water
SELECTOR FUNCTIONS
Selector: OFF Everything is switched off
Selector: MAN Driven Circulator
Valve is set
Selector: AUTO Circulator is set
Valve is set
Alarm selection No acoustic signal in the OFF position
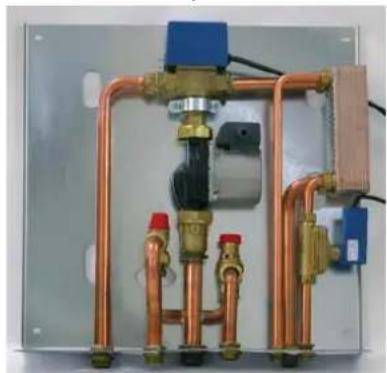
KIT3 code 261900
SYSTEM FOR AN OPEN TANK INSTALLATION
AN EXAMPLE OF A HYDRAULIC SYSTEM FOR A THERMO FIREPLACEITH HOT SANITARY WATER PRODUCTION AND A WALL MOUNTED BOILER USING KIT N3
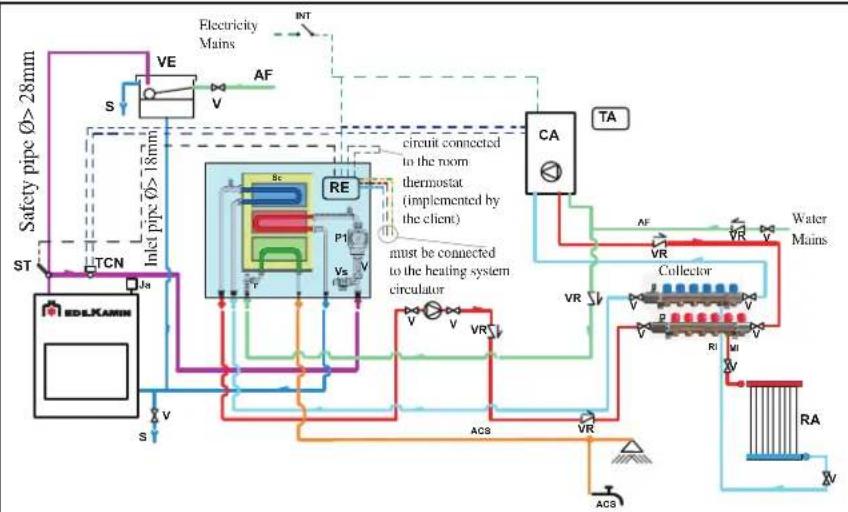
CA: Wall Mounted Boiler
PR: Pump (circulator)
P1: Primary circuit pump
RE: Electronic regulator
TA: Room thermostat
VE: Expansion Tank
Ja: Air relief Valve
V:Intercept valve
VR: Retaining valve
ST: Temperature Sensor
F: Flow switch
Sc: Heat plate exchanger
EV: 3-way solenoid valve
R1: Heating system return
RA: Radiators
MI: Heating system flow
AF: Cold water
ACS: Hot sanitary water
S: Drain
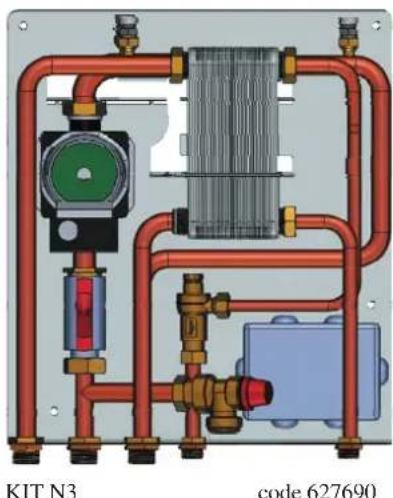
Kit N3 is designed to facilitate the work carried out by the installers. In fact, it consists of all the necessary components for the product to be properly installed.
NB: insulating mats must be applied so that the components of the kit are well-protected from the heat radiation emitted by the thermo-fireplace.
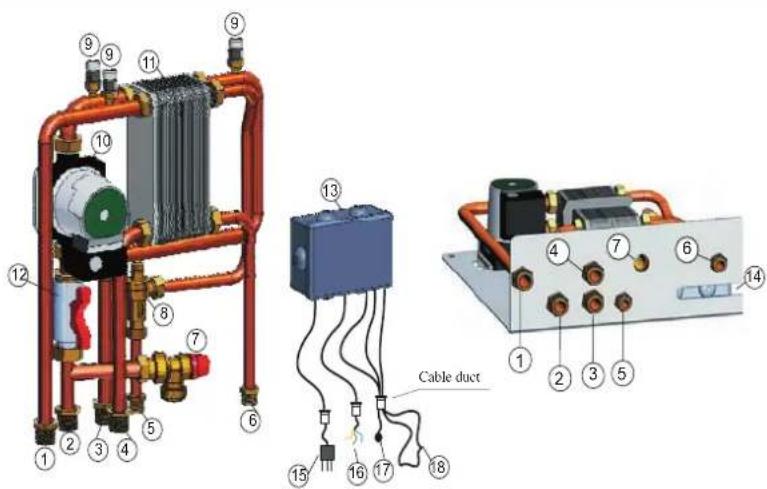
- Heating system flow G 3/4"
- EDILKAMIN generator flow G 3/4"
- EDILKAMIN generator return G 3/4"
- Heating system return G 3/4"
- Cold sanitary water inlet G 1/2"
- Hot water return to the sanitary system G 1/2
- Safety valve - temperature and pressure (90
^ C -3bar)
- Flow Switch
- Air relief valve G 3/8"
- EDILKAMIN generator circuit circulator
- 3-way heat exchanger
- Intercept valve G 1"
- Electronic regulator with wiring
- Appropriate aperture for the cable duct to pass through
- Power cable
- Cables for the heating system circulator (phase, neutral, earth)
- Temperature sensor
- Room thermostat circuit
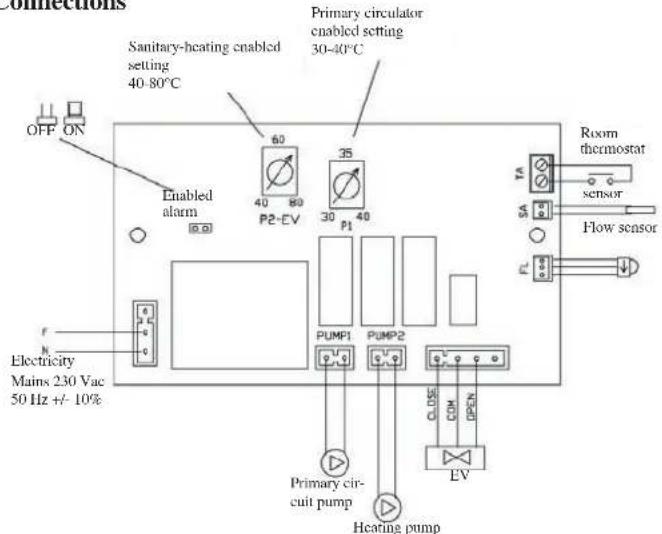
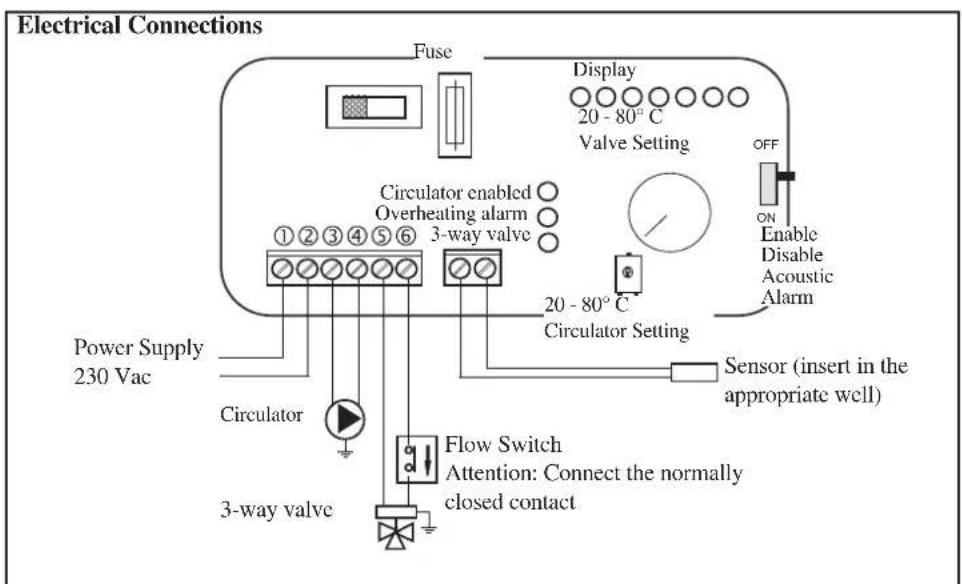
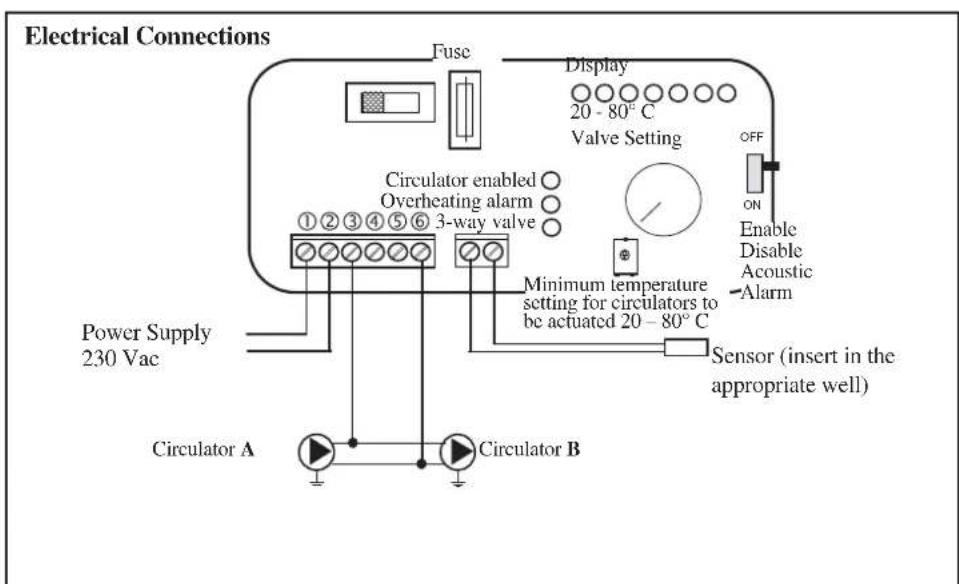
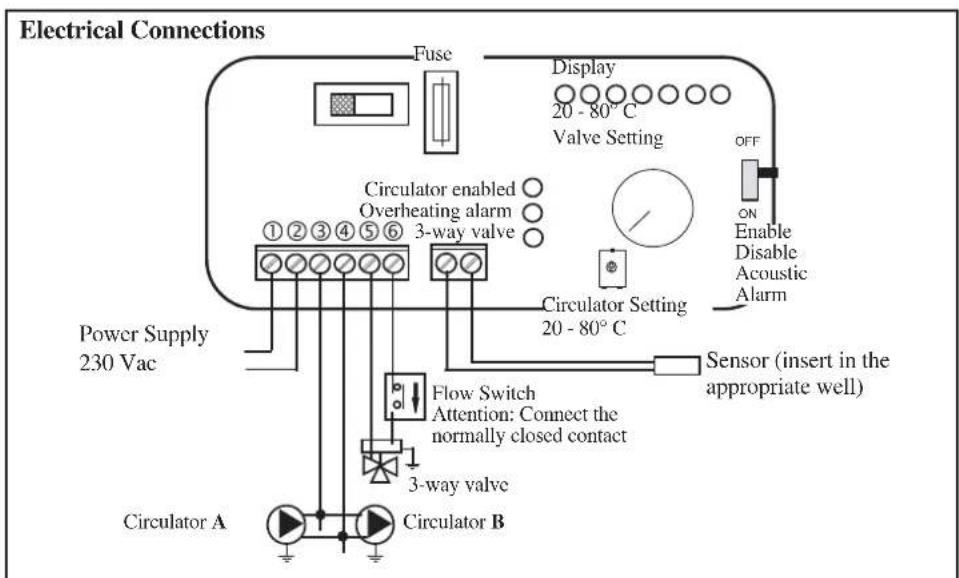
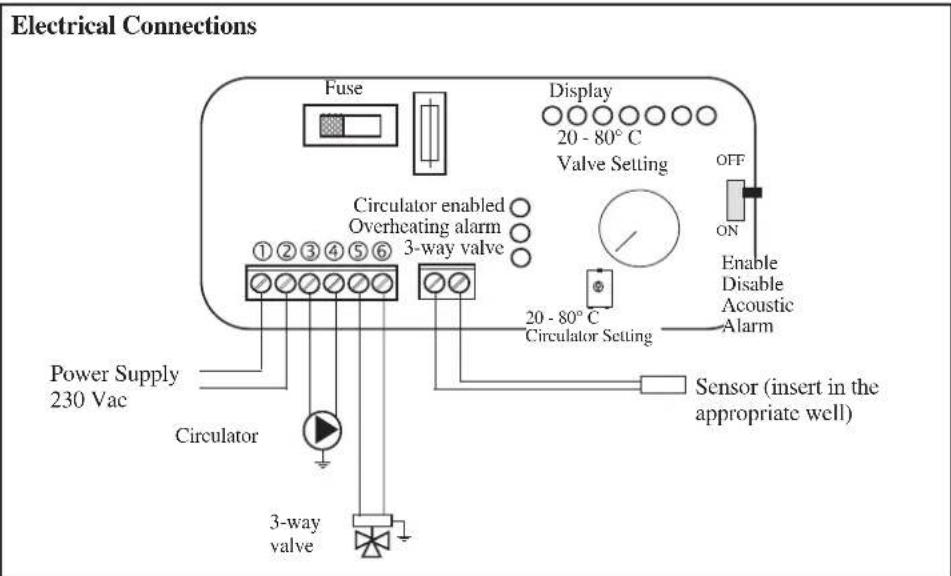
Electrical Connections
SYSTEM FOR AN OPEN TANK INSTALLATION
AN EXAMPLE OF A HYDRAULIC SYSTEM FOR A THERMO FIREPLACE WITH HOT SANITARY WATER PRODUCTION AND A WALL MOUNTED BOILER USING KIT N3 BIS
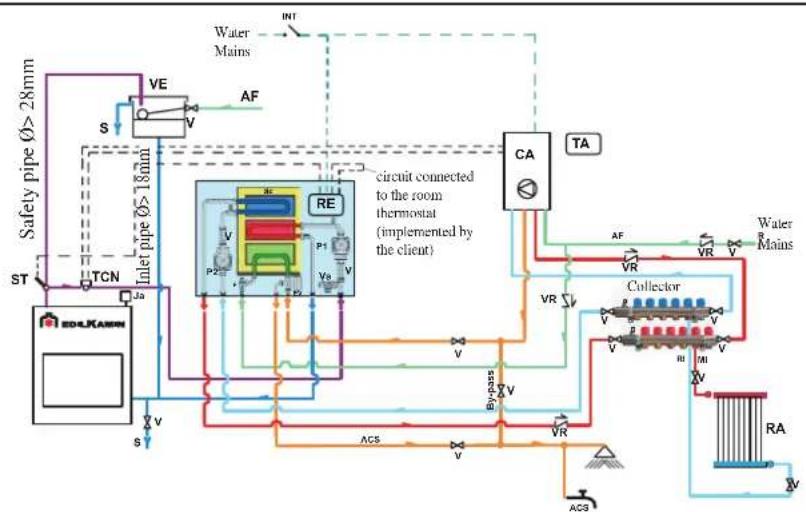
CA Wall Mounted Boiler
P2 Pump (circulator)
P1 Primary circuit pump
RE Electronic regulator
TA Room Thermostat
VE Expansion Tank
Ja Air Relief Valve
Intercept valve
VR Retaining valve
ST Temperature Sensor
F Flow switch
Sc Heat Plate Exchanger
EV 3-way Solenoid Valve
RI Heating system return
RA Radiators
MI Heating system flow
AF Cold Water
ACS Hot Sanitary Water
S Drain
INT Main switch
TCN Contact Thermostat
Kit N3BIS is designed to facilitate the work carried out by the installers. In fact, it consists of all the necessary components for the product to be properly installed.
NB: insulating mats must be applied so that the components of the kit are well-protected from the heat radiation emitted by the thermo-fireplace.
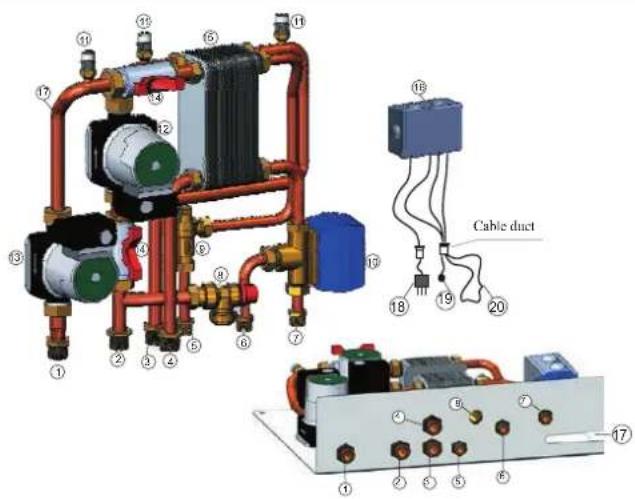
- Heating system flow G 3/4"
- EDILKAMIN generator flow G 3/4"
- EDILKAMIN generator return G 3/4
- Heating system return G 3/4"
- Cold sanitary water inlet G 1/2"
- Hot water return to the sanitary system G 1/2"
- Sanitary hot water inlet to the gas boiler G 1/2"
- Safety valve - temperature and pressure (90^-
3bar)
- Flow Switch
- 3-way deviation solenoid valve
- Air relief valve G 3/8
- EDILKAMIN generator circuit circulator
- Heating system circuit circulator
- Intercept valve G 1
- 3-way heat exchanger
- Electronic regulator with wiring
- Appropriate aperture for the cable duct to pass
through
- Power cable
- Temperature sensor
- Room thermostat circuit
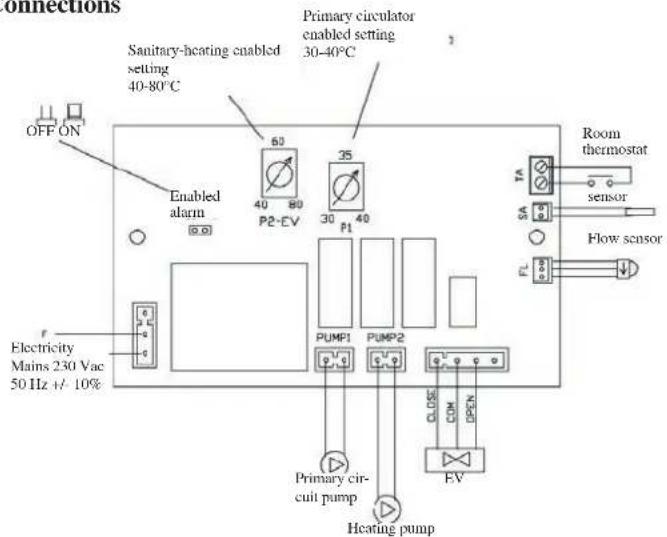
Electrical Connections
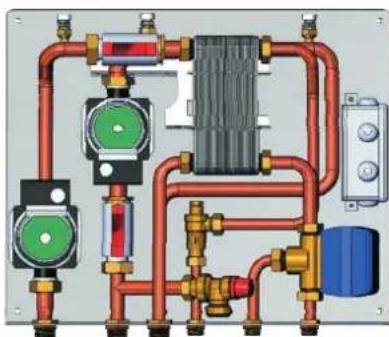
KIT N3 BIS
code 627860
SYSTEM FOR A CLOSED TANKINSTALLATION
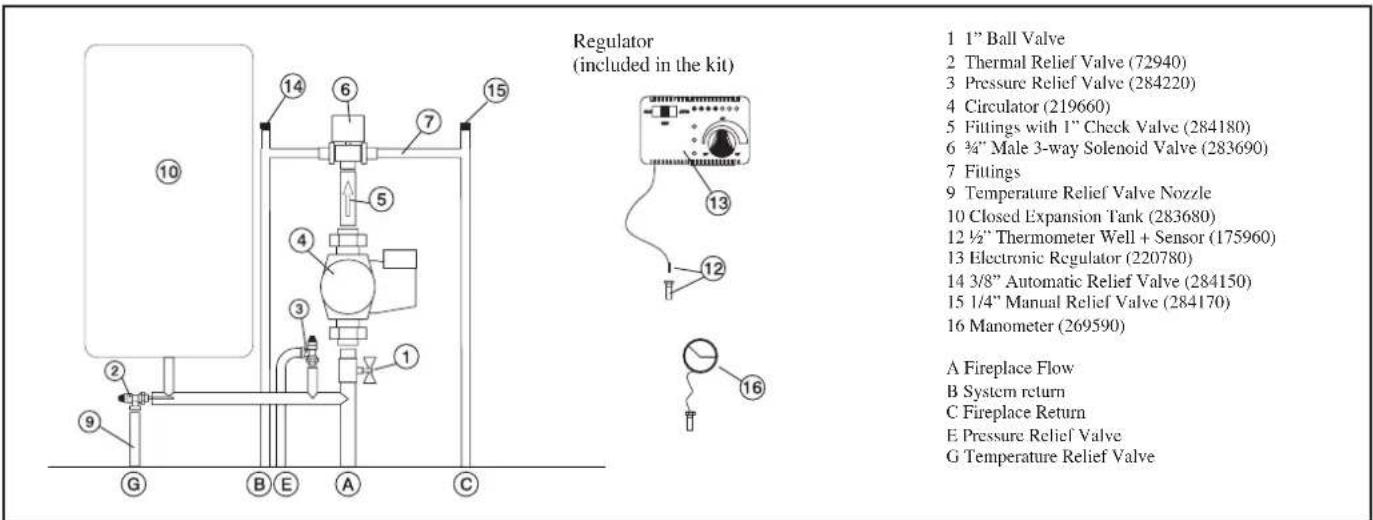
AN EXAMPLE OF A HYDRAULIC SYSTEM FOR A THERMO FIREPLACE - ONLY HEATING USING KIT 5
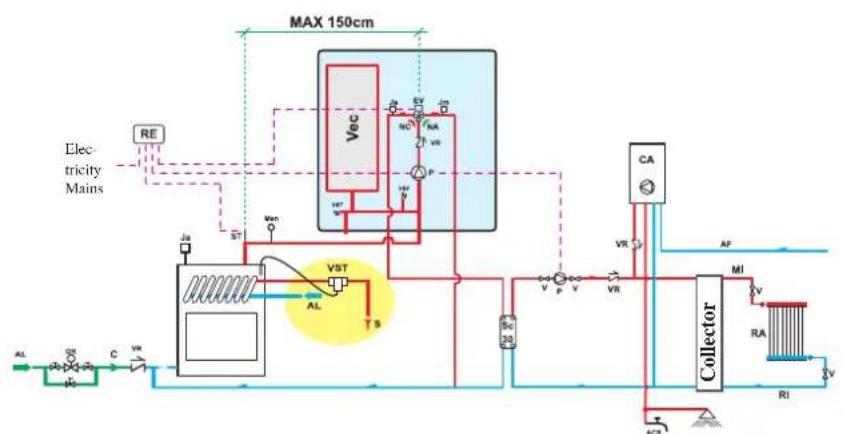
NB: Essential safety connections
AL: Water Mains Supply
C: Filling/Top-Up Section
EV: 3-way Solenoid Valve
NA: Normally Open
NC: Normally Closed
GR: Filling unit
Ja: Automatic Relief Valve
Jm: Manual Relief Valve
MAN: Manometer
MI: System Flow
P: Pump (circulator)
RA: Radiators
RE: Electronic Regulator
RI: System Return
S: Drain
ST: Temperature Sensor
V: Ball Valve
Vec: Closed Expansion Tank
VR: Check Valve
VSP: Pressurised Safety Valve
VST Thermal Relief Valve
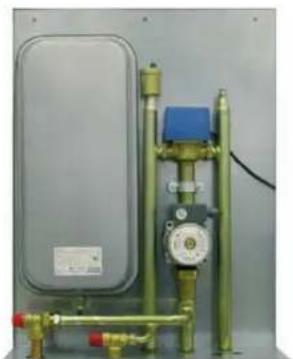
Kit 5 is designed to facilitate the work carried out by the installers. In fact, it consists of all the necessary components for the product to be properly installed.
NB: insulating mats must be applied so that the components of the kit are well-protected from the heat radiation emitted by the thermo-fireplace.
SELECTOR FUNCTIONS
Selector: OFF Everything is switched off
Selector: MAN Driven Circulator
Valye is set
Selector: AUTO Circulator is set
Valve is set
Alarm selection No acoustic signal in the
OFF position
KIT5 code 280590
SYSTEM FOR A CLOSED TANKINSTALLATION
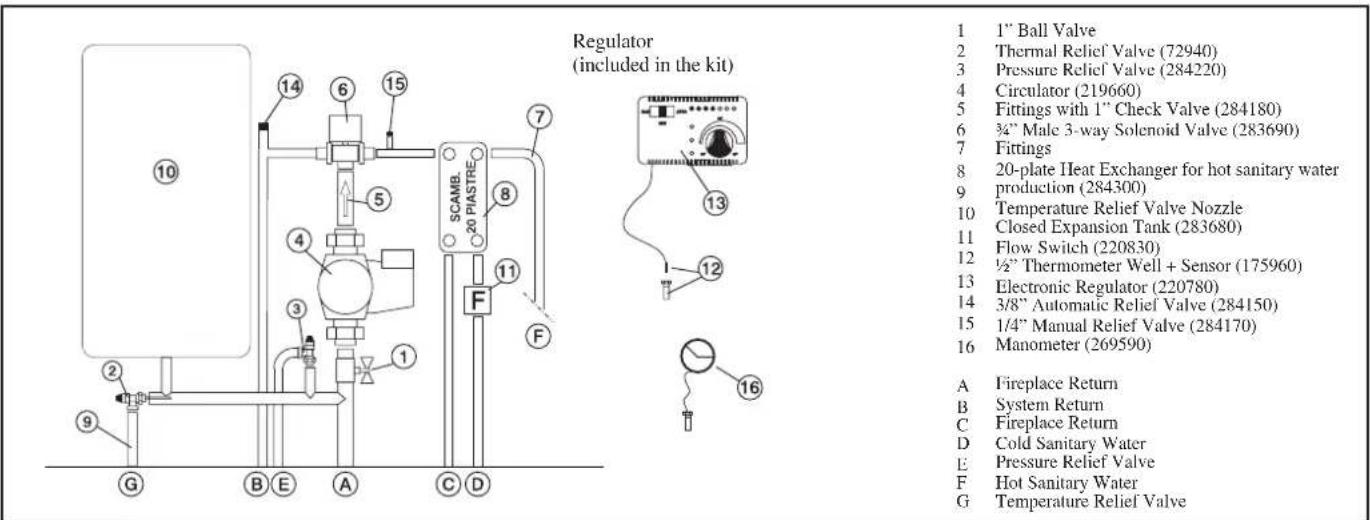
AN EXAMPLE OF A HYDRAULIC SYSTEM FOR A THERMO FIREPLACE WITH HOT SANITARY WATER PRODUCTION USING KIT 6
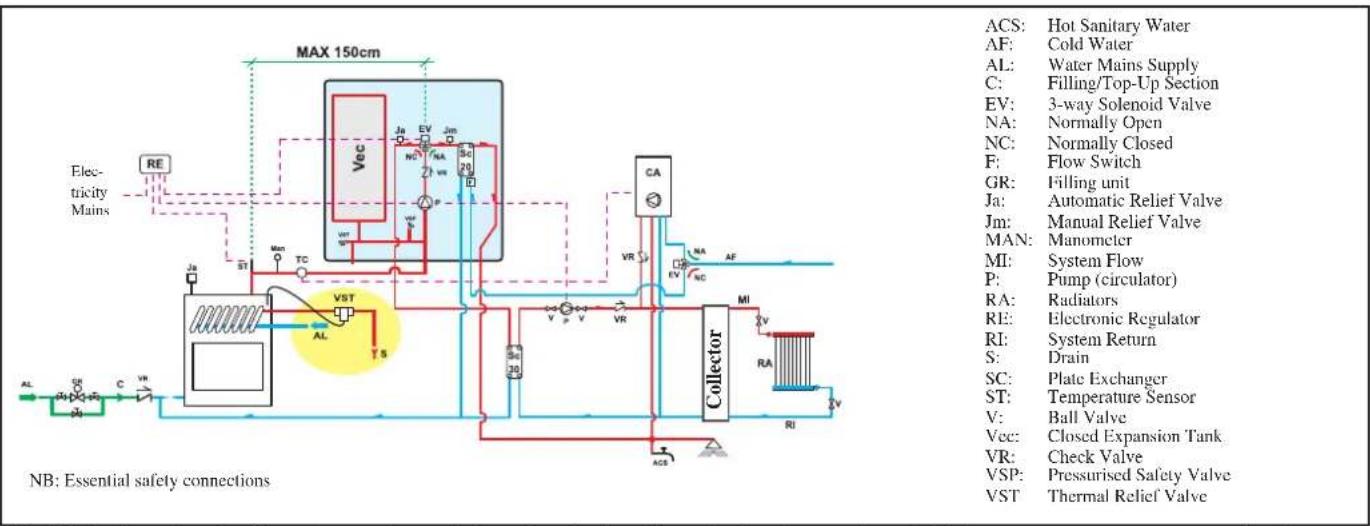
ACS: Hot Sanitary Water
AF: Cold Water
AL: Water Mains Supply
C: Filling/Top-Up Section
EV: 3-way Solenoid Valve
NA: Normally Open
NC: Normally Closed
F: Flow Switch
GR: Filling unit
Ja: Automatic Relief Valve
Jm: Manual Relief Valve
MAN: Manometer
MI: System
P: Pump (circulator)
RA: Radiators
RE: Electronic Regulator
RI: System Return
S: Drain
SC: Plate Exchanger
ST: Temperature Sensor
V: Ball Valve
Vec: Closed Expansion Tank
VR: Check Valve
VSP: Pressurised Safety Valve
VST Thermal Relief Valve
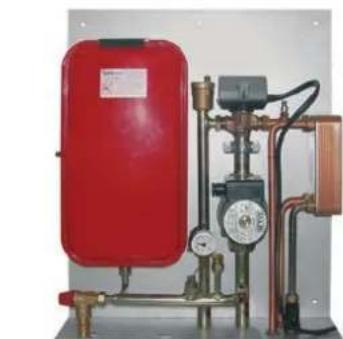
Kit 6 is designed to facilitate the work carried out by the installers. In fact, it consists of all the necessary components for the product to be properly installed.
NB: insulating mats must be applied so that the components of the kit are well-protected from the heat radiation emitted by the thermo-fireplace.
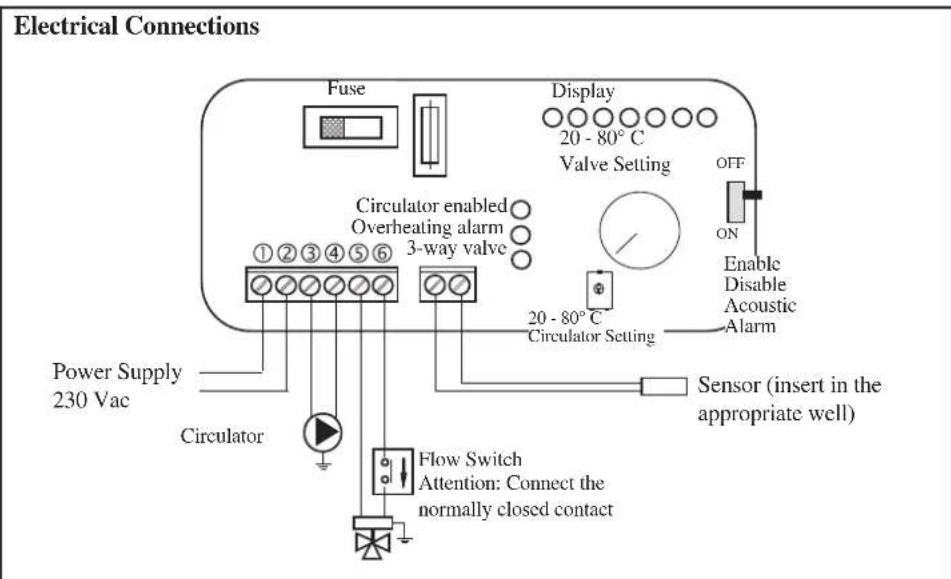
SELECTOR FUNCTIONS
Selector: OFF Everything is switched off
Selector: MAN Driven Circulator
Valve is set
Selector: AUTO Circulator is set
Valve is set
Alarm selection No acoustic signal in the
OFF position
KIT6 code 280600
ELECTRONIC REGULATOR
IMPORTANT ADVICE REGARDING THE INSTALLATION
The connections, commissioning and verification of proper operation of the fireplace must be carried out by qualified personnel, who can implement all connections in accordance with the laws in force, particularly with Italian Law No. 46/90, apart from complying with these instructions.
Compliance with regulations regarding the earth connection is fundamental for the safety of people.
It is obligatory to install a differential circuit breaker switch before the device and the entire electrical circuit of the thermo fireplace.
It is also obligatory to connect the pump, valve and metal parts of the thermo fireplace to an earthing system.
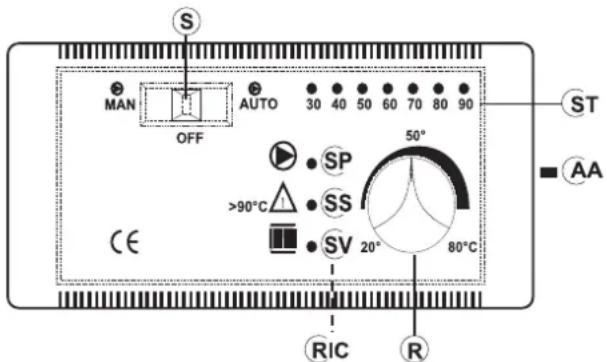
LEGEND
AA acoustic alarm switch
R way valve opening setting (KITS 1-3)
R circulators operation setting (KIT 2)
RIC internal pump setting
S MAN-OFF-AUTO selector
SP pump light
SS overheating light
ST temperature scale
SV 3-way valves light (KITS 1-3)
SV circulators setting (KIT 2)
| TECHNICAL DATA | |
| Power Supply (+15 - 10%) Vac 230 | |
| Degree of protection IP 40 | |
| Min/Max Room Temperature °C 0÷+50 | |
| Sensor range mt 1,2 | |
| Thermometer °C 30÷90 | |
| Maximum contact rating of the circulator W 400 | |
| Maximum contact rating of the 3-way valve | W 250 |
| Fuse | mA 500 |
The electric control regulator allows you to monitor the operating conditions and is equipped with:
- MAN-OFF-AUTO selector (S)
- temperature scale (ST)
- acoustic alarm (AA)
- 3-way valve opening setting (R) (KIT1-3)
- circulators operation setting (R) (KIT2)
- internal pump setting (RIC)
- 3-way valve light (SV) (KIT1-KIT3)
- circulators setting light (SV) (KIT2)
- overheating pump (SS)
- pump light (SP)
OPERATION
- Control device:
Thermometer - Protection device (acoustic alarm system):
- Acoustic alarm (AA)
Overheating alarm (SS)
This system intervenes when the water temperature exceeds 90^ and warns the user to stop adding fuel.
The acoustic alarm can be disabled from the switch (AA).
However, the alarm remains enabled by means of the overheating light (SS). To restore the initial settings, the switch (AA) must be enabled after the water temperature in the thermo fireplace has cooled down.
Power supply device (circulation system):
- MAN-OFF-AUTO selector (S)
- Pump light (SP)
The pump remains on when in manual mode and off when in OFF mode. When in AUTO mode, the pump is activated by the system when the desired temperature is reached, by means of the internal setting (RIC), which ranges from 20 to 80^ (this is pre-set at 20^ ).
- Operation device (setting system):
3-way valve opening setting (R)
3-way valve operating light (SV)
When the fluid reaches the temperature set through the regulator, the 3-way valve diverts the fluid to the radiators and the operating light (SV) goes on.
When the temperature of the fluid drops below the set value, the system opens the electrical circuit and the 3-way valve bypasses the fluid directly to the thermo fireplace.
Attention: During normal operation check that the warning lights (SV) and (SP) are lit.
POSITIONING
The electronic regulator must be installed close to the thermo fireplace. The sensor of the operation, protection and control devices must be placed directly on the thermo fireplace or at most on the flow pipe, no more than 5cm away from the thermo fireplace and in any case before any intercepting device.
The sensor must be immersed in the well.
INSTALLATION
The power supply must be disconnected from the mains and the AUTO-OFF-MAN selector (S) must be in the OFF position when all these operations are carried out.
Follow this procedure to install the electronic regulator correctly: loosen the fastening screw, remove the cover and fasten it in place against the wall with the dowels supplied.
Then make the connections, paying utmost attention to the wiring diagram and pass the wires through ducts that are in conformity with the regulations in force. Put the cover back in place and tighten the screw.
Connect the brown wire (phase) and blue wire (neutral) of the 3-way Valve, respectively, to terminals 5 and 6 of the regulator. Connect the yellow/green wire to the earth.
Follow the assembly instructions contained in the package to connect the regulator to the system properly.
OPTIONAL ACCESSORIES
ELECTRONIC REGULATOR (Optional)
This lets you monitor the operating conditions and is equipped with:
- MAN-OFF-AUTO selector
-temperature scale - acoustic alarm
-3-way valve opening setting - internal pump setting
- pump light
-3-way valve light - overheating light
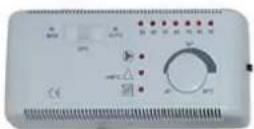
Electronic Regulator (220780)
The electronic regulator is part of various types of installation kits (supplied as optionals)
HEAT EXCHANGER 20-PLATE FOR SANITARY WATER (Optional)
This is a very simple and inexpensive device with guaranteed performance that produces 13-14 litres of hot water per minute according to the power plant. It is easily installed on the flow pipe to the radiators, in the most suitable position according to the layout of the system. This has the great advantage of being removed for maintenance or replacement without affecting the thermo fireplace.
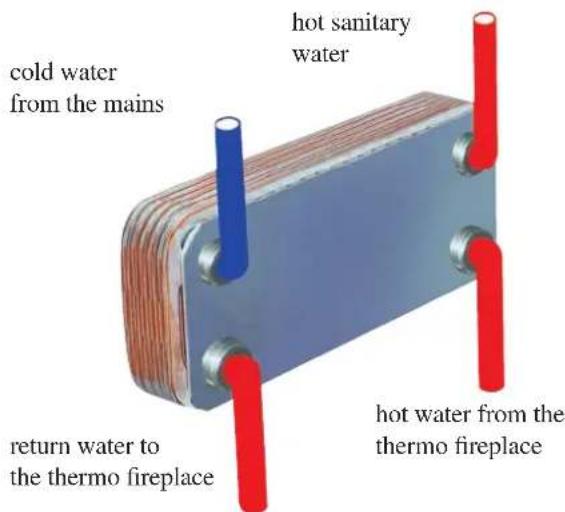
The 20-plate heat exchanger is part of various types of installation kits (supplied as optionals)
EXCHANGER 3-WAY (optional)
It produces hot water for a domestic circuit and a secondary circuit (radiators), excluding, with respect to KIT 3, use of 3-way valve and a plate heat exchanger.
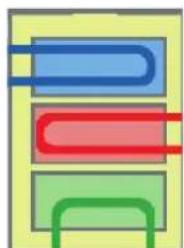
cold water system
hot water from the thermo fireplace
cold
sanitary water
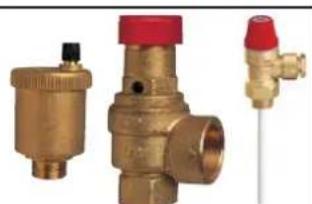
Valves Kit (421600) consisting of: automatic air relief valve, 1.5 bar safety valve, 90^ thermal relief valve
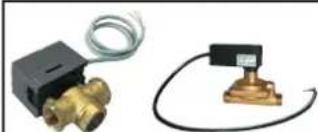
1"3-way val-Flow Switch
ve (143330) to (220830)
set the water
flow to the sys
tem
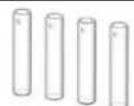
H OCEANO 15 - RISER FEET KIT raises the fireplace unit from 14 to 19cm from the floor H OCEANO 23 - RISER FEET KIT raises the fireplace unit from 12 to 17cm from the floor H OCEANO 28 - RISER FEET KIT raises the fireplace unit from 12 to 17cm from the floor
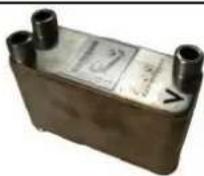
Exchanger 3-way code 627780
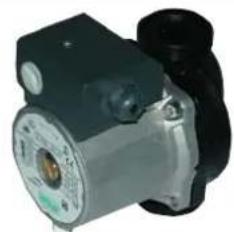
Circulator
UPS 25-50 code 219660
UPS 25-60 code 238270
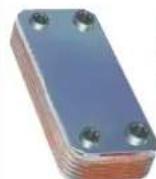
20-plate Heat Exchanger for sanitary water (262570)
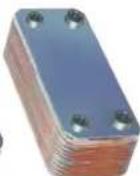
30-plate Heat Exchanger for sanitary water (216620)
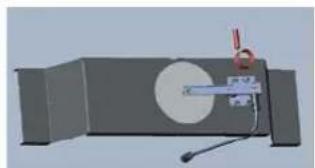
Thermostatic valve
H2OCEANO 15 code 739460
H2OCEANO 23 code 739440
H2OCEANO 28 code 739450
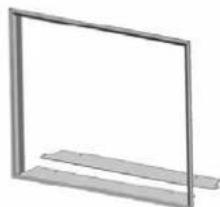
Inlet frame
HOCEANO 15 code 739390 - dim. 63× 63cm HOCENO 23 code 739370 - dim. 77× 68~cm HOCENO 28 code 739380 - dim. 95× 68cm
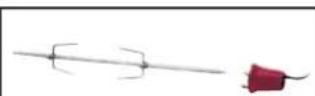
Roaster
HOCEANO 15 code 750820
HOCEANO 23 code 234560
HOCEANO 28 code 236710

Support for hydraulic kits A1-A2-B-C-D (installation on right)
H_2 OCEANO 15 code 739510 H_2 OCEANO 23 code 739470
II, OCEANO 28 code 739490
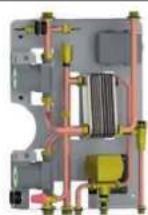
Hydraulic kit V for OPEN TANK versions code 743430 (installation on right)
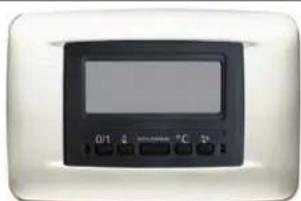
Remote dispaly code 741180
Madame, Monsieur,
Capita# € 4,100,000 rt. yen
Sode loyals
Installation contrepoids
CA: Chaudière murale
C: Charge/Compensation
AN EXAMPLE OF A HYDRAULIC SYSTEM FOR A THERMO FIREPLACE WITH HOT SANITARY WATER PRODUCTION USING KIT 6
C: Charge/ Compensation
ACCESSIONS EN OPTION
REGULATEUR ELECTRONIQUE (en option)
INT: interruptor general
TCN: Termostato de contacto
THERMOSTATVENTIL AUF WUNSCH (ABB.2)
GEOCTROOIEERD INNOVATIEF ASROOSTER
BESCHERMINGS - EN MEETINSTALLATIONS
IN HET GEVAL VAN EEN INSTALLATIE OPEEN INSTALLATIE MET OPEN VAT
OPTIONELE THERMOSTAATKLEP (AFB.2)
PR: Pomp (circulator)
P1: Pomp primair circuit
P2 Pomp (circulator)
P1: Pomp primair circuit
P: Pomp (circulator)
RA: Radiators
OPTIONELE ACCESSOIRES
TT Tipalo temperature
Selector OFF Tudo desligado
INT: Interruptor Gerald
MI: Saida planta
PR: Bomba (circulador)
P1: Bomba circuito primario
Ja: Jolly purga automatica
RA: Radiadores
INT: Interruptor Gerald
MI: SaídaSYSTEMA
PR: Bomba (circulador)
P1: Bomba circuito primario
Ja: Jolly purga automatica
RA: Radiadores
RI: Zpetyokruzharizeni
S: Vypoustěni
SC Deskovy vymenik
ST: Teplotni sonda
TCN: Dotykovy termostat
V: Ventil

- TECHNICALAND HEATING SPECIFICATIONS
- INNOVATIVE PATENTED ASH GRILLE
- "GASKET-SAVING"DOOR
- AUTOMATIC SMOKE BY-PASS
- SAFETY INFORMATION
- IMPORTANT: ONLY THERMO FIREPLACES WITH COILS DRIVEN BY A THERMAL RELIEF VALVE SHOULD BE INSTALLED ON CLOSED TANK SY
- Litres ?
- Year
- GENERAL SAFETY REGULATIONS
- IN CASE OF INSTALLATION ON OPEN TANK SYSTEMS
- NB:
- IN CASE OF INSTALLATION ON CLOSED TANK SYSTEMS
- WATER TREATMENT
- DIMENSIONS
- TECHNICAL AND HEATING SPECIFICATIONS
- N.B.: DATA PROJECT (Refer to standard EN 13229)
- THE DIAMETER OF THE CHIMNEY FLUE TO BE USED MUST BE ASSESSED BY THE INSTALLER ACCORDING TO THE HEIGHT OF THE CHIMNEY FLUE ITSELF.
- TECHNICAL AND HEATING ECODESIGN
- EDILKAMIN TECHNOLOGY DEL FUCO
- EXIGENCES D'INFORMATIONS APPLICABLES AUX DISPOSITIFS DE CHAUFFAGE DÉCENTRALISÉS À COMBUSTIBLE SOLIDE - RÉGULATION (EU) 2015/1185 E 2015/1186
- EXIGENCES D'INFORMATIONS APPLICABLES AUX DISPOSITIONS DE CHAUFFAGE DÉCENTRALISÉS À COMBUSTIBLE SOLIDE -
- RÉGULATION (EU) 2015/1185 E 2015/1186
- Particularly:
- EXTERNAL AIR INLET
- CHIMNEY FLUES AND CHIMNEYPOT
- The fundamental characteristics of the chimncypot are:
- INSTALLATION
- INSTALLATION COVERING, FIREPLACE MANTEL AND VENTILATION OUTLETS
- INLET FRAME (OPTIONAL)
- INSTRUCTIONS FOR USE
- Practical advice
- Igniting the fireplace
- 3-way valve
- By-pass damper
- Thermal Relief Valve
- External air regulation
- OPTIONAL THERMOSTATIC VALVE (FIG.2) Manual adjustment of combustion air (to be carried out during installation)
- Automatic adjustment of combustion air
- Installation of thermostatic valve "V" is optional.
- Adaptation to the characteristics of the draft in the chimney (fig. 16).
- Door opening
- Installing counterbalances
- MAINTENANCE
- Cleaning the hearth
- Glass cleaning
- SYSTEM FOR AN OPEN TANK INSTALLATION
- AN EXAMPLE OF A HYDRAULIC SYSTEM FOR A THERMO FIREPLACE WITH HOT SANITARY WATER PRODUCTION USING KIT 1
- SELECTOR FUNCTIONS
- AN EXAMPLE OF A HYDRAULIC SYSTEM FOR A THERMO FIREPLACEITH HOT SANITARY WATER PRODUCTION AND A WALL MOUNTED BOILER USING KIT N3
- SYSTEM FOR A CLOSED TANKINSTALLATION
- AN EXAMPLE OF A HYDRAULIC SYSTEM FOR A THERMO FIREPLACE - ONLY HEATING USING KIT 5
- AN EXAMPLE OF A HYDRAULIC SYSTEM FOR A THERMO FIREPLACE WITH HOT SANITARY WATER PRODUCTION USING KIT 6
- ELECTRONIC REGULATOR
- IMPORTANT ADVICE REGARDING THE INSTALLATION
- Compliance with regulations regarding the earth connection is fundamental for the safety of people.
- LEGEND
- OPERATION
- Power supply device (circulation system):
- - Operation device (setting system):
- POSITIONING
- OPTIONAL ACCESSORIES
- ELECTRONIC REGULATOR (Optional)
- HEAT EXCHANGER 20-PLATE FOR SANITARY WATER (Optional)
- EXCHANGER 3-WAY (optional)
- Installation contrepoids
- ACCESSIONS EN OPTION
- REGULATEUR ELECTRONIQUE (en option)
- THERMOSTATVENTIL AUF WUNSCH (ABB.2)
- GEOCTROOIEERD INNOVATIEF ASROOSTER
- BESCHERMINGS - EN MEETINSTALLATIONS
- IN HET GEVAL VAN EEN INSTALLATIE OPEEN INSTALLATIE MET OPEN VAT
- OPTIONELE THERMOSTAATKLEP (AFB.2)
- OPTIONELE ACCESSOIRES
Brand : EDILKAMIN
Model : H2OCEANO
Category : Fireplace