MR1 Mk1 - Speaker Ruark Audio - Free user manual and instructions
Find the device manual for free MR1 Mk1 Ruark Audio in PDF.
| Product type | Compact active speaker |
| Brand | Ruark Audio |
| Model | MR1 Mk1 |
| Dimensions (H x W x D) | 175 x 130 x 135 mm |
| Weight (including packaging) | 3.5 kg |
| Power supply | AC adapter: input 100-240 VAC, 50-60 Hz, 1.0 A; output 14 VDC, 2.0 A |
| Power consumption (on) | 10-12 W (typical), 28 W (max) |
| Power consumption (standby) | 0.5 W |
| Speakers | 75 mm neodymium woofer, 20 mm soft dome tweeter |
| Amplification | 20 W linear amplifier |
| Audio inputs | Line-in (3.5 mm stereo jack) |
| Audio outputs | Subwoofer output (3.5 mm stereo jack, line level) |
| Wireless technology | Bluetooth A2DP, aptX |
| Bluetooth codec | aptX (CD quality) |
| Remote control | Infrared, CR2025 battery included (remove protective tab) |
| Auto standby | Yes, after 10 minutes without audio signal (enable/disable) |
| Battery compatibility | Compatible with R1 BackPack battery pack (optional) |
| Cleaning | Lint-free or slightly damp cloth; do not spray any product |
| Operating temperature | 5 °C to 40 °C |
| Warranty | 2 years from date of purchase |
| Repairability | Do not open; refer to qualified personnel |
Frequently Asked Questions - MR1 Mk1 Ruark Audio
User questions about MR1 Mk1 Ruark Audio
0 question about this device. Answer the ones you know or ask your own.
Ask a new question about this device
Download the instructions for your Speaker in PDF format for free! Find your manual MR1 Mk1 - Ruark Audio and take your electronic device back in hand. On this page are published all the documents necessary for the use of your device. MR1 Mk1 by Ruark Audio.
USER MANUAL MR1 Mk1 Ruark Audio
Thank you for choosing our MR1 active Bluetooth speakers.
With our heritage designing high-fidelity loudspeaker systems for audio enthusiasts, we're fanatical about sound quality. With this in mind, we've created these compact multipurpose loudspeakers to give everyone access to high quality sound, with the additional convenience of Bluetooth connectivity. We think they're great and we hope you enjoy them as much as we do.
With due care, we're confident our MR1s will give you many years of listening pleasure, so please take the time to read this user guide as it will help you to set them up and get the best performance from them.
Once again, thank you for choosing Ruark Audio.
Alan O. Rawke
Alan O'Rourke
Founder and Managing Director
1 What's in the box
Ensure that all parts listed below are in the box. If any part is missing do not use the speakers and contact us directly if purchased in the UK, or your Ruark Audio dealer if purchased outside the UK.
- Left speaker
- Right speaker
- AC power adaptor
- Plug(s) for AC power adapter*
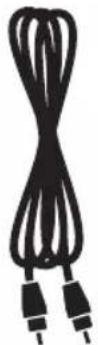
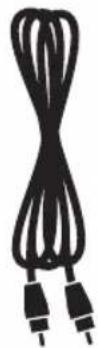
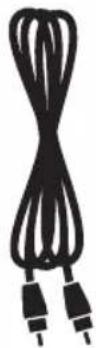
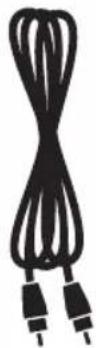
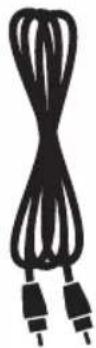
- Speaker interconnect cable
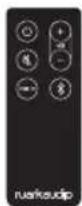
- Remote control
- User guide & other documents
Please retain carton and all packing materials.
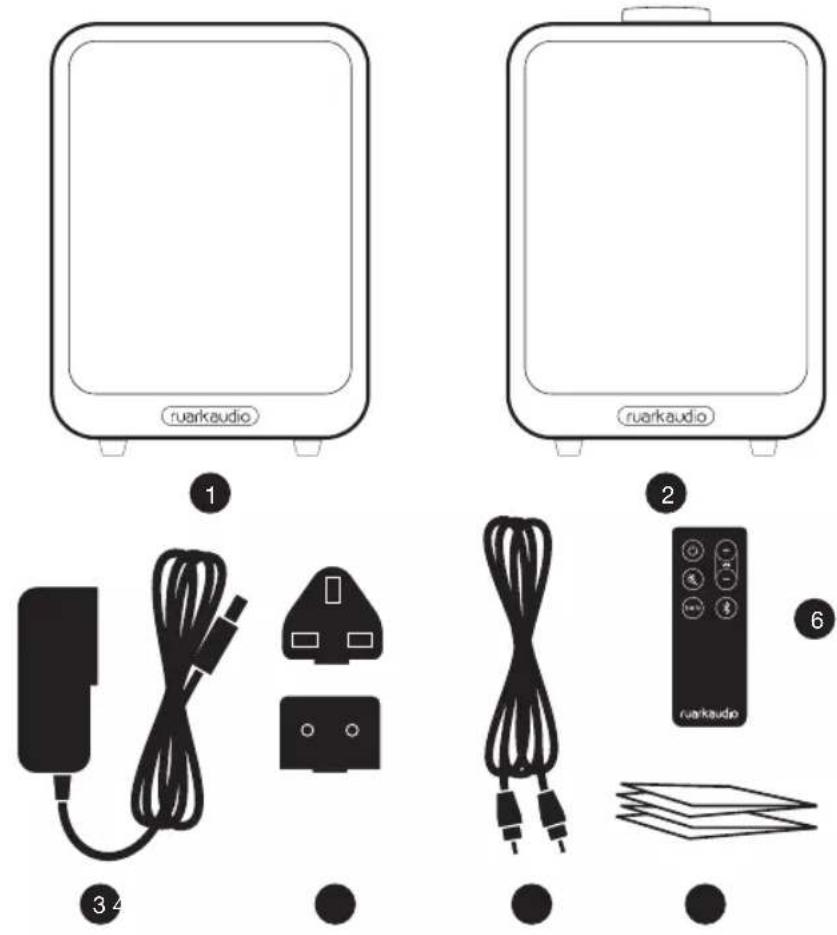
* The number and type of plug adapters supplied will vary according to region.
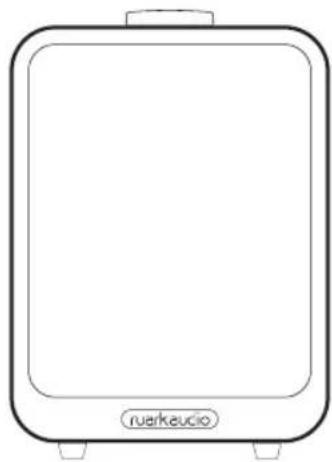
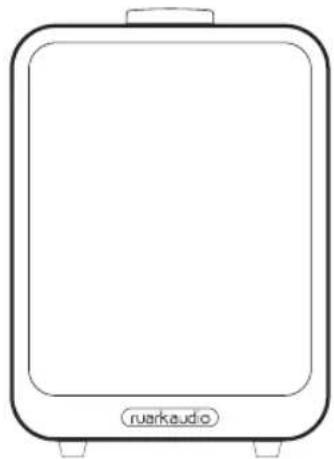
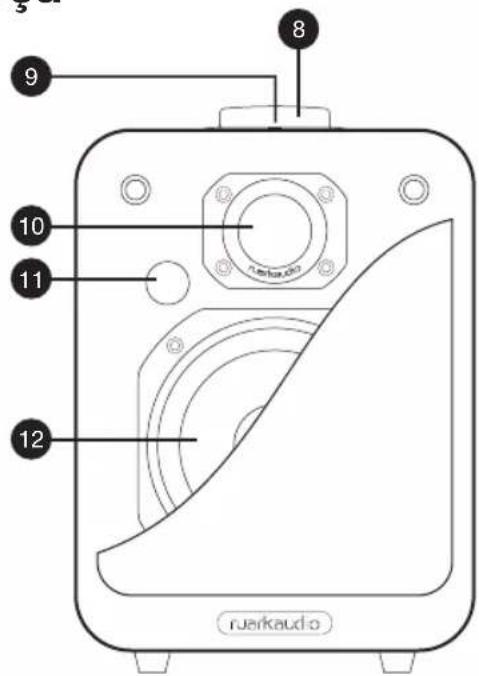
2 Overview

Right speaker front
- Control knob (volume and source)
- Status indicator light (see section 8)
- Tweeter (high frequency driver)
- Remote sensor
- Woofer (low frequency driver)
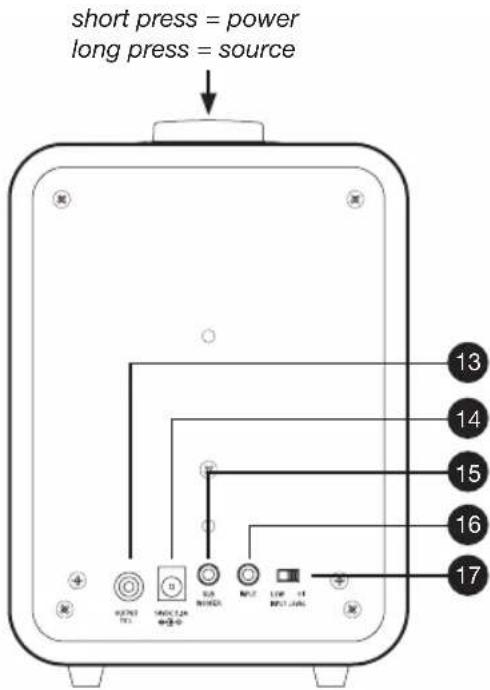
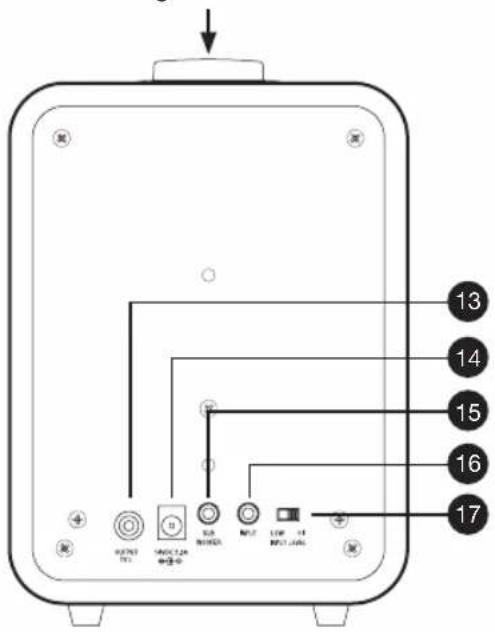
Right speaker back
- Output to left speaker
- DC power socket
- Sub-woofer output (3.5mm stereo jack)
- Line-in audio input (3.5mm stereo jack)
- Input level select
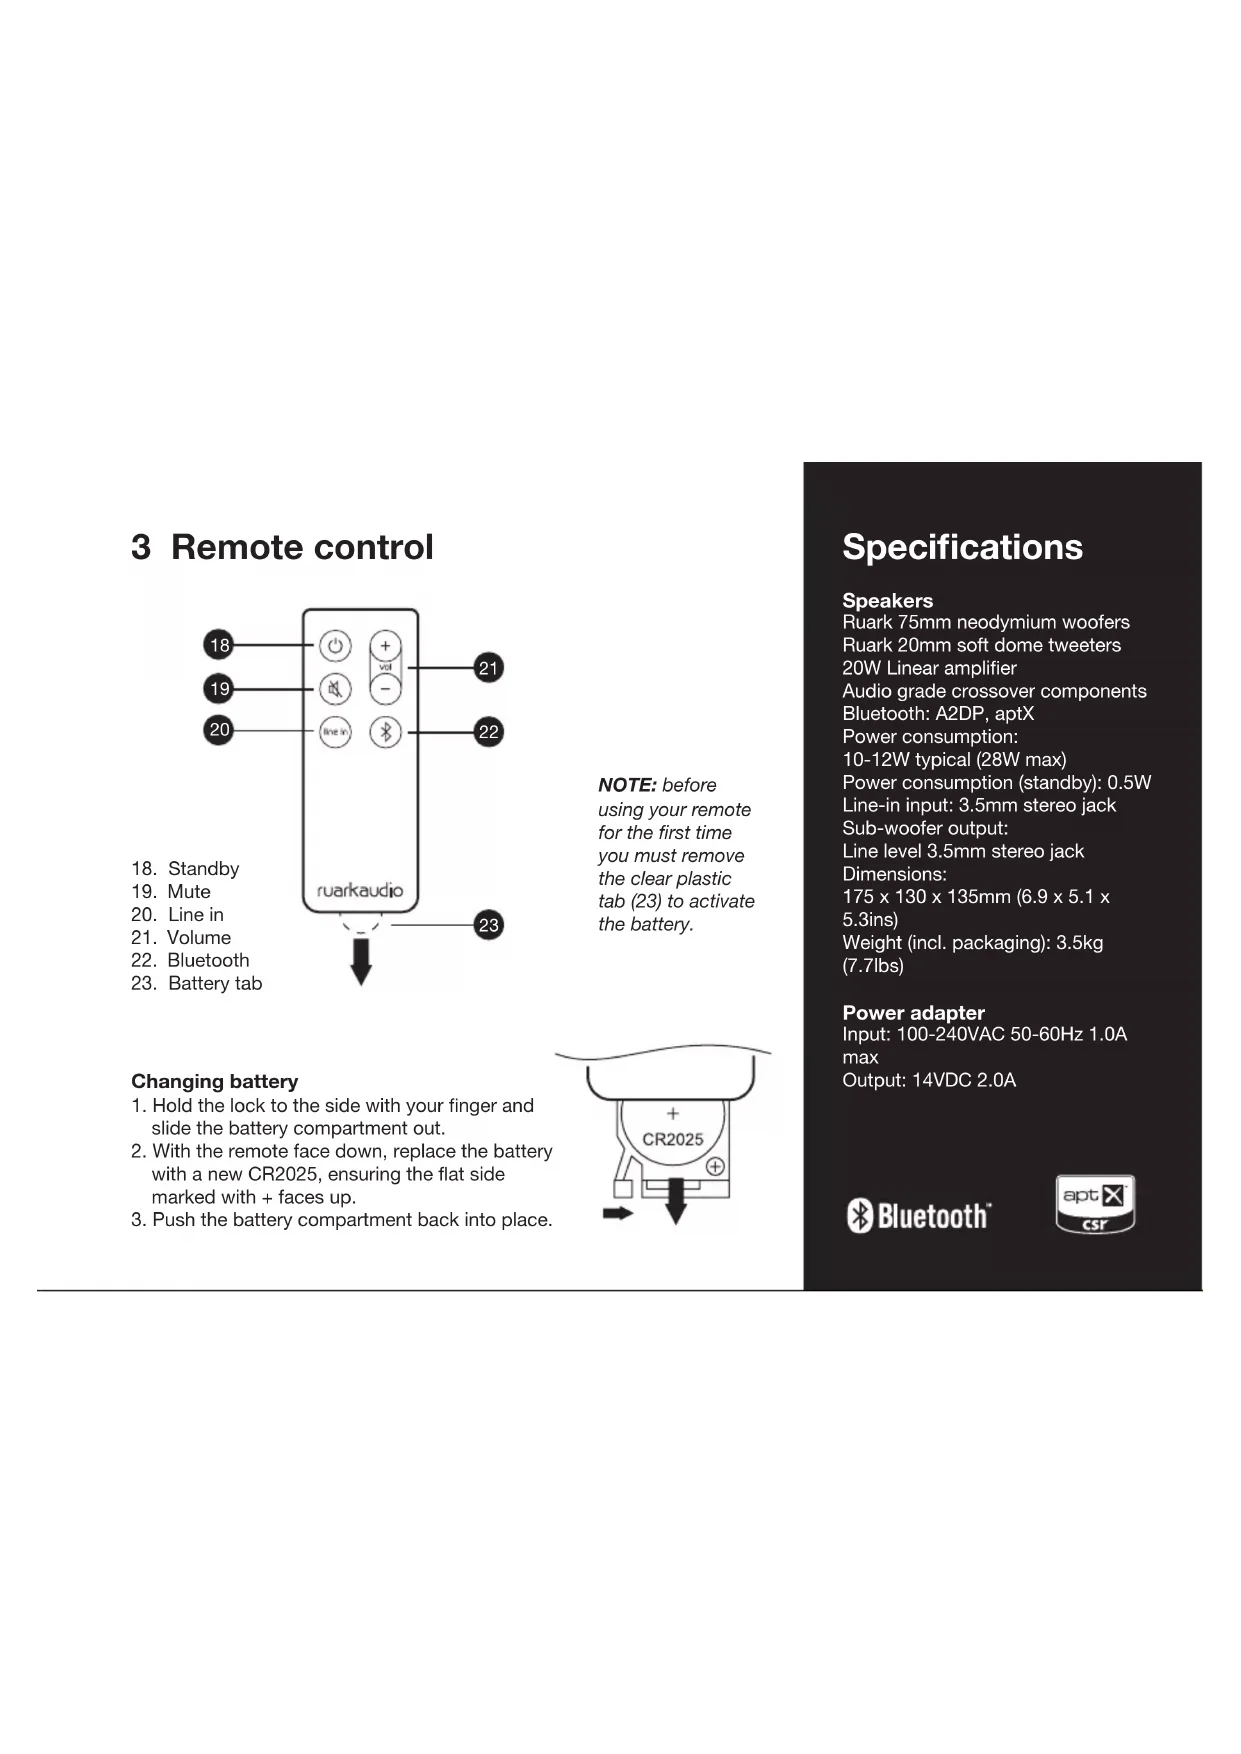
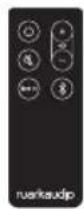
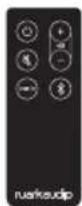
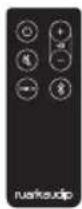
3 Remote control
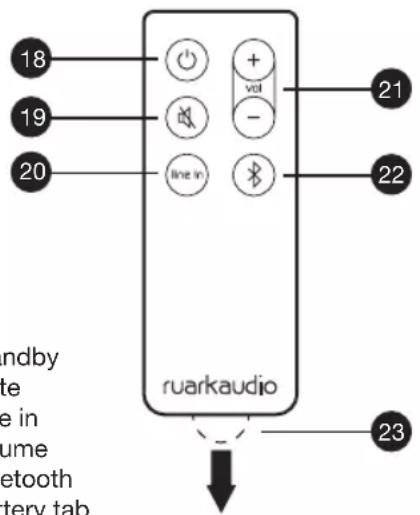
- Standby
- Mute
- Line in
- Volume
- Bluetooth
- Battery tab
NOTE: before using your remote for the first time you must remove the clear plastic tab (23) to activate the battery.
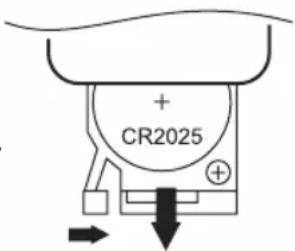
Changing battery
- Hold the lock to the side with your finger and slide the battery compartment out.
- With the remote face down, replace the battery with a new CR2025, ensuring the flat side marked with + faces up.
- Push the battery compartment back into place.
Specifications
Speakers
Ruark 75mm neodymium woofers
Ruark 20mm soft dome tweeters
20W Linear amplifier
Audio grade crossover components
Bluetooth: A2DP, aptX
Power consumption:
10-12W typical (28W max)
Power consumption (standby): 0.5W
Line-in input: 3.5mm stereo jack
Sub-woofer output:
Line level 3.5mm stereo jack
Dimensions:
175 x 130 x 135mm (6.9 x 5.1 x
5.3ins)
Weight (incl. packaging): 3.5kg
(7.7lbs)
Power adapter
Input: 100-240VAC 50-60Hz 1.0A
max
Output: 14VDC 2.0A

Bluetooth™

4 Setup
1 Position speakers
For best stereo reproduction, place left and right speakers no less than 60cm (24in) apart with the speaker with volume control on the right. Avoid having objects in front of the speakers and also ensure the underside of each speaker is unobstructed.
2 Connect speakers together
Connect the two speakers with the interconnect cable (5), inserting one end into the output (13) on the right speaker and the other end into the input socket on the left speaker.
3 Connect to AC power
Fit the correct plug (4) for your region to the mains power supply. When you fit the plug adapter, it will "click" into place. Connect the DC cable from the power supply to the DC power socket on the back of your MR1. Plug the AC power adapter into a mains power socket.
CAUTION: do not plug the AC power cord into the mains until all other connections are made.
4 Turn on your speakers
When you connect the speakers to mains power they will power up in standby mode. To turn them on, press the control knob (8) on the right speaker or the standby button (18) on the remote; the source status indicator (9) glows solid amber showing that Line-in audio input is selected.
5 Adjust volume
Turn the volume control knob (8) clockwise to increase the volume, anticlockwise to decrease it or use the volume buttons (21) on the remote. When you reach the maximum or minimum volume, the status indicator (9) goes off temporarily.
6 Standby
Press and release (short press) the control knob (8) or press the standby button (18) on the remote.
5 Playing audio through the Line-in input socket
1 Connect your device
To connect you will need a lead with a 3.5mm stereo jack on one end to connect to the Line-in input socket (16) and an appropriate connector on the other to connect to the Line-out or headphone output of the device you wish to connect, MP3/CD Player, Laptop or TV etc.
2 Select Line-in audio input
When the status indicator (9) is amber, the audio input is set to Line-in.
If the status indicator (9) is blue the speakers are in Bluetooth mode, in which case press and hold the control knob (8) or press the Line-in button (20) on the remote control to change to Bluetooth mode. If the status indicator (9) is off, the speakers are in standby, in which case press the control knob (8), or press the Line-in button (20) on the remote control to turn them on.
3 Start music play on your device
Adjusting input level
Unless you experience audio distortion, we recommend you keep the output volume on your device near maximum and the input level switch (17) set to LOW.
Some computer headphone or audio outputs may have high signal levels. If the sound is distorted, turn down the volume level on the device.
Other audio devices, such as CD/DVD/Blu-ray players, may also have high output signals but without the ability to adjust the output volume. In this case, slide the input level select switch (17) to HIGH to attenuate the signal and prevent distortion.
For latest advice and useful hints and tips, please visit www.ruarkaudio.com
6 Playing from a Bluetooth device
To play audio from a Bluetooth device you first need to pair the device with your MR1 speakers, after that you simply need to connect it. Pairing is necessary to prevent unwanted devices connecting to your speakers.
1 Select Bluetooth mode on your MR1s
When you first turn on your speakers they will be in Line-in mode and the status indicator (9) will be solid amber. Activate Bluetooth mode by pressing and holding the control knob (8) for 2 seconds (long press) or by pressing the Bluetooth button (22) on the remote control. When the status indicator (9) flashes blue the speakers are discoverable and ready to pair or connect to your Bluetooth device.
2 Pair your Bluetooth device
Turn on Bluetooth on your audio device and select "RUARK MR1" from the device list. When your MR1s have paired and connected the indicator (9) will turn solid blue.
3 Start music play on your Bluetooth device
You may need to select "Ruark MR1" or Bluetooth as your music playing device.
General notes on Bluetooth function
- If you are unsure how to connect your device, please refer to your device's user manual.
- For some devices you may need to input "0000" as the pairing password.
- It may take a few seconds for your MR1 speakers to appear in your device list.
- Pairing will time out after 10 minutes and your MR1 speakers will go into standby.
Operating range
Your MR1 speakers will typically operate up to 10 metres (30 feet) from your Bluetooth device although obstructions such as walls will reduce this. Operating distance will also depend on the Bluetooth performance of the device you connect.
Disconnecting a device
Short press the Bluetooth button (22) on the remote control. When the status indicator (9) flashes the current device is disconnected and your MR1s are ready to pair or connect again.
Pairing additional devices to your MR1s
You can pair up to 8 devices although you will only be able to play audio from one device at a time.
Clearing the pairing list
Press and hold the Bluetooth button (22) on the remote control for 5 seconds to clear all pairing information.
The status indicator (9) flashes when your MR1s are ready to pair again.
You may also need to unpair or forget the "Ruark MR1" entry in your device's Bluetooth pairing list.
Auto connect
Your MR1s will automatically attempt to connect to the most recently paired Bluetooth device available. If your preferred device does not auto connect, clear the pairing list and pair it again.
For useful hints and tips on Bluetooth, please visit www.ruarkaudio.com
7 Status indicator light
The status indicator (9) on top of the right speaker indicates the following:
amber solid: Line-in mode
blue solid: Bluetooth mode
blue flashes every second: discoverable in Bluetooth
flashes every 10 seconds: auto standby mode
8 Other features
Auto standby
Your MR1 speakers will automatically go to standby after 10 minutes without an audio signal and they will then turn back on as soon as a signal is detected. Auto standby is on by default. To disable it select Line-in mode and press and hold the Line-in button (20) on the remote control for at least 5 seconds until the status indicator (9) flashes twice.
To enable auto standby, select Line-in mode and press and hold the Line-in button (20) on the remote control for at least 5 seconds until the status indicator (9) flashes three times.
Mute
Press Mute (19) on the remote. Press again to restore volume to the previous level.
BackPack battery pack
Your MR1s are fully compatible with the R1 BackPack battery pack so you can use them where mains power is not available.
See www.ruarkaudio.com
9 Safety and regulatory information
- Read this user guide and follow all instructions, it will help you set up and operate your product properly.
- Heed all warnings and keep this user guide for future reference.
- Do not attempt to use a damaged device as this could result in a dangerous electric shock.
- Do not open the unit or remove any panels to expose the electronics. No user serviceable parts inside.
- Refer all servicing to qualified service personnel. Servicing is required when the device has been damaged in any way, such as power-supply cord or plug is damaged, liquid has been spilled or objects have fallen into the device, the device has been exposed to rain or moisture, does not operate normally, or has been dropped.
- This device is intended to be operated ONLY from the AC Voltages listed on the back panel or included power supply. Operation from other voltages other than those indicated may cause irreversible damage to the device and void the product warranty.
- Use only the power supply provided with the device or an approved alternative.
- Ensure that the power adapter, mains plug or mains connector into the unit is readily accessible in case disconnection from the mains is required.
- The mains adapter, mains plug or mains connector must be removed from the socket to completely disconnect the system from mains power.
-
Do not place any naked flame sources, such as lighted candles, on or near the device. Do not install near any heat sources such as radiators, stoves, or other devices (including amplifiers) that produce heat.
-
Avoid exposure to extreme heat or cold.
- Only use attachments/accessories specified for this device. Make no modifications to the system or accessories. Unauthorised alterations may compromise safety, regulatory compliance, and system performance.
- Only use the supplied aerial or an approved replacement.
- To reduce the risk of fire or electrical shock, do not expose the device to rain or moisture. Do not expose this device to dripping or splashing, and do not place objects filled with liquids, such as vases, on or near the device. As with any electronic products, use care not to spill liquids into any part of the system. Liquids can cause a failure and/or a fire hazard.
- Unplug this device during lightning storms or when unused for long periods of time to prevent damage to this device.
- To prevent risk of fire or electric shock, avoid overloading wall outlets, extension cords, or integral convenience receptacles.
- Long-term exposure to loud music may cause hearing damage. It is best to avoid extreme volume when using headphones, especially for extended periods.
- Do not install this device in a confined space. Always leave a space of at least 10cm around the device for ventilation and ensure that curtains or other objects never cover ventilation openings on the device.

LITHIUM COIN CELL SAFETY NOTICE. The remote control contains a lithium coin cell battery which if ingested, may cause chemical burns. Keep new and used batteries out of reach of small children. If you think batteries may have been ingested, seek immediate medical attention. Do not handle leaking or damaged batteries. Danger of explosion if battery is incorrectly replaced. Replace only with the same or equivalent type.

This device is labelled in accordance with European Directive 2002/96/EC concerning waste electrical and electronic equipment. This symbol indicates that the product or associated batteries should not be disposed of as general household waste. As with any electrical equipment, please dispose of it according to local regulations.

CE COMPLIANCE INFORMATION
This product conforms to all EU Directive requirements as applicable by law. You may obtain a free copy of the Declaration of Conformity by contacting your dealer, distributor, or Ruark Audio.
Hereby, Ruark Audio, declares that these MR1 speakers are in compliance with the essential requirements and other relevant provisions of Directive 1999/5/EC.
FCC COMPLIANCE INFORMATION
This product complies with Part 15 of the FCC Rules. Operation is subject to the following two conditions:
(1) this device may not cause harmful interference, and
(2) this device must accept any interference received, including interference that may cause undesired operation.
CAUTION
Any modifications not approved by Ruark Audio may void the authority granted to the user by the FCC to operate this equipment.
This equipment has been tested and found to comply with the limits for a Class B digital device, pursuant to part 15 of the FCC Rules. These limits are designed to provide reasonable protection against harmful interference in a residential installation. This equipment generates, uses and can radiate radio frequency energy and, if not installed and used in accordance with the instructions, may cause harmful interference to radio communications. However, there is no guarantee that interference will not occur in a particular installation. If this equipment does cause harmful interference to radio or television reception, which can be determined by turning the equipment off and on, the user is encouraged to try to correct the interference by one or more of the following measures:
• Reorient or relocate the receiving antenna.
- Increase the separation between the equipment and receiver.
- Connect the equipment into an outlet on a circuit different from that to which the receiver is connected.
- Consult the dealer or an experienced radio/TV technician for help.
Approved under the verification provision of FCC Part 15 as a Class B Digital Device.
RF EXPOSURE WARNING
This equipment must be installed and operated in accordance with provided instructions and the antenna(s) used for this transmitter must be installed to provide a separation distance of at least 20 cm from all persons and must not be co-located or operating in conjunction with any other antenna or transmitter. End-users and installers must be provided with antenna installation instructions and transmitter operating conditions for satisfying RF exposure compliance.
Guarantee information
We guarantee this product to be free from defects for a period of two years from date of purchase, providing due care and attention has been paid. Product failure through accidental damage (however caused), excessive wear and tear, negligence or unauthorised modification will void your guarantee.
Should you experience a problem please contact us via our website www.ruarkaudio.com or by calling directly on 01702 601410 where we will advise the course of action. If your product needs to be returned it should be packaged in its original packing along with proof of purchase. If it is not possible to return the product by hand, then it should be sent carriage prepaid by a reputable parcel carrier. If the original packing is not available, replacement packing can be purchased from us.
Guarantee for overseas sales
The distributor in the country of purchase guarantees products purchased outside the UK. For details, please contact your local Ruark distributor or outlet.
THIS GUARANTEE IN NO WAY VARIES OR REMOVES THE PURCHASER'S STATUTORY RIGHTS. E&OE
General care
- Clean with a soft, lint-free duster or slightly dampened cloth. Do not use wax sprays or other substances as these may damage the surface finish or impair performance.
- Do not expose your unit to direct sunlight, high humidity, dust, excessive vibration or extreme temperatures, all of which can affect the finish, performance and reliability of the unit.
- Recommended operating temperature range is 5°C to 40°C.
- Natural wood finish cabinets will vary and lighten or darken with age, particularly when exposed to sunlight.
Copyright and trademarks
© 2015 Ruark Audio. All rights reserved. Ruark Audio, the Ruark Audio logo, and other Ruark Audio marks are owned by Ruark Audio and may be registered. All other trademarks are the property of their respective owners. Ruark Audio assumes no responsibility for any errors that may appear in this manual and the information contained in it may change without notice.
Bluetooth® and associated logos are registered trademarks owned by Bluetooth SIG, Inc.
aptX® and associated logos are registered trademarks owned by CSR plc. All other trademarks are the property of their respective owners

ruarkaudio
59 Tailors Court, Temple Farm Industrial Estate, Southend on Sea, Essex, SS2 5TH, UK
+44 (0) 1702 601 410 www.ruarkaudio.com
Designed in Great Britain

20150331.1
MR ^1
Active Bluetooth Speakers MR1
User guide EN
Brugervejledning DA
natural_image
Simple line drawing of a rectangular electronic device with rounded corners and a label 'ruarkaudio' at the bottom (no other text or symbols)1

natural_image
Black silhouette of a charging plug with a coiled cable (no text or symbols)34

●
natural_image
Line drawing of a rectangular electronic device with a label 'ruarkaudio' at the bottom (no other text or symbols)2
●

6
●
DA-3
2 Oversigt

CE-OVERHOLDELSESINFORMATION
59 Tailors Court, Temple Farm Industrial Estate, Southend on Sea, Essex, SS2 5TH, UK
+44 (0) 1702 601 410 www.ruarkaudio.com
Designet i
Storbritannien

20150331.1
MR ^1
Active Bluetooth Speakers MR1
User guide EN
Brugervejledning DA
natural_image
Simple line drawing of a rectangular electronic device with rounded corners and a label 'ruarkaudio' at the bottom (no other text or symbols)1
natural_image
Line drawing of a rectangular electronic device with a label 'ruarkeucio' at the bottom (no other text or symbols)2

natural_image
Black rectangular electronic device with a coiled cable and plug, no visible text or symbols34

natural_image
Simple black line drawing of a cord with two leads (no text or symbols)●
●
●
ES
6
ES-3
2 Descripción

59 Tailors Court, Temple Farm Industrial Estate, Southend on Sea, Essex, SS2 5TH, UK
+44 (0) 1702 601 410 www.ruarkaudio.com
natural_image
Front view of a rectangular electronic device with rounded corners and a 'uarkaudio' label at the bottom (no other text or symbols)1
natural_image
Line drawing of a rectangular electronic device with a label 'ruarkaudio' at the bottom (no other text or symbols)2

natural_image
Black rectangular electronic device with a coiled cable and plug, no visible text or symbols3

natural_image
Simple black line drawing of a cord with a plug, no text or symbols present●
●
6
●
FR-3
FR
2 Aperçu
Pression longue = source
INFORMATIONS DE CONFORMITÉ CE
59 Tailors Court, Temple Farm Industrial Estate, Southend on Sea, Essex, SS2 5TH, UK
+44 (0) 1702 601 410 www.ruarkaudio.com
Conçuen
Grande-Bretagne

20150331.1
MR ^1
Active Bluetooth Speakers MR1
User guide EN
Brugervejledning DA
natural_image
Simple line drawing of a rectangular electronic device with rounded corners and a label 'ruerkaudio' at the bottom (no other text or symbols)1

natural_image
Black rectangular electronic device with a coiled cable and plug, no visible text or symbols3

natural_image
Simple black line drawing of a cord with a plug, no text or symbols present●

natural_image
Line drawing of a rectangular electronic device with a label 'ruarkaudio' at the bottom (no other text or symbols)2
●
6
●
2 Panoramica

59 Tailors Court, Temple Farm Industrial Estate, Southend on Sea, Essex, SS2 5TH, UK
+44 (0) 1702 601 410 www.ruarkaudio.com
Progettato in
Gran Bretagna

20150331.1
MR ^1
Active Bluetooth Speakers MR1
User guide EN
Brugervejledning DA
natural_image
Front view of a rectangular electronic device with rounded corners and a 'ruarkaudio' label at the bottom (no other text or symbols)1

natural_image
Line drawing of a rectangular electronic device with a label 'ruarkaudio' at the bottom (no other text or symbols)2

natural_image
Black rectangular electronic device with a coiled cable and plug, no visible text or symbols3

natural_image
Simple black line drawing of a cord with a plug, no text or symbols present●
●
6

●
NL-3
2 Overzicht

Bluetooth. A2DP, aptX
Stroomverbruik:
10-12 W standaard (28 W max)
2 Selecteer Line-in audio invoer
59 Tailors Court, Temple Farm Industrial Estate, Southend on Sea, Essex, SS2 5TH, UK
+44 (0) 1702 601 410 www.ruarkaudio.com
Ontworpen in
Groot-Brittannië

20150331.1
MR ^1
Active Bluetooth Speakers MR1
User guide EN
Brugervejledning DA
59 Tailors Court, Temple Farm Industrial Estate, Southend on Sea, Essex, SS2 5TH, UK
+44 (0) 1702 601 410 www.ruarkaudio.com
Designed in Great Britain