014168 - Paint spray Meec Tools - Free user manual and instructions
Find the device manual for free 014168 Meec Tools in PDF.
| Product type | Spray gun (paint spray) |
| Brand | Meec Tools |
| Model | 014168 |
| Rated voltage | 230 V ~50 Hz |
| Rated power | 800 W |
| Protection class | II (double insulation) |
| Maximum material viscosity | 100 DIN-s |
| Container capacity | 800 ml |
| Weight | 2 kg |
| Air hose length | 1.8 m |
| Sound pressure level | 84 dB(A) (K=3 dB) |
| Sound power level | 95 dB(A) (K=3 dB) |
| Vibration | < 2.5 m/s² |
| Sprayable material types | Water- and solvent-based paints, varnishes, primers, 2-component paints, wood treatment agents |
| Non-sprayable material types | Emulsion paints, acids or bases, materials with flash point <21°C |
| Spray pattern settings | Horizontal flat, round, vertical narrow |
| Material flow adjustment | Yes (by wheel on trigger lock) |
| Trigger lock system | Yes |
| Air filter | Replaceable |
| Maintenance | Cleaning after each use, replacement of air filter |
| Safety | Double insulation, anti-drip protection, do not use near flames |
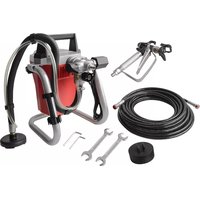
| Included accessories | Nozzle, air nozzle, air hose, container |
Frequently Asked Questions - 014168 Meec Tools
User questions about 014168 Meec Tools
0 question about this device. Answer the ones you know or ask your own.
Ask a new question about this device
Download the instructions for your Paint spray in PDF format for free! Find your manual 014168 - Meec Tools and take your electronic device back in hand. On this page are published all the documents necessary for the use of your device. 014168 by Meec Tools.
USER MANUAL 014168 Meec Tools

230 V/800 W
SPRAY GUN
Item no. 014168

natural_image
Exterior view of a MECO Tool kit with spray gun and coiled hose (no text or symbols visible)SV FÄRGSPRUTA
BRUKSANVISNING
Important! Read the user instructions carefully before use. Save them for future reference.
(Translation of the original instructions).
DE FARBSPRÜHGERÄT
BEDIENUNGSANLEITUNG
Care for the environment!
Recycle discarded product in accordance with local regulations.
Jula reserves the right to make changes. For latest version of operating instructions, see www.jula.com
3
4
natural_image
Technical line drawing of a spray gun with water level indicator (no text or symbols)A
natural_image
Line drawing of a spray gun with a water droplet inside, showing airflow direction (no text or symbols)B
5
natural_image
Three circular mechanical components with internal features and a separate black oval shape below (no text or symbols)ABC
6
7
natural_image
Line drawing of a mechanical component with no visible text or symbols8
9
natural_image
Technical line drawing of two different handheld devices, one with a lever mechanism and arrow indicating motion (no text or symbols present)10
natural_image
Technical line drawing of a vehicle interior showing structural components and seating layout (no text or symbols)SÄKERHETSANVISNINGAR
ARBETSOMRÅDE
BRUK OG VEDLIKEHOLD AV EL-VERKT∅Y
INNSTILLING AV MATERIALSTR∅M
- Keep the work area clean and well lit. Dark and cluttered work areas increase the risk of accidents and injuries.
- Do not use power tools in explosive environments, such as in the vicinity of flammable liquids, gas or dust. Power tools produce sparks that can ignite dust and fumes.
- Keep children and onlookers at a safe distance when using power tools. You can lose control of the tool if you are distracted.
ELECTRICAL SAFETY
- The plug on the power tool must match the power point. Never modify the plug in any way. Never use an adapter with earthed power tools. Unmodified plugs and matching outlets reduce the risk of electric shock.
- Avoid body contact with earthed surfaces such as pipes, radiators, cookers and refrigerators. There is an increased risk of electric shock if your body is earthed.
- Do not expose power tools to rain or moisture. There is a greater risk of electric shock if water gets into a power tool.
- Be careful with the power cord. Never use the power cord to carry or pull the tool, or to pull out the plug from the power point. Keep the power cord away from heat, oil, sharp edges and moving parts. Damaged or tangled power cords increase the risk of electric shock.
- If using the tool outdoors, only use an extension cord approved for outdoor use. Cords intended for outdoor use reduce the risk of electric shock.
- If it is absolutely necessary to use power tools in damp conditions, use a mains connection protected by a residual current device (RDC). Using an RCD reduces the risk of electric shock.
PERSONAL SAFETY
- Stay alert. Pay attention to what you are doing, and use your common sense when working with power tools. Never use power tools if you are tired or under the influence of drugs, alcohol or medication. A moment of inattention when using a power tool can result in serious personal injury.
- Use personal safety equipment. Depending on the type of tool and how it is used, safety equipment such as dust masks, non-slip safety shoes, safety helmets and ear protection reduce the risk of personal injury.
- Avoid accidental starting. Make sure the power switch is in the OFF position before inserting the battery or lifting/carrying the tool. Carrying a power tool with your finger on the switch, or connecting a tool to the mains when the switch is in the ON position, increases the risk of accidents and injuries.
- Remove adjuster keys/spanners before switching on the power tool. Spanners or the like that are left in a rotating part of the tool can cause personal injury.
- Do not overreach. Always maintain a firm footing and good balance. This ensures better control over the power tool in unexpected situations.
- Wear suitable clothing. Do not wear loose-fitting clothing or jewellery. Keep your hair, clothing and gloves away from moving parts. Loose-fitting clothing, jewellery and long hair can get caught in moving parts.
- If dust extraction and dust collection equipment is available, this should be connected and used correctly. The use of such devices can reduce the risk of dust-related problems.
USING AND LOOKING AFTER POWER TOOLS
- Do not force the power tool. Use the correct power tool for the planned work. The tool does the job better and safer when used at the rate for which it was designed.
- Do not use the tool if it cannot be switched on and off with the power switch. Power tools that cannot be controlled with the power switch are dangerous and must be repaired.
- Pull out the plug and/or remove the battery before making any adjustments, changing accessories or putting the power tool away. These safety precautions reduce the risk of accidentally starting the power tool.
- Store power tools out of the reach of children when not in use. Never allow children, or anyone who is unfamiliar with the power tool and these instructions, to use the tool. Power tools are dangerous if used by inexperienced persons.
- Keep the power tool properly maintained. Check that moving parts are properly adjusted and do not jam, and that no parts are incorrectly fitted or damaged. Check for other factors that could affect functionality. If the power tool is damaged, it must be repaired before being used again. Many accidents are caused by poorly maintained power tools.
- Keep cutting tools sharp and clean. Properly maintained cutting tools with sharp cutting edges are less likely to jam and are easier to control.
- Use the power tool, accessories and bits etc., in accordance with these instructions, taking into account the actual working conditions and the work that is to be done. It can be dangerous to use power tools for purposes other than those for which they are intended to be used.
- Keep handles and grips clean, dry and free from oil and grease. Greasy handles and grips make it difficult to hold the tool.
SERVICE
- The power tool must only be serviced by qualified personnel using identical spare parts. This will ensure that the power tool remains safe to use.
ADDITIONAL SAFETY INSTRUCTIONS
- Never point the nozzle at people or animals, and never allow the spray to come into contact with your skin.
- The product must not be used to spray material with a flash point less than 21°C.
- Ensure good ventilation when spraying.
- The nozzle guard must always be fitted during use.
- Do not use the product in a flammable or explosive environment.
- Read and follow all the information on the container for the sprayed material.
- Never spray anything you are not familiar with.
- Wear safety glasses or a face mask.
• Always wear a mask. - Wear ear protection if the sound pressure level exceeds 85 dB (A).
- Keep the product, material container and nozzles clean. Do not clean with an agent with a flash point less than 21°C. Check the power cord regularly. A damaged cord or plug must be replaced by an authorised service centre or qualified person to ensure safe use.
- Never spray near a naked flame or other source of heat.
- Smoking prohibited.
- Follow the instructions of the manufacturer for thinning.
- Pull out the plug before cleaning and refilling the material container.
- Do not allow the product to work for long with the flow switched off.
SYMBOLS
The following symbols can be of importance for how you should use your power tool. Make sure you understand the symbols and their significance.
 | Read the instructions. |
 | Approved in accordance with the relevant EU directives. |
 | This product has a safety class II rating. This means it is fitted with extra or double insulation. |
 | Use ear protection. |
 | Wear a face mask. |
 | Recycle as electrical waste. |
TECHNICAL DATA
| Rated voltage 230 V | ~50 Hz |
| Nominal input power 800 W | |
| SafetyclassII | |
| Max viscosity 100 DIN/s | |
| Container volume 800 ml | |
| Weight | 2 kg |
| Hose length | 1.8 ml |
| Sound pressure level LpA | 84 dB(A) K = 3 dB(A) |
| Sound power level, LwA | 95 dB(A) K = 3 dB(A) |
| Vibration | < 2.5 m/s ^2 |
Always wear ear protection.
The declared values for vibration and noise, which have been measured according to a standardised test method, can be used to compare different tools with each other and for a preliminary assessment of exposure. The measurement values have been determined in accordance with EN 60745-1:2009.
WARNING!
The actual vibration and noise level when using tools may differ from the specified maximum value, depending on how the tool is used and the material. It is therefore necessary to determine which safety precautions are required to protect the user, based on an estimate of exposure in actual operating conditions (taking into account all stages of the work cycle, e.g. the time when the tool is switched off and when it is idling, in addition to the start-up time).
DESCRIPTION
PARTS
- Air nozzle
- Nozzle
- Lock ring
- Front part of spray gun
- Trigger catch
- Lock button
- Back part of spray gun
- Air filter cover
- Air hose
- Lever to adjust material flow
- Container
FIG. 1
HOW TO USE
THINNER
The material may need to be thinned with a suitable thinner before spraying. Follow the instructions of the manufacturer.
Never thin the material more than recommended by the manufacturer.
NOTE:
The material to be sprayed should always be strained before use to remove any impurities that can block the product. Impurities in the sprayed material reduce the functionality of the product and surface finish.
FIG. 2
| Material Run out time (s) | |
| Enamel paint 25–45 | |
| Oil-based primer 30–50 | |
| Varnish 20–55 | |
| Varnish/flatting varnish | 25–40 |
| Varnish stain Sealing lacquer Polyurethane | No thinner |
The flash point of the material must be at least 21^ C.
Measure how many seconds it takes for the material to run out (run time).
NOTE:
Stir the material well before measuring and pour it into the test container.
LIQUIDS THAT CAN BE SPRAYED
Water and solvent-based paints, varnish, primer, 2-component paint, clear varnish, automotive paint, surface finish and wood preservatives.
LIQUIDS THAT CANNOT BE SPRAYED
Emulsion paints, acidic or basic paints. Material with a flash point less than 21^ C.
PREPARATIONS
Check that the mains voltage corresponds to the rated voltage on the type plate.
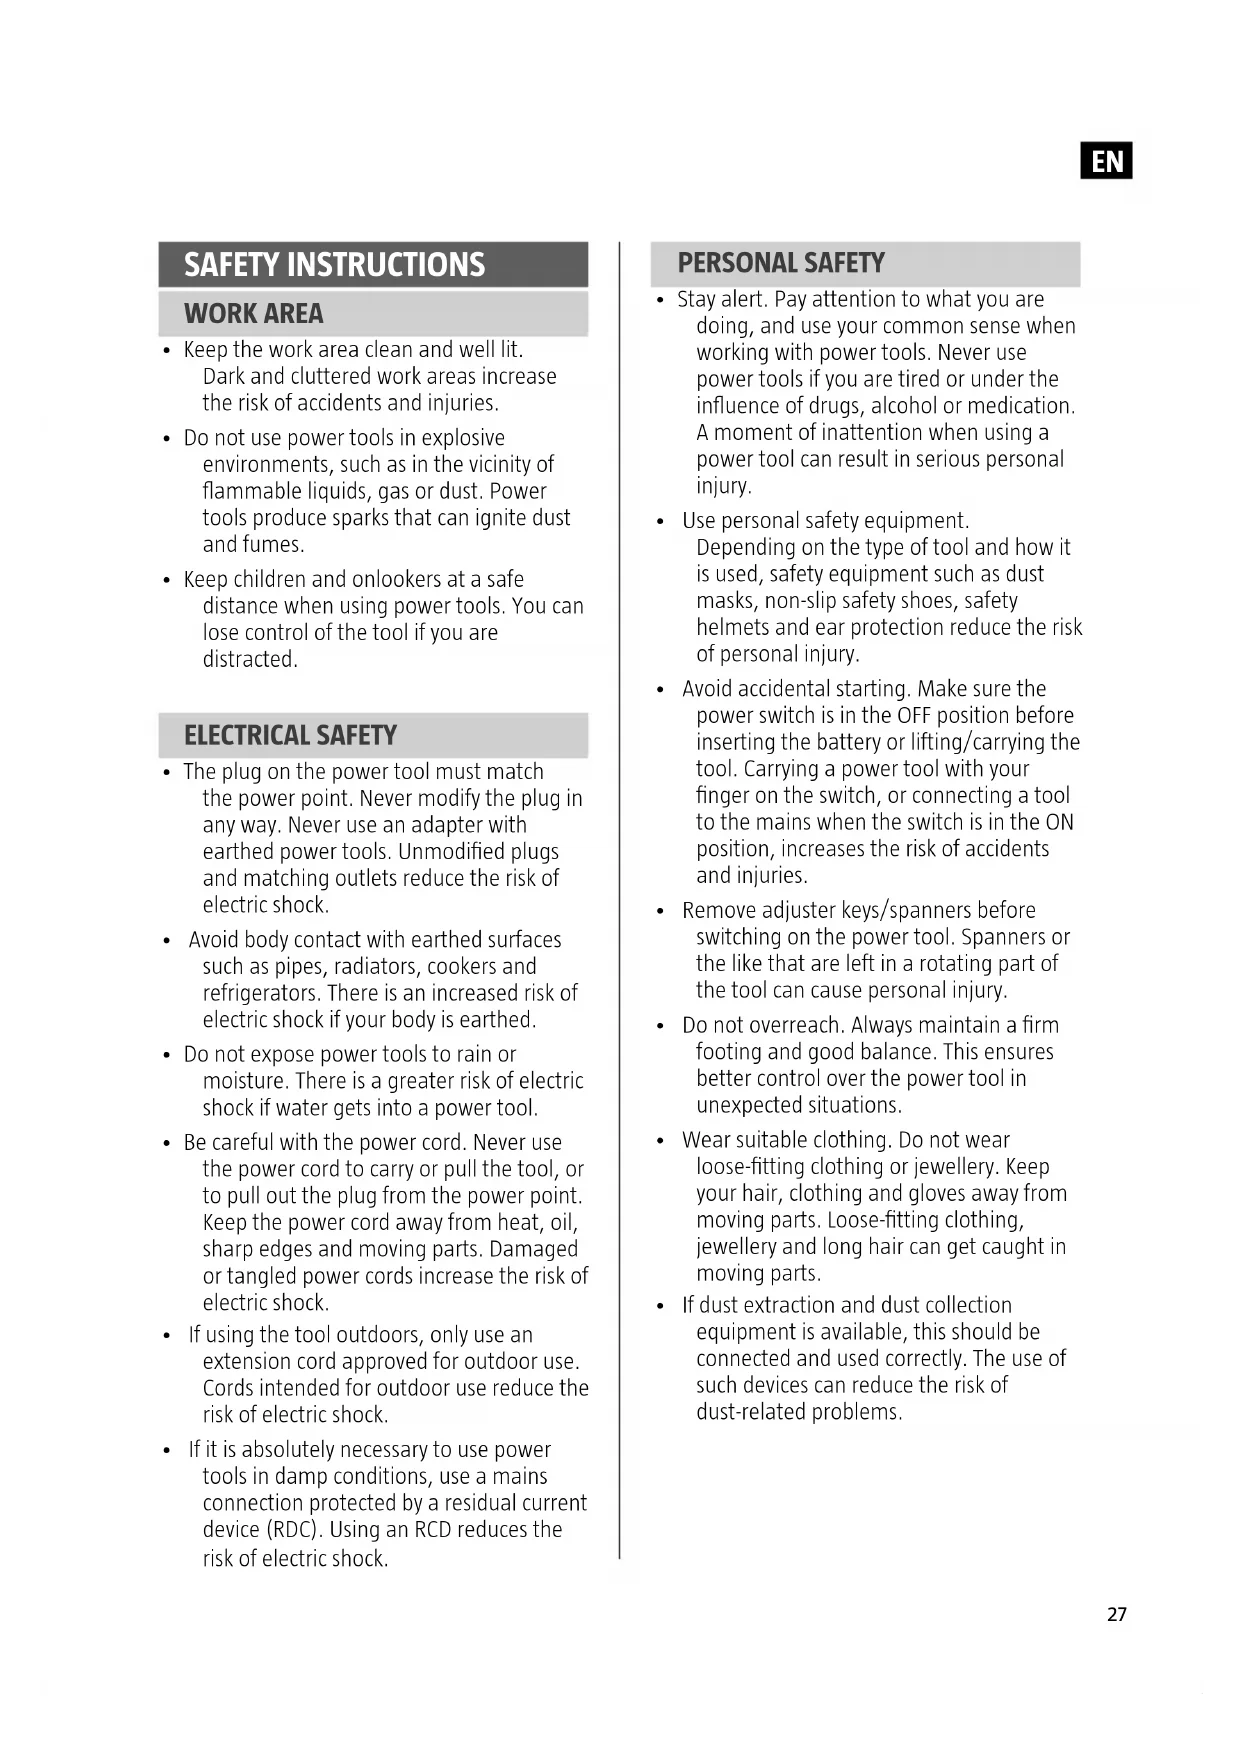
FITTING THE AIR HOSE
- Put the air hose connectors in the connections on the product and on the spray gun and twist to lock.
FIG. 3
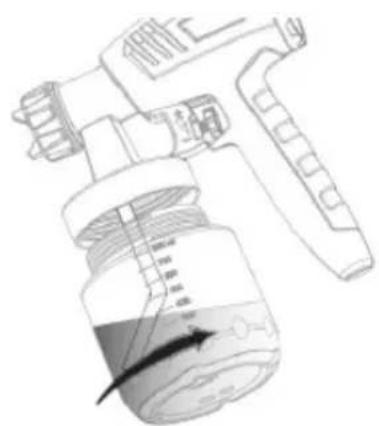
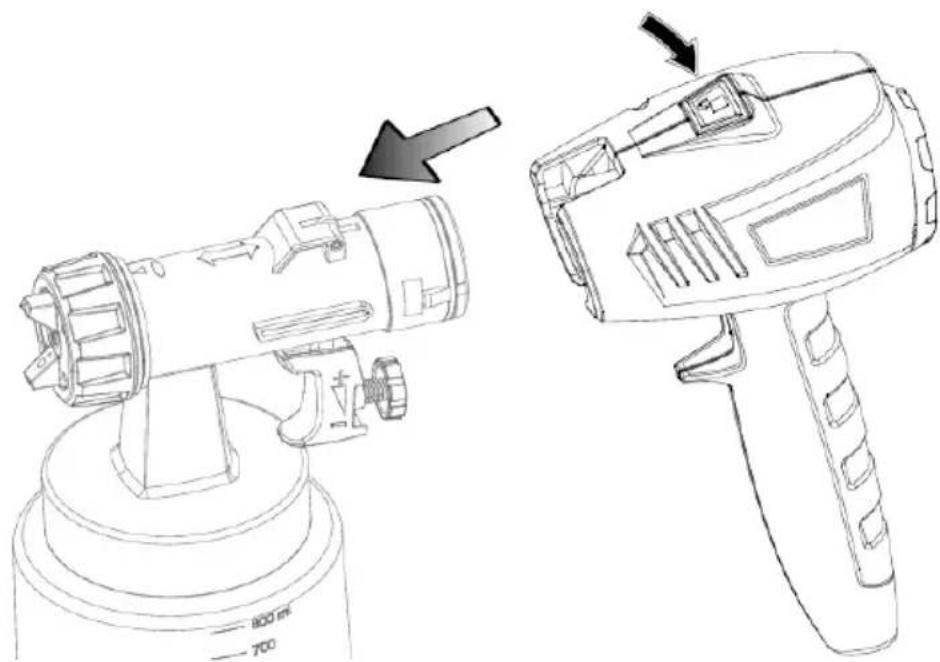
-
Unscrew the container from the spray gun. Adjust the suction hose. The container should be almost completely emptied during the spraying.
-
When spraying downwards the suction hose should point forward (A).
- When spraying upwards the suction hose should be pointed back (B).
FIG. 4
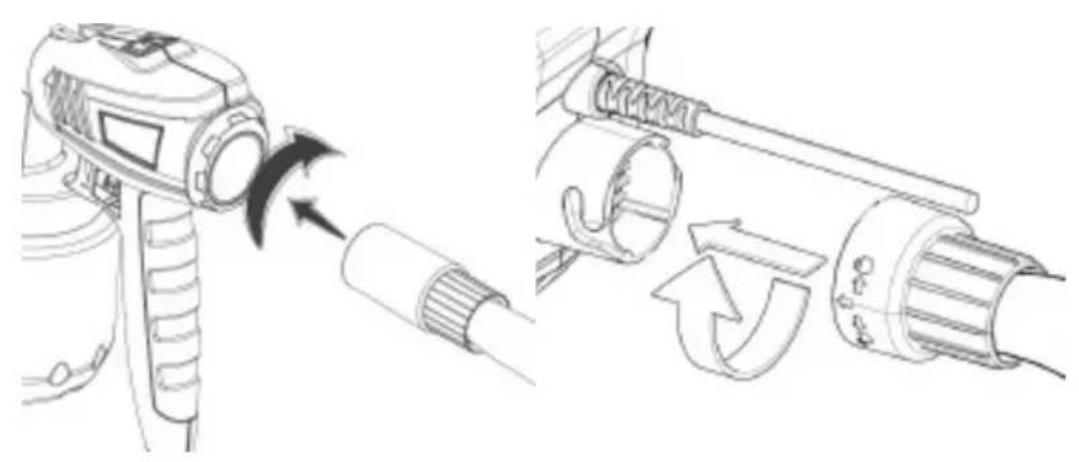
- Pour the prepared material into the container and screw the container firmly on the spray gun.
- Put the compressor unit down on a level, clean surface, otherwise it can suck in dust etc.
- Adjust the flow of material in the spray gun.
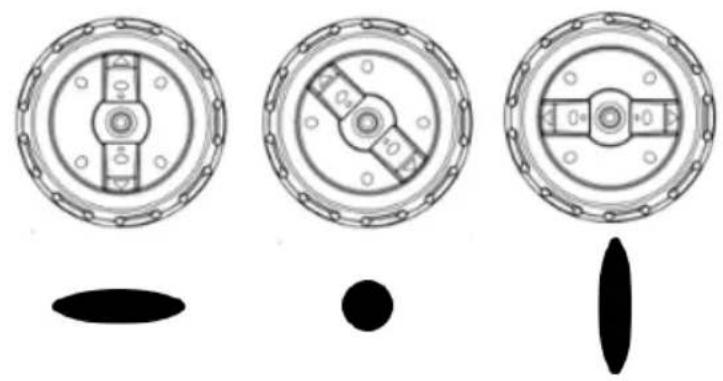
SPRAY SETTINGS
There are three different spray settings for different applications.
• A = horizontal, flat jet
- B = round jet
• C = vertical thin jet
The different spray patterns are marked on the front of the spray gun. Turn so that the arrow for the required spray pattern is opposite the projecting parts on the front end.
FIG. 5
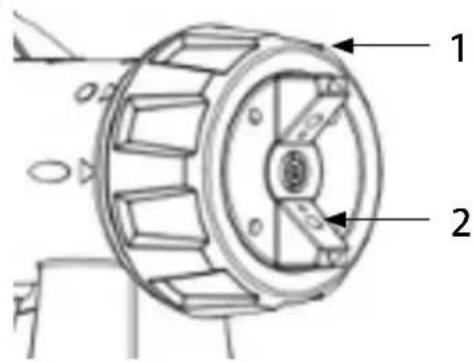
ADJUSTING THE SPRAY PATTERN
Release lock ring (1) a little, twist the air nozzle (2) to the marking for the required spray pattern.
FIG. 6
WARNING!
Risk of personal injury. Never touch the trigger while adjusting the air flow.
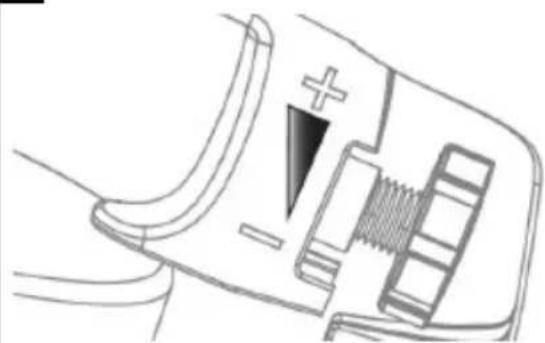
ADJUSTING THE FLOW OF MATERIAL
Adjust the flow with the knob on the trigger catch.
- down = reduced flow of material
+ up = increased flow of material
FIG. 7
SPRAYING TECHNIQUE
- The surface to be painted must be free from dust, dirt and grease.
- Mask areas that are not to be painted.
- Mask threads etc. on the object to be painted.
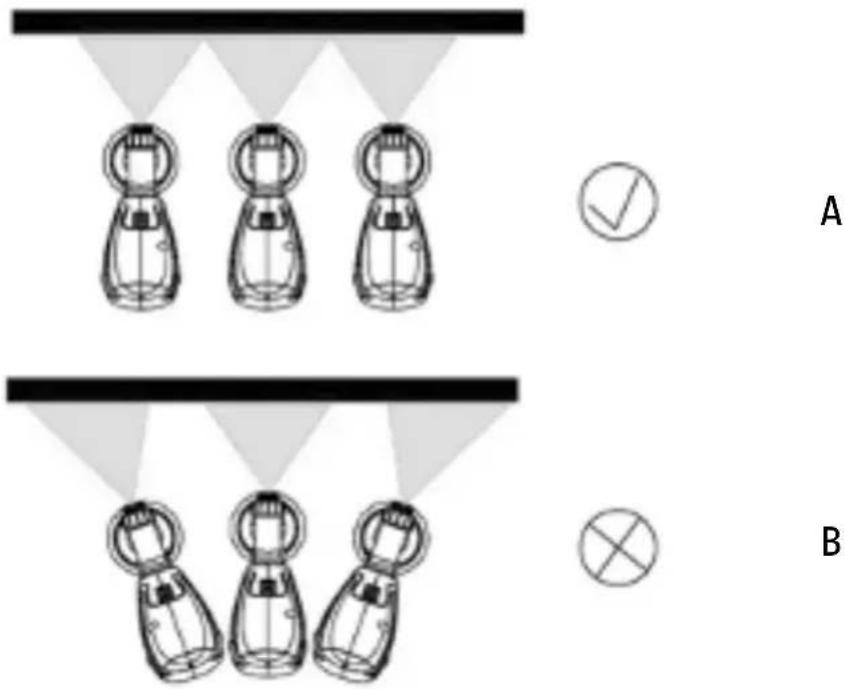
- Test on cardboard first, or something else. Start spraying outside the area to be painted and avoid interruptions in this area.
- Correct (A). Hold the spray gun at a steady distance (10–30 cm) from the object to be sprayed.
- Wrong (B). Uneven coating of material or excessive spray mist.
FIG. 8
- Handle the spray gun with a smooth action to obtain a uniform surface finish.
- Clean the nozzle and air nozzle with a suitable solvent if they get clogged.
SHORT PAUSE
- Switch off the product.
- Put the spray gun in the holder on the compressor unit.
MAINTENANCE
SWITCHING OFF AND CLEANING
Proper maintenance and regular cleaning are essential for the product to work properly. The warranty does not cover problems resulting from inadequate cleaning.
-
Switch off the product. Press the trigger catch so that the material in the spray gun runs back into the container.
-
Unscrew the container and pour residual material back into the original container.
- Clean the container and suction hose with a brush.
- Pour solvent or water into the container and replace it on the spray gun. Do not use solvent that has a flash point lass than 21^ C.
- Start the product and spray the solvent into a container or on a rag.
- Repeat until only clean solvent comes out.
- Switch off the product.
- Completely empty the container. Make sure that the seal is clean and undamaged.
- Press the catch, pull off the front part of spray gun and clean it well. Press the button and pull out.
FIG. 9
- Clean the spray gun and container with a cloth moistened with solvent or water.
- Unscrew the lock ring and remove the air nozzle and nozzle. Clean with solvent and a brush.
IMPORTANT:
Never clean the nozzle and air holes on the spray gun with sharp metal objects.
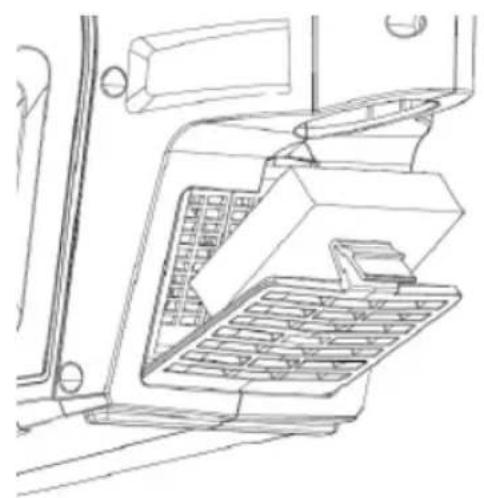
REPLACING THE AIR FILTER
Replace the air filter when necessary. Release the cover on the compressor unit and put the new air filter in the cover. Press the cover in place again.
FIG. 10
WARNING!
Never run the product without an air filter – risk of material damage when adjusting the air flow.
TROUBLESHOOTING
| Problem Cause Action | ||
| No material comes out through the nozzle. | The nozzle is blocked.The suction hose is blocked.The flow of material is set too low.The suction hose has come loose.The pressure in the container is too low.The material is too thick. | Clean.Clean.Increase the flow of material (+).Fix the hose in place.Screw the container on properly.Thin the material. |
| Material drips from the nozzle. | The nozzle is loose.The nozzle is worn.Material has accumulated in the air nozzle, nozzle or paint needle. | Tighten.Replace nozzle.Clean. |
| The material is not shredded properly. | The material is too thick.The flow of material is set too high.The nozzle is blocked.The air filter is very dirty.The pressure in the container is too low. | Thin the material.Reduce the flow of material (-).Clean.Replace.Screw the container on properly. |