
18310015 - Kitchen scales Gastronoma - Free user manual and instructions
Find the device manual for free 18310015 Gastronoma in PDF.

User questions about 18310015 Gastronoma
0 question about this device. Answer the ones you know or ask your own.
Ask a new question about this device
Download the instructions for your Kitchen scales in PDF format for free! Find your manual 18310015 - Gastronoma and take your electronic device back in hand. On this page are published all the documents necessary for the use of your device. 18310015 by Gastronoma.
USER MANUAL 18310015 Gastronoma
UK Electronic kitchen scale 23
To get the best out of your new electronic kitchen scale, please read through these instructions carefully before using it for the first time. Take particular note of the safety precautions. We also recommend that you keep the instructions for future reference.
GENERAL SAFETY INSTRUCTIONS
- This appliance may only be used by children aged from 8 years and above and persons with reduced physical, sensory or mental capabilities or lack of experience and knowledge if they are supervised or have been given instructions concerning use of the appliance in a safe way and understand the hazards involved. Children must not play with
the appliance.
Cleaning and user maintenance must not be performed by children without supervision.
- Keep the appliance under constant supervision while in use. Keep an eye on any children in the vicinity of the appliance when it is in use. The appliance is not a toy.
- Incorrect use of this appliance may cause personal injury or damage the appliance.
- Use for its intended purpose only. The manufacturer is not responsible for any injury or damage resulting
UK
from incorrect use or handling (see also Warranty Terms).
- For domestic use only. Not for outdoor or commercial use.
- Never try to repair the appliance yourself. Please contact the store where you bought the appliance for repairs under warranty.
- Unauthorised repairs or modifications will invalidate the warranty.
SPECIAL SAFETY INSTRUCTIONS
- The appliance must not be loaded with more than 5 kg, as this may damage it!
• The smallest weight that can be weighed
is 5 grams.
- The appliance must be placed on a flat, stable surface when in use.
- The appliance must not be stored on end. It must be kept flat just as it is when in use.
- Do not allow water or other liquids to get into the operating panel.
- Do not stack things on top of the appliance.
- Avoid subjecting the appliance to heavy impacts or knocks.
- Check that the polarities of the batteries are facing in the right direction, as incorrectly

UK
fitted batteries can damage the appliance.
- Remove the batteries if the appliance is not going to be used for a prolonged period.
• Always replace all batteries at the same time. - Never mix different types of battery (e.g. manganese dioxide batteries and alkaline batteries), old and new batteries or different makes of batteries.
UK
DISPLAY
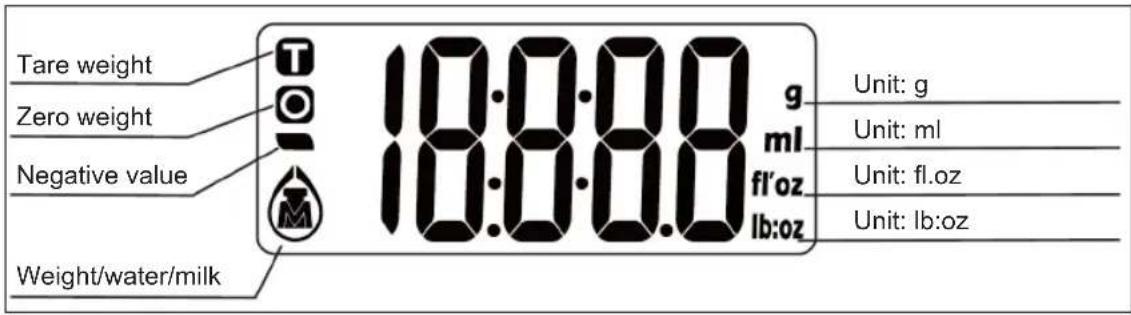
text_image
Tare weight Zero weight Negative value Weight/water/milk 18:00:00 g ml fl'oz lb:oz Unit: g Unit: ml Unit: fl.oz Unit: lb:ozPREPARATION
Remove the battery cover underneath the appliance. Insert 2 x 1.5 V AAA batteries. Check that the batteries are in the right way round. Replace the battery cover.
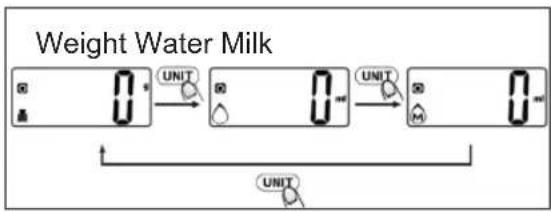
MODE AND UNIT
When the appliance comes on, the measure ment unit is always grams and ml.
Short press the UNIT button to change between the following measurement functions: weight - water volume - milk volume - weight.
flowchart
graph LR
    A["0"] --> B["UNIT"]
    B --> C["0"]
    C --> D["UNIT"]
    D --> E["0"]
    E --> F["UNIT"]
    style A fill:#f9f,stroke:#333
    style B fill:#ccf,stroke:#333
    style C fill:#cfc,stroke:#333
    style D fill:#fcc,stroke:#333
    style E fill:#cff,stroke:#333
    style F fill:#ffc,stroke:#333
Long press the UNIT button one or more times to change between the following measurement unit pairs: g (grams) and ml (millilitres) or lb:oz (pounds:ounces) and fl.oz (fluid ounces).
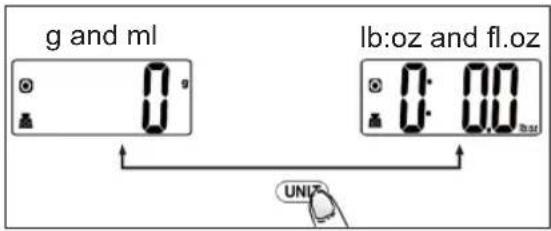
text_image
g and ml lb:oz and fl.oz 0:00 UNIFWEIGHING
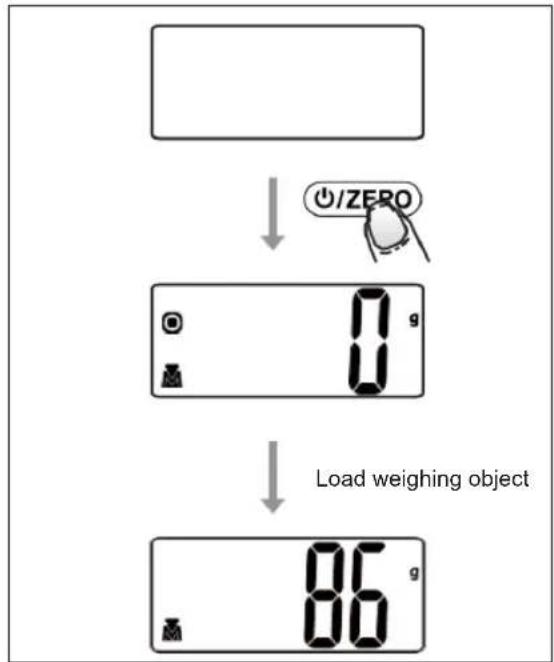
- Place the appliance on a flat, stable surface.
- Press the ON/ZERO button. All the segments light up on the display. When the display shows "0", it is ready for use.
- Place a bowl (if used) on the weighing platform and press ON/ZERO button to reset the weight reading to 0.
- Change unit if necessary.
- Put weighing object on the weighing platform or in the bowl on to start weighing. The display will show the reading.
flowchart
graph TD
    A["Blank"] --> B["↓ ⏻/ZERO"]
    B --> C["Load weighing object: 0 g, 1 g, 2 g"]
    C --> D["↓"]
    D --> E["Load weighing object: 86 g, 1 g, 2 g"]
UK
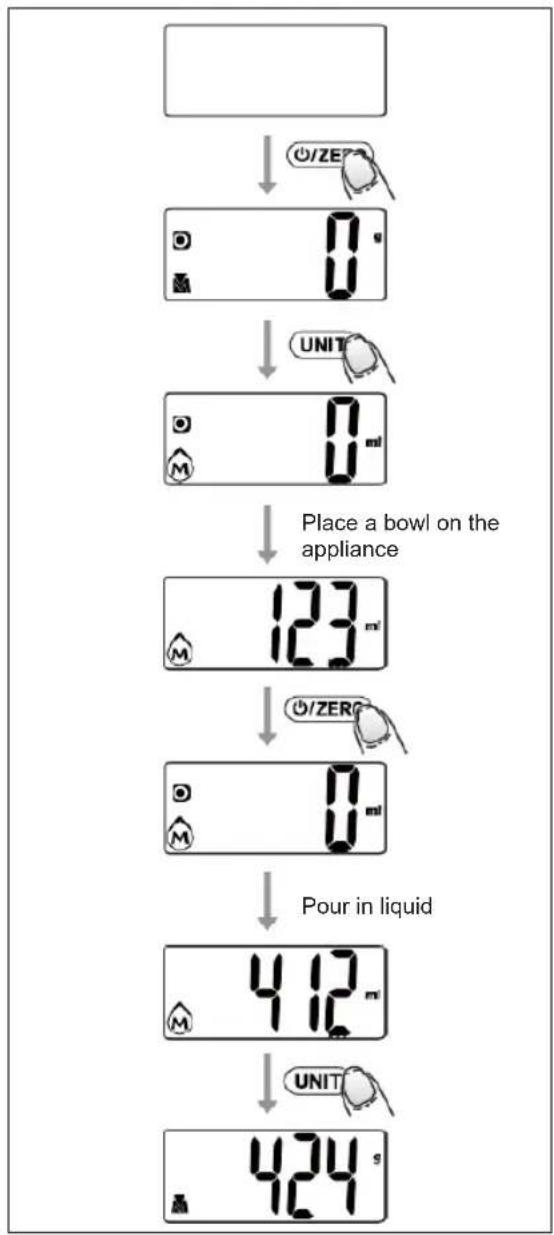
MEASURING VOLUME
- Place the appliance on a flat, stable surface.
- Press the ON/ZERO button. All the segments light up on the display. When the display shows "0", it is ready for use.
- Press the UNIT button to choose "Water" or "Milk" mode. Change unit if necessary.
flowchart
graph TD
    A[" "] --> B["○/ZERO"]
    B --> C["0 m²"]
    C --> D["UNIT"]
    D --> E["0 m²"]
    E --> F["Place a bowl on the appliance"]
    F --> G["123 m²"]
    G --> H["○/ZERO"]
    H --> I["0 m²"]
    I --> J["Pour in liquid"]
    J --> K["412 m²"]
    K --> L["UNIT"]
    L --> M["424 s"]
- Place a bowl on the weighing platform. Press ON/ZERO button to reset the display reading to "0".
- Pour liquid in the bowl to start measuring the volume. The display will show the reading.
- You can press the UNIT button to view the weight of the liquid.
ZERO AND TARE FUNCTIONS
The zero function can be used when the sum of all loads on the appliance is less than 200 g.
The tare function can be used when the sum of all loads on the appliance exceeds 200 g.
Zero function
- Put first load on the weighing platform. The display will show the reading.
- Press the ON/ZERO button to reset the display reading to "0" before adding next load.
The display will show "0" each time ON/ZERO button is pressed.
The icon "0" on the left side of the display means that the zero function has been activated.
You can repeat this operation.
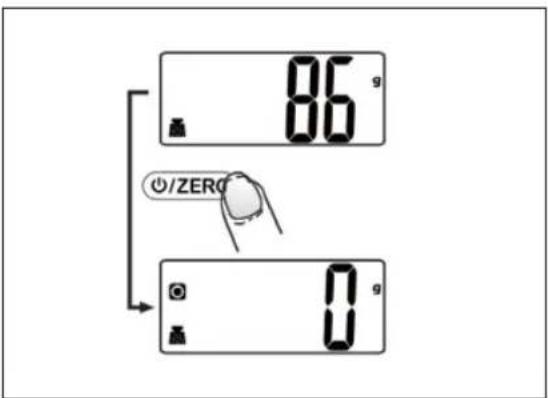
text_image
86 g ZERO 0 gUK
Tare function
You can weigh several things one after another without removing them from the scale and display the total weight.
- Put first load on the weighing platform. The display will show the reading.
- Press the ON/ZERO button to tare.
The icon "T" is displayed and the last weight is zeroed. Weigh the next item. The new weight will be displayed. - Press the ON/ZERO button to display the sum of all weighed loads.
- Press the ON/ZERO button again to tare and carry on weighing.
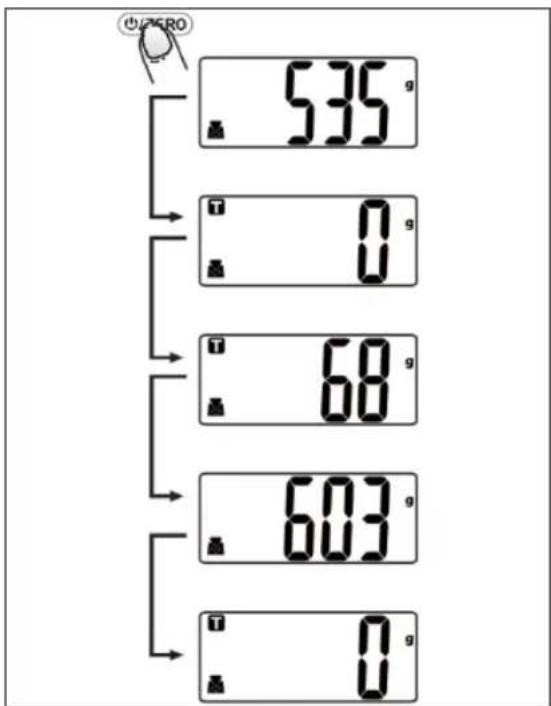
text_image
535 g 0 g 68 g 603 g 0 gPOWER OFF
The appliance automa tically turns off after around 2 minutes of inactivity.
You can also switch off the appliance by holding down the ON/ZERO button for 3 seconds.
ERROR MESSAGES
- If "Lo" appears on the display, the batteries are so depleted that the appliance can no longer function correctly. Replace the batteries.
- If "Err" is shown on the display, the appliance is overloaded. Remove the weighing item from the weighing platform.
- If “----” is shown on the display, appliance is unstable so it cannot weigh correctly. Place the appliance on a flat and stable surface and try again.
CLEANING
- Clean using a damp cloth and, if necessary, a little detergent. Make sure water does not get into the appliance.
- Remove the batteries if the appliance is not going to be used for a prolonged period.
UK
INFORMATION ON DISPOSALAND RECYCLING OF THIS PRODUCT
Please note that this product is marked with this symbol:
This means that this product must not be disposed of along with ordinary household waste, as electrical and electronic waste must be disposed of separately.
According to the WEEE directive, every member state must ensure correct collection, recovery, handling and recycling of electrical and electronic waste. Private households in the EU can take used equipment to special recycling stations free of charge.
In some member states you can in certain cases return used equipment to the retailer from whom you purchased it, if you are purchasing new equipment. Contact your retailer, distributor or the municipal authorities for further information on what to do with electrical and electronic waste.
WARRANTY TERMS
The warranty does not apply:
- if the above instructions have not been followed
- if the appliance has been interfered with
- if the appliance has been mishandled, subjected to rough treatment, or has suffered any other form of damage
- if the appliance is faulty due to faults in the electricity supply.
Due to the constant development of our products in terms of function and design, we reserve the right to make changes to the product without prior warning.
QUESTIONS AND ANSWERS
If you have any questions regarding the use of the appliance and cannot find the answer in this user guide, please try our website at www.commaxx.nl.
You can also see contact details on our website if you need to contact us for technical questions, repairs, accessories or spare parts.
MANUFACTURED IN CHINA FOR
Commaxx B.V.
Wiebachstraat 37,
NL-6466 NG Kerkrade
Netherlands
www.commaxx.nl
We cannot be held responsible for any printing errors.
DE
EINFÜHRUNG
INFORMATIONS RELATIVES À LA MISE AU REBUT ET AU RECYCLAGE DE CE PRODUIT
CONDITIONS DE GARANTIE
ALGEMENE VEI- LIGHEIDSVOOR- SCHRIFTEN
NUL- EN TARRAFUNCTIES
WYPRODUKOWANO W CHINACH DLA
Commaxx B.V.
Wiebachstraat 37,
NL-6466 NG Kerkrade
Netherlands
www.commaxx.nl