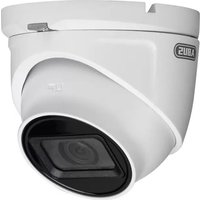
HDCC35561 - Surveillance Camera ABUS - Free user manual and instructions
Find the device manual for free HDCC35561 ABUS in PDF.


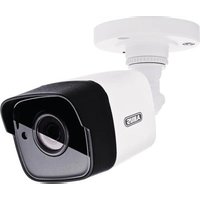
| Product type | HD analog surveillance camera |
| Brand | ABUS |
| Model | HDCC35561 |
| Maximum resolution | 5 MPx (2560x1920) or 4 MPx (depending on setting) |
| Supported video formats | TVI, CVI, AHD, CVBS |
| Video output | BNC (TVI/CVI/AHD/CVBS) |
| Power supply | 5.5 x 2.1 mm, hollow plug, 12 V DC (via power adapter) |
| Included cable length | 30 m (combined cable) |
| Maximum transmission distance | 800 m (2 MPx) or 300 m (5 MPx) |
| Viewing angle (pan) | 0° - 360° |
| Viewing angle (tilt) | 0° - 75° (depending on model) |
| Viewing angle (rotation) | 0° - 360° |
| Night vision | Yes, IR LED with SMART IR mode (indoor/outdoor) |
| Housing | Plastic, for indoor use |
| Mounting | Wall mount with drilling template and screws included |
| Maintenance and cleaning | Clean with a damp cloth, without solvents or alcohol |
| Safety | Disconnect before intervention; follow electrical instructions |
| Spare parts and repairability | No spare parts provided; repair by a specialist |
| General information | Compliant with EMC directives 2014/30/EU and RoHS 2011/65/EU |
Frequently Asked Questions - HDCC35561 ABUS
User questions about HDCC35561 ABUS
0 question about this device. Answer the ones you know or ask your own.
Ask a new question about this device
Download the instructions for your Surveillance Camera in PDF format for free! Find your manual HDCC35561 - ABUS and take your electronic device back in hand. On this page are published all the documents necessary for the use of your device. HDCC35561 by ABUS.
USER MANUAL HDCC35561 ABUS
HDCC35560 / HDCC45560
www.abus.com/product/HDCC32561
wwwabus.com/product/HDCC42561
www.abus.com/product/HDCC35560
www.abus.com/product/HDCC45560
Thank you for purchasing this product.
ABUS Security-Center hereby declares that the cameras comply with the requirements of the following EU Directives: EMC Directive 2014/30/EU and the RoHS Directive 2011/65/EU. The full text of the EU Declaration of Conformity can be found at:
www.abus.com/product/HDCC32561
www.abus.com/product/HDCC42561
www.abus.com/product/HDCC35560
www.abus.com/product/HDCC45560
To ensure this remains the case and to guarantee safe operation, it is your obligation to observe these operating instructions.
If you have any questions, please contact your specialist dealer or our customer service team:
Post: ABUS Support, Linker Kreuthweg 5, 86444 Affing, Germany
Email: support@abus-sc.com
Phone: +49 8207 959 90 888
Hotline opening hours: Mon-Thurs: 8:00-17:00; Fri: 8:00-14:00

Data storage is subject to national data privacy guidelines.

Disclaimer
This user guide has been produced with the greatest of care. Should you discover any omissions or inaccuracies, please contact us in writing at the address provided above.
ABUS Security-Center GmbH does not accept any liability for technical and typographical errors, and reserves the right to make changes to the product and user guides at any time and without prior warning.
ABUS Security-Center GmbH is not liable or responsible for direct or indirect damage resulting from the equipment, performance and use of this product. No guarantee is made for the contents of this document.
Explanation of symbols
| The triangular high voltage symbol is used to warn of the risk of injury or health hazards (e.g. caused by electric shock). | |
| The triangular warning symbol indicates important notes in this user guide which must be observed. | |
| This symbol indicates special tips and notes on the operation of the unit. |
Lists
| 3. ... 4. ... | Lists with a set order given either in the text or warning notice. |
| • ... • ... | Lists without a set order given either in the text or warning notice. |
Intended use
Only use the device for the purpose for which it was built and designed. Any other use is not considered to be the intended use.
Important safety information
General
Before using this device for the first time, please read the following instructions carefully and observe all warning information, even if you are familiar with the use of electronic devices.
| All guarantee claims are invalid in the event of damage caused by non-compliance with this user guide. We cannot be held liable for resulting damage. | |
| We cannot be held liable for material or personal damage caused by improper operation or non-compliance with the safety information. All guarantee claims are void in such cases. |
Retain this handbook for future reference.
If you sell or pass on the device to third parties, you must include these instructions with the device. The following safety information and hazard notes are not only intended to protect your health, but also to protect the device from damage. Please read the following points carefully:
Power supply
- Only operate this device through a power source which supplies the mains power specified on the type plate. If you are unsure which voltage is supplied at the installation location, contact your energy provider.
- Disconnect the device from the power supply before carrying out maintenance or installation work.
- The device is only fully disconnected from the mains network when the power supply unit is removed.
- To fully disconnect the device from the mains, the mains plug must be withdrawn from the mains socket.
- In order to eliminate the risk of fire, the device's mains plug should always be disconnected from the mains socket, if the device is not being used for an extended period of time.
Overload/overvoltage
- Prior to unstable weather and/or when there is a risk of lightning strike, disconnect the device from the mains network or connect the device to a UPS.
- Avoid overloading electrical sockets, extension cables and adapters, as this can result in fire or electric shock.
Cables
- Always grasp cables by the plug connector and do not pull the cable itself.
- Never grasp the power cable with wet hands, as this can cause a short circuit or electric shock.
- Do not place the device itself, items of furniture or other heavy objects on the cable and ensure that it does not become kinked, especially at the connector plug and at the connection sockets.
- Never tie a knot in the cable and do not bundle it together with other cables.
- All cables should be laid so that they cannot be trodden on or cause a hazard.
- Damaged power cables can cause fire or electric shock. Check the power cable from time to time.
- Do not modify or manipulate the power cable or plug.
- Only use adapter plugs or extension cables that conform to applicable safety standards, and do not interfere with the mains or power cables.
Children
- Keep electrical devices out of reach of children. Never allow children to use electrical devices unsupervised. Children may not always properly identify possible hazards. Small parts may be fatal if swallowed.
- Keep packaging film away from children. There is a risk of suffocation.
This device is not intended for children. If used incorrectly, parts under spring tension may fly out and cause injury to children (e.g. to eyes).
Surveillance
The use of surveillance equipment may be forbidden or regulated by law in some countries.
Before using this equipment, ensure that all of your surveillance activities are completely legal.
Installation location/operating environment
Do not place any heavy objects on the device.
The device is only designed for operation in spaces with appropriate temperatures or humidity (e.g. bathrooms), or excessive accumulation of dust. Please refer to the individual devices' technical data for more detailed information.
Ensure that:
- adequate ventilation is always guaranteed (do not place the device on a shelf, thick carpet, bed or anywhere where ventilation slits may be covered and always leave a 10cm gap on all sides)
- no direct sources of heat (e.g. radiators) can affect the device
- interior devices are not exposed to direct sunlight or strong artificial light
- the device is not in the immediate vicinity of magnetic fields (e.g. loudspeakers)
- no naked flames (e.g. lit candles) are placed on or next to the device
- sprayed or dripping water is prevented from coming into contact with interior devices and caustic fluids are avoided
- the device is not operated in the vicinity of water, in particular, the device should never be submerged (do not place objects containing fluids, e.g. vases or drinks, on or near the device)
- no foreign bodies penetrate the device
- the device is not exposed to wide temperature variations, as otherwise there may be condensation from humidity causing electrical short circuits
- the device is not exposed to excessive shock or vibration.
Unpacking the device
Handle the device with extreme care when unpacking it.
Packaging and packaging aids can be reused and, as far as possible, should be sent for recycling.
We recommend the following:
Paper, cardboard and corrugated cardboard as well as plastic packaging items should be placed in the appropriate recycling containers.
If no such facility exists in the area, these materials should be put into the general household waste.

Warning
If the original packaging has been damaged, inspect the device. If the device shows signs of damage, return it in the original packaging and inform the delivery service.
Start-up
- Observe all safety and operating instructions before operating the device for the first time.
| 警告 | Warning When installing the device in an existing video surveillance system, ensure that all devices have been disconnected from the mains power circuit and low-voltage circuit. |
| 警告 | Warning Improper or unprofessional work on the mains network or domestic installations puts both you and others at risk. Connect the installations so that the mains power circuit and low-voltage circuit always run separately from each other. They should not be connected at any point or become connected as a result of a malfunction. |
Care and maintenance
Maintenance is necessary if the device has been damaged (e.g. damage to the power cable and plug, or the housing), or if liquids or foreign bodies have got into the interior of the device, or if it has been exposed to rain or damp, or if it does not work properly or has been dropped.
Maintenance
- If smoke, unusual noises or smells develop, switch the device off immediately and unplug from the socket. In such cases, the device should not be used until it has been inspected by a qualified technician.
- Have all maintenance tasks carried out by qualified technicians only.
- Never open the housing on the device or accessories unless this is necessary. As there is always a risk to life due to electric shock when the housing is open, only open the housing when the device is disconnected from the power source.
With some devices, opening the device is unavoidable and permitted for the following purposes:
- Installing the device
- Inserting a storage medium (SD card or hard drive)
- Accessing essential functions (reset button or WPS button)
Cleaning
- Only clean the device housing with a damp cloth.
- Do not use products such as solvents, white spirit or thinners, or any of the following substances:
Brine, insect spray, solvents containing chlorine or acids (ammonium chloride), or scouring powder.
- Rub the surface gently with a cotton cloth until it is completely dry.

The device operates with a dangerous voltage level. When conducting maintenance or cleaning work, disconnect the device from the mains.
Contents
- Scope of delivery 21
- Description of hardware 22
2.1. HDCC32561 / HDCC35560 22
2.2. HDCC42561 / HDCC45560 22
- Mounting/installation 23
3.1. HDCC32561 / HDCC35560 23
3.2. HDCC42561 / HDCC45560 24
3.3. Connecting the video cable 24
3.4. Changing the analogue format 24
3.5. HDCC35560 / HDCC45560 5MPx resolution 25
- OSD menu 25
1. Scope of delivery
HDCC32561
- Analogue HD 2MPx camera
- Drilling template
- 30 m combination cable
- Installation material
- Manual
HDCC35560
- Analogue HD 2MPx camera
- Drilling template
- 30 m combination cable
- Installation material
- Manual
HDCC42561
- Analogue HD 2MPx camera
- Drilling template
- 30m combination cable
- Installation material
- Manual
HDCC45560
- Analogue HD 2MPx camera
- Drilling template
- 30m combination cable
- Installation material
- Manual
2. Description of hardware
2.1. HDCC32561 / HDCC35560

| 1 | Camera base plate | 2 | Locking plate |
| 3 | Camera cap | 4 | Camera |
| 5 | Toggle switch For switching between analogue formats (TVI / CVI / AHD / CVBS) | 6 | Power supply connection (5.5 x 2.1 mm, barrel connector) |
| 7 | BNC video output (TVI / CVI / AHD / CVBS) | ||
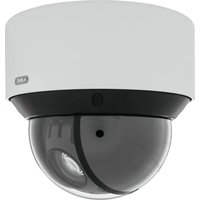
2.2. HDCC42561 / HDCC45560
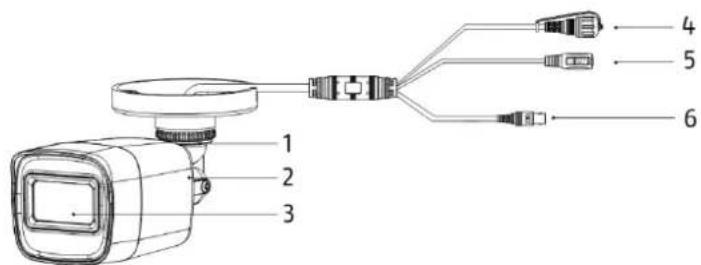
| 1 | Camera wall bracket | 2 | Camera |
| 3 | Lens | 4 | Toggle switch For switching between analogue formats (TVI / CVI / AHD / CVBS) |
| 5 | Power supply connection (5.5 x 2.1 mm, barrel connector) | 6 | BNC video output (TVI / CVI / AHD / CVBS) |
3. Mounting/installation

IMPORTANT!
The camera must be disconnected from the power supply during installation.
3.1. HDCC32561 / HDCC35560

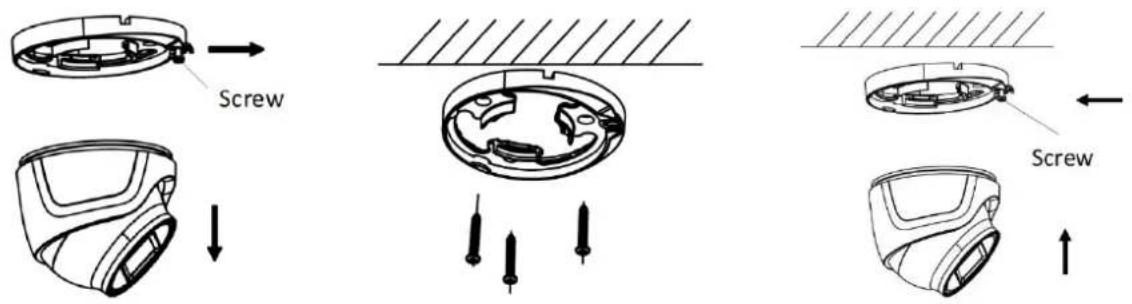
Glue the drilling template provided where you intend to install the camera. Loosen the screws on the locking plate. Use the wall plugs and screws provided to mount the camera base plate in place.

If the cable is to be routed through the side, do not fully mount the camera base plate at this stage, so that the camera cable can still be fed through.
Lift the camera and cap onto the camera base plate and lock in position using the locking plate and screw.
Alignment
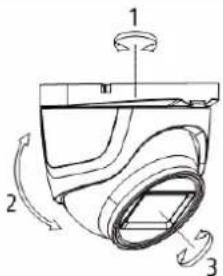
Loosen the screw on the locking plate slightly to adjust the position of the camera.
- Panning: 0-360°
- Tilting: 0 - 75^
- Rotating: 0 - 360^
3.2. HDCC42561 / HDCC45560

| 1 | Mounting screws | 2 | Alignment screws |
Glue the drilling template provided where you intend to install the camera. Drill the required holes.
Use the wall plugs and screws provided to mount the camera in place.
Alignment

Loosen the fixing ring or fixing screws to point the camera in the required direction.
- Panning: 0-360°
- Fixing ring for panning
- Tilting: 0 - 180^
- Fixing screw for tilting
- Rotation: 0 - 360^
- Fixing screw for rotation
3.3. Connecting the video cable
In order to transmit the video signal from the camera to an analogue recorder, a coaxial cable with BNC plug (male) must be used. The cable lengths between devices must not exceed 800 m (2MPx) or 300 m (5MPx).

Please note that the camera's image transmission may be disrupted when laying cable next to power lines or other conducting materials.
Recommendation:
Use TVAC25220 or TVAC25210 suppressor filters to minimise disruptions.
3.4. Changing the analogue format
The camera is delivered with the analogue TVI format preset. To change the format, unscrew the cover on the toggle switch and press and hold the button for 5 seconds. The switch will toggle between the analogue formats in a fixed order:
TVI->CVI->AHD->CVBS
3.5. HDCC35560 / HDCC45560 5MPx resolution
The HDCC35560 and HDCC45560 5MPx cameras are delivered with a lower resolution (4MPx) preset. This enables a higher frame rate (30 images per second rather than 20 images per second) and maintains the conventional aspect ratio (4MPx - 16:9 aspect ratio, 5MPx - 4:3 aspect ratio), which means no black bars appear when using conventional 4:3 aspect ratio monitors. You can set the resolution in the camera's OSD menu (see below).

The TVVR33600 analogue hybrid recorder supports resolutions up to 4MPx (TVI format). Therefore, when using the HDCC35560 and HDCC45560 5MPx cameras with this recorder, the resolution cannot be increased to 5MPx. If the resolution is already set to 5MPx, it will be automatically reduced to 4MPx.
4. OSD menu
The camera's on-screen display (OSD) can only be opened by devices with control capabilities (recorder, control panel). To open the OSD menu, either use the "Iris+" option or call up preset 95. To navigate, use the device's PTZ arrow keys and the "Iris+" option to open and confirm.

The OSD menu is only available in English. Please familiarise yourself with the description of the points below.
The "Iris+" option may differ for each device.
MAIN MENU
General menu navigation
BACK
Go back one menu step
EXIT
Leave main menu without saving changes
EXIT & SAVE
Leave main menu and save all changes
VIDEO FORMAT
Select video format
HDCC32561 / HDCC42561:
2MPx with 25 or 30 images per second
HDCC35560 / HDCC45560:
2MPx with 25 or 30 images per second
4MPx with 25 or 30 images per second
5MPx with 20 images per second
EXPOSURE
EXPOSURE MODE Set exposure mode
GLOBAL Automatic
- BLC Backlight compensation
HLC Highlight compensation
WDR Wide dynamic range
AGC Automatic gain control
OFF Off
LOW Low
MIDDLE Middle
- HIGH - High
SLOW Low shutter speed
OFF Standard shutter speed
X2-X16 High shutter speed
DAY NIGHT
MODE Set mode
- AUTO Automatic
COLOR Image is always in colour - BW Image is always in black/white
IR LIGHT Enable/disable IR light
SMART IR SetsmartIRmode
MODE1 For indoor/outdoor
MODE2 Forindoor
MODE3 For outdoor
LEVEL Select IR level
D->N THRESHOLD Day to night threshold
- The lower the value, the sooner the camera switches between day/night mode
The higher the value, the later the camera switches between day/night mode
N->D THRESHOLD Night to day threshold (see above)
VIDEO SETTING
IMAGE MODE Select image mode
- STD Standard setting
- HIGH-SAT High saturation
WHITE BALANCE Open white balance settings
BRIGHTNESS Set brightness
CONTRAST Set contrast
SHARPNESS Set sharpness
SATURATION Set saturation
3DNR Set dynamic noise reduction
MIRROR Mirror camera image
- DEFAULT Normal
H Horizontal
V Vertical - HV Horizontal and vertical
WB (White balance settings)
MODE Set mode
- AUTO Automatic
- MANUAL Manual setting
RGAIN Set red gain
BGAIN Set blue gain
FUNCTIONS - Only for HDCC35560 / HDCC45560
MOTION DET Open motion detection
PRIVACY Open privacy masking
PRIVACY / MOTION (privacy masking/motion detection)
MODE Enable/disable privacy masking/motion detection
AREA x Edit zone
DISPLAY Enable/disable display
X POSITION Set X-axis position
- Y POSITION Set Y-axis position
- WIDTH Set width
-HEIGHT Set height
- RETURN Exit menu
SENSITIVITY Set sensitivity
COLOR Set colour
TRANSPARENCY Enable/disable transparency
RETURN Exit menu item
FACTORY DEFAULT Reset camera to factory settings
Introduction
Chere cliente, cher client,
www.abus.com/product/HDCC32561
wwwabus.com/product/HDCC42561
www.abus.com/product/HDCC35560
www.abus.com/product/HDCC45560
Surcharge/Surtension
- Montage/Installation 36
3.1. HDCC32561 / HDCC35560 36
3.2. HDCC42561 / HDCC45560 37
3.3. Installation du cable video 37
3.4. Changer le format analogue 37
3.5. Resolution HDCC35560 / HDCC45560 5MPx 38
3. Montage/Installation

ATTENTION!
www.abus.com/product/HDCC32561
www.abus.com/product/HDCC42561
www.abus.com/product/HDCC35560
www.abus.com/product/HDCC45560
www.abus.com/product/HDCC32561
www.abus.com/product/HDCC42561
www.abus.com/product/HDCC35560
www.abus.com/product/HDCC45560
- Montering / installation 62
3.1. HDCC32561 / HDCC35560 62
3.2. HDCC42561 / HDCC45560 63
3.3. Placering af videokablet 63
3.4. Shift analogt format 63
3.5. HDCC35560 / HDCC45560 5MPx oplosning .64
4.OSD-menu 64
1. Indhold i kassen
HDCC32561
3. Monitoring / installation

VIGTIGT!
www.abus.com/product/HDCC42561
www.abus.com/product/HDCC35560
www.abus.com/product/HDCC45560
www.abus.com/product/HDCC32561
www.abus.com/product/HDCC42561
www.abus.com/product/HDCC35560
www.abus.com/product/HDCC45560
www.abus.com/product/HDCC32561
wwwabus.com/product/HDCC42561
www.abus.com/product/HDCC35560
www.abus.com/product/HDCC45560
www.abus.com/product/HDCC32561
www.abus.com/product/HDCC42561
www.abus.com/product/HDCC35560
www.abus.com/product/HDCC45560
E-post: support@abus-sc.com
Tel.: +49-820-795 990 888
3. Monitoring/installation

OBS!
Under monteringen maste strommen till kameran vara bruten.
3.1. HDCC32561/HDCC35560
HDCC35560/HDCC45560:
SMART IR Stall in smart IR-lage
MODE 1 For inom-/utomhus
MODE 2 For inomhus
MODE3 Forutomhus
LEVEL Valj IR-niva
D->N THRESHOLD Tröskelvarde for dag till natt
SHARPNESS Stall in skärpan
SATURATION Stall in mattnaden
3DNR Stall in dynamisk brusreducing
MIRROR Spegla kamerabilden
- HDCC35560 / HDCC45560
- Disclaimer
- Explanation of symbols
- Lists
- Intended use
- Important safety information
- General
- Power supply
- Overload/overvoltage
- Cables
- Children
- Surveillance
- Installation location/operating environment
- Ensure that:
- Unpacking the device
- Warning
- Start-up
- Care and maintenance
- Maintenance
- Cleaning
- Contents
- Scope of delivery
- HDCC32561
- HDCC35560
- HDCC42561
- HDCC45560
- Description of hardware
- HDCC32561 / HDCC35560
- HDCC42561 / HDCC45560
- Mounting/installation
- IMPORTANT!
- HDCC32561 / HDCC35560
- Alignment
- HDCC42561 / HDCC45560
- Connecting the video cable
- Changing the analogue format
- HDCC35560 / HDCC45560 5MPx resolution
- OSD menu
- MAIN MENU
- VIDEO FORMAT
- EXPOSURE
- DAY NIGHT
- VIDEO SETTING
- WB (White balance settings)
- FUNCTIONS - Only for HDCC35560 / HDCC45560
- PRIVACY / MOTION (privacy masking/motion detection)
- Introduction
- Surcharge/Surtension
- Montage/Installation
- ATTENTION!
- Indhold i kassen
- Monitoring / installation
- Monitoring/installation
- HDCC32561/HDCC35560
Brand : ABUS
Model : HDCC35561
Category : Surveillance Camera