FX-RM5170PRO - Lawn mower Fuxtec - Free user manual and instructions
Find the device manual for free FX-RM5170PRO Fuxtec in PDF.
| Product type | Gasoline lawn mower |
| Brand | Fuxtec |
| Model | FX-RM5170PRO |
| Engine | OHV, 4-stroke, air-cooled |
| Displacement | 170 cm³ |
| Rated power | 2.9 kW |
| Engine speed | 2800 rpm |
| Starter | Recoil start |
| Cutting width | 508 mm |
| Cutting heights | 25 mm - 75 mm (adjustable) |
| Grass catcher volume | 60 L |
| Front wheel diameter | 18 cm |
| Rear wheel diameter | 23 cm |
| Weight | 28.8 kg |
| Fuel tank capacity | 1.0 L (unleaded gasoline SP98) |
| Oil tank capacity | 0.5 L |
| Variable speed | 2.7 - 5.0 km/h (4 speeds) |
| Sound power level | 98 dB |
| Mulching function | Yes (integrated in rear flap) |
| Side discharge | Possible (depending on model) |
| Bag fill indicator | Yes |
| Easy Clean function | Yes (water connection for washing under the deck) |
| Safety | Engine brake, safety handle, emergency stop |
| Maintenance | Blade sharpening, oil change, air filter cleaning, spark plug |
Frequently Asked Questions - FX-RM5170PRO Fuxtec
User questions about FX-RM5170PRO Fuxtec
0 question about this device. Answer the ones you know or ask your own.
Ask a new question about this device
Download the instructions for your Lawn mower in PDF format for free! Find your manual FX-RM5170PRO - Fuxtec and take your electronic device back in hand. On this page are published all the documents necessary for the use of your device. FX-RM5170PRO by Fuxtec.
USER MANUAL FX-RM5170PRO Fuxtec
natural_image
Line drawing of a Fuxiey lawn mower on a black background (no text or symbols)
natural_image
Orange icon of a person reading a book (no text or symbols)
natural_image
Illustration of a hand pointing at an open book with horizontal lines representing text on pages (no actual text or symbols)Inhalt
DEUTSCHE VERSION 7
ENGLISH VERSION 34
VERSION FRANCAISE 59
POLSKA WERSJA JEZYKOWA 222
Inhalt
DEUTSCHE VERSION 7
- Introduction and safety 34
- Safety instructions for lawnmowers 35
- Information and warnings.... 37
- Assembly.... 38
- Before the first use.... 45
- Working with the mower 47
- Maintenance work 49
- Safety instructions....54
- Storage 56
- Disposal 56
- Technical data....57
- EU Declaration of Conformity 58
VERSION FRANCAISE 59
POLSKA WERSJA JEZYKOWA 222
Manual\_FX-RM5170PRO\_Int24\_rev3
natural_image
Technical line drawing of a mechanical assembly with no visible text or symbolsnatural_image
Technical line drawing of a mechanical vehicle showing two wheels and a brake assembly (no text or symbols)natural_image
Technical line drawing of a lawn mower with three circular components (no text or symbols)natural_image
Technical line drawing of a mechanical pump assembly with two views of internal components (no text or symbols)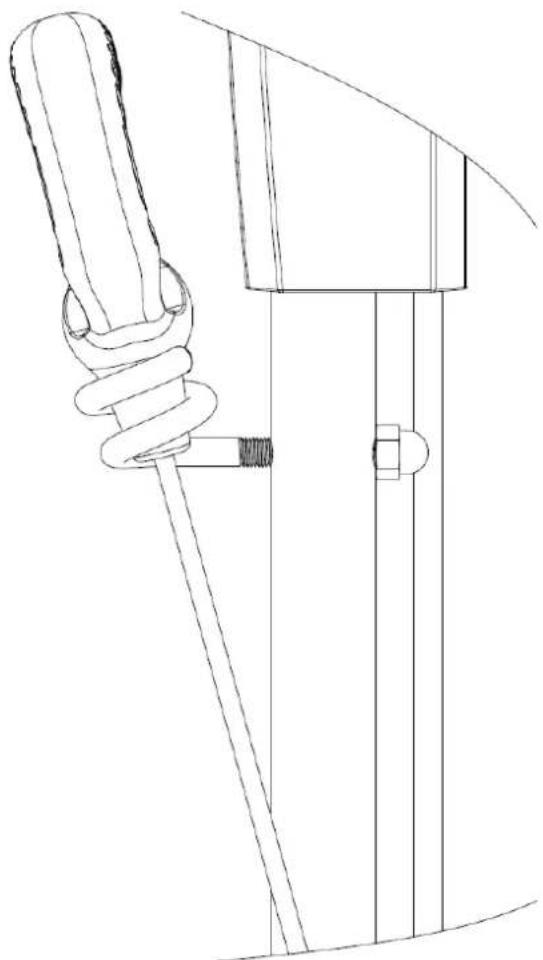
natural_image
Technical line drawing of a mechanical clamp or hook assembly (no text or symbols)natural_image
Technical line drawing of a mechanical device frame with no visible text or symbolsMontage des Grasfangkorbes
natural_image
Technical line drawing of a mechanical device with green arrows indicating motion or assembly (no text or symbols)natural_image
Illustration of a car seatbelt switch mechanism with hands and arrows indicating movement (no text or symbols)Mulchkit
natural_image
Technical line drawing of a tracked vehicle showing front, rear, and side views (no text or symbols)text_image
Technical diagram of a tracked vehicle showing labeled parts and component layoutnatural_image
Technical line drawing of a vehicle's internal components including wheels, hoses, and a green safety device (no text or symbols)WICHTIGE HINWEISE:
natural_image
Technical line drawing of a mechanical device with hands operating it, showing internal components and a water level indicator (no text or symbols)Maximal Füllhöhe

Tankdeckel
natural_image
Technical line drawing of a mechanical component with no visible text or symbolsnatural_image
Illustration of a person using a mechanical clamp or spring scale tool (no text or symbols present)natural_image
Technical line drawing of a vehicle steering wheel assembly (no text or labels)natural_image
Diagram of a car interior with green mechanical components and no visible text or symbolsLuftfilter
natural_image
Technical diagram of a mechanical component with a green section, enclosed in a circular boundary (no text or symbols)
natural_image
Technical line drawing of a mechanical component with no visible text or symbols
natural_image
Technical line drawing of a car interior showing engine compartment and a close-up inset of the dashboard (no text or symbols)Recycling raw materials instead of waste disposal.
Hereby we declare that the above mentioned machine meet the essential safety and health requirements of the above stated EC directives. Any manipulation or change of the machine not being explicitly authorized by us in advance renders this document null and void.
13. Introduction and safety
Never allow children or persons unfamiliar with these instructions to use the garden tool. Children should be supervised to ensure they do not play with the device.
Intended use
This device is intended exclusively for mowing lawns in private areas.
The device must be operated according to the descriptions and safety instructions. Only operate the device in the technical condition prescribed and delivered by the manufacturer. Any other use is not in accordance with the intended use. Use not in accordance with the intended use will result in the forfeiture of the warranty and the rejection of any responsibility on the part of the manufacturer. The user is liable for all damage to third parties and their property. Unauthorised modifications to the device exclude the manufacturer's liability for any resulting damage.
Vibration and noise reduction
To reduce the impact of vibration and noise, limit working time, use lower vibration and noise settings and wear personal protective equipment.
Observe the following points to keep vibration and noise pollution low:
- Only use the product as intended in accordance with the design and instructions.
- Make sure that the product is in perfect condition and well-maintained.
- Use the right accessories and make sure they are in good condition.
- Hold the product firmly but not tensely by the handles provided.
- Maintain the product according to these instructions and keep it well-lubricated.
- Plan your working hours according to these instructions to spread a higher workload over a more extended period.
Emergency
- Familiarise yourself with the use of the product by reading the operating instructions thoroughly. Memorise the safety instructions and follow them carefully. That will help you to avoid risks and hazards.
- Always be alert when using the product to identify and respond to hazards early. Quick action can prevent serious injury and property damage.
Residual risks
Even if you operate this lawnmower as instructed, there will always be residual risks. The following hazards may occur in connection with the design and construction of this lawnmower:
d) Injuries and property damage caused by flying parts.
e) Hearing impairment if you do not wear suitable hearing protection or use the lawnmower for an extended period.
f) Damage to health results from hand-arm vibrations if the lawnmower is used for a long time or is not guided correctly and maintained.
14. Safety instructions for lawnmowers
General safety instructions
- For your safety and the safety of others, read this instruction manual and its safety instructions before using the device. Please keep the operating instructions and safely store their safety instructions for later use and keep these for ready to hand for every use.
- Pass on the operating instructions with the device if there is a change of ownership.
- Persons operating the device must not be under the influence of intoxicants (e.g. alcohol, drugs or medication).
- Operate the device only in the technical condition prescribed and supplied by the manufacturer. Unauthorised modifications to the device exclude the manufacturer's liability for any resulting damage.
- Use the device only in daylight or under good artificial lighting.
- Use the device only in dry weather conditions. Please keep it away from rain or wet conditions. The ingress of water into the device increases the risk of electric shock.
- Switch off the device and remove the battery in the following conditions:
♦ if the device is left unattended
♦ if the device starts to vibrate excessively.
Before use
- Before starting work, familiarise yourself with the device and its functions and controls.
- Check the device for signs of wear or damage before commissioning and after an impact.
- Do not use a device whose switch is defective and can no longer be switched on or off.
-
Check that all nuts, bolts and screws are tight to ensure that the device is operated safely.
-
Never use a device with damaged or missing parts. Have them repaired or, if necessary, replaced by a qualified specialist or specialist workshop.
- Always wear sturdy shoes, long trousers and the appropriate personal protective equipment (safety goggles, ear protectors, work gloves with a good grip, etc.) when working with or on the device.
Wearing personal protective equipment reduces the risk of injury.
During use
Do not switch on the device when people (especially children) or animals are in the immediate vicinity. Make sure that children do not play with the device.
Stop work if you notice that people (especially children) or pets are nearby.
Working on steep slopes can be dangerous. Make sure you have a firm footing and mow slowly.
Always mow across the slope and not up and down. Be especially careful when changing direction.
There is a risk of tipping over!
Do not mow on steep slopes. Be especially careful when mowing backwards and pulling the mower on yourself.
Do not tilt the mower when starting the engine.
Keep a safe distance as indicated by the handle frame.
Do not switch on the engine until your feet are safe from the cutting blade. Be careful and do not reach into the rotating cutting blade. Never drive over gravel while the engine is running. There is a risk of being hit by stones! Switch off the lawnmower before tipping or transporting it, e.g., from / to lawns or over paths.
Before lifting or transporting the lawnmower, switch off the engine
until the cutting blade has come to a standstill. Do not adjust the cutting height until the engine is switched off and the cutting blade has stopped. Never open the discharge flap while the engine is running. Before removing the grass collector, switch off the engine and wait until the cutting blade has stopped. After emptying the grass collector, carefully reattach it and ensure it is securely fastened to the lawnmower. If possible, do not mow wet grass. Do not use the garden tool in an explosive environment with flammable liquids, gases or dust. When you stop work, never leave the device unattended and keep it in a safe place.
After use
Switch off the device, and only then put the device in a safe place.
Do not store the device within reach of children. Make sure that the ventilation slots in the device are clean.
Keep all nuts, bolts and screws tightened to ensure the mower is in safe working condition.
Check the grass collector frequently for wear or damage.
Only use a cutting blade designed for this lawnmower.
Please follow the installation instructions and remove the battery beforehand (only for an eS model).
Only have repairs carried out by a qualified technician or service centre.
15. Information and warnings
 | Engine capacity: 170 cm3 |
 | Please only fill with regular petrol with an octane rating of at least 95. The maximum tank capacity is 1.0l. |
 | Risk of injury: keep your hands and feet away! |
 | Attention: please read the instruction manual carefully! The mower is delivered without oil! |
 | Mower sound power level: 98dB |
 | Notes on using the primer pump during a cold start! |
 | To stop the engine, release the throttle! |
16. Assembly
Essential instructions for assembling the mower
Before assembling and operating the petrol lawnmower, please read the full user manual and the instructions.
IMPORTANT INFORMATION: The lawnmower is supplied WITHOUT FUEL AND OIL in the engine.
Your new lawnmower has been tested in the production facility, i.e. there may be a small amount of residual oil in the engine or visible on the dipstick!
Remove the lawnmower from the cardboard packaging and check that no loose parts remain in the packaging.
natural_image
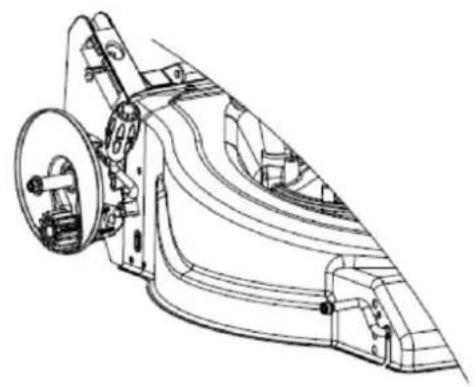
Technical line drawing of a car body panel assembly (no text or symbols)Take out four bolts from four axles by M10 wrench.
natural_image
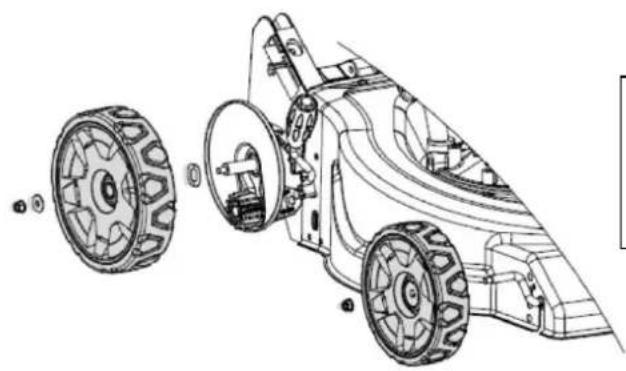
Technical line drawing of a mechanical vehicle showing two wheels and a brake assembly (no text or symbols)Mount the two front wheels and two rear wheels as shown in the illustration. Then fix the four bolts by M10 wrench.
natural_image
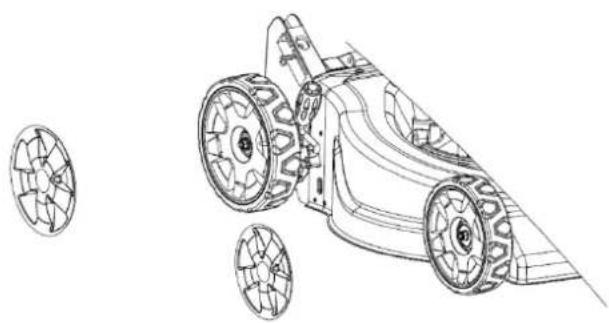
Technical line drawing of a mechanical vehicle with three circular components, no text or symbols presentMount the two front wheel covers and two rear wheel covers as shown in the illustration.
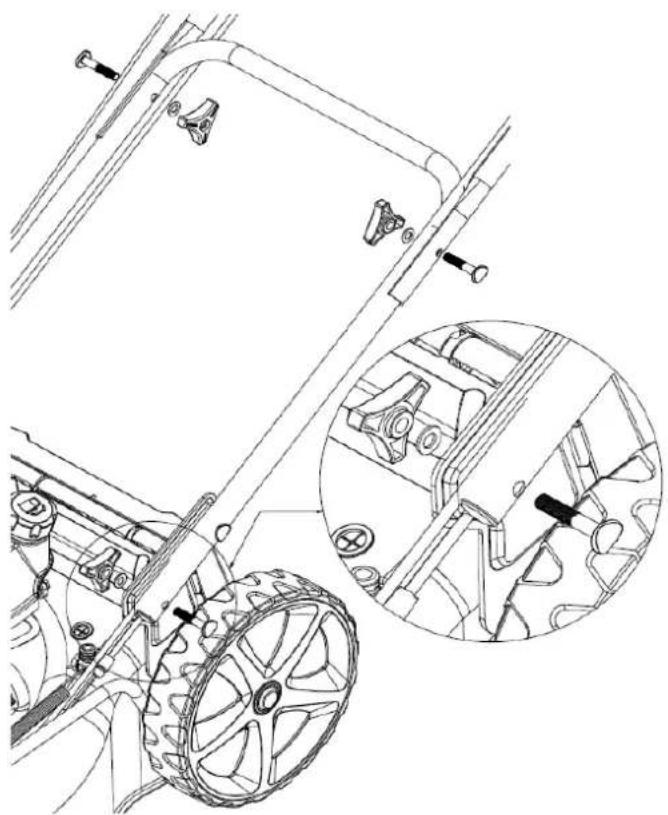
Assembly upper and lower tie bar
Carefully unfold the lawnmower handle, not pinching or damaging the lawnmower control cables.
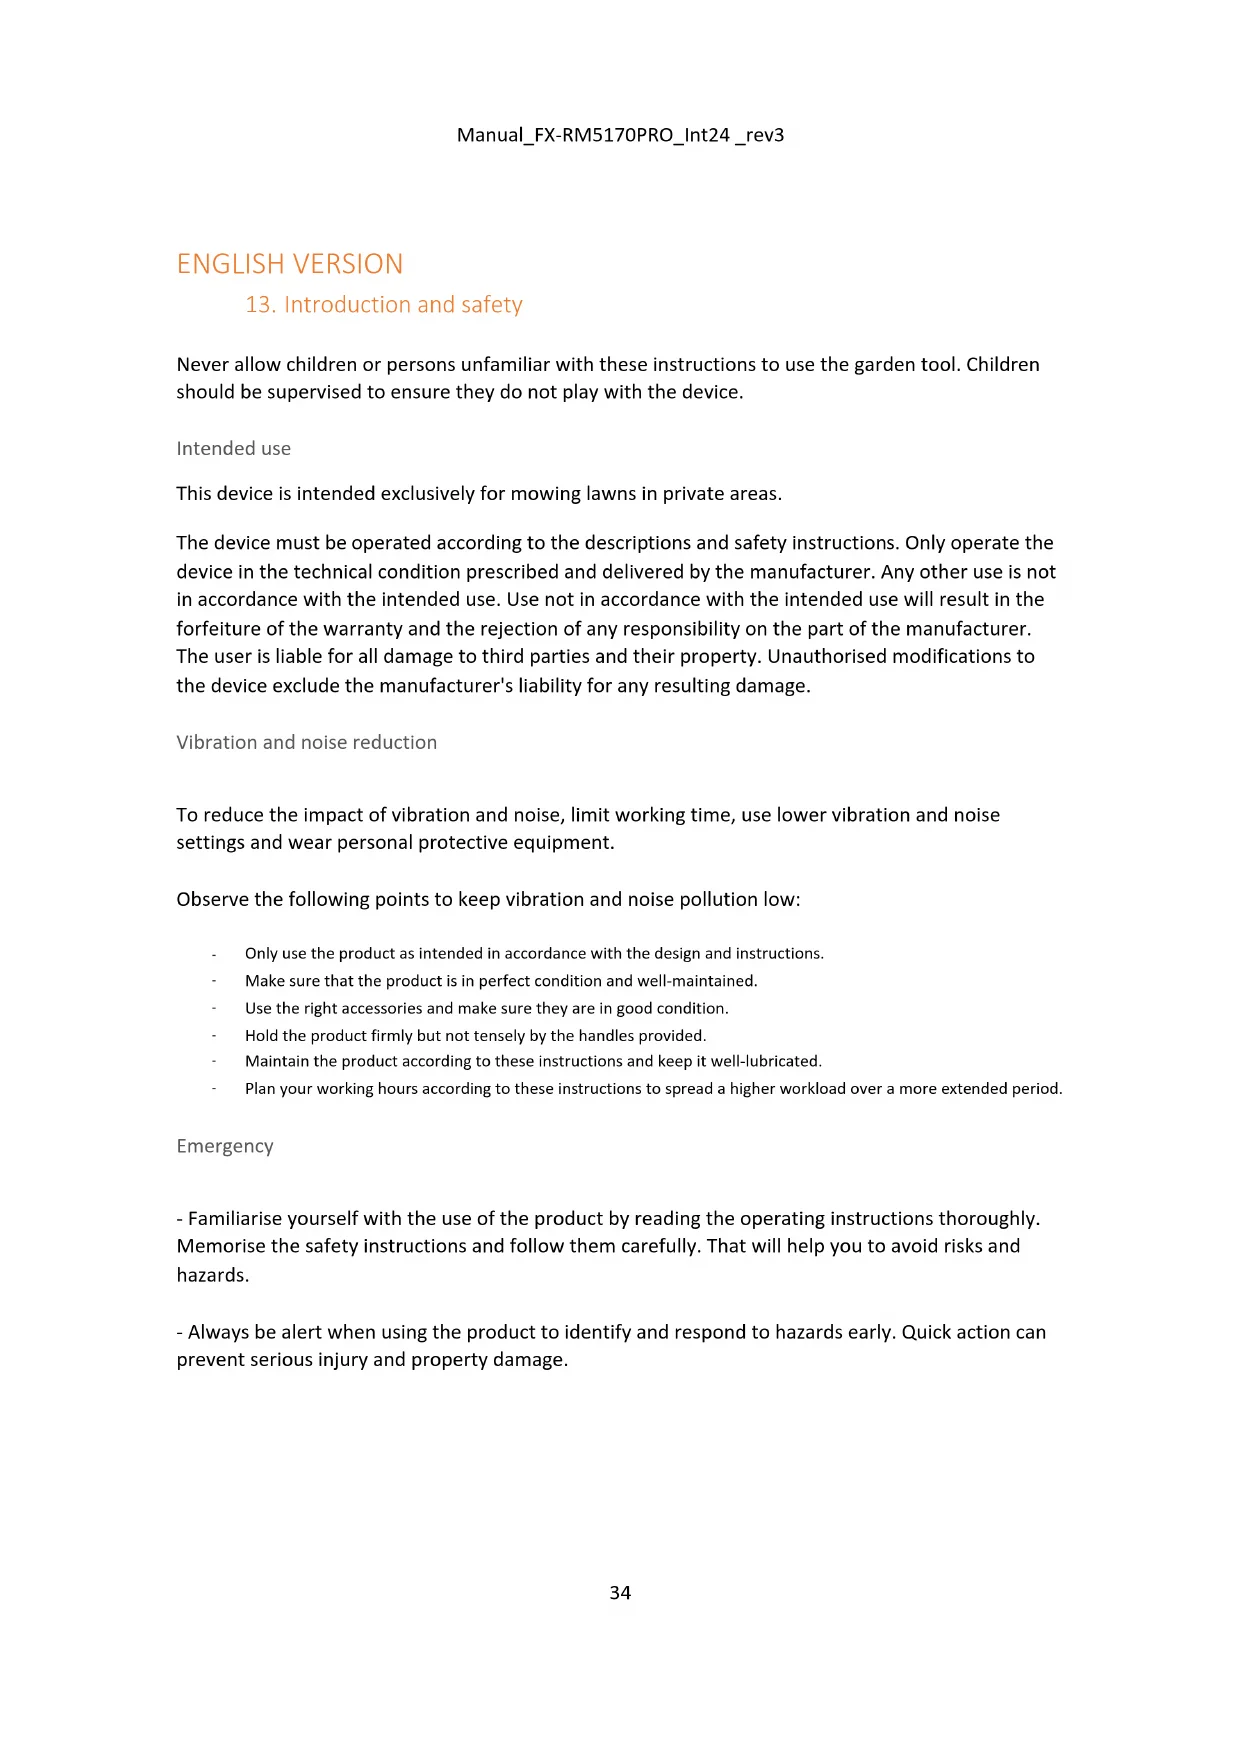
Open the handle and tighten the handle parts with the four wing nuts, one washer each and the screws, as shown below. Insert the starter cable on the right side of the handle and secure it with the plastic handle (see the following pictures).
natural_image
Technical line drawing of a mechanical device with two views: top shows a curved bracket and wheel assembly, bottom shows internal components (no text or symbols)
natural_image
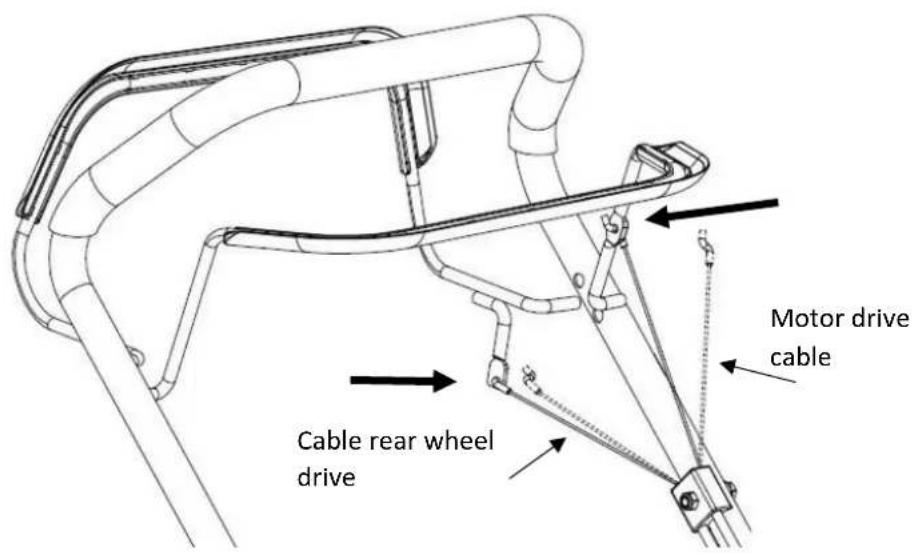
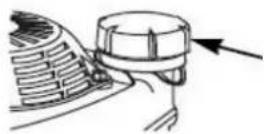
Technical line drawing of a mechanical assembly with rope and mounting bracket (no text or symbols)Insert the engine drive and rear-wheel drive cable into the hole of the corresponding lever. See the illustration below. The arrow shows where the cable should be hooked.
text_image
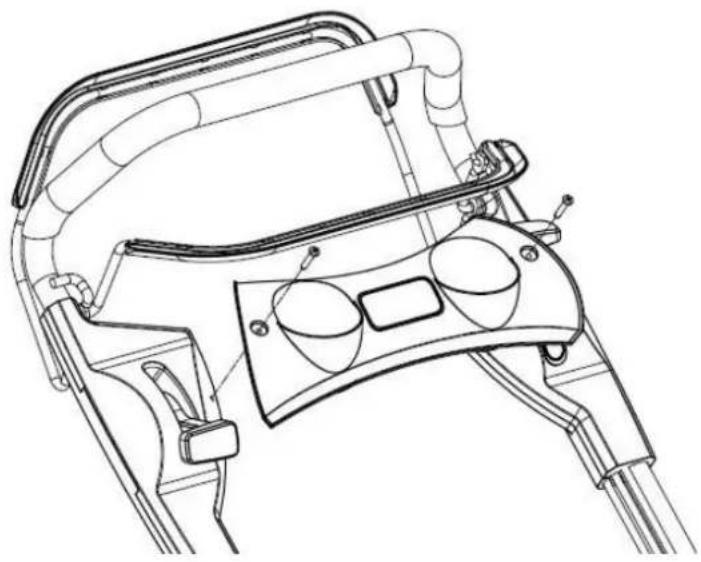
Motor drive cable Cable rear wheel driveMounting the control panel
Take the control panel out of the box and fix it with the two screws supplied (see the following picture).
natural_image
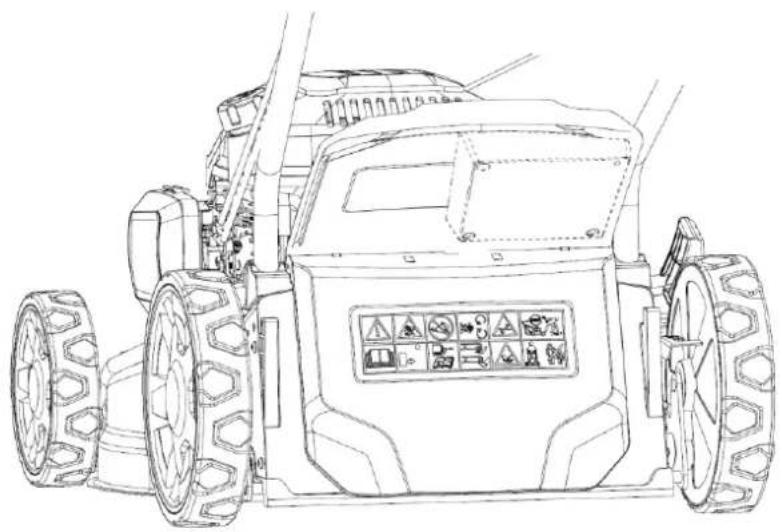
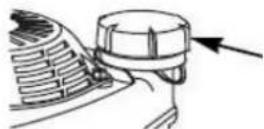
Technical line drawing of a mechanical device with no visible text or symbolsMounting the grass collector
Put the plastic edges of the basket on the frame and fix the clips, as shown below.
The grass collector box contains a level indicator that shows whether the container is full of grass and needs to be emptied (see the following picture).
natural_image
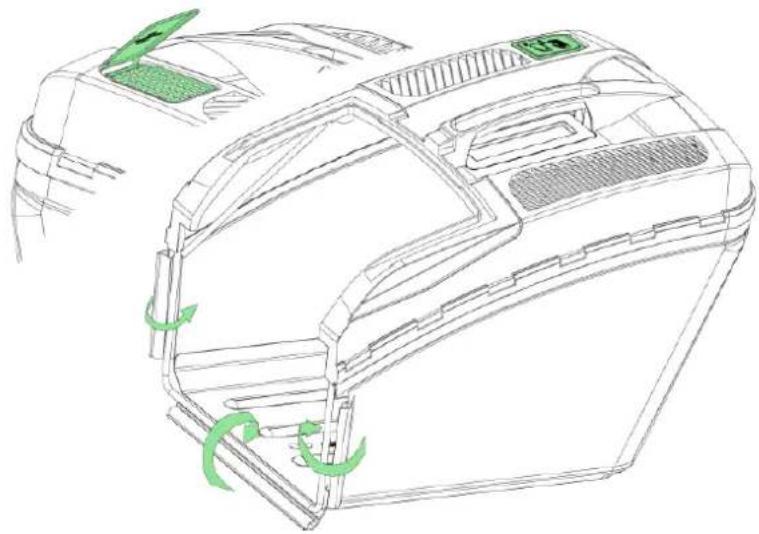
Line drawing of a device casing with green arrows indicating motion or movement, no text or symbols presentLift the rear ejector guard, remove the mulch kit and insert the grass collector box (see the following picture).
Grass catcher handle
Tailgate
natural_image
Diagram of a car seatbelt switch mechanism with hands and arrows indicating movement (no text or symbols)Mulch kit
The mulching kit is integrated into the rear cover. When the rear cover is folded down, the mulching kit blocks the rear discharge opening and fulfils its purpose. The grass is not collected and is further shredded by the rotation of the blade!
natural_image
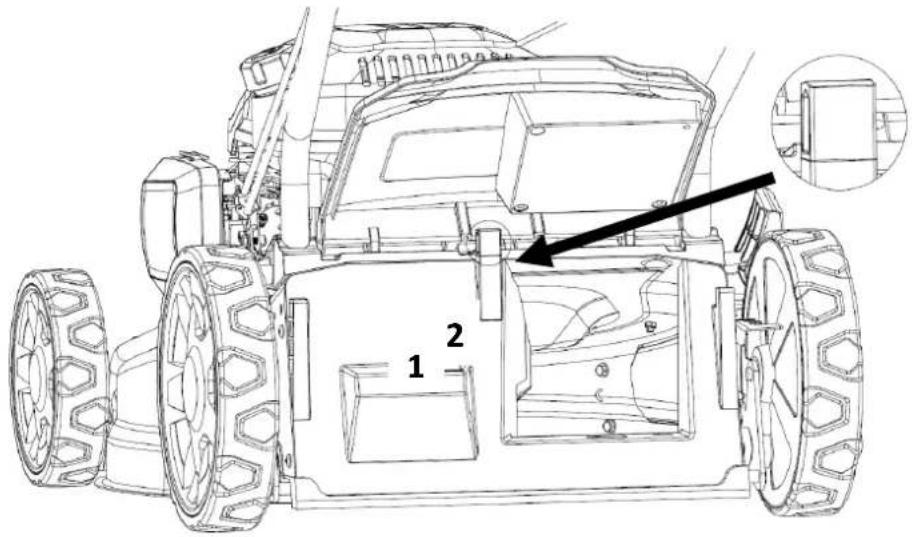
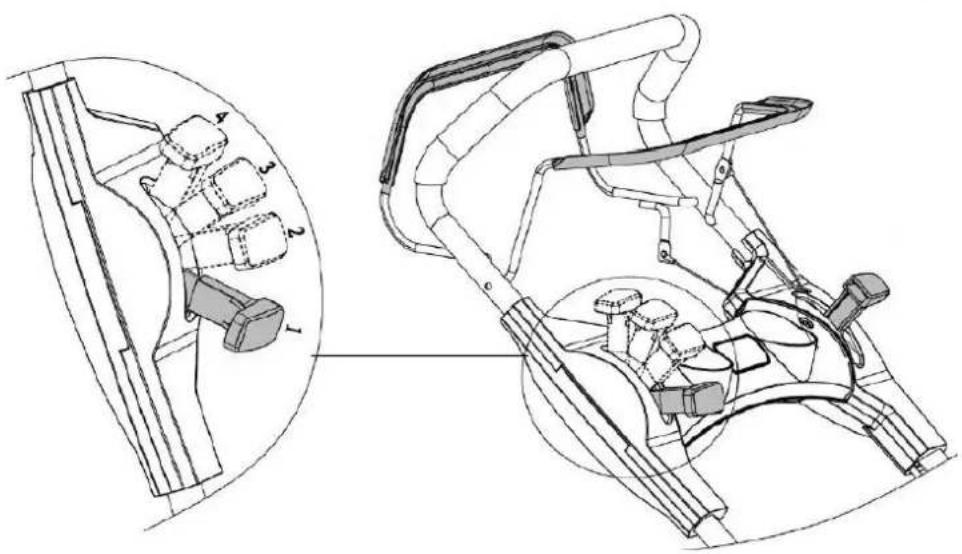
Technical line drawing of a tracked vehicle showing front wheel, rear wheels, and control panel (no text or symbols)Remove a bracket from position 1 and insert it in position 2. Lift the rear ejector guard and install the frame that holds the rear ejector guard can.
Supports/wedge for lifting and holding the tailgate
Remove the wedge/support from position 1 and install it in position 2.
Raise the rear ejector guard and install the support/wedge to hold the tailgate higher on the ejector guard.
With the help of the support/wedge, heavy, damp grass can be ejected more efficiently from the cutting area to the rear.
text_image
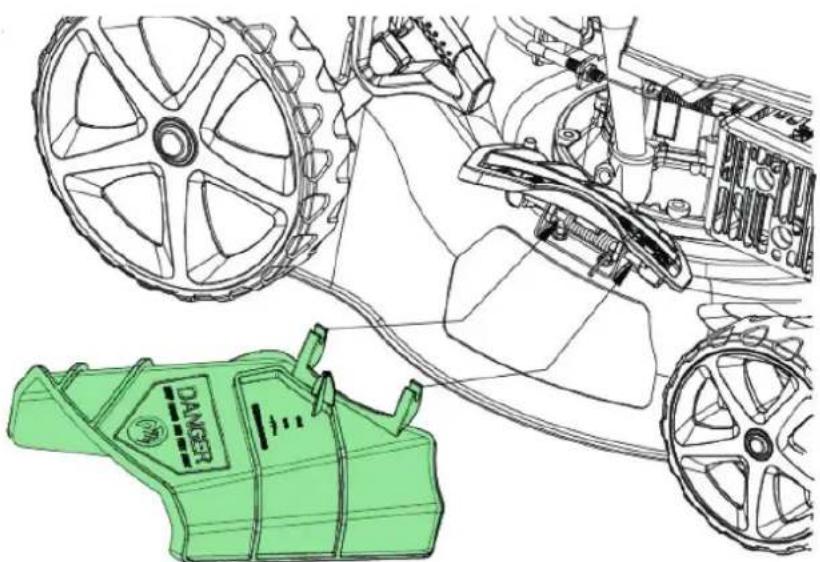
Technical diagram of a tracked vehicle showing labeled parts and a close-up inset view with annotation arrows.Side ejection chute
To use the side discharge, lift the cover and hook in the side discharge chute (see picture).
natural_image
Technical line drawing of a vehicle's internal components including wheels, hoses, and a green safety device (no text or symbols)IMPORTANT NOTES:
Not every model has a side discharge.
If you want to mulch, the side discharge must be uninstalled beforehand.
17. Before the first use
Fill with oil
ATTENTION: The mower is delivered without oil in the engine.
All engines are tested at the factory before packing. Most of the oil is removed before shipping; however, a small amount remains in the engine. During transport, the oil moves around in the engine compartment. Therefore, you may see a sufficient amount of oil indicated on the dipstick. However, this is not the case!
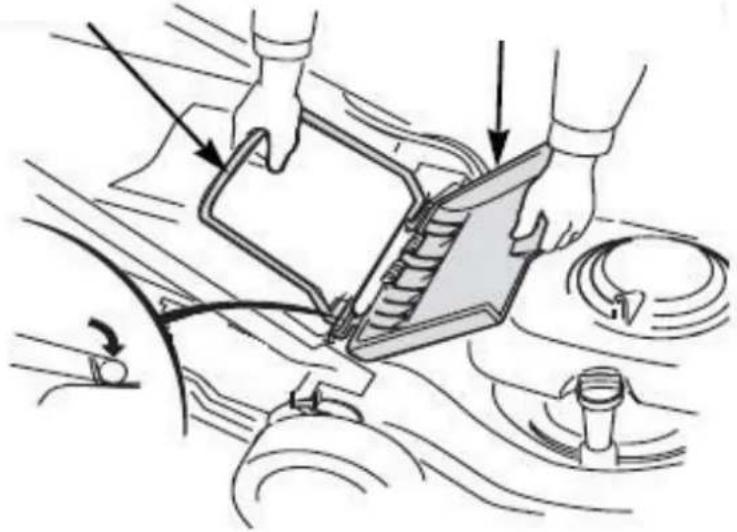
Therefore, please top up with enough oil, so the oil level is between the upper and lower marks on the dipstick (see illustration). Do not overfill the engine with oil.
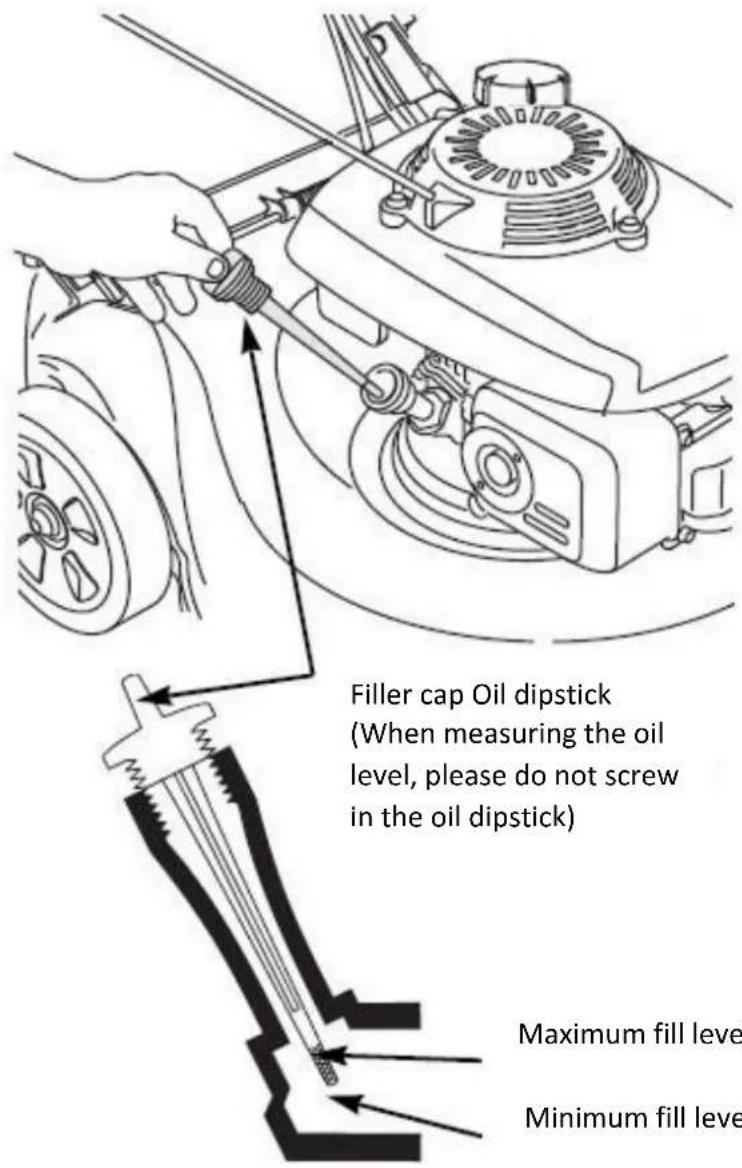
text_image
Filler cap Oil dipstick (When measuring the oil level, please do not screw in the oil dipstick) Maximum fill level Minimum fill levelMaximum fill level
Minimum fill level
Fill with petrol
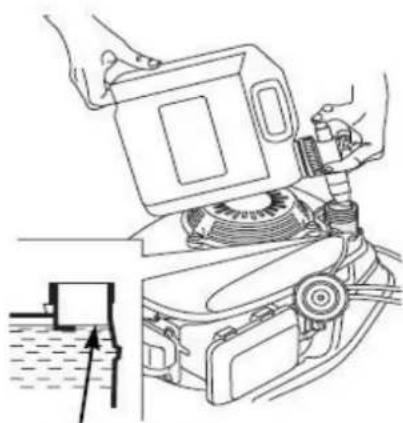
natural_image
Illustration of hands operating a mechanical device with a water tank nearby (no text or symbols)Maximum fill level

Fuel filler cap
The engine is delivered without petrol. Fill up with 1.0 litre of petrol before starting the engine.
- Remove the fuel filler cap
Fill with fuel to the lower edge of the fill level limit in the neck of the fuel tank. Do not overfill. Wipe up spilt fuel before starting the engine. - Tighten the fuel filler cap.
Use extreme caution when handling petrol. Petrol is highly flammable; petrol vapours can explode and cause severe injury or death. Keep it out of the reach of children.
Refuel in a well-ventilated area with the engine off. Avoid repeated or prolonged contact with skin or inhalation of vapours. Do not smoke or allow flames or sparks in the area where the engine is being refuelled or where petrol is stored.
After refuelling, tighten the fuel filler cap securely. If fuel has been spilt, ensure the area is dry before starting the engine.
Cutting height adjustment

natural_image
Technical line drawing of a mechanical component with no visible text or symbolsUse the cutting height adjustment lever to set the desired height to which the grass should be cut. Caution: There is a considerable risk of injury. Therefore, please only carry out this operation when the engine is switched off, and the cutting blade is stationary.
18. Working with the mower
Starting/stopping the engine
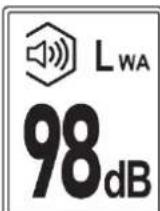
When cold starting, first press the primer pump before tightening the throttle grip on the upper spar.
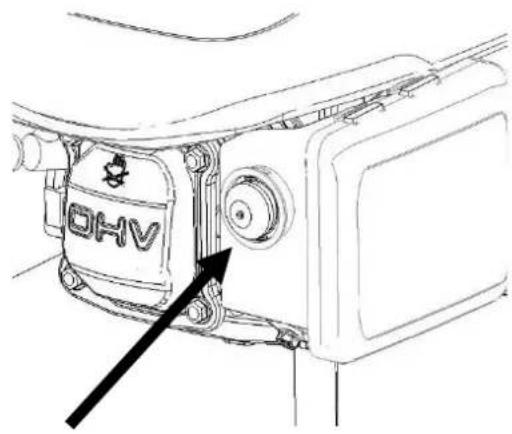
text_image
OHV| Temperature | Pressing the primer pump |
| <0°C | 3x - 4x |
| 0°C - 10°C | 2x - 3x |
| 10°C - 20°C | 1x - 2x |
| >20°C | 1x |
Important note: not every model is equipped with a primer pump.
To start the engine, tighten the handle for the engine cable to the handle of the upper spar. If your model has rear-wheel drive, you should not hold the handle for the rear-wheel drive during the starting process. Otherwise, the rear wheels will start moving immediately.
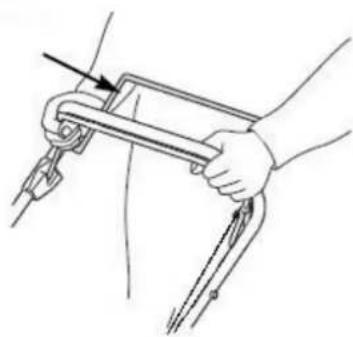
natural_image
Line drawing of a person using a mechanical clamp or lever (no text or symbols)Then pull carefully on the handle of the starter cable until you feel a slight resistance. Now pull the starter rope with momentum to start the engine. With a cold start, you may need 2-3 attempts until the engine runs.
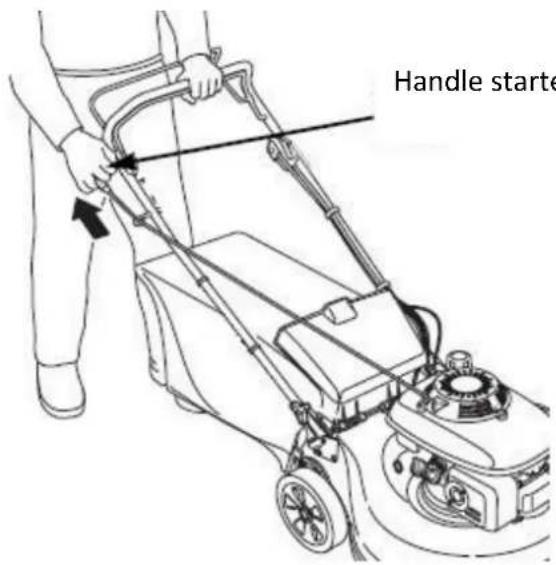
text_image
Handle starterTo stop the engine again, release the handle with the engine cable. The engine stops, and the knife turns a few more rounds until it stops completely.
Variable speed adjustment
text_image
Technical diagram of a vehicle steering wheel assembly with labeled components and cross-sectional viewsSpeed can be adjusted from 2.7 – 5.0 km/h while driving. Activate the right handle on the dashboard and set in one of the 4 different speeds. When driving in one the two lowest speeds the pace difference will not vary significantly.
19. Maintenance work
General maintenance instructions
All nuts, bolts and screws must be properly tightened to ensure that the device is safe and operational. Regular maintenance is essential for the user's safety, maintaining the operating condition and performance of the mower.
Never store a device with petrol in the tank in a building where the fumes could come into contact with open fire, sparks or high temperatures.
Allow the engine to cool down before storing it in an enclosed space.
To reduce the risk of fire, ensure that the lawnmower, especially the engine, the muffler and where the replacement fuel is stored, are free from grass, leaves or excessive amounts of lubricants.
Regularly check the condition of the collector cover and the grass collector and replace them if damaged.
Drain the fuel in a well-ventilated area when the engine has cooled down.
Use thick work gloves when removing and installing the cutting blade.
ATTENTION:
Before doing maintenance or repair work, switch off the engine and remove the spark plug.
Check the mower regularly and ensure that all grass deposits on the underside of the chassis are removed.
Lubricate the axle of the chassis and the bearings regularly with a suitable lubricant.
Regularly check the condition of the blades, as they have a significant impact on the performance of the lawnmower. The blades should always be sharp and balanced.
Check at regular intervals that all bolts and nuts are tight. Worn or incorrectly tightened bolts and nuts can cause severe damage to the engine or frame.
If the blade hits an obstacle hard, stop the lawnmower and contact FUXTEC Customer Service.
The cutting blade is made of pressed steel. For optimum mowing results, sharpen the blade regularly, approximately every 25 operating hours. Check that the blade is always properly balanced. To do this, insert a steel axle (with a diameter of 2-3 mm) into the centre hole. If the axle is aligned correctly, it will stay in the horizontal position.
If the knife does not stay in the horizontal position, replace it.
When removing the knife, unscrew the bolt and check the knife holder. If the parts are worn or damaged, replace them.
ATTENTION:
Always use original spare parts. Low-quality spare parts can seriously damage the lawnmower and pose a safety risk.
Changing the cutting blade
Tilt the mower to the right, so the air filter side faces up. That prevents fuel from leaking out and the mower from starting with difficulty.
Inspect the blade for damage, cracks and excessive rust or corrosion.
A dull blade can be sharpened, but a blade that is excessively worn, bent, cracked or otherwise damaged must be replaced.
Always use a torque spanner when installing the blade.
Check that the blade screws are tight.
If you remove the blade for sharpening or replacement, you will need a torque spanner for installation. Wear suitable work gloves to protect your hands.
- Remove the screw with a socket spanner. Then remove the blade. Use a wooden block to prevent the blade from turning when removing the screw.
- Mount the blade with the blade screw and the special washers. Make sure to install the special washers with the concave side towards the blade and the convex side towards the screw.
- Tighten the blade screw with a torque spanner. Use a wooden block to prevent the blade from turning when tightening the screw.
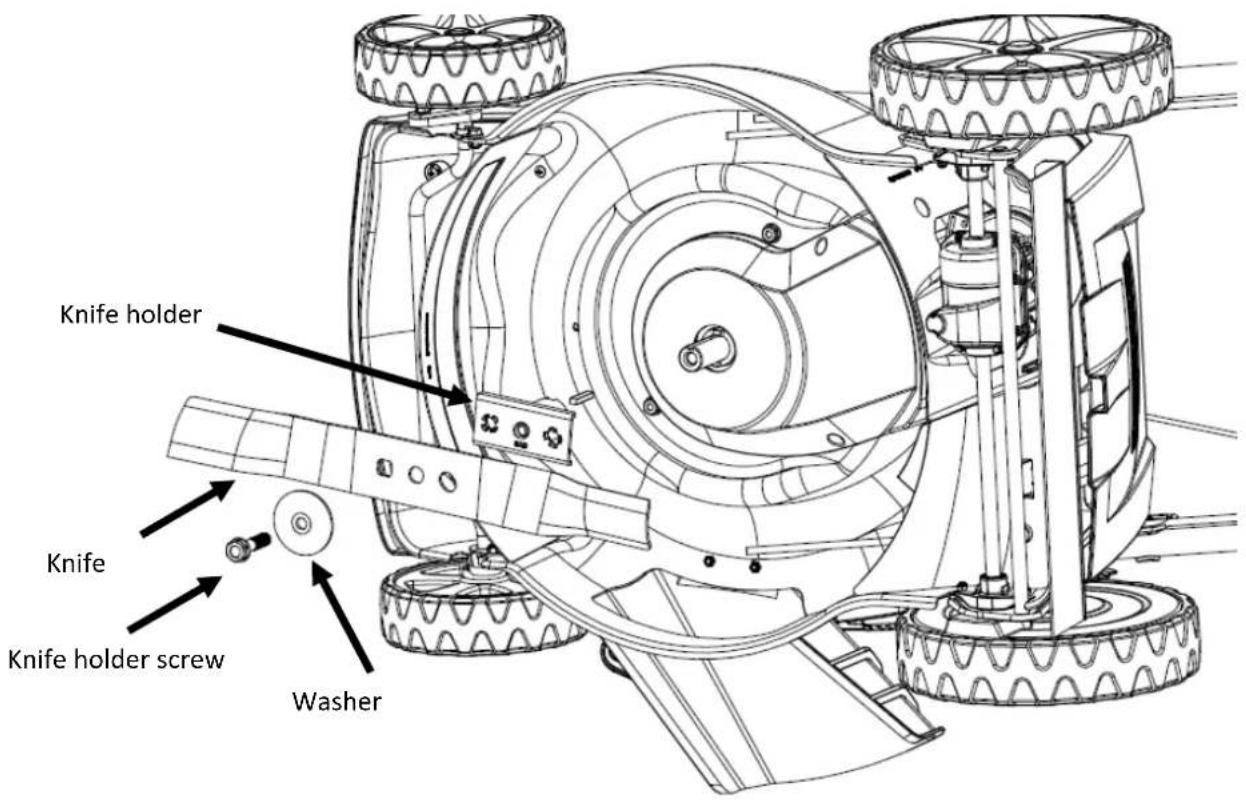
text_image
Knife holder Knife Knife holder screw WasherUsing the Easy Clean function
On the left side of the mower, you will find a water connection for washing the mower on some models.
When using the water connection, the device must be in the lowest height position on the lawn. That ensures that the water remains under the mower during cleaning.
- Connect a hose to the nozzle.
- Turn on the water and start the engine.
• The rotations of the blades ensure that the water cleans the underside of the mower.
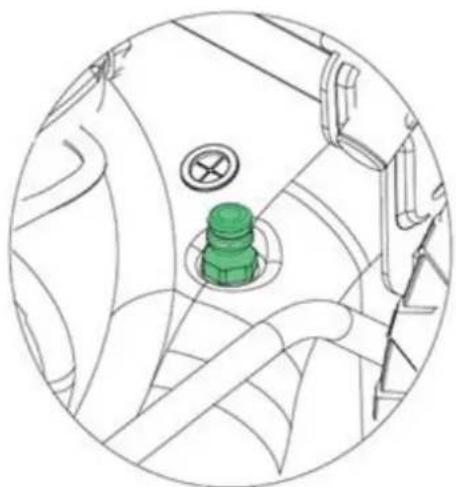
natural_image
Technical line drawing of a mechanical component with green bolt and circular housing (no text or symbols)Air filter
If the engine is operated without an air filter or a damaged air filter, dirt can get into the engine, causing rapid wear.
- Press the cover tabs down and remove the cover.
- Remove the filter from the air filter base.
- Check the filter and foam elements and replace them if damaged.
- Clean the filter by tapping it several times on a hard surface to remove dirt or blow compressed air through the air filter from the inside. Never try to brush off the dirt; brushing will push the dirt into the fibres.
- Wipe the dirt off the inside of the air filter housing and cover it with a damp cloth. Ensure no dirt gets into the air duct leading to the carburettor.
- Replace the filter and the cover.
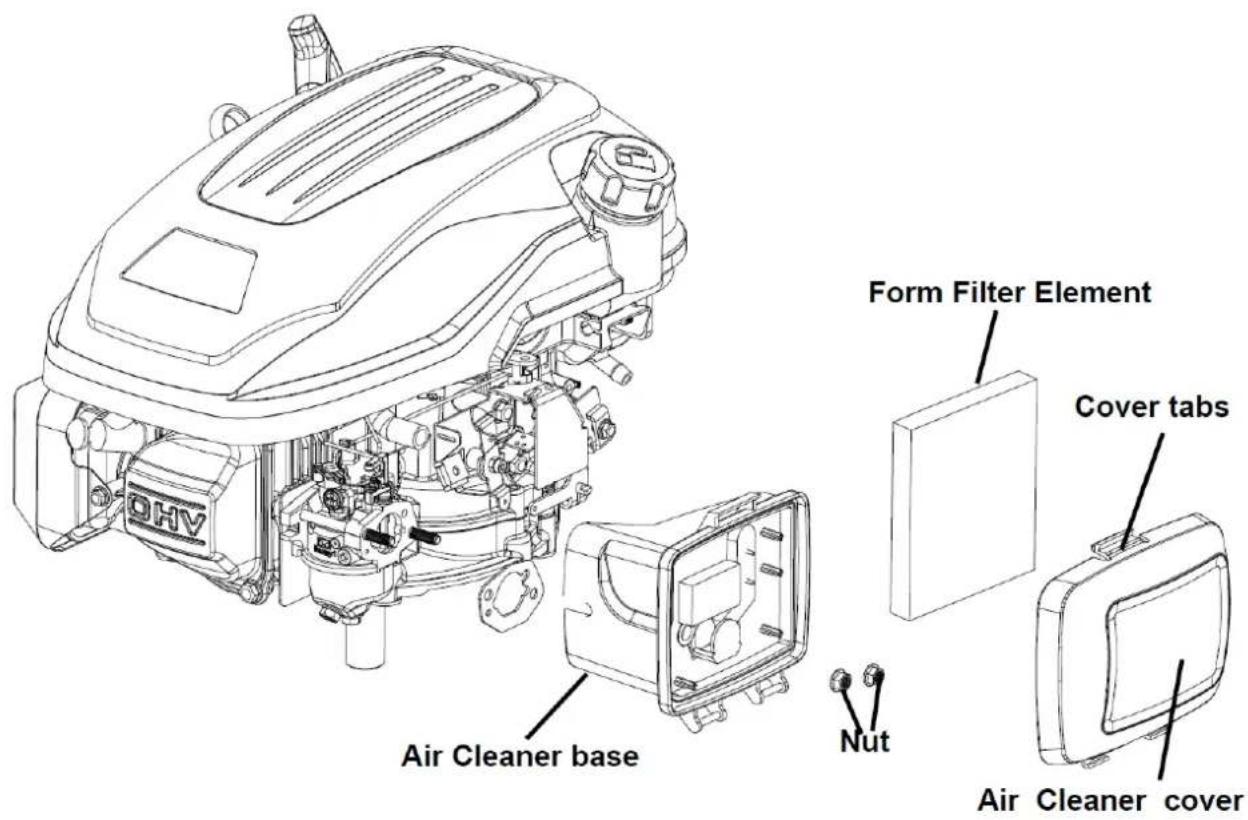
text_image
Form Filter Element Cover tabs Nut Air Cleaner base Air Cleaner coverSpark plug
The spark plug must have a correct gap and be free of deposits to achieve good performance. To maintain the spark plug, proceed as follows:
- Disconnect the spark plug cap and remove any dirt in the area of the spark plug.
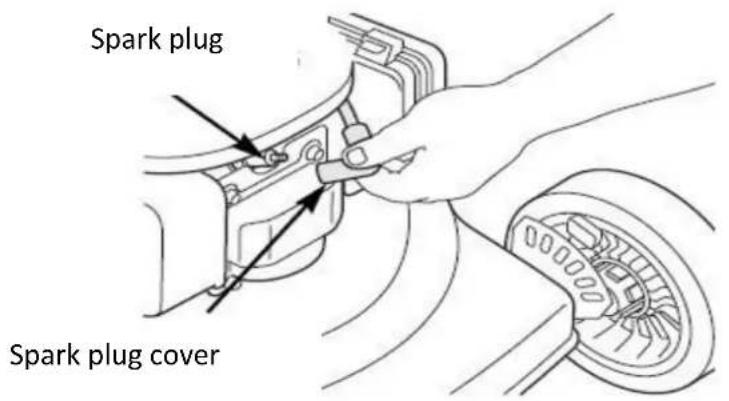
text_image
Spark plug Spark plug cover- Remove the spark plug with a spark plug spanner.
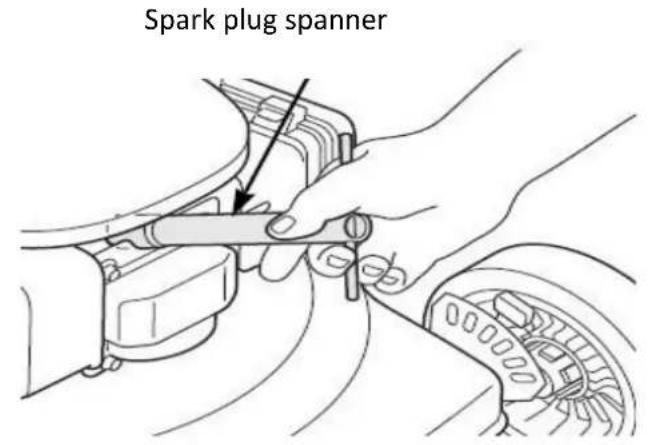
text_image
Spark plug spannerImportant: A spark plug spanner is not included in the scope of delivery
- Check the spark plug. Replace it if the electrodes are worn, or the insulator is cracked or fissured.
- Measure the spark plug electrode gap with a suitable gauge. Correct the space by carefully bending the side electrode with a suitable tool if necessary. The distance should be 0.028 \~ 0.031 inch (0.7 \~ 0.8 mm).
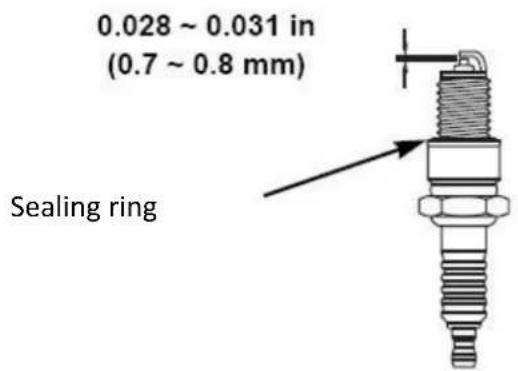
text_image
0.028 ~ 0.031 in (0.7 ~ 0.8 mm) Sealing ring- Insert the spark plug carefully by hand to avoid overtightening.
- Place the spark plug cap on the spark plug.
Caution: A loose spark plug can overheat and damage the engine. Tightening the spark plug too tightly can damage the thread in the cylinder head.
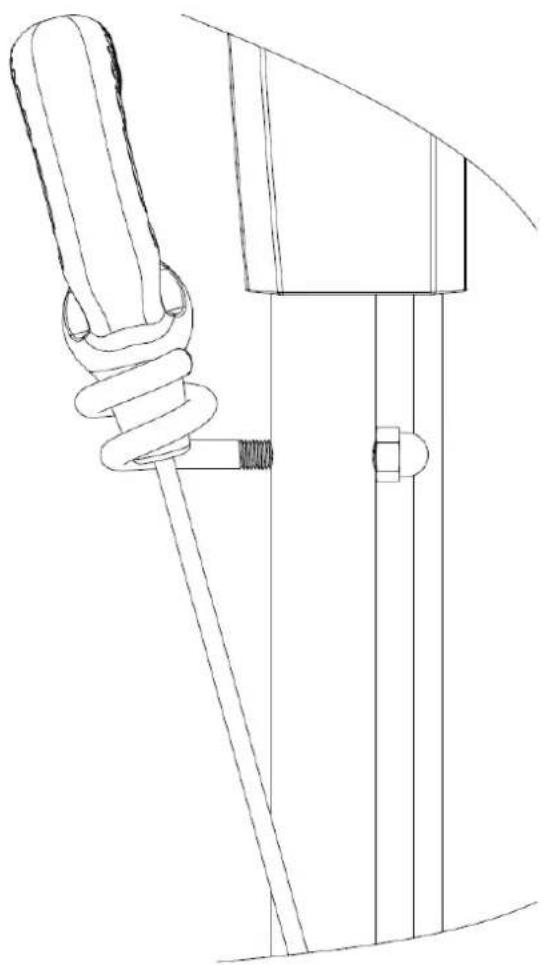
Adjusting the cables
Before the device is put into operation, the rope setting should always be checked.
The cables can be checked by fully operating the handles and checking that the cable is taut. If it is not, it must be tightened. The cable should be loosened if the handle cannot easily be entirely operated.
After the first season, expect to adjust the cables for optimal activation, as the cables may stretch with use.
Readjustment may be necessary for the following cables:
- cable for the drive
- cable for the engine brake
- cable for the throttle cable

natural_image
Pure mechanical diagram showing a green component inserted into a cylindrical shaft, enclosed in a circle (no text or symbols)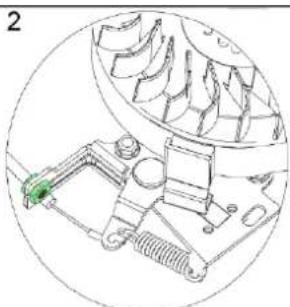
natural_image
Technical line drawing of a mechanical component with no visible text or symbols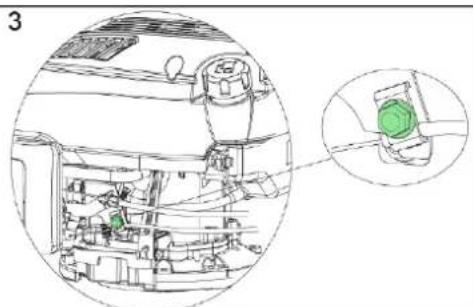
natural_image
Diagram of a car interior showing engine compartment and dashboard, with an inset close-up of the green component (no text or symbols)GENERAL SAFETY INSTRUCTIONS
- This product is intended for mowing only. Please do not use it for purposes other than those it is intended for. Otherwise, there is a risk that it will be damaged or cause injury.
- Never allow children or persons unfamiliar with the contents of these operating instructions to work with the device.
• The person operating the mower is responsible for the safety of persons in the work area. - Never operate the lawnmower near other people, children or free-roaming animals.
- Before starting to mow, check the terrain where the mower is to be used and remove stones, wires, sticks, splinters, bones and other foreign objects that could get caught or deflected and cause injury.
INSTRUCTIONS FOR USE
- All nuts, pins and bolts must be properly tightened to ensure that the device is in good working order and ready for use.
• Never use the lawnmower without the protective cover. - Never use the lawnmower with a loose cutting blade. Always check that all associated bolts are tight.
- Blunt blades should be replaced.
- When working with lawnmowers, they must ensure that they stand securely.
- Never store the lawnmower in closed or poorly ventilated areas where fumes could accumulate. Exhaust fumes from the engine contain carbon monoxide, which is dangerous to life.
• Only work in sufficient light conditions (in twilight or with adequate artificial lighting).
- Please do not use the lawnmower when it is raining or when the grass is wet.
- Take extra care when mowing in elevated terrain (on slopes). Always mow perpendicular to the slope, parallel to the contour and not directly uphill/downhill.
- Never leave the lawnmower running unattended; if you leave the lawnmower running, switch off the engine.
- Never lift the rear of the mower when you park it and do not hold your limbs near the mowing deck or rear discharge chute when the engine is running.
• Never change the speed setting of the engine.
• Never transport the lawnmower with the engine running.
- Stop the engine and disconnect the ignition plug in the following cases:
- When carrying out work under the mower deck or in the discharge chute.
- When carrying out maintenance, repairs or inspections on the device.
Before carrying, lifting or transporting the lawnmower. - When you leave the lawnmower unattended or want to adjust the cutting height.
Before removing and emptying the coarse discharge chute.
- Stop the engine and check thoroughly for damage if a foreign object is encountered. In case of damage, take the lawnmower to a specialised service centre for repair.
ATTENTION:
The mower fan continues to rotate for a few seconds after the engine is switched off.
If the mower vibrates abnormally, stop the engine immediately. To ensure safe operation, regularly check that the lawnmower's bolts, screws and nuts are tight.
CAUTION: FUEL IS A HIGHLY FLAMMABLE LIQUID.
- Store the fuel in a suitable container.
- Fill fuel only in an open and well-ventilated place. Do not smoke or use a mobile phone when handling fuel.
- Only fill with fuel when the engine is switched off. Never open the fuel tank; do not fill the fuel when the engine is hot or running.
- If fuel has been spilt, do not start the engine. Move the mower away from where the fuel was spilt, avoiding possible ignition. Do not resume work until the spilt fuel has evaporated and the fuel vapours have dissipated.
• After filling the fuel, tighten the fuel filler cap and the fuel canister cap securely.
ATTENTION:
Before doing maintenance or repair work, switch off the engine and remove the spark plug.
21. Storage
If you do not use the device for an extended period, you should store it according to the following instructions. That will prolong the life of the device.
• The same petrol must not remain in the tank for more than one month.
- Clean the mower thoroughly and store it in a dry room.
- Never store the lawnmower with fuel in the tank in a building where an open flame or spark may occur.
- To reduce the fire risk, keep the engine, muffler, battery compartment and fuel storage area free of grass, leaves or excessive grease.
• This should be done outdoors if the fuel tank needs to be emptied.
- When adjusting the device, take care not to trap your fingers between the moving blade and the fixed parts of the device.
- Allow the product to cool for at least 30 minutes before storing.
22. Disposal

Please get in touch with your local authority/city for information on disposal options,
Recycling raw materials instead of waste disposal.
- Technical data
| Engine | OHV, air cooled, 4-Stroke |
| Nominal power | 2,9 kW |
| Engine speed | 2800 U/pro Minute |
| Displacement | 170 cm ^3 |
| Starter | Recoil |
| Tank volume | 1,0l |
| Oil tank volume | 0,5l |
| Cutting heights | 25mm-75mm |
| Cutting width | 508 mm |
| Diameter wheels | 7 inch front / 9inch rear |
| Grass collector volume | 60l |
| Sound power level | 98dB |
| Vibration | 3,64 km/h |
| Weight | 28,8kg |
24. EU Declaration of Conformity
Manufacturer / Producer FUXTEC GmbH
Kappstraße 69, 71083 Herrenberg Germany / Germany
Email: info@fuxtec.com Web: www.fuxtec.com
Designation/name Petrol Lawnmower FX-RM5170PRO
EC Directive / EC directive 2006 42 EC
2014/30/EU
200/14/EC amended by
2005/88/EC Annex IV
Applicable standards
EN ISO 5395-1:2013
EN ISO 5395-2:2013+A1+A2
EN ISO 14982:2009
We, with this, declare that, due to its design, the device mentioned above in the version placed on the market by us complies with the basic safety and health requirements of the listed EC directive. Any manipulation or modification of the device not expressly approved by us will render this document null and void.
We declare that the device mentioned above meets the above-stated EC directives' essential safety and health requirements. Any manipulation or change of the device not being explicitly authorised by us in advance renders this document null and void.
Custody of technical documents: FUXTEC GmbH ● Kappstraße 69 ● 71083 Herrenberg ● Germany, L. Zirkler, Management Board
Herrenberg, November the 07 ^th , 2023

text_image
Diagram showing three labeled components: a valve with red handle, a valve with black handle, and a valve with white handle, arranged vertically within a diamond-shaped frame.28. Assemblage
natural_image
Technical line drawings of a three-part robotic car with visible wheels and components (no text or symbols)natural_image
Technical line drawing of a mechanical device with two views: top shows a bracket and wheel assembly, bottom shows internal components (no text or symbols)natural_image
Technical line drawing of a mechanical hook and bracket assembly (no text or symbols)natural_image
Technical line drawing of a mechanical device with no visible text or symbolsnatural_image
Technical line drawing of a mechanical device with green arrows indicating motion or rotation (no text or symbols)text_image
Diagram illustrating vehicle seatbelt usage with labeled arrows and componentsKit de Mulching
natural_image
Technical line drawing of a tracked vehicle showing front wheel, rear wheels, and control panel (no text or symbols)text_image
Technical diagram of a tracked vehicle showing labeled parts and a close-up inset viewnatural_image
Technical line drawing of a vehicle's internal components including wheels, hoses, and a green safety device (no text or symbols)REMARQUES IMPORTANTES :
natural_image
Line drawing of a mechanical device with hands operating it, showing internal components and a water level indicator (no text or symbols)natural_image
Technical line drawing of a mechanical component with numbered parts (1-3) and no visible text or symbolsnatural_image
Line drawing of a person using a cable clamp or lifting device (no text or symbols)text_image
Technical diagram of a vehicle steering wheel assembly with labeled components and cross-sectional viewnatural_image
Diagram of a mechanical device with green component and circular symbol (no text or labels)Filtre
natural_image
Pure mechanical diagram showing a green component inserted into a shaft inside a circular frame (no text or symbols)
natural_image
Technical line drawing of a mechanical component with no visible text or symbols
natural_image
Interior view of a car showing dashboard, steering wheel, and hand seat (no text or symbols)natural_image
Simple line drawing of a lawn mower (no text or symbols)
natural_image
Symbolic icon of a person pushing a circular arrow, representing waste or disposal (no text or symbols)ÉLÉMENTS D'EMBALLAGE À SÉPARER ET À DÉPOSER DANS LE BAC DE TRI

- Données techniques
Fabricant / Producer FUXTEC GmbH
Kappstraße 69, 71083 Herrenberg Allemagne / Germany
Email: info@fuxtec.fr Web: www.fuxtec.fr
Directives CE / EC directive 2006 42 EC
2014/30/EU
Hereby we declare that the above mentioned machine meet the essential safety and health requirements of the above stated EC directives. Any manipulation or change of the machine not being explicitly authorized by us in advance renders this document null and void.
Conservation des documents techniques : FUXTEC GmbH • Kappstraße 69 •
71083 Herrenberg ● Germany, L. Zirkler, Direction
Herrenberg, 07.11.2023
C. Jille
natural_image
Diagram showing three black shapes with white symbols: a hand holding a pen, a pen with red lines, and a person holding a box (no text or labels)natural_image
Technical line drawing of a mechanical device with two views: top shows a curved bracket and wheel assembly, bottom shows internal components (no text or symbols)

natural_image
Technical line drawing of a mechanical clamp or hook assembly (no text or symbols)natural_image
Technical line drawing of a mechanical device with no visible text or symbolsnatural_image
Line drawing of a mechanical device with green arrows indicating motion or rotation, no text or symbols presentnatural_image
Medical illustration showing hands operating a device with a cable and switch (no text or symbols)Kit mulching
natural_image
Technical line drawing of a tracked vehicle showing front wheel, rear wheels, and control panel (no text or symbols)text_image
Technical diagram of a tracked vehicle showing labeled parts and a close-up inset with annotation arrowsnatural_image
Technical line drawing of a vehicle's internal components including wheels, suspension, and a green safety device (no text or symbols)NOTA BENE:
natural_image
Line drawing of a mechanical device with hands operating it, showing internal components and a water level indicator (no text or symbols)Livello massimo

Tappo serbatoio
natural_image
Technical line drawing of a mechanical component with no visible text or symbolsnatural_image
Line drawing of a person using a mechanical clamp or lever mechanism (no text or symbols)text_image
Technical diagram of a vehicle steering wheel assembly with numbered components and cross-sectional viewsnatural_image
Diagram of a mechanical component with green parts and a cross symbol, enclosed in a circular outline (no text or labels)Filtro dell'aria
natural_image
Pure mechanical assembly diagram without any text, numbers, or symbols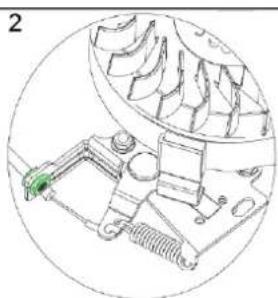
natural_image
Technical line drawing of a mechanical component with no visible text or symbols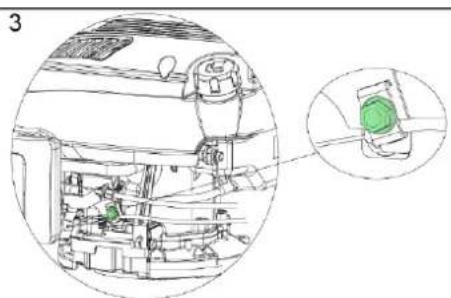
natural_image
Diagram of a car interior showing engine compartment and a close-up of a green circular component (no text or symbols)Email: info@fuxtec.it Web: www.fuxtec.it
Norme applicate / applicable standards
EN ISO 5395-1:2013
EN ISO 5395-2:2013+A1+A2
EN ISO 14982:2009
Hereby we declare that the above mentioned machine meet the essential safety and health requirements of the above stated EC directives. Any manipulation or change of the machine not being explicitly authorized by us in advance renders this document null and void.
natural_image
Technical line drawing of a mechanical trawler assembly with an inset close-up showing internal components (no text or symbols)
natural_image
Technical line drawing of a mechanical clamp or hook assembly (no text or symbols)natural_image
Technical line drawing of a mechanical device with no visible text or symbolsnatural_image
Technical line drawing of a mechanical device with green arrows indicating motion or assembly (no text or symbols)natural_image
Illustration of a medical device being inserted into a car's seatbelt, showing hand placement and motion arrows (no text or symbols)Kit de mulching
natural_image
Technical line drawing of a tractor's front wheel assembly (no text or symbols)natural_image
Technical line drawing of a vehicle's internal components including wheels, hoses, and a green safety device (no text or symbols)TENGA EN CUENTA:
natural_image
Illustration of hands operating a mechanical device with a water tank nearby (no text or symbols)Nivel máximo
Tapón del tanque
natural_image
Technical line drawing of a mechanical component with no visible text or symbolsnatural_image
Illustration of a person using a mechanical clamp or spring scale tool (no text or symbols present)text_image
Technical diagram of a car seat assembly with numbered components and cross-sectional viewsnatural_image
Technical line drawing of a mechanical component with green cylindrical component and circular features (no text or symbols)Filtro de aire
natural_image
Pure mechanical component diagram without any text, numbers, or symbols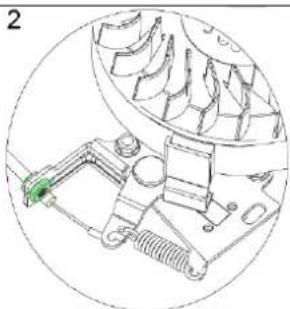
natural_image
Technical line drawing of a mechanical component with no visible text or symbols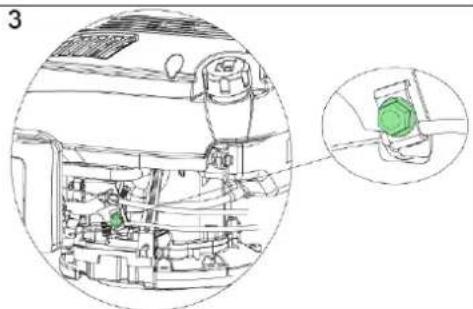
natural_image
Interior view of a car showing dashboard, steering wheel, and gear shift (no text or symbols)Fabricante / Producer FUXTEC GmbH
Directiva CE / EC directive 2006/42/CE
2014/30/UE
Hereby we declare that the above mentioned machine meet the essential safety and health requirements of the above stated EC directives. Any manipulation or change of the machine not being explicitly authorized by us in advance renders this document null and void.
natural_image
Technical line drawing of a mechanical pump or cutter assembly with two views (top and side), no text or symbols present.
natural_image
Technical line drawing of a mechanical clamp or hook assembly (no text or symbols)natural_image
Technical line drawing of a mechanical device with no visible text or symbolsnatural_image
Technical line drawing of a mechanical device with green arrows indicating motion or rotation (no text or symbols)natural_image
Medical illustration showing hands performing a medical procedure on a car seatbelt, with no visible text or symbols.Kit de cobertura vegetal
natural_image
Technical line drawing of a tracked vehicle with visible tire, wheel, and parking area (no text or symbols)natural_image
Technical line drawing of a vehicle's internal components including wheels, hoses, and a green safety device (no text or symbols)NOTAS IMPORTANTES:
natural_image
Illustration of hands operating a fuel can into a water tank (no text or symbols present)Nível máximo de
natural_image
Technical line drawing of a mechanical component with no visible text or symbolsnatural_image
Illustration of a person using a mechanical clamp or crimping tool (no text or symbols present)natural_image
Technical line drawing of a vehicle steering wheel assembly (no text or labels)natural_image
Diagram of a vehicle interior with green components and no visible text or symbolsFiltro de ar
natural_image
Technical line drawings of mechanical components and a close-up view of the engine compartment (no text or symbols present)natural_image
Diagram showing three black shapes with white symbols: a hand holding a pen, a pen with red lines, and a person holding a box (no text or labels)Laat de gashendel los om de motor te stoppen!
76. Montage
natural_image
Technical line drawing of a mechanical device with two views: top shows a curved bracket and wheel assembly, bottom shows internal components (no text or symbols)

natural_image
Technical line drawing of a mechanical clamp or hook assembly (no text or symbols)natural_image
Technical line drawing of a mechanical device with no visible text or symbolsDe grasvanger monteren
natural_image
Line drawing of a device casing with green arrows indicating motion or rotation, no text or symbols presentnatural_image
Medical illustration showing hands performing a medical procedure on a car seatbelt, with no visible text or symbols.Mulch kit
natural_image
Technical line drawing of a tracked vehicle with visible tire, wheel, and parking area (no text or symbols)text_image
Technical diagram of a tracked vehicle showing labeled parts and a close-up inset view with annotation arrows.Zij-uitworpgoot
natural_image
Technical line drawing of a vehicle's internal components including wheels, suspension, and a green safety device (no text or symbols)BELANGRIJKE OPMERKINGEN:
natural_image
Illustration of hands operating a fuel pump in a water tank (no text or symbols)Maximaal vulniveau

text_image
Tankdopnatural_image
Technical line drawing of a mechanical component with no visible text or symbolsnatural_image
Illustration of a person using a mechanical clamp or lever mechanism (no text or symbols present)text_image
Technical diagram of a vehicle steering wheel assembly with numbered components and cross-sectional viewsnatural_image
Diagram of a vehicle interior with green components and no visible text or symbolsLuchtfilter
text_image
0.028 ~ 0.031 in (0.7 ~ 0.8 mm) SEALING WASHERAfdichtring
text_image
Technical diagram showing three views of a mechanical assembly with labeled components and a magnified inset view.text_image
Diagram showing three labeled components: a hand holding a pen, a pen with red lines indicating force or motion, and a device with a box.natural_image
Technical line drawing of a mechanical trawler assembly with close-up insets showing internal components (no text or symbols)

natural_image
Technical line drawing of a mechanical assembly with rope and mounting bracket (no text or symbols)natural_image
Technical line drawing of a mechanical device frame with no visible text or symbolsnatural_image
Technical line drawing of a car interior with green arrows indicating motion or movement (no text or symbols)natural_image
Medical illustration showing hands operating a device with arrows indicating motion (no text or symbols present)Mulch-kit
natural_image
Technical line drawing of a tracked vehicle showing front wheel, rear wheels, and control panel (no text or symbols)text_image
Technical diagram of a tracked vehicle showing labeled parts and a close-up inset with annotation arrownatural_image
Technical line drawing of a vehicle's internal components including wheels, suspension, and a green safety device (no text or symbols)VIKTIGA ANMÄRKNINGAR:
natural_image
Illustration of hands operating a fuel pump in a water tank (no text or symbols)natural_image
Technical line drawing of a mechanical component with no visible text or symbolsnatural_image
Line drawing of a person using a mechanical clamp or spring (no text or symbols)text_image
Technical diagram of a car seat assembly with numbered components and cross-sectional viewsnatural_image
Diagram of a mechanical component with green cylindrical part and circular features, enclosed in a circular frame (no text or symbols)Luftfilter
natural_image
Technical line drawings of mechanical components and a close-up view of a component (no text or symbols present)92. Säkerhetsinstruktioner
ALLMÄNNA SÄKERHETSANVISNINGAR
POLSKA WERSJA JEZYKOWA
text_image
Diagram showing three labeled components: a hand holding a pen, a pen with red lines indicating force or motion, and a device with a box.natural_image
Technical line drawing of a mechanical assembly with no visible text or symbolsnatural_image
Technical line drawing of a mechanical vehicle showing two wheels and a handle assembly (no text or symbols)natural_image
Line drawing of a tracked vehicle with visible wheels and a small inset showing a broken part (no text or symbols)natural_image
Technical line drawing of a mechanical tool or plow with multiple components and a close-up inset showing internal gear mechanism (no text or symbols)
natural_image
Technical line drawing of a mechanical device with rope and mounting bracket (no text or symbols)natural_image
Technical line drawing of a mechanical device with no visible text or symbolsnatural_image
Technical line drawing of a device casing with green arrows indicating motion or rotation (no text or symbols)natural_image
Illustration of a car seatbelt switch mechanism with hands and arrows indicating movement (no text or symbols)natural_image
Technical line drawing of a tracked vehicle with visible tire, wheel, and parking area (no text or symbols)natural_image
Technical line drawing of a vehicle's internal components including wheels, sensors, and a green DANGER container (no text or symbols)WAŻNE UWAGI:
natural_image
Line drawing of a mechanical device with hands operating it, showing internal components and a water level indicator (no text or symbols)Maksymalny poziom
Korek wlewu paliwa