
BXMMA1000E - Chopper BLACK & DECKER - Free user manual and instructions
Find the device manual for free BXMMA1000E BLACK & DECKER in PDF.
| Product type | Electric meat grinder |
| Brand | Black & Decker |
| Model | BXMMA1000E |
| Power supply | Mains, 220-240 V ~ 50/60 Hz |
| Power | 1000 W |
| Housing material | Plastic and stainless steel |
| Included accessories | 3 cutting plates (coarse, medium, fine), sausage funnel, kibbeh adapter, tomato sauce attachment, pusher, tray |
| Functions | Grinding, sausage making, kibbeh, tomato sauce |
| Reverse function | Yes (autoreverse to unblock) |
| Thermal safety | Overheat protection |
| Non-slip feet | Yes |
| Cleaning | Damp cloth, do not immerse, not dishwasher safe |
| Dimensions (approx.) | 30 x 15 x 25 cm |
| Weight (approx.) | 3.5 kg |
| Cable length | 1.2 m |
| Warranty | As per applicable legislation |
| Certifications | Directive 2014/35/EU, 2014/30/EU, 2011/65/EU, 2009/125/EC |
Frequently Asked Questions - BXMMA1000E BLACK & DECKER
User questions about BXMMA1000E BLACK & DECKER
0 question about this device. Answer the ones you know or ask your own.
Ask a new question about this device
Download the instructions for your Chopper in PDF format for free! Find your manual BXMMA1000E - BLACK & DECKER and take your electronic device back in hand. On this page are published all the documents necessary for the use of your device. BXMMA1000E by BLACK & DECKER.
USER MANUAL BXMMA1000E BLACK & DECKER
natural_image
Line drawing of a black+ decker kitchen tool with no text or symbols on the device itself


natural_image
Technical line drawings of various household appliances including a microwave, heater, and showerhead (no text or labels)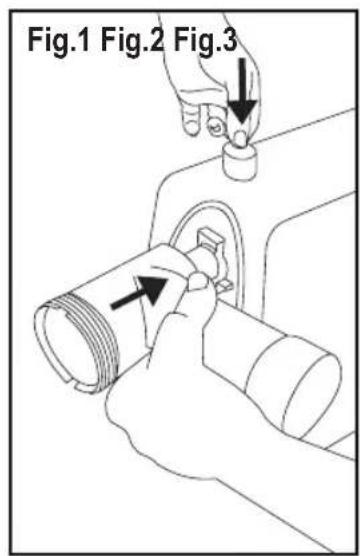
natural_image
Line drawing of a hand holding a cylindrical device with a curved arrow indicating rotation (no text or symbols)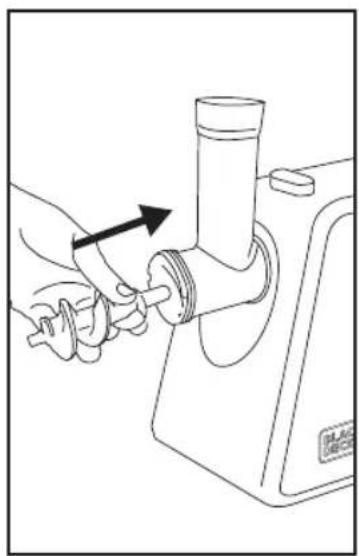
natural_image
Line drawing of a hand operating a manual pump tool with a cylindrical component and directional arrow (no text or symbols)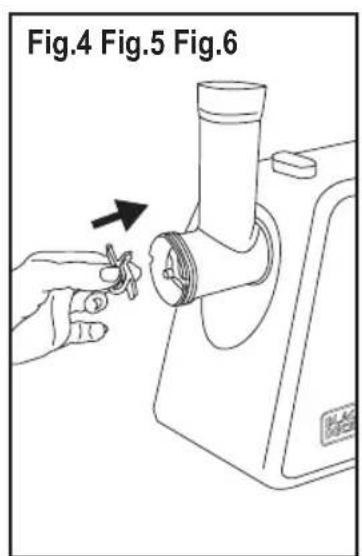
natural_image
Line drawing of a hand holding a small component next to a motor, with an arrow indicating direction (no text or symbols)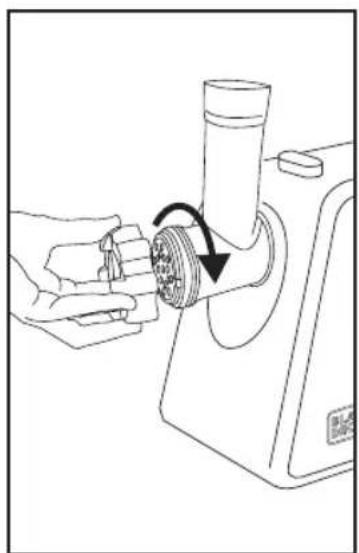
natural_image
Line drawing of a hand using a sewing machine to adjust a sewing machine component (no text or symbols)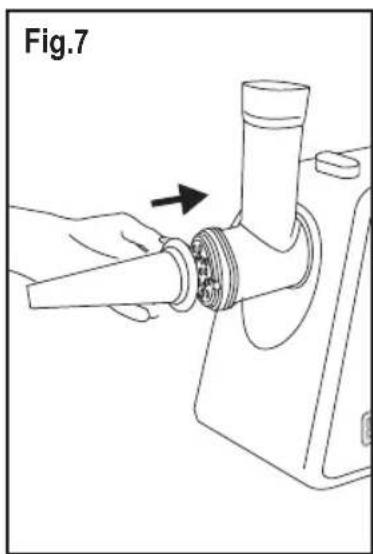
natural_image
Line drawing of a hand operating a sewing machine tool, showing a mechanical component with a pointed tip and threaded shaft (no text or symbols)
natural_image
Line drawing of a hand using a sewing machine to adjust a mechanical component (no text or symbols)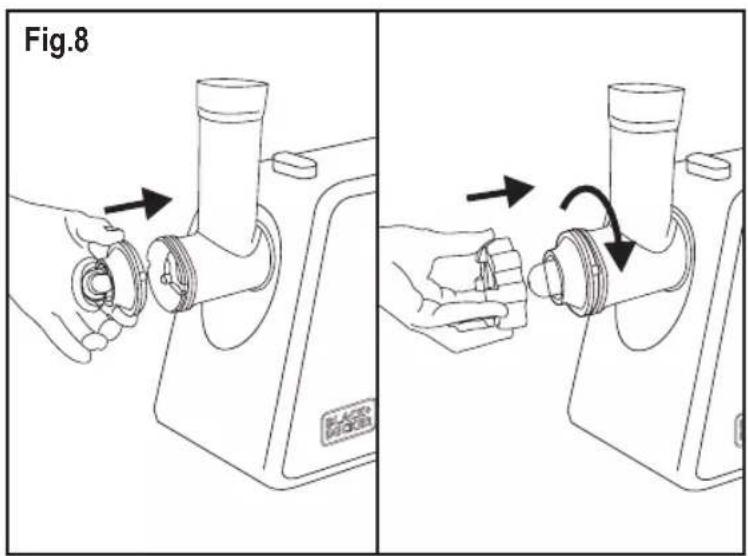
ENGLISH
(Original instructions)
MEAT MINCER
BXMM1000E
BXMMA1000E
Dear customer,
Many thanks for choosing to purchase a Black+Decker brand product.
Thanks to its technology, design and operation and the fact that it exceeds the strictest quality standards, a fully satisfactory use and long product life can be assured.
SAFETY ADVICE AND WARNINGS
- Read these instructions carefully before switching on the appliance and keep them for future reference. Failure to follow and observe these instructions could lead to an accident.
- Clean all the parts of the product that will be in contact with food, as indicated in the cleaning section, before use.
- This appliance shall not be used by children. Keep the appliance and its cord out of reach of children.
- This appliance can be used by people with reduced physical, sensory or mental capabilities or lack of experience and knowledge if they have been given supervision or instruction concerning use of the appliance in a safe way and understand the hazards involved.
- This appliance is not a toy. Children should be supervised to ensure that they do not play with the appliance.
Blades are sharp and could cause harm, be careful and avoid direct contact with the blades' cutting edges.
- Pay special attention when handling the blades, during assembly and disassembly operations, emptying the bowl and during cleaning.
- Always switch off the appliance and disconnect from supply if it is left unattended and before changing accessories or approaching parts that move in use, assembling, disassembling and cleaning.
CAUTION: In order to avoid a hazard due to inadvertent resetting of the thermal protector, this appliance must not be supplied through an external switching device, such as a timer, or connected to a circuit that is regularly switched on and off by the utility.
If the connection to the mains has been damaged, it must be replaced, take the appliance to an authorised technical support service. Do not attempt to disassemble or repair the appliance by yourself in order to avoid a hazard.
- This appliance is for household use only, not professional, industrial use.
(Original instructions)
ENGLISH
- The appliance's plug must fit into the mains socket properly. Do not alter the plug. Do not use plug adaptors.
- Do not place the appliance on hot surfaces, such as cooking plates, gas burners, ovens or similar.
- The appliance must be used and placed on a flat, stable surface.
- Do not use the appliance if the cable or plug is damaged.
If any of the appliance casings breaks, immediately disconnect the appliance from the mains to prevent the possibility of an electric shock.
- Do not use the appliance if it has fallen on the floor, if there are visible signs of damage or if it has a leak.
- Do not force the power cord. Never use the power cord to lift up, carry or unplug the appliance.
- Check the state of the power cord. Damaged or tangled cables increase the risk of electric shock.
Supply cord should be regularly examined for signs of damage, and if the cord is damaged, the appliance must not be used.
Do not use or store the appliance outdoors.
Do not touch the plug with wet hands.
Take the necessary measures to avoid starting the appliance involuntarily.
- Do not touch any of the appliance's moving parts while it is operating.
Exercise precaution after employing the stop operation on the appliance as the blade/s will continue moving from the effect of its own mechanical inertia.
- The temperature of the accessible surfaces may be high when the appliance is in use.
Use and care:
- Fully unroll the appliance’s power cable before each use
- Do not use the appliance if its accessories are not properly fitted.
- Do not use the appliance if the accessories attached to it are defective. Replace them immediately.
- Do not use the appliance if the on/off switch does not work.
Do not move the appliance while in use.
- Do not force the appliance’s work capacity.
- Store this appliance out of reach of children and/or persons with physical, sensory or reduced mental or lack of experience and knowledge.
- Keep the appliance in good condition. Check that the moving parts are not misaligned or jammed and make sure there are no broken parts or anomalies that may prevent the appliance from operating correctly.
◆ Use the appliance and its accessories and tools in
accordance with these instructions, taking into account the working conditions and the work to be performed. Use the appliance for operations different from those intended could result in a hazardous situation.
- To push the food, always use the food pusher. Never use your fingers or other accessories.
- Never leave the appliance unattended while in use.
- Do not use the appliance for more than 3 minutes at any one time.
- Do not use the appliance with frozen goods or those containing bones.
Service:
- Any misuse or failure to follow the instructions for use renders the guarantee and the manufacturer's liability null and void.
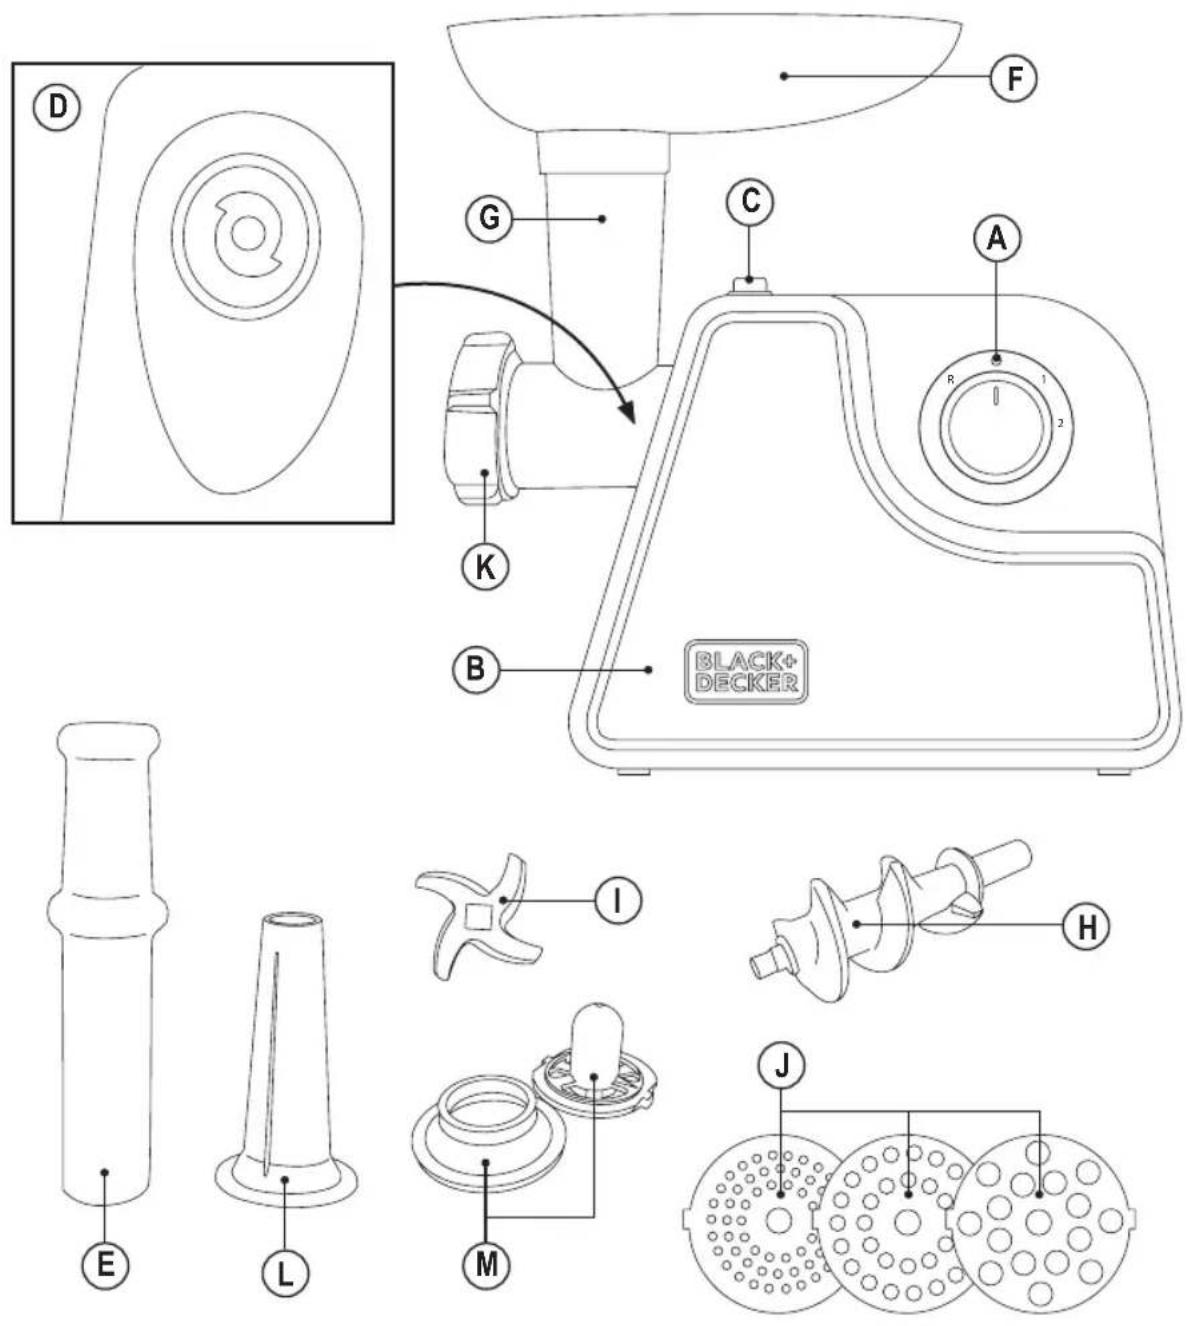
DESCRIPTION
A Switch button (ON/OFF/Reverse)
B Body
C Mincing head lock button
D Mincing head installation place
E Pusher
F Tray
GMincinghead
HScrew
I Crossed blade
J Cutting plate (3 sizes)
K Fixing ring
L Sausage
M Kebbe
N Tomato juicer (*)
(*) Only available in the model BXMMA1000E.
If the model of your appliance does not have the accessories described above, they can also be bought separately from the Technical Assistance Service.
INSTRUCTIONS FOR USE
Before use:
- Make sure that all products' packaging has been removed.
Before using the product for the first time, clean the parts that will come into contact with food in the manner described in the cleaning section.
- Prepare the appliance according to the function you wish to use.
ENGLISH
(Original instructions)
Use:
- Unroll the cable completely before plugging it in.
- Prepare the appliance with the accessory required according to the food to be prepared.
- Cut all foods into pieces (sinew less, boneless and fat-less meats is recommended, approximate size: 20x20x-60mm) so that they fit easily into the hopper opening.
- Connect the appliance to the mains.
- Turn the appliance on, by selection position 1 on switch buttons.
- Feed food into the tray using only the food pusher to introduce it into the mincing head.
Once you have finished using the appli- ance:
- Turn the appliance off, using the on/off switch. Select "0" position.
◆ Unplug the appliance from the mains. - Clean the appliance.
Accessories:
Cutting plates (J):
These cutting plates allow mincing meat with a coarser or finer texture depending on the size of the holes of the disc.
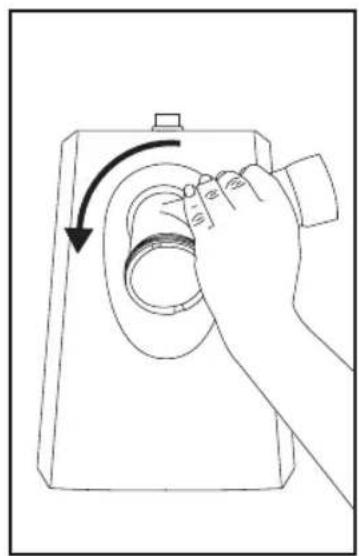
- Press the lock button (C), hold the head and insert it into the inlet (when inserting please pay attention the head must be slanted as per arrow indicated on the top) (Fig.1). Then move the head anticlockwise so that the head is fastened tightly. (Fig.2).
- Insert the screw through the outlet mouth of the mincing head. (Fig.3).
Place the cutting blade into the screw with the cutting edge pointing to the front. (Fig.4). If it is not fitted properly, meat will not be minced.
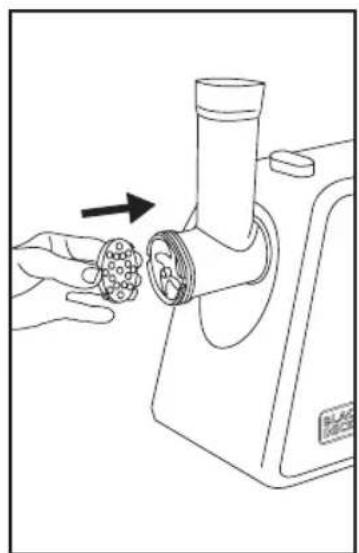
- Insert one of the three cutting plates next to the cutting blade, fitting the outlets of the cutting plate in the notches of the outlet mouth edge of the mincing head. (Fig.5).
♦ Screw the fixing ring tightly in the outlet mouth of the mincing head turning clockwise to fit the screw, blade and cutting plate. (Fig.6).
◆ Position the tray at the top of the mincing head.
Nozzle for filling sausages (L):
- Press the lock button (C), hold the head and insert it into the inlet (when inserting please pay attention the head must be slanted as per arrow indicated on the top) (Fig.1). Then move the head anticlockwise so that the head is fastened tightly. (Fig.2).
- Insert the screw through the outlet mouth of the mincing head. (Fig.3).
- Place the cutting blade in the screw with the cutting edge pointing to the front. (Fig.4).
- Insert the cutting plate with largest holes in the screw, fitting the outlets of the cutting plate in the notches of the outlet mouth edge of the mincing head. (Fig.5).
- Insert the nozzle for filling sausages via the fixing ring. (Fig.7).
- Screw the fixing ring tightly in the outlet mouth of the mincing head turning clockwise to fit the screw, blade and nozzle. (Fig.6).
◆ Position the tray at the top of the mincing head.
Accessory for Kebbe (M):
- Press the lock button (C), hold the head and insert it into the inlet (when inserting please pay attention the head must be slanted as per arrow indicated on the top) (Fig.1). Then move the head anticlockwise so that the head is fastened tightly. (Fig.2).
- Insert the screw through the outlet mouth of the mincing head. (Fig.3).
- Insert the accessory for base Kebbe in the screw and position the other Kebbe accessory on top, fitting the outlets in the edge notches of the filling mouth. (Fig.8).
- Screw the fixing ring tightly turning clockwise to fit the accessories for Kebbe in the screw. (Fig.6).
◆ Position the tray at the top of the mincing head.
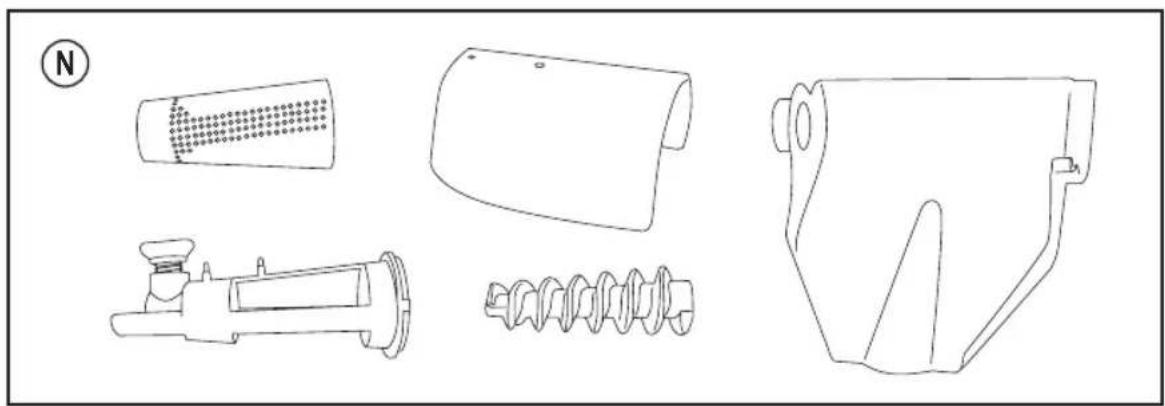
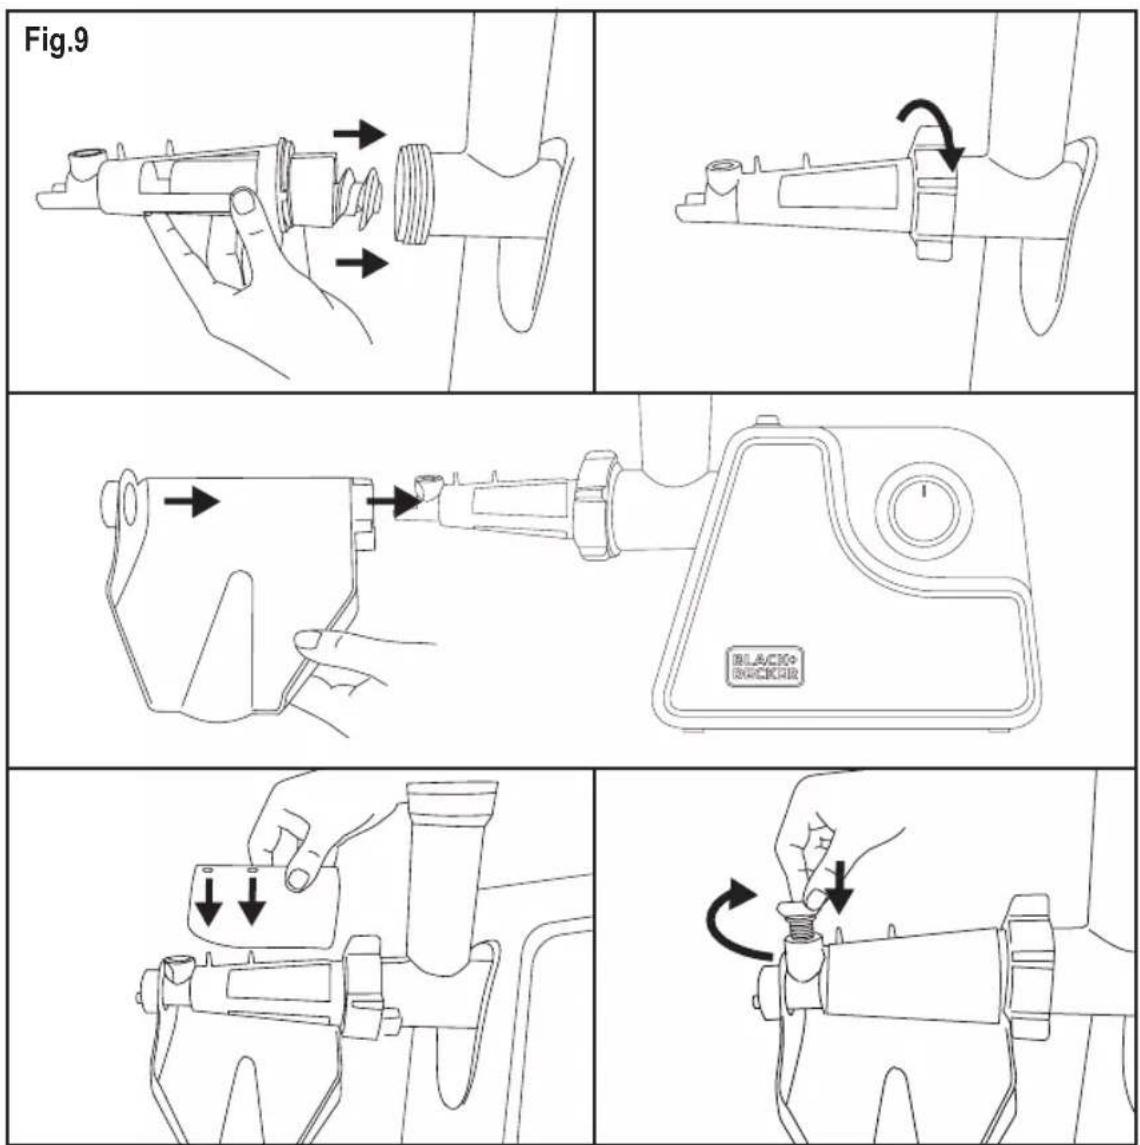
Tomato juicer accessory (N):
- This accessory permits you to separate the seeds and pulp of the tomato to extract the juice.
- Insert the mincing head into the motor body, and secure it with the blade retaining clamp.
- Insert the worm screw through the mouth of the mincing head. (Fig.3).
- Insert the tomato accessory, fitting the protrusions with the slots on the edge of the filler neck. Tighten the locking ring firmly by screwing it clockwise until the accessory fits into the worm screw. (Fig.9).
- Fit the pressure control valve, the anti-spatter guard and the tray for collecting the juice.
Reverse function:
- In case of jamming, switch off the appliance pressing switch to "R" position.
- The screw will be rotating in the opposite direction, and the head will get empty.
If it does not work, switch off the appliance and clean it.
- Wait for one minute before and after the reverse function.
- You can download this instruction manual and its updates at http://www.2helpu.com/.
If the motor blocks:
- If the motor moves slowly or stops, it could be due to the food in the blender blocking the chopper. In that case, use the direction changer switch. To do this; place the ON/OFF switch in position 0, press the direction changer switch. Using the worm screw to perform this operation the food will become decompacted (pay attention in this inverse turn situation as part of the food could come out of the filling tube/tray). Deactivate the opposite direction turn by follow the previous procedure in reverse. - If the motor continues to be blocked, unplug the appliance from the mains and demount its accessories.
For EU product versions and/or in case that it is requested in your country:
Ecology and recyclability of the product
- The materials of which the packaging of this appliance consists are included in a collection, classification and recycling system. Should you wish to dispose of them, use the appropriate public recycling bins for each type of material. - The product does not contain concentrations of substances that could be considered harmful to the environment.
CLEANING
- Disconnect the appliance from the mains and allow it to cool before undertaking any cleaning task.
- Clean the equipment with a damp cloth with a few drops of washing-up liquid and then dry.
Do not use solvents, or products with an acid or base pH such as bleach, or abrasive products, for cleaning the appliance.
- Never submerge the appliance in water or any other liquid or place it under running water.
During the cleaning process, take special care with the blades, as they are very sharp.
It is advisable to clean the appliance regularly and remove any food remains.
- Neither parts of this appliance are suitable for cleaning in the dishwasher.
- Then dry all parts before its assembly and storage.
This symbol means that in case you wish to dispose of the product once its working life has ended; take it to an authorised waste agent for the selective collection of Waste from Electric and Electronic Equipment (WEEE).
This apliance complies with Directive 2014/35/EU on Low Voltage, Directive 2014/30/EU on Electromagnetic Compatibility, Directive 2011/65/EU on the restrictions of the use of certain hazardous substances in electrical and electronic equipment and Directive 2009/125/EC on the eco-design requirements for energy-related products.
ANOMALIES AND REPAIR
Take the appliance to an authorised technical support service if product is damaged or other problems arise. Do not attempt to disassemble or repair the appliance yourself as this may be dangerous.
WARRANTY AND TECHNICAL ASSISTANCE
- This product enjoys the recognition and protection of the legal guarantee in accordance with current legislation. To enforce your rights or interests you must go to any of our official technical assistance services.
- You can find the closest one by accessing the following web link: http://www.2helpu.com/.
- You can also request related information, by contacting us (see the last page of the manual).
FRANÇAIS
(Instructions initiales)
ROBOT HACHOIR À VIANDE
BXMM1000E
BXMMA1000E
Cher Client,
A Bouton (ON/OFF/Reverse)
B Corps
C Bouton de fixation
Accessoire tomate (N)
A Pulsante (ON/OFF/Reverse)
B Corpo
Accessorio pomodoro (N)
A Botão (ON/OFF/Reverse)
ENGINEERING AND TECHNOLOGY FOR LIFE, S.L.
Avda. Barcelona s/n
Oliana, 25790, Spain

- ENGLISH
- (Original instructions)
- MEAT MINCER
- Dear customer,
- SAFETY ADVICE AND WARNINGS
- Use and care:
- Service:
- DESCRIPTION
- INSTRUCTIONS FOR USE
- Before use:
- Use:
- Once you have finished using the appli- ance:
- Accessories:
- Cutting plates (J):
- Nozzle for filling sausages (L):
- Accessory for Kebbe (M):
- Tomato juicer accessory (N):
- Reverse function:
- If the motor blocks:
- For EU product versions and/or in case that it is requested in your country:
- Ecology and recyclability of the product
- CLEANING
- ANOMALIES AND REPAIR
- WARRANTY AND TECHNICAL ASSISTANCE
- FRANÇAIS
- ROBOT HACHOIR À VIANDE
- Accessoire tomate (N)
- Accessorio pomodoro (N)
Brand : BLACK & DECKER
Model : BXMMA1000E
Category : Chopper