Slide Precision 3000 TSA2011 - Iron Teesa - Free user manual and instructions
Find the device manual for free Slide Precision 3000 TSA2011 Teesa in PDF.
| Product type | Steam iron |
| Brand | Teesa |
| Model | Slide Precision 3000 TSA2011 |
| Max power | 3000 W |
| Power supply | 230 V, 50/60 Hz |
| Soleplate type | Ceramic |
| Water tank capacity | 360 ml |
| Power cord length | 1.9 m |
| Steam shot | 120 g |
| Continuous steam setting | Level 1: 8-18 g/min, ECO: 15-25 g/min, BOOST: 20-30 g/min |
| Steam distribution | Tip, sides |
| Heat-up time | Approximately 90 seconds |
| Auto shut-off | Vertical: 8 min, Horizontal: 30 seconds |
| Main functions | Vertical ironing, dry ironing, steam shot, spray, self-cleaning, anti-calc system, anti-drip system |
| Handle | With non-slip coating |
| Indicators | Temperature, auto shut-off |
| Cable | Rotating flexible |
| Base | Stable |
| Water filling | Large opening |
| Included accessories | Iron, water filling container |
| Care and cleaning | Clean with a soft damp cloth. Self-cleaning possible with distilled water. Do not use abrasive or chemical products. |
| Safety | Auto shut-off, overheating protection, do not touch hot soleplate, do not use with damaged cord, unplug before filling/cleaning. |
| Warranty | Not specified in the manual, but warranty repair via authorized service. Any unauthorized repair voids the warranty. |
| General information | For indoor domestic use only. Made in PRC for Lechpol Electronics Leszek Sp.k. |
Frequently Asked Questions - Slide Precision 3000 TSA2011 Teesa
User questions about Slide Precision 3000 TSA2011 Teesa
0 question about this device. Answer the ones you know or ask your own.
Ask a new question about this device
Download the instructions for your Iron in PDF format for free! Find your manual Slide Precision 3000 TSA2011 - Teesa and take your electronic device back in hand. On this page are published all the documents necessary for the use of your device. Slide Precision 3000 TSA2011 by Teesa.
USER MANUAL Slide Precision 3000 TSA2011 Teesa
text_image
Labeled diagram of a steam iron with numbered parts for identificationCS DE EN FR GR
| 1 | Žehlicí plocha Bügelsohle Soleplate | Semelle du fer à repasser | Kεραμική πλάκα | |
| 2 | Tryska rozprašovače Spraydüse Spray nozzle Buse du pulvérisateur Ακροφύσιο ψεκασμού | |||
| 3 | Ukazatel teploty Temperaturregler Temperature knob | Manette de température | Κουμπί θερμοκρασίας | |
| 4 | Indikátor termostatu Temperaturanzeige Temperature lamp Témoin de thermostat Λυχνία θερμοκρασίας | |||
| 5 | Indikátor automatického vypnutí | Automatische Abschaltanzeige | Auto-off lamp | Témoin de l’arrêt automatique |
| 6 | Posuvník regulace páry | Dampfregler | Steam ruler | Curseur de vapeur |
| 7 | Tlačítko pro rozprašování | Sprühtaste | Spray button | Bouton de pulvérisateur |
| 8 | Tlačítko pro spuštění páry | Taste Dampfstoß | Steam shot button | Bouton de jet de vapeur |
| 9 | Tlačítko automatického čištění | Taste Selbstreinigung | Self-clean button | Bouton d’auto-nettoyage |
| 10 | Víko nádrže na vodu | Wassertankabdeckung | Water tank cover | Couvercle du réservoir d’eau |
| 11 | Sítový kabel | Netzkabel | Power supply cable | Câble d’alimentation |
HU NL PL ROSK
| 1 | Vasalótalp | Zoolplaat van het strijkijzer | Stopa żelazka | Talpă ceramică | Żehliaca plocha |
| 2 | Permetező fúvóka | Sproeikop | Dysza spryskiwacza | Duză de pulverizare | Tryska kropenia |
| 3 | Hőfokszabályzó gomb | Temperatuurknop | Pokrętło temperatury | Buton de temperatură | Regulátor teploty |
| 4 | Termosztát jelzőfény | Controlelampje thermostaat | Kontrolka termostatu | Bec temperatură | Indikátor termostatu |
| 5 | Automatikus kikapc-solás jelzőfény | Controlelampje autom-atisch uitschakelen | Kontrolka automatycz-nego wyłączania | Oprire automată bec | Indikátor auto-matického vypnutia |
| 6 | Gőzerő szabályozó | Stoomschuifregelaar | Suwak pary | Regulator debit abur | Posuvný regulátor pary |
| 7 | Permetező gomb | Sproeiknop | Przycisk spryskiwacza | Buton pulverizare | Tlačidlo kropenia |
| 8 | Gőzlöket gomb | Stoomstootknop | Przycisk uderzenia pary | Buton vaporizare | Tlačidlo parného rázu |
| 9 | Automatikus tisztítás gomb | Auto-reinigingsknop | Przycisk auto-czyszcze-nia | Buton auto-curățare | Tlačidlo automatického čistenia |
| 10 | Víztartály fedél | Deksel waterreservoir | Pokrywka zbiornika na wodę | Capac rezervor de apă | Veko zásobníka na vodu |
| 11 | Tápkábel | Netsnoer | Kabel sieciowy | Cablu alimentare | Napájací kábel |
Thank you for purchasing this TEESA appliance. Please read this operation instruction carefully before use, and keep it for future use. Producer does not take responsibility for damages caused by inappropriate handling and use of the product.
SAFETY INSTRUCTIONS
In order to reduce the injuries or damages, follow basic safety precautions applied when using any electrical device, including the following:
- Read this instruction manual carefully, even if you are familiar with the appliance. Keep the manual for future reference.
- Before connecting the device to power supply socket, make sure the voltage indicated on the appliance corresponds to the voltage in the power supply socket.
- The appliance must be plugged into an earthed electrical socket. If you have to use an electrical extension lead, it must be earthed.
- To avoid a circuit overload, do not operate another high wattage appliance on the same circuit.
- This appliance MUST NOT be supplied through an external switching device, such as a timer, or connected to a circuit that is regularly switched on and off by the utility, as it may lead to damage of the device.
- Clean this device in accordance to instructions listed in "Cleaning and Maintenance" section.
-
ALWAYS turn off the device and disconnect it from the mains supply:
-
if it's not operating correctly
- if there's an uncommon voice when using
- before cleaning
-
when not in use
-
When you disconnect the power cord of the device, grasp and pull the plug, not the cord/cable.
- Keep the device out of the reach of children. Do not leave children unsupervised with the product.
- This appliance may be used by children who are above 8 years old and by persons with reduced physical, sensory or mental capabilities, or lack of experience and knowledge, if they are supervised and guided by a person who is responsible for their safety in a cautious manner, and all the safety precautions are understood and followed. Children should not play with this device. Children should not perform cleaning and servicing of the device unsupervised.
- Fixed power cable may only be replaced in an authorized service point.
- Keep the device and its cord/cable away from heat, water, moisture, sharp edges and any other factor which may damage the appliance or its cord. The device, the power cable and the mains plug must not be immersed in water or any other liquid. Do not handle/use it with wet or moist hands.
- Improper use of this device may lead to injuries and damages.
- Do not use the product for purposes different from displayed in this operating manual.
- Do not leave the appliance unattended when it's working. ALWAYS disconnect the product from the mains supply when it is not in use.
-
Do not use unauthorized accessories.
-
Appliance for indoor and household use only. Not for commercial use.
- Never place the device on hot surfaces (e.g. hot plates) or near heat sources or open fire.
- WARNING: During operation, according to selected settings, steam will be ejected - RISK OF SCALDING!
- DO NOT TOUCH THE SOLEPLATE DURING OPERATION, NOR UNTIL IT HAS COMPLETELY COOLED DOWN!
- DO NOT leave the hot iron touching fabrics or very inflammable surfaces.
- The iron should always be turned to "min", and the steam function turned to "0" before plugging or unplugging from outlet.
- Do not allow cord to touch hot surfaces. Let iron cool completely before putting away.
- Loop cord loosely around iron when storing.
- Burns can occur from touching hot metal parts, hot water, or steam. Use caution when you turn a steam iron upside down – there may be hot water in the reservoir.
- Always disconnect iron from electrical outlet when filling with water or emptying, and when not in use.
- In case of any abnormality, when the iron is not operating normally, disconnect it from the power supply and have the device serviced by qualified service personnel.
- The iron must be used and rested on a stable surface.
- Do not use chemical additive, scented substances or decalcifiers. Failure to comply with the above-mentioned regulations leads to the loss of guarantee and may damage the device.
- DO NOT use this device if the power cord, the plug or the device itself shows visible damage, or if the appliance has been dropped, is damaged or leaks.
- Do not attempt to repair/disassemble this device yourself. In case of damage, contact with an authorized service point for check-up/repair.
- IMPORTANT: In order to ensure children's safety, please keep all packaging (plastic bags, boxes, etc.) out of their reach. Caution! Do not allow small children to play with the foil as there is a danger of suffocation!
BEFORE FIRST USE
- Remove any sticker, protective foil or storage cover from the soleplate if present and clean the base with a soft cloth.
- Connect to power supply and heat up the iron to maximum temperature and iron over a piece of damp cloth for several minutes for the purpose of removing any residue on the soleplate (some particles may come out of the soleplate when you use the iron for the first time. This is normal; the particles are harmless and stop coming out of the iron after a short while).
- When using the iron for the first time, you may notice a slight emission of smoke, peculiar odor and hear some sounds made by the expanding plastics. This is quite normal and it stops after a short time (certain parts of the iron have been lightly greased; therefore the iron could give off a little smoke when plugged in for the first time. This will cease after a short while).
OPERATION
How to fill the water tank
-
Make sure the iron is unplugged.
-
Set the steam ruler to dry ironing (position "0").
-
Fill the tank through the water inlet. Do not overfill the tank above MAX level.
-
Use distilled water only; do not use chemically de-limed or perfumed water, as it may damage the device. Do not pour any liquid other than water into the tank.
-
The water tank cover must be closed during operation.
Note: Do not store the iron with water in the tank!
Ironing
-
If using with steam, fill the iron as described in the section "how to fill the water tank". Steam ironing is only possible when highest temperatures are selected (otherwise, water may escape through the soleplate).
-
Plug the device to power mains.
-
Turn temperature dial to your desired setting, which is depended on the fabric of garment, and temperature indicator will illuminate while heating up. You can also refer to chart below. Once it reaches the temperature, the indicator will be extinguished, which indicates the soleplate has achieved the selected temperature.
Caution:
• Do not touch hot soleplate at any time before cooling down!
- Don't emit the steam directly on people or animals!
| Setting Fabric Temperature Variable steam | |||
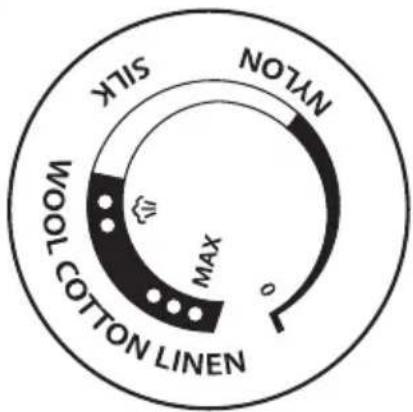 | Nylon 60°C - 105°C × | ||
| Silk 105°C - 145°C × | |||
| Wool 145°C - 175°C √ | |||
| Cotton | 175°C - 200°C √ | ||
| Linen | 200°C - 220°C √ | ||
Note: temperatures provided in this chart are for reference only, and may vary in your device for various external reasons.
- Set the steam ruler to required position and begin ironing.
- Disconnect the iron from the mains supply when finished. Carefully pour off any remaining water (risk of scalding) and leave the iron to cool off in vertical position.
Note: When the ironing is finished, and during breaks in ironing, place the iron in its upright position.
Spray
The spray can be used provided the water tank is filled with water.
Press the spray button to release spray.
NOTE: When using spray for the first time, the button has to be pressed repetitively to activate this function.
Continuous steam control
Use this function for steam ironing. Set the steam ruler to required position:
| 0 Dry ironing | |
| 1^st level Lowest | level of continuous steam operation |
| ECO Optimum | level of continuous steam operation |
| BOOST The most powerful continuous steam level. To use this setting, push the ruler to BOOST position and hold it there. The function will be active as long as you hold the ruler is this position. | |
Steam shot
Shot of steam gives extra steam to remove persistent wrinkles.
- Move the temperature control at the "MAX" position and wait until the temperature light goes off.
- Press the steam shot button.
- Wait few seconds for the steam to penetrate the fiber before pressing again.
NOTE:
- For the best steam quality, do not use more than three successive steam shots at a time (keep the intervals between single shots).
• Excessive use of this feature will cause the iron to cool down. - When using steam for the first time, the button has to be pressed repetitively to activate this function.
• Before operating the shot of steam control make sure the temperature light is out.
Vertical steam
WARNING:
• Do not apply steam near or on a person!
- Be careful, released steam is hot and may cause scalds. Do not iron garments while wearing it.
Use the function on hanging fabric: hold the iron in vertical position and press the steam shot button. Bring close the iron's soleplate to the fabric and move it slowly over the material.
Anti-drip
This iron is equipped with a drip-stop function: when the iron's temperature is too low, the steaming function automatically stops to prevent water from dripping out of the soleplate.
Automatic shut off
If the iron is connected to power mains and not moved for a certain period of time, an internal safety feature will activate auto shut off function. In about 8 minutes (when in vertical position) or 30 seconds (while horizontally), if not moved, the device will issue sound signals and the auto-off indicator will blink. After few seconds, the sound signals will be muted and the auto-off indicator will be still blinking, which means the iron has been automatically switched off. Move the appliance sharply to switch it on again.
Anti-calc
The Anti-calc function filtrate the minerals from the water to prevent mineral residue build up at the steam chamber.
EN
IRONING TIPS
- Check and follow the ironing instructions for the garment to be ironed.
- If the garment does not have any ironing instructions but you know the kind of fabric in question, use the chart provided in this manual.
- Fabrics that have some kind of finish (polishing, wrinkles, contrasts, etc.) can be ironed at the lowest temperatures.
- If the fabric contains several kinds of fibers, use the lowest temperature recommended for the fibers in the blend; if an article contains 60% polyester and 40% cotton, you must choose the temperature corresponding to polyester and iron without steam.
- Group the articles to be ironed, according to their ironing temperature: wool with wool, cotton with cotton, etc.
- The iron heats up quicker than it cools down. Start by ironing the articles requiring the lowest temperature (such as those made of synthetic fibers), and move towards those that require higher temperatures.
- Silk and other fabrics that are likely to become shiny should be ironed on the inner side. Velvet and other textures that rapidly become shiny should be ironed in one direction with light pressure applied.
• Always keeps the iron moving at all times. - Pure wool fabrics (100% wool) may be ironed with the steam iron. Set temperature to the one designed for wool, select a high steam position and use a dry ironing cloth over the material. NOTE: When ironing woolen fabrics, shining of the fabric may occur, so it is suggested that you should turn the article inside out and iron the reverse side.
- Please note, steam functions is not to be used in lowest temperature setting (dripping may occur).
• Steam ironing eliminates odor and has bactericidal effect.
- Do not run it over metal objects (such as against the ironing board, buttons, zips, etc.), as it may damage iron's surface. Iron around any such object.
CLEANING AND MAINTENANCE
- Before cleaning, disconnect the appliance from the mains.
- Use soft cloth to clean the iron. Do not use solvents or abrasive products as it may damage this device.
- Before cleaning, firstly disconnect the device from power mains and let the appliance cool down completely.
- Wipe flakes and any other deposits on the soleplate with a damp cloth or a non-abrasive (liquid) cleaner.
- DO NOT use chemical, steel, wooden or abrasive cleaners to scrape the soleplate.
- Clean the iron with a soft damp cloth.
- When not using the appliance for a long time, pour out the water in the tank, and store the iron vertically, on a stable surface.
- Wind the power cord around the base.
Self-cleaning function
- Before initiating this function, disconnect iron from the power supply;
- Fill the water tank to MAX level.
WARNING: Do not fill the tank with other liquids than distilled water. Do not fill the water tank with vinegar or any cleaning liquids!
- Next, connect the iron to power supply, turn off steam function and turn temperature knob to maximum position;
- Hold the device horizontally above the sink;
- Repeatedly press self-clean button. You can also gently shake the iron. Water will start to pour out of the iron soleplate.
- When all water inside water tank has been used, unplug the steam iron from the power supply socket and leave the iron to cool off.
- When the iron is cool, treat the soleplate with clean, damp cloth to remove any remaining impurities and calc flakes.
It is advised to perform the self clean regularly in order to keep the device in optimum state.
TROUBLESHOOTING
| Iron emits an odor or smoke | Iron gives off an odor when turned on for the first time. Oils used during manufacture need to be burnt off. The odor will disappear after a while. |
| Iron does not steam | The water tank may be empty. Unplug the iron from the mains supply, turn the steam ruler to “0” and add water. Leave the iron for few minutes to heat (depending on selected temperature), and then set the steam dial to the steam setting. |
| Shot of steam feature does not work | The water tank must be filled up. Fill the iron as described in the section “how to fill the water tank”. Steam must be on. Iron should be in the horizontal position. Prime pump briefly. Make short pauses between shots. Be sure you depress the burst of steam button fully. |
| Spray mist feature does not work | The water tank must be filled up. Fill the iron as described in the section “how to fill the water tank”, and try again. |
| Iron is leaking The ste | am ruler must be set off, until the iron is hot. If the set temperature is too low, the steam will not be produced, and the iron will be leaking. |
| If the shots of steam are used too often, the iron won’t be able to reheat, and won’t produce steam. Make pauses between shots of steam. |
SPECIFICATION
Main features
• Vertical ironing function
• Dry ironing function
- Auto shut-off:
- vertically: after 8 min.
- horizontally: after 30 sec.
• Handle covered with non-slip coating
• Temperature indicator
• Auto-off indicator
• Flexible cord swivel
• Low temperature anti-drip function
• Self-clean function
- Anti-calc system
- Spray
• Vertical steam boost
- Stable heel rest
- Large water inlet
Technical data
- Steam shot: 120 g
• Continuous steam control: - 1st level: 8-18 g/min.
- ECO: 15-25 g/min.
- BOOST: 20-30 g/min.
- 1st level: 8-18 g/min.
- ECO: 15-25 g/min.
- BOOST: 20-30 g/min.
• Steam diffusion: tip, sides
• Heat up time: around 90 sec.
- Soleplate: ceramic
• Water tank capacity: 360 ml
• Power cord length: 1,9 m
• Max. power: 3000 W
• Power supply: 230 V, 50/60 Hz
• Set includes: steam iron, refill cup

English
Correct Disposal of This Product
(Waste Electrical & Electronic Equipment)

(Applicable in the European Union and other European countries with separate collection systems) This marking shown on the product or its literature, indicates that it should not be disposed with other household wastes at the end of its working life. To prevent possible harm to the environment or human health from uncontrolled waste disposal, please separate this from other types of wastes and recycle it responsibly to promote the sustainable reuse of material resources. Household users should contact either the retailer where they purchased this product, or their local government office, for details of where and how they can take this item for environmentally safe recycling. Business users should contact their supplier and check the terms and conditions of the purchase contract. This product should not be mixed with other commercial wastes for disposal.
Made in China for Lechpol Electronics Leszek Sp.k., ul. Garwolińska 1, 08-400 Miętne.