GF110mmF5.6 T/S Macro - Lens FUJIFILM - Free user manual and instructions
Find the device manual for free GF110mmF5.6 T/S Macro FUJIFILM in PDF.
| Product type | Tilt-shift macro lens |
| Mount | Fujifilm G (exclusive, not X-compatible) |
| Focal length | 110 mm (87 mm equivalent in 35 mm) |
| Maximum aperture | f/5.6 |
| Minimum aperture | f/32 |
| Optical construction | 11 elements in 9 groups (1 aspherical, 2 ED) |
| Angle of view | 27.9° |
| Minimum focusing distance | 0.43 m (from focal plane) |
| Maximum magnification | 0.5× |
| Tilt range | ±10° |
| Shift range | ±15 mm |
| Lens rotation | Lock at -90°, 0°, and 90° with click stops every 30° |
| B/D rotation (tilt) | Lock at 0° and 90° with click stop at 45° |
| Filter diameter | 72 mm |
| Dimensions (Diameter × Length) | ∅ 95 mm × 149 mm |
| Weight (without accessories) | 1255 g |
| Number of aperture blades | 9 (circular diaphragm) |
| Supplied accessories | Front and rear caps, case |
| Care and cleaning | Clean with blower and soft cloth; do not use solvents; store in a dry place away from sunlight |
| Safety | Do not look at the sun through it; avoid water and extreme heat; disassembly prohibited |
| Spare parts and repairability | Contact Fujifilm representative for repairs |
| General information | Firmware update required; AF not available in tilt/shift mode |
Frequently Asked Questions - GF110mmF5.6 T/S Macro FUJIFILM
User questions about GF110mmF5.6 T/S Macro FUJIFILM
0 question about this device. Answer the ones you know or ask your own.
Ask a new question about this device
Download the instructions for your Lens in PDF format for free! Find your manual GF110mmF5.6 T/S Macro - FUJIFILM and take your electronic device back in hand. On this page are published all the documents necessary for the use of your device. GF110mmF5.6 T/S Macro by FUJIFILM.
USER MANUAL GF110mmF5.6 T/S Macro FUJIFILM
https://fujifilm-x.com/ja-jp/support/download/firmware/
text_image
Diagram of a camera lens with numbered parts and directional arrows indicating motion or assembly.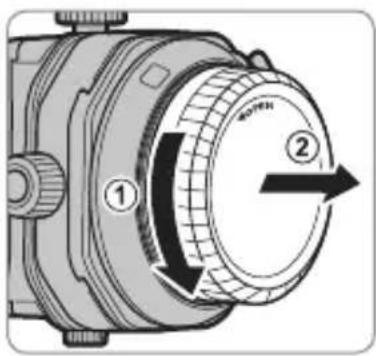
text_image
Technical diagram of a mechanical device with labeled parts and directional arrows indicating rotation or movement.text_image
Diagram of a camera lens with numbered parts indicating directional movement or rotationnatural_image
Diagram showing a camera lens being converted into a cylindrical lens (no text or symbols present)
natural_image
Diagram showing a mechanical component being converted into a cylindrical housing, with no text or symbols present.text_image
Diagram illustrating a mechanical component with numbered parts and an inset showing a close-up of the component's motion.natural_image
Technical illustration of a camera with internal components and a side-view view of the camera module (no text or symbols present)text_image
Technical diagram of a camera with labeled parts and exploded views showing internal componentsnatural_image
Technical illustration of a camera assembly with an inset showing a mechanical component (no text or symbols present)絞り操作
カメラの使用説明書をご覧ください。
ティルト操作
natural_image
Technical line drawing of a mechanical device with rotational arrow indicating motion (no text or symbols)操作方法
text_image
Diagram showing a mechanical component with numbered parts and directional arrows indicating motion or assembly.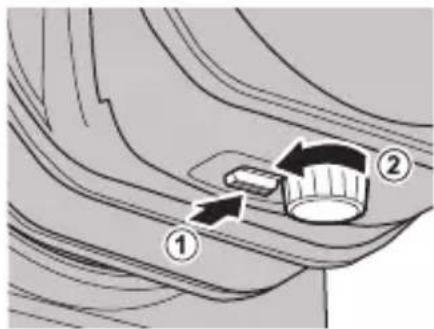
text_image
Diagram showing a mechanical component with numbered parts and directional arrows indicating motion or movement.GF30mmF5.6 T/S GF110mmF5.6 T/S Macro
natural_image
Close-up of a DSLR camera's internal components, showing no text or symbolsnatural_image
Diagram of a mechanical component with a circular knob and arrow, no visible text or symbolsシフト操作
natural_image
Technical line drawing of a mechanical device with no visible text or symbols操作方法
natural_image
Close-up of a camera's side panel showing the left button and right grip (no text or symbols visible)natural_image
Mechanical component diagram showing a rotating knob with directional arrow (no text or symbols)natural_image
Close-up of a camera mode dial with a rotary knob (no text or symbols visible)レボルビング操作
natural_image
Line drawing of a DSLR camera with lens and frame (no text or symbols)操作方法
text_image
Technical diagram of a camera component with numbered parts and directional arrows indicating motion or movement.natural_image
Line drawing of a DSLR camera with lens and adjustment arrow (no text or symbols)操作方法
text_image
Diagram of a camera lens assembly with numbered components and directional arrows indicating rotation or movement.Be sure to read these notes before use
Safety Notes
Thank you for your purchase of this product. For repair, inspection, and internal testing, contact your Fujifilm dealer.
• Make sure that you use the lens correctly. Read these safety notes and the camera Owner's Manual carefully before use.
• After reading these safety notes, store them in a safe place.
About the Icons
The icons shown below are used in this document to indicate the severity of the injury or damage that can result if the information indicated by the icon is ignored and the product is used incorrectly as a result.

WARNING
This icon indicates that death or serious injury can result if the information is ignored.

CAUTION
This icon indicates that personal injury or material damage can result if the information is ignored.
The icons shown below are used to indicate the nature of the instructions which are to be observed.

Triangular icons tell you that this information requires attention ("Important").

Circular icons with a diagonal bar tell you that the action indicated is prohibited ("Prohibited").

Filled circles with an exclamation mark indicate an action that must be performed ("Required").

WARNING

Do not use in the athroom or shower
Do not immerse in or expose to water. Failure to observe this precaution can cause a fire or electric shock.

Do not disassemble
Do not disassemble. Failure to observe this precaution can cause fire, electric shock, or injury due to product malfunction.

Do not touch internal parts
Should the case break open as the result of a fall or other accident, do not touch the exposed parts. Failure to observe this precaution could result in electric shock or in injury from touching the damaged parts. Remove the camera battery immediately, taking care to avoid injury or electric shock, and take the product to the point of purchase for consultation.


Do not place on unstable surfaces. The product may fall, causing injury.
Do not view the sun through the lens or camera viewfinders. Failure to observe this precaution can cause permanent visual impairment.
| CAUTION | |
 | Do not use or store in locations that are exposed to steam, or smoke or are very humid or extremely dusty.Failure to observe this precaution can cause fire or electric shock. |
 | Do not leave in direct sunlight or in locations subject to very high temperatures, such as in a closed vehicle on a sunny day.Failure to observe this precaution can cause fire. |
 | Keep out of the reach of small children.This product could cause injury in the hands of a child. |
 | Do not handle with wet hands.Failure to observe this precaution can cause electric shock. |
 | Keep the sun out of the frame when shooting backlit subjects.Sunlight focused into the camera when the sun is in or close to the frame can cause fire or burns. |
 | When the product is not in use, replace the lens caps and store out of direct sunlight.Sunlight focused by the lens can cause fire or burns. |
 | Do not carry the camera or lens while they are attached to a tripod.The product can fall or strike other objects, causing injury. |
 | When attaching or removing the lens from the camera, always set the tilt and shift amounts to 0.Failure to observe this precaution may cause your fingers to get caught, leading to injury, or cause damage to the camera. |
 | If a sharp part is exposed in part of the tilt/shift mechanism during tilt operation or shift operation, do not touch the exposed part.Failure to observe this precaution may cause injury. |
 | Do not perform tilt or shift operations and rotation operations at the same time.Your fingers may get caught, causing injury. |
 | Do not operate with the tilt/shift mechanism locked.Do not apply excessive force to knobs, lock switches, or levers.Failure to observe this precaution may cause damage to the lens. |
For Customers in the U.S.A. For Customers in the U.S.A.
Tested To Comply With FCC Standards
FOR HOME OR OFFICE USE

FCC Statement: This device complies with Part 15 of the FCC Rules. Operation is subject to the following two conditions: (1) This device may not cause harmful interference, and (2) this device must accept any interference received, including interference that may cause undesired operation.
CAUTION: This equipment has been tested and found to comply with the limits for a Class B digital device, pursuant to Part 15 of the FCC Rules. These limits are designed to provide reasonable protection against harmful interference in a residential installation. This equipment generates, uses, and can radiate radio frequency energy and, if not installed and used in accordance with the instructions, may cause harmful interference to radio communications. However, there is no guarantee that interference will not occur in a particular installation. If this equipment does cause harmful interference to radio or television reception, which can be determined by turning the equipment off and on, the user is encouraged to try to correct the interference by one or more of the following measures:
• Reorient or relocate the receiving antenna.
- Increase the separation between the equipment and receiver.
- Connect the equipment into an outlet on a circuit different from that to which the receiver is connected.
- Consult the dealer or an experienced radio/TV technician for help.
- You are cautioned that any changes or modifications not expressly approved in this manual could void the user's authority to operate the equipment.
Notes on the Grant: To comply with Part 15 of the FCC Rules, this product must be used with a Fujifilm-specified ferrite-core A/V cable, USB cable, and DC supply cord.
For Customers in Canada For Customers in Canada
CAN ICES-003 (B)/NMB-003(B)
CAUTION: This Class B digital apparatus complies with Canadian ICES-003.
IMPORTANT SAFETY INSTRUCTIONS
- Read these instructions.
- Keep these instructions.
- Heed all warnings.
- Follow all instructions.
- Do not use this apparatus near water (excluding waterproof products).
- Clean only with a dry cloth.
- Do not block any ventilation openings. Install in accordance with the manufacturer's instructions.
- Do not install near any heat sources such as radiators, heat registers, stoves, or other apparatus (including amplifiers) that produce heat.
- Protect the power cord from being walked on or pinched particularly at plugs, convenience receptacles, and the point where they exit from the apparatus.
- Only use attachments/accessories specified by the manufacturer.
- Unplug this apparatus during lightning storms or when unused for long periods of time.
- Refer all servicing to qualified service personal. Servicing is required when the apparatus has been damaged in any way, such as power supply cord or plug is damaged, liquid has been spilled or objects have fallen into the apparatus, the apparatus has been exposed to rain or moisture, does not operate normally, or has been dropped.
Disposal of Electrical and Electronic Equipment in Private Households
In the European Union, Norway, Iceland and Liechtenstein: This symbol on the product, or in the manual and in the warranty, and/or on its packaging indicates that this product shall not be treated as household waste. Instead it should be taken to an applicable collection point for the recycling of electrical and electronic equipment.

By ensuring this product is disposed of correctly, you will help prevent potential negative consequences to the environment and human health, which could otherwise be caused by inappropriate waste handling of this product.
The recycling of materials will help to conserve natural resources. For more detailed information about recycling this product, please contact your local city office, your household waste disposal service or the shop where you purchased the product.
In Countries Outside the European Union, Norway, Iceland and Liechtenstein: If you wish to discard this product, including the batteries or accumulators, please contact your local authorities and ask for the correct way of disposal.
U.K. Importer:
FUJIFILM UK Limited
Fujifilm House, Whitbread Way, Bedford, Bedfordshire, MK42 0ZE, United Kingdom
EU Importer:
FUJIFILM Electronic Imaging Europe GmbH
Fujistrasse 1 47533 Kleve, Germany
Australian RCM

Before Using This Product
The lens may not perform as expected and some features may not be available with outdated lens or camera firmware. Be sure to update the lens and camera firmware to the latest versions. Instructions on viewing firmware version information and updating firmware are available from the following website:
https://fujifilm-x.com/support/download/firmware/
If you do not have access to a computer, support is available from the local distributor listed in the “FUJIFILM Worldwide Network” material provided with your camera.
Product Care
- When using a lens hood, do not pick up or hold the camera using only the hood.
- Keep the lens signal contacts clean.
- Use a blower to remove dust and lint from the glass surfaces of the lens or filter. To remove smudges and fingerprints, apply a small amount of lens cleaner to a soft, clean cotton cloth or lens-cleaning tissue and clean from the center outwards using a circular motion, taking care not to leave smears or touch the glass with your fingers.
- Never use organic solvents such as paint thinner or benzene to clean the lens.
- Attach the front and rear caps when the lens is not in use.
- Store the lens and filter in cool, dry locations to prevent mold and rust. Do not store in direct sunlight or with naphtha or camphor moth balls.
- Keep the lens dry. Rusting can cause irreparable damage. Wipe off rain and water droplets.
• Leaving the lens in extremely hot locations could cause damage or warping.
Parts of the Lens

① Front lens cap
② Front ring*
③ Focus ring
④ Tilt index/Tilt scale
⑤ Tilt dial
⑥ Mounting marks (focal length)
⑦ Shift dial
⑧ Orientation index (on lens)*
⑨ Tilt lock switch
⑩ Tilt dial lock
⑪ Lens signal contacts
⑫ Rotation lock release button
⑬ Shift index/Shift scale
⑭ Shift dial lock
⑮ T/S rotation lock release button
⑯ Tripod collar foot*
⑰ Tripod collar reference index (on collar)*
⑱ Lock knob*
⑲ Lens hood*
⑳ Adapter ring cap*
②1 Adapter ring*
②2 Rear lens cap
* GF30mmF5.6 T/S only
A GF30mmF5.6 T/S lens is used here for illustrative purposes.
Supplied Accessories
GF30mmF5.6 T/S
- Front lens cap
- Rear lens cap
- Lens pouch
-
Adapter ring
-
Adapter ring cap
- Lens hood
- Tripod collar foot
GF110mmF5.6 T/S Macro
- Front lens cap
- Rear lens cap
- Lens pouch
Attaching the Lens
See the camera manual for information on attaching and removing lenses.
① This lens is for use exclusively with FUJIFILM G mounts and can not be used with X mounts.
① Before attaching or removing the lens, set the tilt and shift amounts to 0 and return the rotation mechanism and the T/S rotation mechanism to the locked positions.
Removing the Caps
Remove the caps as shown.

text_image
Diagram of a camera lens with numbered parts and directional arrows indicating rotation or adjustment.
text_image
Technical diagram of a mechanical device with labeled parts and directional arrows indicating rotation or movement.Attaching the Hood (GF30mmF5.6 T/S only)
When attached, lens hoods reduce glare and protect the front lens element.
1 Remove the front ring from the lens.
text_image
Diagram of a camera lens with numbered parts and directional arrows indicating rotation or movement.2 Attach the adapter ring to the lens (①), then attach the lens hood to the adapter ring (②).
text_image
Technical diagram showing two steps of ring closure or rolling process with arrows indicating direction① When attaching the lens hood or filter, be sure to use the adapter ring.
① If you attach a lens hood or filter too tightly after attaching an adapter ring to the lens, it may remain stuck to the adapter ring when the adapter ring is removed. Do not attempt to forcibly separate the lens hood or filter from the adapter ring, as the filter threads could injure your hands. Cover both the lens hood or filter and the adapter ring with silicone jar openers or the like and unscrew them using the palms of your hands.
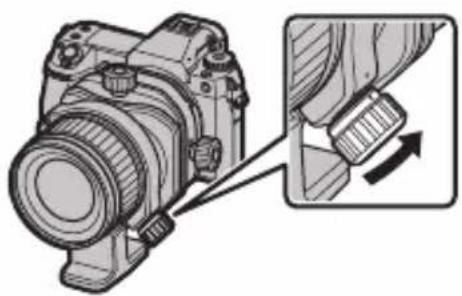
Attaching the Tripod Collar Foot (GF30mmF5.6 T/S only)
1 Align the lock knob with the ring index (①), then pull the lock knob toward you (②) to open the ring (③).
2 Align the ring with the tripod collar foot mounting groove.
Align the tripod collar reference index with the center of the orientation index or the tilt scale according to the camera orientation.
3 Turn the lock knob to secure the ring.

text_image
Diagram illustrating a mechanical component with numbered parts and an inset showing a close-up of the component's dial.
natural_image
Illustration of a camera with attached circuit board and internal components (no text or symbols)
text_image
Technical diagram of a camera with labeled parts and zoomed-in views showing internal components
natural_image
Diagram of a camera with an inset showing the insertion of a component (no text or symbols present)Aperture
See the camera manual.
Tilt
The optical axis of the lens can be tilted. By tilting the optical axis of the lens relative to the imaging surface, you can tilt the focus plane and change the focus range.
natural_image
Technical line drawing of a camera module with rotation arrow (no text or symbols)Procedure
1 Press the tilt lock switch in the direction of the arrow (①), then loosen the tilt dial lock (②).

text_image
Diagram showing two mechanical components with numbered parts and directional arrows indicating motion or movement.GF30mmF5.6 T/S GF110mmF5.6 T/S Macro
2 Turn the tilt dial to adjust the tilt amount.
①Sharp parts may be exposed. Do not touch any sharp parts when they are exposed.

natural_image
Technical illustration of a DSLR camera with a rotary knob (no text or symbols)3 Turn the focus ring to focus on the subject.
①This lens cannot be focused using autofocus.
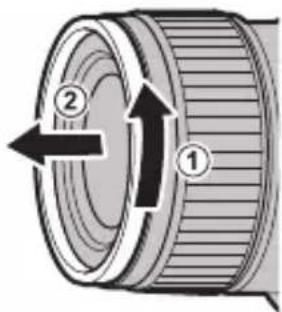
4 Turn the tilt dial lock in the direction of the arrow to secure it.
① To fix the tilt amount at the 0 position, align the tilt lock switch to the LOCK position and then turn the tilt dial lock.

natural_image
Diagram of a mechanical component with a circular knob and arrow, no visible text or symbolsShift
The optical axis of the lens can be moved parallel to the optical axis of the lens while keeping the optical axis straight, allowing the shooting range to be moved up, down, left, or right.

natural_image
Technical line drawing of a mechanical device with no visible text or symbolsProcedure
1 Turn the shift dial lock in the direction of the arrow to loosen it.

natural_image
Close-up of a camera lens adjustment lever with an arrow indicating rotation (no text or symbols)2 Turn the shift dial to adjust the shift amount.
① Sharp parts may be exposed. Do not touch any sharp parts when they are exposed.
① When turning the shift dial, check the surroundings of the shift mechanism beforehand to ensure that your fingers do not get caught between the shift mechanism and the camera grip or other components.
①Large shift amounts may produce variations in lighting at the edges of the frame.

natural_image
Mechanical component diagram showing a rotating knob with directional arrow (no text or symbols)◆ Compatible cameras show the shift amount in the monitor. The shift amount is also included in the EXIF data embedded in pictures as they are taken. See the camera manual for details.
3 Turn the focus ring to focus on the subject.
① This lens cannot be focused using autofocus.
4 Turn the shift dial lock in the direction of the arrow to secure it.

natural_image
Close-up of a mechanical component with a circular knob and directional arrow indicating rotation (no text or symbols)Rotation
The tilt/shift mechanism can be rotated to change the tilt and shift direction.

natural_image
Line drawing of a DSLR camera with lens and frame (no text or symbols)Procedure
Press the rotation lock release button in the direction of the arrow (①) and then turn the tilt/shift mechanism (②).
text_image
Technical diagram of a camera component with numbered parts and directional arrows indicating motion or assembly.① Before performing a rotation operation, set the tilt and shift amounts to 0.
① If you turn the tilt/shift mechanism suddenly while holding down the rotation lock release button, you may hit your finger and injure yourself, so please be careful.
① Do not perform tilt/shift operations and rotation operations at the same time. Your fingers may get caught, causing injury.
The rotation range is ±90^ .
The rotation mechanism locks at 0^ and ±90^ . In addition, a click can be felt every 30^ . We recommend shooting at these angles to avoid changing orientation while shooting.
Compatible cameras show the rotation amount in the monitor. The rotation amount is also included in the EXIF data embedded in pictures as they are taken. See the camera manual for details.
T/S Rotation
The tilt mechanism can be rotated to change the operating direction of the tilt and shift from orthogonal to the same direction.

natural_image
Line drawing of a DSLR camera with lens and frame (no text or symbols)Procedure
Press the T/S rotation lock release button in the direction of the arrow (①), and then turn the tilt mechanism (②).

text_image
Diagram of a camera lens with numbered directional arrows indicating rotation or movement steps① Before performing a T/S rotation operation, set the tilt and shift amounts to 0.
① If you turn the tilt mechanism suddenly while holding down the T/S rotation lock release button, you may hit your finger and injure yourself, so please be careful.
① Do not perform tilt/shift operations and T/S rotation operations at the same time. Your fingers may get caught, causing injury.
The rotation range is 0–90°.
The T/S rotation mechanism locks at 0^ and 90^ . In addition, a click can be felt at the 45^ position. We recommend shooting at these angles to avoid changing orientation while shooting.
When the tilt direction is rotated 90^ to match the shift direction, vignetting will occur in the vertical (①), horizontal (②), and diagonal (③) directions on the display in the gray range indicated in the table below, depending on the tilt and shift amounts.

text_image
Display ③ ① ②| GF30mmF5.6 T/S GF110mmF5.6 T/S Macro | ||
| Vertical |  Shift amount (mm) Shift amount (mm) Shift amount (mm) Shift amount (mm) |  |
| Horizontal |  Shift amount (mm) Shift amount (mm) Shift amount (mm) Shift amount (mm) |  |
| Diagonal |  Shift amount (mm) Shift amount (mm) Shift amount (mm) Shift amount (mm) |  |
Specifications
| Type GF30mmF5.6 T/S GF110mmF5.6 T/S Macro | ||
| Lens construction 16 elements in 11 groups (3 aspherical elements, 2 ED elements, 1 super ED element) | 11 elements in 9 groups (1 aspherical element, 2 ED elements) | |
| Focal length (35 mm format equivalent) | f=30 mm (24 mm) | f=110 mm (87 mm) |
| Angle of view 84.7° 27.9° | ||
| Max. aperture f/5.6 f/5.6 | ||
| Min. aperture f/32 f/32 | ||
| Aperture controlNumber of bladesStop size | 9 (rounded diaphragm opening)1⁄3 EV (16 stops) | 9 (rounded diaphragm opening)1⁄3 EV (16 stops) |
| Minimum focus distance (measured from focal plane) | 0.3 m | 0.43 m |
| Max. magnification | 0.21 × | 0.5 × |
| Tilt range | ±8.5° | ±10° |
| Shift range ±15 mm | ±15 mm | |
| Tilt scale | Ruled in 1° increments | Ruled in 1° increments |
| Shift scale | Ruled in 1 mm increments | Ruled in 1 mm increments |
| Lens rotation | Locks at -90, 0, and 90 degrees with a click every 30 degrees | Locks at -90, 0, and 90 degrees with a click every 30 degrees |
| T/S rotation Locks at 0 and 90 degrees with a click every 45 degrees | Locks at 0 and 90 degrees with a click every 45 degrees | |
| External dimensions: Diameter × Length* (approx.)* distance from front of lens to lens mount flange | ∅ 87.1 mm × 138.5 mmNote: The tilt/shift mechanism is 96 mm long | ∅ 95 mm × 149 mmNote: The tilt/shift mechanism is 96 mm long |
| Weight* (approx.)* excluding caps, hoods, tripod collar feet, and adapter ring | 1340 g | 1255 g |
| Filter size | ∅ 105 mm (uses adapter ring) | ∅ 72 mm |
① Improvements may result in unannounced changes to specifications and appearance.
① Owing to how this lens is constructed, the "Distance indicator" displayed by the camera may in some cases differ from the actual focus distance. Use the "Distance indicator" as a guide only.
① Do not use a teleconverter.
① The following may occur when performing tilt or shift operations.
- Autoexposure may produce results that differ from the optimal value.
- The camera's image stabilization function may not work as intended. Turn off image stabilization before shooting.
- The camera may not be able to detect the distance to the subject. For this reason, some camera functions may not work as intended.
- Depending on the shooting conditions, color irregularities may occur in the captured image, and the image quality of the EVF or LCD display may deteriorate.
- When shooting with an electronic front curtain shutter, uneven exposure may occur in the captured image. Shooting with a mechanical shutter is recommended.
Pour votre sécurité
https://fujifilm-x.com/support/download/firmware/
text_image
Diagram of a camera lens with numbered parts and directional arrows indicating components
text_image
Technical diagram of a rotary switch mechanism with labeled parts and directional arrowsFixation du pare-soleil (GF30mmF5.6 T/S uniquement)
text_image
Diagram of a camera lens with numbered parts and directional arrows indicating rotation or movement.text_image
Technical diagram showing two steps of a mechanical component with arrows indicating direction of motion or assembly.text_image
Diagram illustrating a mechanical component with numbered parts and an inset showing a close-up of the component's rotation.
natural_image
Illustration of a camera with attached lens and internal components, alongside a close-up view of the internal component (no text or symbols)
text_image
Technical diagram of a camera with labeled parts and zoomed-in views showing internal components
natural_image
Mechanical assembly diagram showing a camera lens and adjustment mechanism (no text or symbols)Ouverture
natural_image
Technical line drawing of a mechanical device with rotational arrow indicating rotation (no text or symbols)Procédure
text_image
Diagram showing two labeled parts (① and ②) with arrows indicating direction or movement, likely illustrating a process or system.
text_image
Diagram showing a mechanical component with numbered parts and directional arrows indicating motion or movement.GF30mmF5.6 T/S GF110mmF5.6 T/S Macro
natural_image
Close-up of a DSLR camera's internal components with no visible text or symbolsnatural_image
Diagram of a mechanical component with a circular knob and arrow, no visible text or symbolsDécentrement
natural_image
Technical line drawing of a mechanical device with no visible text or symbolsProcédure
natural_image
Close-up of a camera's side panel showing the left button and right grip (no text or symbols visible)natural_image
Mechanical component diagram showing a rotating knob with directional arrows (no text or symbols)natural_image
Close-up of a camera mode dial with a rotary knob (no text or symbols visible)Rotation
natural_image
Line drawing of a DSLR camera with lens and frame (no text or symbols)Procédure
text_image
Technical diagram of a camera component with numbered parts and directional arrows indicating motion or movement.natural_image
Line drawing of a DSLR camera with lens and scroll wheel (no text or symbols)Procédure
text_image
Technical diagram of a camera lens with numbered components and directional arrows indicating rotation or movement.https://fujifilm-x.com/support/download/firmware/
text_image
Diagram of a camera lens with numbered parts and directional arrows indicating rotation or adjustment.
text_image
Technical diagram of a rotary dial with labeled components and directional arrows indicating rotation or movement.text_image
Diagram of a camera lens with numbered parts and directional arrows indicating rotation or movement.natural_image
Diagram showing a camera lens being converted into a cylindrical lens (no text or symbols present)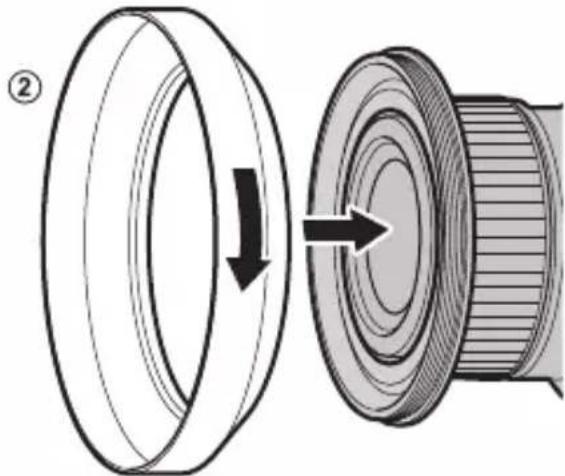
natural_image
Diagram showing a mechanical component being converted into a cylindrical housing, with no text or symbols present.text_image
Diagram illustrating a mechanical component with numbered parts and an inset showing a close-up of the component's rotation.
natural_image
Illustration of a camera with attached lens and external housing (no text or symbols)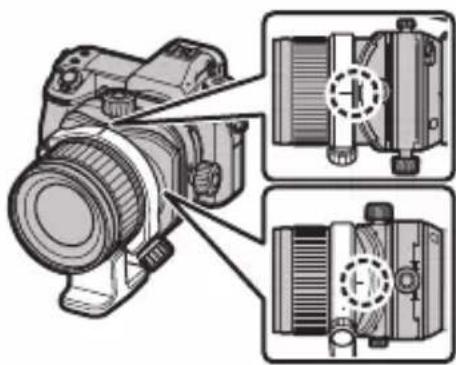
text_image
Technical diagram of a camera with labeled parts and zoomed-in views showing internal components
natural_image
Mechanical assembly diagram showing a camera component with an inset view of a mechanical component (no text or symbols present)Blendeneinstellung
natural_image
Technical line drawing of a mechanical device with rotational arrow indicating rotation (no text or symbols)Vorgehensweise
text_image
Diagram showing two labeled parts (① and ②) with arrows indicating direction or movement on a curved surface.
text_image
Diagram showing a mechanical component with numbered parts and directional arrows indicating motion or movement.GF30mmF5.6 T/S GF110mmF5.6 T/S Macro
natural_image
Close-up of a DSLR camera with a rotary knob and adjustment arrow (no text or symbols visible)natural_image
Illustration of a mechanical component with a knob and arrow, no text or symbols presentVerschiebung
natural_image
Technical line drawing of a mechanical device with no visible text or symbolsVorgehensweise
natural_image
Close-up of a camera mode dial with an arrow indicating rotation (no text or symbols)natural_image
Mechanical component diagram showing a rotating knob with directional arrow (no text or symbols)natural_image
Close-up of a camera mode dial with a rotary knob (no text or symbols visible)Drehung
natural_image
Line drawing of a DSLR camera with lens and frame (no text or symbols)Vorgehensweise
text_image
Technical diagram of a camera component with numbered parts and directional arrows indicating motion or movement.natural_image
Line drawing of a DSLR camera with lens and adjustment knob (no text or symbols)Vorgehensweise
text_image
Diagram of a camera lens with numbered directional arrows indicating rotation or movement stepstext_image
Display ③ ① ②https://fujifilm-x.com/support/download/firmware/
text_image
Diagram of a camera lens with numbered parts and directional arrows indicating components
text_image
Technical diagram of a mechanical device with labeled parts and directional arrows indicating rotation or movement.text_image
Diagram of a camera lens with numbered parts and directional arrows indicating rotation or movementnatural_image
Diagram showing a camera lens being converted into a cylindrical lens (no text or symbols present)
natural_image
Diagram showing a mechanical component being converted into a cylindrical housing, with no text or symbols present.text_image
Diagram illustrating a mechanical component with numbered parts and an inset showing a close-up of the component's dial.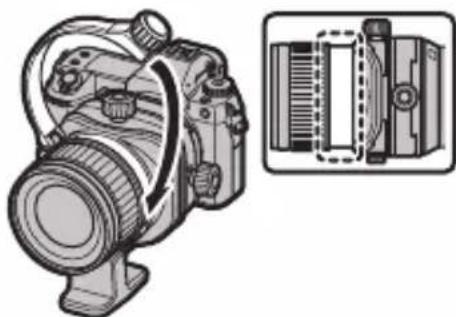
natural_image
Technical illustration of a camera with external components and a close-up view of the internal structure (no text or symbols)
text_image
Technical diagram of a camera with labeled parts and zoomed-in views showing internal components
natural_image
Mechanical assembly diagram showing a camera component with an inset view of a mechanical component (no text or symbols present)Apertura
natural_image
Technical line drawing of a mechanical device with rotational arrow indicating rotation (no text or symbols)Procedimiento
text_image
Diagram showing two mechanical components with numbered arrows indicating motion or assembly stepsGF30mmF5.6 T/S GF110mmF5.6 T/S Macro
natural_image
Technical illustration of a DSLR camera with a rotary knob (no text or symbols)natural_image
Diagram of a mechanical component with a knob and arrow indicator (no text or symbols)Desplazamiento
natural_image
Technical line drawing of a mechanical device with no visible text or symbolsProcedimiento
natural_image
Close-up of a camera's side panel showing the rotary knob and adjustment knob (no text or symbols visible)natural_image
Mechanical component diagram showing a rotating knob with directional arrow (no text or symbols)natural_image
Close-up of a mechanical knob with a circular dial indicator (no text or symbols visible)Rotación
natural_image
Line drawing of a DSLR camera with lens and frame (no text or symbols)Procedimiento
text_image
Technical diagram of a camera component with numbered parts and directional arrows indicating motion or assembly.natural_image
Line drawing of a DSLR camera with lens and frame (no text or symbols)Procedimiento
text_image
Diagram of a camera lens with numbered directional arrows indicating rotation or movement pathshttps://fujifilm-x.com/support/download/firmware/
text_image
Diagram of a camera lens with numbered parts and directional arrows indicating components
text_image
Technical diagram of a mechanical device with labeled parts and directional arrows indicating rotation or movement.De zonnekap bevestigen (Alleen GF30mmF5.6 T/S)
text_image
Diagram of a camera lens with numbered parts and directional arrows indicating rotation or movement.natural_image
Diagram showing a camera lens being converted into a cylindrical lens (no text or symbols present)
natural_image
Diagram showing a mechanical component being converted into a cylindrical housing, with no text or symbols present.text_image
Diagram illustrating a mechanical component with numbered parts and an inset showing a close-up of the component's rotation.
natural_image
Technical illustration of a camera with internal components and a side-view view showing internal structure (no text or symbols)
text_image
Technical diagram of a camera with labeled parts and zoomed-in views showing internal components
natural_image
Technical illustration of a camera assembly with an inset showing the mechanical component (no text or symbols present)Diafragma
natural_image
Technical line drawing of a mechanical device with rotational arrow indicating motion (no text or symbols)Procedure
text_image
Diagram showing two mechanical components with numbered parts and directional arrows indicating motion or assembly.GF30mmF5.6 T/S GF110mmF5.6 T/S Macro
natural_image
Technical illustration of a DSLR camera with a rotary knob (no text or symbols)natural_image
Diagram of a mechanical component with a knob and adjustment knob (no text or symbols)Verschuiving
natural_image
Technical line drawing of a mechanical device with no visible text or symbolsProcedure
natural_image
Close-up of a camera's side panel showing the left eye and right eye with a rotary knob (no text or symbols visible)natural_image
Mechanical component diagram showing a rotating knob with directional arrow (no text or symbols)natural_image
Close-up of a camera mode dial with a rotary knob (no text or symbols visible)Rotatie
natural_image
Line drawing of a DSLR camera with lens and frame (no text or symbols)Procedure
text_image
Technical diagram of a camera component with numbered parts and directional arrows indicating motion or movement.natural_image
Line drawing of a DSLR camera with lens and adjustment knob (no text or symbols)Procedure
text_image
Diagram of a camera lens with numbered directional arrows indicating rotation or movement stepshttps://fujifilm-x.com/support/download/firmware/
text_image
Diagram of a camera lens with numbered parts and directional arrows indicating components
text_image
Technical diagram of a mechanical component with labeled parts and directional arrows indicating rotation or movement.Montera motljusskyddet (Endast GF30mmF5.6 T/S)
text_image
Diagram of a camera lens with numbered parts and directional arrows indicating rotation or movement.text_image
Technical diagram illustrating two steps of tire rolling process with labeled arrows and componentsnatural_image
Technical line drawing of a mechanical device with rotational arrow indicating rotation (no text or symbols)Procedur
text_image
Diagram showing two mechanical components with numbered arrows indicating motion or assembly stepsGF30mmF5.6 T/S GF110mmF5.6 T/S Macro
natural_image
Close-up of a DSLR camera with a rotary knob and adjustment arrow (no text or symbols visible)natural_image
Diagram of a mechanical component with a knob and adjustment knob (no text or symbols)Förskjutning
natural_image
Technical line drawing of a mechanical device with no visible text or symbolsProcedur
natural_image
Close-up of a camera's side panel showing a rotary knob and adjustment knob (no text or symbols visible)natural_image
Mechanical component diagram showing a rotating knob with directional arrow (no text or symbols)natural_image
Close-up of a mechanical knob adjustment lever on a door (no text or symbols visible)Rotation
natural_image
Line drawing of a DSLR camera with lens and frame (no text or symbols)Procedur
text_image
Technical diagram of a camera component with numbered parts and directional arrows indicating motion or movement.natural_image
Line drawing of a DSLR camera with lens and adjustment knob (no text or symbols)Procedur
text_image
Diagram of a camera lens with numbered parts and directional arrows indicating rotation or adjustment.text_image
Display ③ ① ②https://fujifilm-x.com/support/download/firmware/
text_image
Diagram of a camera lens with numbered parts and directional arrows indicating components
text_image
Technical diagram of a mechanical device with labeled parts and directional arrows indicating rotation or movement.Festing av solblenderen (kun GF30mmF5.6 T/S)
Når den er montert, reduserer solblenderen blendende lys og beskytter fremre objektivelement.
1 Fjern den fremre ringen fra objektivet.

text_image
Diagram of a camera lens with numbered parts and directional arrows indicating rotation or movement.natural_image
Diagram showing a camera lens being converted into a cylindrical lens (no text or symbols present)
natural_image
Diagram showing a mechanical component being converted into a cylindrical housing, with no text or symbols present.natural_image
Technical line drawing of a camera module with rotation arrow (no text or symbols)Prosedyre
text_image
Diagram illustrating two mechanical or electrical component states with numbered arrows indicating motion or assembly steps.GF30mmF5.6 T/S GF110mmF5.6 T/S Macro
2 Drei på vippehjulet for å justere vippeverdien.
natural_image
Close-up of a DSLR camera's internal components with a rotary knob (no text or symbols visible)natural_image
Illustration of a kitchen sink with a kitchen handle and a small object, no text or symbols presentJustering
natural_image
Technical line drawing of a mechanical device with no visible text or symbolsProsedyre
natural_image
Close-up of a camera mode dial with an arrow indicating rotation (no text or symbols)2 Drei justeringshjulet for å justere justeringsverdi- en.

natural_image
Mechanical component diagram showing a rotating knob with directional arrow (no text or symbols)natural_image
Close-up of a camera mode dial with a rotary knob (no text or symbols visible)Rotasjon
natural_image
Line drawing of a DSLR camera with lens and frame (no text or symbols)Prosedyre
text_image
Technical diagram of a camera component with numbered parts and directional arrows indicating motion or movement.natural_image
Line drawing of a DSLR camera with lens and adjustment knob (no text or symbols)Prosedyre
text_image
Diagram of a camera lens with numbered directional arrows indicating rotation or movement stepstext_image
Display ③ ① ②| GF30mmF5.6 T/S GF110mmF5.6 T/S Macro | ||
| Vertikal |  |  |
| Forskyvningsverdi (mm) Forskyvningsverdi (mm) | ||
| Horizontal |  | 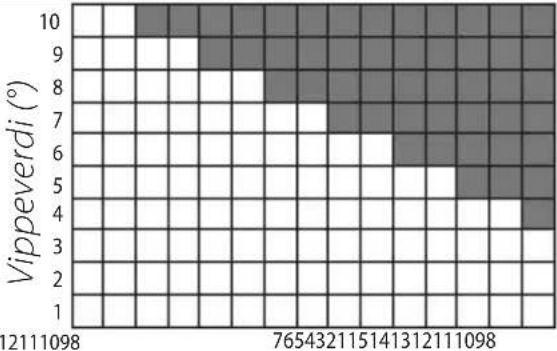 |
| Forskyvningsverdi (mm) Forskyvningsverdi (mm) | ||
| Diagonal | 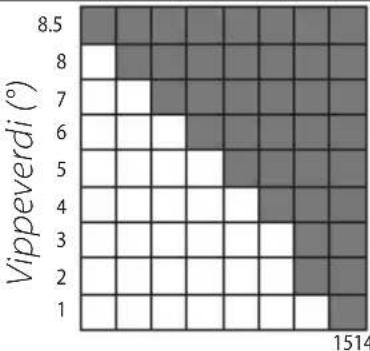 | 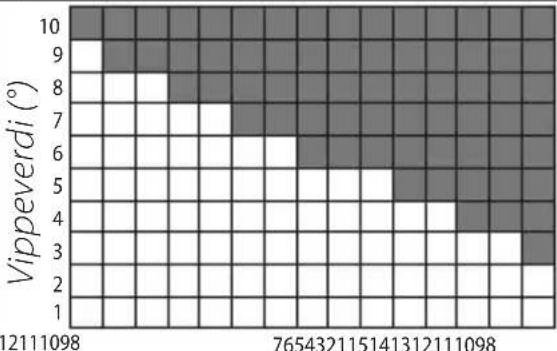 |
| Forskyvningsverdi (mm) Forskyvningsverdi (mm) | ||
Spesifikasjoner
https://fujifilm-x.com/support/download/firmware/
text_image
Diagram of a camera lens with numbered parts and directional arrows indicating components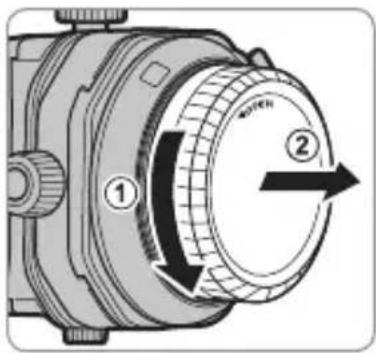
text_image
Technical diagram of a mechanical device with labeled parts and directional arrows indicating rotation or movement.text_image
Diagram of a camera lens with numbered parts and directional arrows indicating rotation or movement.natural_image
Diagram showing a camera lens being converted into a cylindrical lens (no text or symbols present)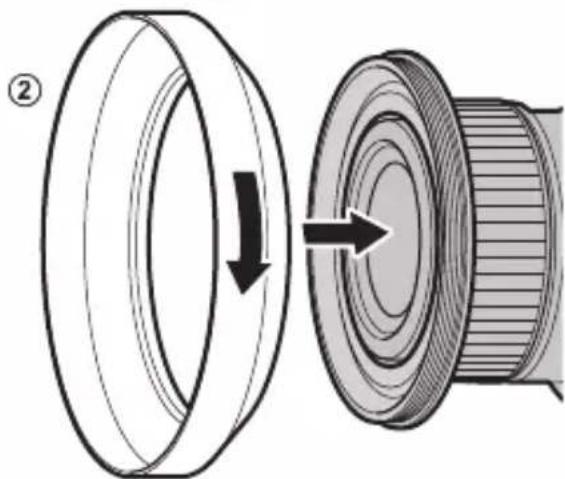
natural_image
Diagram showing a mechanical component being converted into a cylindrical housing, with no text or symbols present.text_image
Diagram illustrating a mechanical component with numbered parts and an inset showing a close-up of the component's dial.
natural_image
Technical illustration of a camera with external components and a close-up view of the internal structure (no text or symbols)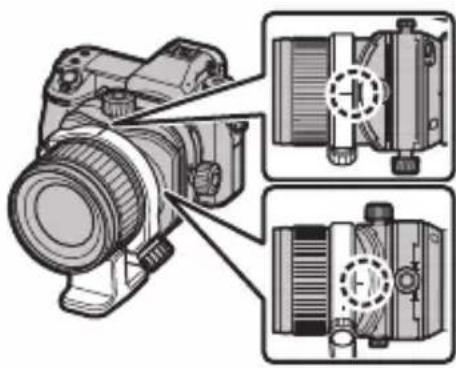
text_image
Technical diagram of a mechanical device with labeled components and cross-sectional views
natural_image
Technical illustration of a camera assembly with an inset showing a mechanical component (no text or symbols present)Aukko
natural_image
Technical line drawing of a mechanical device with rotational arrow indicating rotation (no text or symbols)Menetelmä
text_image
Diagram showing two mechanical components with numbered parts and directional arrows indicating motion or movement.GF30mmF5.6 T/S GF110mmF5.6 T/S Macro
natural_image
Technical illustration of a DSLR camera with a rotary knob (no text or symbols)natural_image
Diagram of a mechanical component with a circular knob and arrow, no visible text or symbolsSiirto
natural_image
Technical line drawing of a mechanical device with no visible text or symbolsMenetelmä
natural_image
Close-up of a camera mode dial with an arrow indicating rotation (no text or symbols)natural_image
Mechanical component diagram showing a rotating knob with directional arrow (no text or symbols)natural_image
Close-up of a camera mode dial with a rotary knob (no text or symbols visible)Pyörintä
natural_image
Line drawing of a DSLR camera with lens and frame (no text or symbols)Menetelmä
text_image
Technical diagram of a camera component with numbered parts and directional arrows indicating motion or movement.natural_image
Line drawing of a DSLR camera with lens and adjustment knob (no text or symbols)Menetelmä
text_image
Diagram of a camera lens with numbered directional arrows indicating rotation or movement stepshttps://fujifilm-x.com/support/download/firmware/
text_image
Diagram of a camera lens with numbered parts and directional arrows indicating components
text_image
Diagram of a mechanical device with labeled parts and directional arrows indicating rotation or movement.text_image
Diagram of a camera lens with numbered parts and directional arrows indicating rotation or movement.natural_image
Diagram showing a camera lens being converted into a cylindrical lens (no text or symbols present)
natural_image
Diagram showing a mechanical component being converted into a cylindrical housing, with no text or symbols present.text_image
Diagram illustrating a mechanical component with numbered parts and an inset showing a close-up of the component's rotation.
natural_image
Technical illustration of a camera with external components and a close-up view of the internal components (no text or symbols)
text_image
Technical diagram of a camera with labeled parts and zoomed-in views showing internal components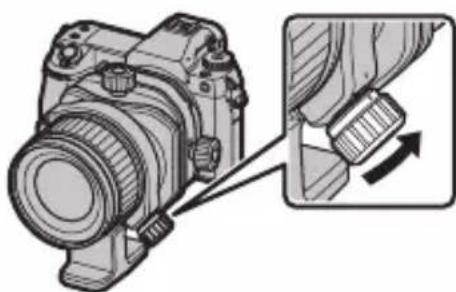
natural_image
Mechanical assembly diagram showing a camera component with an inset view of a mechanical component (no text or symbols present)Диафрагма
natural_image
Technical line drawing of a mechanical device with rotational arrow indicating motion (no text or symbols)Процедура
text_image
Diagram showing two mechanical components with numbered parts and directional arrows indicating motion or movement.GF30mmF5.6 T/S GF110mmF5.6 T/S Macro
natural_image
Close-up of a DSLR camera's internal components, showing no text or symbolsnatural_image
Diagram of a mechanical component with a knob and adjustment knob (no text or symbols)Сдвиг
natural_image
Technical line drawing of a mechanical device with no visible text or symbolsПроцедура
natural_image
Close-up of a camera's side panel showing the left button and right grip (no text or symbols visible)natural_image
Mechanical component diagram showing a rotating knob with directional arrows (no text or symbols)natural_image
Close-up of a camera mode dial with a rotary knob (no text or symbols visible)Вращение
natural_image
Line drawing of a DSLR camera with lens and frame (no text or symbols)Процедура
text_image
Technical diagram of a camera component with numbered parts and directional arrows indicating motion or movement.natural_image
Line drawing of a DSLR camera with lens and frame (no text or symbols)Процедура
text_image
Diagram of a camera lens with numbered components and directional arrows indicating rotation or movement.https://fujifilm-x.com/support/download/firmware/
text_image
Diagram of a camera lens with numbered parts and directional arrows indicating motion or assembly.
text_image
Technical diagram of a mechanical device with labeled parts and directional arrows indicating rotation or movement.Montaggio paraluce (Solo GF30mmF5.6 T/S)
text_image
Diagram of a camera lens with numbered parts and directional arrows indicating rotation or movement.natural_image
Diagram showing a camera lens being converted into a cylindrical lens (no text or symbols present)
natural_image
Diagram showing a mechanical component being converted into a cylindrical housing, with no text or symbols present.text_image
Diagram illustrating a mechanical component with numbered parts and an inset showing a close-up of the component's rotation.
natural_image
Technical illustration of a camera with external components and a close-up view of the internal structure (no text or symbols)
text_image
Technical diagram of a mechanical device with labeled components and cross-sectional views
natural_image
Technical illustration of a camera assembly with an inset showing a mechanical component (no text or symbols present)Diaframma
natural_image
Technical line drawing of a mechanical device with rotational arrow indicating rotation (no text or symbols)Procedura
text_image
Diagram showing two mechanical components with numbered arrows indicating motion or assembly stepsGF30mmF5.6 T/S GF110mmF5.6 T/S Macro
natural_image
Technical illustration of a camera with a rotary knob (no text or symbols)natural_image
Diagram of a mechanical component with a circular knob and arrow indicator (no text or symbols)Spostamento
natural_image
Technical line drawing of a mechanical device with no visible text or symbolsProcedura
natural_image
Close-up of a camera mode dial with an arrow indicating rotation (no text or symbols)natural_image
Mechanical component diagram showing a rotating knob with directional arrow (no text or symbols)natural_image
Close-up of a camera mode dial with a rotary knob (no text or symbols visible)Rotazione
natural_image
Line drawing of a DSLR camera with lens and frame (no text or symbols)Procedura
text_image
Technical diagram of a camera component with numbered parts and directional arrows indicating motion or movement.natural_image
Line drawing of a DSLR camera with lens and adjustment knob (no text or symbols)Procedura
text_image
Diagram of a camera lens with numbered directional arrows indicating rotation or movement stepstext_image
Display ③ ① ②https://fujifilm-x.com/support/download/firmware/
text_image
Diagram of a camera lens with numbered parts and directional arrows indicating motion or assembly.
text_image
Technical diagram of a mechanical component with labeled parts and directional arrows indicating rotation or movement.text_image
Diagram of a camera lens with numbered parts and directional arrows indicating rotation or movement.natural_image
Diagram showing a camera lens being converted into a cylindrical lens (no text or symbols present)
natural_image
Diagram showing a mechanical component being converted into a cylindrical housing, with no text or symbols present.text_image
Diagram illustrating a mechanical component with numbered parts and an inset showing a close-up of the component's rotation.
natural_image
Technical illustration of a camera with an inset showing its internal components (no text or symbols present)
text_image
Technical diagram of a mechanical device with labeled components and cross-sectional views
natural_image
Diagram of a camera with an inset showing a mechanical component (no text or symbols present)Blænde
natural_image
Technical line drawing of a mechanical device with rotational arrow indicating rotation (no text or symbols)Procedure
1 Tryk kontakten til tilt-låsen i pilens retning (①), og løsn derefter tilt-kommandohjulets lås (②).

text_image
Diagram showing two mechanical components with numbered arrows indicating motion or assembly steps, likely illustrating a machining or tool path.GF30mmF5.6 T/S GF110mmF5.6 T/S Macro
natural_image
Technical illustration of a DSLR camera with a rotary knob (no text or symbols)natural_image
Diagram of a mechanical component with a knob and arrow indicator (no text or symbols)Shift
natural_image
Technical line drawing of a mechanical device with no visible text or symbolsProcedure
1 Drej shift-kommandohjulets lås i pilens retning for at løsne det.

natural_image
Close-up of a camera's side panel showing the left button and right grip (no text or symbols visible)natural_image
Mechanical component diagram showing a rotating knob with directional arrow (no text or symbols)natural_image
Close-up of a camera mode dial with a rotary knob (no text or symbols visible)Rotation
natural_image
Line drawing of a DSLR camera with lens and frame (no text or symbols)Procedure
text_image
Technical diagram of a camera component with numbered parts and directional arrows indicating motion or movement.natural_image
Line drawing of a DSLR camera with lens assembly (no text or symbols)Procedure
text_image
Diagram of a camera lens with numbered directional arrows indicating rotation or movement stepshttps://fujifilm-x.com/support/download/firmware/
text_image
Diagram of a camera lens with numbered parts and directional arrows indicating rotation or movement.
text_image
Technical diagram of a mechanical device with labeled components and directional arrows indicating rotation or movement.text_image
Diagram of a camera lens with numbered parts and directional arrows indicating rotation or movement.natural_image
Diagram showing a camera lens being converted into a cylindrical lens (no text or symbols present)
natural_image
Diagram showing a mechanical component being converted into a cylindrical housing, with no text or symbols present.text_image
Diagram illustrating a mechanical component with numbered parts and an inset showing a close-up of the component's dial.
natural_image
Technical illustration of a camera with external components and a close-up view of the internal structure (no text or symbols)
text_image
Technical diagram of a camera with labeled parts and zoomed-in views showing internal components
natural_image
Technical illustration of a camera assembly with an inset showing a mechanical component (no text or symbols present)Przystona
natural_image
Technical line drawing of a camera module with rotation arrow (no text or symbols)Procedura
text_image
Diagram showing two mechanical components with numbered arrows indicating motion or assembly stepsGF30mmF5.6 T/S GF110mmF5.6 T/S Macro
natural_image
Technical illustration of a DSLR camera with a rotary knob (no text or symbols)natural_image
Diagram of a mechanical component with a knob and arrow indicator (no text or symbols)Przesuwanie
natural_image
Technical line drawing of a mechanical device with no visible text or symbolsProcedura
natural_image
Close-up of a camera's side panel showing the left eye and right eye with a rotary knob (no text or symbols visible)natural_image
Mechanical component diagram showing a rotating knob with directional arrow (no text or symbols)natural_image
Close-up of a camera mode dial with a rotary knob (no text or symbols visible)Obracanie
natural_image
Line drawing of a DSLR camera with lens and frame (no text or symbols)Procedura
text_image
Technical diagram of a camera component with numbered parts and directional arrows indicating motion or movement.natural_image
Line drawing of a DSLR camera with lens and frame (no text or symbols)Procedura
text_image
Diagram of a camera lens with numbered parts and directional arrows indicating rotation or movement.https://fujifilm-x.com/support/download/firmware/
text_image
Labeled diagram of a camera lens with numbered parts and a separate inset showing the main body and casing.
text_image
Technical diagram of a camera lens with numbered parts for identification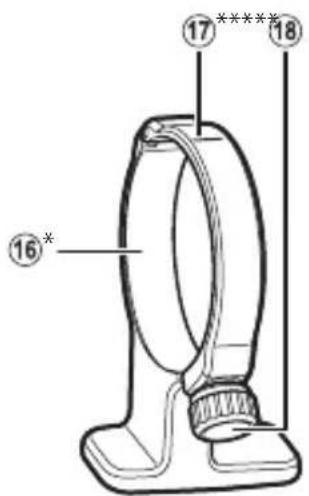
text_image
17 ***** 18 16*
natural_image
Diagram of a ring structure with a numbered label (19) pointing to one segment, no text or symbols present.
text_image
20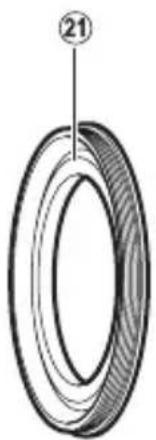
natural_image
Cross-sectional diagram of a ring or ring structure with numbered label (21), no text or symbols present.
text_image
22 WATERtext_image
Diagram of a camera lens with numbered parts and directional arrows indicating components
text_image
Technical diagram of a mechanical component with labeled parts and directional arrows indicating rotation or movement.text_image
Diagram of a camera lens with numbered parts indicating directional movement or rotationtext_image
Technical diagram showing two steps of ring closure or rolling process with arrows indicating direction of movementnatural_image
Technical line drawing of a mechanical device with rotational arrow indicating motion (no text or symbols)步骤
text_image
Diagram showing two labeled parts (① and ②) with arrows indicating movement or process, likely illustrating a mechanical or electrical component.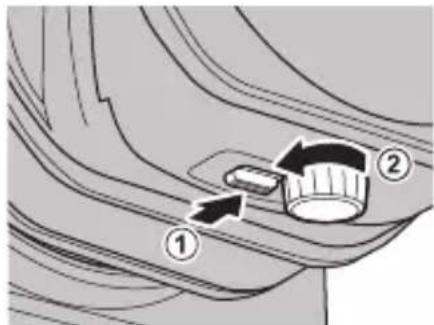
text_image
Diagram showing a knob with directional arrows and numbered labels ① and ②, likely illustrating a mechanical or electrical component.GF30mmF5.6 T/S GF110mmF5.6 T/S Macro
2 转动倾斜拨盘以调整倾斜量。
natural_image
Technical illustration of a DSLR camera with a rotary knob (no text or symbols)3 转动对焦环对拍摄对象进行对焦。
①该镜头无法使用自动对焦进行对焦。
natural_image
Diagram of a mechanical component with a knob and arrow indicating rotation (no text or symbols)偏移
natural_image
Close-up of a camera's side panel showing the left button and right grip (no text or symbols visible)2 转动偏移拨盘以调整偏移量。
natural_image
Technical diagram of a camera lens assembly with rotational arrow indicating rotation (no text or symbols)natural_image
Close-up of a camera mode dial with a rotary knob (no text or symbols visible)旋转
natural_image
Line drawing of a DSLR camera with lens and frame (no text or symbols)步骤
text_image
Technical diagram of a camera component with numbered parts and directional arrows indicating motion or movement.natural_image
Line drawing of a DSLR camera with lens and scroll wheel (no text or symbols)步骤
text_image
Diagram of a camera lens assembly with numbered components and directional arrows indicating motion or rotation.https://fujifilm-x.com/support/download/firmware/
text_image
Diagram of a camera lens with numbered parts and directional arrows indicating components
text_image
Technical diagram of a rotary dial with labeled components and directional arrows indicating rotation or movement.text_image
Diagram of a camera lens with numbered parts and directional arrows indicating rotation or movement.natural_image
Diagram showing a camera lens being converted into a cylindrical lens (no text or symbols present)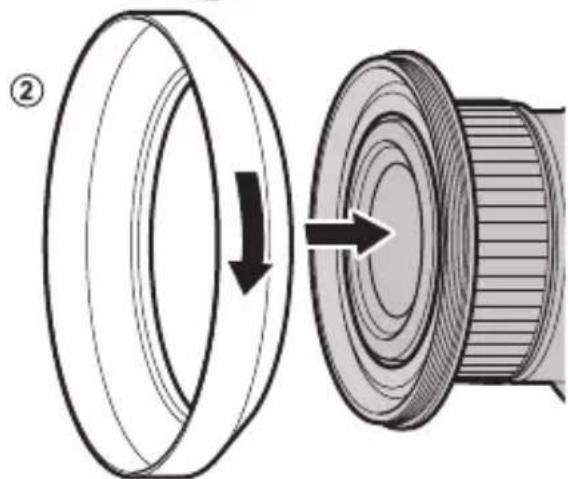
natural_image
Diagram showing a mechanical component being converted into a cylindrical housing, with no text or symbols present.text_image
Diagram illustrating a mechanical component with numbered parts and an inset showing a close-up of the component's dial indicator.2 將環與三腳架固定底座安裝槽對齊。

natural_image
Technical illustration of a mechanical device with a close-up inset showing internal components (no text or symbols)text_image
Technical diagram of a mechanical device with labeled components and zoomed-in views showing internal structure.3 轉動鎖定旋鈕以固定環。
natural_image
Technical illustration of a camera assembly with an inset showing a mechanical component (no text or symbols present)光圈
請參閱相機使用手冊。
傾斜
natural_image
Technical line drawing of a mechanical device with rotational arrow indicating rotation (no text or symbols)步驟
text_image
Diagram showing a mechanical component with numbered parts and directional arrows indicating motion or assembly.
text_image
Diagram showing a mechanical component with numbered parts and directional arrows indicating motion or movement.GF30mmF5.6 T/S GF110mmF5.6 T/S Macro
2 轉動傾斜轉盤以調整傾斜量。
natural_image
Diagram of a mechanical component with a circular knob and arrow, no visible text or symbols位移
natural_image
Technical line drawing of a mechanical device with no visible text or symbols步驟
natural_image
Close-up of a camera's side panel showing the rotary knob and adjustment knob (no text or symbols visible)2 轉動位移轉盤以調整位移量。

natural_image
Close-up of a camera mode dial with a rotary knob (no text or symbols visible)旋轉
natural_image
Line drawing of a DSLR camera with lens and frame (no text or symbols)步驟
text_image
Technical diagram of a mechanical component with numbered parts and directional arrows indicating motion or assembly.natural_image
Line drawing of a DSLR camera with lens and adjustment arrow (no text or symbols)步驟
text_image
Diagram of a camera lens with numbered directional arrows indicating rotation or movement pathshttps://fujifilm-x.com/support/download/firmware/
text_image
Diagram of a camera lens with numbered parts and directional arrows indicating components
text_image
Technical diagram of a mechanical device with labeled parts and directional arrows indicating rotation or movement.text_image
Diagram of a camera lens with numbered parts indicating directional movement or rotationnatural_image
Diagram showing a camera lens being converted into a cylindrical lens (no text or symbols present)
natural_image
Diagram showing a mechanical component being converted into a cylindrical housing, with no text or symbols present.text_image
Diagram illustrating a mechanical component with numbered parts and an inset showing a dial indicator.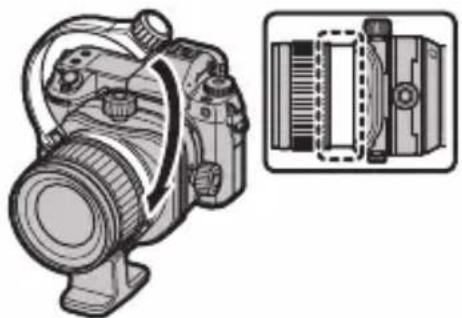
natural_image
Technical illustration of a mechanical device with internal components and a close-up view of its internal structure (no text or symbols)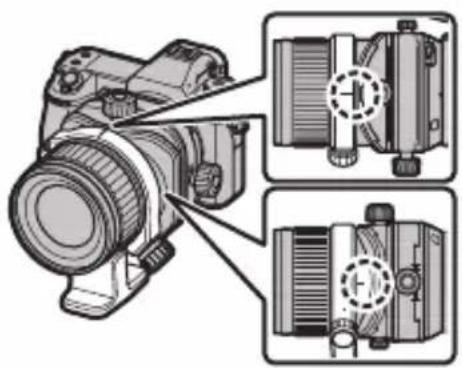
text_image
Technical diagram of a camera with labeled parts and zoomed-in views showing internal components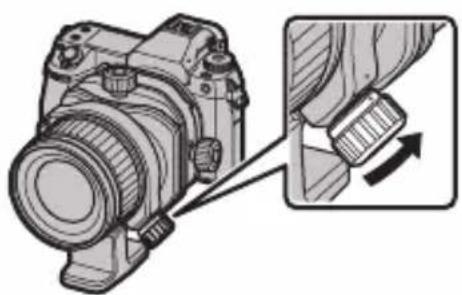
natural_image
Diagram of a camera with an inset showing the mechanical component (no text or symbols present)조리개
카메라 설명서를 참조하십시오.
기울기
natural_image
Technical line drawing of a mechanical device with rotational arrow indicating motion (no text or symbols)절차
text_image
Diagram showing two mechanical components with numbered parts and directional arrows indicating motion or movement.GF30mmF5.6 T/S GF110mmF5.6 T/S Macro
natural_image
Technical illustration of a DSLR camera with a rotary knob (no text or symbols)natural_image
Illustration of a ceiling-mounted device with a circular component and arrow symbol (no text or labels)이동
natural_image
Technical line drawing of a mechanical device with no visible text or symbols절차
natural_image
Close-up of a camera's side panel showing the rotary knob and adjustment knob (no text or symbols visible)natural_image
Technical illustration of a camera lens assembly with rotational arrow (no text or symbols)natural_image
Close-up of a camera mode dial with a rotary knob (no text or symbols visible)회전
natural_image
Line drawing of a DSLR camera with lens and frame (no text or symbols)절차
text_image
Technical diagram of a camera component with numbered parts and directional arrows indicating motion or assembly.natural_image
Line drawing of a DSLR camera with lens and adjustment knob (no text or symbols)절차
text_image
Diagram of a camera lens with numbered parts and directional arrows indicating rotation or movement.natural_image
Line drawing of a DSLR camera with lens and adjustment knobs (no text or symbols)text_image
Technical diagram of a camera lens with numbered directional arrows indicating rotation or movement paths.natural_image
Line drawing of a DSLR camera with lens and frame (no text or symbols)text_image
Technical diagram of a camera component with numbered parts and directional arrows indicating motion or assembly.① .0均已إrezاحة على
natural_image
Technical line drawing of a camera assembly with no visible text or symbolsnatural_image
Close-up of a camera's side panel showing the left button and right-angle indicator (no text or symbols)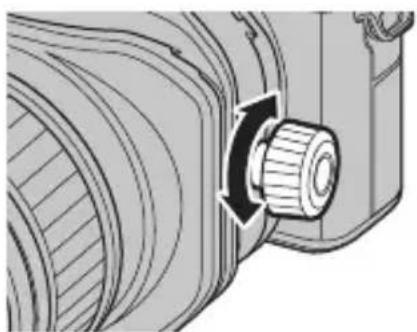
natural_image
Mechanical component diagram showing a rotating knob with directional arrows (no text or symbols)natural_image
Close-up of a door handle with a rotary knob and scroll wheel (no text or symbols visible)natural_image
Technical line drawing of a camera module with rotational arrow indicating rotation (no text or symbols)و sogيرDiscounter Treksiz Boudry.
الإجراء
text_image
Diagram showing a mechanical component with numbered parts and directional arrows indicating motion or movement.
text_image
Diagram showing two labeled components (① and ②) with directional arrows indicating flow or movement between them.GF110mmF5.6 T/S Macro GF30mmF5.6 T/S

natural_image
Technical illustration of a DSLR camera with a rotary knob (no text or symbols)natural_image
Illustration of a kitchen sink with a kitchen handle and a small object, no text or symbols presenttext_image
Diagram illustrating a mechanical component with numbered parts and an inset showing a dial indicator.natural_image
Technical illustration of a mechanical device with a close-up inset showing internal components (no text or symbols)2
text_image
Technical diagram of a mechanical device with labeled components and cross-sectional viewsnatural_image
Mechanical assembly diagram showing a camera component with an inset view of a mechanical component (no text or symbols present)text_image
Diagram of a camera lens with numbered parts and directional arrows indicating rotation or movement.
natural_image
Diagram showing a camera lens being converted into a cylindrical lens (no text or symbols present)
natural_image
Diagram showing a mechanical component being converted into a cylindrical housing, with no text or symbols present.① ② ②
③
④
⑤
⑥
⑦
⑧
⑨
⑩
⑪
⑫
⑬
⑭
⑮
⑯
⑰
⑱
⑲
⑳
㉑
㉒
㉓
㉔
①. ام حلقة المهايئ.
text_image
Technical diagram of a mechanical device with labeled parts and directional arrows indicating rotation or movement.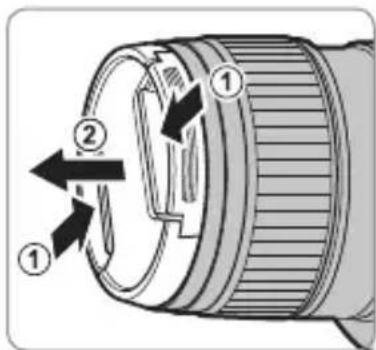
text_image
Diagram of a camera lens with numbered parts and directional arrows indicating rotation or adjustment.
text_image
Labeled diagram of a camera lens with numbered parts and a separate inset showing the main body and casing.
text_image
Technical diagram of a camera lens with numbered parts for identification
text_image
17 ***** 16*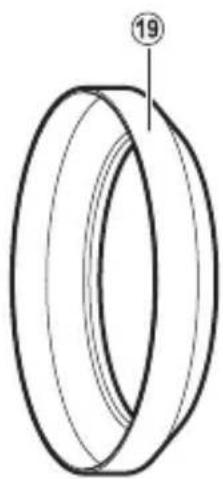
natural_image
Diagram of a toroidal ring with a numbered label (19) pointing to its outer edge, no text or symbols present.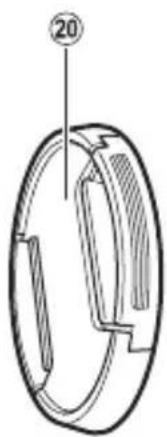
text_image
20
natural_image
Cross-sectional diagram of a ring with numbered label (21), no text or symbols present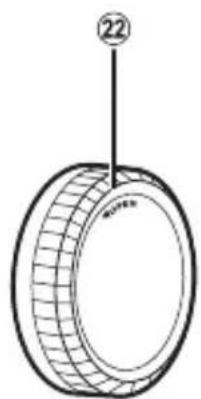
natural_image
Diagram of a tire with a labeled end (22), showing internal structure without any text or symbols.⑭ youth mental health insurance
https://fujifilm-x.com/support/download/firmware/
سيcess Equipment t Working the main home, you want to go to your home. My home is a well-known home, and you want to go to your home.