Smart Finder - Connected object locator FRESH N REBEL - Free user manual and instructions
Find the device manual for free Smart Finder FRESH N REBEL in PDF.
User questions about Smart Finder FRESH N REBEL
0 question about this device. Answer the ones you know or ask your own.
Ask a new question about this device
Download the instructions for your Connected object locator in PDF format for free! Find your manual Smart Finder - FRESH N REBEL and take your electronic device back in hand. On this page are published all the documents necessary for the use of your device. Smart Finder by FRESH N REBEL.
USER MANUAL Smart Finder FRESH N REBEL
natural_image
Abstract black claw-like symbol on white background (no text or symbols)FRESH*REBEL
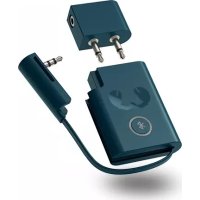
SMART FINDER CARD MANUAL
6ACTAG6 v1 001

Works with Android
Find My Device
EN – ATTENTION: Fully charge the battery before product installation and use.
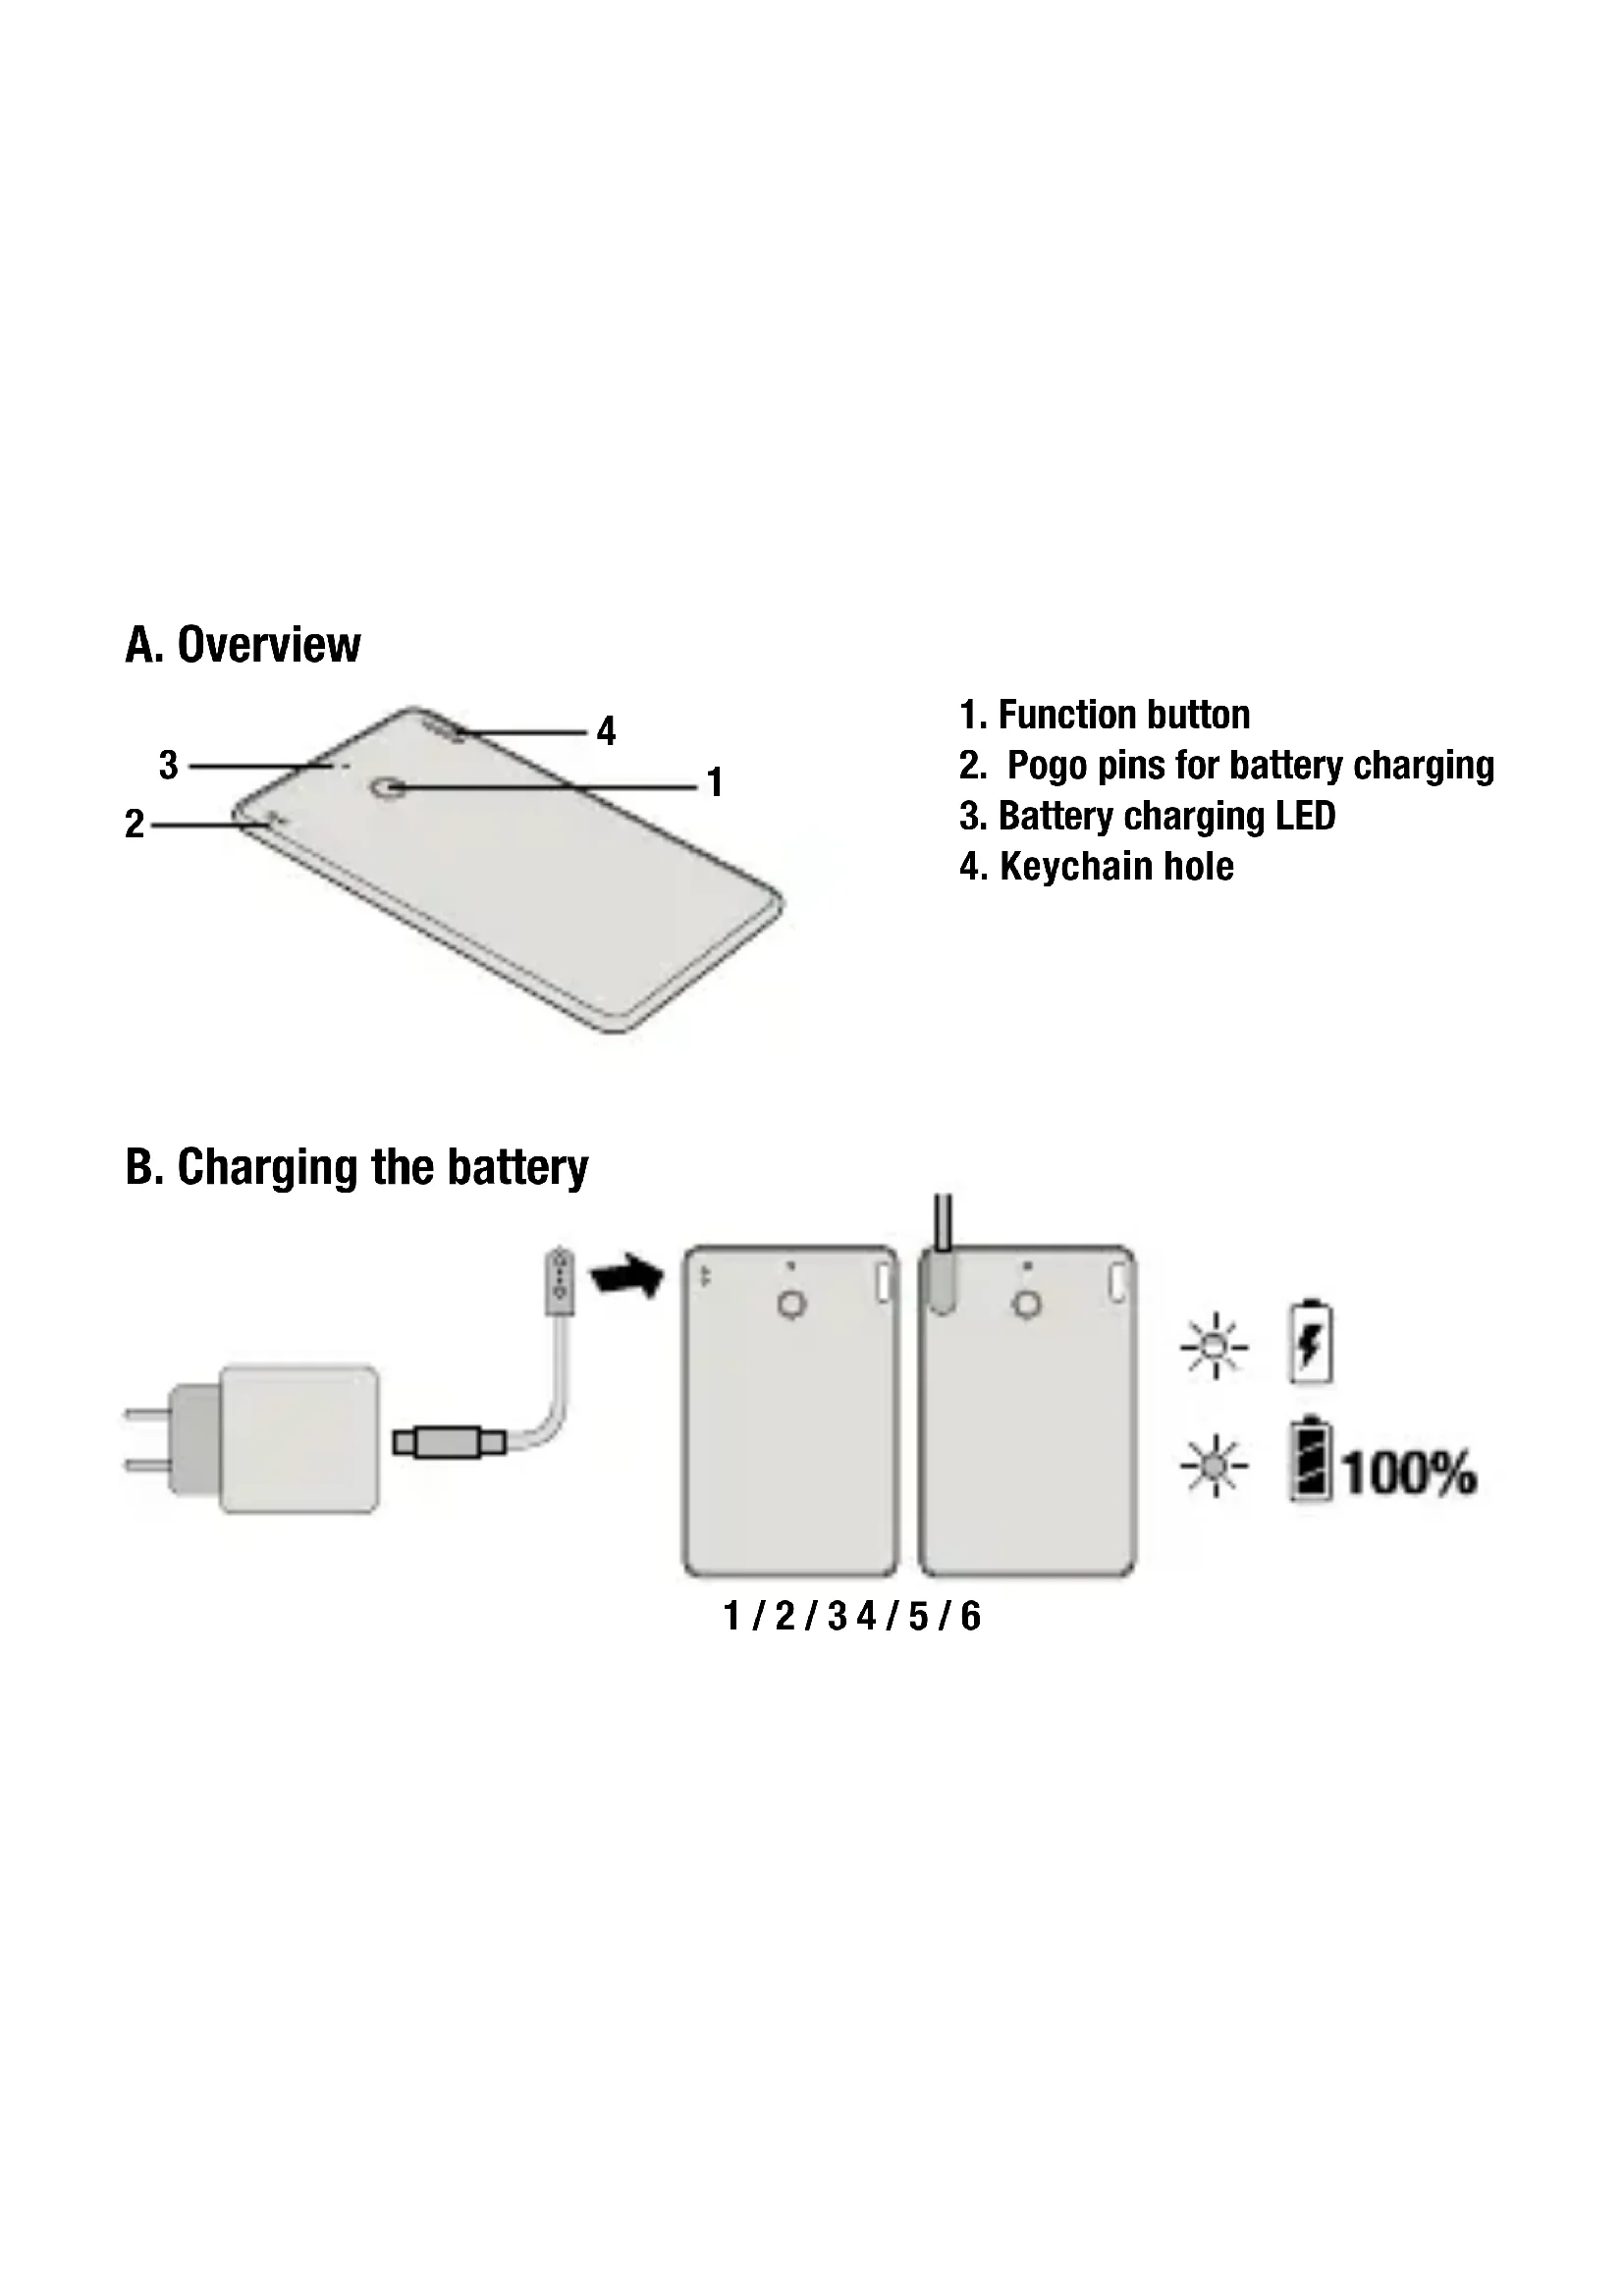
- Function button
- Pogo pins for battery charging
- Battery charging LED
- Keychain hole
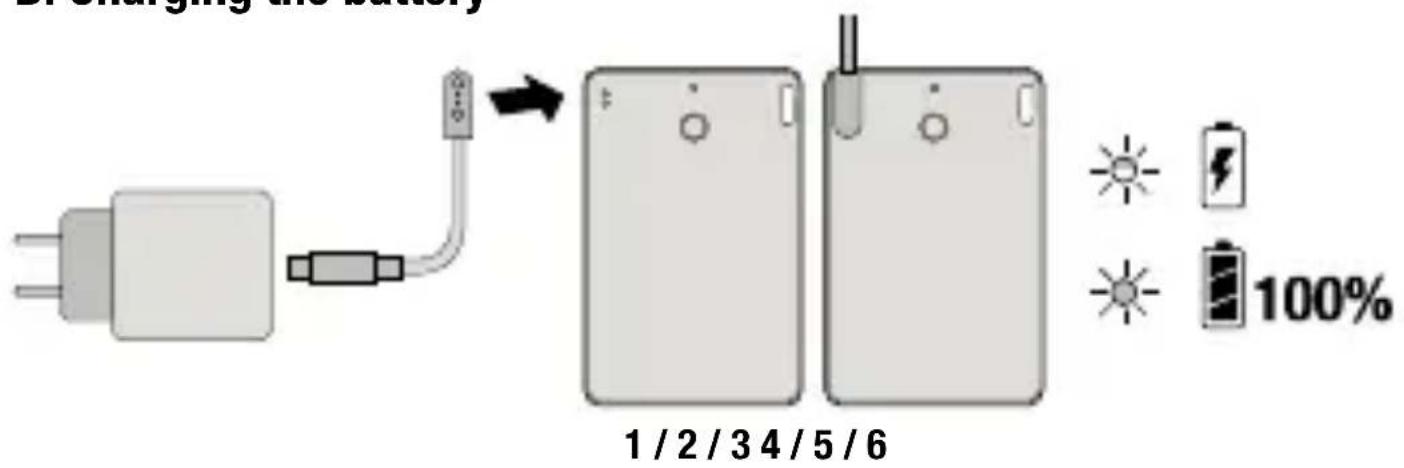
B. Charging the battery
text_image
1 / 2 / 3 4 / 5 / 6 100%EN - Specifications
Fresh 'n Rebel Smart Finder Card 6ACTAG6 v1 001
Google's Find My Device enabled Smart Finder, Bluetooth 5.2, built-in speaker for beeping sounds, rechargeable Li-ion battery 150mAh , battery life up to 6 months per charge, USB-C to pogo pins charging 5.0V / 0.5A
System requirements and compatibility: Android phone or tablet with OS 9 or above and Google Play Services installed, Google Account, Google's Find My Device app, Bluetooth, internet connection. To use Google's Find My Device app to locate this item, the latest version of Android OS is recommended. Google's Find My Device network requires location services and Bluetooth to be turned on. Requires cell service or internet connection. Works on Android 9+ on select devices and in certain countries for age-eligible users.
Contents: Smart Finder Card, USB-C to pogo pins charging cable 0.5 m, Quick start guide
Overview (Image A)
- Function button / 2. Pogo pins for battery charging /
- Battery charging LED / 4. Keychain hole
Getting Started
IMPORTANT: Make sure your device's Bluetooth is turned on and you are connected to internet!
- Go to Google Play and search for Google's Find My Device app. Custom language versions are available for many different countries.
- Install the app or tap to "Update".
- Tap "Open" or tap on the Find My Device app icon on your device.
- Log in to Google's Find My Device page with your Google Account.
- Review and accept the terms and tap "Continue".
- Make sure the Smart Finder Card battery is fully charged.
- Press the function button once to power on your Smart Finder. You will hear a chime.
- Place the Smart Finder next to your device.
- Wait for the FnR 6ACTAG6 pop-up to appear on your device and follow the instructions on the screen to complete the setup.
- After the setup, you can locate your Smart Finder in Google's Find My Device app.
If the pop-up in step 9 does not appear, please try the following:
Make sure you are connected to the internet
Turn Bluetooth ON: "Settings" > "Connections" > "Bluetooth" ON
Turn Location ON: "Settings" > "Location" > "Location" ON
Turn Scan for nearby devices ON: "Settings" > "Google" >
"Devices" > "Scan for nearby devices" ON
If the Smart Finder is not added to Google's Find My Device app within 10 minutes after powering it on, it will automatically power off again. Repeat step 7 to 10 if that happens.
Change name and pictogram
- Open Google's Find My Device app and tap on your Smart Finder.
- Tap on the gear icon to access the settings.
- Tap on the pencil icon to change the name of the Smart Finder.
- Tap on the triangle to change the category pictogram. The selected pictogram will be the one displayed on the map.
Locate your Smart Finder when it is nearby
- Open Google's Find My Device app and tap on your Smart Finder.
- Tap "Play Sound" to make your Smart Finder beep.
- Tap "Stop Sound" to stop the beeps.
- If the Smart Finder is within 10 meters near you, you can get a shape that fills in as you get closer to your Smart Finder: Tap "Find nearby". This may take a few seconds to update.
Locate your Smart Finder on a map
- Open Google's Find My Device app and tap on your Smart Finder.
- You can see your Smart Finder's location on a map. Zoom in or out to get more details.
- If your Smart Finder is not near you, tap "Get directions" to find your way to it.
- The radius displayed around the location pin is an indication of the location accuracy.
- If your Smart Finder's current location can not be found, you may still find its last known location, if available.
Mark your Smart Finder as lost
- Open Google's Find My Device app and tap on your Smart Finder.
- If your Smart Finder is not near you, tap "Mark as lost".
- Fill in your contact details. You may enter a message that will be shared with the person that finds your item.
- Tap "Mark as lost"
Privacy and Security
Your location data is end-to-end encrypted, meaning that Google can never view or access it. Only you can see where your items have been and currently are. With the Find My Device app, Google does not use nor share your data. The information you share about yourself and your devices remains confidential. Find My Device is built to deter unwanted tracking. If your Android phone notices an unfamiliar device moving with you, you will receive a notification. View the unknown device on a map, ring it to find it by sound, or get further help.
Reset your Smart Finder
Remove the Smart Finder from Google's Find My Device app:
- Open Google's Find My Device app and tap on your Smart Finder.
- Tap on the gear icon to access the settings.
- Tap on “Remove device” and follow the instructions on the screen.
Reset your Smart Finder: After removing the Smart Finder from Google's Find My Device app, press the Smart Finder's function button four times rapidly and then hold it a fifth time until you hear a ringing chime. The Smart Finder is now reset and ready to be paired
to a new Google Account. To turn your Smart Finder off, hold the function button for at least three seconds. You will hear two beeps to indicate that your Smart Finder is powered off.
Charging the battery (Images B)
- Connect the pogo pins of the cable to the pogo pins of the Smart Finder Card. Magnets ensure that the connectors are in the correct position.
- Plug the USB-C connector of the cable into a USB-C wall charger.
- Plug the wall charger into a power socket.
- Once the charging process starts, the LED will blink.
- When the battery is fully charged, the LED will be on constantly.
- Disconnect the wall charger and cable. The LED will turn off.
WARNING Always follow all instructions and warnings closely. Do not disassemble or modify. Do not open or repair the device yourself. Do not expose to liquids. Do not use or store in damp, humid or wet environments. Do not expose to excessive heat or open fire. Avoid abrupt changes in temperature. Do not burn or incinerate. CAUTION: This product contains a rechargeable 3.7 V 150 mAh Lithium battery. Do not open the device and do not try to retrieve or replace the battery. There is a danger of explosion when the battery is not handled properly. Do not dispose of the device together with other waste. To avoid possible environmental pollution, the device must be disposed of at a recycling centre.
Manufacturer: Sitecom Europe B.V., Linatebaan 101, 3045 AH Rotterdam, The Netherlands
www.freshnrebel.com
Conformity information
Hereby, Sitecom Europe B.V. declares that this radio equipment product is in compliance with Directive 2014/53 EU (RED), 2011/65 EU (RoHS) and all other applicable EU Regulations. The full text of the EU declaration of conformity is available at the following internet address:
https://www.freshnrebel.com/cedoc/6ACTAG6
Operating frequency band: 2402 to 2480 MHz
Maximum radio-frequency power transmitted: -0.17 dBm / 0.96 mW
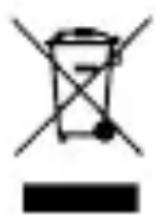
Disposal of the device
The crossed out wheelie bin symbol means that this product shall not be disposed of with normal household waste. Electronic and Electrical Equipment not included in the selective sorting process are potentially dangerous for the environment and human health due to the presence of hazardous substances. Please dispose of responsibly at an approved waste or recycling facility.
natural_image
Symbolic icon of a person moving with arrows, enclosed in a circle (no text or symbols)FR
This product has been certified by Sitecom Europe B.V. to meet Google's compatibility standards. Google is not responsible for the operation of this product or its compliance with any applicable safety or other requirements. Google, Android, and Google Play are trademarks of Google LLC.
© 2025 Sitecom Europe B.V. The Fresh 'n Rebel word mark and logo are registered trademarks owned by Sitecom Europe B.V. The Bluetooth® word mark and logos are registered trademarks owned by Bluetooth SIG, Inc. and any use of such marks by Sitecom Europe B.V. is under license.
EN The power delivered by the charger must be between min 1 Watt required by the radio equipment, and max 2.5 Watt in order to achieve the maximum charging speed.
text_image
Al Azul Al Amarillo MIX Paper FSC FSC® C154884EN The packaging materials have been selected for their environmental friendliness and are recyclable. Dispose of packaging materials which are no longer needed in accordance with applicable local regulations. / DE Die Verpackungsmaterialien wurden aufgrund ihrer Umweltfreundlichkeit ausgewählt und sind recycelbar. Bitte entsorgen Sie nicht mehr benötigte Verpackungsmaterialien gemäss den nationalen und lokalen Gesetzen und Vorschriften. / BG Опаковъчните материали са избрани заради тяхната екологичност и могат да се рециклират. Изхвърлете опаковъчните материали, когато вече не са необходими, в съответствие с приложимите местни разпоредби. / CZ Obalové materiály byly vybrány pro jejich šetrnost k životnímu prostředí a jsou recyklovatelné. Nepotrebné obalové materiály zlikvidujte v souladu s platnými místními předpisy. / ES Los materiales de embalaje han sido seleccionados por su respeto al medio ambiente y son reciclables. Deseche los materiales de embalaje que ya no necesite de acuerdo con las regulaciones locales aplicables. / FR Les matériaux d'emballage ont été sélectionnés pour leur respect de l'environnement et sont recyclables. Éliminer les matériaux d'emballage qui ne sont plus nécessaires conformément aux réglementations locales applicables. / GR Ta ulića συσκευασίας έχουν επιλεγεί για την φιλικότητα προς το περιβάλλον και είναι ανακυκλώσιμα. Απορρίψτε τα ulića συσκευασίας που δεν χρειάζονται πλέον σύμφωνα με τους ισχύοντες τοπικούς κανονισμούς. / HR Ambalažni materijali odabrani su zbog njihove ekološke prihvatljivosti i mogu se reciklirati. Odloži ambalažni materijal koji više nije potreban u skladu s važećim lokalnim propisima. / IT I nostri materiali di imballaggio sono riciclabili e selezionati in virtù della loro compatibilità ambientale. Smaltire i materiali di imballaggio in conformità con le normative locali vigenti. / NL De verpakkingsmaterialen zijn geselecteerd op basis van hun milieuvriendelijkheid en zijn recyclebaar. Verpakkingsmateriaal dat niet meer nodig is, dient volgens toepasselijke plaatselijke voorschriften afgevoerd te worden. / PL Materiały opakowaniowe zostały wybrane ze względu na ich przyjazność dla środowiska i nadają się do recyklingu. Niepotrzebne już materiały opakowaniowe należy usuwać zgodnie z obowiązującymi lokalnymi przepisami. / PT Os nossos materiais de embalagem são recicláveis e seleccionados em virtude da sua compatibilidade ambiental. Descarte os materiais de embalagem que já não sejam necessários de acordo com os regulamentos locais aplicáveis. / RO Materialele de ambalare au fost selectate pentru respectarea mediului și sunt reciclabile. Eliminați materialele de ambalaj care nu mai sunt necesare în conformitate cu reglementările locale aplicabile. / SI Embalažni materiali so bili izbrani zaradi njihove prijaznosti do okolja in jih je mogoče reciklirati. Embalažni material, ki ga ne potrebujete več, zavrzite v skladu z veljavnimi lokalnimi predpisi. / SK Obalové materiály boli vybrané pre ich šetrnosť k životnému prostrediu a sú recyklovatelné. Nepotrebné obalové materiály zlikvidujte v súlade s platnými miestnymi predpismi.

text_image
FRESH" REBELKeep in touch:

freshnrebel.com helpme@freshnrebel.com
freshnrebel
Made in China