Passau - Ice machine Klarstein - Free user manual and instructions
Find the device manual for free Passau Klarstein in PDF.

| Product Type | Beer Cooler / Beer Fountain |
| Brand | Klarstein |
| Model | Passau |
| Article Number | 10041520, 10041521 |
| Power Supply | 220-240 V ~ 50 Hz |
| Rated Power | 65 W |
| Keg Capacity | 6 liters (sealed universal kegs) |
| Adjustable Temperature Range | 3 to 12 °C (37-54 °F) |
| Dimensions (W × D × H) | 495 mm × 290 mm × 475 mm |
| Net Weight | 5.3 ± 0.3 kg |
| Main Functions | Cooling, preservation, air pump, LED display, digital control |
| Cooling Time | 16 to 21 hours to reach 3-4 °C (at 22-24 °C ambient) |
| Storage Life After Opening | 30 days |
| Maximum Operating Pressure | 1.5 bar |
| Care and Cleaning | Clean with a dry cloth; beer line and tap with hot water; do not use abrasive cleaners or dishwasher |
| Safety | Do not immerse; child supervision required; unplug before cleaning; do not use with damaged cord |
| Repairability | Replacement of cord by professional; cleaning/replacement of hoses possible |
| Included Accessories | Draft tap, drip tray, beer line, quick connectors |
| Intended Use | Domestic and similar (staff kitchens, farms, hotels, etc.) |
Frequently Asked Questions - Passau Klarstein
User questions about Passau Klarstein
0 question about this device. Answer the ones you know or ask your own.
Ask a new question about this device
Download the instructions for your Ice machine in PDF format for free! Find your manual Passau - Klarstein and take your electronic device back in hand. On this page are published all the documents necessary for the use of your device. Passau by Klarstein.
USER MANUAL Passau Klarstein
INHALTSVERZEICHNIS
natural_image
Technical line drawing of a mechanical device with no visible text or symbolsMember of Berlin Brands Group
Handwerkerstr. 11
15366 Dahlwitz-Hoppegarten
Deutschland
natural_image
Symbol of a trash bin crossed with a diagonal line, no text or numbers presentBerlin Brands Group UK Ltd
PO Box 1145
Oxford, OX1 9UW
United Kingdom
Dear customer,
Congratulations on your purchase. Please read the following instructions carefully and follow them to prevent potential damage. We accept no liability for damage caused by disregarding the instructions and improper use. Please scan the QR code to access the latest operating instructions and further information about the product.

CONTENTS
Safety Instructions 20
Barrel selection 21
Device Overview 22
Assembly 22
Replacing the beer keg 28
Cleaning the beer line and the valve device 29
Troubleshooting 31
Disposal Considerations 32
Manufacturer & Importer (UK) 32
TECHNICAL DATA
| Article number 10041520 | 10041521 |
| Power supply 220-240 V | ~ 50 Hz |
| Available capacity 6-litre | beer keg |
| Nominal power 65 W | |
| Cooling capacity | The minimum barrel temperature is 3 - 12 °C (at an ambient temperature of 22 - 24 °C) |
| Noise level ≤ dB (A) (with | ambient noise ≤ 25 dB (A)) |
| Dimensions 495 mm (W) | * 290 mm (D) * 475 mm (H) |
| Net weight 5.3 ± 0.3 kg |
SAFETY INSTRUCTIONS
Note: This is a household beer cooler with exquisite, high-quality tap and housing with beautiful and unique design. An air pump is used to squeeze out the beer and has the functions of cooling and preservation. The beer cooler brings the beer to the best temperature for cold storage (3 °C to 4 °C) within 16 - 21 hours. However, it is recommended to first chill the beer keg in the refrigerator for at least 12 hours before placing it in the beer cooler.
- Read the entire instruction manual carefully before use.
- Remove all packaging material and carefully check the beer cooler for proper condition. Make sure that there is no damage to the cooler, the mains cable or the plug.
- Make sure the voltage matches the voltage listed on the rating plate and that the outlet is properly grounded.
- If the power cord is damaged, it must be replaced by the manufacturer, its service agent or a similarly qualified person to avoid a hazard.
- Do not plug in or unplug the mains plug when your hands are wet.
- Place the beer cooler on a dry and horizontal surface.
- To ensure good ventilation of the beer cooler, make sure that the beer cooler has at least 10 cm clearance on each side.
- Never expose the beer cooler to direct sunlight.
- Never cover the beer cooler when it is in operation.
- The beer cooler must be placed in a location that is protected from the weather such as wind, rain, splashing or dripping water.
- Make sure that the power supply to the unit is disconnected before starting any cleaning or maintenance work. Failure to do so may result in electrocution or death.
- Do not immerse the beer cooler or the plug in water or other liquids.
- Do not use coarse cloths or abrasive cleaners to clean the beer cooler.
- This unit is not intended for use by persons (including children) with reduced physical, sensory or mental capabilities, or lack of experience and knowledge, unless these persons are supervised by a person responsible for their safety or have been given one Instructions for using the device safely.
- Children should be supervised to ensure that they do not play with the device.
• After use or before cleaning the device, unplug the power cord.
- Keep these operating instructions.
- Warning: Do not store explosive substances such as aerosol cans with flammable propellant in this device.
- This device is intended for use in households and similar areas, such as
- staff kitchens in shops, offices and other work environments;
- farms and by customers in hotels, motels and other residential areas;
• bed-and-breakfast environments;
• catering and similar non-retail applications.
BARREL SELECTION
- Only use sealed 6 litre universal drums.
- Pay close attention to the safety and storage instructions on the barrel.
- Before buying, make sure that the keg is not damaged and does not contain expired beer.
- Protect the top of the barrel from damage. Otherwise, access to the suction pipe could become difficult.
- Store the barrel in a rather cool but not too cold place (e.g. refrigerator) for 12 hours until the next use.
- The shelf life of the opened beer keg is 30 days. Make sure that the device is in operation when you place the beer keg in the machine. If you want to take the device out of operation for a longer period of time, place the beer keg in the refrigerator to cool it.
- Do not put the beer keg in the freezer. Freezing would destroy the beer keg.
- Never shake the barrel before use.
- To avoid a possible explosion, do not expose the beer keg to direct sunlight or temperatures above 30 °C.
- Store the beer keg at a low temperature and in a stable environment. Do not open the beer keg before use.
- When the keg is under pressure, it is forbidden to damage the upper connecting part of the beer keg. It is forbidden to use a damaged barrel as this may cause damage to the device. The wine valve that matches the machine must be used. Other, non-approved tap valves must not be used.
- The maximum operating pressure of the barrel is 1.5 bar.
- When storing barrels, they should not be stacked.
DEVICE OVERVIEW
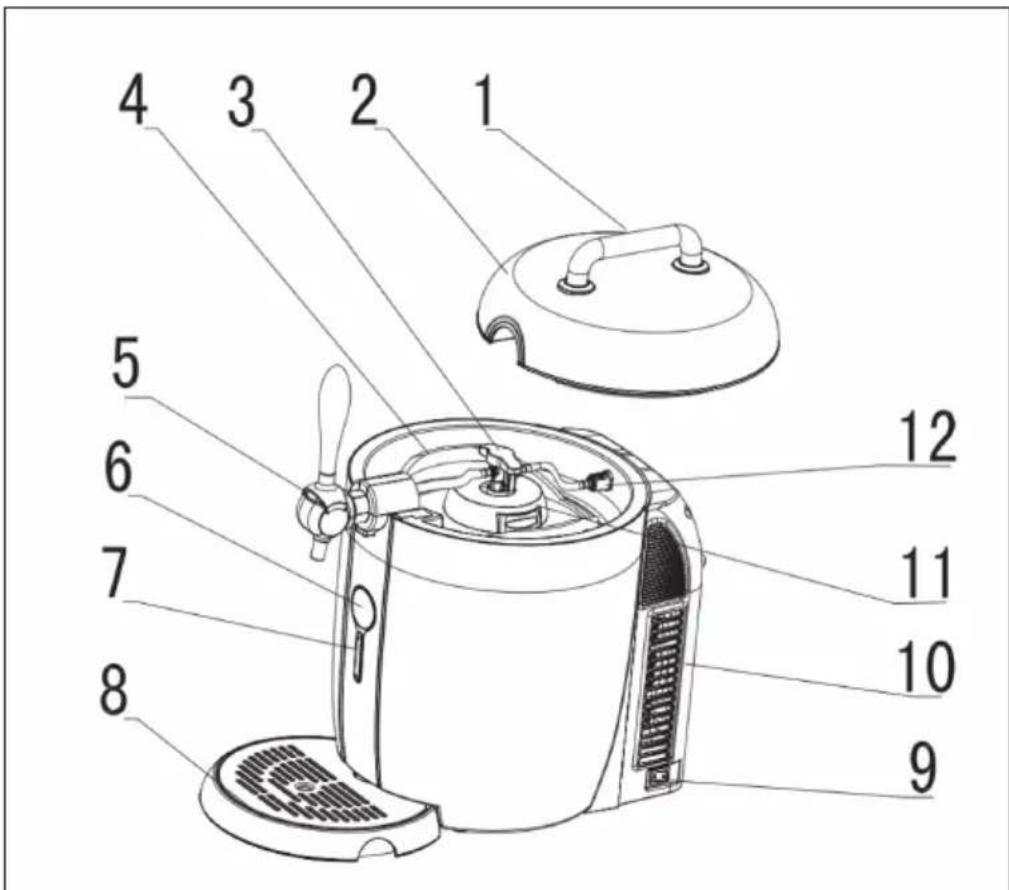
| 1 Top cover handle 7 Digital control button | ||
| 2 Top cover 8 Drip tray | ||
| 3 Beer outlet connection 9 Power switch (on/off) | ||
| 4 Keg 10 Back cover | ||
| 5 Tap 11 Connection valve | ||
| 6 LED screen 12 Air inlet connection |
ASSEMBLY
-
Remove the beer cooler from the packaging. Place the beer cooler on a stable and horizontal surface. Make sure that the beer cooler is at least 10 cm away from other devices or the wall on each side so that the device is well ventilated and can perform better.
-
Install the tap handle and connect the tap. Make sure that both ends fit together perfectly (see figure 1).
- Insert the drip tray into the recess provided (see figure 2).
| 1 | 2 |
- Check if the infrared detection LED (as shown in figure 3) on the top left and right of the inside of the unit's cooling drum is dirty or damaged. If the beer keg is not inserted in the cooling keg or is removed, the device cannot operate normally and the code "OP" is displayed on the control panel.

- Remove the protective cover and the beer hose of the beer keg.
- Align the beer outlet valve device vertically with the connection part of the beer keg in the middle of the top of the beer keg and press it into the beer keg immediately. When you hear a click, it means that the tap valve device has been correctly attached to the beer keg (see figure 4). Place the beer keg in the cooling keg of the appliance after installing the valve device.
| 4 | |
| Note: After installing the valve device, hold the suction pipe in the direction of the middle groove of the two handles of the barrel. Keep the bottom of the cooling keg and the beer keg free of dirt and other substances, otherwise the cooling effect may be impaired. | |
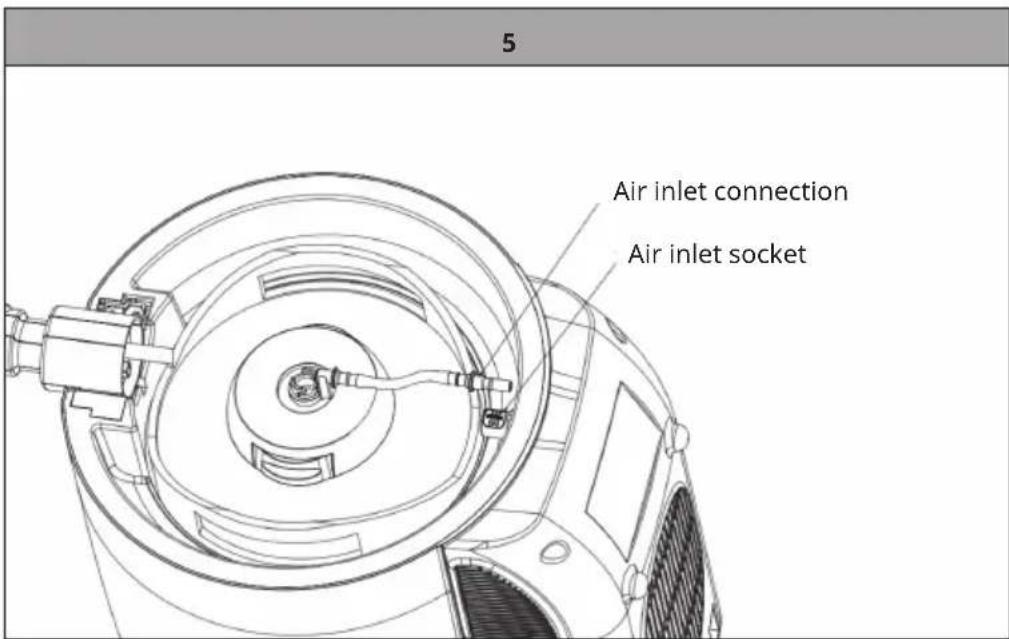
- Plug the quick release connector at the end of the beer line on the beer valve device into the air inlet connector. As soon as you hear a slight click, this indicates that the connection has been successfully established (see figure 5).
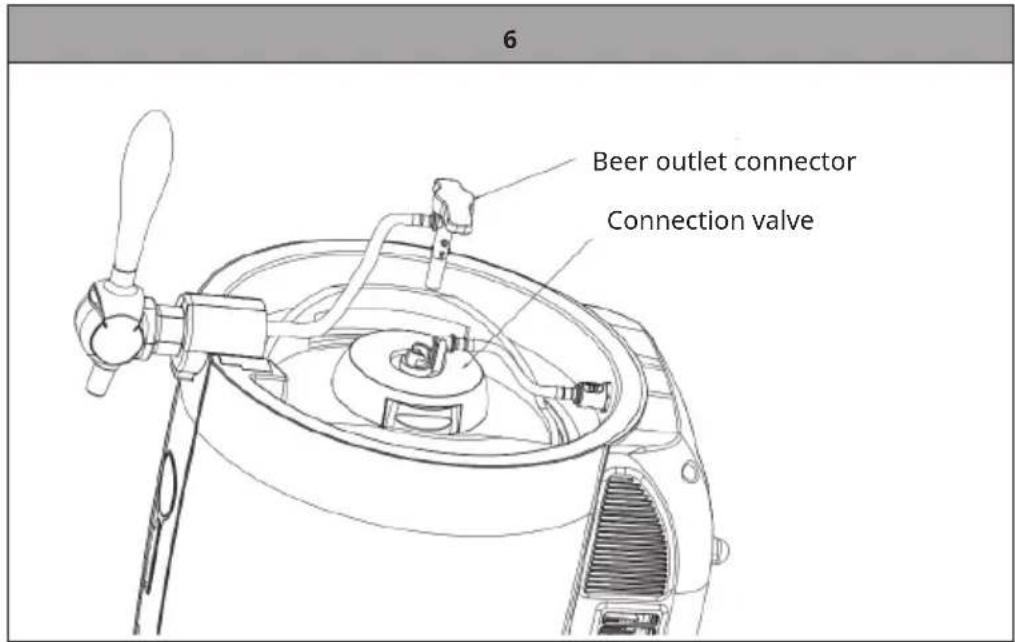
- Insert the beer outlet connector at the end of the beer line of the tap into the centre of the metal connection opening of the beer valve device and turn it clockwise to fix it (see figure 6).
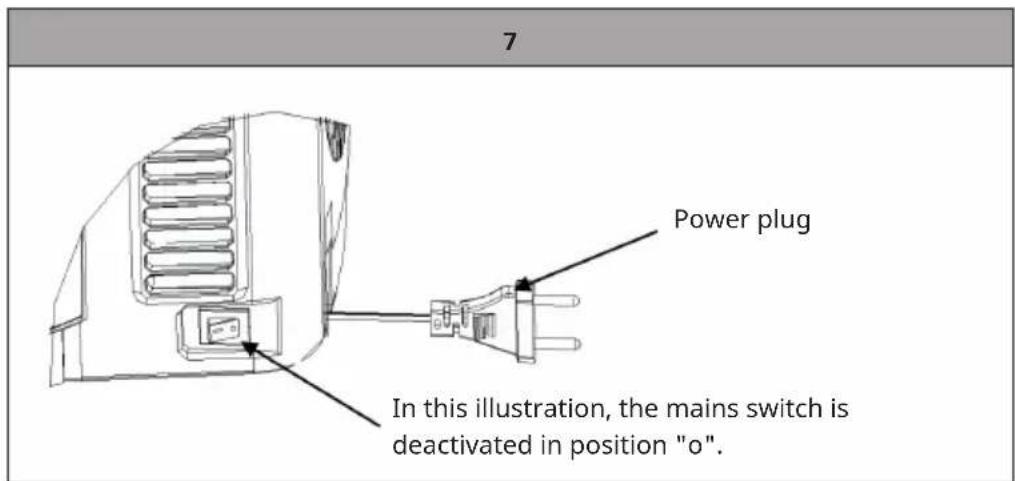
- Cover the top cover (see the inscription on the top cover for more information). Set the power switch to the "-" position. The unit will then start operating (set the power switch to the "o" position to cut off the power supply to the unit) (see figure 7). CAUTION: Make sure your hands are dry before pressing the power switch.
-
It takes 19-21 hours to cool the beer to 3-4 °C at 22-24 °C ambient temperature. At this ambient temperature, the temperature can be maintained. However, it is recommended to chill the beer keg in the refrigerator for at least 12 hours before placing it in the beer cooler, especially if the ambient temperature is higher than 25°C.
-
Function of the control panel (as shown in figure 8).
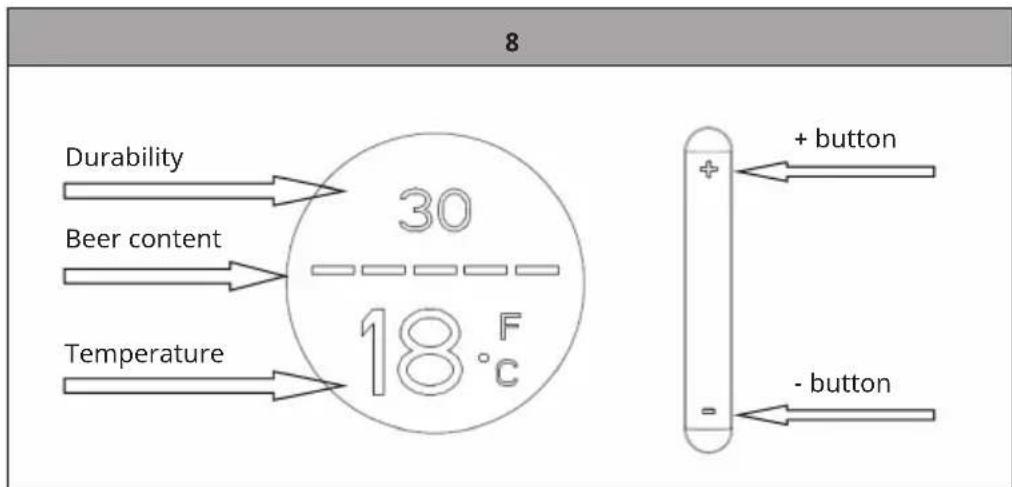
- Storage days: When you place a new keg of beer in the device, the device starts recording the number of days the beer is stored in the device. A daily countdown from 30 - 0 begins. When the number reaches 0, it means that the barrel must be replaced. Be sure to note the days of beer storage. If you want to reinsert an opened keg of beer, you can increase the number of days by pressing + for 3 seconds or decrease the number of days by pressing - for 3 seconds.
- Make sure the device is turned on during storage. (If you want to switch off the device during storage, remove the beer keg beforehand and place it in the refrigerator to cool).
- Temperature adjustment: The temperature of the refrigerator corresponds to the previously set temperature. The cooling temperature can be adjusted by pressing the + or - button on the control panel. Each time you press the + button, the temperature increases by one degree. Each time you press the - button, the temperature decreases by one degree. The screen displays the current temperature of the beer in the keg. Press any button to display the set temperature and return to the current temperature after 3 seconds. If you press the + and - buttons at the same time, you can switch between Fahrenheit and Celsius. The cooling temperature of the beer cooler is adjustable between 3 -12 °C (37-54 °F).
-
The beer cooler has a switch-off memory function. Press any button to check the set temperature before switching off.
-
When the tap handle is closed vertically (as shown in the "closed" position in figure 9), pull the handle forward 45 degrees to let the beer out of the tap (as shown in the "open" position in figure 9).
| 9 | |
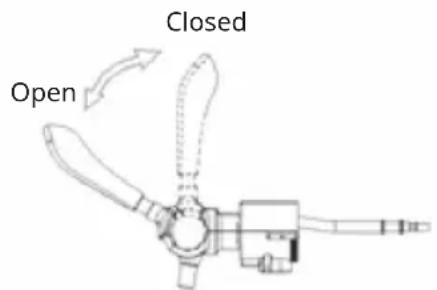 | Caution: Before drinking the beer, rinse the glass with cold water. If the temperature of the glass is very high, many bubbles will form. If the temperature of the beer is too high, many air bubbles will form. |
- When tapping beer, tip the glass towards the outlet of the tap and open the tap handle completely. If the handle is not fully opened, many bubbles will appear. It is best to first tap half a glass of beer and then pause for a while before tapping again. Note: The beer outlet must not be immersed in the glass filled with beer, otherwise strong bubbles will form. Turn off the tap when you have finished the process.
- It is normal to have more bubbles when pouring the first 3 beers.
- It is normal for a short stream to come out of the tap's mouth when the beer in the keg has been used up. Release the handle of the tap and turn the tap off.
REPLACING THE BEER KEG
- Open the top cover of the beer cooler.
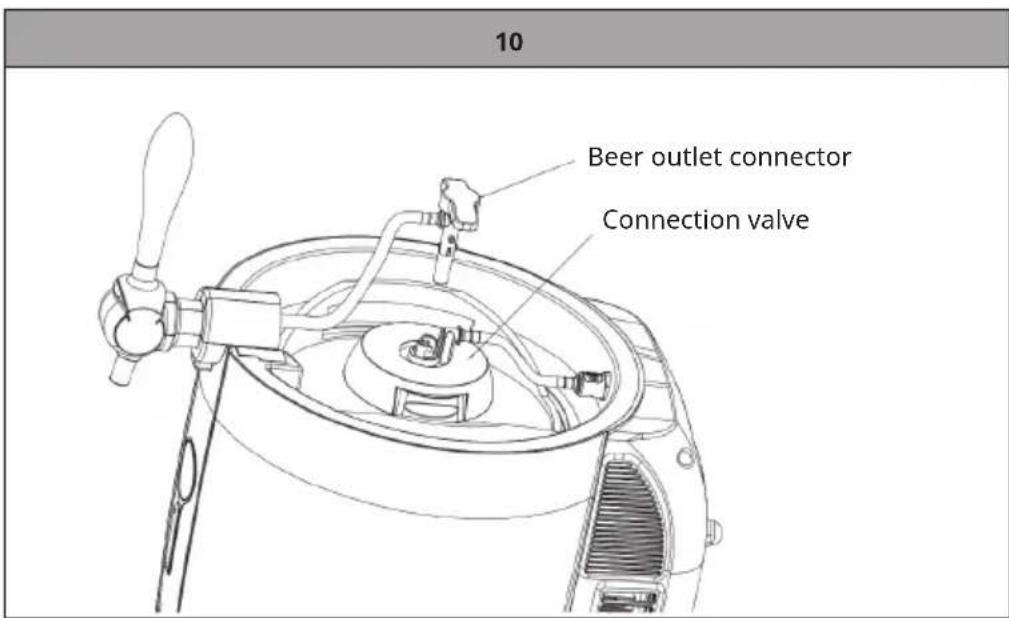
- Push down the quick connector at the end of the beer line on the tap, at the same time turn the connector anticlockwise from the engagement position of the tap valve and then pull out the connector (as shown in figure 10).
- Press and hold the white button of the air inlet socket (as shown in figure 12).
| 11 12 | |
| Air inlet connection Air inlet socket |
-
Remove the empty beer keg with beer valve from the appliance.
-
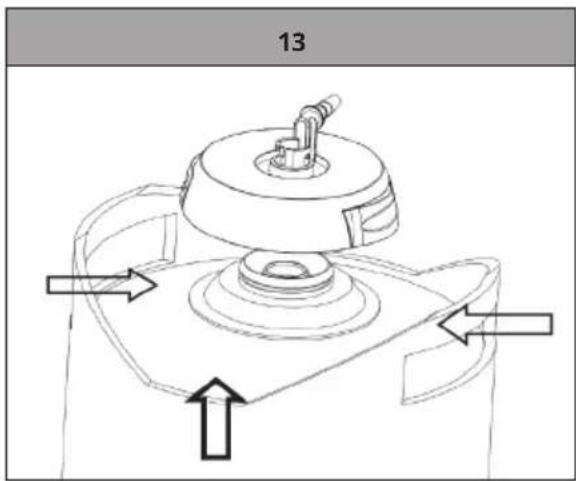
Press the left and right buttons on the beer valve device to pull the beer valve device out of the empty beer keg (as shown in figure 13).
- Take a new beer keg and repeat steps 5 - 9 of the section "Installation and Use".
CLEANING THE BEER LINE AND THE VALVE DEVICE
When you use the device for the first time or for a long time (it is recommended to clean it once a week), clean the entire appliance with a dry cloth. Clean the beer line from the tap and the valve device from the keg with warm water. The beer hose assembly can be removed as follows:
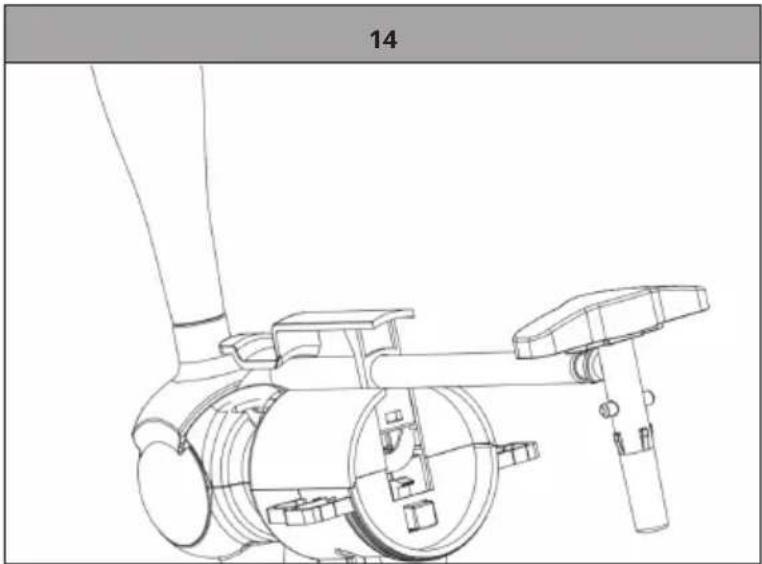
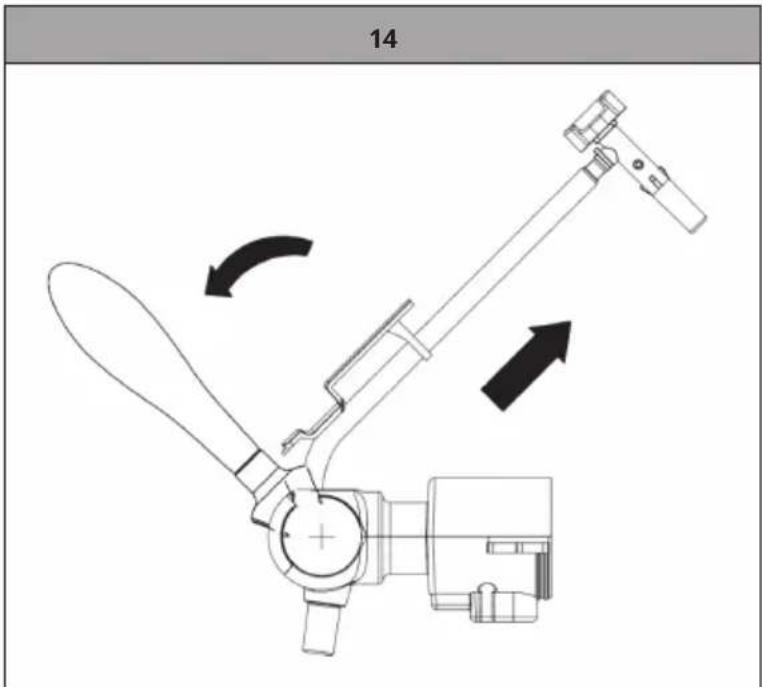
- Press and hold the button on the back of the tap and the beer line assembly and the removable top cover of the tap will automatically pop out together (as shown in figure 14).
natural_image
Technical line drawing of a mechanical device with no visible text or symbols- Pull the handle forward 45 degrees to open the tap and pull out the beer hose (see figure 15). The beer hose assembly can be installed in reverse order.
Note: Do not put the tap or other parts in the dishwasher for cleaning. Do not use cleaning agents, only pure water.
TROUBLESHOOTING
| Problem Possible cause Solution | ||
| The tap does not work / cannot pour beer. | The beer hose is poorly connected. | Connect the hose correctly. |
| No keg or no beer in the keg. | Replace the barrel with a new one. | |
| The fast air inlet connection is not installed correctly. | Connect the quick connector for the air inlet. | |
| Too many bubbles when pouring. | Beer is being poured incorrectly. | Quickly turn the tap on full. Ensure the correct distance between the beer glass and the tap when pouring beer. Generally, the height is between 2 and 2.5 cm. The normal bubbles should be thick and cream-coloured. |
| The beer temperature is high (better at 3-5□). | Cool the beer to 3-5□. | |
| The barrel was shaken before use. | Set the beer keg aside for a while until there are no more bubbles in it. | |
| Almost no beer left in the keg. | Replace the keg with a new one. | |
| The beer flows out too slowly. | Foreign body in the outlet hose. | Remove the beer hose for cleaning or replace the beer hose. |
| The connection hose or the outlet hose is leaking. | Check whether the hose is leaking or not, if so, replace the hose. | |
DISPOSAL CONSIDERATIONS
natural_image
Symbol of a trash bin crossed with a diagonal line, no text or numbers presentIf there is a legal regulation in your country regarding the disposal of electrical and electronic equipment, this symbol on the product or on the packaging indicates that this product must not be disposed of with household waste. Instead, it must be taken to a collection point for the recycling of electrical and electronic equipment. By disposing of this product in accordance with the regulations, you protect the environment and the health of those around you from negative consequences. For information on recycling and disposal of this product, contact your local government or household waste disposal service.
MANUFACTURER & IMPORTER (UK)
Manufacturer:
Chal-Tec GmbH, Wallstraße 16, 10179 Berlin, Germany.
Importer for Great Britain:
Berlin Brands Group UK Ltd
PO Box 1145
Oxford, OX1 9UW
United Kingdom
Estimado cliente:
ÍNDICE
natural_image
Technical line drawing of a mechanical device with no visible text or symbolsnatural_image
Symbol of a trash bin crossed with a diagonal line, no text or numbers presentBerlin Brands Group UK Ltd
PO Box 1145
Oxford, OX1 9UW
Reino Unido
Cher client, chère cliente,
SOMMAIRE
natural_image
Technical line drawing of a mechanical device with no visible text or symbolsnatural_image
Symbol of a trash bin crossed with a diagonal line, no text or numbers presentBerlin Brands Group UK Ltd
PO Box 1145
Oxford, OX1 9UW
United Kingdom
Gentile cliente,
INDICE
natural_image
Technical line drawing of a mechanical device with no visible text or symbolsnatural_image
Symbol of a trash bin crossed with a diagonal line, no text or numbers presentPRODUTTORE E IMPORTATORE (UK)
Produttore:
Chal-Tec GmbH, Wallstraße 16, 10179 Berlino, Germania.
Berlin Brands Group UK Ltd
PO Box 1145
Oxford, OX1 9UW
United Kingdom

area
| Category | Value | |---|---| | 1 | 100 | | 2 | 100 | | 3 | 100 | | 4 | 100 | | 5 | 100 | | 6 | 100 | | 7 | 100 | | 8 | 100 | | 9 | 100 | | 10 | 100 | | 11 | 100 | | 12 | 100 | | 13 | 100 | | 14 | 100 | | 15 | 100 | | 16 | 100 | | 17 | 100 | | 18 | 100 | | 19 | 100 | | 20 | 100 | | 21 | 100 | | 22 | 100 | | 23 | 100 | | 24 | 100 | | 25 | 100 | | 26 | 100 | | 27 | 100 | | 28 | 100 | | 29 | 100 | | 30 | 100 | | 31 | 100 | | 32 | 100 | | 33 | 100 | | 34 | 100 | | 35 | 100 | | 36 | 100 | | 37 | 100 | | 38 | 100 | | 39 | 100 | | 40 | 100 | | 41 | 100 | | 42 | 100 | | 43 | 100 | | 44 | 100 | | 45 | 100 | | 46 | 100 | | 47 | 100 | | 48 | 100 | | 49 | 100 | | 50 | 100 | | 51 | 100 | | 52 | 100 | | 53 | 100 | | 54 | 100 | | 55 | 100 | | 56 | 100 | | 57 | 100 | | 58 | 100 | | 59 | 100 | | 60 | 100 | | 61 | 100 | | 62 | 100 | | 63 | 100 | | 64 | 100 | | 65 | 100 | | 66 | 100 | | 67 | 100 | | 68 | 100 | | 69 | 100 | | 70 | 100 | | 71 | 100 | | 72 | 100 | | 73 | 100 | | 74 | 100 | | 75 | 100 | | 76 | 100 | | 77 | 100 | | 78 | 100 | | 79 | 100 | | 80 | 100 | | 81 | 100 | | 82 | 100 | | 83 | 100 | | 84 | 100 | | 85 | 100 | | 86 | 100 | | 87 | 100 | | 88 | 100 | | 89 | 100 | | 90 | 100 | | 91 | 100 | | 92 | 100 | | 93 | 100 | | 94 | 100 | | 95 | 100 | | 96 | 100 | | 97 | 100 | | 98 | 100 | | 99 | 100 | | Note: The actual values in the 'Value' column are not provided in the code. I have used the label 'The Region' to represent the 'Region'. The values are estimated based on the provided code.