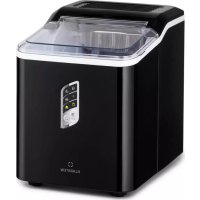
Chios - Ice machine Klarstein - Free user manual and instructions
Find the device manual for free Chios Klarstein in PDF.

| Product type | Ice maker |
| Brand | Klarstein |
| Model | Chios |
| Item numbers | 10041143, 10041144 |
| Power supply | 220-240 V ~ 50 Hz |
| Net weight | 9.5 kg |
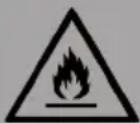
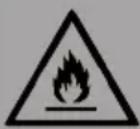
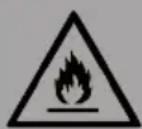
| Refrigerant | R290 (flammable) |
| Refrigerant type | Flammable gas, beware of ignition sources |
| Control panel | Touch panel with digital display and TIMER/CLEAN, ON/OFF, +, - buttons |
| Display | Ambient temperature, cycle time, making and dispensing icons |
| Main functions | Ice making, automatic dispensing, programmable timer, self-cleaning |
| Duration of a production cycle | 13 to 25 minutes (variable depending on ambient temperature) |
| Ice cube size adjustment | By +/- buttons, adjustment up to ±6 minutes per cycle |
| Water tank capacity | Approx. 2 L (estimation, FULL mark on tank) |
| Low water level indicator | Warning symbol on the display |
| Ice basket full indicator | Warning symbol on the display |
| Self-cleaning program | Duration ~20 minutes, activation by holding TIMER/CLEAN button |
| Water drain | Drain plug located under the appliance |
| Included accessories | Ice basket, ice scoop, water bottle holder (optional) |
| Maintenance | Regular cleaning of interior surfaces, tank and water separation line |
| Safety | Grounding required, indoor use only, level surface, keep away from heat sources |
| Special safety instructions | Flammable refrigerant R290 – do not damage the circuit, do not use mechanical devices, keep ventilation openings clear |
| Reparability | Repairs only by the manufacturer or an authorized professional |
| Recycling | Do not dispose of with household waste, follow local regulations for appliances containing flammable gases |
Frequently Asked Questions - Chios Klarstein
User questions about Chios Klarstein
0 question about this device. Answer the ones you know or ask your own.
Ask a new question about this device
Download the instructions for your Ice machine in PDF format for free! Find your manual Chios - Klarstein and take your electronic device back in hand. On this page are published all the documents necessary for the use of your device. Chios by Klarstein.
USER MANUAL Chios Klarstein
INHALTSVERZEICHNIS
Member of Berlin Brands Group
Handwerkerstr. 11
15366 Dahlwitz-Hoppegarten
Deutschland
natural_image
Symbol of a trash bin crossed with a diagonal line, no text or numbers presentBerlin Brands Group UK Ltd
PO Box 1145
Oxford, OX1 9UW
United Kingdom
Dear customer,
Congratulations on the purchase of your appliance. Please read the following instructions carefully and follow them to prevent potential damage. We accept no liability for damage caused by disregarding the instructions and improper use. Please scan the QR code to access the latest operating instructions and further information about the product.

CONTENTS
Safety Instructions 20
Instructions for Refrigerant R290 22
Control panel overview 23
Device Overview 24
Getting Started 25
Operation 27
Troubleshooting 30
Disposal Considerations 32
Manufacturer & Importer (UK) 32
TECHNICAL INFORMATION
| Article number 10041143, 10041144 | |
| Power supply 220-240 V ~ 50 Hz | |
| Net weight 9.5 kg | |
| Coolant R290 |
SAFETY INSTRUCTIONS
- Place the device on a level surface.
- Only use the unit indoors.
- Unplug the device when not in use.
- Never immerse the power cord or the plug in water or other liquids.
- Only use equipment that is expressly recommended for this device by the manufacturer.
- Do not place the device directly under a power socket.
- Do not let the power cord hang off the work surface so that children cannot pull on it.
- Do not overfill the unit, otherwise short circuits and electric shocks may occur.
- Make sure that the lid is always closed during operation.
- Do not pull the plug out of the socket by the cable; instead, hold it securely with your hand while unplugging it.
- Only use this device for its defined purpose. We accept no liability for damage caused by disregarding the instructions or improper use. Only use the device in the household.
- Do not connect the device to a timer or remote-controlled socket.
- Do not immerse the device in water.
- If the power cord is damaged, it must be replaced by the manufacturer, an authorised specialist company or a similarly qualified person.
- When disposing of the appliance, follow the local regulations for the disposal of appliances containing flammable gas.
- Do not store highly flammable or explosive substances in the unit.
- Only fill the device with drinking water.
- Children over 8 years as well as mentally, sensory and physically impaired persons may only use the device if they have been informed in detail about the functions and safety precautions by a supervisor responsible for them beforehand and understand the associated risks.
WARNING
Fire hazard from improper disposal! Please observe the local regulations for the disposal of appliances containing flammable refrigerants and gases.
- Keep ventilation openings in the unit housing free of obstructions.
- Do not damage the refrigerant circuit.
- Do not use mechanical devices or other means to speed up the defrosting process or the ice-making process.
- Do not use any other type of electrical appliance inside the ice maker.
Special Notes
- When positioning the unit, take care that the power cord is not pinched or damaged.
- Make sure that there are no multiple sockets or power supply units on the back of the device.
To avoid contamination of food, please follow the instructions below:
- Regularly clean surfaces that may come into contact with food. Clean the water drain regularly.
- If the device has a water tank, clean it if the device has not been used for 48 hours. Rinse the tank if no water has been drawn for 5 days.
WARNING
When using, during maintenance and when disposing of the device, pay attention to the left symbol located on the back or on the compressor of the device. This symbol warns you of possible fires. There are flammable substances in the refrigerant lines and in the compressor. Keep the device away from sources of fire during use, maintenance and disposal.
INSTRUCTIONS FOR REFRIGERANT R290
Safety instructions
- The air conditioner must be stored and transported in an upright position. Otherwise irreparable compressor damage may occur. Allow the unit to stand for at least 24 hours before operation.
- Before cleaning, switch off the appliance and disconnect it from the power supply.
- Please check that the product generates a constant flow of air! Please make sure that the air inlets and outlets are not blocked.
- Operate the appliance on a horizontal surface to prevent leaks.
- Every person working on a refrigerant circuit should have a valid certificate from an industry accredited assessment body. This ensures competence in the safe handling of refrigerants in accordance with an industry-recognised assessment specification.
- When the appliance no longer operates, dispose of it properly.
- Store the appliance in a well-ventilated place when not in use.
- Store the appliance in a place where no damage can occur to it.
- Repairs may only be carried out by the manufacturer or an authorised specialist company.
- Do not damage any of the components of the refrigerant circuit. Leaking refrigerant may not be noticed as it is odourless.
- Maintenance and repairs must be carried out under the supervision of specialists in the use of flammable refrigerants.
Information for areas with refrigerant pipes
- Keep pipework to a minimum.
• Take care not to damage the pipelines. - Appliances with flammable refrigerants may only be installed in a well-ventilated room.
- Comply with national gas regulations.
- All mechanical connections must be freely accessible for maintenance purposes.
CAUTION
Fire hazard! This device contains the flammable refrigerant R290. If the refrigerant is leaking and exposed to an external ignition source, there may be a fire hazard.
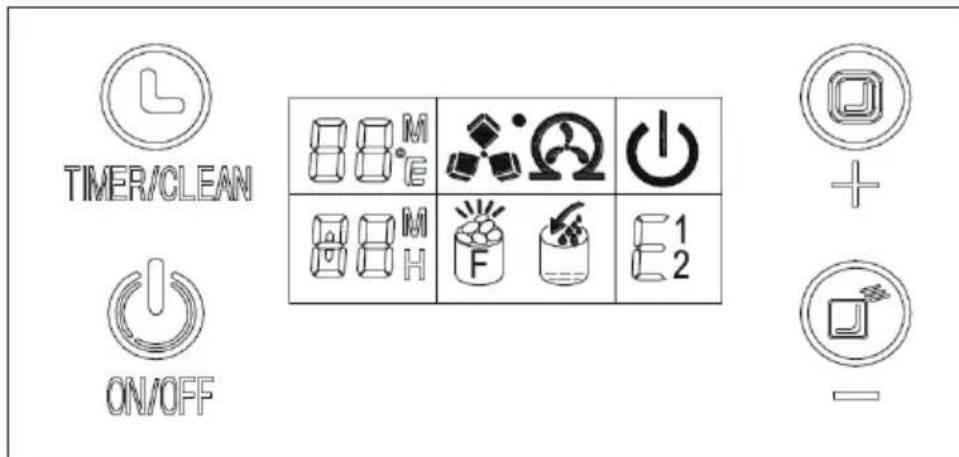
CONTROL PANEL OVERVIEW

| A | If you press this button once briefly, you enter the timer setting; if you press this button for longer than 5 seconds, you enter the cleaning programme. | |
| B | When the appliance is switched off, press this button to switch it on; if the appliance is making ice cubes and you press and hold this button for more than 5 seconds, the appliance automatically switches to ice cube dispensing. | |
| C | 1 | Room temperature and ice making symbol: when the screen shows [M], the countdown for ice making is running, when the screen shows [°C], this is the ambient temperature. |
| 2 | Ice cube symbol: when the symbol rotates, the appliance is making ice cubes. When the symbol flashes, it means that the ice cubes are being dispensed. | |
| 3 | Automatic self-cleaning symbol | |
| 4 | On/off symbol | |
| 5 | Error code E1 - the room temperature sensor is broken.Error code E2 - the water temperature sensor is broken.Error code E - ice making anomaly or coolant leak. | |
| 6 | Warning indicator for low water level. | |
| 7 | Warning indicator for full ice bin. | |
| 8 | Time setting display area. | |
| DDecrease time | ||
| EIncrease time | ||
DEVICE OVERVIEW
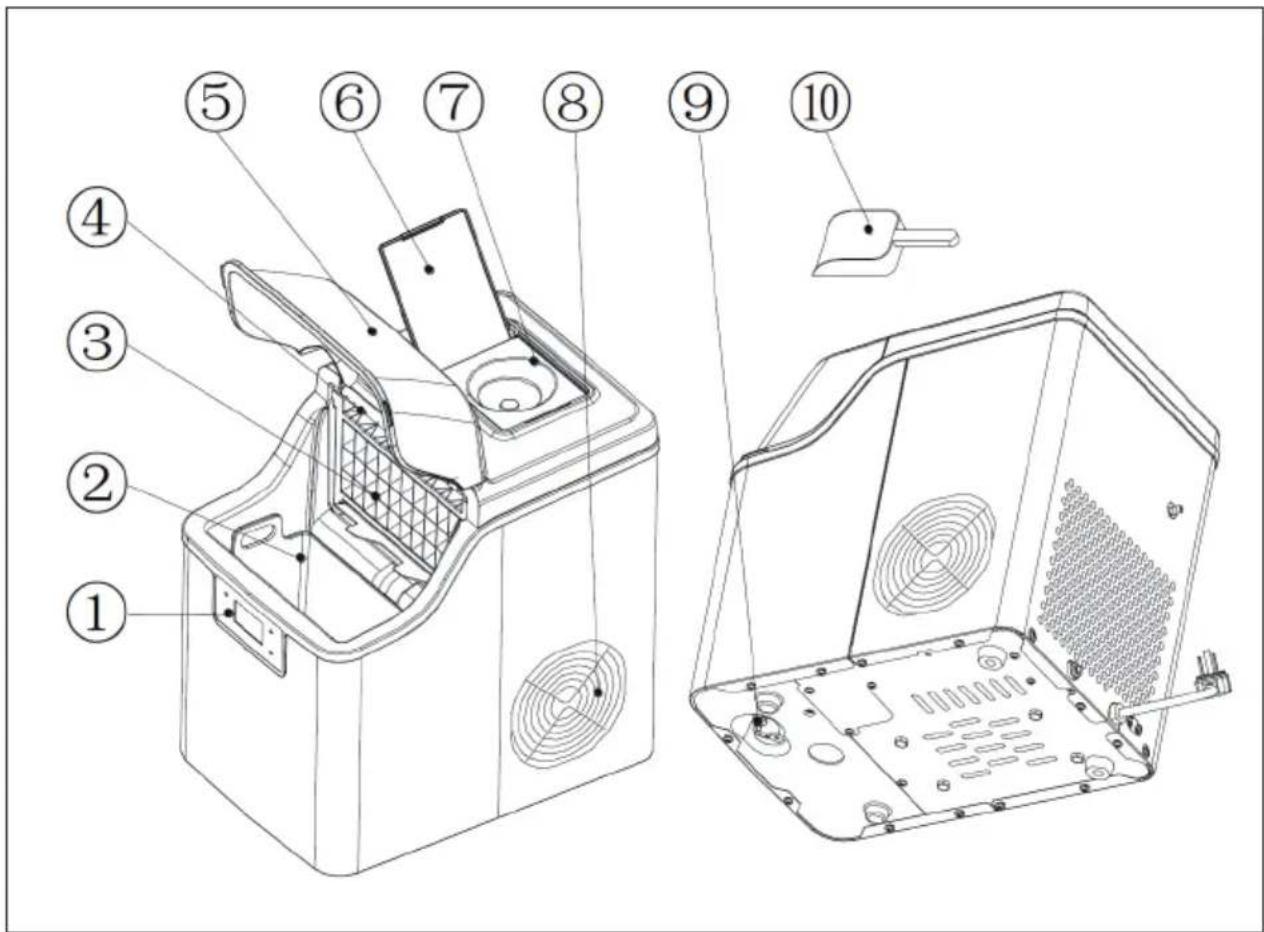
| 1 Control panel 6 Water tank cover | ||
| 2 Ice basket 7 | Water bottle holder (optional, especially for the water bottle included in the scope of delivery) | |
| 3 Evaporator 8 Hot air outlet | ||
| 4 Water sensor line 9 | Water drainage cap: For draining water from the appliance | |
| 5 Top cover 10 Ice scoop |
GETTING STARTED
Unpacking the unit
- Remove all outer and inner packaging material. Make sure that the ice basket and ice scoop are included. If the scope of delivery is not complete, contact customer service.
- Clean the interior of the device only with lukewarm water and a soft cloth. Remove the ice basket and clean it.
- Place the unit in a location without direct sunlight and at a safe distance from heat sources (such as ovens, cookers, heaters, etc.). Place the unit on a level surface. Ensure that there is a minimum distance of 15 cm from the wall to the rear and sides of the device.
- After unpacking the unit, let it stand for at least one hour before plugging it into the mains socket to allow the refrigerant to settle.
- The device must be positioned so that the power cord is easily accessible at all times.
Note: Only fill the water tank of the machine with drinking water.
Connecting the device
- The unit should be properly earthed for your own safety.
- A 220-240 V \~ 50 Hz socket is required for this device.
Cleaning the device
Thorough cleaning is required before using the device for the first time.
- Remove the ice basket.
- Clean the interior of the device with detergent, warm water and a soft cloth.
- Then rinse the inside of the device with clean water. Open the water drainage cap on the bottom of the device and drain the water.
- The exterior of the unit should be cleaned regularly with a mild soap solution and warm water.
- Dry the inside and outside of the device with a soft cloth.
- Open the water drainage cap if the appliance is not going to be used for a long time so that the water can be completely drained from the water tank.
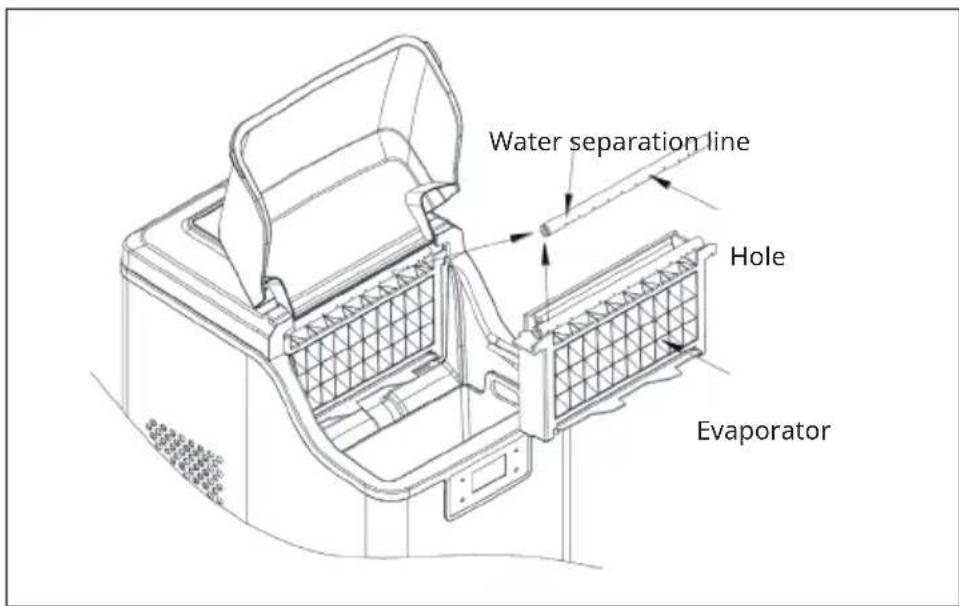
Note: Clean the appliance if you have used it for a long period of time. In particular, the water separation line and the water filters must be cleaned at regular intervals.
- If the water separation pipe is blocked and no water is flowing down, but the compressor and the water pump are still operating, first switch off the unit, remove the water separation pipe and clean it. Clean each hole of the water separation pipe thoroughly. Replace the water separation pipe after cleaning and make sure it is seated correctly.
-
Both the water tank and the large water container can be cleaned with a mild detergent, warm water and a soft cloth. Then rinse both with clean water and open the water drain cap on the bottom of the appliance and drain the water. This will keep the unit hygienically clean, ensuring normal operation.
-
If, when cleaning the appliance, you notice that there are still ice cubes on the evaporator that cannot be easily removed, switch on the appliance and let it start the ice making process. Then press the ON/OFF button for 5 seconds to make the device start dispensing ice cubes. This melts the stuck ice cube and makes it easier to remove.
Drain water completely from the inner water tank and the large water tank
The water from the large water tank is prevented from flowing out by the plug on the water valve. Plug in the device when you want to drain the water completely, but do not start the device. Then remove the water drainage cap on the back of the device. Wait a few minutes until the water has flowed out completely.
OPERATION
Control panel and indicator lights
- Remove the water tank cover and fill the water tank with drinking water. Make sure that the water level is always below the maximum mark "FULL" (see illustration).
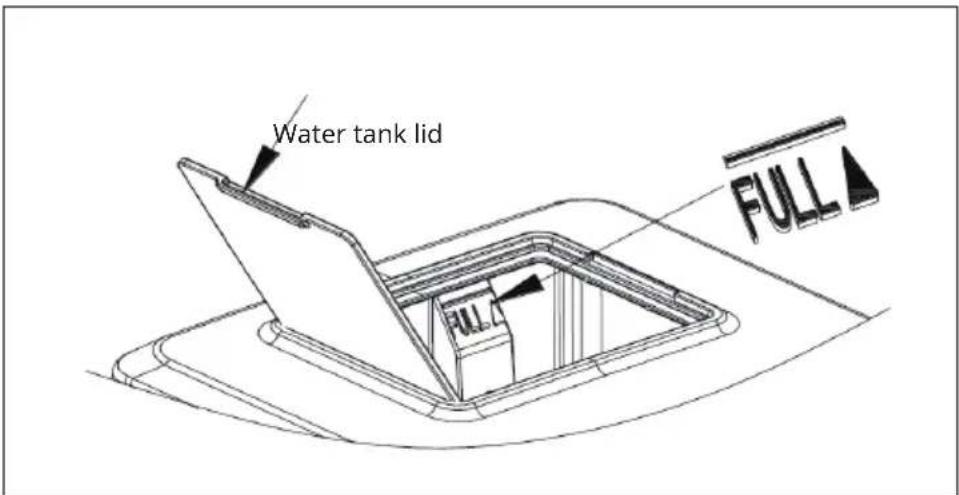
Note: Never pour water into the internal water tank, which is located below the ice basket. This water tank is not big enough. Non-observance can negatively affect the ice-making process.
-
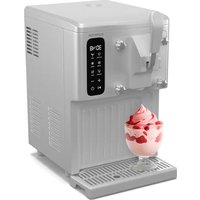
Switch on: When you insert the mains plug into the socket, the symbol ⏻ starts flashing. The current room temperature is displayed on the upper left right side of the screen. For example, if [26 °C] is displayed there, it means that the room temperature is 26 degrees Celsius. Press the ON/OFF button again to start the unit. The water flows into the water tank to the standard level. The compressor is then started and the ice cube production begins. At the same time, the display ⏻ disappears from the screen and is replaced by the rotating display ⏻. The temperature display disappears. After a few minutes of making ice cubes, the digital display flashes in the temperature display area of the screen. For example, if [10 M] is displayed, it means that the ice cube making process will be finished in 10 minutes.
-
When the ice cubes are dispensed, the symbol flashes on the screen. The water flows through the solenoid valve into the lower water tank and the symbol is displayed. When the lower water tank is full, the symbol goes out. The next ice cube making process begins. If there is no water in the water tank, the symbol remains lit. Switch off the machine and fill water into the water tank. Then restart the appliance to make ice cubes. You also have the option of filling the water tank directly and waiting 20 minutes for the machine to restart.
Note: An ice cube making cycle takes 13 - 25 minutes, depending on the room temperature. When you use the device for the first time, it may take a little longer to make ice cubes, depending on the initial temperature of the water. If the room temperature is high, the ice cube making process can take much longer, but no longer than 35 minutes. If the ice cubes are not big enough for you, press the + or - button during ice cube making to adjust the ice cube making time. If you press the + button, the ice cube making time is increased by one minute at a time. Pressing the - button decreases the ice cube making time by one minute. The time can be increased or decreased by a maximum of 6 minutes. Your adjustment will be taken into account from the next ice cube making cycle.
- When the symbol is displayed, it means that the ice cube tray is full. The unit stops. As soon as the ice cubes have been removed, the appliance restarts operation. If the ON/OFF button is pressed for more than 5 seconds while the appliance is in operation, the ice cubes are dispensed automatically. When you press the ON/OFF button, the unit is switched off.
The unit has two different timer settings. When the unit is switched on, the timer can be set so that the unit switches off automatically after a certain time. When the unit is switched off, the timer can be set so that the unit switches on automatically after a certain time.
When you press the TIMER button, [1H] is displayed on the screen. Press the + or - buttons to increase or decrease the time. While you are making the setting, the [H] symbol flashes on the screen. 5 seconds after the setting is complete, the timer setting symbol [H] lights up permanently on the screen.
- Draining the water: take off the water drain cap at the bottom of the device and drain the water. It is recommended to change the water every 24 hours and to clean the appliance at least every 3 days.
Automatic self-cleaning programme
Starting the self-cleaning programme: Plug in the device and press and hold the TIMER/CLEAN button on the control panel for more than 5 seconds. The self-cleaning process will start. This takes about 20 minutes. The symbol Ⓞ rotates on the screen and [20 M] is displayed.
Cancellation of the self-cleaning programme:
The self-cleaning programme takes about 20 minutes to complete. As soon as the programme is finished, the device switches off automatically. It is also possible to force the self-cleaning programme to stop by pressing the ON/OFF button.
Important notes on operation
- Make sure that the water tank, water filter and water separation pipe are not blocked. Clean them.
- The water temperature influences the ice cube production. The lower the water temperature, the more ice cubes are produced.
- The lower the ambient temperature, the more ice cubes are produced.
- Only use good quality water to ensure that the pump works properly. If you use poor quality water, this may cause the pump to be noisy. However, this has no effect on the operation of the pump.
- When you switch off the unit, the compressor will start 3 minutes later.
TROUBLESHOOTING
| Problem Potential cause Possible solution | ||
| The symbol lights up | No water Switch off the device and fillthe water tank with drinkingwater up to the maximummark. Restart the unit. | |
| The symbol lights up | Too many ice cubes in theice basket | Remove the ice cubes fromthe ice basket |
| The water tank is full but thesymbol [IMAGE] lights up | The inlet solenoid valve isbroken | Contact customer service |
| The symbol [E1]lights up | The room temperaturesensor is broken. | The unit is still functional,replace the sensor |
| The symbol [E2]lights up | The water temperaturesensor is broken. | The unit is still functional,replace the sensor |
| Problem Potential cause | Possible solution | |
| No water in the water tank water separation line | The holes are blocked Remove | ove the blockages in the holes with a thin wire until the water can flow out very easily |
| The water filter is blocked Clean the water filter | ||
| The ice cubes are too big and cannot fall down | Ice cube making takes too long | Reduce the ice cube making time by pressing the - button. |
| The ice cubes are too small | The ambient temperature is too high. | Move the device to a cooler location. |
| The water temperature is too high. | The water temperature should not exceed 25 °C. | |
| The duration of the ice cube production is too short. | Press the + button to increase the duration. | |
| The device is in operation but no ice cubes are formed | The ambient temperature is too high or the water temperature is too high. | Move the device to a cooler location. The water temperature should not exceed 25 °C, fill the water tank with cold water. |
| Coolant leak Please contact customer service. | ||
| The coolant system is blocked. | Please contact customer service. | |
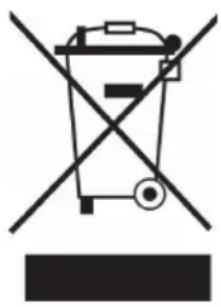
DISPOSAL CONSIDERATIONS
natural_image
Symbol of a trash bin crossed with a diagonal line, no text or numbers presentIf there is a legal regulation in your country regarding the disposal of electrical and electronic equipment, this symbol on the product or on the packaging indicates that this product must not be disposed of with household waste. Instead, it must be taken to a collection point for the recycling of electrical and electronic equipment. By disposing of this product in accordance with the regulations, you protect the environment and the health of those around you from negative consequences. For information on recycling and disposal of this product, contact your local government or household waste disposal service.
MANUFACTURER & IMPORTER (UK)
Manufacturer:
Chal-Tec GmbH, Wallstraße 16, 10179 Berlin, Germany.
Importer for Great Britain:
Berlin Brands Group UK Ltd
PO Box 1145
Oxford, OX1 9UW
United Kingdom
Cher client, chère cliente,
SOMMAIRE
natural_image
Symbol of a trash bin crossed with a diagonal line, no text or numbers presentBerlin Brands Group UK Ltd
PO Box 1145
Oxford, OX1 9UW
United Kingdom
Estimado cliente:
ÍNDICE
natural_image
Symbol of a trash bin crossed out by a diagonal line, with no text or labels present.Berlin Brands Group UK Ltd
PO Box 1145
Oxford, OX1 9UW
United Kingdom
Gentile cliente,
INDICE
natural_image
Symbol of a trash bin crossed with a diagonal line, no text or numbers presentPRODUTTORE E IMPORTATORE (UK)
Produttore:
Chal-Tec GmbH, Wallstraße 16, 10179 Berlino, Germania.
Berlin Brands Group UK Ltd
PO Box 1145
Oxford, OX1 9UW
United Kingdom

area
| Category | Value | |---|---| | 1 | 100 | | 2 | 100 | | 3 | 100 | | 4 | 100 | | 5 | 100 | | 6 | 100 | | 7 | 100 | | 8 | 100 | | 9 | 100 | | 10 | 100 | | 11 | 100 | | 12 | 100 | | 13 | 100 | | 14 | 100 | | 15 | 100 | | 16 | 100 | | 17 | 100 | | 18 | 100 | | 19 | 100 | | 20 | 100 | | 21 | 100 | | 22 | 100 | | 23 | 100 | | 24 | 100 | | 25 | 100 | | 26 | 100 | | 27 | 100 | | 28 | 100 | | 29 | 100 | | 30 | 100 | | 31 | 100 | | 32 | 100 | | 33 | 100 | | 34 | 100 | | 35 | 100 | | 36 | 100 | | 37 | 100 | | 38 | 100 | | 39 | 100 | | 40 | 100 | | 41 | 100 | | 42 | 100 | | 43 | 100 | | 44 | 100 | | 45 | 100 | | 46 | 100 | | 47 | 100 | | 48 | 100 | | 49 | 100 | | 50 | 100 | | 51 | 100 | | 52 | 100 | | 53 | 100 | | 54 | 100 | | 55 | 100 | | 56 | 100 | | 57 | 100 | | 58 | 100 | | 59 | 100 | | 60 | 100 | | 61 | 100 | | 62 | 100 | | 63 | 100 | | 64 | 100 | | 65 | 100 | | 66 | 100 | | 67 | 100 | | 68 | 100 | | 69 | 100 | | 70 | 100 | | 71 | 100 | | 72 | 100 | | 73 | 100 | | 74 | 100 | | 75 | 100 | | 76 | 100 | | 77 | 100 | | 78 | 100 | | 79 | 100 | | 80 | 100 | | 81 | 100 | | 82 | 100 | | 83 | 100 | | 84 | 100 | | 85 | 100 | | 86 | 100 | | 87 | 100 | | 88 | 100 | | 89 | 100 | | 90 | 100 | | 91 | 100 | | 92 | 100 | | 93 | 100 | | 94 | 100 | | 95 | 100 | | 96 | 100 | | 97 | 100 | | 98 | 100 | | 99 | 100 | | Note: The actual values in the 'Value' column are not provided in the code. I have used the label 'The Region' to represent the region of interest based on the visual scale. The 'Index' column is not included in the chart. I have used the label 'The Region' to represent the region of interest based on the visual scale. I have used the label 'The Region' to represent the region of interest based on the visual scale. I have used the label 'The Region' to represent the region of interest based on the visual scale. I have used the label 'The Region' to represent the region of interest based on the visual scale. I have used the label 'The Region' to represent the region of interest based on the visual scale. I have used the label 'The Region' to represent the region of Interest. I have used the label 'The Region' to represent the Region of Interest based on the visual scale. I have used the label 'The Region' to represent the Region of Interest based on the visual scale. I have used the label 'The Region' to represent the Region of Interest based on the visual scale. I have used the label 'The Region' to represent the Region of Interest based on the visual scale. I have used the label 'The Region' to represent the Region of Interest based on the visual scale. I have used the label 'The Region' to represent the Region of Investment. I have used the label 'The Region' to represent the Region of Investment based on the visual scale. I have used the label 'The Region' to represent the Region of Investment based on the visual scale. I have used the label 'The Region' to represent the Region of Investment based on the visual scale. I have used the label 'The Region' to represent the Region of Investment based on the visual scale. I have used the label 'The Region' to represent the Region of Investment based on the visual scale. I have used the label 'The Region' to represent the Region of Interest. I have used the label 'The Region' to represent the Region of Interest based on the visual scale. I have used the label 'The Region' to represent the Region of Interest based on the visual scale. I have used the label 'The Region' to represent the Region of Interest based on the visual scale. I have used the label 'The Region' to represent the Region of Interest based on the visual scale. I have used the label 'The Region' to represent the Investment. I have used the label 'The Region' to represent the Investment based on the visual scale. I have used the label 'The Region' to represent the Investment based on the visual scale. I have used the label 'The Region' to represent the Investment based on the visual scale. I have used the label 'The Region' to represent the Investment based on the visual scale. I have used the label 'The Region' to represent the Investment based on the visual scale. I have used the label 'The Region' to represent the Investment based on the visual scale. I have used one of these values, but this appears to be an abstract representation rather than a standard chart type. The chart type is a single bar chart.