
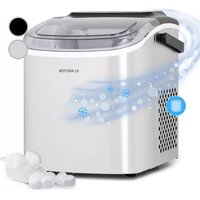
Sweet Sundae Touch - Ice machine Klarstein - Free user manual and instructions
Find the device manual for free Sweet Sundae Touch Klarstein in PDF.

| Product type | Ice cream maker / sorbet maker |
| Brand | Klarstein |
| Model | Sweet Sundae Touch |
| Bowl capacity | 1.5 liters |
| Power supply | 220-240 V ~ 50 Hz, 250 W |
| Dimensions (L x W x H) | 417 x 280 x 517 mm |
| Net weight | 16.5 kg |
| Gross weight | 18.5 kg |
| Package dimensions | 465 x 342 x 495 mm |
| Refrigerant | R290 (propane, flammable) |
| Operating modes | Ice cream, Juice, Cooling, Shakes, Mixing, Cleaning |
| Time setting | Yes, via +/- buttons |
| Display | LED |
| Motor protection | Yes, against overheating (automatic shutdown) |
| Production capacity | Up to 900 g of ice cream |
| Included accessories | Beater blade, brush, funnel, manual |
| Removable parts | Bowl, blade, handle, funnel (easy cleaning) |
| Safety | Compressor, automatic shutdown, user instructions |
| Protection class | I |
| Climate type | N/SN |
Frequently Asked Questions - Sweet Sundae Touch Klarstein
User questions about Sweet Sundae Touch Klarstein
0 question about this device. Answer the ones you know or ask your own.
Ask a new question about this device
Download the instructions for your Ice machine in PDF format for free! Find your manual Sweet Sundae Touch - Klarstein and take your electronic device back in hand. On this page are published all the documents necessary for the use of your device. Sweet Sundae Touch by Klarstein.
USER MANUAL Sweet Sundae Touch Klarstein
KLARSTEIN
www.klarstein.com

area
| Category | Value | | -------- | ----- | | A | 100 | | B | 100 | | C | 100 | | D | 100 | | E | 100 | | F | 100 | | G | 100 | | H | 100 | | I | 100 | | J | 100 | | K | 100 | | L | 100 | | M | 100 | | N | 100 | | O | 100 | | P | 100 | | Q | 100 | | R | 100 | | S | 100 | | T | 100 | | U | 100 | | V | 100 | | W | 100 | | X | 100 | | Y | 100 | | Z | 100 |INHALT
natural_image
Pure mechanical assembly diagram without any text, numbers, or symbolsnatural_image
Pure mechanical diagram showing a lever mechanism with no text or symbolsnatural_image
Technical line drawing of a mechanical component with no visible text or symbolsnatural_image
Line drawing of a coffee maker with a bowl on top and a side panel, showing no text or symbols.natural_image
Line drawing of a mechanical device with ventilation grilles and a funnel (no text or symbols)natural_image
Line drawing of a modern kitchen appliance with control panel and fan (no text or symbols)natural_image
Symbol of a trash bin with crossed lines indicating no waste or discharge, and a solid black rectangle below (no text or labels)Berlin Brands Group UK Limited
PO Box 42
272 Kensington High Street
London, W8 6ND
United Kingdom
Dear Customer,
Congratulations on purchasing this device. Please read the following instructions carefully and follow them to prevent possible damages. We assume no liability for damage caused by disregard of the instructions and improper use. Scan the QR code to get access to the latest user manual and more product information.

CONTENTS
Technical Data 25
Safety Instructions 26
Device Description 29
Installation 31
Operation 33
Cleaning and Maintenance 42
Troubleshooting 43
Disposal Considerations 44
Manufacturer & Importer (UK) 44
TECHNICAL DATA
| Item number 10046255, 10046256 | |
| Power supply 220-240 V - 50 Hz | |
| Power consumption 250 W | |
| Protection class I | |
| Climate type N/ SN | |
| Capacity 1.5 litres | |
| Dimensions (LxWxH) 417x280x517 mm | |
| Package dimensions (LxWxH) 465x342x495 mm | |
| Netto weight 16.5 kg | |
| Brutto weight 18.5 kg |
SAFETY INSTRUCTIONS
- In order to avoid harm caused by misuse, please read the instruction manual carefully before using this product and use this product strictly in accordance with the purpose stated in the instruction manual.
- Place the device on a level surface.
- Use the device indoors only.
- Unplug the device from the power outlet when not in use.
- Never immerse the power cord and plug in water or other liquids.
- Only use accessories that are expressly recommended by the manufacturer for this device.
- Do not place the device directly under an electrical outlet.
- Do not let the power cord hang from the work surface so that children cannot pull on it.
- Do not overfill the unit, otherwise short circuits and electric shocks may occur.
- Make sure that the lid is always closed during operation.
- Do not pull the plug out of the outlet by the cord, but hold it by hand when unplugging.
- Use this device only for its intended purpose. We accept no liability for damage caused by disregarding the instructions and improper use. Only use the device in the household.
- Do not connect the device to a timer or remote-controlled socket.
- Do not immerse the device in water.
- The use of an extension cord is not recommended, as it may overheat and become a risk of fire.
- If the power cord or plug is damaged, it must be replaced by the manufacturer, an authorized service centre, or a similarly qualified person.
- Follow local regulations for disposal of equipment containing flammable gas.
- Do not store highly flammable or explosive substances in the device.
- Do not overturn the appliance. If the machine is overturned, leave it to stand for 2 hours before switching it on.
- If the Ice Maker is brought in from outside in winter, allow it to warm up to room temperature for a few hours before switching it on.
- Dispose of the appliance only at an authorised waste disposal facility. Do not expose to flame.
- This appliance is not intended for use by persons (including children) with reduced physical, sensory or mental capabilities, or lack of experience and knowledge, unless they have been given supervision or instruction concerning use of the appliance by a person being responsible for their safety.
- Children shall not play with the appliance. Cleaning and user maintenance shall not be made by children without supervision.
- Children between the ages of 3 and 8 are not allowed to load and unload refrigeration equipment.
- Keep the appliance 8 cm away from other objects to ensure good heat dissipation.
- Do not use the appliance near flames, hotplates or stoves.
- Do not switch on the appliance frequently (at least every 5 minutes) to avoid
damaging the compressor.
- Do not insert metal sheets or other electrical objects into the appliance to avoid fire and short circuits.
- When removing the ice-cream, do not hit the drum or the edge of the drum to avoid damaging the drum.
- Do not switch on the power supply until the drum or mixer blade has been properly installed.
- The initial temperature of the ingredients is 25 ± 5^ C . Do not put the ingredients in the freezer to pre-freeze, as it will easily block the blender blade before the ice-cream is in good condition.
- Do not remove the blender blade while the machine is operating.
- Do not use outdoors.
- Never clean with abrasive cleaners or hard objects.
- This appliance is intended to be used in household and similar applications such as
- staff kitchen areas in shops, offices and other working environments;
- farm houses and by clients in hotels, motels and other residential type environments;
- bed and breakfast type environments and catering and similar non-retail applications.
This appliance contains the coolant isobutane (R600a), a natural gas which is environmentally friendly. Although it is flammable, it does not damage the ozone layer and does not increase the greenhouse effect. The use of this coolant has, however, led to a slight increase in the noise level of the appliance. In addition to the noise of the compressor, you might be able to hear the coolant flowing around the system. This is unavoidable, and does not have any adverse effect on the performance of the appliance. Care must be taken during the transportation and setting up of the appliance that no parts of the cooling system are damaged. Leaking coolant can damage the eyes.
- Keep ventilation openings in the unit housing free of obstacles.
- Do not damage the refrigerant circuit.
- The refrigeration system contains a high-pressure refrigerant. Do not damage the refrigeration system.
- The maintenance of the refrigeration system shall be done by professionals.
- Do not use any mechanical devices or other means to accelerate the defrosting process or the ice recovery process.
- Do not use electrical appliances inside the food storage compartments of the appliance, unless they are of the type recommended by the manufacturer.
- Unplug the ice maker before cleaning or making any repairs or servicing.
- Do not clean the ice maker with flammable liquids, as this could cause a fire or explosion.
- Refrigerant and insulation blowing gas are flammable.

WARNING
Fire hazard due to improper disposal! Please observe the local regulations for the disposal of appliances containing flammable refrigerants and gases.
Special Notes
- When positioning the unit, make sure that the power cord is not pinched or damaged.
- Make sure that there are no multiple sockets or power supplies on the back of the unit.
To avoid contamination of food, please follow the instructions below:
- If the door is left open for a long time, the temperature in the compartments of the appliance may rise significantly.
- Clean food contact surfaces and accessible drainage systems regularly.

WARNING
When using, servicing and disposing of the unit, pay attention to the left symbol on the rear of the unit or on the compressor. This symbol warns of possible fires. There are flammable substances in the refrigerant lines and in the compressor. Keep the appliance away from sources of fire during use, maintenance and disposal.
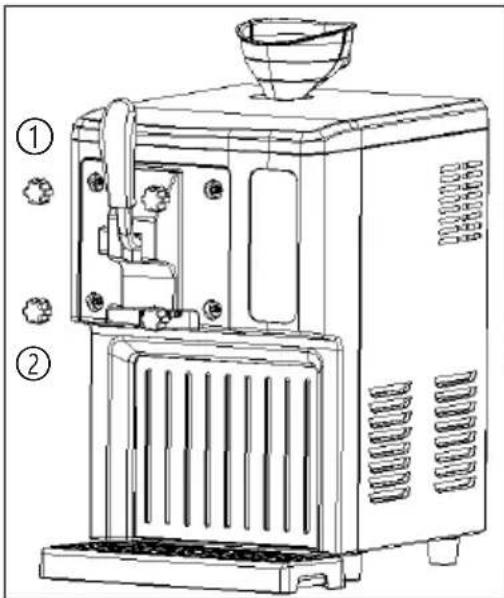
DEVICE DESCRIPTION
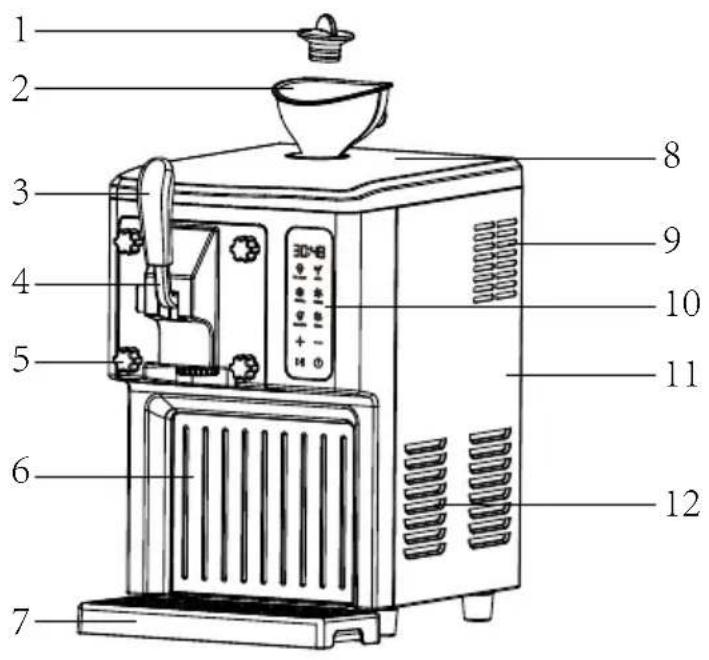
| 1 Feed port plug 7 Water pan | |
| 2 Funnel 8 Upper cover | |
| 3 Handle 9 Display screen cover | |
| 4 Handle 10 Exhaust vent | |
| 5 Locking nut 11 Side panel | |
| 6 Front decorative cover 12 Exhaust vent |
Function buttons
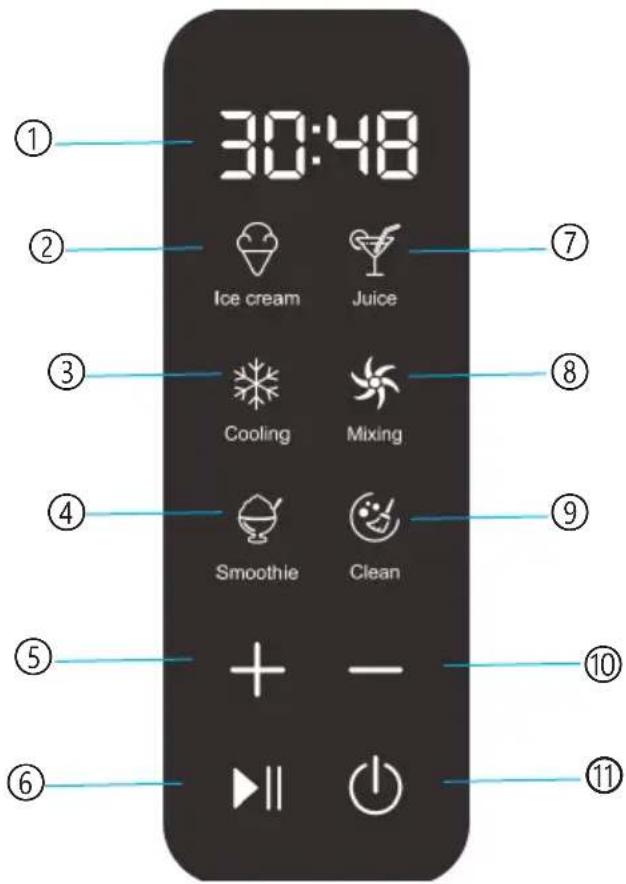
| 1 Time 7 Juice mode button | |
| 2 Ice cream mode button 8 Mixing button | |
| 3 Refrigeration mode button 9 Cleaning function button | |
| 4 Shakes mode button 10 Time decrease button | |
| 5 Time increase button | 11 Power button |
| 6 Start/Pause button |
Attachments
| Mixing blade 1 User manual 1 | |||
| Brush 1 Funnel 1 |
INSTALLATION
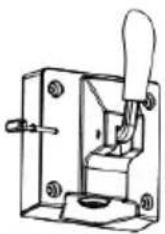
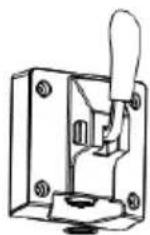
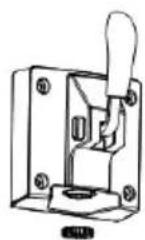
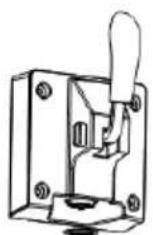
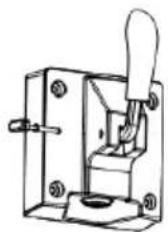
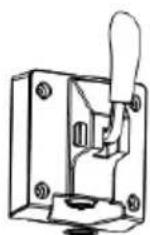
Handle assembly and disassembly
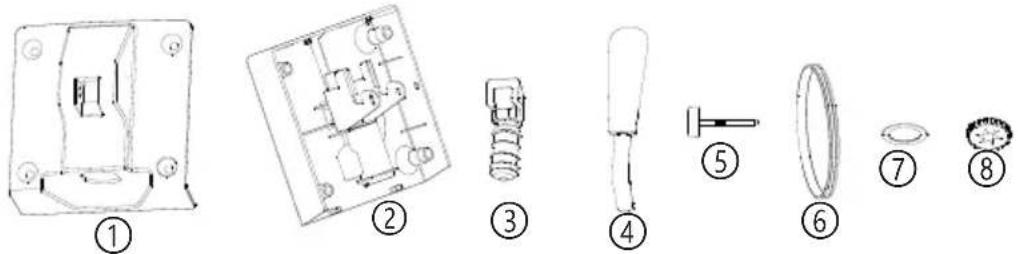
| 1 Feed port upper cover | 5 Handle tip |
| 2 Feed port base | 6 Sealing ring |
| 3 Feed port plug | 7 Feed port sealing ring |
| 4 Handle | 8 Feed port cover |
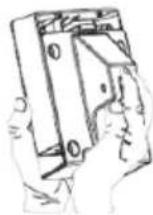
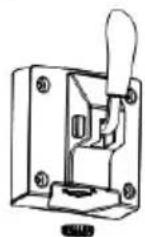
- Insert ③ into ② as shown in Figure 1.
- Push ③ into ② by hand, as shown in Figure 2.
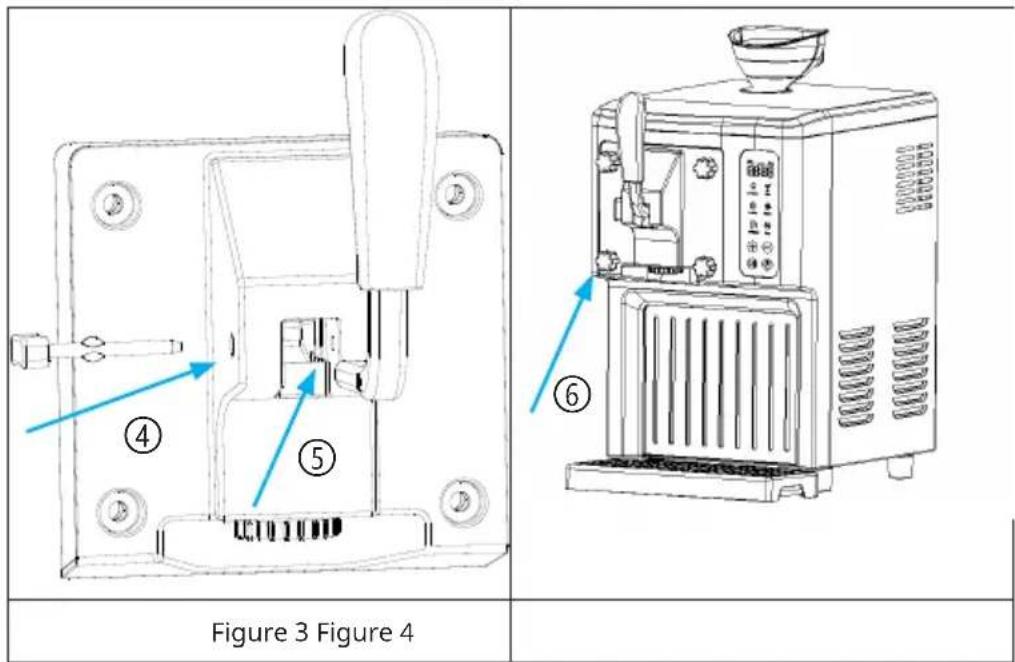
- Push ① into ② and then upward until you hear a clicking sound, as shown in Figure 3.
- Insert ④ into ③ as shown in Figure 4.
- Insert ⑤ into ① as shown in Figure 5.
- Clip ⑦ into ② as shown in Figure 6.
- Clamp ⑧ into ② and tighten clockwise, as shown in Figure 7.
- Put ⑧ into ② as shown in Figure 8.
Slot position up
natural_image
Pure mechanical assembly diagram without any text, numbers, or symbolsAlign and insert into the bottom
natural_image
Mechanical switch assembly diagram showing a lever and handle (no text or symbols)Figure 1 Figure 2 Figure 3 Figure 4

natural_image
Technical line drawing of a mechanical component with no visible text or symbolsFigure 5 Figure 6 Figure 7 Figure 8
Handle disassembly
Follow the steps from Figure 1 to Figure 8 in reverse order.
Features
- Automatic microcomputer control, easy and reliable to use and won't cost you much.
- LED display shows the working status, it is more convenient to monitor the working status.
- Rotary extrusion type ice-cream maker, good mixing and easy to operate.
- Suitable for continuous ice-cream production.
• 1.5L large capacity. - The parts are removable, easy to clean, hygienic and safe.
OPERATION
- Connect the power supply and plug the power cord into a suitable outlet. The shape and voltage of the socket must match those shown.
- Press and hold the on/off key, the screen will be fully lit and you can enter the menu interface to select the function mode.
Ice-cream mode
- Click on the menu interface to enter Ice mode. The default time is 50 minutes and the time is adjustable.
- Click to start the Ice-cream mode. The compressor and mixer motor will start and the 50 minute countdown will start.
- When the ice-cream production is completed, the display will show "COOL", entering isolation stage I, and the buzzer will sound 6 times. At this stage the mixer motor continues to run. The first isolation stage lasts for 60 minutes.
- After 60 minutes of isolation stage I, the buzzer sounds 6 times and the unit enters isolation stage II. When the compressor is running, the mixer motor is running. When the mixer motor stops, you can press the key to start the discharge of the mixer motor. The duration of the second isolation stage is 120 minutes. At the end of the second isolation stage, return to the standby interface.
- When keeping the ice-cream cold, you can press the ice-cream icon to return to the ice-cream operating mode, with a default time of 10 minutes and an adjustable time.
- During the ice-cream production process, the user can press the key to pause the process. The compressor will not stop for 3 minutes before the pause. During the pause, the user can press the +/- button to adjust the ice production time. There is no operation for 10 minutes and the buzzer sounds 6 times to return to the standby interface.
Juice Mode
- Click on the menu interface to enter the juice mode. Users can press +/- button according to their needs to adjust the cooling time of the juice. The default time is 30 minutes, click to start the juice mode. At this time, the compressor and blender motor will start and the time will count down.
- The countdown will end, the display will show "COOL", the machine will enter isolation mode and the buzzer will sound 6 times simultaneously. After 60 minutes of isolation, return to the Standby interface.
- During the juice extraction process, users can press to pause the process. The compressor will not stop for 3 minutes before the pause and during the pause you can press +/- to adjust the cooling time of the juice. There is no operation for 10 minutes and the buzzer sounds 6 times to return to the standby interface.
Refrigeration mode
- Click on the menu interface to enter the single chill mode. Users can press +/- to adjust the cooling time required for the single cooling mode according to their needs. The default setting is 10 minutes. Click to start the single chill mode. The compressor will start and the time will count down.
- The countdown ends, the buzzer sounds 6 times and the display returns to the Standby interface.
- During the single chill mode, the user can press to pause the process. The compressor will not stop for 3 minutes before the pause, and during the pause, the desired cooling time can be set by pressing +/- . There is no operation for 10 minutes and the buzzer sounds 6 times to return to the standby interface.
Mixing mode
- Click on the menu interface to enter the single mix mode. Users can press +/- to set the required mixing time to suit their needs. The default setting is 30 minutes. Click to start the single mix mode. The mixing motor will start and the time will count down.
- The countdown ends, the buzzer rings 6 times and returns to the standby interface.
- During the single mix production process, users can press to pause the work and during the pause process, they can press +/- to adjust the desired mixing time. There will be no operation for 10 minutes and the buzzer will sound 6 times and return to the standby interface.
Shakes Mode
- Click on the menu interface to enter the shakes mode. Users can press +/- to adjust the cooling time required for the milkshake to suit their needs. The default setting is 30 minutes. Click to start the shakes mode. At this point, the compressor and mixer motor will start and the time will count down.
- The countdown will end, the display will show "COOL", the machine will enter the isolation mode and the buzzer will sound 6 times. After 60 minutes of isolation, return to the Standby interface.
- During the milk shake production process, users can press to pause the process. The compressor will not stop for 3 minutes before pausing. During the pause, users can press +/- to adjust the cooling time required for the milkshake. There is no operation for 10 minutes and the buzzer sounds 6 times to return to the standby interface.
Cleaning Mode
- Click on the menu interface to enter the cleaning mode. Users can press +/- to adjust the cleaning time according to their needs. The default setting is 10 minutes. Click to start the single mix mode and the mix motor will start for 1 minute, stop for 1 minute and start working. The time is counted down.
- The countdown ends, the buzzer sounds 6 times and returns to the Standby interface.
- During the cleaning process, users can press to pause work, and during the pause process, they can press +/- adjust the desired cleaning time. There will be no operation for 10 minutes and the buzzer will sound 6 times to return to the standby interface.
Return
- If the function is selected and not activated, press the appropriate menu function key to return to the desktop.
- If the machine is already running, press Pause and then the appropriate function key to return to the desktop.
Motor protection function
As the production time increases, the ice-cream becomes harder and harder and the mixing motor is blocked. At this point, the motor protector will monitor the current and temperature of the motor and automatically stop the motor to ensure the life of the mixing motor. After a short time, the motor will restart automatically.
The largest production capacity
To avoid unnecessary spillage and waste, please ensure that the ice-cream ingredients do not exceed 60 % of the inner drum volume by approximately 900 g (as there is some expansion after the ice-cream is formed). In continuous production, the weight is controlled within 600 g when new material is added. This prevents the ice-cream from expanding and overflowing (because some of the material remains in the barrel).
ICE-CREAM PRODUCTION
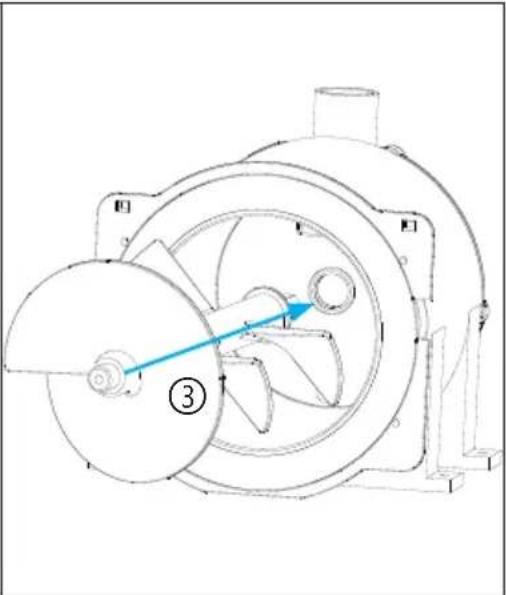
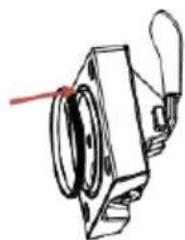
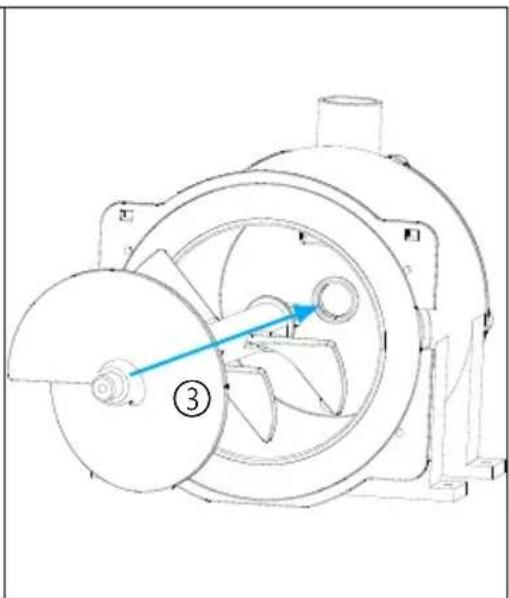
Note: Thoroughly clean all parts that come into contact with ice-cream before use, including: cooling bowl, feed bowl, mixing knife, outlet gasket, outlet inner cover and hopper, etc. Before cleaning, ensure that the power cord is unplugged from the wall outlet. When making ice-cream, keep the machine flat on a level surface to ensure that the machine's compressor works properly.
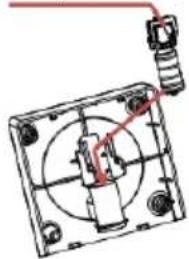
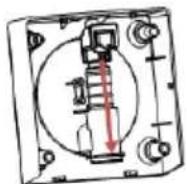
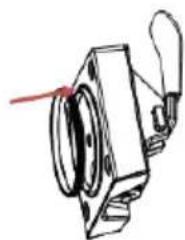
Loosen the four counter-clockwise locking nuts and remove the handle assembly as shown in Figure 1. Check that the inside of the drum is clean, remove the mixing fan blade, wipe it with a damp cloth and re-insert the mixing blade after cleaning as shown in Figure 2. Fit the handle and handle assembly as shown in Figure 3. Tighten the nut clockwise as shown in Figure 4.
natural_image
Technical line drawing of a mechanical device with internal components and directional arrows (no text or symbols)Figure 1 Figure 2
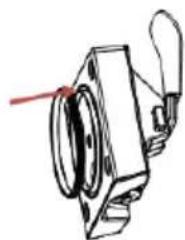
①: Loosen the locking nut counterclockwise
②: Take out the handle assembly and mixing blade for cleaning.
③: When installing the mixing fan blade, align the inner hexagon with the hole position and pay attention to the direction of the mixing blade.
④: Align the handle with the hole and pay attention to the direction.
⑤: Align with slot position.
⑥: Lock the four nuts clockwise.
Prepare recipe ingredients
- Prepare recipe ingredients from your own recipe or from the recipes included in this manual. It is recommended to put in 800 g (the optimal weight is from 600 to 900 g) of ingredients.
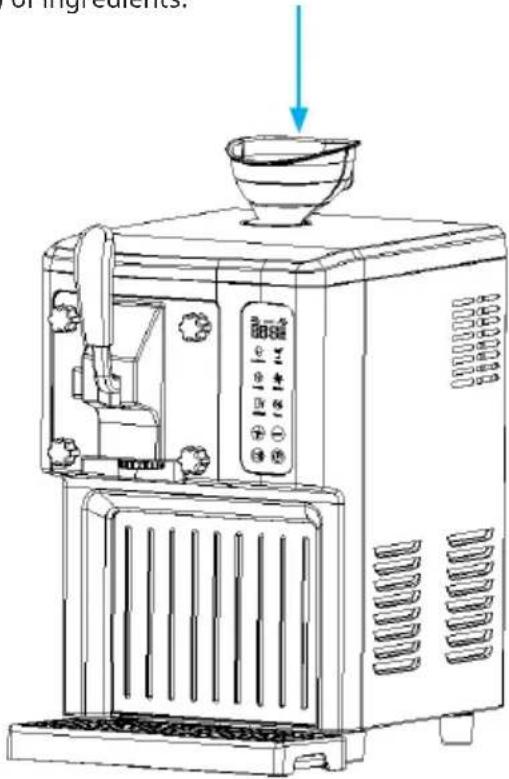
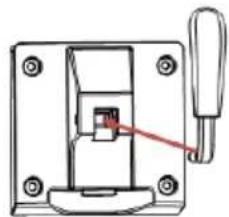
- Fill the correct amount of ice material into the funnel.
- Remove the funnel and replace the inlet plug.
- Plug in the power supply.
natural_image
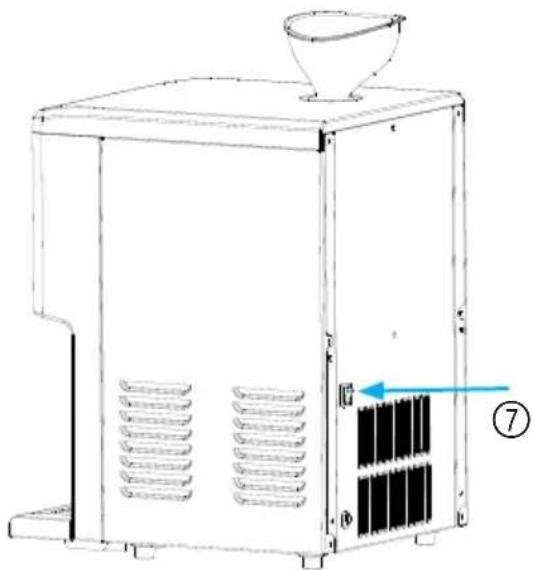
Line drawing of a mechanical device with a funnel and internal grid structure (no text or symbols)- Press the power button ⑦.
- Choose a menu function with the function buttons.
- The appliance starts preparing ice-cream.
- When production is complete, pull the handle to pour out the ice-cream.
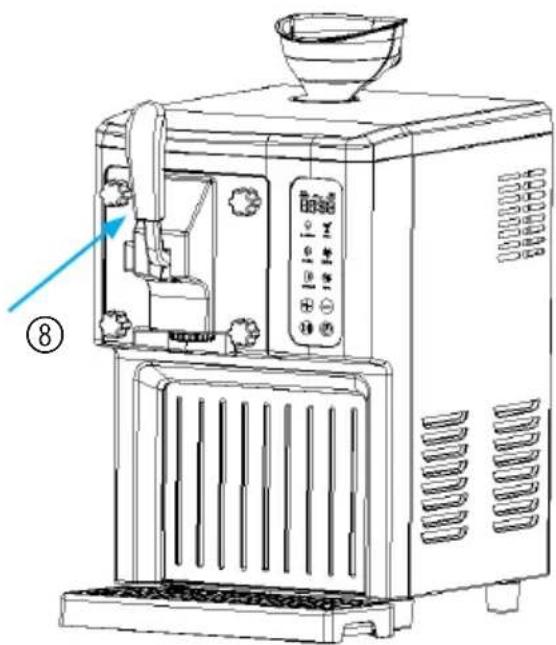
⑧: Pull the handle to pour out the ice-cream.

CAUTION
- Prepare the recipe ingredients from your own recipe or from the recipe booklet here. Note: You do not need to freeze the bowl in the freezer for hours beforehand, as this machine has a built-in compressor that freezes the recipe ingredients during operation to ensure ice-cream output. It is recommended to place 800g (the optimal weight is 600 to 900g) of ingredients at a temperature of 18 to 22 °C.
- When making ice-cream, you can add other favourite seasonings ten minutes before making the ice-cream. Avoid adding granules to avoid clogging the spout. For fruit, you can use a blender to make it liquid and pour it in.
- When the ice-cream is ready, you can continue to add ingredients. When adding new ingredients, the weight should be controlled within 600 g to avoid expansion and overflow of the ice-cream (because some materials remain in the drum).
RECIPES
Recommended ice-cream raw material formula and production method (the following is for reference only, please ensure that the ice cream ingredients do not exceed 60% of the volume of the loading drum).
Basic ice-cream
Ingredients: 300 g of water, 200 g of powdered milk, 300 g of cream
- Mix the water, milk powder and cream until there are no more granules.
- Pour through the funnel into the ice-cream tub to start the ice-cream menu.
Fresh strawberry ice-cream
Ingredients: 120 g of water, 180 g of powdered milk, 260 g of cream and 220 g of strawberries
Tools needed: blender
- Wash the strawberries, put them in the blender with the water and milk powder and blend.
- Pour the cream into the bowl and mix well.
- Pour through the funnel into the ice-cream tub to start the ice-cream menu.
Fresh mango ice-cream
Ingredients: 200 g of water, 200 g of milk powder, 300 g of cream and 160 g of mango
Tools needed: blender
- After peeling the mango, place it in the blender with the milk powder and water and blend until smooth.
- Pour the cream into the bowl and mix well.
- Pour into the ice-cream tub through the funnel to start the ice-cream menu.
Pitaya ice-cream
Ingredients: 400 g of milk, 240 g of cream and 260 g of pitaya
Tools needed: blender
- After peeling the pitaya, place it in the blender with the milk and blend until smooth.
- Pour the cream into the jar and mix well.
- Pour through the funnel into the ice-cream tub to start the ice-cream menu.
Milk ice-cream
Ingredients: 360 g of pure milk, 30 g of refined cane sugar and 300 g of cream
- Mix the pure milk, cream and refined cane sugar until there are no more granules.
- Pour through the funnel into the ice-cream tub to start the ice-cream menu.
Powdered ice-cream
Ingredients: 600 g of pure milk, 200 g of ice-cream powder
- Mix the milk and ice cream powder until there are no more granules.
- Pour through the funnel into the ice-cream tub to start the ice-cream menu.
CLEANING AND MAINTENANCE
Warning: The plug must be removed before cleaning to avoid electric shock.
- Use a damp cloth to clean dirty areas such as the refrigerator compartment and the hull.
- Do not immerse the hull in water or allow water to enter through the side air outlet or inlet.
- After cleaning, it is necessary to dry the inner bowl and handle accessories before reassembly to prevent residual water in the inner bowl from causing odours.
Cleaning Function
- Wash the ice-cream maker after tasting using the cleaning function. First, pour about 1 litre of clean water from the funnel, press the button and enter the cleaning mode. After working for about 1 minute, drain the water, change the water and wash again, 5 times in succession until the water is clear. It is recommended to use the detergent or lemonade for a better effect. At the same time, clean the feed opening with a brush.
- When the water is drained, unscrew the nut as shown in Figure 1, remove the handle parts and clean the mixing blade separately.
- Refer to the next page for details of disassembly and assembly of the handle components and place in the dishwasher for cleaning after disassembly.
- After cleaning the mixing blade, handle components and inner barrels, they must be completely dried and then reassembled to avoid any odour caused by traces of water. Install the handle assembly. Refer to "Handle disassembly" for details.
TROUBLESHOOTING
| Problem Possible Cause $olution | ||
| Unable to empty after the ice cream is finished. | The ice cream is too hard or contains granules. | Allow the ice cream to melt naturally before discharging. |
| Handle assembly does not fit properly. | The mixing blade is not in place or facing the wrong way. | Align the mixing blade with the hole or turn 180 degrees and reinstall. |
| No water comes out during the first cleaning. | Ice is blocking the water outlet. | Allow the ice to melt and drain. |
| Leakage at the handle position. | Sealing ring not fitted or nut not tightened. | Fit the sealing ring and tighten the nut. |
| Scraping noise after eating ice cream. | The ice cream on the drum wall is too hard. | Stop the machine in time or add raw materials to continue production. |
| The handle tip does not slide in and out smoothly. | Wrong direction of the handle tip. | Turn 90 degrees and insert or pull out. |
| There is no rotation of the motor. | Motor overheating protection. | Wait a moment and try again. |
DISPOSAL CONSIDERATIONS
natural_image
Symbol of a trash bin with crossed x- and y-axes, no text or labels presentIf there is a legal regulation for the disposal of electrical and electronic devices in your country, this symbol on the product or on the packaging indicates that this product must not be disposed of with household waste. Instead, it must be taken to a collection point for the recycling of electrical and electronic equipment. By disposing of it in accordance with the rules, you are protecting the environment and the health of your fellow human beings from negative consequences. For information about the recycling and disposal of this product, please contact your local authority or your household waste disposal service.
MANUFACTURER & IMPORTER (UK)
Manufacturer:
Chal-Tec GmbH, Wallstrasse 16, 10179 Berlin, Germany.
Importer for Great Britain:
Berlin Brands Group UK Limited
PO Box 42
272 Kensington High Street
London, W8 6ND
United Kingdom
Estimado cliente:
CONTENIDO
natural_image
Pure mechanical assembly diagram without any text, numbers, or symbolsnatural_image
Technical line drawing of a mechanical switch or bracket assembly (no text or symbols)Figura 1 Figura 2 Figura 3 Figura 4


natural_image
Technical line drawing of a mechanical component with no visible text or symbolsFigura 5 Figura 6 Figura 7 Figura 8
Figura 1 Figura 2

natural_image
Technical line drawing of a mechanical device with labeled components and directional arrow (no text or symbols beyond basic diagram)natural_image
Line drawing of a coffee maker with a bowl on top and a side panel, showing no text or symbols.natural_image
Line drawing of a mechanical device with ventilation grilles and a funnel (no text or symbols)natural_image
Line drawing of a modern kitchen appliance with control panel and fan (no text or symbols)natural_image
Symbol of a trash bin crossed with a diagonal line, no text or labels present
Berlin Brands Group UK Limited
PO Box 42
272 Kensington High Street
London, W8 6ND
United Kingdom
Cher client, chère cliente,
SOMMAIRE
natural_image
Pure mechanical assembly diagram without any text, numbers, or symbolsnatural_image
Mechanical switch assembly diagram showing a lever and handle (no text or labels)Figure 1 Figure 2 Figure 3 Figure 4

natural_image
Technical line drawing of a mechanical component with no visible text or symbolsFigure 5 Figure 6 Figure 7 Figure 8
Figure 1 Figure 2
natural_image
Technical line drawing of a mechanical device with labeled components and directional arrow (no text or symbols beyond basic diagram)natural_image
Line drawing of a coffee maker with a bowl on top and a side panel, showing no text or symbols.natural_image
Line drawing of a mechanical device with ventilation grilles and a funnel (no text or symbols)natural_image
Line drawing of a modern coffee maker with control panel and side-mounted dish (no text or symbols)natural_image
Symbol of a trash bin with crossed lines indicating no waste or discharge, and a solid black rectangle below (no text or labels)Berlin Brands Group UK Limited
PO Box 42
272 Kensington High Street
London, W8 6ND
United Kingdom
Gentile cliente,
INDICE
natural_image
Mechanical assembly diagram showing a rotating component with mounting holes and a red-handled lever (no text or labels)natural_image
Mechanical switch assembly diagram with no visible text or symbolsnatural_image
Technical line drawing of a toggle switch mechanism (no text or symbols)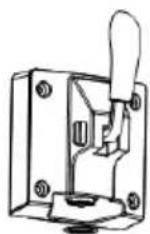
natural_image
Technical line drawing of a mechanical component with no visible text or symbolsnatural_image
Technical line drawing of a mechanical pump or fan assembly with internal blades and housing (no text or symbols)natural_image
Line drawing of a coffee maker with a bowl on top and a side panel, showing no text or symbols.natural_image
Line drawing of a mechanical device with ventilation grilles and a funnel (no text or symbols)natural_image
Line drawing of a modern coffee maker with control panel and side-mounted dish (no text or symbols)natural_image
Symbol of a trash bin with crossed lines indicating no waste or discharge, and a solid black rectangle below (no text or labels)Berlin Brands Group UK Limited
PO Box 42
272 Kensington High Street
London, W8 6ND
United Kingdom

area
| Category | Value | | -------- | ----- | | 1 | 100 | | 2 | 100 | | 3 | 100 | | 4 | 100 | | 5 | 100 | | 6 | 100 | | 7 | 100 | | 8 | 100 | | 9 | 100 | | 10 | 100 | | 11 | 100 | | 12 | 100 | | 13 | 100 | | 14 | 100 | | 15 | 100 | | 16 | 100 | | 17 | 100 | | 18 | 100 | | 19 | 100 | | 20 | 100 | | 21 | 100 | | 22 | 100 | | 23 | 100 | | 24 | 100 | | 25 | 100 | | 26 | 100 | | 27 | 100 | | 28 | 100 | | 29 | 100 | | 30 | 100 | | 31 | 100 | | 32 | 100 | | 33 | 100 | | 34 | 100 | | 35 | 100 | | 36 | 100 | | 37 | 100 | | 38 | 100 | | 39 | 100 | | 40 | 100 | | 41 | 100 | | 42 | 100 | | 43 | 100 | | 44 | 100 | | 45 | 100 | | 46 | 100 | | 47 | 100 | | 48 | 100 | | 49 | 100 | | 50 | 100 | | 51 | 100 | | 52 | 100 | | 53 | 100 | | 54 | 100 | | 55 | 100 | | 56 | 100 | | 57 | 100 | | 58 | 100 | | 59 | 100 | | 60 | 100 | | 61 | 100 | | 62 | 100 | | 63 | 100 | | 64 | 100 | | 65 | 100 | | 66 | 100 | | 67 | 100 | | 68 | 100 | | 69 | 100 | | 70 | 100 | | 71 | 100 | | 72 | 100 | | 73 | 100 | | 74 | 100 | | 75 | 100 | | 76 | 100 | | 77 | 100 | | 78 | 100 | | 79 | 100 | | 80 | 100 | | Note: The actual values are not provided in the code. I have used the label 'Value' as a placeholder for the value detection. You would need to run the code to get the actual values from the code list. Please note that the actual values would be the result of this example. You would need to run the code to get the actual values from the code list. You would need to run the code to get the actual values from the code list. You would need to run the code to get the actual values from the code list. You would need to run the code to get the actual values from the code list. You would need to run the code to get the actual values from the code list. You would need to run the code to get the actual values from the code list. You would need to run the code to get the actual values from you would need to run the code. You would need to run the code to get the actual values from you would need to run the code.
KLARSTEIN
- INHALT
- Dear Customer,
- CONTENTS
- SAFETY INSTRUCTIONS
- WARNING
- Special Notes
- To avoid contamination of food, please follow the instructions below:
- DEVICE DESCRIPTION
- INSTALLATION
- Handle assembly and disassembly
- Handle disassembly
- Features
- OPERATION
- Ice-cream mode
- Juice Mode
- Refrigeration mode
- Mixing mode
- Shakes Mode
- Cleaning Mode
- Return
- Motor protection function
- The largest production capacity
- ICE-CREAM PRODUCTION
- Prepare recipe ingredients
- CAUTION
- RECIPES
- Basic ice-cream
- Fresh strawberry ice-cream
- Tools needed: blender
- Fresh mango ice-cream
- Pitaya ice-cream
- Milk ice-cream
- Powdered ice-cream
- CLEANING AND MAINTENANCE
- Cleaning Function
- TROUBLESHOOTING
- DISPOSAL CONSIDERATIONS
- MANUFACTURER & IMPORTER (UK)
- Manufacturer:
- Importer for Great Britain:
- Estimado cliente:
- CONTENIDO
- SOMMAIRE
- Gentile cliente,
- INDICE
- KLARSTEIN
Brand : Klarstein
Model : Sweet Sundae Touch
Category : Ice machine