Xenio CX1104XW01 - Thermostat HARVIA - Free user manual and instructions
Find the device manual for free Xenio CX1104XW01 HARVIA in PDF.
| Product type | Thermostat (Control center for sauna) |
| Brand | Harvia |
| Model | Xenio CX1104XW01 |
| Power supply | Mains connection via power supply unit (230 V, fuses according to heater power) |
| Maximum load | 9 kW between control center and heater |
| Included components | Power supply unit, control panel, temperature sensor + cable, door sensor kit, mounting screws |
| Main functions | Sauna heating control, programming, remote control (via optional remote or MyHarvia app), lighting (max 100 W), door switch, overheat safety |
| Temperature sensor | Integrated sensor with overheat safety, maximum detection distance from magnet not specified, installation at least 1000 mm from an omnidirectional air duct |
| Connectivity | WiFi (router required), MyHarvia app for mobile control |
| Installation ambient temperature | Power supply unit: > 0 °C, in a dry place or sauna cabin |
| Maintenance and cleaning | Clean with a slightly damp cloth and mild detergent, no solvents or corrosive products |
| Safety | Do not use if damaged; installation by professional electrician; overheat safety must be reset after diagnosis; do not cover; do not use PVC insulated cable; no residual current circuit breaker for the heater |
| Overheat safety reset | Button on sensor housing (WX232); determine cause before reset |
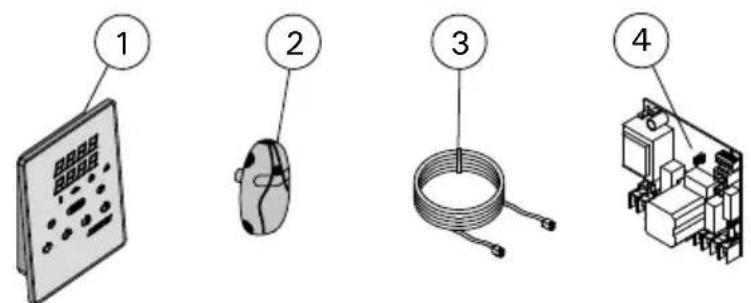
| Spare parts | Control panel, printed circuit board (XT2020), temperature sensor, 5 m control cable |
| Warranty | 2 years domestic use, 1 year building, 3 months commercial; does not cover non-compliance with instructions or use of non-recommended stones |
| Product standard | IEC/EN 60335-2-53 (electric sauna heaters) |
Frequently Asked Questions - Xenio CX1104XW01 HARVIA
User questions about Xenio CX1104XW01 HARVIA
0 question about this device. Answer the ones you know or ask your own.
Ask a new question about this device
Download the instructions for your Thermostat in PDF format for free! Find your manual Xenio CX1104XW01 - HARVIA and take your electronic device back in hand. On this page are published all the documents necessary for the use of your device. Xenio CX1104XW01 by HARVIA.
USER MANUAL Xenio CX1104XW01 HARVIA
√ Control unit
√ Door switch sensor set
√ Temperature sensor + cable
√ Control panel + data cable
√ Mounting screws
√ Instructions for Installation and Use
DE: Lieferumfang
INSTALLATION IMAGES....6
WARNINGS AND NOTES ......20
INSTRUCTIONS FOR INSTALLATION ......22
Technical data 22
Installing the Power Unit 22
Electrical Connections 22
Installation of the Sensor ....23
Mounting the door sensor 23
Resetting the Overheat Protector 23
SPARE PARTS 52
GUARANTEE ....53
DE: Inhalt
SYSTEMKOMPONENTEN 5
MONTAGEILLUSTRATIONEN 6
Anduri paigaldamine....35
Ukseanduri paigaldamine....35
IMAGES D'INSTALLATION ....6
AVERTISSEMENTS ET REMARQUES ....36
INSTRUCTIONS D'INSTALLATION....38
natural_image
Technical illustration of a mechanical assembly with a rectangular block and internal components, shown with tool tips (no text or symbols)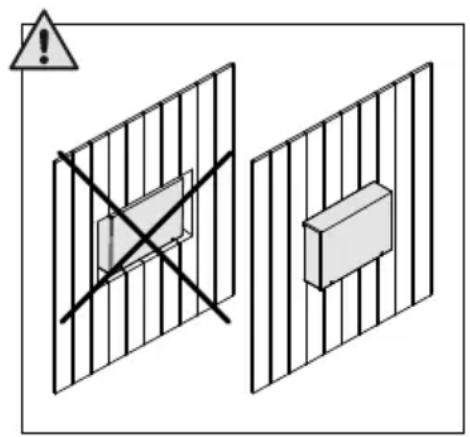
text_image
Safety warning diagram showing a warning sign and two fence diagrams with crosshair indicatorsE. Control panel
F. Remote switch
G. Safety switch
H. Temperature sensor
I. Lighting (max 100 W)
J. Control of electric heating
K. Residual current device
DE
EN: Maximum detection distance of the sensor from the magnet
natural_image
Diagram of a mechanical device with a lever and handle, showing motion direction (no text or symbols)
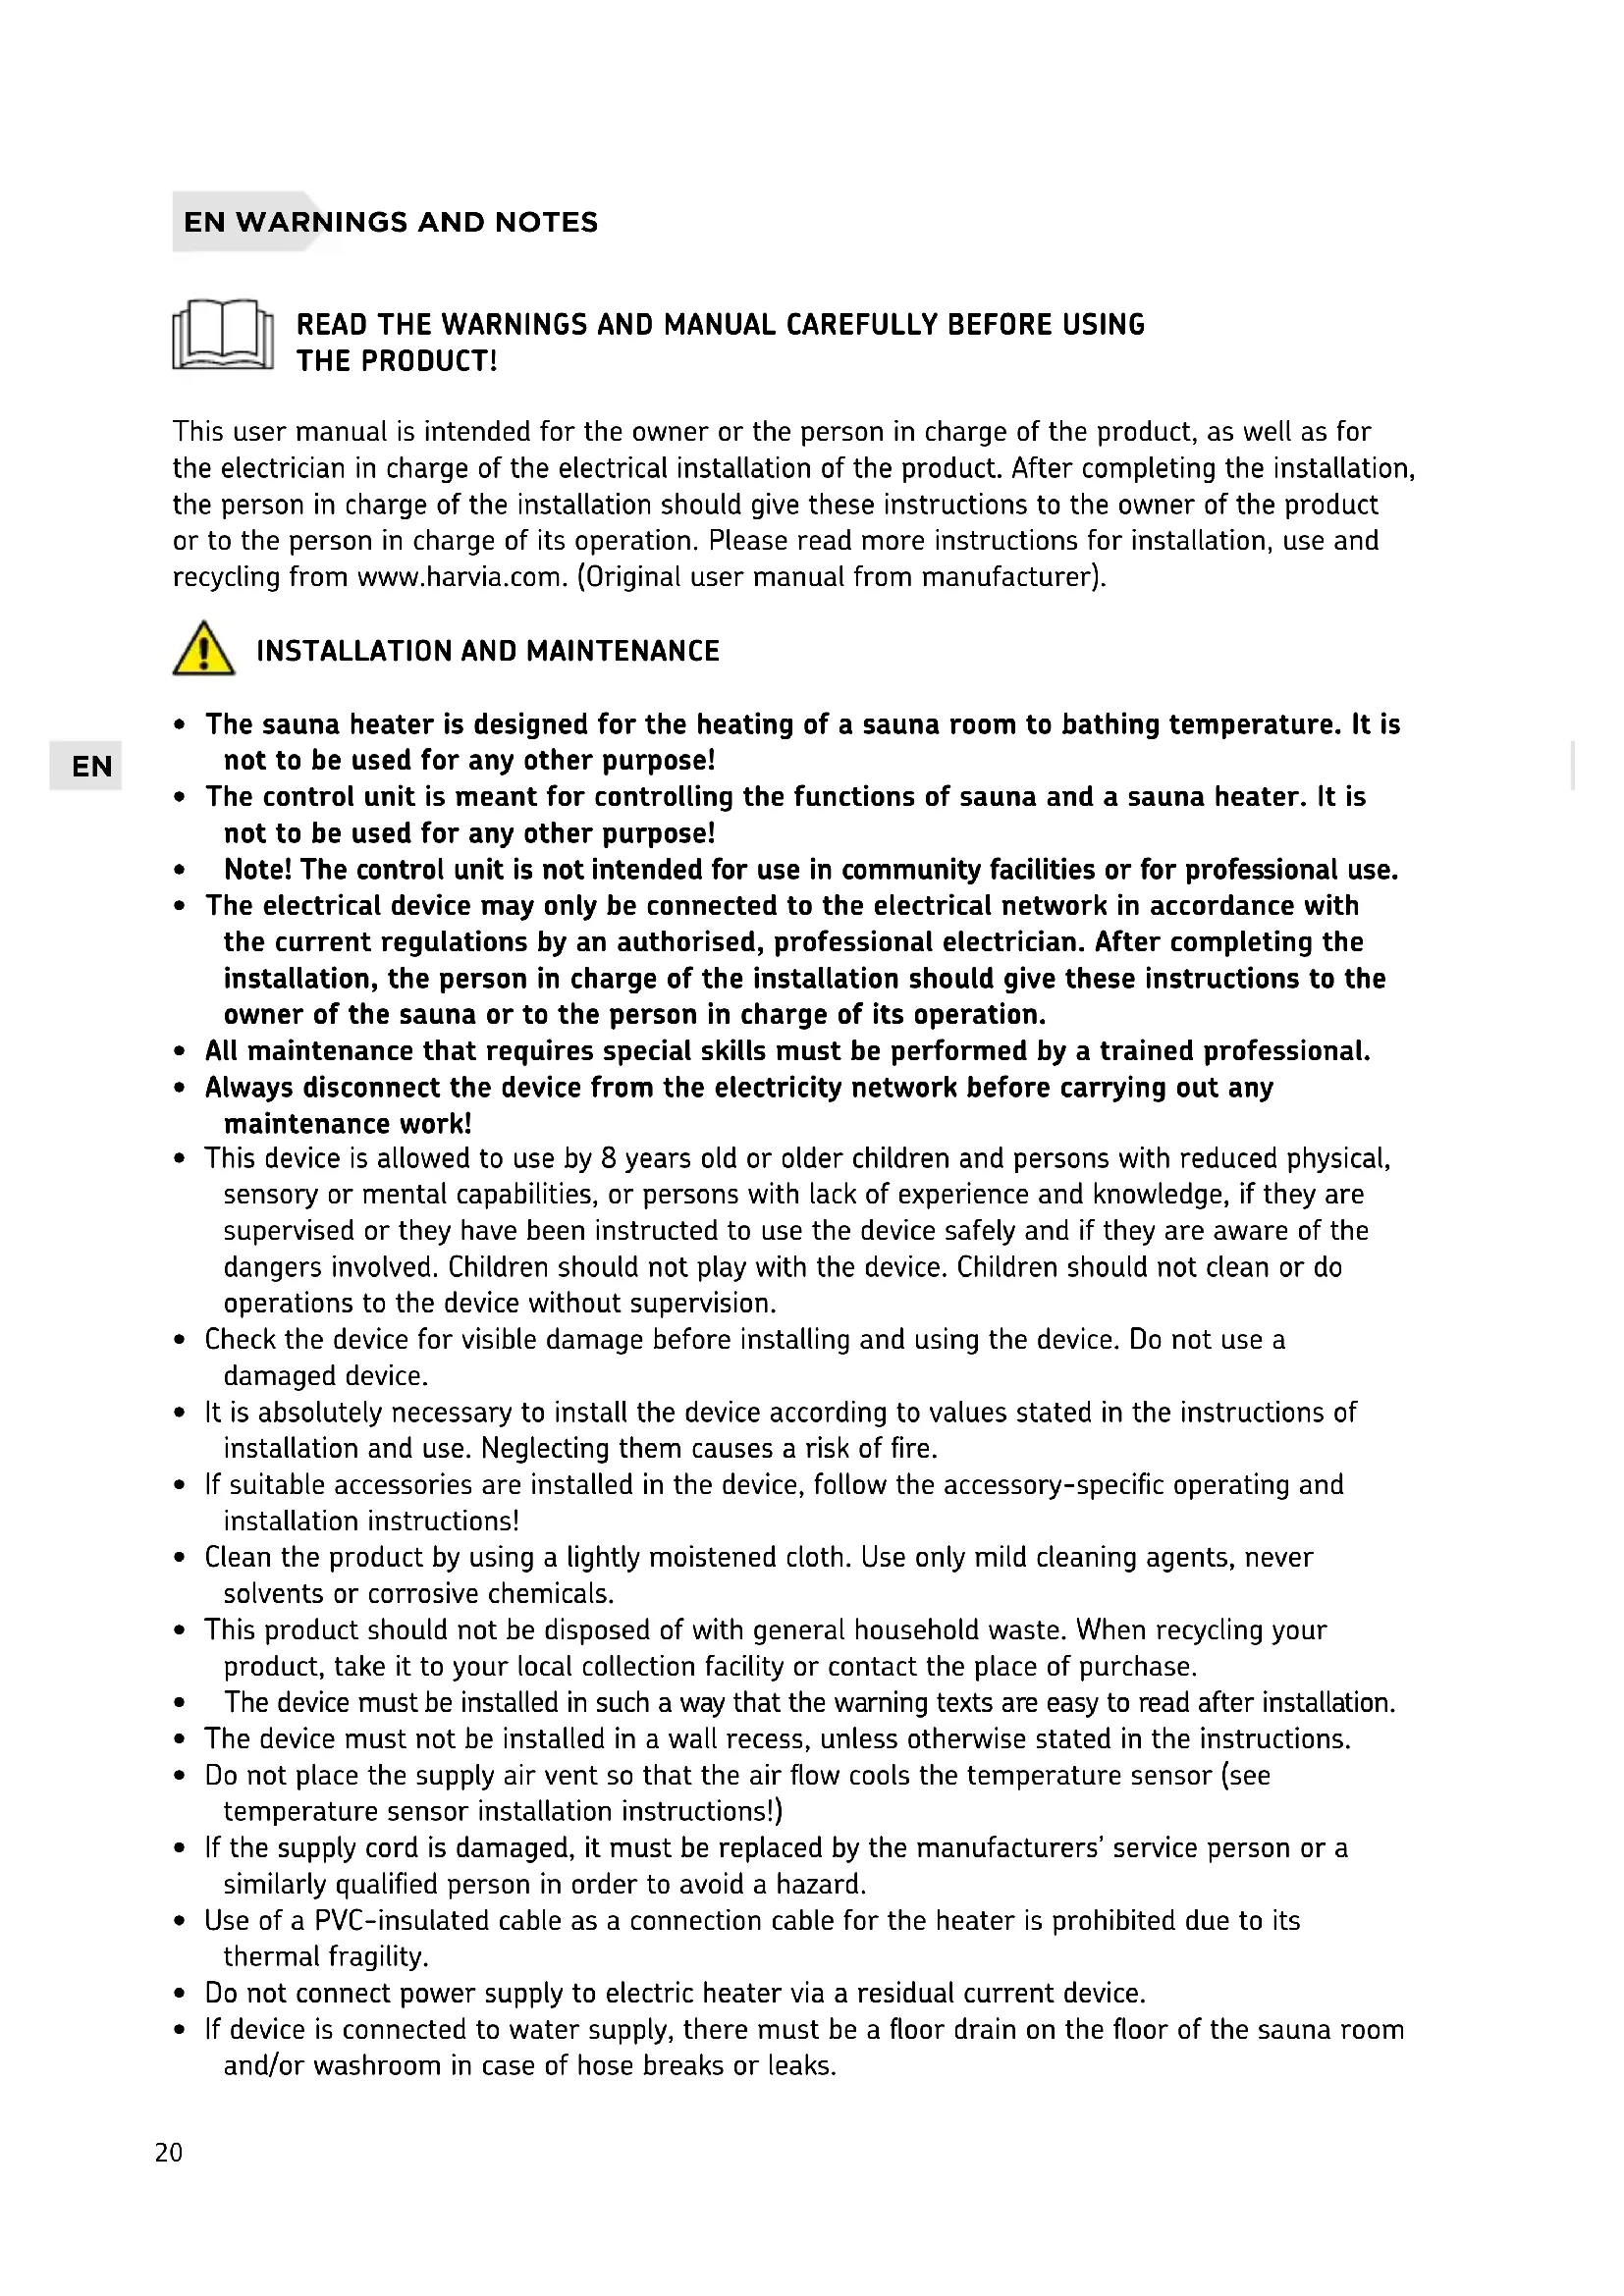
LUE HUOLELLISESTI VAROITUKSET JA KÄYTTÖOHJE ENNEN KUIN KÄYTÄT LAITETTA!
READ THE WARNINGS AND MANUAL CAREFULLY BEFORE USING THE PRODUCT!
This user manual is intended for the owner or the person in charge of the product, as well as for the electrician in charge of the electrical installation of the product. After completing the installation, the person in charge of the installation should give these instructions to the owner of the product or to the person in charge of its operation. Please read more instructions for installation, use and recycling from www.harvia.com. (Original user manual from manufacturer).

INSTALLATION AND MAINTENANCE
- The sauna heater is designed for the heating of a sauna room to bathing temperature. It is not to be used for any other purpose!
- The control unit is meant for controlling the functions of sauna and a sauna heater. It is not to be used for any other purpose!
• Note! The control unit is not intended for use in community facilities or for professional use.
- The electrical device may only be connected to the electrical network in accordance with the current regulations by an authorised, professional electrician. After completing the installation, the person in charge of the installation should give these instructions to the owner of the sauna or to the person in charge of its operation.
- All maintenance that requires special skills must be performed by a trained professional.
- Always disconnect the device from the electricity network before carrying out any maintenance work!
- This device is allowed to use by 8 years old or older children and persons with reduced physical, sensory or mental capabilities, or persons with lack of experience and knowledge, if they are supervised or they have been instructed to use the device safely and if they are aware of the dangers involved. Children should not play with the device. Children should not clean or do operations to the device without supervision.
- Check the device for visible damage before installing and using the device. Do not use a damaged device.
- It is absolutely necessary to install the device according to values stated in the instructions of installation and use. Neglecting them causes a risk of fire.
- If suitable accessories are installed in the device, follow the accessory-specific operating and installation instructions!
- Clean the product by using a lightly moistened cloth. Use only mild cleaning agents, never solvents or corrosive chemicals.
- This product should not be disposed of with general household waste. When recycling your product, take it to your local collection facility or contact the place of purchase.
- The device must be installed in such a way that the warning texts are easy to read after installation.
- The device must not be installed in a wall recess, unless otherwise stated in the instructions.
- Do not place the supply air vent so that the air flow cools the temperature sensor (see temperature sensor installation instructions!)
- If the supply cord is damaged, it must be replaced by the manufacturers' service person or a similarly qualified person in order to avoid a hazard.
- Use of a PVC-insulated cable as a connection cable for the heater is prohibited due to its thermal fragility.
- Do not connect power supply to electric heater via a residual current device.
- If device is connected to water supply, there must be a floor drain on the floor of the sauna room and/or washroom in case of hose breaks or leaks.

INSTRUCTIONS FOR USE AND BATHING
• Always check that there are no objects on the heater or near the heater before switching it on.
- Beware of hot heater. The stones and metal parts of the heater may burn the skin.
- Sea air and a humid climate may corrode the metal surfaces of the device.
- Do not hang clothes to dry in the sauna, as this may cause a risk of fire. Excessive moisture content may also cause damage to the electrical equipment.
- Do not press the overheating protection button before the cause of the fault has been found. Only persons authorised to carry out electrical installations can reset the overheat protector, unless otherwise stated in the instructions manual.
- Always check that the heater has switched off and stopped heating after the on-time period has elapsed.
- The sauna room and surroundings of the heater must always be checked before the heater is switched on again or it is switched on with the remote-control system.
- The sauna room and surroundings of the heater must always be checked before the device is brought into standby mode required by remote control or pre-timed operation.
- According to the product standard IEC/EN 60335 -2-53 regulating electrical sauna heaters, the control unit can be used to remotely control the heater once the heater or sauna room door is equipped with a secure switch (safety or door switch).

Do not cover!

See WARNINGS AND NOTES!
See INSTALLATION IMAGES!
Technical data
| Technical data Model CX110XW | |||||
Installing the Power Unit > Image 1
Install the power unit in a dry area or sauna room (ambient temperature >0^ ). Note! Do not embed the power unit into the wall, since this may cause excessive heating of the internal components of the unit and lead to damage.
Electrical Connections > Image 2
Connect the wiring according to Figure 2. Tables show the wire and fuse sizes, depending on the heater output. For more detailed installation instructions see the instructions for installation and use of the selected heater model. Maximum load from control unit to heater is 9 kW.
Power Unit Fuse Faults
Replace a blown fuse by a new one with the same value. The location of the fuses in the power unit is shown in Figure 2.
- If the fuse for the electronic card has blown, there is likely a fault in the power unit. Service is required.
- If the lighting fuse (Figure 2) is broken, there is a fault in the lighting. Check the operation and wiring of the lighting.
Terminals for controlling electrical heating
The power unit interface J (Figure 2) can also be used for purposes such as electric heating control. When the heater is turned on from the control unit, voltage is generated in terminal J. The heating can be switched on or off based on the signal.
Installation of the Sensor > Image 4

NOTE! Always check the correct location of the temperature sensor from the heater's installation instruction.
• See image 4A
- Note! Do not install the temperature sensor closer than 1000 mm to an omnidirectional air vent or closer than 500 mm to an air vent directed away from the sensor. See figure 4B. The air flow near an air vent cools down the sensor, which gives inaccurate temperature readings to the control unit. As a result, the heater might overheat.
Mounting the door sensor > Image 5
Installation of a sensor on a door frame:
- Attach the sensor holder to the door frame, using either a screw (Figure 5A) or double-sided tape (Figure 5B).
• Install the sensor in the holder (Figure 5C). - Note: If the door frame is sheet metal and there is room for the sensor behind it, the sensor can also be attached using a grommet (Figure 5D). An 8 mm drill bit should be used.
Attaching the magnet to the door:
- Fix the magnet holder to the door, using either a screw (Figure 5E) or double-sided tape (Figure 5F).
- Press the magnet into place in the holder (Figure 5G).
- The magnet can also be mounted on the door using only double-sided tape (Figure 5H).
Resetting the Overheat Protector > Image 6
The sensor box (WX232) contains a temperature sensor and an overheat protector. If the temperature in the sensor's environment rises too high, the overheat protector cuts off the heater power. Resetting the overheat protector is shown in figure 6.

Note! The reason for the going off must be determined before the button is pressed.

Anduri paigaldamine > Joonis 4

WX694 WX248 WX311 WX683
FI: Varaosat
- Control panel 2. Temperature sensor 3. Data cable 5 m
- Circuit board (XT2020)
DE: Ersatzteile
- Bedienfeld 2. Temperaturfühler 3. Datakabel 5 m
- Platine (XT2020)
RU: Запасные части
- The guarantee period for heaters, steam generators and control equipment used in saunas by families is two (2) years.
- The guarantee period for heaters, steam generators and control equipment used in saunas by building residents is one (1) year.
- The guarantee period for heaters, steam generators and control equipment used in commercial saunas facilities is three (3) months.
- The guarantee does not cover any faults resulting from failure to comply with installation, use or maintenance instructions.
- The guarantee does not cover any faults resulting from the use of stones not recommended by the heater manufacturer.
- Använd endast tillverkarens reservdelar.
EN: Guarantee
- The guarantee period for heaters, steam generators and control equipment used in saunas by families is two (2) years.
- The guarantee period for heaters, steam generators and control equipment used in saunas by building residents is one (1) year.
- The guarantee period for heaters, steam generators and control equipment used in commercial saunas facilities is three (3) months.
- The guarantee does not cover any faults resulting from failure to comply with installation, use or maintenance instructions.
- The guarantee does not cover any faults resulting from the use of stones not recommended by the heater manufacturer.
- We recommend to use only the manufacturer's spare parts.
DE: Garantie
CENTRAL EUROPE: Sentiotec GmbH | Division of Harvia Group | Wartenburger
Straße 31, A-4840 Vöcklabruck | T +43 (0) 7672/22 900-50 | F -80 |
info@sentiotec.com | www.sentiotec.com