USER MANUAL E6EC1-6BST ELECTROLUX
natural_image
Line drawing of a modern espresso machine with control panel and lever (no text or symbols)
GB INSTRUCTION BOOK
FR MODE D'EMPLOI
AR دليل المستخدم
CZ NÁVOD K POUŽITÍ
* available in certain models only

natural_image
Illustration of a coffee maker with upward arrows indicating process flow (no text or symbols)
natural_image
Illustration of a coffee maker with a side panel and control buttons, no text or symbols present.
natural_image
Illustration of a coffee maker with a wooden stand and glass lid, no text or symbols present
flowchart
graph TD
    A["Lighting"] --> B["Brush"]
    B --> C["Color/Brush"]
    C --> D["Close-up of Brush"]
    style A fill:#f9f,stroke:#333
    style B fill:#ccf,stroke:#333
    style C fill:#cfc,stroke:#333
    style D fill:#fcc,stroke:#333
natural_image
Illustration of a hand pouring milk from a glass cup into a brown liquid (no text or symbols)
natural_image
Illustration of a coffee maker with speaker and control panel (no text or symbols)

electrolux.com/shop
Premium Coffee
Descaler
Ref: EPD1
PNC:900923302
Premium Cleaning
Tablets
Ref : ECT
PNC:900168167
PureAdvantage™ water filter
Ref: EPAB3
PNC:900167741
CONTENTS
| ENGLISH 6 | HRVATSKI 54 | SRPSKI | 102 |
| ARABIC 11 | MAGYAR 60 | PYCCKIЙ | 108 |
| ČEŠTINA 16 | ITALIANO 66 | SVENSKA | 114 |
| DEUTSCH 22 | LIETUVIŠKAI 72 | SLOVENŠČINA | 120 |
| DANSK 30 | LATVIEŠU 78 | SLOVENČINA | 126 |
| EESTI 36 | NORSK 84 | TÝRKÇE | 132 |
| SUOMI 42 | POLSKI 90 | УКРАЇНСЬКА | 138 |
| FRANÇAIS 48 | ROMÂNĂ 96 | | |
WE'RE THINKING OF YOU
Thank you for purchasing an Electrolux appliance. You've chosen a product that brings with it decades of professional experience and innovation. Ingenious and stylish, it has been designed with you in mind. So whenever you use it, you can be safe in the knowledge that you'll get great results every time.
Welcome to Electrolux.
Visit our website to:

Get usage advice, brochures, trouble shooter, service information: www.electrolux.com
Register your product for better service: www.electrolux.com/productregistration

Buy accessories and consumables for your appliance: www.electrolux.com/shop
CUSTOMER CARE AND SERVICE
When contacting Service, ensure that you have the following data available:
- Model number
- PNC number
- Serial number
The information can be found on the rating plate.
ENGLISH
Thank you for choosing an Electrolux product. In order to ensure the best results, always use original Electrolux accessories and spare parts. They have been designed especially for your product. This product is designed with the environment in mind. All plastic parts are marked for recycling purposes.
COMPONENTS (picture page 2)
A. Power indicator button
B. One-cup indicator/button
C. Two-cup indicator/button
D. Steam indicator/button
E. Brewing head
F. One-cup/E.S.E pod filter cup
G. Two-cup filter cup
H. Filter holder
I. Tamper/dispenser measure spoon
* available in certain models only
J. Cleaning pin*
K. Water tank lid
L. Water tank handle
M. Water tank
N. Cup warmer
O. Steam knob
P. Hot water/steam nozzle (milk frother)
Q. Drip grid
R. Drip tray
SAFETY ADVICE
Read the following instructions carefully before using the appliance for the first time.
- This appliance can be used by children aged from 8 years and above and persons with reduced physical, sensory or mental capabilities or lack of experience and knowledge if they have been given supervision or instruction concerning use of the appliance in a safe way and understand the hazards involved.
• Children shall not play with the appliance.
- Cleaning and user maintenance shall not be made by children unless they are supervised.
- Keep the appliance and its cord out of reach of children less than 8 years old.
- The appliance may only be connected to a power supply whose voltage and frequency comply with the specifications on the rating plate!
- Never use or pick up the appliance if
– the supply cord is damaged,
– the housing is damaged.
- The appliance must only be connected to an earthed socket. If necessary, an extension cable suitable for 10 A can be used.
- If the appliance or the supply cord is damaged, it must be replaced by the manufacturer, its service agent or similarly qualified person, in order to avoid hazard.
• Always place the appliance on a flat, level surface.
- The appliance must be switched off and the mains plug withdrawn each time after use, before cleaning and maintenance.
- The appliance and accessories become hot during operation. Use only designated handles and knobs. Allow to cool down before cleaning or storage.
- The mains cable must not come into contact with any hot parts of the appliance.
- Do not remove the filter holder during the brewing process as the appliance is pressurized. The risk of burns exists.
- Do not remove the water tank during the brewing process.
- Do not remove the filter holder during the brewing process or when there's steam /
hot water escaping from the filter holder. Ensure to release the pressure into water tank before removing the filter holder. DANGER! There is risk of scalding.
- Release pressure through hot water/steam nozzle before removing filter holder.
- Warning: Avoid steam burn.
- When the steam function is used there can be some hot water dripping from the brewing head. DANGER! The water is hot, there is a risk for scalding.
- When opening the steam knob there is a shot of hot water coming out. Be careful and open the steam valve slowly. DANGER! The water is hot, there is a risk for scalding.
- Do not immerse the appliance in water or any other liquid.
- Do not exceed the maximum filling volume as indicated on the appliances.
- Fill the water tank only with cold water, never with milk or other liquids.
• Always use fresh water to brew espresso to promise the best taste.
- Do not use the appliance if the water tank has not been filled.
- Do not use the appliance without the drip tray or drip grid, unless a higher cup/mug is in use.
- Do not use or place the appliance on a hot surface or near source of heat.
- Warning: Avoid spillage on the connector.
- This appliance is intended for domestic use only. The manufacturer cannot accept any liability for possible damage caused by improper or incorrect use.
- This appliance is not intended to be operated by means of an external timer or separate remote-control system.
• Power consumption in off mode: 0.3W
• Power consumption in standby: 0.5W
• Maximum time needed for the equipment to reach automatically the applicable low power mode: 20Min
This appliance is intended to be used in household and similar applications such as:
- staff kitchen areas in shops, offices and others working environments;
- farm houses;
- by clients in hotels, motels and other residential type environments;
- bed and breakfast type environments.
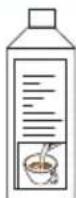
GETTING STARTED (picture page 3 and 4)
Start the machine for the first time
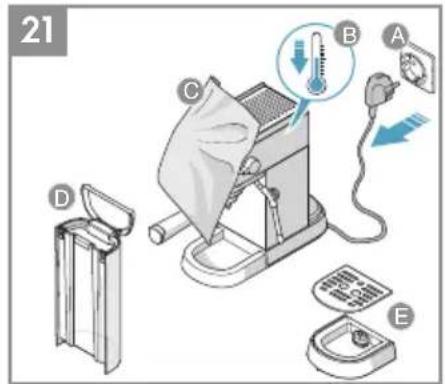
1 before the machine on a flat surface. Plug in the machine to turn on its stand-by mode, while turns half on. Fill the tank with cold pure water. Put filter cup into filter holder, and then fix it onto brewing head anti-clockwise from "INSERT" to "LOCK" position without coffee. Make sure the knob is at the horizontal position ("OFF" position).
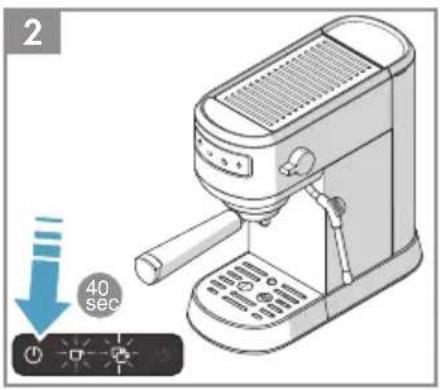
2 Start the machine with the ⏻ button, whose light turns fully on and and buttons start blinking.
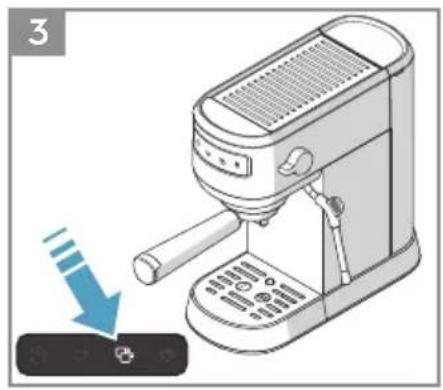
3 When buttons stop blinking, pre-heating is done. Press 📋 button to start brewing process. NOTE: There may be noise when pumping the water for the first time. It is normal. The machine is releasing the air from inside. The noise will stop after about 20 seconds.
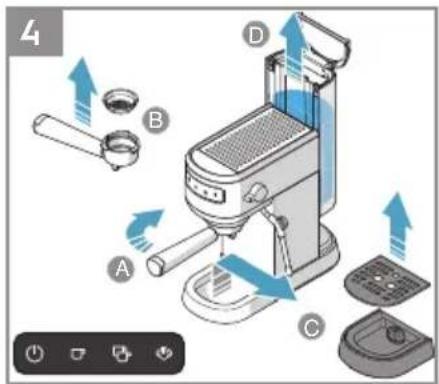
4 When brewing is finished, remove the filter holder clockwise, clean up the filter and clear up the drip tray. Now the machine is ready to use. NOTE: The machine will turn off automatically after 20 mins of no operation.
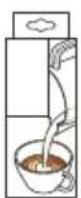
Make espresso coffee
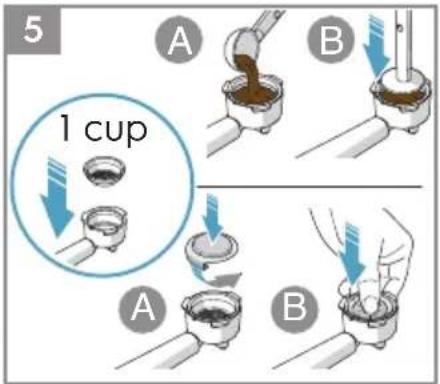
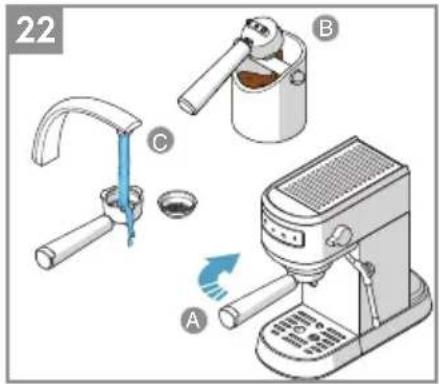
5 Put one-cup filter cup into filter holder. Add one spoon of ground coffee, press it tight with tamper; or add an E.S.E pod and put it into filter cup. E.S.E (Easy Serving Espresso) Pods can be used to simplify the espresso preparation. Each pre-packed pod contains 7 grams of coffee, already measured and pressed and sealed between 2 fine layers of filter paper.
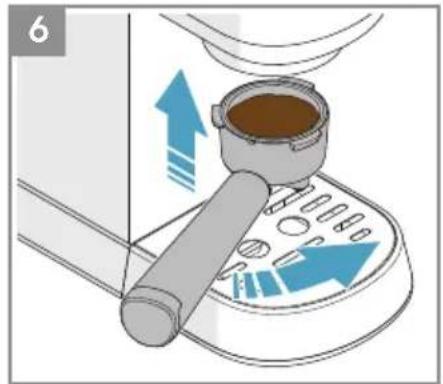
6 Fix the filter holder onto brewing head anti-clockwise from "INSERT" to "LOCK" position.
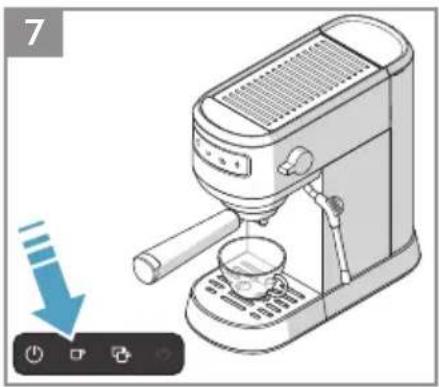
7 Put a warm cup on the drip tray. In "pre-heating done" mode when ⏻ and □ and 📋 buttons are steadily and fully light on, press button to start brewing process.
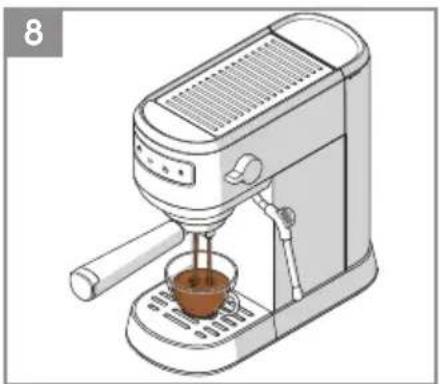
8 Wait a moment and the top-grade coffee will flow out. When the machine stops working, your coffee is now ready.
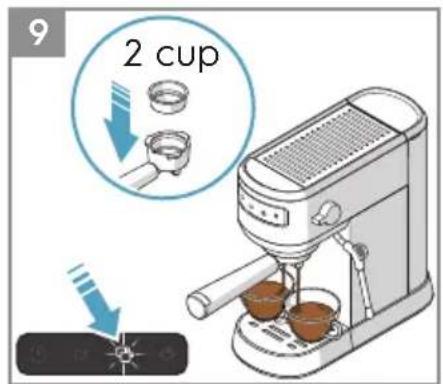
9 Now apply two-cup filter cup. Press 📋 button. Brew 2 cups of espresso at the same time.
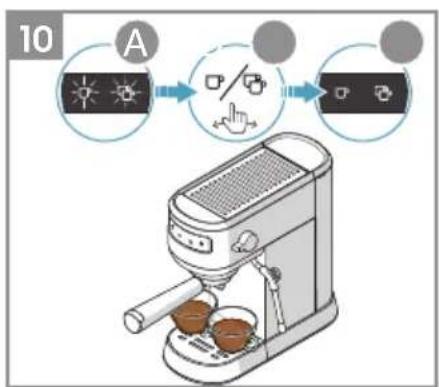
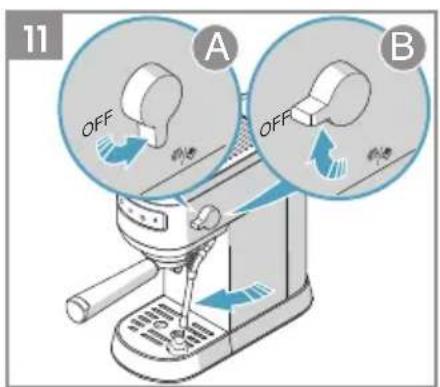
10 NOTE: If both □ and □ buttons start blinking quickly, you may simply press or button to cancel brewing, or (step 11)
11 (step 10) you may restart brewing after cooling down the boiler. Turning the knob to 🎩/💡 position and release hot water from steam nozzle. The pump stops working automatically when it's done cooling off. Turn the knob off and resume brewing again.
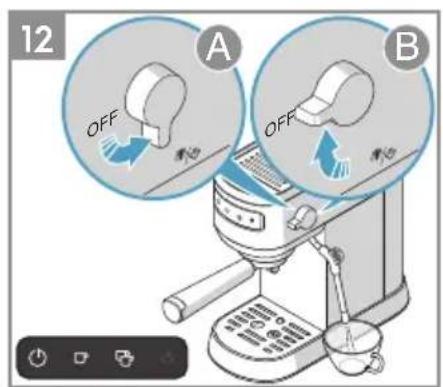
Make hot water
12 In "pre-heating done" mode when ⏻ and □ and 📋 buttons are steadily and fully light on, turn the knob to 🔊/ 🔔 position. Hot water comes out of the steam nozzle. Turn the knob off when the desired amount is complete.
Froth milk and make cappuccino/latte
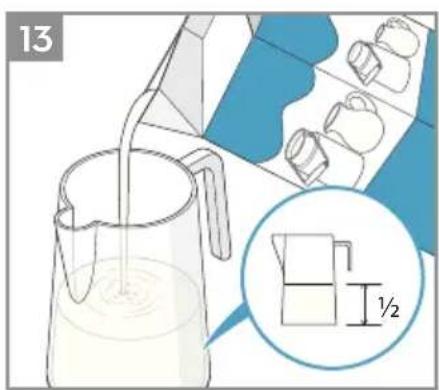
13 Fill a jug with 100ml (for cappuccino) or 200ml (for latte) milk. NOTE: make sure jug diameter is no less than 70±5mm, and jug capacity can hold twice the milk volume after it's done frothing.
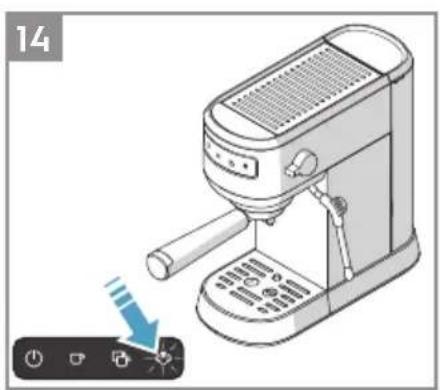
14 In "pre-heating done" mode when ⏻ and □ and buttons are steadily and fully light on, press button, it starts blinking. NOTE: Use full milk at refrigerator temperature (NOT HOT!).
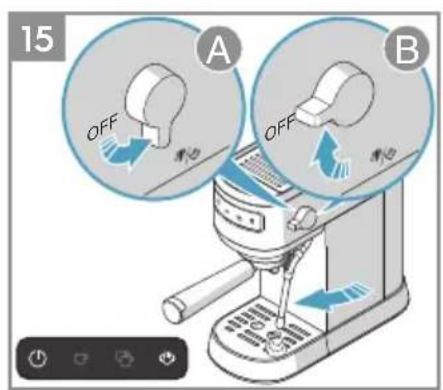
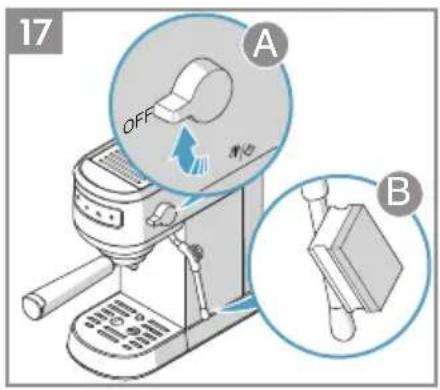
15 When the 🎨 button stops blinking, steam / milk frothing function is ready. Before frothing milk, push steam nozzle in the direction of drip tray, turn the knob to 🎨/ 🔊 position and release steam until there's no water coming out, then turn off steam function by turning the knob back to horizontal "OFF" position.
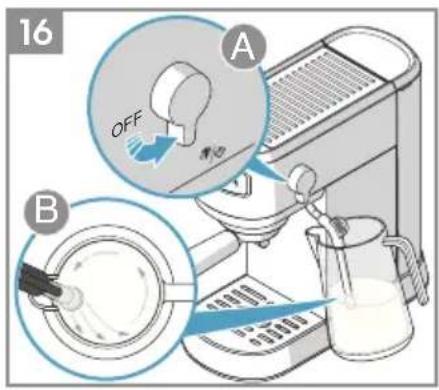
16 Immerse steam nozzle in milk about 2cm under the milk surface, turn on the knob. Make sure the steam nozzle is placed in a position that makes the milk turning in one direction inside the jug from top to bottom.
17 NOTE En Clear steam nozzle with wet reached, turn off the knob. sponge immediately after steam stops generating, but care not to hurt! The pump automatically stops working after milk frothing for 3 minutes.
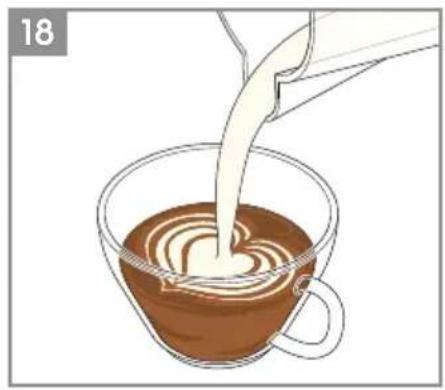
18 Pour the frothed milk into the espresso prepared, now the cappuccino/latte is ready. Sweeten to taste and if desired, sprinkle the froth with a little cocoa powder. NOTE: After making steam, you may immediately make espresso again by pressing or button. If both and buttons start blinking quickly, cool down the boiler and resume brewing (see step 11).
DIY / volume
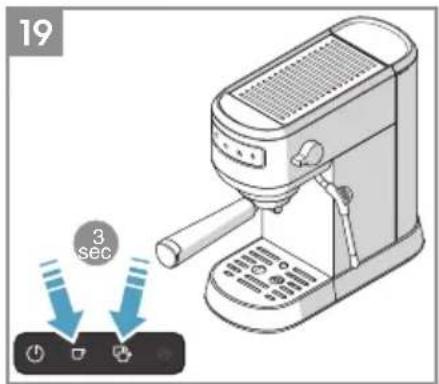
19 In "pre-heating done" mode when ⏻ and □ and 📋 buttons are steadily and fully light on, long press / button for 3 seconds to start resetting mode. Press / button to start brewing and press again to stop when the desired volume is complete. Now the volume is saved for next operation and from then on.
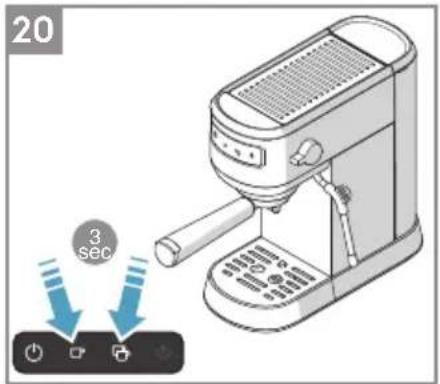
20 Restore factory volume setting simply by long pressing □ and □ buttons for 3 seconds again.
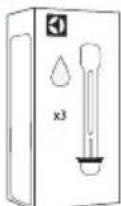
CLEANING AND CARE
21 - Turn the machine off and unplug the power cord. Let the machine cool down completely before cleaning. Wipe all outer surfaces with a damp cloth. Clean water tank, drip tray and drip grid regularly. Never use caustic or abrasive cleaners, and never immerse the machine in liquid!
22 Detach the filter holder by turning it clockwise. Scrap coffee residue or used E.S.E pod. Extract the filter cup from the filter holder, rinse them with clean water and dry thoroughly.
DECALCIFYING
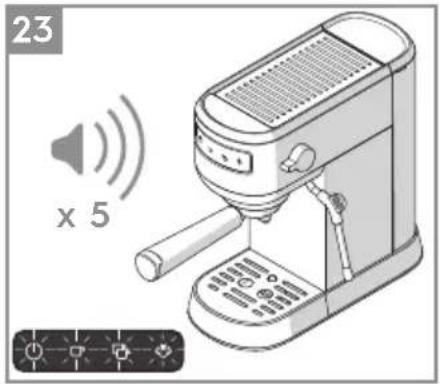
23 Descaling is recommended when all indicators blink 5 times with 5 beeps the moment machine is turned on. Descaling warning will repeat 2 more times each time when you turn on the appliance if you do not perform descaling or do not cancel by simultaneously pressing and and for 3 seconds.
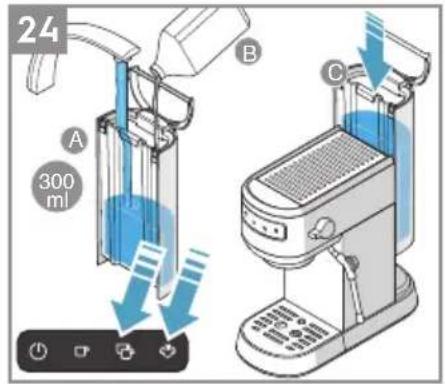
24 Fill the water tank to 300ml level with water and then add the descaling agent (or fill in water and vinegar 1:1). Use only an environmentally friendly descaling agent and always follow the manufacturer's instructions. In "pre-heating done" mode when and and buttons are steadily and fully light on, simultaneously press and for 3 seconds to start descaling process, during which and buttons blinking slowly one after another. When descaling completes, the machine will return to standby mode. Perform step 1-4 twice before using the machine.
Enjoy your new Electrolux product!
TROUBLESHOOTING
| PROBLEM POSSIBLE CAUSE SOLUTION | | |
| Water leaks from the bottom of coffee maker. | There is too much water in the drip tray. Please clean the drip tray. |
| The coffee maker malfunctions. | Please contact with the authorized service facility for repairing. |
| Water leaks outside of filter cup. | There is some coffee powder on filter edge when locked into the brewing head. | Clear up the coffee powder on the filter edge. |
| Acid (vinegar) taste exists in espresso. Didn't perform descaling correctly. Clean up machine according to coffee. | The coffee powder is stored in a hot, wet place for a long time. The coffee powder turns bad. in a cool, dry place. After | Step 1-4 for "Start the machine for the first time". |
| Please use fresh coffee powder, or store unused coffee powder opening a package of coffee powder, reseal it tightly and store it in a refrigerator to maintain its freshness. |
| The coffee maker cannot work anymore or does not respond at all. | The power outlet is not plugged well. Plug the power cord into an earthed socket correctly. If the appliance still does not work, please contact with the authorized service facility for repairing. |
| The steam / milk frothing does not work properly. | The white indicator is not illuminated. Only after the white indicator is illuminated, the steam station can be used to perform milk frothing. |
| The container is too big or the shape is not fit. | Use high and narrow cup or professional milk frothing jug. |
| You have used skimmed milk | Use whole milk or half-skimmed milk. |
| Steam indicator blinking quickly. Make steam for 3 minutes and the steam knob is not reset. | Reset steam knob to "OFF" position. |
| One-cup indicator and two-cup indicator blinking quickly. | Make hot water for 40ml and then the steam knob is not reset. | Reset steam knob to "OFF" position. |
| The steam knob is not reset after cooling down. |
| Boiler temperature is too high. Cool it down by perform Step 11. |
| One-cup indicator, two-cup indicator and steam indicator blinking quickly. | The steam knob is not reset, but the machine is turned on. | Reset steam knob to "OFF" position. |
| ALL indicators blinking at the same time for 5 times. | Need descaling. Perform decalcifying. | |
| Filter holder is too tight to operate. | Too much coffee powder filled in filter. | Fill filter cup with less coffee powder. |
| Coffee flows drip by drip. | Too much powder. | Fill filter cup with less coffee powder. |
| Too fine coffee powder and tamped too tight. | Make more coarse coffee powder or tamp coffee powder with less force. |
| Filter cup blocked. | Clean the filter cup with cleaning pin. |
ENVIRONMENTAL CONCERNS
Recycle materials with the symbol 📄. Put the packaging in relevant containers to recycle it. Help protect the environment and human health by recycling waste of electrical and electronic appliances.
Do not dispose appliances marked with the symbol with the household waste. Return the product to your local recycling facility or contact your municipal office.
i For Switzerland:
Where should you take your old equipment?
Anywhere that sells new equipment or hand it in to official SENS collection points or official SENS recycling firms. The list of official SENS collection points can be found at www.erecycling.chseconds
Electrolux reserves the right to change products, information and specifications without notice.
COMPOSANTS (IMAGE PAGE 2)
A. Voyant/bouton marche
Make espresso coffee
C. Indikator/knapp for to kopper
D. Dampindikator/knapp
E. Brygghode
F. Èn kopp / E.S.E-pod
G. To kopper
H. Filterholder
I. Tamper/måleskje
COMPONENTĂ (IMAGINEA DE LA PAGINA 2)
A. Indicator/buton de alimentare
RECOMANDARI PENTRU SIGURANTĂ
BİLEŞEN (RESIM SAYFA 2)
ELECTROLUX APPLIANCES AB
BUSINESS SECTOR EMA-EMEA (SEE)
ST GÖRANSGATAN 143
SE-105 45 STOCKHOLM SWEDEN
TEL: +46 (8) 738 60 00
FAX: +46 (8) 738 63 35
www.electrolux.com
ithalatci:
Electrolux Dayanıklı Tüketim
Mamulleri San. ve Tic. AŞ.
TR-34435 Taksim-Beyoğlu-Istanbul
Froth milk and make cappuccino/latte
natural_image
Abstract geometric design with three white petal-like shapes on a black background (no text or symbols)
3481 E E6EC1 E5EC1 02 01 0721
Share more of our thinking at www.electrolux.com
electrolux.com/shop
Electrolux Floor Care AB
S:t Göransgatan 143
S-105 45 Stockholm
Sweden