
Optima Perfect PV2014 - Iron SOLAC - Free user manual and instructions
Find the device manual for free Optima Perfect PV2014 SOLAC in PDF.
| Product Type | Steam Iron |
| Brand | Solac |
| Model | Optima Perfect PV2014 |
| Power Supply | 220-240 V ~ 50/60 Hz (depending on country) |
| Power | Not specified in the manual |
| Water Tank Capacity | Not specified in the manual |
| Soleplate | Metallic |
| Temperature Setting | Rotary selector with min, •, ••, Max positions |
| Adjustable Steam Flow | Yes, 3 positions: off, medium, maximum |
| Super Steam Function | Yes, dedicated button |
| Vertical Steam | Yes, for steaming hanging clothes |
| Spray | Yes, dedicated button |
| Dry Ironing | Yes |
| Anti-drip System | Yes |
| Anti-calc System | Yes, resin filter |
| Self-cleaning Function | Yes, to be used approximately once a month |
| Heating Indicator | Yes (turns off when temperature is reached) |
| Power Cord | With 360° swivel and cord clip |
| Soleplate Maintenance | Eco-friendly clay-based products |
| Exterior Cleaning | Damp cloth with water and soap |
| Safety Instructions | Do not use by children, unplug before filling, do not immerse |
| Warranty | Not specified in the manual |
Frequently Asked Questions - Optima Perfect PV2014 SOLAC
User questions about Optima Perfect PV2014 SOLAC
0 question about this device. Answer the ones you know or ask your own.
Ask a new question about this device
Download the instructions for your Iron in PDF format for free! Find your manual Optima Perfect PV2014 - SOLAC and take your electronic device back in hand. On this page are published all the documents necessary for the use of your device. Optima Perfect PV2014 by SOLAC.
USER MANUAL Optima Perfect PV2014 SOLAC
natural_image
Black and white iron iron with brand name 'sOlaC' and certification marks, no visible text or symbols on the body itself.PLANCHA DE VAPOR INSTRUCCIONES DE USO
STEAM IRON INSTRUCTIONS FOR USE
Solac is a registered Trade Mark


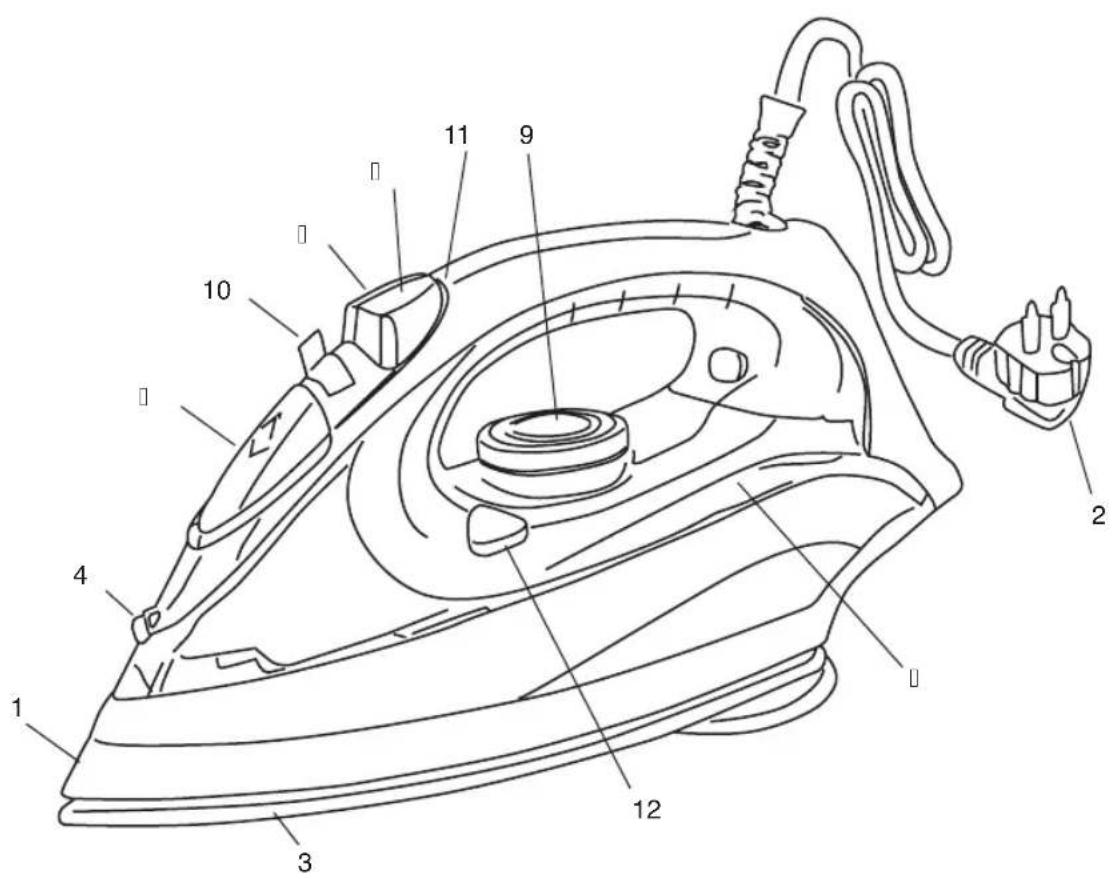

Fig 1.
natural_image
Line drawing of a hand using a power iron to cut the iron, showing mechanical components and a handle (no text or symbols)

natural_image
Diagram of a car wheel with a black arrow indicating motion direction (no text or symbols)

natural_image
Line drawing of an iron iron being heated, labeled Fig 6 and Fig 7 (no text on diagram)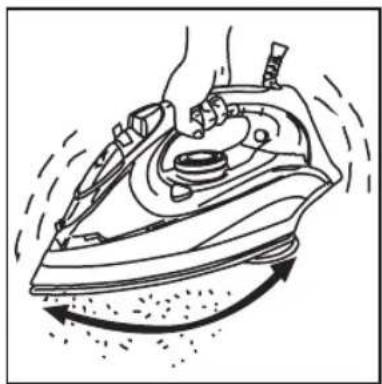
natural_image
Line drawing of a hand using a steam iron to clean or spread material (no text or symbols)ESPAÑOL ES
SAFETY ADVICE AND WARNINGS
· Clean all the parts of the product that will be in contact with food, as indicated in the cleaning section, before use.
- This appliance can not be used by children. Keep the appliance and its cord out of reach of children.
This appliance can be used by people with reduced physical, sensory or mental capabilities or lack of experience and knowledge if they have been given supervision or instruction concerning use of the appliance in a safe way and understand the hazards involved.
This appliance is not a toy. Children should be supervised to ensure that they do not play with the appliance.
- Always switch off the appliance and disconnect from supply if it is left unattended and before changing accessories or approaching parts that move in use, assembling, disassembling and cleaning.
- Do not use the appliance if the rotating sieve is damaged or the protective cap is damaged or cracked.
- If the connection is damaged it must be replaced. Take the
appliance to an authorized Technical Assistance Service. Do not try to dismantle or repair without assistance, as this may be dangerous.
. The temperature of the accessible surfaces may be high when the appliance is in use.
- Unplug the appliance from the mains before refilling the water tank.
- Ensure that the voltage indicated on the name-plate matches the mains voltage before plugging in the appliance.
- Connect the appliance to a base with an earth socket withstanding a minimum of 10 amperes.
- The appliance's plug must fit into the mains socket properly. Do not alter the plug. Do not use plug adaptors.
- Keep the working area clean and well lit. Cluttered and dark areas invite accidents.
- The appliance should be used and kept over a flat and stable surface.
- Do not use the appliance if the cable or plug is damaged.
- If any of the appliance casings breaks, immediately disconnect the appliance from the mains to prevent the possibility of an electric shock.
- Do not use the appliance if it has fallen on the floor, if there are visible signs of damage or if it has a leak.
- Never use the electric wire to lift up, carry or unplug the appliance.
- Do not wrap the cable around the appliance.
- Ensure that the electric cable does not get trapped or tangled
- The power cord must be regularly examined for signs of damage and if damaged, the appliance must not be used.
- Do not use or store the appliance outdoors.
- Do not touch the plug with wet hands.
- Do not allow the connection cable to hang or to come into contact with the appliance's hot surfaces.
- Check the state of the power cord. Damaged
EN
or tangled cables increase the risk of electric shock.
- Do not use the appliance if the cable or plug is damaged.
- If any of the appliance casings breaks, immediately disconnect the appliance from the mains to prevent the possibility of an electric shock.
- Do not touch metal parts or the body when it is operating, as it may cause serious burns.
- Fully unroll the appliance's power cable before each use.
- Disconnect the appliance from the mains when not in use and before undertaking any cleaning task.
- Do not store or transport the appliance if it is still hot.
- Turn the thermostat control to the minimum (MIN) setting. This does not mean that the iron is switched off permanently.
- Any misuse or failure to follow the instructions for use renders the guarantee and the manufacturer's liability null and void.

SORTANT: When you want to dispose the appliance, NEVER throw it in the rubbinstead, go to your closest CLEAN POINT paste collection centre for subsequent treat. In this way, you will be contributing to ing after the environment.
- Before disposing of your used appliance, you should make it visibly unserviceable and have it disposed of according to current national legislation.
- Ask your Distributor, Town Council or Local Authority for detailed information.
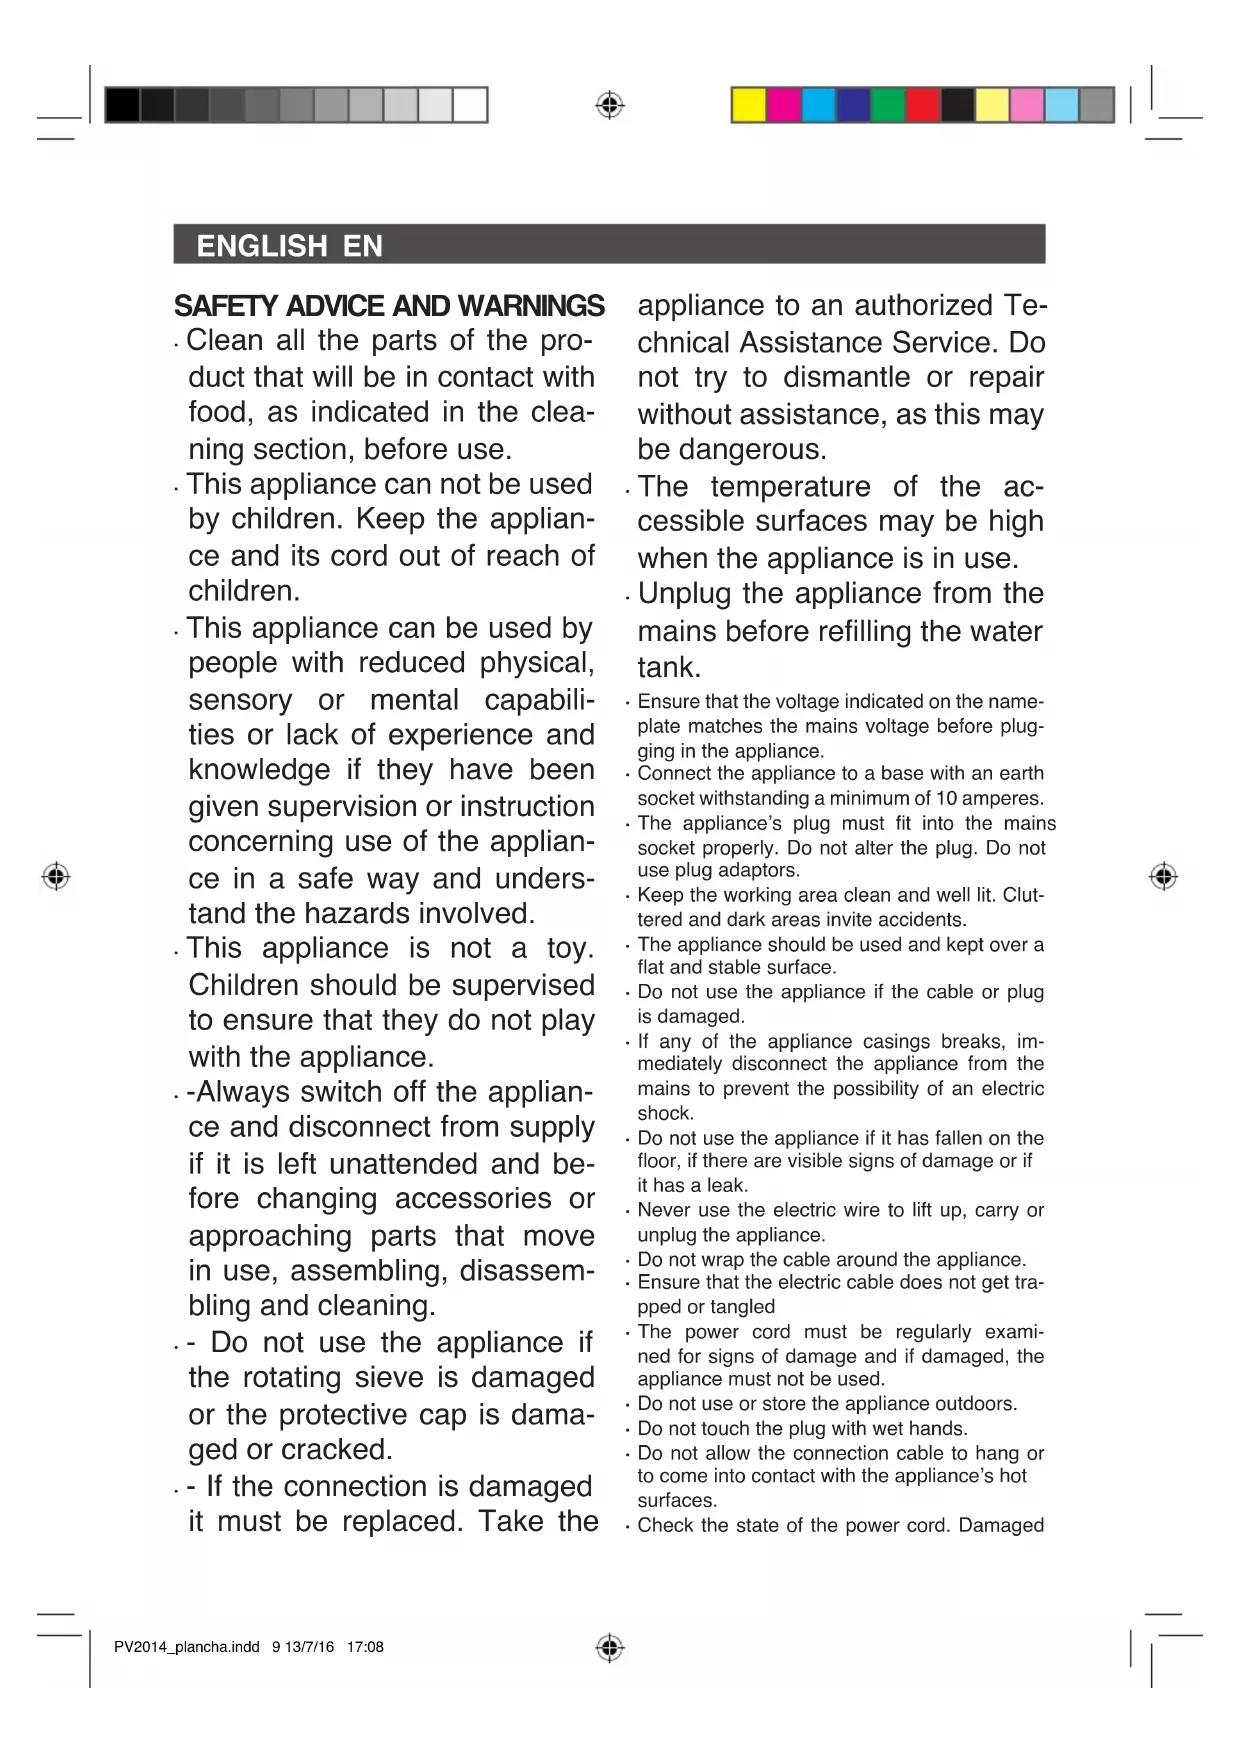
MAIN COMPONENTS
1 Main body
2 Power cord
3 Metal soleplate
4 Spray outlet
5 Water filler opening
6 Water tank
7 Spray button
8 Supersteam button
9 Temperature selector
10 Steam selector
11 Temperature pilot light
12 Self clean
BEFORE STARTING TO IRON
Due to the high levels of mains water hardness in most areas, Solac recommends that you always use demineralised water for ironing. In this way, you will guarantee that your iron remains in optimal condition for a longer period of time.
Do not use decalcifying agents or descaling products in the water tank. Do not use scented water or ironing water either. These products damage the interior of the steam generation system.
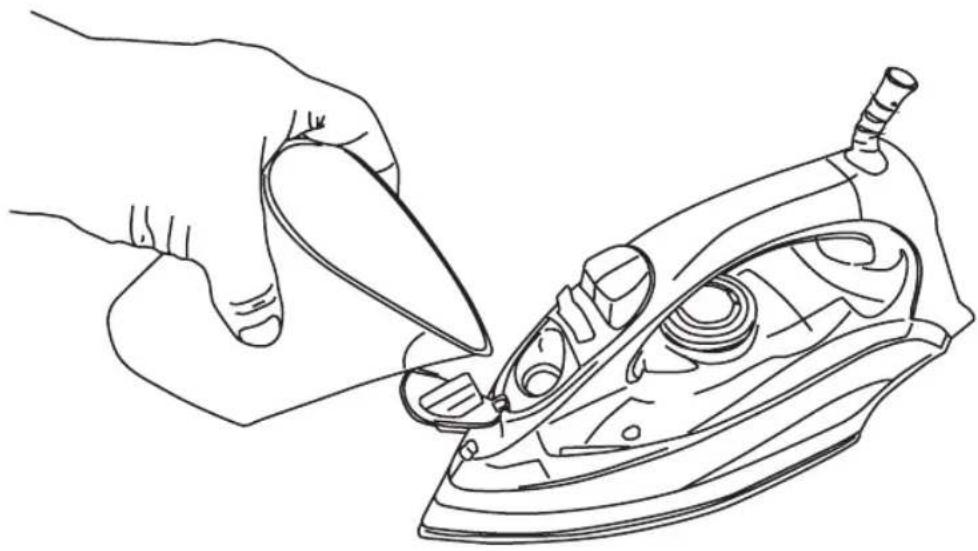
1 With the iron unplugged from the mains, rotate the steam selector (10) to the closed position (fig. 2).
2 Open the water filler opening (5). Fill the water tank without exceeding the maximum level, using the water beaker provided (12) and keeping the iron in the vertical position (Fig. 1). When the tank is full, close the cap..
When filling the tank, make sure that the water does not overflow from the water filler opening.
3 Check whether the garment to be ironed has a label indicating the ironing tempera.
We recommend you classify the garments according to their required ironing temperature and begin with the garments ironed on the lowest temperature(•)
SYNTHETIC FIBRES, minimum temperature ( · ) SILK, WOOL, medium temperature ( ·· )
COTTON, high temperature ( ·s )
LINEN, MAX temperature
NOTE: Ironing delicate garments at a temperature higher than necessary spoils the fabric and causes burnt residue to stick to the sole-plate.
If you have any doubts about the temperature to use for a given garment, perform a test on a part, which will not be visible, beginning with the lowest temperature settings
USE
This appliance has been designed exclusively for ironing clothes. Do not use it for any other purpose.
Completely remove all the elements use for transportation and packaging.
If the appliance is hot, handle it with care and do not touch the metal soleplate..
▲Never leave the iron in a horizontal position when the soleplate is hot. Rest it on its rear
EN
end.
⚠️ Take care with the steam; do not aim it at people, animals or delicate objects.
▲ Always iron on stable, solid and smooth surfaces.
For very delicate garments, place a cloth between the iron and the delicate garment to avoid potential markings from the soleplate..
1 Extend the cord completely and plug it into the mains. The temperature pilot light will turn on (11). Place the iron in the vertical position.
2 Select the desired operating temperature according to the garment you wish to iron (see "TEMPERATURE SELECTION (fig. 4)").
3 Select steam ironing (medium or maximum) or dry ironing as appropriate (see "STEAM SELECTION").
4 Hold the iron by the handle, and slide the soleplate over the garment to be ironed.
5 After using the iron, set the steam selector (10) to the closed position yand the temperature selector (9) to position 0.
6 Unplug the power cord from the mains.
7 Empty the water tank (see "EMPTYING THE WATER TANK"). Wait until the iron is completely cold and store it in the vertical position in a safe place.
BEFORE FIRST USE
Before using it for the first time, use the appliance to iron an old cloth or clothing, to clean the system.
1 Set the temperature selector (9) to the Max position and wait a few minutes for the iron to reach the appropriate temperature (the temperature pilot light will go out).
2 Rotate the steam selector (10) until it is in the completely open position (fig. 3): steam will start to come out of the orifices in the soleplate.
3 Hold the iron by the handle and slide the sole-plate over the old towel.
4 When the water tank is empty, no more steam will be produced. The iron is ready for use.
Do not worry if the iron gives off a little smoke when used for the first time. This will go away quickly.
TEMPERATURE SELECTION (fig. 4)
1 Turn the temperature selector (9) until it is in the desired position.
When changing the position of the temperatu-
re selector (9), to either increase or reduce the temperature, several minutes must pass before the iron reaches the selected temperature.
When the selected temperature is reached, the pilot light will go out (11).
STEAM SELECTION
To obtain steam, set the temperature selector (9) between the levels • and Max, depending on the garment to be ironed.
The iron has 3 steam positions (dry ironing, medium steam flow or maximum steam flow)
1 When the pilot light (11) goes out, indicating that the desired temperature has been reached, rotate the steam selector (10) until the desired steam flow is obtained (fig. 5).
EMPTYING THE WATER TANK
When you finish ironing, always empty the water from the tank.
1 Set the steam selector (10) to the closed position and the temperature selector (9) to the 0 position.
2 Unplug the plug from the mains.
3 Open the water filler opening (5) and place the iron face down over the sink, gently shaking it to completely empty the tank.
4 Wait until the iron is completely cold and store it in the vertical position in a safe place.
IRONING RECOMMENDATIONS
STEAM IRONING
For professional ironing results, we recommend you steam iron garments first and then dry iron them.
SUPERSTEAM
If you want more steam while ironing, press the button (8) two or three times, aim the supersteam at the desired area of the garment and pass the iron soleplate over it to dry it. Thus is useful for eliminating wrinkles.
The supersteam may not be released on the first occasions. This is normal. Press the push-button a couple of times. Once the supersteam circuit has been primed, the jet of steam will be released
- We recommend pressing the control at 5-second intervals.
VERTICAL STEAM
This allows you to remove creases from delicate garments without having to put them on the ironing board: jackets, overcoats, curtains,
EN
etc.
1 Fill the water tank as explained in the "BEFORE STARTING TO IRON" section.
2 Place the garment on a hanger, well away from other garments, people, animals, etc.
Do not discharge steam onto a garment hanging in the wardrobe or on a person.
3 Set the steam control (10) to the closed position and the temperature selector (9) to the Max position.
-
Bring the iron close to the garment, in the vertical position, (between 15 and 30 cm) and press the supersteam button (8) once only. Do not position the iron too close to the garment, because you could damage it.
-
Wait a few seconds before pressing the button (8) again, so as not to damage the garment. Most wrinkles can be eliminated with three sprays of stea.
DRY IRONING
1 If there is water in the tank, turn the steam selector (10) to the closed position (fig. 2).
2 Plug in the iron and set the temperature selector (9) to the desired position.
The pilot light (11) will go off when the temperature is reached.
IRONING WITH SPRAY
Spray can be obtained by pressing the corresponding button (7) when dry ironing or ironing with steam. The iron is at any temperature level
- Press the spray button (7) as many times as you want to use this function. 3D soleplate:
- Ceramic soleplate with active tip, equipped with a metal body ideal for professional ironing of shirt collars, pockets, trouser creases, etc. Caution. The skirt is an active area of the soleplate, so it will be hot while ironing.
- 3D Ironing is a way to help with ironing, use it to iron delicate areas like shirt cuffs, pockets or skirt and trouser hems. Do not make direct contact with the skin, and wait for the iron to cool down completely before touching it.
OTHER FUNCTIONS
ANTI-LIMESCALE SYSTEM
This iron has an innovative built-in anti-limescale system, consisting of a resin filter that retains the limescale substances from the water, so these cannot reach the steam chamber of the soleplate, thus extending the life of the iron.
The existence of this anti-limescale system does not mean that the recommendations about water hardness mentioned in the “BEFORE STARTING TO IRON” section can be ignored.
ANTI-DRIP SYSTEM
The iron incorporates an anti-drip system that prevents the iron from dripping, even when it is switched ofa.
STORAGE AND CLEANING
Clean the appliance after using it for the first time, immediately after each use and after a long time without use.
SOLEPLATE
1 Disconnect the iron and allow the soleplate to cool down.
Use clay-based, environmentally friendly products to clean the solep.
EXTERNAL PART
1 To clean the external part of your iron, use a cloth dampened with soapy water.
Do not use solvents or abrasive products to clean your iron, as these could damage some of the plastic parts and/or remove some of the marks.
2 Store your iron in a vertical position, coiling the cord around the base and pressing the cable into the fixing clip.
Although the power cord is fitted with a 360° swivel piece, NEVER FORCE this cord when coiling it around the appliance on the first turn.
SELF-CLEANING
It is advisable to carry out the self-cleaning operation about once a month, depending on the frequency of use and the hardness of the water used
1 Ensure that the tank is half filled with water.
2 Place the iron in the vertical position.
3 Plug in the iron and turn the temperature selector (9) to the Max position.
4 Wait for the pilot light to go off (11) indicating that the desired temperature has been reached.
5 Turn the temperature selector (9) to the 0 position and unplug the iron from the mains.
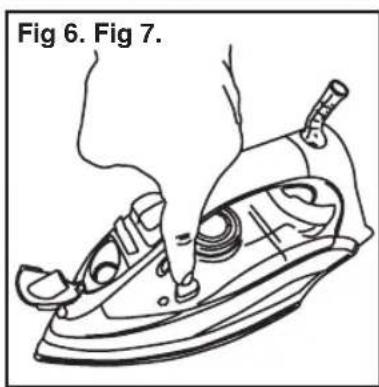
6 Place the iron in the horizontal position over a sink or an appropriate container and press the selfclean button (12), keeping the iron in this position and swinging it gently from side to side. Steam and water will come out from the holes in the iron, flushing out dirt and impuri-
EN
ties.
▲ Swing the iron gently from side to side. Steam and water will come out of the holes in the iron, flushing out dirt and impurities (fig. 6-7).
▲Be careful when performing this operation, as the water and steam are very hot and can cause burns.
7 Place the iron in the vertical position and wait for it to cool completely.
8. Wipe the soleplate with a damp cloth.
Remember that damage caused by the effects of limescale is not covered in the warranty.
This symbol means that it is important to read the operating instructions.
This symbols means that user must to con-
sult instructions thoroughly before use.

This symbol indicates that the appliance should not be covered.

This symbol indicates that the surface may heat up during use.
This appliance complies with Directive 2014/35/EU on Low Voltage, Directive 2014/30/EU on Electromagnetic Compatibility, Directive 2011/65/EU on the restrictions of the use of certain hazardous substances in electrical and electronic equipment and Directive 2009/125/EC on the eco-design requirements for energy-related products.
FRANÇAIS FR
CONSEILS ET MESURES DE SÉCURITÉ
VEMISJA PA RY W PIONIE
EXTRA GÓZ (super steam)
CĂLCAREA USCATĂ (FĂRĂ ABUR)
natural_image
Color palette bar with grayscale shades and a central crosshair symbol (no text or labels)


natural_image
Color palette bar with grayscale shades and a crosshair symbol (no text or labels)


natural_image
Color palette bar with grayscale shades and a central crosshair symbol (no text or labels)


sOlac


- ESPAÑOL ES
- SAFETY ADVICE AND WARNINGS
- EN
- MAIN COMPONENTS
- BEFORE STARTING TO IRON
- USE
- BEFORE FIRST USE
- TEMPERATURE SELECTION (fig. 4)
- STEAM SELECTION
- EMPTYING THE WATER TANK
- IRONING RECOMMENDATIONS
- STEAM IRONING
- SUPERSTEAM
- VERTICAL STEAM
- DRY IRONING
- IRONING WITH SPRAY
- OTHER FUNCTIONS
- ANTI-LIMESCALE SYSTEM
- ANTI-DRIP SYSTEM
- STORAGE AND CLEANING
- SOLEPLATE
- EXTERNAL PART
- SELF-CLEANING
- FRANÇAIS FR
- CONSEILS ET MESURES DE SÉCURITÉ
- VEMISJA PA RY W PIONIE
- EXTRA GÓZ (super steam)
- CĂLCAREA USCATĂ (FĂRĂ ABUR)
- sOlac
Brand : SOLAC
Model : Optima Perfect PV2014
Category : Iron