
SAT-180 - Sander HiKOKI - Free user manual and instructions
Find the device manual for free SAT-180 HiKOKI in PDF.

| Product type | Sander / polisher |
| Brand | HiKOKI |
| Model | SAT-180 |
| Power | 750 W |
| Supply voltage | 110-240 V~ (depending on region) |
| No-load speed | 3,400 / 1,900 min⁻¹ (two speeds) |
| Disc diameter | 180 mm |
| Weight (without cord, standard accessories) | 3.0 kg |
| Housing material | Reinforced plastic |
| Motor type | Universal brush motor |
| Main functions | Sanding, polishing, buffing |
| Included accessories | 5 sanding discs (grit P24 to P120), rubber pad, 180 mm wool bonnet, wrenches A and B, side handle |
| Safety | On/off switch, residual current device (RCD) recommended, double insulation |
| Routine maintenance | Cleaning vents, checking carbon brushes, replacing worn brushes |
| Available spare parts | Carbon brushes, sanding discs, wool bonnet, rubber pad |
| Repairability | Repair by HiKOKI authorized service center, identical replacement parts |
| Sound level | Sound pressure level LpA = 91.4 dB(A), uncertainty 3 dB(A) |
| Vibration (polishing) | ah = 4.1 m/s², uncertainty K = 1.5 m/s² |
| Vibration (buffing) | ah = 3.9 m/s², uncertainty K = 1.5 m/s² |
| Compliance standards | EN62841, CE, RoHS, electromagnetic compatibility |
| Warranty | Manufacturer's warranty according to national regulations |
Frequently Asked Questions - SAT-180 HiKOKI
User questions about SAT-180 HiKOKI
0 question about this device. Answer the ones you know or ask your own.
Ask a new question about this device
Download the instructions for your Sander in PDF format for free! Find your manual SAT-180 - HiKOKI and take your electronic device back in hand. On this page are published all the documents necessary for the use of your device. SAT-180 by HiKOKI.
USER MANUAL SAT-180 HiKOKI
natural_image
Line drawing of a power tool with a circular base and handle, no text or symbols presentRead through carefully and understand these instructions before use. Diese Anleitung vor Benutzung des Werkzeugs sorgfältig durchlesen und verstehen. Lire soigneusement et bien assimiler ces instructions avant usage. Prima dell'uso leggere attentamente e comprendere queste istruzioni. Deze gebruiksaanwijzing s.v.p. voor gebruik zorgvuldig doorlezen. Leer cuidadosamente y comprender estas instrucciones antes del uso. Antes de usar, leia com cuidado para assimilar estas instruções.

Handling instructions Bedienungsanleitung Mode d'emploi Istruzioni per l'uso Gebruiksaanwijzing Instrucciones de manejo Instruções de uso
1
2
3
4
5
natural_image
Line drawing of hands using a power tool to work on a circular workpiece (no text or symbols present)6
| English Deutsch Français Italiano | ||||
| 1 | Washer nut Sicherungsmutter Ecrou rondelle Dado ad anello | |||
| 2 | Sanding disc Schleifscheibe Disque de ponçage Disco abrasivo | |||
| 3 | Rubber pad Gummischleifelter Coussinet en caoutchouc Cuscino di gomma | |||
| 4 | Spindle Spindel Arbre Asse | |||
| 5 | Wrench (A) Schlüssel (A) Clef (A) Chiave (A) | |||
| 6 | Hood | Haube | Bonnet | Cuffia |
| 7 | Tuck the excess string in into | Das Ende des Bandes hineinstecken | Rentrer la partie restante du cordon dans | Infilare la parte in eccesso del laccio |
| 8 | Wear limit | Verschleißgrenze | Limite d'usure | Limite di usura |
| 9 | No. of carbon brush | Nr. der Kohlebürste No. de balai en carbone | N. della spazzola di carbone | |
| 10 | Side handle | Seitengriff | Poignée latérale | Impugnatura laterale |
| 11 | Handle | Griff | Poignée | Impugnatura |
| Nederlands | Español | Português | |
| 1 | Veiligheidsschroef | Contra tuerca de arandela | Porca de arruela |
| 2 | Schuurschijf | Disco de esmerilado | Disco de lixar |
| 3 | Rubber steunschijf | Disco de caucho | Suporte de borracha |
| 4 | As | Eje | Eixo |
| 5 | Sleutel (A) | Llave para tuercas (A) | Chave (A) |
| 6 | Hoes | Cubierta | Cobertura |
| 7 | Steek het uiteinde van de band in | Meter firmemente el resto del cordón | Encaixe o fio em excesso |
| 8 | Slijtagegrens | Límite de uso | Limite de desgaste |
| 9 | Nr. van de koolborstel | No. de carbón de contacto | N° de escova de carvão |
| 10 | Zijhandgreep | Asidero lateral | Pega lateral |
| 11 | Handgreep Asidero Pega |
| Symbols⚠ WARNINGThe following show symbols used for the machine. Be sure that you understand their meaning before use. | Symbole⚠ WARNINGDie folgenden Symbole werden für diese Maschine verwendet. Achten Sie darauf, diese vor der Verwendung zu verstehen. | Symboles⚠ AVERTISSEMENTLes symboles suivants sont utilisés pour l'outil. Bien se familiariser avec leur signifi cation avant d'utiliser l'outil. | Simboli⚠ AVVERTENZADi seguito mostriamo i simboli usati per la macchina. Assicurarsi di comprenderne il signifi cato prima dell'uso. | |
 | To reduce the risk of injury, user must read instruction manual.Failure to follow the warnings and instructions may result in electric shock, fi re and/or serious injury. | Der Anwender muss die Bedienungsanleitung lesen, um das Risiko einer Verletzung zu verringern.Wenn die Warnungen und Anweisungen nicht befolgt werden, kann es zu Stromschlag, Brand und/oder ernsthaften Verletzungen kommen. | Pour réduire les risques de blessures, l'utilisateur doit lire le manuel d'utilisation.Tout manquement à observer ces avertissements et instructions peut engendrer des chocs électriques, des incendies et/ou des blessures graves. | Per ridurre il rischio di lesioni, l'utente deve leggere il manuale delle istruzioni.La mancata osservanza degli avvertimenti e delle istruzioni potrebbe essere causa di scosse elettriche, incendi e/o gravi lesioni. |
 | ||||
 | Always wear eye protection. | Tragen Sie immer einen Augenschutz. | Toujours porter des verres de protection. | Indossate sempre le protezioni oculari. |
 | Always operate the power tool with two hands | Handhaben Sie das Elektrowerkzeug immer mit zwei Händen | Toujours utiliser l'outil électrique à deux mains | Utilizzare sempre l'utensile elettrico con due mani |
 | Only for EU countries Do not dispose of electric tools together with household waste material! In observance of European Directive 2012/19/EU on waste electrical and electronic equipment and its implementation in accordance with national law, electric tools that have reached the end of their life must be collected separately and returned to an environmentally compatible recycling facility. | Nur für EU-Länder Werfen Sie Elektrowerkzeuge nicht in den Hausmüll!Gemäss Europäischer Richtlinie 2012/19/EU über Elektro- und Elektronik- Altgeräte und Umsetzung in nationales Recht müssen verbrauchte Elektrowerkzeuge getrennt gesammelt und einer umweltgerechten Wiederververtung zugeführt werden. | Pour les pays européens uniquementNe pas jeter les appareils électriques dans les ordures ménagères!Conformément à la directive européenne 2012/19/UE relative aux déchets d'équipements électriques ou électroniques (DEEE), et à sa transposition dans la législation nationale, les appareils électriques doivent être collectés à part et être soumis à un recyclage respectueux de l'environnement. | Solo per Paesi UE Non gettare le apparecchiature elettriche tra i rifi uti domestici.Secondo la Direttiva Europea 2012/19/UE sui rifi uti di apparecchiature elettriche ed elettroniche e la sua attuazione in conformità alle norme nazionali, le apparecchiature elettriche esauste devono essere raccolte separatamente, al fi ne di essere reimpiegate in modo eco-compatibile. |
| Symbolen⚠ WAARSCHUWINGHieronder staansymbolen afgebeeld dievan toepassing zijn opdeze machine. U moetde betekenis hiervanbegrijpen voor gebruik. | Símbolos⚠ ADVERTENCIAA continuación semuestran los símbolosusados para lamáquina. Asegúresede comprender susignifi cado antes del uso. | Símbolos⚠ AVISOA seguir aparecem ossímbolos utilizados pelamáquina. Assimile bemseus signifi cados antesdo uso. | |
 | Om het risico opverwondingen teverminderen, moetde gebruiker deinstructiehandleidinglezen.Nalating om dewaarschuwingen instructies op te volgenkan in een elektrischeschok, brand en/of ernstigletsel resulteren. | Para reducir el riesgode lesiones, el usuariodeberá leer el manualde instrucciones.Si no se siguenlas advertencias einstrucciones, podríaproducirse una descargaeléctrica, un incendio y/odaños graves. | Para reduzir o riscode lesão, o utilizadordeve ler o manual deinstruções.Se não seguir todas asinstruções e os avisos,pode provocar um choqueeléctrico, incêndio e/ouferimentos graves. |
 | Draag altijdoogbescherming. | Utilice siempre unaprotección ocular. | Utilize sempre protecçãopara os olhos. |
 | Gebruik het elektrischegereedschap altijd mettwee handen | Utilice siempre laherramienta eléctrica conlas dos manos | Utilize sempre aferramenta elétrica comduas mãos |
 | Alleen voor EU-landenGeef elektrischgereedschap niet met thehuisvuil mee!Volgens de Europeserichtlijn 2012/19/EUinzake oude elektrischeen elektronischeapparaten en detoepassing daarvann binnen de nationalewetgeving, dient gebruiktelektrisch gereedschapgescheiden te wordeningezameld en te wordenafgevoerd naar eenrecycle bedrijf dat voldoetaan de geldende milieu-eisen. | Sólo para países de laUnión Europea¡No deseche los aparatoseléctricos junto con losresiduos domésticos!De conformidad con laDirectiva Europea 2012/19/UE sobre residuos deaparatos eléctricos yelectrónicos y su aplicaciónde acuerdo con lalegislación nacional, lasherramientas eléctricascuya vida útil haya llegadoa su fi n se deberán recogerpor separado y trasladar auna planta de reciclaje quecumpla con las exigenciasecológicas. | Apenas para países daUENão deite ferramentaseléctricas no lixodoméstico!De acordo com a directivaeuropeia 2012/19/UESobre ferramentaseléctricas e electrónicasusadas e a transposiçãopara as leis nacionais, asferramentas eléctricasusadas devem serrecolhidas em separadoe encaminhadas a umainstalação de reciclagemdos materiais ecológica. |
GENERAL POWER TOOL SAFETY WARNINGS
WARNING
Read all safety warnings, instructions, illustrations and specifications provided with this power tool.
Failure to follow all instructions listed below may result in electric shock, fire and/or serious injury.
Save all warnings and instructions for future reference.
The term "power tool" in the warnings refers to your mains-operated (corded) power tool or battery-operated (cordless) power tool.
1) Work area safety
a) Keep work area clean and well lit.
Cluttered or dark areas invite accidents.
b) Do not operate power tools in explosive atmospheres, such as in the presence of fl ammable liquids, gases or dust.
Power tools create sparks which may ignite the dust or fumes.
c) Keep children and bystanders away while operating a power tool.
Distractions can cause you to lose control.
2) Electrical safety
a) Power tool plugs must match the outlet.
Never modify the plug in any way.
Do not use any adapter plugs with earthed (grounded) power tools.
Unmodifi ed plugs and matching outlets will reduce risk of electric shock.
b) Avoid body contact with earthed or grounded surfaces, such as pipes, radiators, ranges and refrigerators.
There is an increased risk of electric shock if your body is earthed or grounded.
c) Do not expose power tools to rain or wet conditions.
Water entering a power tool will increase the risk of electric shock.
d) Do not abuse the cord. Never use the cord for carrying, pulling or unplugging the power tool.
Keep cord away from heat, oil, sharp edges or moving parts.
Damaged or entangled cords increase the risk of electric shock.
e) When operating a power tool outdoors, use an extension cord suitable for outdoor use.
Use of a cord suitable for outdoor use reduces the risk of electric shock.
f) If operating a power tool in a damp location is unavoidable, use a residual current device (RCD) protected supply.
Use of an RCD reduces the risk of electric shock.
3) Personal safety
a) Stay alert, watch what you are doing and use common sense when operating a power tool. Do not use a power tool while you are tired or under the influence of drugs, alcohol or medication.
A moment of inattention while operating power tools may result in serious personal injury.
b) Use personal protective equipment. Always wear eye protection.
Protective equipment such as a dust mask, non-skid safety shoes, hard hat, or hearing protection used for appropriate conditions will reduce personal injuries.
c) Prevent unintentional starting. Ensure the switch is in the off-position before connecting to power source and/or battery pack, picking up or carrying the tool.
Carrying power tools with your fi nger on the switch or energising power tools that have the switch on invites accidents.
d) Remove any adjusting key or wrench before turning the power tool on.
A wrench or a key left attached to a rotating part of the power tool may result in personal injury.
e) Do not overreach. Keep proper footing and balance at all times.
This enables better control of the power tool in unexpected situations.
f) Dress properly. Do not wear loose clothing or jewellery. Keep your hair and clothing away from moving parts.
Loose clothes, jewellery or long hair can be caught in moving parts.
g) If devices are provided for the connection of dust extraction and collection facilities, ensure these are connected and properly used.
Use of dust collection can reduce dust-related hazards.
h) Do not let familiarity gained from frequent use of tools allow you to become complacent and ignore tool safety principles.
A careless action can cause severe injury within a fraction of a second.
4) Power tool use and care
a) Do not force the power tool. Use the correct power tool for your application.
The correct power tool will do the job better and safer at the rate for which it was designed.
b) Do not use the power tool if the switch does not turn it on and off.
Any power tool that cannot be controlled with the switch is dangerous and must be repaired.
c) Disconnect the plug from the power source and/or remove the battery pack if detachable, from the power tool before making any adjustments, changing accessories, or storing power tools.
Such preventive safety measures reduce the risk of starting the power tool accidentally.
d) Store idle power tools out of the reach of children and do not allow persons unfamiliar with the power tool or these instructions to operate the power tool.
Power tools are dangerous in the hands of untrained users.
e) Maintain power tools and accessories. Check for misalignment or binding of moving parts, breakage of parts and any other condition that may affect the power tool's operation.
If damaged, have the power tool repaired before use.
Many accidents are caused by poorly maintained power tools.
f) Keep cutting tools sharp and clean.
Properly maintained cutting tools with sharp cutting edges are less likely to bind and are easier to control.
g) Use the power tool, accessories and tool bits etc. in accordance with these instructions, taking into account the working conditions and the work to be performed.
Use of the power tool for operations different from those intended could result in a hazardous situation.
h) Keep handles and grasping surfaces dry, clean and free from oil and grease.
Slippery handles and grasping surfaces do not allow for safe handling and control of the tool in unexpected situations.
5) Service
a) Have your power tool serviced by a qualified repair person using only identical replacement parts.
This will ensure that the safety of the power tool is maintained.
PRECAUTION
Keep children and infi rm persons away.
When not in use, tools should be stored out of reach of children and infi rm persons.
SAFETY WARNINGS COMMON FOR SANDING OR POLISHING OPERATIONS
a) This power tool is intended to function as a sander or polisher. Read all safety warnings, instructions, illustrations and specifications provided with this power tool.
Failure to follow all instructions listed below may result in electric shock, fi re and/or serious injury.
b) Operations such as grinding, wire brushing, hole cutting or cutting-off are not recommended to be performed with this power tool.
Operations for which the power tool was not designed may create a hazard and cause personal injury.
c) Do not convert this power tool to operate in a way which is not specifically designed and specified by the tool manufacturer.
Such a conversion may result in a loss of control and cause serious personal injury.
d) Do not use accessories which are not specifically designed and specified by the tool manufacturer.
Just because the accessory can be attached to your power tool, it does not ensure safe operation.
e) The rated speed of the accessory must be at least equal to the maximum speed marked on the power tool.
Accessories running faster than their rated speed can break and fly apart.
f) The outside diameter and the thickness of your accessory must be within the capacity rating of your power tool.
Incorrectly sized accessories cannot be adequately guarded or controlled.
g) The dimensions of the accessory mounting must fit the dimensions of the mounting hardware of the power tool.
Accessories that do not match the mounting hardware of the power tool will run out of balance, vibrate excessively and may cause loss of control.
h) Do not use a damaged accessory. Before each use inspect the accessory such as abrasive wheels for chips and cracks, backing pad for cracks, tear or excess wear, wire brush for loose or cracked wires. If power tool or accessory is dropped, inspect for damage or install an undamaged accessory. After inspecting and installing an accessory, position yourself and bystanders away from the plane of the rotating accessory and run the power tool at maximum no-load speed for one minute.
Damaged accessories will normally break apart during this test time.
i) Wear personal protective equipment. Depending on application, use face shield, safety goggles or safety glasses. As appropriate, wear dust mask, hearing protectors, gloves and workshop apron capable of stopping small abrasive or workpiece fragments.
The eye protection must be capable of stopping flying debris generated by various operations. The dust mask or respirator must be capable of filtrating particles generated by your operation. Prolonged exposure to high intensity noise may cause hearing loss.
j) Keep bystanders a safe distance away from work area. Anyone entering the work area must wear personal protective equipment.
Fragments of workpiece or of a broken accessory may fly away and cause injury beyond immediate area of operation.
k) Hold the power tool by insulated gripping surfaces only, when performing an operation where the cutting accessory may contact hidden wiring or its own cord.
Cutting accessory contacting a "live" wire may make exposed metal parts of the power tool "live" and could give the operator an electric shock.
I) Position the cord clear of the spinning accessory. If you lose control, the cord may be cut or snagged and your hand or arm may be pulled into the spinning accessory.
m) Never lay the power tool down until the accessory has come to a complete stop.
The spinning accessory may grab the surface and pull the power tool out of your control.
n) Do not run the power tool while carrying it at your side.
Accidental contact with the spinning accessory could snag your clothing, pulling the accessory into your body.
o) Regularly clean the power tool's air vents.
The motor's fan will draw the dust inside the housing and excessive accumulation of powdered metal may cause electrical hazards.
p) Do not operate the power tool near flammable materials.
Sparks could ignite these materials.
q) Do not use accessories that require liquid coolants.
Using water or other liquid coolants may result in electrocution or shock.
KICKBACK AND RELATED WARNINGS
Kickback is a sudden reaction to a pinched or snagged rotating wheel, backing pad, brush or any other accessory. Pinching or snagging causes rapid stalling of the rotating accessory which in turn causes the uncontrolled power tool to be forced in the direction opposite of the accessory's rotation at the point of the binding.
For example, if an abrasive wheel is snagged or pinched by the workpiece, the edge of the wheel that is entering into the pinch point can dig into the surface of the material causing the wheel to climb out or kick out. The wheel may either jump toward or away from the operator, depending on direction of the wheel's movement at the point of pinching. Abrasive wheels may also break under these conditions.
Kickback is the result of power tool misuse and/or incorrect operating procedures or conditions and can be avoided by taking proper precautions as given below.
a) Maintain a fi rm grip with both hands on the power tool and position your body and arm to allow you to resist kickback forces. Always use auxiliary handle, if provided, for maximum control over kickback or torque reaction during start-up.
The operator can control torque reactions or kickback forces, if proper precautions are taken.
b) Never place your hand near the rotating accessory. Accessory may kickback over your hand.
c) Do not position your body in the area where power tool will move if kickback occurs.
Kickback will propel the tool in direction opposite to the wheel's movement at the point of snagging.
d) Use special care when working corners, sharp edges etc. Avoid bouncing and snagging the accessory.
Corners, sharp edges or bouncing have a tendency to snag the rotating accessory and cause loss of control or kickback.
e) Do not attach a saw chain woodcarving blade, segmented diamond wheel with a peripheral gap greater than 10 mm or toothed saw blade.
Such blades create frequent kickback and loss of control.
SPECIFICATIONS
| Voltage (by areas)* | (110 V, 115 V, 120 V, 127 V, 220 V, 230 V, 240 V)~ |
| Power input 750 W* | |
| Rated no-load speed n_0 | 3400/1900 min-1 |
| Sanding Disc Size outer dia. × inner dia. 180 × 22 mm | |
| Weight (without cord, standard accessories)** 3.0 kg |
* Be sure to check the nameplate on product as it is subject to change by areas.
** According to EPTA-Procedure 01/2014.
STANDARD ACCESSORIES
(1) 180mm Sanding Disc ....5
(Grain: c-p24, c-p30, c-p50, c-p80, c-p120 each)
(2) Rubber Pad ....1
(3) 180mm Wool Bonnet ....1
(4) Wrench (A) ....1
(5) Wrench (B) 1
(6) Side Handle....1
Standard accessories are subject to change without notice.
SAFETY WARNINGS SPECIFIC FOR SANDING OPERATIONS
a) Do not use excessively oversized sanding disc paper. Follow manufacturers recommendations, when selecting sanding paper.
Larger sanding paper extending beyond the sanding pad presents a laceration hazard and may cause snagging, tearing of the disc or kickback.
SAFETY WARNINGS SPECIFIC FOR POLISHING OPERATIONS
a) Do not allow any loose portion of the polishing bonnet or its attachment strings to spin freely. Tuck away or trim any loose attachment strings.
Loose and spinning attachment strings can entangle your fingers or snag on the workpiece.
PRECAUTIONS ON USING ELECTRONIC POLISHER
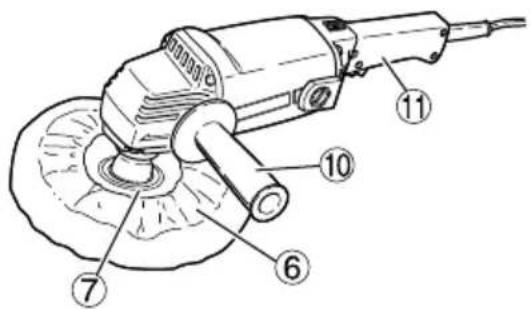
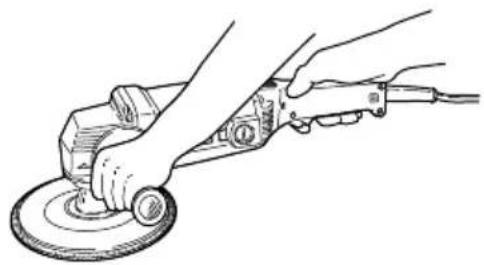
- Attach the side handle firmly, hold the handle and the side handle with both hands, and support the tool body securely. (Fig. 6)
- Never mount a grinding wheel and attempt to use this tool as a disc grinder.
- Always hold the body handle and side handle of the power tool firmly.
Otherwise the counterforce produced may result in inaccurate and even dangerous operation.
- Ensure that sparks resulting from use do not create a hazard e.g. do not hit persons, or ignite flammable substances.
- Always use protective safety glasses and hearing protectors, use other personal protective equipment such as gloves, apron and helmet when necessary.
- Always use eye and ear protection.
Other personal protective equipment such as dust mask, gloves, helmet and apron should be worn when necessary.
If in doubt, wear the protective equipment.
APPLICATIONS
○ Sanding metal surfaces
○ Preliminary sanding of metal surfaces before painting, rust removal, removing old paint before repainting.
○ Finishing woodwork, correcting projections of timber from joints or assemblies.
- Preliminary sanding of wood surfaces before applying paint.
Polishing or shining painted metal surfaces, such as those of automobiles, trains, elevators, refrigerators, sewing machines, washing machines, metal appliances, etc.
○ Polishing varnished surfaces of wooden furniture, etc.
○ Shining synthetic resin or ebonite products.
PRIOR TO OPERATION
1. Power source
Ensure that the power source to be utilized conforms to the power requirements specified on the product nameplate.
CAUTION
Do not operate on Direct Current power source.
2. Power switch
Ensure that the power switch is in the OFF position. If the plug is connected to a receptacle while the power switch is in the ON position, the power tool will start operating immediately, which could cause a serious accident.
3. Extension cord
When the work area is removed from the power source, use an extension cord of sufficient thickness and rated capacity. The extension cord should be kept as short as practicable.
4. RCD
The use of a residual current device with a rated residual current of 30 mA or less at all times is recommended.
PRACTICAL SANDER POLISHER APPLICATIONS
1. Sander operation
When utilizing this tool as a disc sander, set the speed to high (H) for maximum efficiency.
(1) Do not excessively push the sanding disc against the surface of the material. Optimum sanding can be achieved by the weight of the machine alone. Excessive pressure will reduce the revolving speed of the disc, creating an unevenly finished surface and causing overload to the motor.
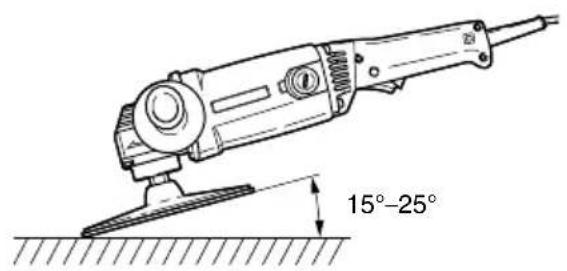
(2) Do not apply the entire disc surface to the surface of the material. As shown in Fig. 1, the sander should be held at an approximately 15^ to 25^ angle in relation to the material surface so that the peripheral portion of the sanding disc is offered to the material surface.
(3) Precaution immediately after finishing an operation: After turning the switch OFF, do not put the sander down until the sanding disc has come to a complete stop. This precaution will not only prevent a serious accident, but will also reduce the amount of dust and swarf sucked into the machine.
2. Polisher operation:
When utilizing this tool as a polisher, set the speed to low (L) for maximum efficiency.
(1) Curved surfaces as well as flat surfaces can be efficiently finished. Do not excessively push the polisher against the surface of the material. The weight of the polisher alone is sufficient for effective polishing. Excessive pressure will result in a poor finish and cause possible overload to the motor.
(2) Sanding disc, polishing compound or wax should be selected in accordance with the material and the desired surface finish. Maximum polishing effect will be attained by following the following method:
○ Preliminary polishing with sander using a finegrain sanding disc.
○ Polishing with wool bonnet using polishing compound and/or wax. Apply a small quantity of compound and/or wax on material surface and polish with the wool bonnet.
CAUTION
Carefully guard against permitting the cabtyre cord to touch the wool bonnet or sanding disc during operation. If the cord touches, there is a danger that it may become entangled.
MOUNTING AND DISMOUNTING THE SANDING DISC AND WOOL BONNET
1. For Sander operation
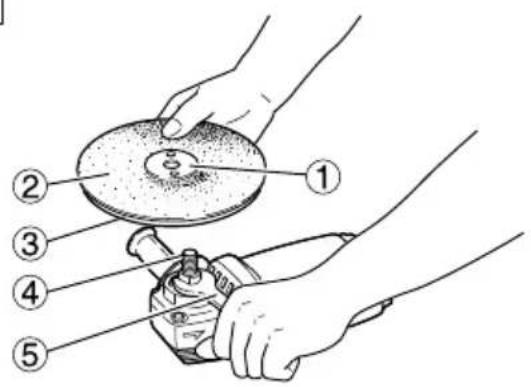
(1) After placing the sanding disc on the rubber pad, thread the washer nut onto the spindle.
(2) While holding the spindle with the accessory wrench (A), as shown in Fig. 2, turn the washer nut clockwise with accessory wrench (B) to screw it onto the spindle. Ensure that the washer nut is thoroughly tightened by using both wrench (A) and (B).
(3) To remove the sanding disc, follow the above procedures in reverse.
2. For Polisher operation
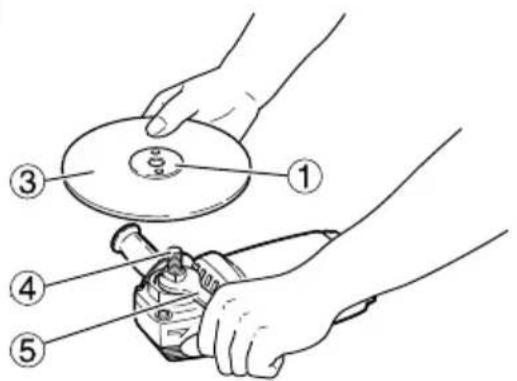
(1) Insert the washer nut through the rubber pad and thread it onto the spindle.
(2) While holding the spindle with the accessory wrench (A), as shown in Fig. 3, turn the washer nut clockwise with accessory wrench (B) to screw it onto the spindle. Ensure that the washer nut is thoroughly tightened by using both wrench (A) and (B).
(3) As shown in Fig. 4, wrap the rubber pad with the hood of the wool bonnet, and firmly secure it by tightening and tying its draw string. Be sure the excess string is firmly tucked inside the wool bonnet to prevent it from flying out while polishing.
CAUTION
Improper fi tting of the wool bonnet may cause vibration.
(4) To remove the wool bonnet, follow the above procedures in reverse.
MAINTENANCE AND INSPECTION
1. Inspecting the mounting screws
Regularly inspect all mounting screws and ensure that they are properly tightened. Should any of the screws be loose, retighten them immediately. Failure to do so could result in serious hazard.
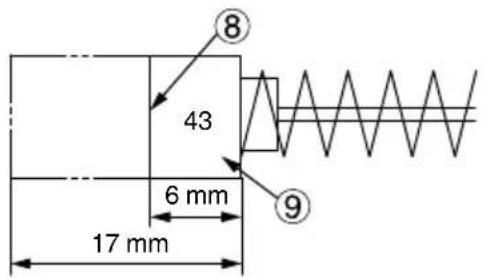
2. Inspecting the carbon brushes (Fig. 5)
The motor employs carbon brushes which are consumable parts. Since an excessively worn carbon brush can result in motor trouble, replace the carbon brush with a new one having the same carbon brush No. shown in the figure when it becomes worn to or near the "wear limit". In addition, always keep carbon brushes clean and ensure that they slide freely within the brush holders.
3. Replacing a carbon brush
Disassemble the brush cap with a minus-head screwdriver. The carbon brush can then be easily removed.
4. Maintenance of the motor
The motor unit winding is the very "heart" of the power tool.
Exercise due care to ensure the winding does not become damaged and/or wet with oil or water.
5. Store the accessories
Store the accessories in a dry, frost-free room at a uniform temperature.
- The workpiece must lay flat and be secured against slipping, e.g. using clamps. Large workpieces must be sufficiently supported.
7. HiKOKI Authorized Service Center:
See https://hikoki-powertools.eu for addresses.
CAUTION
In the operation and maintenance of power tools, the safety regulations and standards prescribed in each country must be observed.
GUARANTEE
We guarantee HiKOKI Power Tools in accordance with statutory/country specific regulation. This guarantee does not cover defects or damage due to misuse, abuse, or normal wear and tear. In case of complaint, please send the Power Tool, undismantled, with the GUARANTEE CERTIFICATE found at the end of this Handling instructions, to a HiKOKI Authorized Service Center.
NOTE
Due to HiKOKI's continuing program of research and development, the specifications herein are subject to change without prior notice.
IMPORTANT
Correct connection of the plug
The wires of the main lead are coloured in accordance with the following code:
Blue: — Neutral
Brown: — Live
As the colours of the wires in the main lead of this tool may not correspond with the coloured markings identifying the terminals in your plug proceed as follows:
The wire coloured blue must be connected to the terminal marked with the letter N or coloured black. The wire coloured brown must be connected to the terminal marked with the letter L or coloured red. The other core must be connected to the earth terminal.
NOTE
This requirement is provided according to BRITISH STANDARD 2769: 1984.
Therefore, the letter code and colour code may not be applicable to other markets except The United Kingdom.
Information concerning airborne noise and vibration
The measured values were determined according to EN62841 and declared in accordance with ISO 4871.
Measured A-weighted sound pressure level: 99.4 dB (A)
Measured A-weighted sound power level: 91.4 dB (A)
Uncertainty KpA: 3 dB (A).
Wear hearing protection.
Vibration total values (triax vector sum) determined according to EN62841.
Polishing:
Vibration emission value a_h, P = 4.1 m/s^2
Uncertainty K = 1.5 m/s ^4
Sanding:
Vibration emission value a_h, DS = 3.9 m/s^2
Uncertainty K = 1.5 m/s ^4
The declared vibration total value and the declared noise emission value have been measured in accordance with a standard test method and may be used for comparing one tool with another.
They may also be used in a preliminary assessment of exposure.
WARNING
☐ The vibration and noise emission during actual use of the power tool can differ from the declared total value depending on the ways in which the tool is used especially what kind of workpiece is processed; and
- Identify safety measures to protect the operator that are based on an estimation of exposure in the actual conditions of use (taking account of all parts of the operating cycle such as the times when the tool is switched off and when it is running idle in addition to the trigger time).
(4) Schraubenschlüssel (A)....1
(5) Schraubenschlüssel (B)....1
(6) Handgriff....1
ALGEMENE VEILIGHEIDSWAARSCHUWINGEN VOOR SCHUREN OF POLIJSTEN
VEILIGHEIDSWAARSCHUWINGEN SPECIFIEK VOOR SCHUREN
natural_image
Line drawing of a quill pen in an inkwell (no text or symbols)
natural_image
Line drawing of a quill pen in an inkwell (no text or symbols)natural_image
Three black-and-white icons: a person recycling with arrows, a rectangular object resembling a pencil, and a trash bin with an 'Recycle' symbol (no text or numbers present)


- GENERAL POWER TOOL SAFETY WARNINGS
- WARNING
- PRECAUTION
- SAFETY WARNINGS COMMON FOR SANDING OR POLISHING OPERATIONS
- KICKBACK AND RELATED WARNINGS
- STANDARD ACCESSORIES
- SAFETY WARNINGS SPECIFIC FOR SANDING OPERATIONS
- SAFETY WARNINGS SPECIFIC FOR POLISHING OPERATIONS
- PRECAUTIONS ON USING ELECTRONIC POLISHER
- APPLICATIONS
- PRIOR TO OPERATION
- Power source
- CAUTION
- Power switch
- Extension cord
- RCD
- PRACTICAL SANDER POLISHER APPLICATIONS
- Sander operation
- Polisher operation:
- MOUNTING AND DISMOUNTING THE SANDING DISC AND WOOL BONNET
- For Sander operation
- For Polisher operation
- MAINTENANCE AND INSPECTION
- Inspecting the mounting screws
- Inspecting the carbon brushes (Fig. 5)
- Replacing a carbon brush
- Maintenance of the motor
- Store the accessories
- HiKOKI Authorized Service Center:
- GUARANTEE
- NOTE
- IMPORTANT
- Correct connection of the plug
- Information concerning airborne noise and vibration
- ALGEMENE VEILIGHEIDSWAARSCHUWINGEN VOOR SCHUREN OF POLIJSTEN
- VEILIGHEIDSWAARSCHUWINGEN SPECIFIEK VOOR SCHUREN
Brand : HiKOKI
Model : SAT-180
Category : Sander