H60MC - Hammer HiKOKI - Free user manual and instructions
Find the device manual for free H60MC HiKOKI in PDF.
User questions about H60MC HiKOKI
0 question about this device. Answer the ones you know or ask your own.
Ask a new question about this device
Download the instructions for your Hammer in PDF format for free! Find your manual H60MC - HiKOKI and take your electronic device back in hand. On this page are published all the documents necessary for the use of your device. H60MC by HiKOKI.
USER MANUAL H60MC HiKOKI
natural_image
Line drawing of a mechanical drill bit with a pointed tool and threaded end (no text or symbols)
en Handling instructions
de Bedienungsanleitung
fr Mode d'emploi
it Istruzioni per l'uso
nl Gebruiksaanwijzing
es Instrucciones de manejo
pt Instruções de uso
sv Bruksanvisning
da Brugsanvisning
no Bruksanvisning
fi Käyttöohjeet
el Οδηγίες χειρισμού
pl Instrukcja obsługi
hu Kezelési utasítás
cs Návod k obsluze
tr Kullanım talimatları
ro Instructiuni de utilizare
sl Navodila za rokovanje
sk Pokyny na manipuláciu
bg Инструкция за експлоатация
sr Uputstvo za rukovanje
hr Upute za rukovanje
1
text_image
Technical diagram of a drill bit with numbered parts for identification2
flowchart
graph TD
    A["Step 1: Hand holding knife"] --> B["Step 2: Inserting knife"]
    B --> C["Step 3: Cutting knife"]
    C --> D["Step 4: Close-up knife"]
3
text_image
1 2 2 O4
text_image
Diagram showing a drill bit being inserted into a drill bit, with a magnified view of the drill bit labeled 'O'.5

text_image
1 2 36
text_image
Technical diagram of a mechanical component with labeled parts O and I, showing a close-up view of the internal structure.7
natural_image
Line drawing of a hand using a handheld drill bit to lift a screwdriver (no text or symbols)8
text_image
a 74 7mm b 17mm9
natural_image
Line drawing of a hand operating a drill bit with arrows indicating motion direction (no text or symbols)10
flowchart
graph TD
    A["16"] --> B["15"]
    B --> C["14"]
    C --> D["13"]
    D --> E["→"]
    E --> F["←"]
    F --> G["16"]
    G --> H["15"]
    H --> I["14"]
    I --> J["13"]
    J --> K["→"]
    K --> L["↓"]
    L --> M["←"]

11
text_image
Technical diagram illustrating the assembly of a drill press with numbered parts and a corresponding process arrow.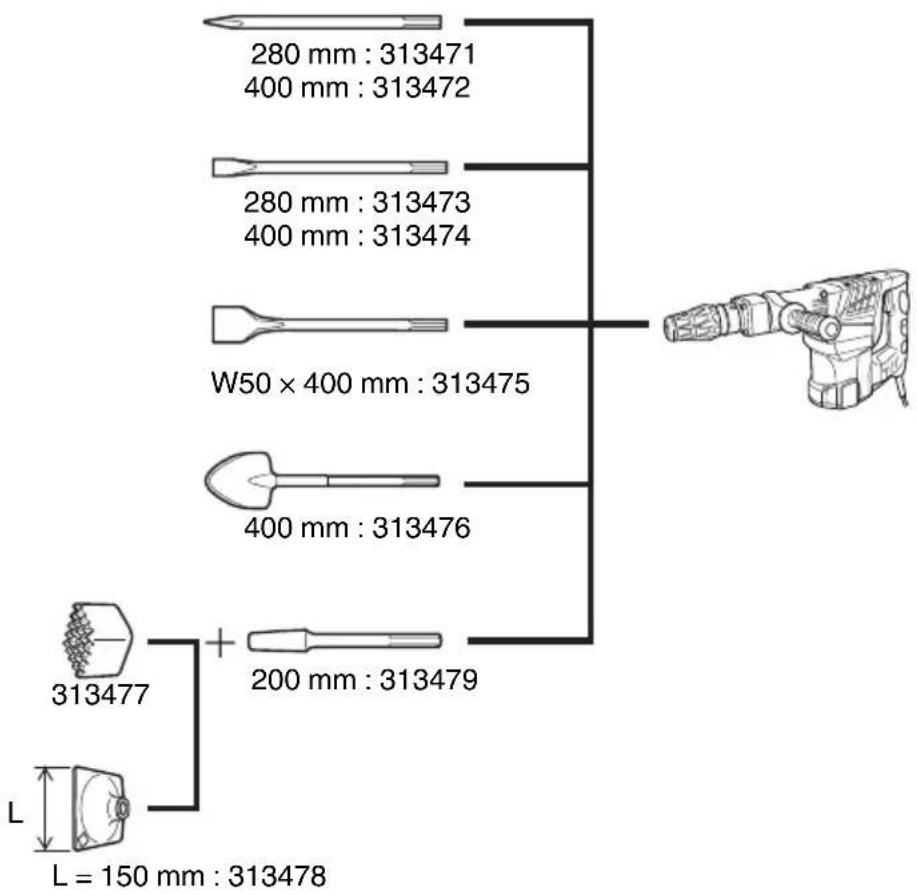
tree
| Dimension | Value | |---|---| | Length (mm) | 280 | | Height (mm) | 313471 | | Base (mm) | 400 | | Thickness (mm) | 313472 | | Width (mm × 400 mm) | 280 | | Base (mm × 400 mm) | 313473 | | Thickness (mm × 400 mm) | 400 | | Width (mm × 400 mm) | 313474 | | Base (mm × 400 mm) | W50 × 400 mm | | Thickness (mm × 400 mm) | 313475 | | Base (mm × 400 mm) | 400 | | Thickness (mm × 400 mm) | 313476 | | Width (mm × 400 mm) | 200 | | Base (mm × 400 mm) | 313479 | | Thickness (mm × 400 mm) | + | | Width (mm × 400 mm) | L = 150 mm | | Thickness (mm × 400 mm) | L = 150 mm | | Length (mm) | L = 150 mm | | Height (mm) | L = 150 mm | | Thickness (mm × 400 mm) | L = 150 mm | | Width (mm × 400 mm) | L = 150 mm | | Base (mm × 400 mm) | L = 150 mm | | Thickness (mm × 400 mm) | L = 150 mm | | Width (mm × 400 mm) | L = 150 mm | | Base (mm × 400 mm) | L = 150 mm | | Thickness (mm × 400 mm) | L = 150 mm | | Width (mm × 400 ms) | L = 150 mm | | Base (mm × 400 ms) | L = 150 ms | | Thickness (mm × 400 ms) | L = 150 ms | | Width (mm × 400 ms) | L = 150 ms | | Base (mm × 400 ms) | L = 150 ms | | Thickness (mm × 400 ms) | L = 150 ms | | Width (mm × 400 ms) | L = 150 ms | | Base (mm × 400 ms) | L = 150 ms | | Thickness (mm × 400 ms) | L = 150ms | | Width (mm × 400 ms) | L = 150ms | | Base (mm × 400 ms) | L = 150ms | | Thickness (mm × 400 ms) | L = 150ms | | Width (mm × 400 ms) | L = 150ms | | Base (mm × 400 ms) | L = 150ms | | Thickness (mm × 400 ms) | L = 150ms | | Width (mm × 400 ms) | L = 150 ms | | Base (mm × 400 ms) | L = 150 ms | | Thickness (mm × 400 ms) | L = 150 ms | | Width (mm × 400 ms) | L = 150 ms | | Base (mm × 400 ms) | L = 150ms | | Thickness (mm × 400 ms) | L = 150ms | | Width (mm × 400 ms) | L = 150ms | | Base (mm × 400 ms) | L = 150ms | | Thickness (mm × 400 ms) | L = 150 ms | | Width (mm × 400 ms) | L = 150ms | | Base (mm × 400 ms) | L = 150ms | | Thickness (mm × 400 ms) | L = 150ms | | Width (mm × 400 ms) | L = 150ms | | Base (mm × 400 ms) | L = 150 ms | | Thickness (mm × 400 ms) | L = 150 ms | | Width (mm × 400 ms) | L = 150 ms | | Base (mm × 400 ms) | L = 150 ms | | Thickness (mm × 400 ms) | L = 150 ps | | Width (mm × 400 ms) | L = 150 ps | | Base (mm × 400 ms) | L = 150 ps | | Thickness (mm × 400 ms) | L = 150 ps | | Width (mm × 400 ms) | L = 150 ps | | Base (mm × 400 ms) | L = 150 ps | | Thickness (mm × 400 ms) | L = 150 ps | | Width (mm × 400 ms) | L = 150ps | | Base (mm × 400 ms) | L = 150ps | | Thickness (mm × 400 ms) | L = 150ps | | Width (mm × 400 ms) | L = 150ps | | Base (mm × 400 ms) | L = 150ps | | Thickness (mm × 400 ms) | L = 15
text_image
333228 333202 334578 333202 333201 333199 334579
natural_image
Technical line drawing of a mechanical housing or enclosure with no visible text or symbols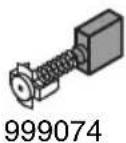
text_image
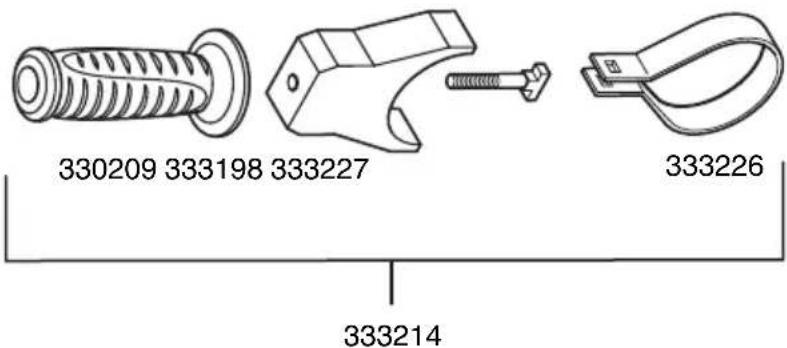
330209 333198 333227 333226 333214(Original instructions)
GENERAL POWER TOOL SAFETY WARNINGS

WARNING
Read all safety warnings, instructions, illustrations and specifications provided with this power tool.
Failure to follow all instructions listed below may result in electric shock, fire and/or serious injury.
Save all warnings and instructions for future reference.
The term "power tool" in the warnings refers to your mains-operated (corded) power tool or battery-operated (cordless) power tool.
1) Work area safety
a) Keep work area clean and well lit.
Cluttered or dark areas invite accidents.
b) Do not operate power tools in explosive atmospheres, such as in the presence of fl ammable liquids, gases or dust.
Power tools create sparks which may ignite the dust or fumes.
c) Keep children and bystanders away while operating a power tool.
Distractions can cause you to lose control.
2) Electrical safety
a) Power tool plugs must match the outlet. Never modify the plug in any way. Do not use any adapter plugs with earthed (grounded) power tools.
Unmodified plugs and matching outlets will reduce risk of electric shock.
b) Avoid body contact with earthed or grounded surfaces, such as pipes, radiators, ranges and refrigerators.
There is an increased risk of electric shock if your body is earthed or grounded.
c) Do not expose power tools to rain or wet conditions.
Water entering a power tool will increase the risk of electric shock.
d) Do not abuse the cord. Never use the cord for carrying, pulling or unplugging the power tool.
Keep cord away from heat, oil, sharp edges or moving parts.
Damaged or entangled cords increase the risk of electric shock.
e) When operating a power tool outdoors, use an extension cord suitable for outdoor use.
Use of a cord suitable for outdoor use reduces the risk of electric shock.
f) If operating a power tool in a damp location is unavoidable, use a residual current device (RCD) protected supply.
Use of an RCD reduces the risk of electric shock.
3) Personal safety
a) Stay alert, watch what you are doing and use common sense when operating a power tool.
Do not use a power tool while you are tired or under the influence of drugs, alcohol or medication.
A moment of inattention while operating power tools may result in serious personal injury.
b) Use personal protective equipment. Always wear eye protection.
Protective equipment such as a dust mask, non-skid safety shoes, hard hat or hearing protection used for appropriate conditions will reduce personal injuries.
c) Prevent unintentional starting. Ensure the switch is in the off -position before connecting to power source and/or battery pack, picking up or carrying the tool.
Carrying power tools with your fi nger on the switch or energising power tools that have the switch on invites accidents.
d) Remove any adjusting key or wrench before turning the power tool on.
A wrench or a key left attached to a rotating part of the power tool may result in personal injury.
e) Do not overreach. Keep proper footing and balance at all times.
This enables better control of the power tool in unexpected situations.
f) Dress properly. Do not wear loose clothing or jewellery. Keep your hair and clothing away from moving parts.
Loose clothes, jewellery or long hair can be caught in moving parts.
g) If devices are provided for the connection of dust extraction and collection facilities, ensure these are connected and properly used.
Use of dust collection can reduce dust-related hazards.
h) Do not let familiarity gained from frequent use of tools allow you to become complacent and ignore tool safety principles.
A careless action can cause severe injury within a fraction of a second.
4) Power tool use and care
a) Do not force the power tool. Use the correct power tool for your application.
The correct power tool will do the job better and safer at the rate for which it was designed.
b) Do not use the power tool if the switch does not turn it on and off.
Any power tool that cannot be controlled with the switch is dangerous and must be repaired.
c) Disconnect the plug from the power source and/or remove the battery pack, if detachable, from the power tool before making any adjustments, changing accessories, or storing power tools.
Such preventive safety measures reduce the risk of starting the power tool accidentally.
d) Store idle power tools out of the reach of children and do not allow persons unfamiliar with the power tool or these instructions to operate the power tool.
Power tools are dangerous in the hands of untrained users.
e) Maintain power tools and accessories. Check for misalignment or binding of moving parts, breakage of parts and any other condition that may affect the power tool's operation. If damaged, have the power tool repaired before use.
Many accidents are caused by poorly maintained power tools.
f) Keep cutting tools sharp and clean.
Properly maintained cutting tools with sharp cutting edges are less likely to bind and are easier to control.
g) Use the power tool, accessories and tool bits etc. in accordance with these instructions, taking into account the working conditions and the work to be performed.
Use of the power tool for operations different from those intended could result in a hazardous situation.
h) Keep handles and grasping surfaces dry, clean and free from oil and grease.
Slippery handles and grasping surfaces do not allow for safe handling and control of the tool in unexpected situations.
5) Service
a) Have your power tool serviced by a qualified repair person using only identical replacement parts.
This will ensure that the safety of the power tool is maintained.
PRECAUTION
Keep children and infi rm persons away.
When not in use, tools should be stored out of reach of children and infi rm persons.
DEMOLITION HAMMER SAFETY WARNINGS
Safety instructions for all operations
- Wear ear protectors.
Exposure to noise can cause hearing loss.
- Use auxiliary handle(s), if supplied with the tool.
Loss of control can cause personal injury.
- Hold the power tool by insulated gripping surfaces, when performing an operation where the cutting accessory may contact hidden wiring or its own cord.
Cutting accessory contacting a "live" wire may make exposed metal parts of the power tool "live" and could give the operator an electric shock.
ADDITIONAL SAFETY WARNINGS
- Ensure that the power source to be utilized conforms to the power requirements specified on the product nameplate.
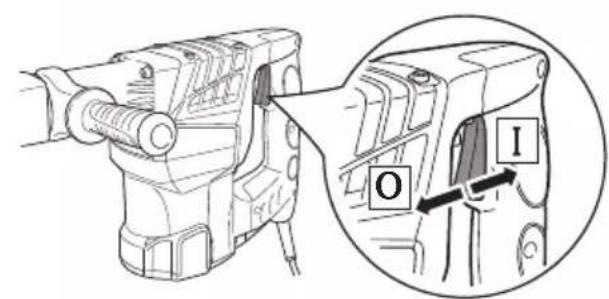
- Ensure that the power switch is in the OFF position.
If the plug is connected to a receptacle while the power switch is in the ON position, the power tool will start operating immediately, which could cause a serious accident.
- When the work area is removed from the power source, use an extension cord of sufficient thickness and rated capacity. The extension cord should be kept as short as practicable.
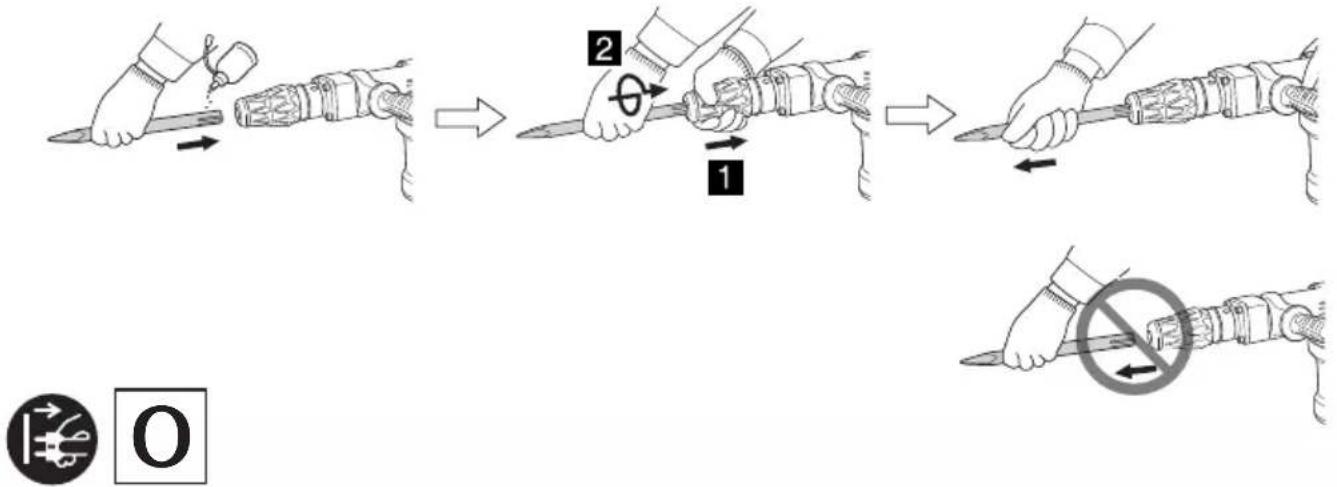
- When using tools such as bull points, cutters, etc., make sure to use the genuine parts designated by our company.
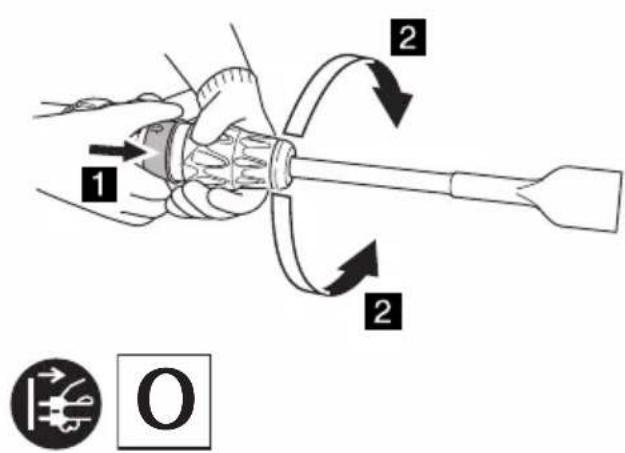
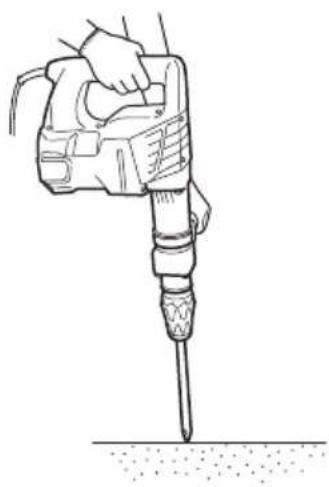
- Be sure to grip the handle and side handle during work. Do not hold by the grip (A) during work. If you pull it by mistake, the bull point could jump out.
- Do not touch the bit during or immediately after operation. The bit becomes very hot during operation and could cause serious burns.
- Before starting to break, chip or drill into a wall, floor or ceiling, thoroughly confi rm that such items as electric cables or conduits are not buried inside.
- Wear a mask when turning your head upward.
- Properly set the bit holder.
- At the start of work, confi rm screw tightening.
- When working at a highly elevated location, pay attention to articles and persons below.
- Wear protective shoes to protect your feet.
- Make sure to securely hold the tool as shown in Fig. 9 during operation.
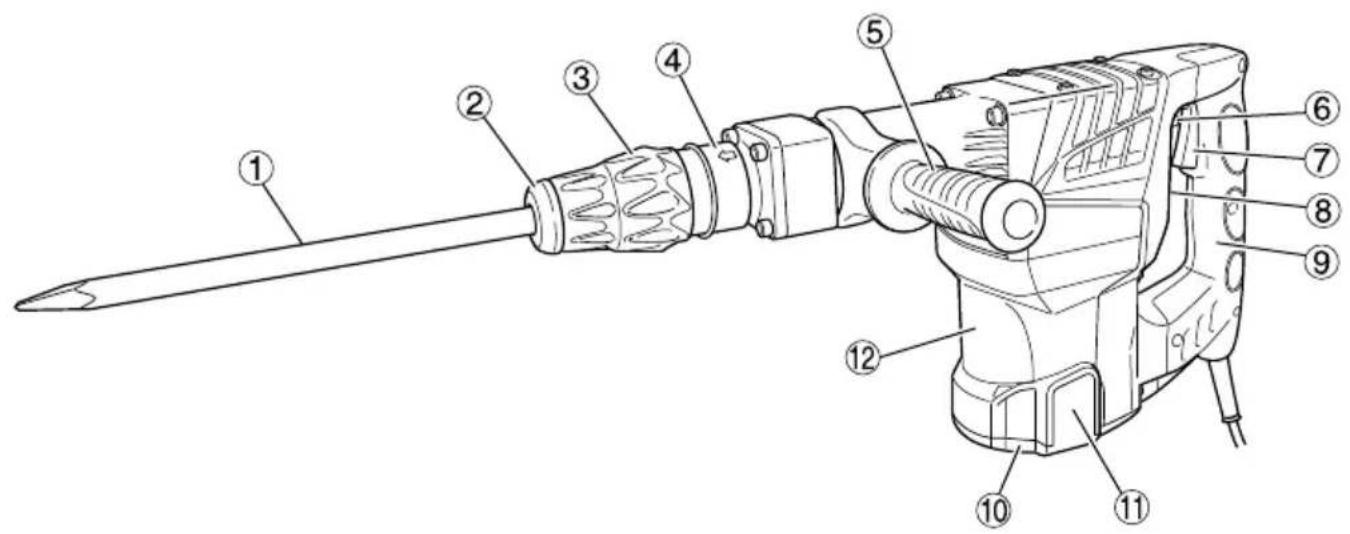
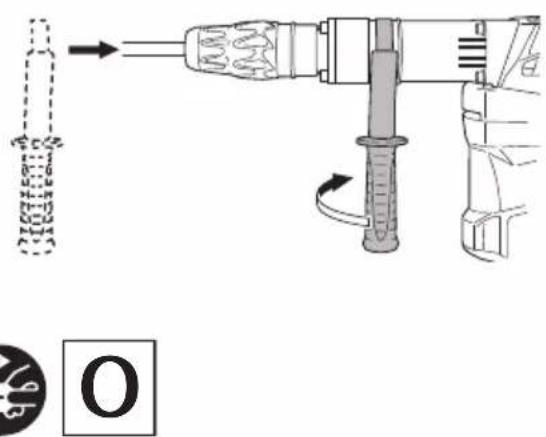
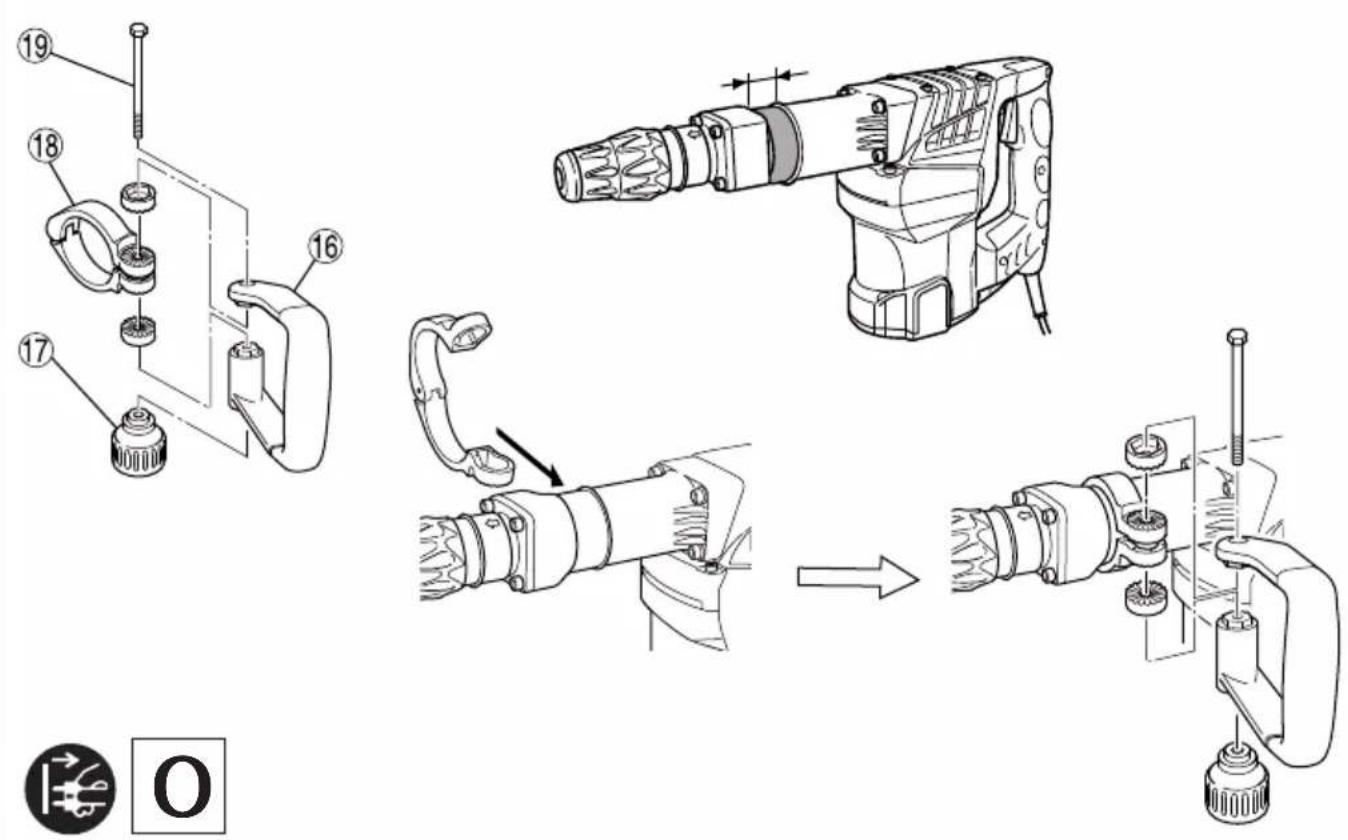
NAMES OF PARTS (Fig.1–Fig.11)
| 1 | Tool shank |
| 2 | Front cap |
| 3 | Grip (A) |
| 4 | Grip (B) |
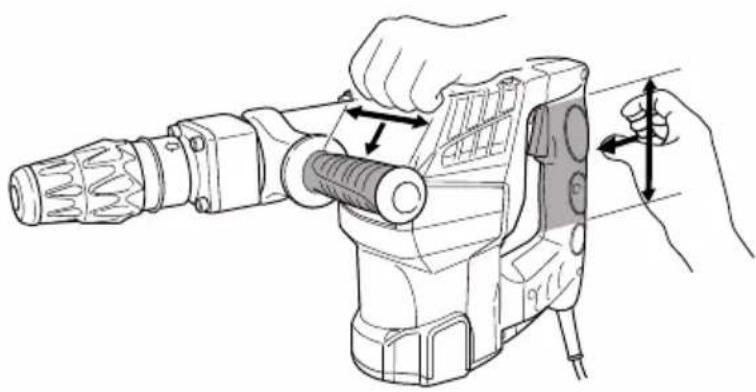
| 5 | Side handle |
| 6 | Stopper |
| 7 | Trigger switch |
| 8 | Nameplate |
| 9 | Handle |
| 10 | Tail cover |
| 11 | Brush cap (inside the Tail cover) |
| 12 | Housing |
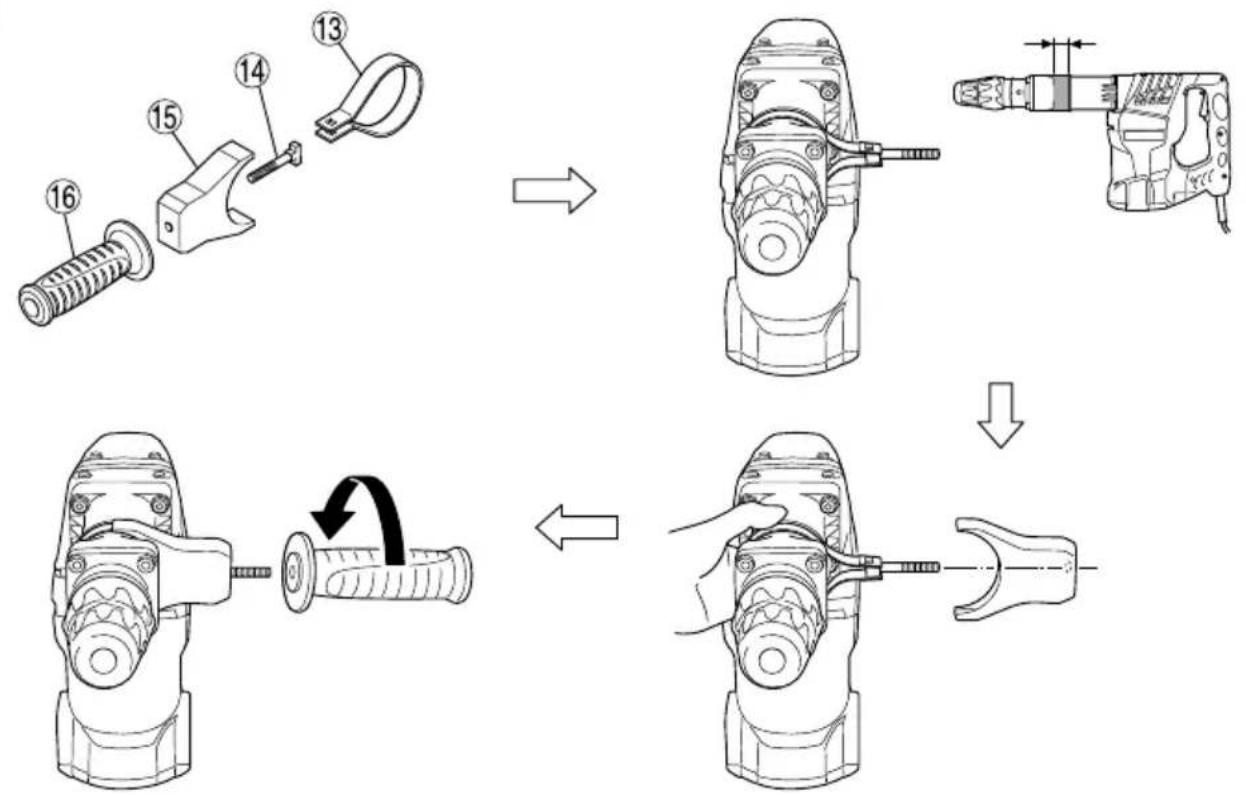
| 13 | Band |
| 14 | Handle bolt |
| 15 | Mount |
| 16 | Side handle |
| 17 | Grip |
| 18 | Handle holder |
| 19 | Bolt |
SYMBOLS
WARNING
The following show symbols used for the machine. Be sure that you understand their meaning before use.
| H60MC : Demolition Hammer | |
 | To reduce the risk of injury, user must read instruction manual. |
 | Only for EU countriesDo not dispose of electric tools together with household waste material!In observance of European Directive 2012/19/EU on waste electrical and electronic equipment and its implementation in accordance with national law, electric tools that have reached the end of their life must be collected separately and returned to an environmentally compatible recycling facility. |
| Switching ON | |
 | Switching OFF |
 | Disconnect mains plug from electrical outlet |
 | Class II tool |
STANDARD ACCESSORIES
In addition to the main unit (1 unit), the package contains the accessories listed in the below.
○ Case....1
○ Bull Point (SDS-max shank) ....1
O Side Handle { I type: bar type handle .....1
II type: D type handle ....1
Either type I or type II Side handle is attached.
Standard accessories are subject to change without notice.
APPLICATIONS
Demolishing concrete, chipping off concrete, grooving, bar cutting, and driving piles.
Application examples:
Installation of piping and wiring, sanitary facility installation, machinery installation, water supply and drainage work, interior jobs, harbor facilities and other civil engineering works.
SPECIFICATIONS
| Voltage (by areas)* | (110 V, 120 V, 127 V, 220 V, 230 V, 240 V) ~ |
| Power Input* 1250 W | |
| Full-load Impact Rate 1600 min | -1 |
| Weight(According to EPTAProcedure 01/2014) | 11.3 kg |
* Be sure to check the nameplate on product as it is subject to change by areas.
NOTE
Due to HiKOKI's continuing program of research and development, the specifications herein are subject to change without prior notice.
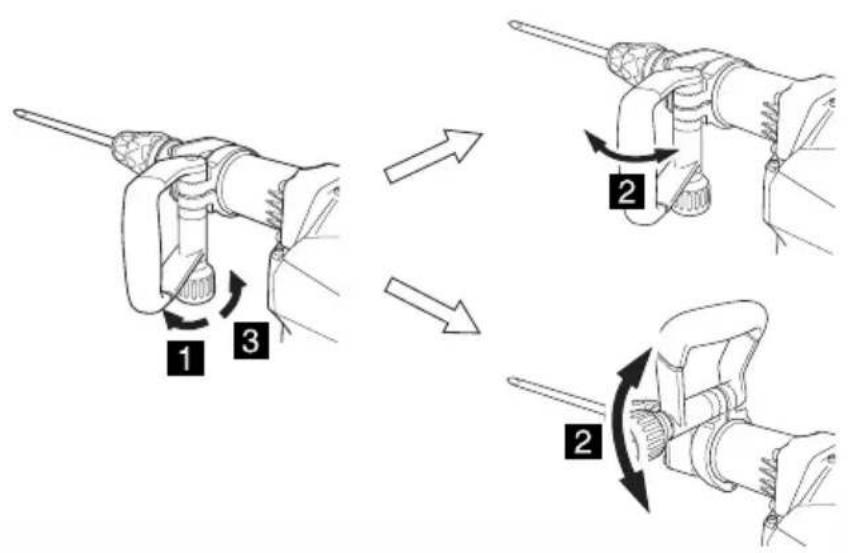
MOUNTING AND OPERATION
| Action Figure Page | ||
| Mounting a tool | 2 | 2 |
| Deciding working position of tool | 3 | 2 |
| Fixing the side handle (Bar type handle) | 4 | 2 |
| Move the side handle (D type handle) | 5 | 3 |
| Switch operation | 6 | 3 |
| How to use the demolition hammer* | 7 | 3 |
| Replacing carbon brushes | 8 | 3 |
| Installing the side handle | 10, 11 | 4 |
| Selecting accessories | — | 5 |
* By utilizing the empty weight of the machine and by firmly holding the demolition hammer with both hands, one can effectively control the subsequent recoil motion. Proceed at a moderate work-rate, the use of too much force will impair efficiency.
CAUTION
After long time of use, the cylinder case becomes hot.
Therefore, be careful not to burn your hands.
GREASE REPLACEMENT
This machine is of full air-tight construction to protect against dust and to prevent lubricant leakage. This machine can be used without grease supplement for an extended period of time. However, perform the grease replacement to maintain the service life. Replace the grease as described below.
1. Grease Replacement Period
You should look at the grease when you change the carbon brush. (See the section MAINTENANCE AND INSPECTION.) Ask for grease replacement at the nearest authorized HiKOKI Service Center.
In the case that you are forced to change the grease by yourself, please follow the following points.
2. How to replace grease
CAUTION
Before replacing the grease, turn the power off and pull out the plug from the receptacle.
(1) Remove the crank cover and wipe off the old grease inside.
(2) Supply 76 g (the standard volume to cover the connecting rod) of HiKOKI Electric Hammer Grease A to the crank case.
(3) After replacing the grease, install the crank cover securely. At this time, do not damage or lose the oil seal.
NOTE
The HiKOKI Electric Hammer Grease A is of the low viscosity type. When the grease is consumed, purchase from an authorized HiKOKI Service Center.
MAINTENANCE AND INSPECTION
CAUTION
Be sure to switch OFF and disconnect the attachment plug from the receptacle to avoid a serious accident.
1. Inspecting accessories
Since use of a dull accessory, such as a bull point, a cutter, etc. will degrade efficiency and cause possible motor malfunction, sharpen or replace with a new one as soon as abrasion is noted.
2. Inspecting the mounting screws
Regularly inspect all mounting screws and ensure that they are properly tightened. Should any of the screws be loose, retighten them immediately. Failure to do so could result in serious hazard.
3. Maintenance of the motor
The motor unit winding is the very "heart" of the power tool. Exercise due care to ensure the winding does not become damaged and/or wet with oil or water.
4. Inspecting the carbon brushes (Fig. 8)
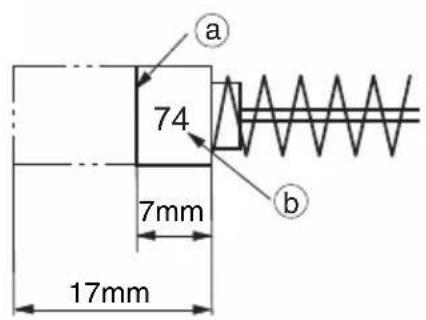
The Motor employs carbon brushes which are consumable parts. When they become worn to or near the "wear limit" ⓐ, it results in motor trouble.
When an auto-stop carbon brush is equipped, the motor will stop automatically. At that time, replace both carbon brushes with new ones which have the same carbon brush Numbers shown in the Fig. 8. In addition, always keep carbon brushes clean and ensure that they slide freely within the brush holders.
5. Replacing carbon brushes
Loosen the set screw and remove the tail cover. Remove the brush caps and carbon brushes. After replacing the carbon brushes, do not forget to tighten the brush caps securely and to install the tail cover.
6. Replacing supply cord
If the replacement of the supply cord is necessary, it has to be done by HiKOKI Authorized Service Center to avoid a safety hazard.
CAUTION
In the operation and maintenance of power tools, the safety regulations and standards prescribed in each country must be observed.
GUARANTEE
We guarantee HiKOKI Power Tools in accordance with statutory/country specific regulation. This guarantee does not cover defects or damage due to misuse, abuse, or normal wear and tear. In case of complaint, please send the Power Tool, undismantled, with the GUARANTEE CERTIFICATE found at the end of this Handling instruction, to a HiKOKI Authorized Service Center.
IMPORTANT
Correct connection of the plug
The wires of the main lead are coloured in accordance with the following code:
Blue: — Neutral
Brown: — Live
As the colours of the wires in the main lead of this tool may not correspond with the coloured markings identifying the terminals in your plug proceed as follows:
The wire coloured blue must be connected to the terminal marked with the letter N or coloured black. The wire coloured brown must be connected to the terminal marked with the letter L or coloured red. Neither core must be connected to the each terminal.
NOTE
This requirement is provided according to BRITISH STANDARD 2769: 1984.
Therefore, the letter code and colour code may not be applicable to other markets except The United Kingdom.
Information concerning airborne noise and vibration
The measured values were determined according to EN62841 and declared in accordance with ISO 4871.
Measured A-weighted sound power level: 100 dB (A)
Measured A-weighted sound pressure level: 80 dB (A) Uncertainty K: 3 dB (A).
Wear hearing protection.
Vibration total values (triax vector sum) determined according to EN62841.
Equivalent chiselling value:
Vibration emission value a_h , CHeq = 19.3m / s^2
Uncertainty K = 1.5 m/s^2
The declared vibration total value and the declared noise emission value have been measured in accordance with a standard test method and may be used for comparing one tool with another.
They may also be used in a preliminary assessment of exposure.
WARNING
☐ The vibration and noise emission during actual use of the power tool can differ from the declared total value depending on the ways in which the tool is used especially what kind of workpiece is processed; and
- Identify safety measures to protect the operator that are based on an estimation of exposure in the actual conditions of use (taking account of all parts of the operating cycle such as the times when the tool is switched off and when it is running idle in addition to the trigger time).
NOTE
Due to HiKOKI's continuing program of research and development, the specifications herein are subject to change without prior notice.
VEILIGHEIDSWAARSCHUWINGEN SLOOPHAMER
○ Skinnehoved (SDS max. skaft) ....1
○ Sidegreb { Type I: Greb af stangtypen ....1 Type II: Greb af D-typen ....1
VEDLIKEHOLD OG INSPEKSJON
FORSIKTIG
Negotovost K: 3 dB (A).
Siemensring 34, 47877 willich, Germany
Tel: +49 2154 49930
Fax: +49 2154 499350
URL: http://www.hikoki-powertools.de
Hikoki Power Tools Netherlands B.V.
Brabanthaven 11, 3433 PJ Nieuwegein, The Netherlands
Tel: +31 30 6084040
Fax: +31 30 6067266
URL: http://www.hikoki-powertools.nl
Hikoki Power Tools (U.K.) Ltd.
25 Majestic Road, Southampton, SO16 OYT,
United Kingdom
Tel: +44 1908 660663
Fax: +44 1908 606642
URL: http://www.hikoki-powertools.uk
Hikoki Power Tools France S.A.S.
Hikoki Power Tools Belgium N.V./S.A.
Koningin Astridlaan 51, B-1780 Wemmel, Belgium
Tel: +32 2 460 1720
Fax: +32 2 460 2542
URL http://www.hikoki-powertools.be
Hikoki Power Tools Italia S.p.A
Via Piave 35, 36077, Altavilla Vicentina (VI), Italy
Tel: +39 0444 548111
Fax: +39 0444 548110
URL: http://www.hikoki-powertools.it
Hikoki Power Tools Ibérica, S.A.
C/ Puigbarral, 26-28, Pol. Ind. Can Petit, 08227 Terrassa
(Barcelona), Spain
Tel: +34 93 735 6722
Fax: +34 93 735 7442
URL: http://www.hikoki-powertools.es
Kjeller Vest 7, N-2007 Kjeller, Norway
Tel: (+47) 6692 6600
Fax: (+47) 6692 6650
URL: http://www.hikoki-powertools.no
Hikoki Power Tools Sweden AB
Rotebergsvagen 2B SE-192 78 Sollentuna, Sweden
Tel: (+46) 8 598 999 00
Fax: (+46) 8 598 999 40
URL: http://www.hikoki-powertools.se
Hikoki Power Tools Denmark A/S
Lillebaeltsvej 90, 6715 Esbjerg N, Denmark
Tel: (+45) 75 14 32 00
Fax: (+45) 75 14 36 66
URL: http://www.hikoki-powertools.dk
Hikoki Power Tools Finland Oy
Tupalankatu 9, 15680 Lahti, Finland
Tel: (+358) 20 7431 530
Fax: (+358) 20 7431 531
URL: http://www.hikoki-powertools.fi
Hikoki Power Tools Hungary Kft.
Hikoki Power Tools Romania S.R.L.
Ring Road, No. 66, Mustang Traco Warehouses, Warehouse
No.1, Pantelimon City, 077145, Ilfov County, Romania
natural_image
Line drawing of a quill pen in an inkwell (no text or symbols)| English Nederlands | |
| EC DECLARATION OF CONFORMITYWe declare under our sole responsibility that Demolition Hammer, identified by type and specific identification code *1), is in conformity with all relevant requirements of the directives *2) and standards *3). Technical fi le at *4) – See below:The European Standard Manager at the representative office in Europe is authorized to compile the technical fi lo.2000/14/ECType of equipment: Hand-held concrete breakerType name: H60MCWeight of equipment: 11.3 kgConformity assessment procedure: Annex VINotified Body: CE 0044 TUV NORD CERT Am TÜV 1, 30519 Hannover, GermanyMeasured sound power level: 100 dBGuaranteed sound power level: 102 dBThe declaration is applicable to the product affi xed CE marking. | EC VERKLARING VAN CONFORMITEITWij verklaren onder onze eigen verantwortelijkheid dat Hakhamer, geldiffticeerd door het type en de specifieke identificatiecode *1), voldoet aan alle relevante vereisten van de richtlijnen *2) en normen *3). Technische documentatie bij *4) – zie onder.De Europese Normen Manager bij de vertegenwoordiging in Europa is gemachtigd om het technisch dossier samen to stellen.2000/14/ECType gereedschap: HandbetonbreekhamerTypenaam: H60MCGewicht gereedschap: 11.3 kgConformiteit vaststellingsprocedure: Annex VIIn kennis gesteld instituit: CE0044 TÜV NORD CERT Am TÜV 1, 30519 Hannover, DuitslandGemeten geluidsdruk: 100 dBGegarandeerde geluidsdruk: 102 dBDeze verklaring is van toepassing op producten voorzien van de CE-markeringen. |
| Deutsch Español | |
| EG-KONFORMITÄTSERKLÄRUNGWir erklären in alleiniger Verantwortung, dass der durch den Typ und den spezifischen Identifizierungscode *1) identifizierte Hammer allen einschlägigen Bestimmungen der Richtlinien *2) und Normen *3) entspricht. Technische Unterlagen unter *4) – Siehe unten.Die Leitung der repräsentativen Behörde für europäische Normen und Richtlinien ist berechtigt, die technischen Unterlagen zusammenzustellen.2000/14/EGArt der Ausrüstung: Handgehaltener BetonbrecherTyname: H60MCGewicht der Ausrüstung: 11.3 kgÜbereinstimmungsbeurteilungsverfahren: Annex VIInformierte Körperschaft:CE 0044 – der in TÜV NORD CERT, Am TÜV 1, 30519 Hannover, DeutschlandGemessener Schalleistungspegel: 100 dBGarantieter Schalleistungspegel: 102 dBDie Erklärung gilt für die an dem Produkt angebrachte CE-Kennzeichnung. | DECLARACIÓN DE CONFORMIDAD DE LA CEDeclaramos bajo nuestra única responsabilidad que el Martillo demoledor, identificado por tipo y por código de identificación específico *1), está en conformidad con todas las disposiciones correspondientes de las directivas *2) y de las normas *3). Documentación técnica en *4) – Ver a continuación.El Director de Normas Europeas en la oficina de representación en Europa está autorizado para elaborar el expediente técnico.2000/14/CETipo de dispositivo: martillo manual para romper el hormigónNombre del modelo: H60MCPeso del dispositivo: 11.3 kgProcedimiento de evaluación de conformidad: Anexo VIEntidad notificada: CE 0044 TÜV NORD CERT Am TÜV 1, 30519 Hannover, AlemaniaNivel de potencia acústica medida: 100 dBNivel de potencia acústica garantizada: 102 dBLa declaración se aplica al producto con marcas de la CE. |
| Français Português | |
| DECLARATION DE CONFORMITE CENous déclarons sous notre entière responsabilité que le Marteau de démolition, identifié par le type et le code d'identification spécifique *1) est en conformité avec toutes les exigences applicables des directives *2) et des normes *3). Dossier technique en *4) - Voir ci-dessous.Le Gestionnaire des normes européennes du bureau de représentation en Europe est autorisé à constituer le dossier technique.2000/14/CEType de matériel: Outil de démolition à mainNom du type: H60MCPoids du matériel : 11.3 kgProcedure d'évaluation de conformité : Annexe VIOrganisme notifié: CE 0044 TÜV NORD CERT Am TÜV 1, 30519 Hannover, AllemagneNiveau de puissance sonore mesuré : 100 dBNiveau de puissance sonore garanti : 102 dBCette déclaration s applique aux produits désignés CE. | DECLARAÇÃO DE CONFORMIDADE CEDeclaramos, sob nossa única e inteira responsabilidade, que Martelo, identificado por tipo e código de identificação específico *1), está en conformidade com todos os requerimentos relevantes das diretivas *2) e normas *3). Ficheiro técnico em *4)-Consulte abaixo.O Gestor de Normas Europeas no escritório de representação na Europa está autorizado a compilar o fi cheiro técnico.2000/14/CETipo de equipamento: Martelo de mão para demolição de concretoNome do tipo: H60MCPeso do equipamento: 11.3 kgProcedimiento de avaliação de conformidade: Anexo VIOrgão notificado: CE 0044 TÜV NORD CERT Am TÜV 1, 30519 Hannover, AlemanhaNivel medido de potência de som: 100 dBNivel garantido de potência de som: 102 dBA declaração aplica-se aos produtos com marca CE. |
| Italiano Svenska | |
| DICHIARAZIONE DI CONFORMITÀ CEDichiariamo sotto la nostra esclusiva responsabilità che il martello demolitore, identificato dal tipo e dal codice identificativo specifico *1), è conforme a tutti i requisiti delle direttive *2) e degli standard *3).Documentazione tecnica presso *4) – Vedere sotto.Il gestore delle norme europee presso l'ufficio di rappresentanza in Europa è autorizzato a compilare il fascicolo tecnico.2000/14/CETipo di apparecchiatura: Demolitore per cemento portatileNome di tipo: H60MCPeso dell'apparecchiatura: 11.3 kgProcedimento di valutazione conformità: Allegato VIEnte notificato: CE 0044 TÜV NORD CERT Am TÜV 1, 30519 Hannover, GermaniaLivello di potenza sonora misurato: 100 dBLivello di potenza sonora garantito: 102 dBLa dichiarazione è applicabile ai prodotti cui sono applicati i marchi CE. | EG-DEKLARATION BETRÄFFANDE LIKFORMIGHETVi förklarar på eget ansvar att produkten mejselhammare, identifierad enligt typ och särskild identifikationskod *1), överensstämmer med alla relevanta krav i direktiven *2) och standardema *3).Teknisk fi I enligt *4) – Se nedan.Den europeiska standardansvariga på representationskontoret i Europa är auktoriserad att sammanställa den tekniska fi len.2000/14/EGTyp av utrustning: Handhållen betongbilningsmaskinTypnamn: H60MCApparatens vikt: 11.3 kgKonformitetsbedömningsmetod: Annex VIUnderättat organ: CE 0044 TÜV NORD CERT Am TÜV 1, 30519 Hannover, TysklandUppmätt ljudstyrkenivä: 100 dBGaranterad ljudstyrkenivä: 102 dBDenna försäkran gäller för produkten med tillhörande CE-märkning. |
| *1) H60MC C349738S*2) 2006/42/EC, 2014/30/EU, 2000/14/EC, 2011/65/EU*3) EN62841-1:2015EN IEC 62841-2-6:2020+A11:2020EN55014-1:2006+A1:2009+A2:2011EN55014-2:1997+A1:2001+A2:2008EN61000-3-2:2014EN61000-3-3:2013 | |
| *4) Representative office in EuropeHikoki Power Tools Deutschland GmbHSiemensring 34, 47877 Willich, GermanyHead office in JapanKoki Holdings Co., Ltd.Shinagawa Intercity Tower A, 15-1, Konan 2-chome,Minato-ku, Tokyo, Japan | 30. 11. 2022Akihisa YahagiEuropean Standard Manager30. 11. 2022 K. YokoyamaGeneral Manager ofQuality Assurance Division K. YokoyamaGeneral Manager ofQuality Assurance Division |
| Dansk Polsk | |
| EF-OVERENSSTEMMELSESERKLÆRINGVi erklærer os fuldstendigt ansvarlige for, at mejselhammeren, identificeret ved type og specifik identifikationskode *1), er i oversensstemmelse med alle relevante krav i direktiverne *2) og standarderne *3). Teknik fil i (4) - Se nedenforLoderen af europeåiske standarder på repräsentationskontoret i Europa er bemyndiget til at kompliere den tekniske fil.2000/14/EFUdystyrstype: Händholdt betonknuserTypenavn: H60MCUdystrets vægt: 11,3 kgProcedure for fastsettele af ensartethed: Bilag VIArmeidt organisation: CE 0044 TÜV NORD CERT Am TÜV 1, 30519, Hannover, TysklandMålt lydstyrkeniveau: 100 dBGaranteret lydstyrkeniveau: 102 dBErkæringen gjelder produktet, der er mærket med CE. | DEKLARACJA ZGODNOŚCI Z WEOświadczyany na własną wyłączną odpowiedzialność, że Mbt udarowy podanego typu i oznaczony unikainym kodem identifikacyjnym *1) jest zgodny z wszystkimi właściwymi wymogami dyrektyw *2) i norm *3). Dokumentacja techniczna w *4) - Patrz ponizej.Menedzer Norm Europejskich przedstawicielstwa firmy w Europie jest upoważniony do sporządzania dokumentacji technicznej.2000/14/WETyp narzędzia: Ręczny młot do kruszenia betonuNazwa typu: H60MCWaga narzędzia: 11,3 kgProcedura oceny zgodności: Annex VIJednostka notyfikowana: CE 0044 TÜV NORD CERT Am TÜV 1, 30519 Hannover, NiemcyZmierzony poziom mocy dźwięku: 100 dBGwarantowany poziom mocy dźwięku: 102 dBNiniejsza deklaracją na zastosowanie do produktu opatrzonego znakiem CE. |
| Norsk MagyarEF'S ERKLÆRING OM OVERENSSTEMMELSEVi erklærer på eget ansvar at elektrisk borehammer, identifisiert etter type og spesifikk identifikasjonskode *1), er i samsvar med alle relevante krav i direktiver *2) og standarder *3). Teknik fil under *4) - Se nedenfor.Styrenen for europeiske standarder ved representantkontoret i Europa er autorisert til å kompilere den tekniske fil len.2000/14/EFUdystyrstype: Händholdt brekkhammerTypenavn: H60MCUdystrets vekt: 11,3 kgProsedyre for konformitetsvurdering: Annex VIUnderrettet organ: CE 0044 TÜV NORD CERT Am TÜV 1, 30519 Hannover, TysklandMålt lydeff ektinivá: 100 dBGarantert lydeff ektinivá: 102 dBErkæringen gjelder for CE-merket på produktet. | EK MEGFELELŐSÉGI NYILATKOZATA kizárólagos felelősségünkre kijelentjük, hogy az Vésokalapács, mely tipus és egyedi azonosító kód *1) alapján azonosított, megfelel az irányelvek *2) és szabványok *3) vonatkozó követelményeinek. Műszaki fájl a *4) - Lásd alább.Az EU képviseleti iroda európai szabványügyi menedzsere jogosult a műszaki dokumentáció összeallitására.2000/14/EKAkszülék típusa: Kézi betontöró szerszámTipusszám: H60MCAkszülék sulya: 11,3 kgMegfelelőségi eljárás: Annex VIÉrtesített hatóság: CE 0044 TÜV NORD CERT Am TÜV 1, 30519 Hannover, NémetországMért hangteljesítmény szint: 100 dBGarantált hangteljesítmény szint: 102 dBJelen nyilatkozat a terméken feltüntetett CE jelzésre vonatkozik. |
| Suomi ČeštiņaEY-ILMOITUS YHDENMUKAISUUDESTAVakuutamme yksinomaisella vastuillamne, että tyypin ja erityisen tunnistuskoodin *1) perusteella tunistettava pikkausvassara on kaikkin direktivien *2) ja standarden *3) asiaankuuuvien vaatimusten mukainen. Tekniinen tiedosto kohdassa *4) - katso alta.Euroopalaisten standenatiell hallintaeiln Euroopan edustustossa on valtuutettu kokoamaan teknisen tiedoston.2000/14/EYLaitteen typpi: Kannettava betonimurskainTypprinimi: H60MCLaitteen paino: 11,3 kgYhodenmukaisyuden määäritystoimenpiteet: Annex VIImoitettu elin: CE 0044 TÜV NORD CERT Am TÜV 1, 30519 Hannover, GermanyMitattu äänenpainetaso: 100 dBTaattu äämempanetaso: 102 dBIlimoitus on sovellettavissa tuotteeseen kiinmitettyn CE-merkintään. | PROHLÁŠENÍ O SHODĚ S EProhlašujeme na vlastní zodpovědnost, že Sekaci kladivo, identifikované podle typu a specifického identifikačního kódu *1), je v souladu se všemi příslušnými požadavky směmic *2) a norem *3).Technický soubor *4) - viz níže.K sestaveni technické dokumentace je oprávněn manažer pro evropské standardy v evropském obchodnim zastoupeni.2000/14/ESDruh zařízení: Sekaci kladivoTyp: H60MCVáha zařízení: 11,3 kgHomologace: Annex VIOrganizace, kde byla homologace oznámena: CE 0044 TÜV NORD CERT Am TÜV 1, 30519 Hannover, NémeckoNaměfená hlučnost: 100 dZaručená mez hiuku: 102 dBToto prohlášení plati pro vyrobek označený značkou CE. |
| Ελληνικά TürkçeΕΚ ΔΗΛΩΣΗ ΕΝΑΡΜΟΝΙΣΜΟΥΔηλώνουμε με αποκλειστική μας ευδύνη ότι το Κρουστικό, το οτοίο προσδιορίζεται από τον τύπο και ευδικό αναγνυριστικό κωδικό *1), είναι σύμφυνο με όλες τις σχετικές απαιτήσεις των Οδηγιών *2) και με τα σχετικά πρότυτια *3). Τεγνικό Αρχείο στο *4) - Dešite παρακάτω.O Διαχειριαττικ Ευρωταικών Προτύπων ατο γραφείο εκπροσώπτησης στην Ευρώτη είναι εξουσιοδοτημένος για τη σύνταξη του τεχνικού φακέλου.2000/14/EKΤύτος μηχογήματος: Θραώστης τομέντου που κρατιέται από το χέριΟνομασί τύπου: H60MCBáρος μηχανήματος: 11,3 kgYαδικασία ελέγχου εναρμονισμού: Παράρτημα νιΑλειρά προς γνιαστοπαιση: CE 0044 TÜV NORD CERT Am TÜV 1, 30519 Hannover, GermanyMetρημένο επιτεδο ηχητικής ισχύος: 100 dBEγγυημένο επιτεδο ηχητικής ισχύος: 102 dBH δηλωση σχώει μόνο για το προϊόν που είναι τοποθετημένη σήμανοη CE. | AT UYGUNLUK BEYANITip ve özel tanım koduyla *1) tanimli Kinci’nin direktiflerin *2) ve standartlamn *3) tüm ilgili gereksinimlerine uygun olduğunu tamamen kendi sorumluluğumuz allinda beyan ederiz. Teknik dosya *4)’dedir – Aşągiya bakın.Avrupa’daki temsilcilik ofisindeki Avrupa Standartlan Yöneticisi, teknik dosyayi derlemek için yetkilendirilmiştir.2000/14/ATAletin tipi: El tipi beton kinciTip adi: H60MCAletin ağırlığı: 11,3 kgUyguniuk değerlendirme prosedjuru: EK LVDeğerlinden Kurum CE 0044 TÜV NORD CERT Am TÜV 1, 30519 Hannover, AlmanyaOçülen ses gücü seviyesi: 100 dBGaranti edilen ses gücü seviyesi: 102 dBBeyan, üzerinde CE işareti bulunan ürünler için geçorlidir. |
| *1) H60MC C349738S*2) 2006/42/EC, 2014/30/EU, 2000/14/EC, 2011/65/EU*3) EN62841-1:2015EN IEC 62841-2-6:2020+A11:2020EN55014-1:2006+A1:2009+A2:2011EN55014-2:1997+A1:2001+A2:2008EN61000-3-2:2014EN61000-3-3:2013 | |
| *4) Representative office in EuropeHikoki Power Tools Deutschland GmbHSiemensring 34, 47877 Willich, GermanyHead off ce in JapanKoki Holdings Co., Ltd.Shinagawa Intercity Tower A, 15-1, Konan 2-chome,Minato-ku, Tokyo, Japan | 30. 11. 2022Akihisa YahagiEuropean Standard Manager30. 11. 2022 K. YokoyamaGeneral Manager ofQuality Assurance Division K. YokoyamaGeneral Manager ofQuality Assurance Division |
| Română БългарскиDECLARATIE DE CONFORMITATE CEDeclarăm pe propriă răspundere că Ciocanul demolator, identificat după tipul și codul de identificare specific *1), este în conformitate cu toate cerinjele relevante ale directivelor *2) si ale standardelor *3). Fisier tehnic la *4) – Vezi mai jos.Managerul standardelor europene de la biroul reprezentanței din Europa este autorizat să întocmească dosarul tehnic.2000/14/CE• Tip de echipament: Spărgător manual de beton• Denumire tip: H60MC• Greutatea echipamentului: 11,3 kg• Procedură de evaluare a conformității: Anexa VI• Organism de certificare: CE 0044 TÜV NORD CERT Am TÜV 1, 30519 Hannover, Germania• Nivel măsurat al puterii sonore: 100 dB• Nivel garant at al puterii sonore: 102 dBDeclaracija se referă la produsul pe care este aplicat semnul CE. | EO ДЕНЛАРАЦИЯ ЗА СЪОТВЕТСТВИЕДекларираме на своя собствена отговорност, че Къртачът, identифициран по тип и специален идентифинационен код *1), е в съответствие с всинки съответни изисквания на директивите *2)и стандартите *3). Техническо досие в *4) - Викте по-долу.Менидрърът по европейските стандарти в представителния офис в Европа е упълномощен да състава техническото досие.2000/14/EO• Тип оборудване: Ръчен къртач за бетон• Наименование на типа: H60MC• Тегло на оборудването: 11,3 кг• Процедура за оценка на съвместимостта: Приложение VI• Нотифициран орган: CE 0044 TÜV NORD CERT Am TÜV 1, 30519 Хановер, Германия• Измерено ниво на акустична мощност: 100 dB• Гарантирано ниво на акустична мощност: 102 dBDекларацията е приложима за продукта, който има поставена CE маркировка. | |
| Slovenščina SrpskiES IZJAVA O SKLADNOSTINa lastno odgovornost izjavljamo, da je Rušilno kladivo, označeno z vrsto in posebno identifikacijsko kodo *1), v skladu z vsemi ustreznimi zahtevami direktiv *2) in standardov *3). Tehnična dokumentacija pod *4) – glejte spodaj. Upravitelv evropskih standardov na predstavništvu v Evropi je pooblašćen za pripravo tehnične dokumentacije.2000/14/ES• Vrsta opreme: Ročni lomilec betona• Ime izdelka: H60MC• Teža opreme: 11,3 kg• Postopek ocenjevanja skladnosti: Dodatek VI• Priglašen organ: CE 0044 TÜV NORD CERT Am TÜV 1, 30519 Hannover, Nemčija• Izmerjen nivo jakosti hrupa: 100 dB• Zajamčen nivo jakosti hrupa: 102 dBDeklaracija je označena na izdelku s pritrjeno oznako CE. | EZ DEKLARACIJA O USAGLAŠENOSTIPod punom odgovornošću izjavljemo da je Čecić za rušenje, identifikovan prema tipu i specifičnom identifikacionom kodu *1), u skladu sa svim relevantnim zahtevima direktiva *2) i standardima *3). Tehnička datoteka pod *4) - Pogiedajte dole.Direktor za evropske standarde u kancelariji predstavništva u Evropi je odgovoran za sastavljanje tehničke dokumentacije.2000/14/EZ• Tip opreme: Ručni razbijac betona• Naziv tipa: H60MC• Tezina opreme: 11,3 kg• Postupak procene saobraznosti: Dopuna VI• Ovlašćeno telo: CE 0044 TÜV NORD CERT Am TÜV 1, 30519 Hannover, Nemačka• Izmerena jacina zvuka: 100 dB• Garantovana jacina zvuka: 102 dBDeklaracija je primerijva na proizvod na koji je stavljena CE oznaka. | |
| Slovenčina HrvatskiES VYHLÁSENIE O ZHODETýmto vyhlasujeme na vlastnú zodpovednosť, že výrobok Sekacie kladivo identifikovaný podľa typu a špecifického identifikacného kódu *1) je v zhode so všetkými prislušnými požiadavkami smernic *2) a noriem *3). Technický subor v *4) – Pozrite nižšie.Manazér európskych noriem na zastupujúcom úrade v Európe má oprávnenie na zostavovanie technickej dokumentácie.2000/14/ES• Typ zariadenia: Ručný dnvič betónu• Názov typu: H60MC• Hmotnosť zariadenia: 11,3 kg• Súlad s procesom ohodnotenia: Priloha VI• Upovedomený orgán: CE 0044 TÜV NORD CERT Am TÜV 1, 30519 Hannover, Nemecko• Numeraná hladina akustického tlaku: 100 dB• Zaručená hladina akustického výkonu: 102 dBToto vyhlásenie sa vzťahuje na výrobok označený značkou CE. | EZ IZJAVA O SUKLADNOSTIIzjavljuemo pod vlastitom odgovornošću da je Čecić za rušenje, identificiiran prema vrsti i posebnom identifikacijskom kodu *1), u skladu sa svim relevantnim zahtevima direktiva *2) i standarda *3). Tehnička dokumentacija na *4) - Vidi dojle.Menadžer za europske standarde u europskom predstavništvu tvrtke ovlašten je za sastavljanje tehničke dokumentacije.2000/14/EZ• Vrsta opreme: Ručni razbijac betona• Naziv vrste: H60MC• Tezina opreme: 11,3 kg• Postupak za ocjenu sukladnosti: Prilog VI• Nadležno tijelo: CE 0044 TÜV NORD CERT Am TÜV 1, 30519 Hannover, Nemačka• Izmerena razina zvučne snage: 100 dB• Zajamčena razina zvučne snage: 102 dBlizjava se primjenjuje na proizvod na kojem je stavljena CE oznaka. | |
| *1) H60MC C349738S*2) 2006/42/EC, 2014/30/EU, 2000/14/EC, 2011/65/EU*3) EN62841-1:2015EN IEC 62841-2-6:2020+A11:2020EN55014-1:2006+A1:2009+A2:2011EN55014-2:1997+A1:2001+A2:2008EN61000-3-2:2014EN61000-3-3:2013 | ||
| *4) Representative office in EuropeHikoki Power Tools Deutschland GmbHSiemensring 34, 47877 Willich, GermanyHead offi ce in JapanKoki Holdings Co., Ltd.Shinagawa Intercity Tower A, 15-1, Konan 2-chome,Minato-ku, Tokyo, Japan | 30. 11. 2022Akihisa YahagiEuropean Standard Manager30. 11. 2022K YokoyamaGeneral Manager ofQuality Assurance Division | |
DECLARATION OF CONFORMITY
We declare under our sole responsibility that Demolition Hammer, identified by type and specific identification code *1), is in conformity with all relevant requirements of the UK regulations *2) and Designated standards *3). Technical file at *4) – See below.
This declaration is applicable to the product affixed UKCA marking.
Noise Emission in the Environment by Equipment for use Outdoors Regulations 2001
- Type of equipment: Hand-held concrete breaker
- Type name: H60MC
• Weight of equipment: H60MC:11.3 kg - Conformity assessment procedure: Schedule 9
- Approved Body: 0888 HORIBA MIRA Certification Limited Watling Street, Nuneaton, Warwickshire, CV10 0TU, England
• Measured sound power level: H60MC:100 dB
• Guaranteed sound power level: H60MC:102 dB
*1) H60MC C342086R, C342087M,
*2) Supply of Machinery (Safety) Regulations 2008,
Noise Emission in the Environment by Equipment for use Outdoors Regulations 2001,
Electromagnetic Compatibility Regulations 2016,
The Restriction of the Use of Certain Hazardous Substances in Electrical and Electronic Equipment Regulations 2012
*3) EN62841-1:2015
EN IEC 62841-2-6:2020+A11:2020
EN55014-1:2006+A1:2009+A2:2011
EN55014-2:1997+A1:2001+A2:2008
EN61000-3-2:2014
EN61000-3-3:2013
*4) Importer and authorized person to compile the technical file Hikoki Power Tools (U.K.) Ltd.
25 Majestic Road, Southampton, SO16 OYT,
United Kingdom
Head office in Japan
Koki Holdings Co., Ltd.
Shinagawa Intercity Tower A, 15-1, Konan 2-chome,
Minato-ku, Tokyo, Japan

-
- 2022

K. Yokoyama
General Manager of
Quality Assurance Division