
KG633E.9 - Pressure washer KRESS - Free user manual and instructions
Find the device manual for free KG633E.9 KRESS in PDF.
| Product type | Cordless pressure washer |
| Brand | Kress |
| Model | KG633E.9 |
| Rated voltage | 18 V (20 V max) |
| Maximum pressure | 25 bar |
| Rated pressure | 22 bar / 15 bar |
| Maximum water flow rate | 210 L/h |
| Max water inlet pressure | 6 bar |
| Max suction height | 1.5 m |
| Max water temperature | 40 °C |
| Weight (tool only) | 1.8 kg |
| Power supply | Lithium-ion battery 20 V max |
| Recommended battery | KAB02 2.0 Ah |
| Recommended charger | KAC02 2.0 A |
| Sound pressure level | 75.1 dB(A) |
| Sound power level | 86.1 dB(A) |
| Vibration value | 0.841 m/s² (K=1.5 m/s²) |
| Included accessories | Spray lance, multi-jet nozzle, hose, float, soap bottle (depending on model) |
| Use | Cleaning and watering |
| Maintenance | Clean the hose filter, rinse with clean water, store in a dry place |
| Environmental protection | Do not dispose of with household waste, recycle at specialized centers |
Frequently Asked Questions - KG633E.9 KRESS
User questions about KG633E.9 KRESS
0 question about this device. Answer the ones you know or ask your own.
Ask a new question about this device
Download the instructions for your Pressure washer in PDF format for free! Find your manual KG633E.9 - KRESS and take your electronic device back in hand. On this page are published all the documents necessary for the use of your device. KG633E.9 by KRESS.
USER MANUAL KG633E.9 KRESS
natural_image
Technical line drawing of a mechanical pressure gun (no text or symbols)| 2 in 1: Portable Power Cleaner/Water Sprayer | EN | P09 |
| 2 in 1: Tragbarer Hochdruckreiniger/Wassersprüher | D | P17 |
| 2 en 1 : nettoyeur portable électrique / pulvérisateur d’eau | F | P26 |
| Idropulitrice/Irroratric e portatile 2 in 1 | I | P35 |
| 2 en 1: Limpiador/pulverizador de agua portátil a presión | ES | P44 |
| 2 in 1: Krachtige draagbare reiniger/watervernevelaar | NL | P53 |
| 2 i 1: Bærbar Power Cleaner/Vandspuler | DK | P62 |
| 2 в 1: Мойка высокого давления / опрыскиватель | RU | P70 |
| 2 i 1: Portabel högtryckstvätt/Vattenspruta | SV | P79 |
| KG633E KG633E.X | ||
text_image
HYDROSH 1 2 3 4 5 6 7 8 9 10 11 12 13 14Optional accessories
text_image
15* 16* 18* 20* 21* 22* 23*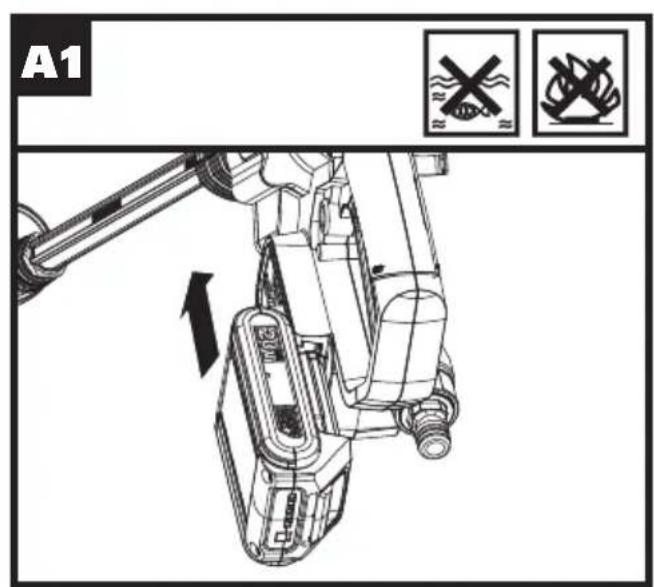
text_image
A1 R R R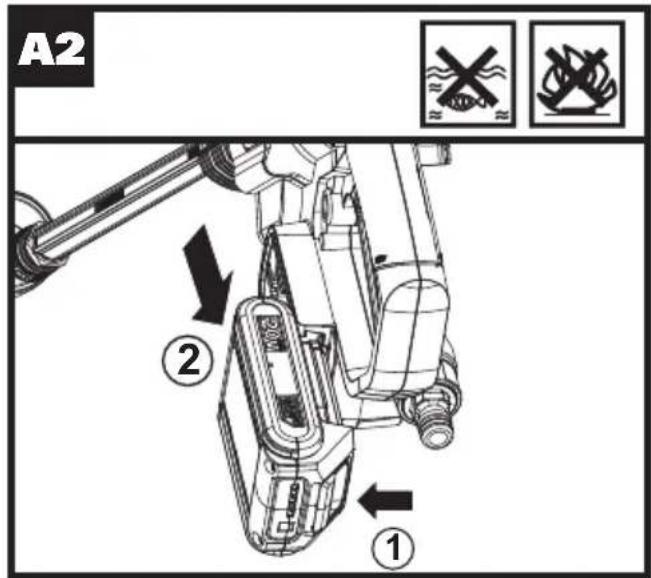
text_image
A2 ① ②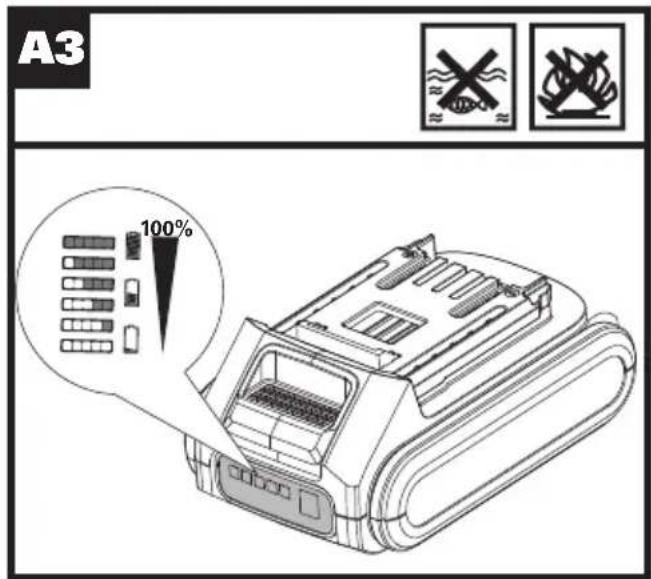
text_image
A3 100%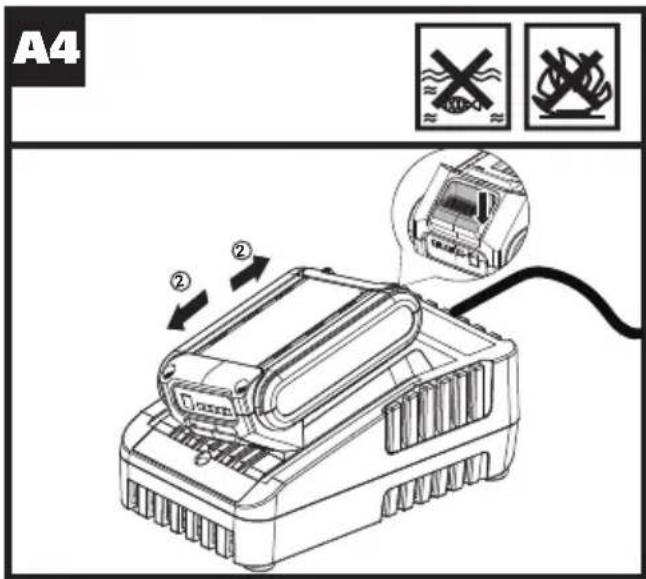
text_image
A4 ② ②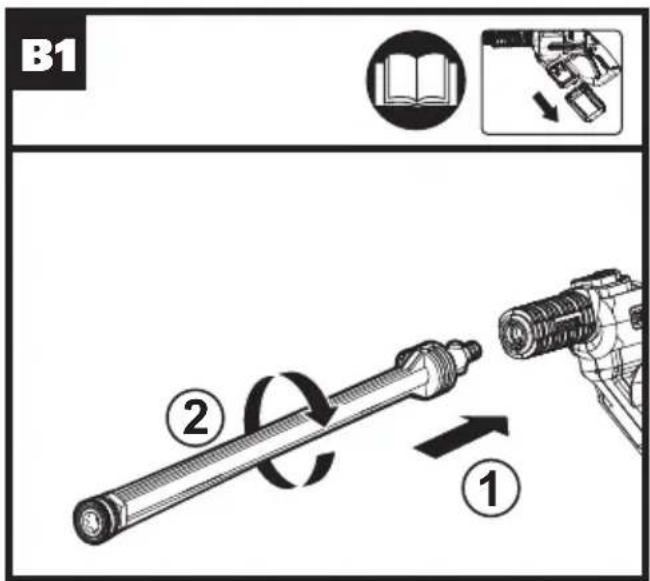
text_image
B1 ① ②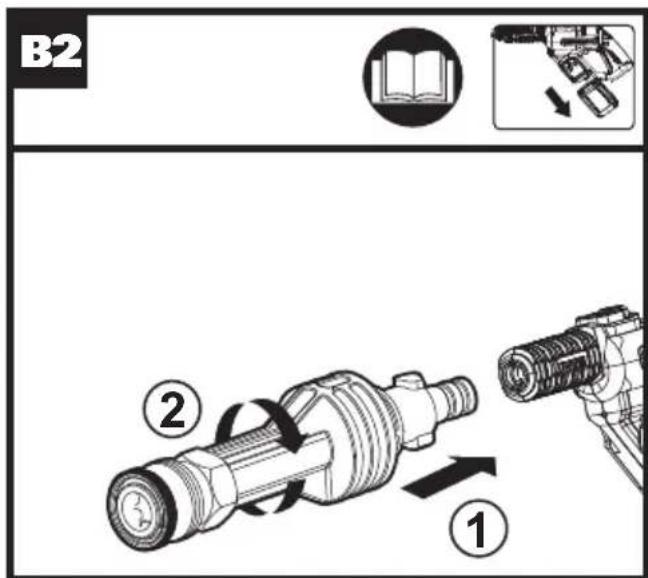
text_image
B2 ① ②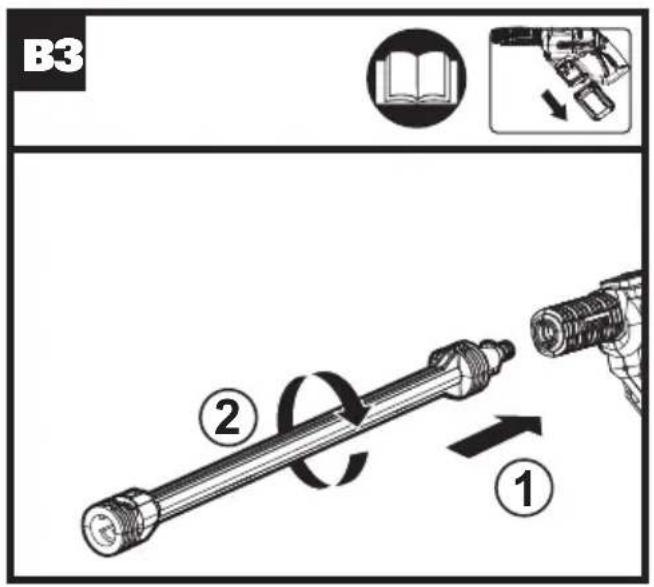
text_image
B3 ② ①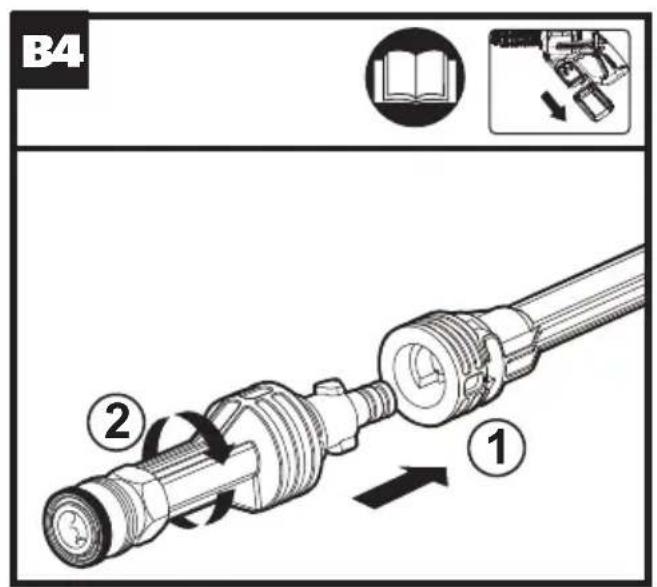
text_image
B4 ① ②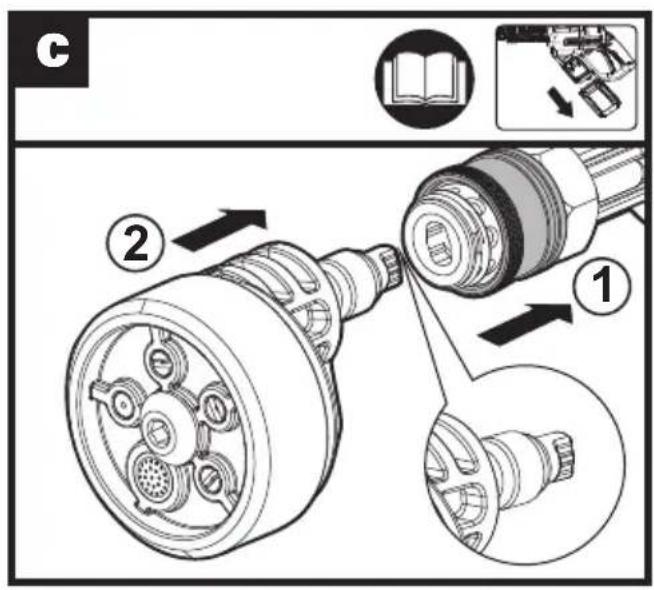
text_image
C ① ②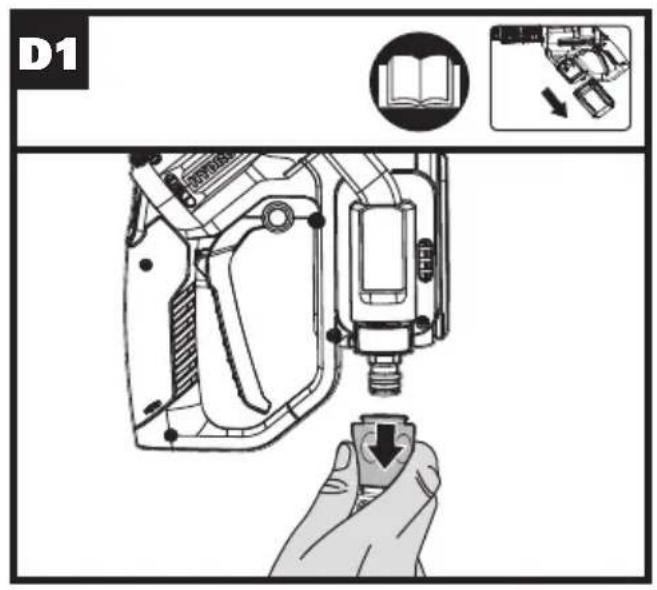
text_image
D1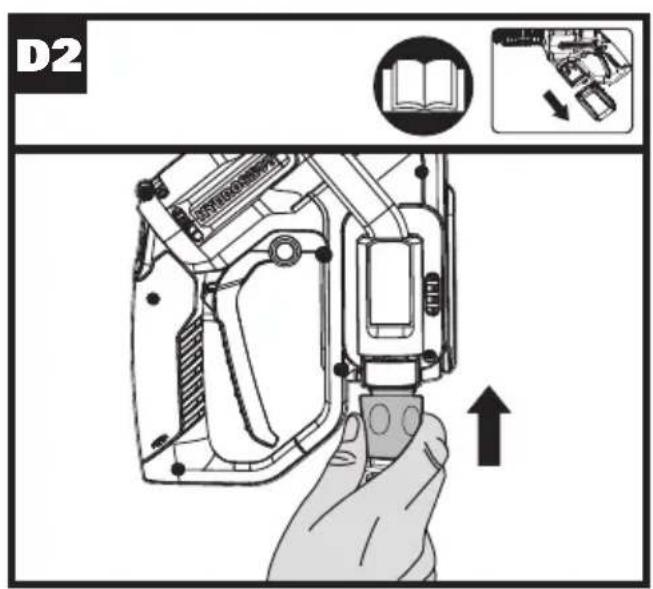
text_image
F 0° 15° 25° 40°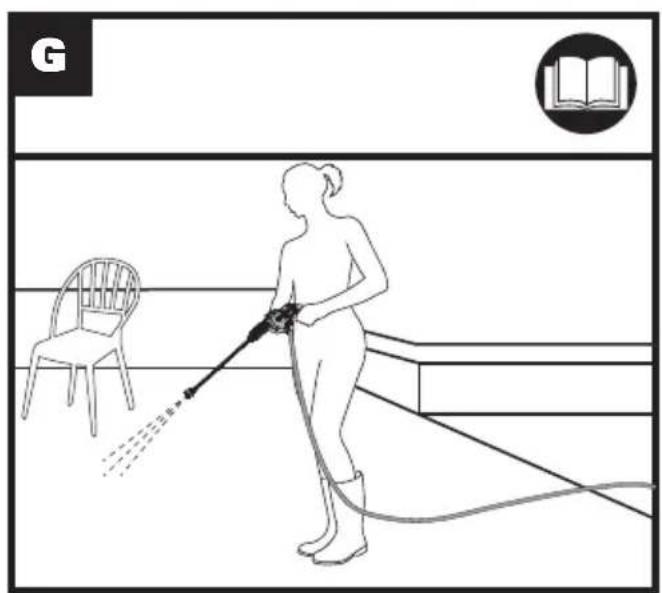
natural_image
Illustration of a person spraying water on a bench with a chair nearby, no text or symbols present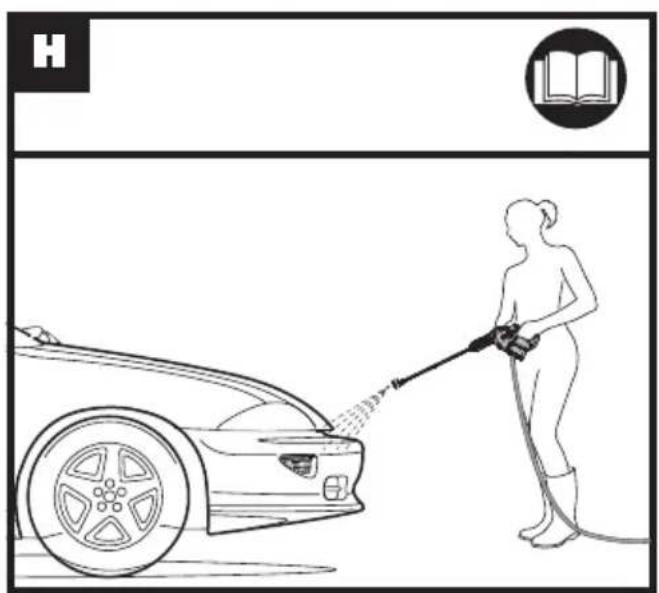
natural_image
Line drawing of a person washing a car with a water hose, no text or symbols present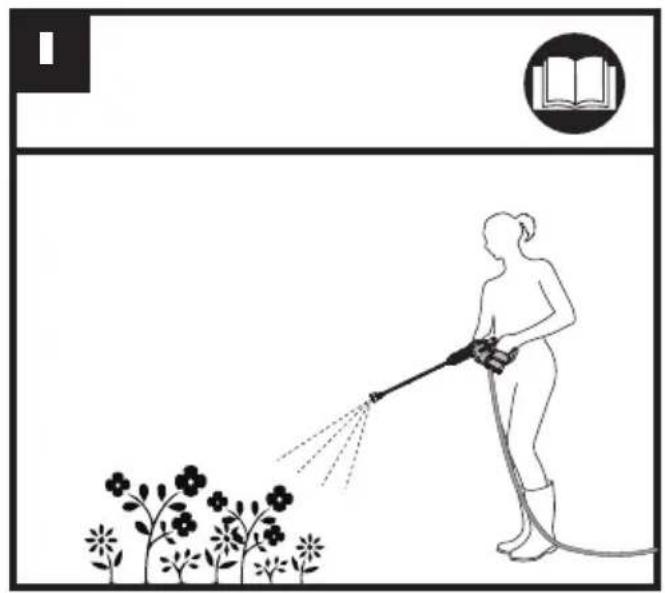
natural_image
Illustration of a person spraying water with flowers, no text or symbols present
text_image
J1* ② ①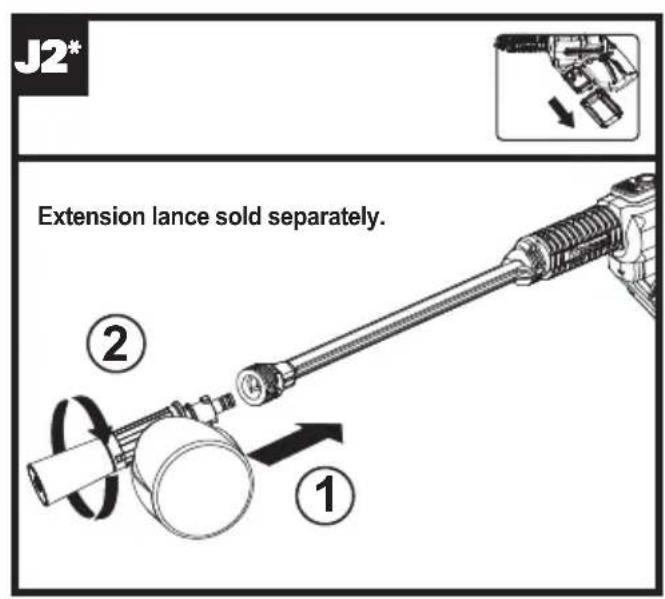
text_image
J2* Extension lance sold separately. ① ②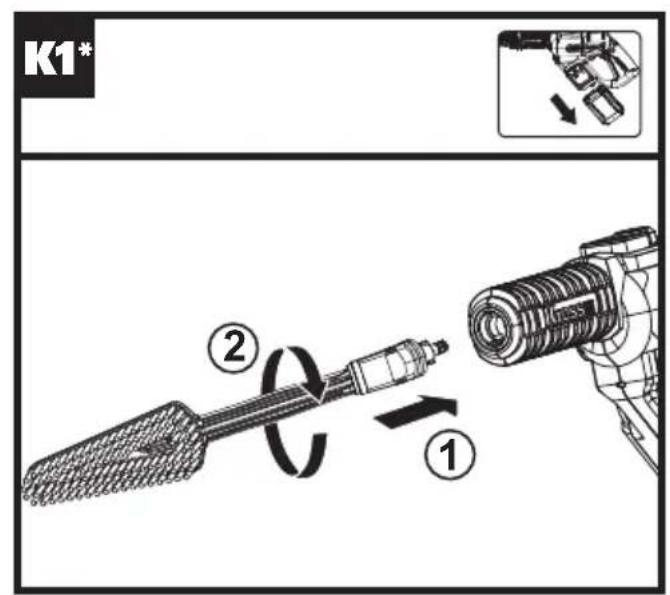
text_image
K1* ② ①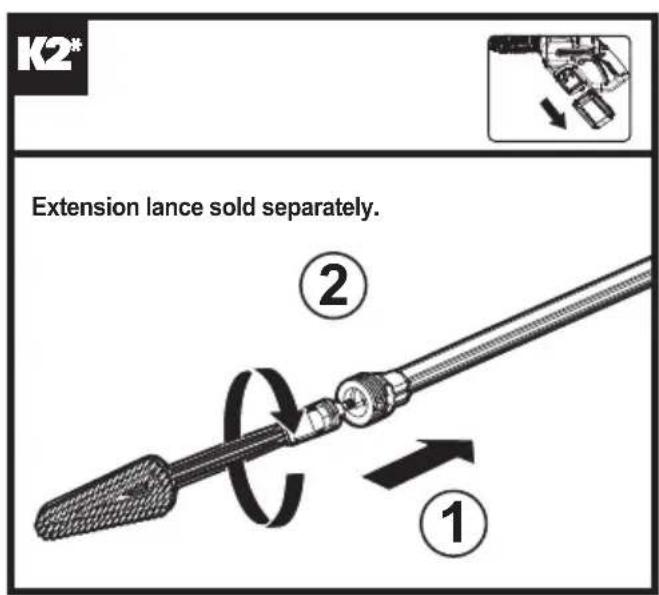
text_image
K2* Extension lance sold separately. ② ①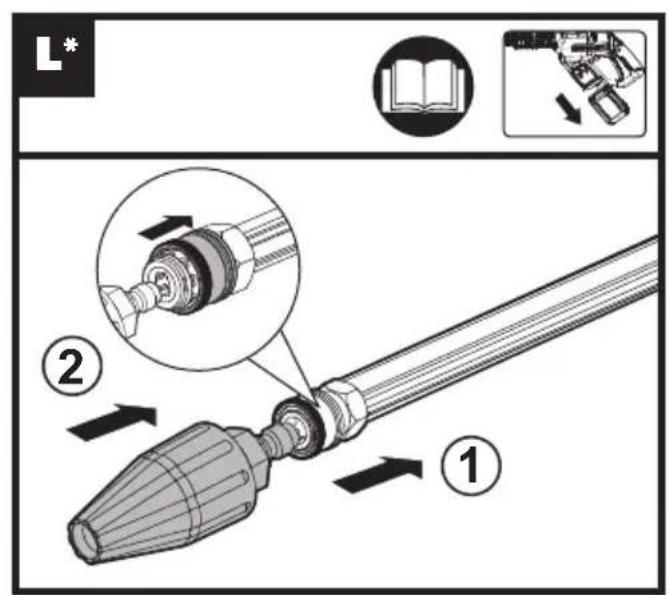
text_image
L* ② ①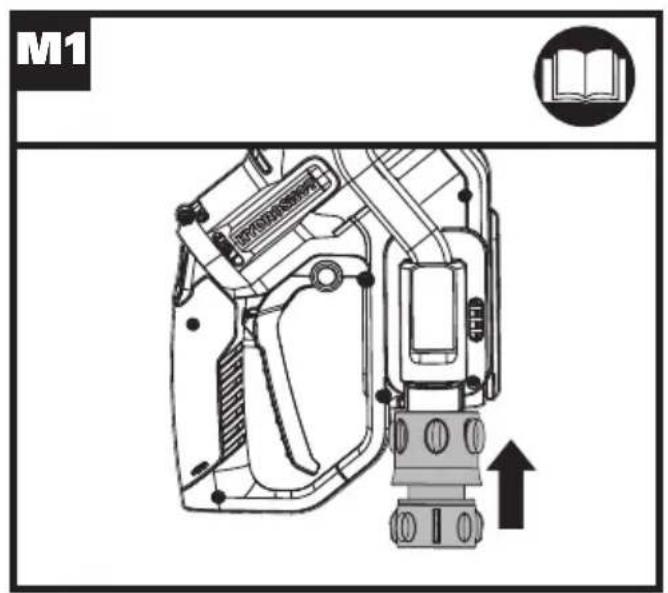
text_image
M1 PROVASSED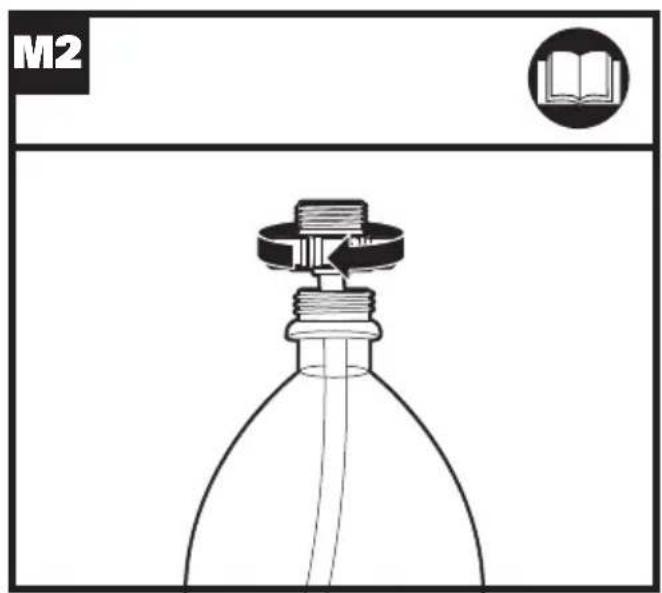
text_image
M2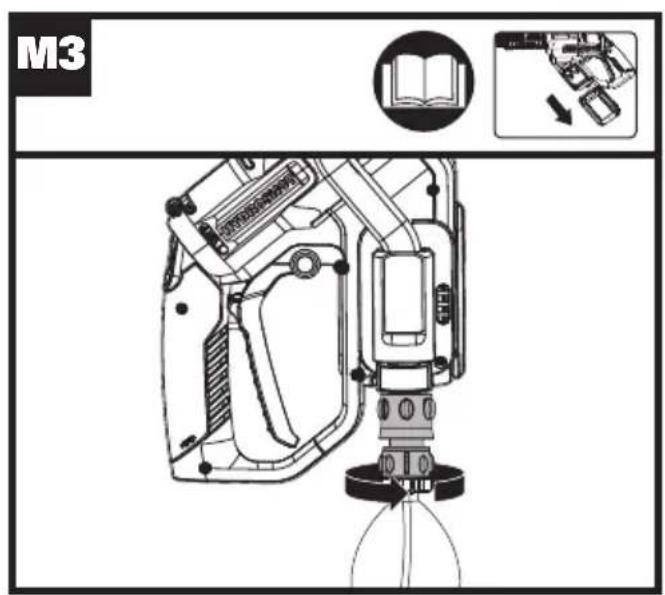
text_image
M3
text_image
N1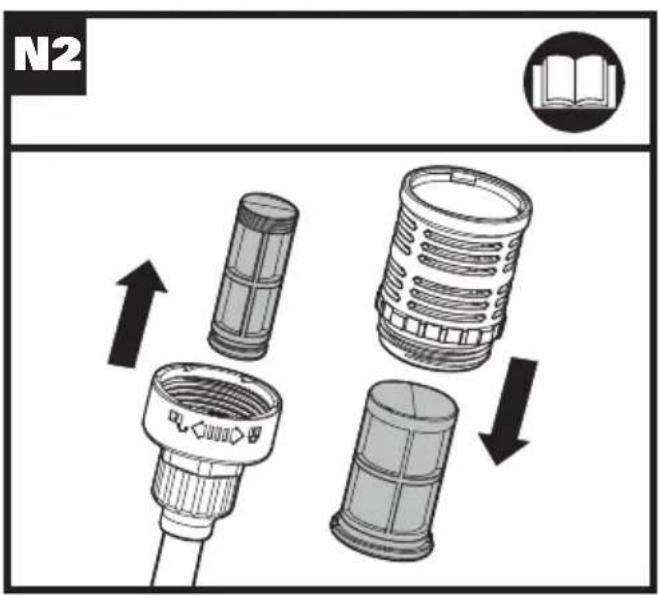
text_image
N2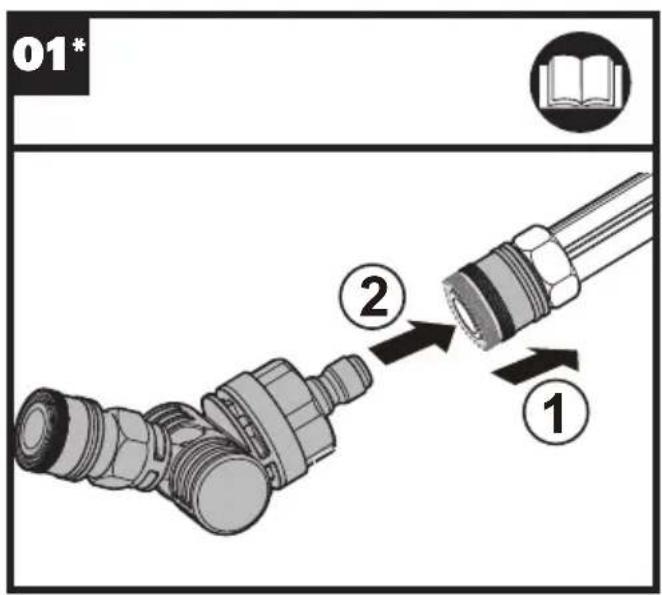
text_image
01* ② ①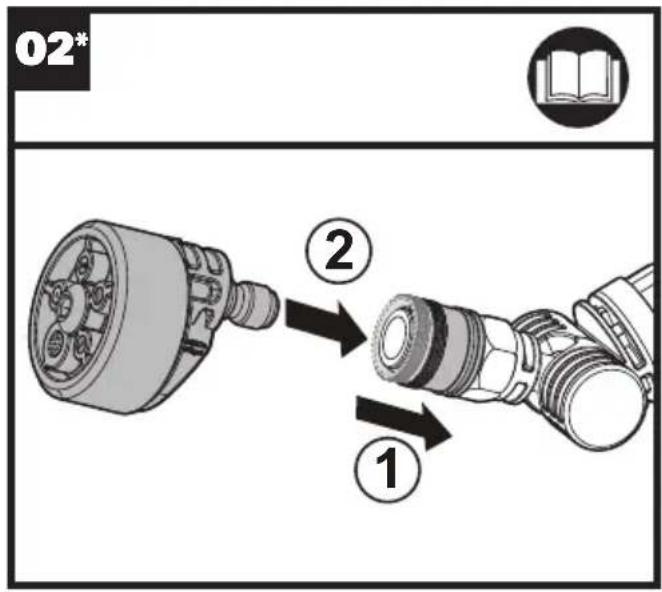
text_image
02* ② ①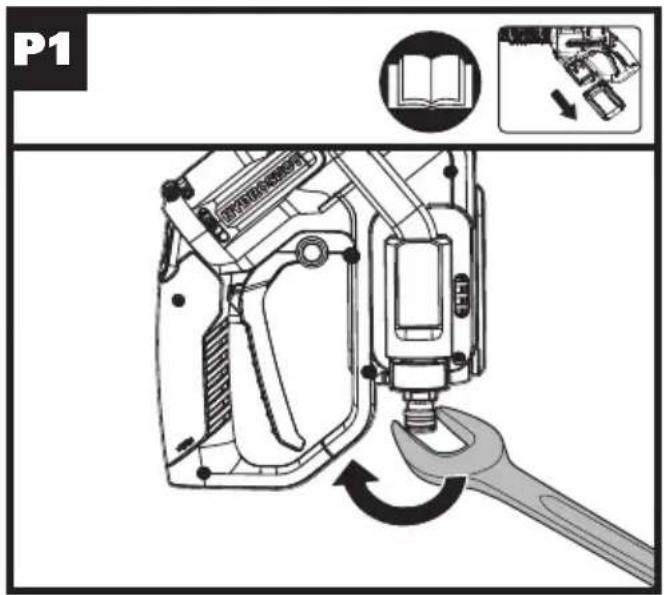
text_image
P1 P1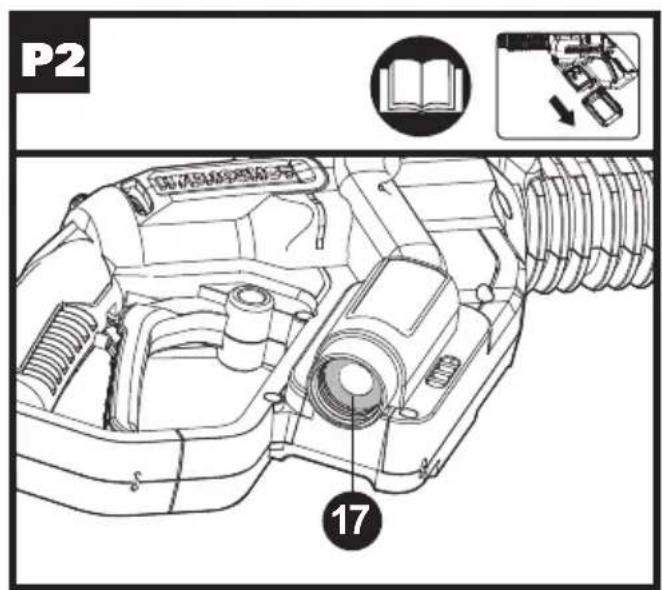
text_image
P2 17TABLE OF CONTENTS
Introduction......9
Safety Instructions....10
Component List....12
Specifications....12
Assembly&Operation....13
Maintenance....14
Environmental Protection....14
Troubleshooting....15
Declaration of Conformity....16
INTRODUCTION
Dear Customer,
Thank you for buying this Kress product. We are dedicated to developing high quality products to meet your lawn & garden requirements.
The Kress brand is synonymous with premium quality service. Over the years of your products life, if you have any questions or concerns about your product, please contact your location of purchase or our Customer Service Team for assistance.
We are confident you will enjoy working with your Kress product for years to come.
INTENDED USE
This tool is intended for cleaning and watering.
ORIGINAL INSTRUCTIONS PRODUCT SAFETY GENERAL SAFETY WARNINGS
WARNING Read all safety warnings, instructions, illustrations and specifications provided with this power tool. Failure to follow all instructions listed below may result in electric shock, fire and/or serious injury.
Save all warnings and instructions for future reference.
- This appliance can be used by persons with reduced physical, sensory or mental capabilities or lack of experience and knowledge if they have been given supervision or instruction concerning use of the appliance in a safe way and understand the hazards involved. Children shall not play with the appliance.
- The appliance is only to be used with the power supply unit provided with the appliance.
Additional safety warnings
- The liquid must not be directed towards equipment containing electrical components.
- Remove or disconnect
the battery pack after use and before carrying out user maintenance on the appliance.
- The appliance shall not be left unattended while it is connected to the battery pack.
- The appliance is not to be used if it has been dropped, if there are visible signs of damage or if it is leaking.
- Keep the appliance out of reach of children when it is energized.
SAFETY WARNINGS FOR BATTERY PACK
a) Do not dismantle, open or shred cells or battery pack.
b) Do not short-circuit a battery pack. Do not store battery packs haphazardly in a box or drawer where they may short-circuit each other or be short-circuited by conductive materials. When battery pack is not in use, keep it away from other metal objects, like paper clips, coins, keys, nails, screws or other small metal objects, that can make a connection from one terminal to another. Shorting the battery terminals together may cause burns or a fire.
c) Do not expose battery pack to heat or fire. Avoid storage in direct sunlight.
d) Do not subject battery pack to mechanical shock.
e) In the event of battery leaking, do not allow the liquid to come into contact with the skin or eyes. If contact has been made, wash the affected area with copious amounts of water and seek medical advice.
f) Keep battery pack clean and dry.
g) Wipe the battery pack terminals with a clean dry cloth if they become dirty.
h) Battery pack needs to be charged before use. Always refer to this instruction and use the correct charging procedure.
i) Do not maintain battery pack on charge when not in use.
j) After extended periods of storage, it may be necessary to charge and discharge the battery pack several times to obtain maximum performance.
k) Recharge only with the charger specified by Kress. Do not use any charger other than that specifically provided for use with the equipment.
I) Do not use any battery pack which is not designed for use with the equipment.
m) Keep battery pack out of the reach of children.
n) Retain the original product literature for future reference.
o) Remove the battery from the equipment when not in use.
p) Dispose of properly.
q) Do not mix cells of different manufacture, capacity, size or type within a device.
r) Keep the battery away from microwaves and high pressure.
SYMBOLS
 | Warning |
 | Read operator's manual |
 | Batteries may enter water cycle if disposed improperly, which can be hazardous for ecosystem. Do not dispose of waste batteries as unsorted municipal waste. |
 | Do not burn |
 | Remove battery from the socket before carrying out any adjustment, servicing or maintenance. |
 | Unlock |
 | Lock |
 | Waste electrical products must not be disposed of with house-hold waste. Please recycle where facilities exist. Check with your local authorities or retailer for recycling advice. |
 | Li-Ion battery This product has been marked with a symbol relating to ‘separate collection’ for all battery packs and battery pack. It will then be recycled or dismantled in order to reduce the impact on the environment. Battery packs can be hazardous for the environment and for human health since they contain hazardous substances. |
 |
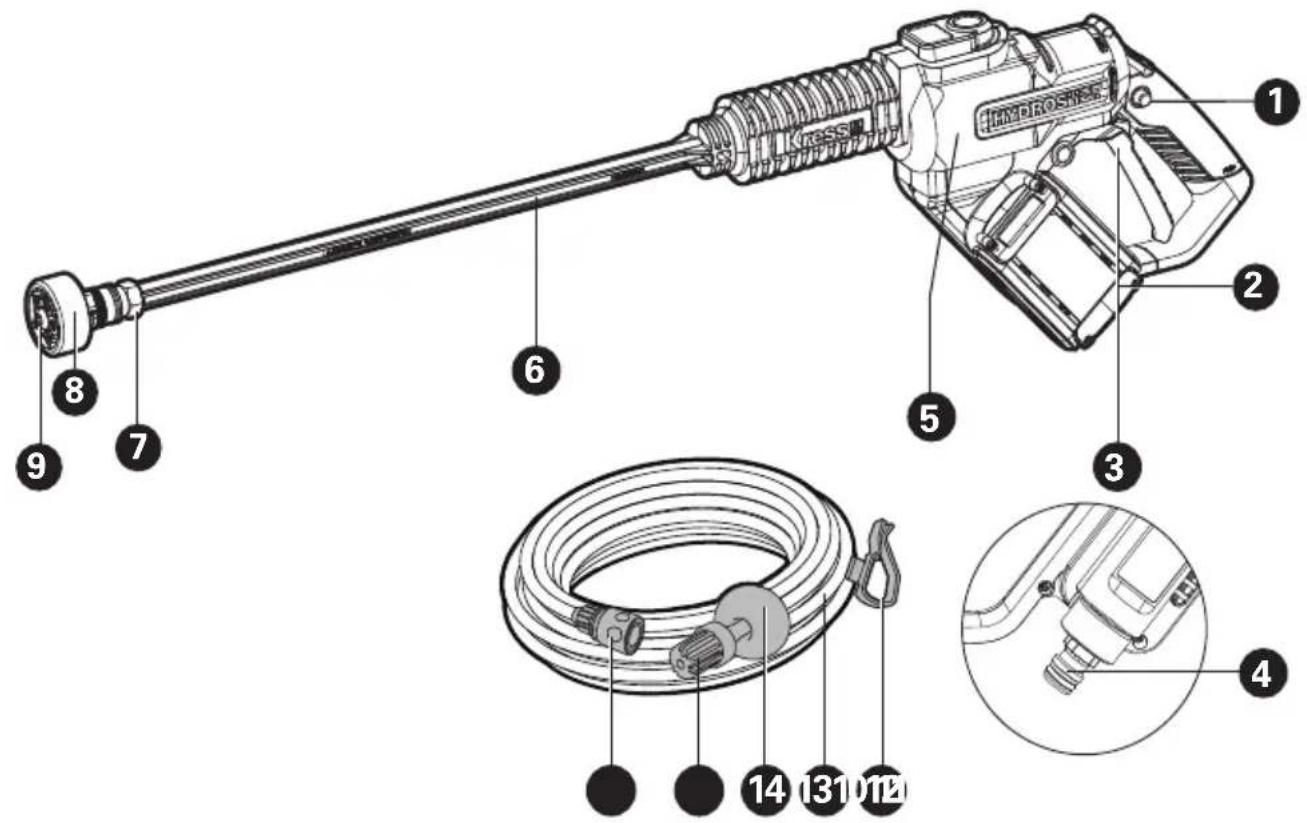
COMPONENT LIST
| 1. LOCK-OFF SWITCH | |
| 12 | 2. BATTERY PACK * |
| EN | 3. ON/OFF SWITCH LEVER |
| 4. HOSE ADAPTER | |
| 5. POWER NOZZLE | |
| 6. PRESSURE CLEANING LANCE | |
| 7. NOZZLE ADAPTER | |
| 8. MULTI-SPRAY NOZZLE | |
| 9. FIXING NAIL | |
| 10. HOSE CONNECTOR | |
| 11. HOSE FILTER | |
| 12. HOSE CLIP | |
| 13. HOSE | |
| 14. FLOATER | |
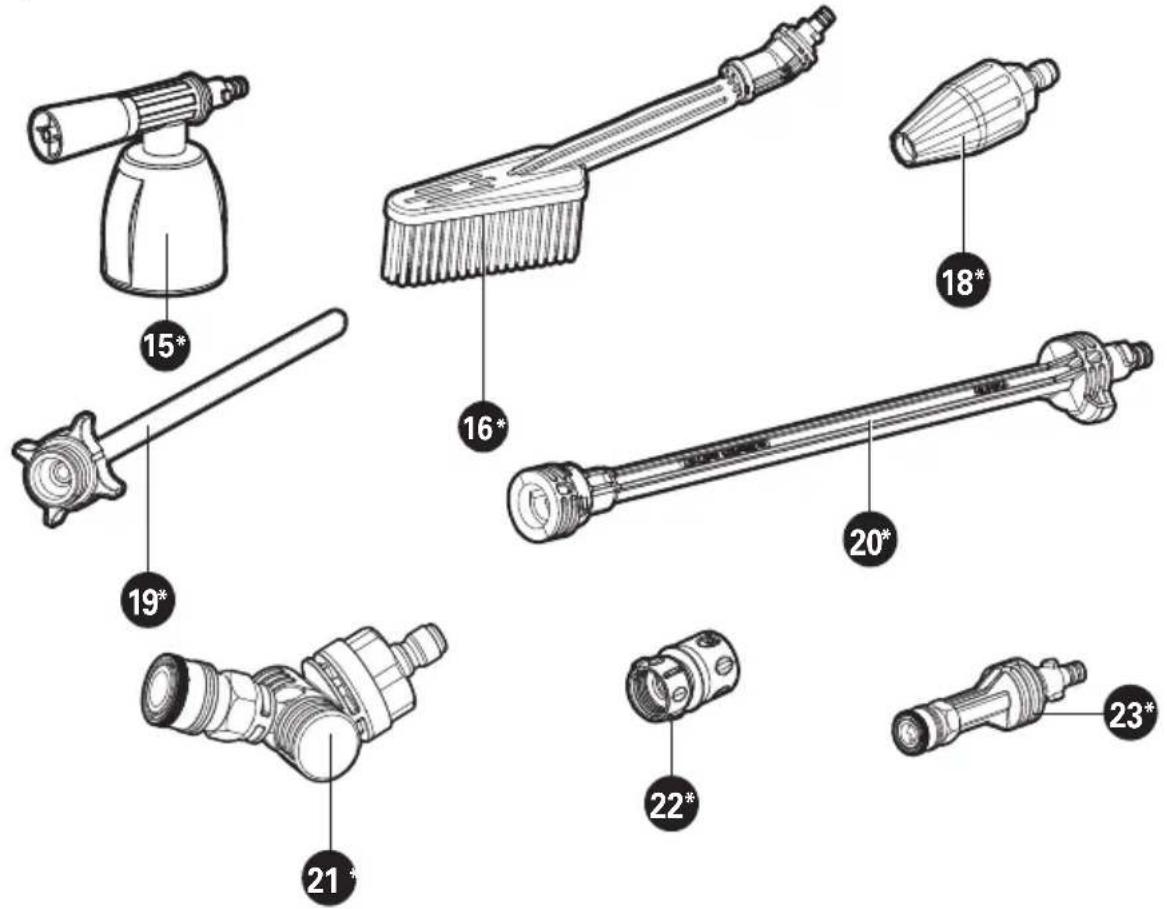
| 15. SOAP BOTTLE * | |
| 16. BRUSH * | |
| 17. FILTER SCREEN (SEE FIG. P2) | |
| 18. TURBO NOZZLE * | |
| 19. BOTTLE CAP CONNECTOR * | |
| 20. EXTENSION LANCE * | |
| 21. PIVOTING QUICK CONNECT ADAPTER * | |
| 22. QUICK CONNECT ADAPTER * | |
| 23. SHORT LANCE * |
* Not all the accessories illustrated or described are included in standard delivery.
TECHNICAL DATA
Type Designation: KG633E KG633E.X (6 - designation of machinery, representative of battery-powered washer)
| KG633E KG633E.X ** | |
| Voltage 20 V Max*** | --- |
| Max pressure 25 bar | |
| Rated pressure 22 bar/15 bar | |
| Max water flow rate | 210 L/h |
| Max. inlet water pressure | 6 bar |
| Suction height Max | 1.5m |
| Water temperature | Max 40°C |
| Machine weight (bare tool) | 1.8 kg |
** X=1-999, A-Z, M1-M9 they are only used for different customers, there are no safe relevant changes between these models *** Voltage measured without workload. Initial battery voltage reaches maximum of 20 volts. Nominal voltage is 18 volts.
SUGGESTED BATTERIES AND CHARGERS
| Category Model Capacity | ||
| 20V Battery | KAB02 | 2.0Ah |
| 20V Charger | KAC02 | 2.0A |
We recommend that you purchase your accessories from the same store that sold you the tool. Refer to the accessory packaging for further details. Store personnel can assist you and offer advice.
NOISE INFORMATION
| A weighted sound pressure | L_pA : 75.1dB(A) |
| A weighted sound power | L_wA : 86.1dB(A) |
| K_pA | 3.0dB(A) |
| Wear ear protection | [DGWS] |
VIBRATION INFORMATION
| Typical weighted vibration | a_h = 0.841m/s^2 K=1.5m/s^2 |
The declared vibration total value may be used for comparing one tool with another, and may also be used in a preliminary assessment of exposure.
WARNING: The vibration emission value during actual use of the power tool can differ from the declared value depending on the ways in which the tool is used dependant on the following examples and other variations on how the tool is used:
How the tool is used and the materials being cut or drilled.
The tool being in good condition and well maintained.
Using the correct accessory for the tool and ensuring it is sharp and in good condition.
The tightness of the grip on the handles and if any anti vibration accessories are used.
And the tool is being used as intended by its design and these instructions.
This tool may cause hand-arm vibration syndrome if its use is not adequately managed.
WARNING: To be accurate, an estimation of exposure level in the actual conditions of use should also take account of all parts of the operating cycle such as the times when the tool is switched off and when it is running idle but not actually doing the job. This may significantly reduce the exposure level over the total working period. Helping to minimise your vibration exposure risk. Maintain this tool in accordance with these instructions and keep well lubricated (where appropriate). If the tool is to be used regularly then invest in anti vibration accessories.
Plan your work schedule to spread any high vibration tool use across a number of days.
NOTE: Before using the tool, read the instruction book carefully.
BEFORE OPERATION
Installing the battery pack (See Fig. A1)
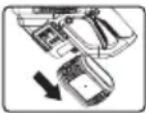
Removing the battery pack (See Fig.A2)
Checking the battery condition(See Fig.A3)
NOTE: Fig. A3 only applies for the battery pack with battery indicator light.
Charging the battery pack(See Fig. A4)
More details can be found in charger's manual
ASSEMBLY
Working mode 1 (See Fig. B1)
Attaching pressure cleaning lance to the power nozzle.
NOTE: The power nozzle has three working modes: pressure cleaning lance only, short lance only and short lance used together with extension lance.
Working mode 2 (See Fig. B2)
Attaching short lance to the power nozzle
Working mode 3 (See Fig. B3, B4)
Attaching extension lance to the power nozzle Attaching short lance to the extension lance
Attaching the Multi-spray nozzle (See Fig. C)
NOTE: When attaching, rotate the nozzle left and right to make sure the nozzle is fully seated into position and gently pull it to make sure it is locked into position securely.
Attaching the hose to the power nozzle (See Fig. D1, D2, D3)
NOTE: After the hose is attached, check the connection by gently pulling upon the hose. It should not be pulled off.
OPERATION
WARNING: The supplied battery is not waterproof. To avoid risk of battery failure, protect the battery from water exposure during use. Store the tool and battery in a dry place after use.
Start(See Fig. E1,E2,E3)
NOTE: At the first use or after long-term storage, it is recommended to attach the tap or inject water into the hose adapter with the machine turned on, so as to empty the air. Do not start working until the water goes up along the hose and sprays out.
Selecting the nozzle pattern (See Fig.F)
NOTE: Choose a suitable nozzle pattern according to your work. Spray patterns 0°, 15°, 25° and 40° are applicable for cleaning, and the spray pattern with the symbol is best suitable for watering.
WARNING: Do not shift the nozzle pattern when the tool is powered on.
Cleaning(See Fig.G,H)
WARNING: Do not connect the machine to water supplies that are dirty, rusty, muddy, or corrosive. (Including window cleaning liquids, plant foods, or fertilizers etc.)
NOTE: If sea water is used, the product should be rinsed and used with fresh water after that in order to
extend the life time of the machine.
WATERING(See Fig.I)
ATTACHMENT OF ACCESSORIES
A number of accessories have been supplied with this product and are required for use in different applications. Do not attempt to use cleaning without a lance or any accessories attached.
1. Soap bottle (KA2563, sold separately)
Soap bottle provides detergent suds for deeper cleaning of dirt. It is used in conjunction with power nozzle or extension lance. (See Fig. J1, J2)
NOTE: Keep the machine connected to water source when using soap bottle.
2. Brush (KA2510, sold separately)
Brush is for cleaning cars, boats, motorcycles etc. It is used in conjunction with power nozzle or extension lance. (See Fig. K1, K2)
3. Turbo nozzle (KA2527, sold separately)
The turbo nozzle delivers 360^ of rotating water, which cleans a larger area than the 0^ water pattern during the same time period. Recommend to use it with high pressure setting (See Fig. L)
4. Bottle cap connector (KA2588, sold separately)
The bottle cap connector accessory allows the tool to directly connect with most 2 Liter bottles with approximately 1" openings. (NOTE: May not fit all consumable soda and water bottles) (See Fig.M1, M2, M3)
WARNING: Do not install the bottle cap connector accessory until it is ready to be used.
The accessories vents will leak liquid, if a bottle is installed, with the machine lying on a surface.
5. Pivoting Quick Connect Adapter (KA2529, sold separately)
The Pivoting Quick Connect Adapter allows power cleaning tips to be fully adjusted up to 180° in any direction. Ideal for cleaning around hard-to-reach areas. Suitable for the HYDROSHOT™ power cleaner and multi-spray nozzle (See Fig. O1, O2)
MAINTENANCE
Remove the Battery Pack from the tool before carrying out any adjustment, servicing or maintenance.
Inspect the product for damaged or worn parts before each use. Do not operate it if you find damaged or worn parts. Contact your supplier or the manufacturer for replacement parts.
Hose filter maintenance
Remove the hose filter from the hose and get out the strainer. Rinse the parts with clean water before
reassembling. (See Fig.N1, N2)
Filter screen maintenance
Remove the hose adapter to get the filter screen. (See Fig. P1, P2) Rinse it with clean water before reassembling.
NOTE: When retightening the hose adapter, please tighten securely. Otherwise, it may not draw any water for proper operation.
WARNING: Any other servicing should be performed by an authorized service representative.
CLEANING/STORAGE
Before Storage, completely drain all the water from the machine and hose. Clean the moulded plastic housing of the machine using a soft brush and clean cloth. Do not use water, solvents or polishes. Store in a secure and dry place out of the reach of children. Do not place other objects on the product. Store the machine and the accessories in a frost free place.
ENVIRONMENTAL PROTECTION

Waste electrical products must not be disposed of with household waste. Please recycle where facilities exist. Check with your
local authorities or retailer for recycling advice.
TROUBLESHOOTING
| Symptom Possible causes Solution | ||
| Machine turns on but it does not draw any water or there is not sufficient pressure. | Power nozzle is too high from the water source surface. | Lower the machine below 5ft/1.5m. |
| Hose filter is blocked. | Take out the hose filter and rinse the parts with clean water. (See Fig. N1, N2) | |
| The users garden hose is not well connected to the machine. | Check and reattach the garden hose tightly. | |
| Hose adapter looses.The filter screen is missing. (See Fig. P1, P2) | Tighten the hose adapter securely with a spanner.Contact Kress service agent to get a filter screen. | |
| Pump, hose, or other parts are frozen due to outside temperatures. | Wait for the pump, hose or other parts to thaw. | |
| Hose kinks. Straighten out the hose. | ||
| Multi-spray nozzle leaks. | The nozzle pattern does not spray correctly. | Make sure the nozzle pattern symbol aligns with the indicator mark on tool. |
| Fixing nail of the multi-spray nozzle loosens. | Tighten it with a hex key. | |
| Outlet pressure increases suddenly. | Multi-spray nozzle is blocked. | Replace with a new multi-spray nozzle. |
| Machine drains out water after stopping. | There is water remaining in the lance and pump after stopping. | Drain all the water completely before storage. |
| Soap accessory cannot spray out any detergent. | Blockage in the soap bottle. Clean it with fresh water. | |
| Machine does not start. | The battery pack is not attached well. Reinstall the battery pack. | |
| Battery pack is empty. Replace with a new battery pack or recharge the battery pack. | ||
| Defective battery. Replace with a new battery pack. | ||
| Machine pressure is not consistent. | Additional air could be sucked into the machine. | Check connection between the hose adapter and the hose. |
| It is at low pressure setting. No action need. | ||
| Machine stops automatically. | Battery pack is empty. | Replace with a new battery pack or recharge the battery pack. |
| The multi-spray nozzle is blocked.The current protection is activated. | Remove the multi-spray nozzle and turn on the machine. If the machine works normally, replace with a new multi-spray nozzle. | |
DECLARATION OF CONFORMITY
We,
Positec Germany GmbH
Postfach 32 02 16, 50796 Cologne, Germany
Declare that the product
Description Battery-operated washer
Type KG633E KG633E.X (6 - designation of machinery, representative of battery-powered washer)
Function Cleaning surfaces
Complies with the following Directives:
2006/42/EC, 2014/30/EU
2011/65/EU&(EU)2015/863
2000/14/EC amended by 2005/88/EC
2000/14/EC amended by 2005/88/EC:
- Conformity Assessment Procedure as per Annex V
- Measured Sound Power Level 86.1 dB
- Declared Guaranteed Sound Power Level 91.1dB
Standards conform to
EN 60335-1, EN 60335-2-54, EN 62233, EN ISO
3744, EN 55014-1, EN 55014-2
The person authorized to compile the technical file,
Name: Marcel Filz
Address: Positec Germany GmbH
Postfach 32 02 16, 50796 Cologne, Germany

text_image
M A
2021/12/13
Allen Ding
Deputy Chief Engineer, Testing & Certification
Positec Technology (China) Co., Ltd.
18, Dongwang Road, Suzhou Industrial
Park, Jiangsu 215123, P. R. China
INHALTSVERZEICHNIS
Einführung....17
18, Dongwang Road, Suzhou Industrial Park,
Jiangsu 215123, P. R. China
SOMMAIRE
Introduction......26
INFORMATIONS RELATIVES AU BRUIT
INFORMATIONS RELATIVES AUX VIBRATIONS
DÉCLARATION DE CONFORMITÉ
Nous,
Positec Germany GmbH
Postfach 32 02 16, 50796 Cologne, Germany
18, Dongwang Road, Suzhou Industrial
Park, Jiangsu 215123, P. R. China
INDICE
Introduzione....35
18, Dongwang Road, Suzhou Industrial
Park, Jiangsu 215123, P. R. China
ÍNDICE
18, Dongwang Road, Suzhou Industrial
Park, Jiangsu 215123, P. R. China
INHOUDSOPGAVE
Inleiding....53
WAARSCHUWING: Voor de
18, Dongwang Road, Suzhou Industrial
Park, Jiangsu 215123, P. R. China
INDHOLDSFORTEGNELSE
Introduktion....62
18, Dongwang Road, Suzhou Industrial
Park, Jiangsu 215123, P. R. China
СОДЕРЖАНИЕ
Введение....70
18, Dongwang Road, Suzhou Industrial
Park, Jiangsu 215123, P. R. China
INNEHÅLLSFÖRTECKNING
Introduktion....79
18, Dongwang Road, Suzhou Industrial
Park, Jiangsu 215123, P. R. China