
KUE12.1 - Saw KRESS - Free user manual and instructions
Find the device manual for free KUE12.1 KRESS in PDF.


| Product Type | Cordless Circular Saw |
| Brand | Kress |
| Model | KUE12.1 |
| Power Source | Battery (12V DC Li-ion) |
| Blade Diameter | 85 mm |
| Cutting Depth at 90° | 25 mm |
| Cutting Depth at 45° | 17 mm |
| No Load Speed | 3500 rpm |
| Weight (with battery) | 1.5 kg |
| Battery Capacity (typical) | 2.0 Ah |
| Charger Included | Yes |
| Laser Guide | Yes |
| Dust Extraction Port | Yes (32 mm) |
| Safety Features | Blade brake, safety switch, lock-off button |
| Maintenance | Clean after use, check carbon brushes periodically |
| Spare Parts Available | Blades, carbon brushes, battery, charger |
| Repairability | User-replaceable blades and brushes; service center for motor |
| Warranty | 2 years (check local terms) |
Frequently Asked Questions - KUE12.1 KRESS
User questions about KUE12.1 KRESS
0 question about this device. Answer the ones you know or ask your own.
Ask a new question about this device
Download the instructions for your Saw in PDF format for free! Find your manual KUE12.1 - KRESS and take your electronic device back in hand. On this page are published all the documents necessary for the use of your device. KUE12.1 by KRESS.
USER MANUAL KUE12.1 KRESS
SAFETY AND OPERATING MANUAL
Lithium-Ion Brushless Circular Saw KUE12 KUE12.9
PRODUCT SAFETY GENERAL POWER TOOL SAFETY WARNINGS

WARNING Read all safety warnings, instructions, illustrations and
specifications provided with this power tool.
Failure to follow all instructions listed below may result in electric shock, fire and/or serious injury.
Save all warnings and instructions for future reference.
The term “power tool” in the warnings refers to your mains-operated (corded) power tool or battery-operated (cordless) power tool.
1) Work area safety
a) Keep work area clean and well lit. Cluttered or dark areas invite accidents.
b) Do not operate power tools in explosive atmospheres, such as in the presence of flammable liquids, gases or dust. Power tools create sparks which may ignite the dust or fumes.
c) Keep children and bystanders away while operating a power tool. Distractions can cause you to lose control.
2) Electrical safety
a) Power tool plugs must match the outlet. Never modify the plug in any way. Do not use any adapter plugs with earthed (grounded) power tools. Unmodified plugs and matching outlets will reduce risk of electric shock.
b) Avoid body contact with earthed or grounded surfaces, such as pipes, radiators, ranges and refrigerators. There is an increased risk of electric shock if your body is earthed or grounded.
c) Do not expose power tools to rain or wet conditions. Water entering a power tool will increase the risk of electric shock.
d) Do not abuse the cord. Never use the cord for carrying, pulling or unplugging the power tool. Keep cord away from heat, oil, sharp edges or moving parts. Damaged or entangled cords increase the risk of electric shock.
e) When operating a power tool outdoors, use an extension cord suitable for outdoor use. Use of a cord suitable for outdoor use reduces the risk of electric shock.
f) If operating a power tool in a damp location is unavoidable, use a residual current device (RCD) protected supply. Use of an RCD reduces the risk of electric shock.
g) Recommendation that the tool always be supplied via a residual current device having a rated residual current of 30 mA or less
3) Personal safety
a) Stay alert, watch what you are doing and use common sense when operating a power tool. Do not use a power tool while you are tired or under the influence of drugs, alcohol or medication. A moment of inattention while operating power tools may result in serious personal injury.
b) Use personal protective equipment. Always wear eye protection. Protective equipment such as dust mask, non-skid safety shoes, hard hat, or hearing protection used for appropriate conditions will reduce personal injuries.
c) Prevent unintentional starting. Ensure the switch is in the off-position before connecting to power source and/or battery pack, picking up or carrying the tool. Carrying power tools with your finger on the switch or energising power tools that have the switch on invites accidents.
d) Remove any adjusting key or wrench before turning the power tool on. A wrench or a key left attached to a rotating part of the power tool may result in personal injury.
e) Do not overreach. Keep proper footing and balance at all times. This enables better control of the power tool in unexpected situations.
f) Dress properly. Do not wear loose clothing or jewellery. Keep your hair and clothing away from moving parts. Loose clothes, jewellery or long hair can be caught in moving parts.
g) If devices are provided for the connection of dust extraction and collection facilities, ensure these are connected and properly used. Use of dust collection can reduce dust-related hazards.
h) Do not let familiarity gained from frequent use of tools allow you to become complacent and ignore tool safety principles. A careless action can cause severe injury within a fraction of a second.
4) Power tool use and care
a) Do not force the power tool. Use the correct power tool for your application.
The correct power tool will do the job better and safer at the rate for which it was designed.
b) Do not use the power tool if the switch does not turn it on and off. Any power tool that cannot be controlled with the switch is dangerous and must be repaired.
c) Disconnect the plug from the power source and/or remove the battery pack, if detachable, from the power tool before making any adjustments, changing accessories, or storing power tools. Such preventive safety measures reduce the risk of starting the power tool accidentally.
d) Store idle power tools out of the reach of children and do not allow persons
unfamiliar with the power tool or these instructions to operate the power tool.
Power tools are dangerous in the hands of untrained users.
e) Maintain power tools and accessories. Check for misalignment or binding of moving parts, breakage of parts and any other condition that may affect the power tool's operation. If damaged, have the power tool repaired before use. Many accidents are caused by poorly maintained power tools.
f) Keep cutting tools sharp and clean. Properly maintained cutting tools with sharp cutting edges are less likely to bind and are easier to control.
g) Use the power tool, accessories and tool bits etc. in accordance with these instructions, taking into account the working conditions and the work to be performed. Use of the power tool for operations different from those intended could result in a hazardous situation.
h) Keep handles and grasping surfaces dry, clean and free from oil and grease. Slippery handles and grasping surfaces do not allow for safe handling and control of the tool in unexpected situations.
5) Battery tool use and care
a) Recharge only with the charger specified by the manufacturer. A charger that is suitable for one type of battery pack may create a risk of fire when used with another battery pack.
b) Use power tools only with specifically designated battery packs. Use of any other battery packs may create a risk of injury and fire.
c) When battery pack is not in use, keep it away from other metal objects, like paper clips, coins, keys, nails, screws or other small metal objects, that can make a connection from one terminal to another. Shorting the battery terminals together may cause burns or a fire.
d) Under abusive conditions, liquid may be ejected from the battery; avoid contact. If contact accidentally occurs, flush with water. If liquid contacts eyes, additionally seek medical help. Liquid ejected from the battery may cause irritation or burns.
e) Do not use a battery pack or tool that is damaged or modified. Damaged or modified batteries may exhibit unpredictable behaviour resulting in fire, explosion or risk of injury.
f) Do not expose a battery pack or tool to fire or excessive temperature. Exposure to fire or temperature above 130 °C may cause explosion.
g) Follow all charging instructions and do not charge the battery pack or tool outside the temperature range specified in the instructions. Charging improperly or at temperatures outside the specified range may damage the battery and increase the risk of fire.
6) Service
a) Have your power tool serviced by a qualified repair person using only identical replacement parts. This will ensure that the safety of the power tool is maintained.
b) Never service damaged battery packs. Service of battery packs should only be performed by the manufacturer or authorized service providers.
SAFETY INSTRUCTIONS FOR ALL SAWS
CUTTING PROCEDURES
a) DANGER: Keep hands away from cutting area and the blade. Keep your second hand on auxiliary handle, or motor housing. If both hands are holding the saw, they cannot be cut by the blade.
b) Do not reach underneath the workpiece. The guard cannot protect you from the blade below the workpiece.
c) Adjust the cutting depth to the thickness of the workpiece. Less than a full tooth of the blade teeth should be visible below the workpiece.
d) Never hold the workpiece in your hands or across your leg while cutting. Secure the workpiece to a stable platform. It is important to support the work properly to minimise body exposure, blade binding, or loss of control.
e) Hold the power tool by insulated gripping surfaces, when performing an operation where the cutting tool may contact hidden wiring. Contact with a "live" wire will also make exposed metal parts of the power tool "live" and could give the operator an electric shock.
f) When ripping, always use a rip fence or straight edge guide. This improves the accuracy of cut and reduces the chance of blade binding.
g) Always use blades with correct size and shape (diamond versus round) of arbour holes. Blades that do not match the mounting hardware of the saw will run off-centre, causing loss of control.
h) Never use damaged or incorrect blade washers or bolt. The blade washers and bolt were specially designed for your saw, for optimum performance and safety of operation.
Further safety instructions for all saws Kickback causes and related warnings
— kickback is a sudden reaction to a pinched, jammed or misaligned saw blade, causing an uncontrolled saw to lift up and out of the workpiece toward the operator;
— when the blade is pinched or jammed tightly by the kerf closing down, the blade stalls and the motor reaction drives the unit rapidly back toward the operator;
— if the blade becomes twisted or misaligned in the cut, the teeth at the back edge of the blade can dig into the top surface of the wood causing the blade to climb out of the kerf and jump back toward the operator.
Kickback is the result of saw misuse and/or incorrect operating procedures or conditions and can be avoided by taking proper precautions as given below.
a) Maintain a firm grip with both hands on the saw and position your arms to resist kickback forces. Position your body to either side of the blade, but not in line with the blade. Kickback could cause the saw to jump backwards, but kickback forces can be controlled by the operator, if proper precautions are taken.
b) When blade is binding, or when interrupting a cut for any reason, release the trigger and hold the saw motionless in the material until the blade comes to a complete stop. Never attempt to remove the saw from the work or pull the saw backward while the blade is in motion or kickback may occur. Investigate and take corrective actions to eliminate the cause of blade binding.
c) When restarting a saw in the workpiece, centre the saw blade in the kerf so that the saw teeth are not engaged into the material. If a saw blade binds, it may walk up or kickback from the workpiece as the saw is restarted.
d) Support large panels to minimise the risk of blade pinching and kickback. Large panels tend to sag under their own weight. Supports must be placed under the panel on both sides, near the line of cut and near the edge of the panel.
e) Do not use dull or damaged blades.
Unsharpened or improperly set blades produce narrow kerf causing excessive friction, blade binding and kickback.
f) Blade depth and bevel adjusting locking levers must be tight and secure before making the cut. If blade adjustment shifts while cutting, it may cause binding and kickback.
g) Use extra caution when sawing into existing walls or other blind areas. The protruding blade may cut objects that can cause kickback.
SAFETY INSTRUCTIONS FOR CIRCULAR SAW WITH INNER PENDULUM GUARD
Lower guard function
a) Check the lower guard for proper closing before each use. Do not operate the saw if the lower guard does not move freely and close instantly. Never clamp or tie the lower guard into the open
position. If the saw is accidentally dropped, the lower guard may be bent. Raise the lower guard with the retracting handle and make sure it moves freely and does not touch the blade or any other part, in all angles and depths of cut.
b) Check the operation of the lower guard spring. If the guard and the spring are not operating properly, they must be serviced before use. Lower guard may operate sluggishly due to damaged parts, gummy deposits, or a build-up of debris.
c) The lower guard may be retracted manually only for special cuts such as "plunge cuts" and "compound cuts." Raise the lower guard by retracting handle and as soon as the blade enters the material, the lower guard must be released. For all other sawing, the lower guard should operate automatically.
d) Always observe that the lower guard is covering the blade before placing the saw down on bench or floor. An unprotected, coasting blade will cause the saw to walk backwards, cutting whatever is in its path. Be aware of the time it takes for the blade to stop after switch is released.
ADDITIONAL SAFETY RULES FOR YOUR CIRCULAR SAW
- Only use saw blades recommended in the specification.
- Do not use any abrasive wheels.
- Use only blade diameter(s) in accordance with the markings.
- Identify the correct saw blade to be used for the material to be cut.
- Use only saw blades that are marked with a speed equal or higher than the speed marked on the tool.
SAFETY WARNINGS FOR BATTERY PACK
a) Do not dismantle, open or shred cells or battery pack.
b) Do not short-circuit a battery pack. Do not store battery packs haphazardly in a box or drawer where they may short-circuit each other or be short-circuited by conductive materials. When battery pack is not in use, keep it away from other metal objects, like paper clips, coins, keys, nails, screws or other small metal objects, that can make a connection from one terminal to another. Shorting the battery terminals together may cause burns or a fire.
c) Do not expose battery pack to heat or fire. Avoid storage in direct sunlight.
d) Do not subject battery pack to mechanical shock.
e) In the event of battery leaking, do not allow the liquid to come into contact with the skin or eyes. If contact has been made, wash the affected area with copious amounts of water and seek medical advice.
f) Keep battery pack clean and dry.
g) Wipe the battery pack terminals with a clean dry cloth if they become dirty.
h) Battery pack needs to be charged before use. Always refer to this instruction and use the correct charging procedure.
i) Do not maintain battery pack on charge when not in use.
j) After extended periods of storage, it may be necessary to charge and discharge the battery pack several times to obtain maximum performance.
k) Recharge only with the charger specified by Kress. Do not use any charger other than that specifically provided for use with the equipment.
I) Do not use any battery pack which is not designed for use with the equipment.
m) Keep battery pack out of the reach of children.
n) Retain the original product literature for future reference.
o) Remove the battery from the equipment when not in use.
p) Dispose of properly.
q) Do not mix cells of different manufacture, capacity, size or type within a device.
r) Keep the battery away from microwaves and high pressure.
SYMBOLS
 | To reduce the risk of injury, user must read instruction manual |
 | Warning |
 | Wear eye protection |
 | Wear ear protection |
 | Wear dust mask |
 | Li-Ion battery. This product has been marked with a symbol relating to ‘separate collection’ for all battery packs and battery pack. It will then be recycled or dismantled in order to reduce the impact on the environment. Battery packs can be hazardous for the environment and for human health since they contain hazardous substances. |
| Li-Ion | |
 | |
| Li-Ion | |
 | Do not burn |
 | Batteries may enter water cycle if disposed improperly, which can be hazardous for ecosystem. Do not dispose of waste batteries as unsorted municipal waste. |
 | RCM marking |
ABN: Australian Business Number. By this number, business information such as entity type, status, business location etc. can be found at website http://abr.business.gov.au. ABN of Positec Australia Pty Limited is 14 101 682 357

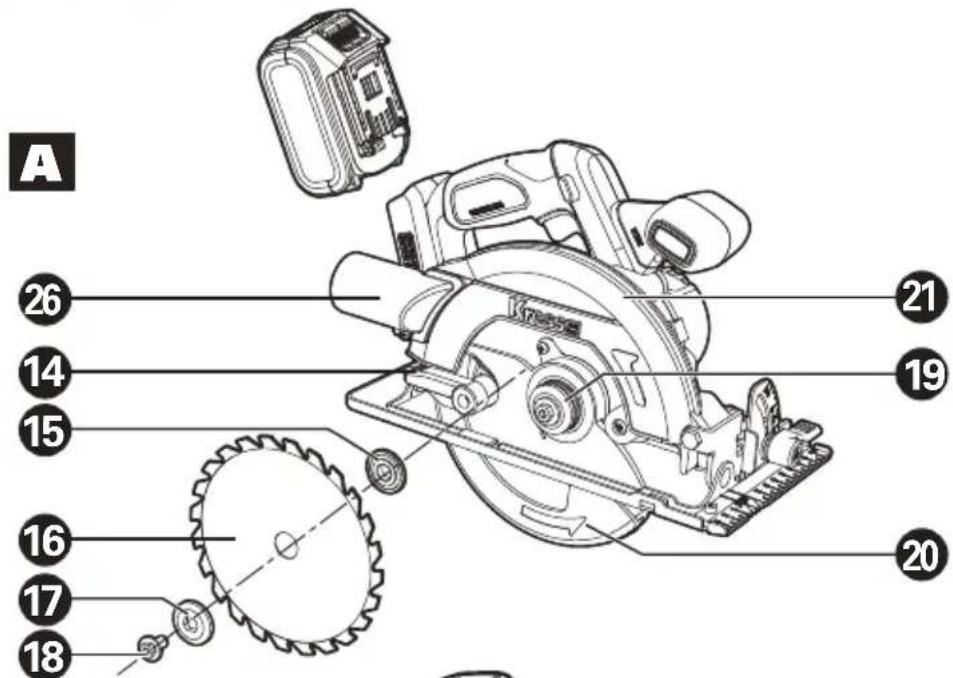
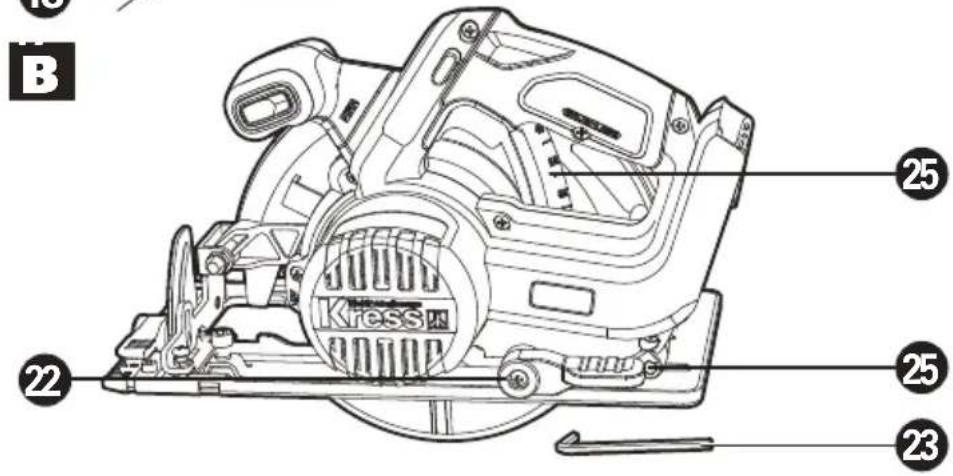
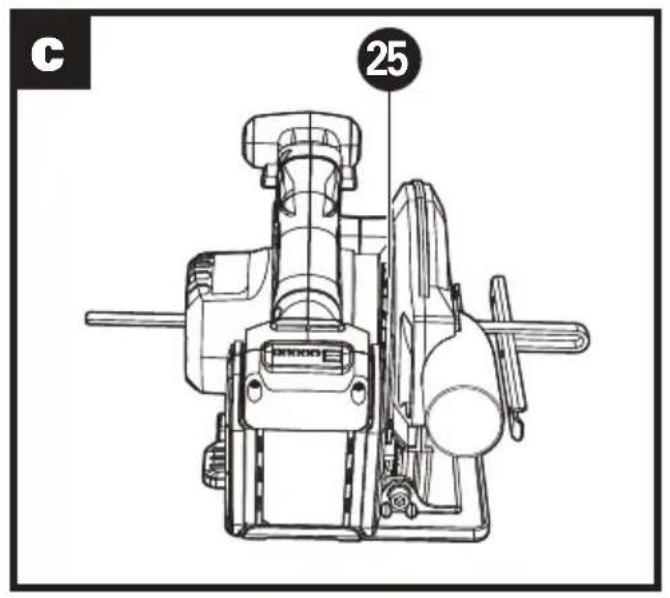

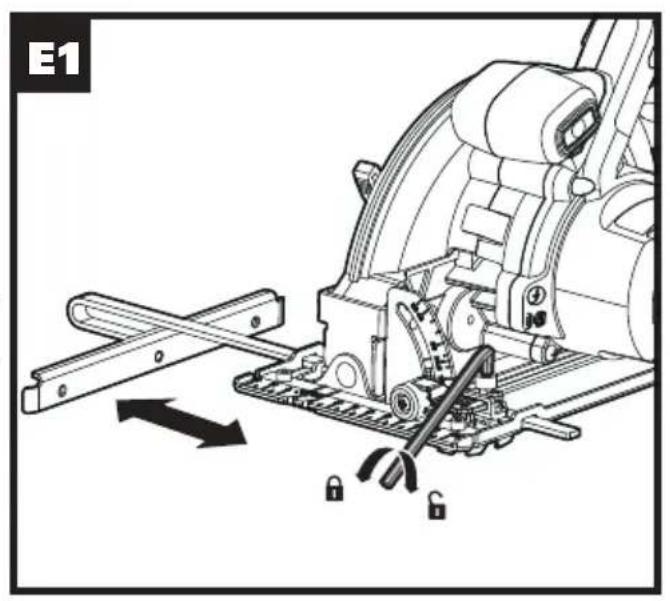

natural_image
Technical line drawing of a mechanical assembly with no visible text or symbols
natural_image
Technical line drawing of a Kresen industrial cutting machine with a tool inserted, showing mechanical components and motion arrows (no text or symbols)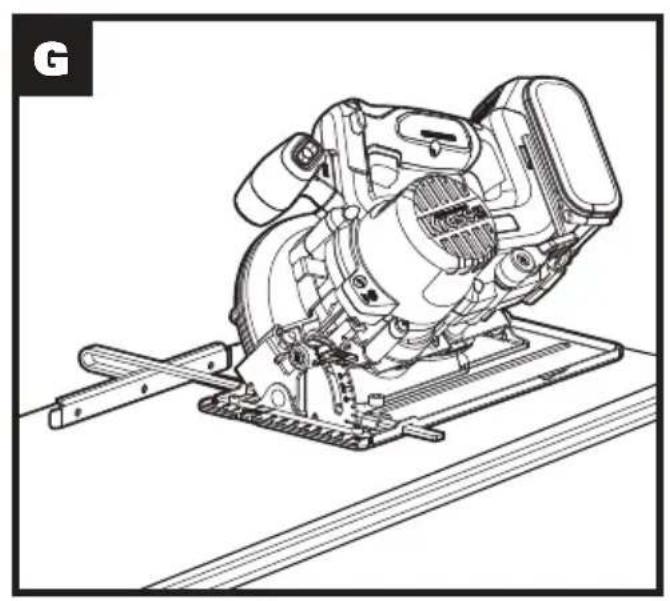
natural_image
Technical line drawing of a mechanical assembly with no visible text or symbolsCOMPONENT LIST
- SAFETY SWITCH
- ON/OFF TRIGGER
- FRONT HAND GRIP
- SPINDLE LOCK BUTTON
- BASE PLATE ANGLE SCALE
- PARALLEL GUIDE
- PARALLEL GUIDE CLAMPING FIXTURE
- CUTTING MARK, 0°
- CUTTING MARK, 45°
- BASE PLATE BEVEL LOCK KNOB
- BASE PLATE
- BATTERY PACK *
- BATTERY PACK RELEASE BUTTON*
- LOWER GUARD LEVER
- INNER FLANGE (SEE FIG. A)
- SAW BLADE (SEE FIG. A)
- OUTER FLANGE (SEE FIG. A)
- BLADE BOLT (SEE FIG. A)
- SPINDLE (SEE FIG. A)
- LOWER BLADE GUARD
- FIXED UPPER BLADE GUARD
- DEPTH ADJUSTMENT LEVER (SEE FIG. B)
- HEX KEY(SEE FIG. B)
- HEX KEY STORAGE AREA (SEE FIG. B)
- CUTTING DEPTH SCALE
- DUST EXTRACTION OUTLET
*Not all the accessories illustrated or described are included in standard delivery.
TECHNICAL DATA
Type KUE12 KUE12.9(E12-designation of machinery, representative of circular saw)
| KUE12 KUE12.9 | ||
| Voltage 20V Max** | --- | |
| No load speed 5200/min | ||
| Blade size 165mm | ||
| Arbor size 20mm | ||
| Cutting capacity | Cutting Depth at 90° | 54mm |
| Cutting Depth at 45° | 42mm | |
| Bevel capacity 0-50° | ||
| Machine weight 3.5kg 2.8kg | ||
** Voltage measured without workload. Initial battery voltage reaches maximum of 20 volts. Nominal voltage is 18 volts
ACCESSORIES
| KUE12 KUE | 12.9 | |
| Hex key 1 | 1 | |
| Parallel guide | 1 | 1 |
| Vacuum adaptor | 1 | 1 |
| 165mm saw blade | 1 | 1 |
| Battery pack | 2(KAB21) | / |
| Charger | 1(KAC21) | / |
We recommend that you purchase your accessories from the same store that sold you the tool. Refer to the accessory packaging for further details. Store personnel can assist you and offer advice.
OPERATING INSTRUCTIONS

NOTE: Before using the tool, read the instruction book carefully.
Intended use:
The tool is intended for ripping and cross-cutting wood and other materials in straight cutting lines, while resting firmly on the work piece. This machine cannot be used to work on iron metal.
BEFORE OPERATION
1) Charging
The battery charger supplied is matched to the Li-ion battery installed in the machine. Do not use another battery charger.
The Li-ion battery is protected against deep discharging. When the battery is empty, the machine is switched off by means of a protective circuit: The tool holder no longer rotates.
In a warm environment or after heavy use, the battery pack may become too hot to permit charging. Allow time for the battery to cool down before recharging. When the battery is charged for the first time and after prolonged storage, the battery will only accept approximately 60% charge. However, after several charge and discharge cycles the battery will accept a 100% charge.
2) Removing/Installing the battery pack (See Fig. A)
Press the battery pack release button and remove the battery pack from the tool. After recharge, slide the battery pack into tool's battery port. A simple push and slight pressure will be sufficient.
3) Parallel Guide(See Fig.E1 E2)
1. ADJUST THE CUTTING DEPTH (See Fig. C)
To achieve an optimum cut, the saw blade must not protrude the material. For adjusting the cutting depth, loosen the cutting depth lock knob and raise the saw from the base plate, or lower it to the base plate respectively. Adjust the required cutting depth using the cutting depth scale(25). Tighten the cutting depth lock knob again.
2. ADJUST THE CUTTING ANGLE
Loosen the base plate bevel lock, tilt the base plate away from the machine until the required cutting angle is adjusted on the angle scale. Then tighten the bevel lock knob.
Note: The adjustment screw is used to set the accurate bevel angle at 0^ . (See Fig. B)
3. CUTTING GUIDE (See Fig. D)
The cutting mark 0° (8) indicates the position of the saw blade for right-angled cuts. The cutting mark 45° (8) indicates the position of the saw blade for 45° cuts. Both cutting marks include the width of the saw blade. Always guide the saw blade off of the drawn-up cutting line so that the required measure is not
reduced by the width of the saw blade. For this, choose the corresponding notch side of the cutting mark 0^ (8) or 45^ (9) as shown in the illustration.
Note: It is best to carry out a trial cut.
4. CHANGING THE SAW BLADE (See Fig. A)
Before any work on the machine itself, remove the battery.
- Wear protective gloves when mounting the saw blade. Danger of injury when touching the saw blade.
- Only use saw blades that correspond with the characteristic data given in the operating instructions.
- Do not under any circumstances use grinding discs as the cutting tool.
For changing the cutting tool, it is best to place the machine on the face side of the motor housing.
REMOVING
Press the spindle lock button (4) and keep it depressed.
The spindle lock button (4) may be actuated only when the saw blade is at a standstill. Or it will damage the machine.
Loosen the blade bolt(18) with the hex key(23).
Remove the outer flange (17). Tilt back the lower blade guard(20), and hold it firmly with the lower guard lever(14). Remove the saw blade (16).
MOUNTING
Clean the saw blade and all the clamping parts to be assembled. Tilt back the lower blade guard (20), and hold it firmly with the lower guard lever (14). Place the saw blade onto the inner flange (15). Assemble the outer flange (17) and the blade bolt (18). Use the hex key to tighten the blade bolt with 1/4 turn more than finger tight.
Take care that the mounting positions of the inner flange and outer flange are correct.
_ When mounting: Ensure that the cutting direction of the teeth (direction of arrow on saw blade) and the direction-of-rotation arrow on the blade guard match.
5. HEX KEY STORAGE (See Fig. B)
The hex key provided can be placed in the area under the machine motor.
6. SAWDUST REMOVAL (See Fig. F)
STARTING OPERATION:
1. SWITHCING ON AND OFF
For starting operation the machine, actuate the lock-off button (1) first, and then press and hold the On/off switch (2) afterwards.
To switch off the machine, release the On/off switch (2).
For safety reasons the On/Off switch of the machine cannot be locked; it must remain pressed during the entire operation.
2. ELECTRICAL BRAKE
An integrated electrical brake immediately reduces the speed of the saw together with the saw blade after switching off the machine.
WORKING HINTS FOR YOUR CORDLESS CIRCULAR SAW
Always use a blade suited to the material and material thickness to be cut. The quality of cut will improve as the number of blade teeth increase. Always ensure the work-piece is firmly held or clamped to prevent movement. Support large panels close to the cut line. Any movement of the material may affect the quality of the cut. The blade cuts on the upward stroke and may chip the uppermost surface or edges of your work piece when cutting, ensure your uppermost surface is a non visible surface when your work is finished.
BEVEL CUTS (SEE FIG. G)
Set required bevel angle between 0^ and 50^ . Do not use the depth of cut scale when making bevel cuts due to possible inaccuracy.
MAINTAINACE
Remove the battery pack from the tool before carrying out any adjustment, servicing or maintenance.
Your power tool requires no additional lubrication or maintenance.
There are no user serviceable parts in your power tool. Never use water or chemical cleaners to clean your power tool. Wipe clean with a dry cloth. Always store your power tool in a dry place. Keep the motor ventilation slots clean. Keep all working controls free of dust. Occasionally you may see sparks through the ventilation slots. This is normal and will not damage your power tool.
FOR BATTERY TOOLS
The ambient temperature range for the use and storage of tool and battery is 0^ C- 45^ C.
The recommended ambient temperature range for the charging system during charging is 0^ C- 40^ C.
Positec Australia Pty Limited
10 Corporate Blvd Bayswater, VIC 3153, Australia
Kress


- SAFETY AND OPERATING MANUAL
- PRODUCT SAFETY GENERAL POWER TOOL SAFETY WARNINGS
- Save all warnings and instructions for future reference.
- SAFETY INSTRUCTIONS FOR ALL SAWS
- CUTTING PROCEDURES
- Further safety instructions for all saws Kickback causes and related warnings
- SAFETY INSTRUCTIONS FOR CIRCULAR SAW WITH INNER PENDULUM GUARD
- Lower guard function
- ADDITIONAL SAFETY RULES FOR YOUR CIRCULAR SAW
- SAFETY WARNINGS FOR BATTERY PACK
- COMPONENT LIST
- TECHNICAL DATA
- OPERATING INSTRUCTIONS
- Intended use:
- BEFORE OPERATION
- 1) Charging
- 2) Removing/Installing the battery pack (See Fig. A)
- 3) Parallel Guide(See Fig.E1 E2)
- ADJUST THE CUTTING DEPTH (See Fig. C)
- ADJUST THE CUTTING ANGLE
- CUTTING GUIDE (See Fig. D)
- CHANGING THE SAW BLADE (See Fig. A)
- REMOVING
- MOUNTING
- HEX KEY STORAGE (See Fig. B)
- SAWDUST REMOVAL (See Fig. F)
- STARTING OPERATION:
- SWITHCING ON AND OFF
- ELECTRICAL BRAKE
- WORKING HINTS FOR YOUR CORDLESS CIRCULAR SAW
- BEVEL CUTS (SEE FIG. G)
- MAINTAINACE
- Remove the battery pack from the tool before carrying out any adjustment, servicing or maintenance.
- FOR BATTERY TOOLS
- Kress
Brand : KRESS
Model : KUE12.1
Category : Saw