
VisiOne 3D VR3550 - Robot vacuum Concept - Free user manual and instructions
Find the device manual for free VisiOne 3D VR3550 Concept in PDF.
| Brand | Concept |
| Model | VisiOne 3D VR3550 |
| Product type | Robot vacuum |
| Power | 65 W |
| Battery voltage | 14.4 V |
| Charging adapter voltage | AC 100-240 V - 50/60 Hz |
| Noise level | ≤ 68 dB |
| Battery type | Li-Ion 5200 mAh |
| Continuous working time | 150 min |
| Full charge time | 4-5 hours |
| Wi-Fi connectivity | 2.4 GHz, WPA1/WPA2 |
| Mobile app | Concept Home (Android 5.0+, iOS 9.0+) |
| Max transmission power | 17.11 dBm |
| Cleaning functions | Auto, spot, zone, scheduled cleaning; vacuuming and mopping |
| Sensors | TOF, front laser, drop sensor, infrared, bump sensor |
| Charging base | With dust bag and auto-empty |
| Dust bin capacity | Not specified (estimated: approx. 300 ml) |
| Robot dimensions | Not specified (estimated: diameter ~32 cm, height ~9 cm) |
| Robot weight | Not specified (estimated: ~3 kg) |
| Operating temperature | 0 °C to 40 °C |
| Maintenance | Regular cleaning of brushes, filters, sensors; replace side brushes every 3-6 months |
| Repairability | Contact an authorized center; original spare parts available |
| Warranty | Not specified (estimated: 2 years) |
| Environmental protection | Recyclable per WEEE directive; do not dispose with household waste |
Frequently Asked Questions - VisiOne 3D VR3550 Concept
User questions about VisiOne 3D VR3550 Concept
0 question about this device. Answer the ones you know or ask your own.
Ask a new question about this device
Download the instructions for your Robot vacuum in PDF format for free! Find your manual VisiOne 3D VR3550 - Concept and take your electronic device back in hand. On this page are published all the documents necessary for the use of your device. VisiOne 3D VR3550 by Concept.
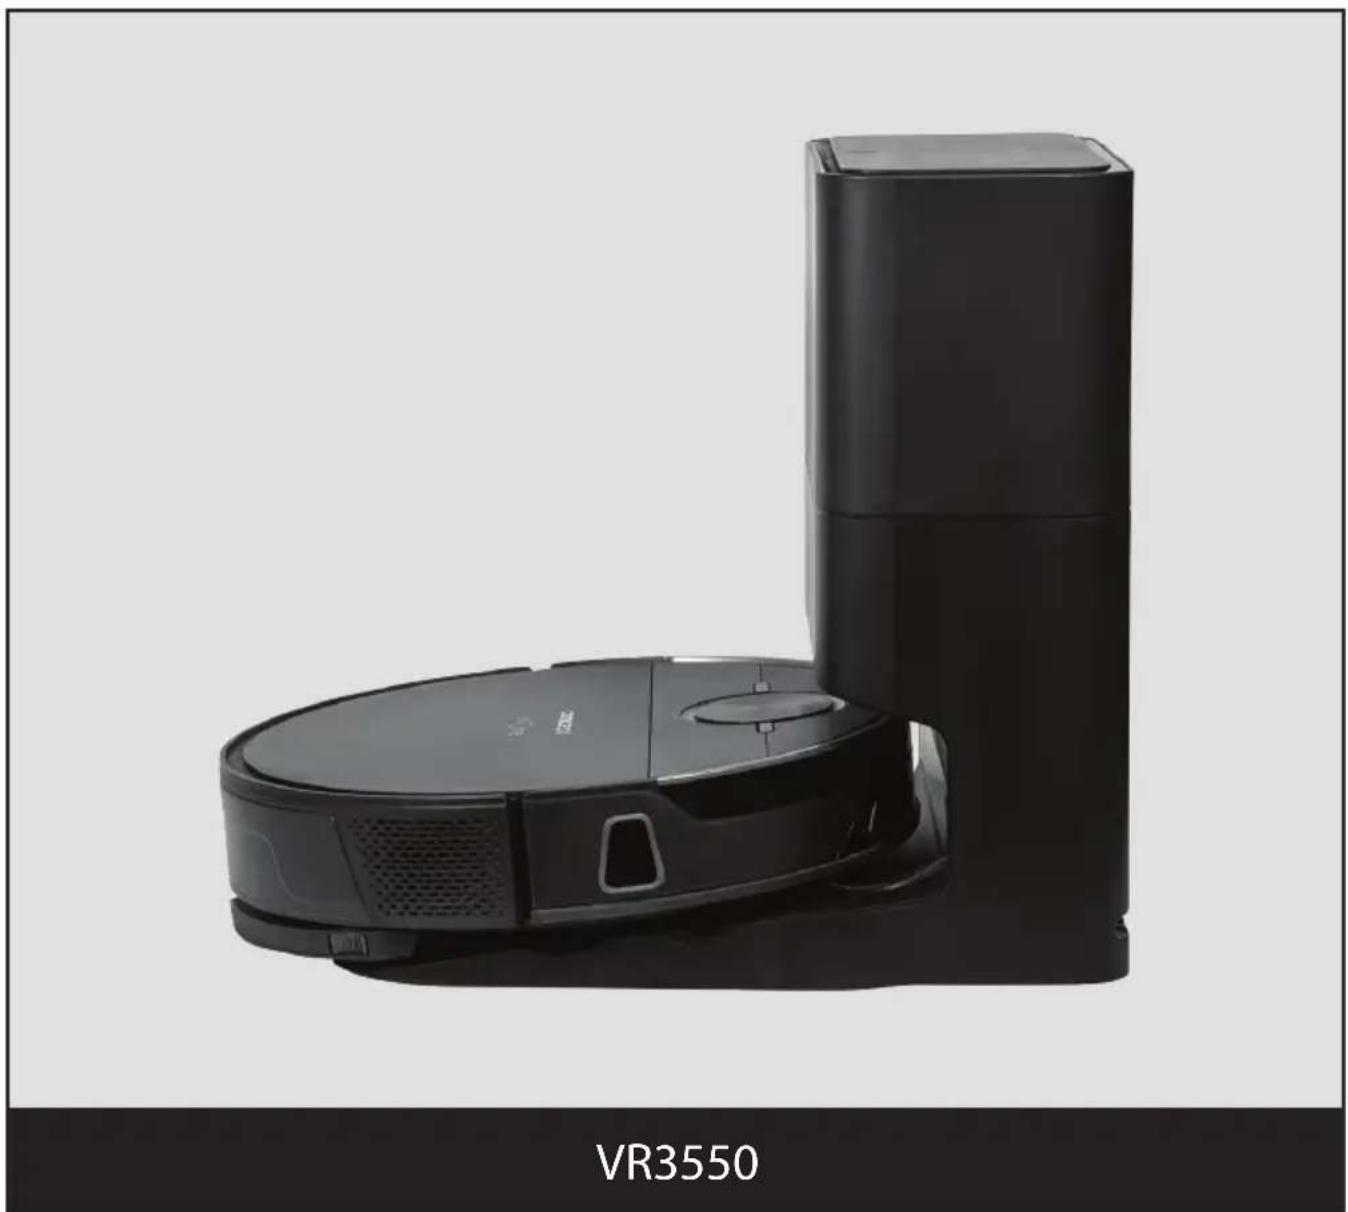
USER MANUAL VisiOne 3D VR3550 Concept
Robotic vacuum cleaner
Roboterstaubsauger
Aspirateur robot
Robot aspirapolvere
Aspiradora robótica
Aspirator robot
natural_image
Black VR3550 robotic vacuum cleaner with a cylindrical top and circular base, displayed against a plain white background (no text or symbols on the device itself)CZ
The image contains no text or characters.
The image contains no text or characters.
HULVDEFR
ENSKPL
The image contains no text or characters. Therefore, the correct OCR output is an empty string.
ITES
RO
POPIS PRODUKTU/ POPIS PRODUKTU/ OPIS PRODUKTU/ TERMÉKLEÍRÁS/
PRODUKTA APRAKSTS/ PRODUCT DESCRIPTION/ BESCHREIBUNG DES PRODUKTS/
DESCRIPTION DU PRODUIT/ DESCRIZIONE DEL PRODOTTO/ DESCRIEREA PRODUSULUI
SEZNAM SOUĆÁSTÍ/ ZOZNAM KOMPONENTOV/ WYKAZ SKŁADNIKÓW/ AZ ÖSSZETEVÓK LISTAJA/ KOMPONENTU SARAKSTS/ LIST OF COMPONENTS/ LISTE DER KOMPONENTEN/ LISTE DER KOMPONENTEN/ ELENCO DEI COMPONENTI/ LISTA DE COMPONENTES/ LISTA DE COMPONENTE
natural_image
Collection of electronic components and devices labeled A through K, including battery pack, circuit board, and power cord (no text or symbols on parts)POPIS NABIJEĆI STANICE/ OPIS NABIJACEJ STANICE/ A TÖLTŐÄLLOMÄS LEIRÄSA/
UZLÄDES STACIJAS APRAKSTS/ DESCRIPTION OF THE CHARGING STATION/
BESCHREIBUNG DER LADESTATION/ DESCRIPTION DE LA STATION DE CHARGE/
DESCRIZIONE DELLA STAZIONE DI RICARICA/ DESCRIPCIÓN DE LA ESTACIÓN DE CARGA/
DESCRIEREA STAÏIEI DE ÚNCÀRCARE
MOPOVACÍ MODUL/ MODUL MOP/ MODUŁ MOP/ MOP MODUL/ MOP MODULIS/ MOP MODULE/ MOP-MODUL/ MODULE MOP/ MODULO MOP/ MODULO MOP/ MODUL MOP
concept
CZ
PODĚKOVÁNÍ
E. Kombipuané filter
Thank you for purchasing a Concept product. We wish you much joy with your new appliance every day you use it. Please read the instruction manual carefully before initial use. To refer to this manual any time you need to, we recommend you to keep it in a safe place. And please pass it to any future owner of the appliance.
| Technical specifications | |
| Input 65 W | |
| Battery voltage 14.4 V | |
| Charger voltage AC 100-240 V - 50/60 Hz | |
| Sound level ≤ 68 dB | |
| Battery 5200 mAh, Li-Ion | |
| Operation time 150 min | |
| Full charge time 4-5 hours | |
| Frequency range 2,412 - 2,472 GHz | |
| Transmitter power (max.) 17,11 dΩm | |
IMPORTANT
Before connecting to the mains, make a visual check to ensure that the unit is intact and that no damage occurred during transport.
IMPORTANT SAFETY PRECAUTIONS
- Do not use the appliance in any other way than as described in this manual.
- Remove all the covering and marketing materials from the appliance before the first use.
- Remove all items from the floor that could disrupt the effective a trouble-free cleaning (cables, papers, clothes, table cloths and curtains touching the ground).
- Use only original accessories and spare parts for this model.
- Do not sit on the vacuum robot or place other objects on it.
- The appliance should only be used in households at temperatures between 0 °C and 40 °C.
- Make sure that the dust container and mopping cloth are properly attached before use.
- Do not put your hair, clothes, fingers or other body parts near the main brush. Keep the main brush and the suction part of the vacuum robot clean, remove all hair and dust that can lower the suction properties of the vacuum robot and the cleaning quality.
VR3550
65
EN
concept
concept
EN
- Do not use the appliance on wet or damp floors.
- Do not vacuum liquids, burning cigarettes, splinters and sharp objects, matches and other flammable materials, larger pieces of paper, plastic bags or other items that can damage the vacuum robot.
- Do not allow the vacuum robot to pass over loose cables when vacuuming.
- When servicing and cleaning the appliance, turn the power switch to the OFF position.
- Direct sunlight may cause a reduced sensitivity of the infra-red sensors of the vacuum robot, please avoid direct sunlight.
- A carpet must be secured so that the robot does not enter on it during cleaning. If a mopping cloth with a water tank is installed on the vacuum robot, cleaning can be interrupted or unwanted soaking of the carpet can occur.
- Do not place the appliance in a place where it could easily fall on the floor (table, chairs).
- Before charging the appliance, make sure the charging station is properly connected.
- Extreme thermal conditions or inappropriate use may result in leakage of the battery. If the fluid gets on your skin, wash immediately under running water. In case of contact with eyes, rinse immediately under running water for at least 10 minutes. Get medical help.
- In case you want to dispose of the product, first disconnect the battery from the appliance.
- If the appliance is being transported or it is not used for a long time, switch it to the OFF position. This extends the battery life.
- Make sure the mains voltage corresponds to the values on the rating plate of the product. Do not connect the appliance to the distribution sockets and extension leads.
- When disconnecting the appliance from the wall outlet, never pull the power cord, grasp the plug end and disconnect it by removing it from the receptacle.
- Do not use the appliance as a toy.
- Do not use coarse and chemically aggressive substances to clean the appliance.
-
The appliance is only suitable for home use and is not intended for commercial use.
-
Do not immerse the power cord, plug or appliance in water or any other liquid.
- Do not repair the appliance yourself. Please contact an authorized service centre to prevent injury from improper handling.
- This appliance can be used by children aged from 8 years and above and persons with reduced physical, sensory or mental capabilities or lack of experience and knowledge if they have been given supervision or instruction concerning the use of the appliance in a safe way and understand the hazards involved. Cleaning and maintenance performed by the user must not be carried out by children unless they are 8 years old and under supervision. Children aged under 8 years of age must be kept away from the appliance and its power cord. Do not let children play with the appliance.
- Children aged under 3 years of age must be prevented from accessing the appliance unless they are permanently supervised.
- The manufacturer and importer to the European Union has no liability for damage caused by the operation of the appliance, i.e. wounds, scalding, fire, injuries, damage to other things, etc.
- If the power cord is damaged, have it replaced by a qualified service centre to avoid a dangerous situation. It is forbidden to use the appliance with a damaged power cord.
- The robotic vacuum cleaner must only be used with the original AC adapter supplied with it. To avoid a dangerous situation, never use any other type of adapter.
Damages from failure to follow the manufacturer's instructions are not covered by the warranty.
Carefully check that you have unpacked all the accessories that are supplied. During the warranty period, we recommend to keep the original paper box, user manual and the packaging material
EN
concept
concept
EN
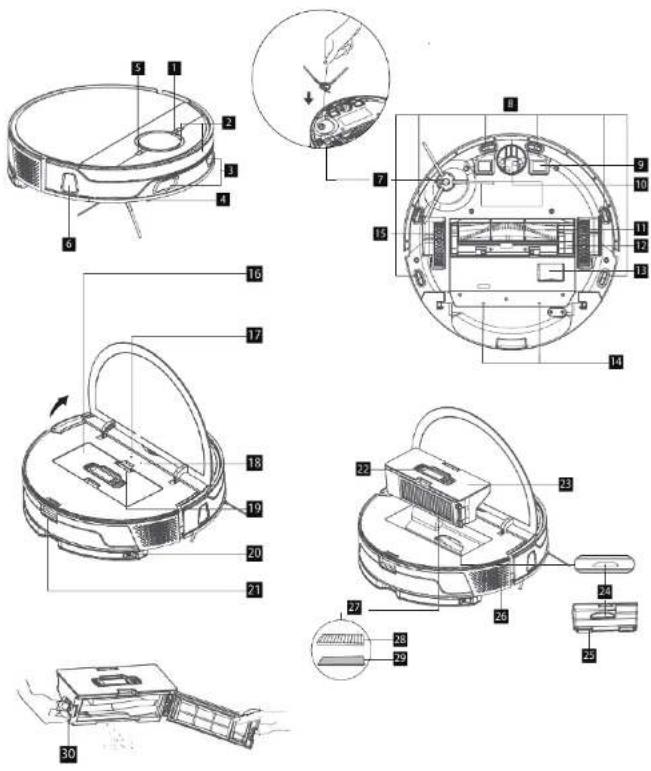
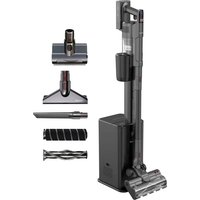
PRODUCT DESCRIPTION
1 Charging station
2 Inbuilt ToF sensor
-
Front laser sensors
-
Ruppur
-
Cleaning on/off button
5 cleaning on/on button 6 side ventral ventra
6 Side vertical sensor
7 Side brush
8 Cliff sensors
9 Charging electrodes
-
Front wheel
-
Rotation brush
11 Rotation brush 12 Rotating brush gued
12 Rotation brush guard 13 Dist extraction self
13 Dirt extraction office
14 Water dosage orifices
15 Side wheel
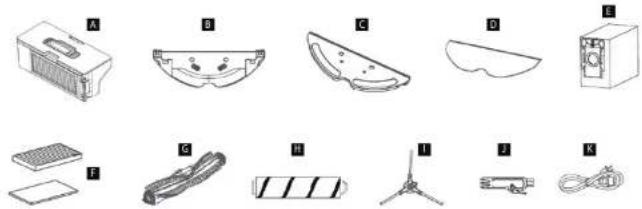
LIST OF PARTS
A. Dust container
B. Water contain
C. Monning module
H. Rotation brush for hard flows
H. Rotation brush for hard floors
- Side brush
J. Cleaning brush
K. Power supply cable
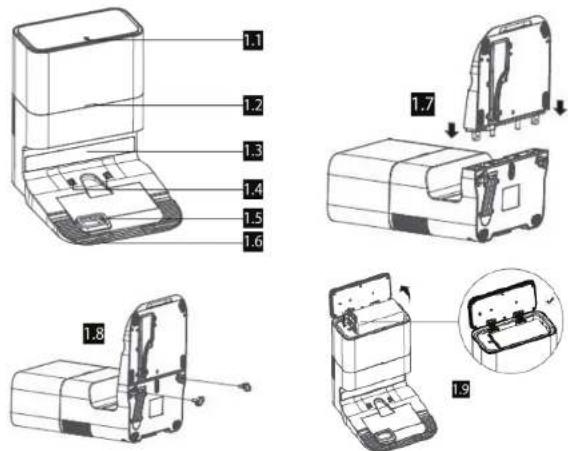
DESCRIPTION OF THE CHARGING STATION
1.1 Lift-up lid
1.2 LED indicator
1.3 Info-red sensor
1.3 Infrared sensor
1.4 Charging electrodes
1.5 Dirt suction orifice
1.6 Base
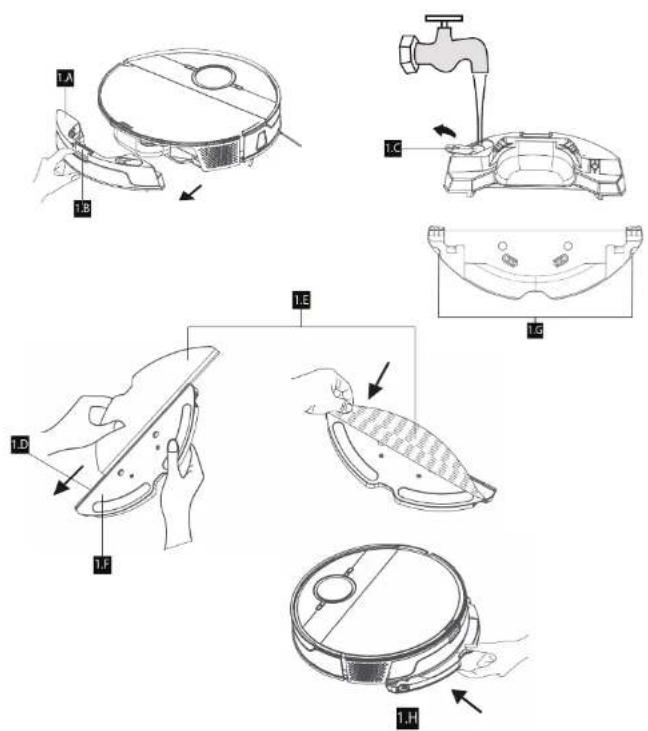
MOPPING MODULE
1.A Water tank
1.8 Water tank unlocking button
1.C. Water filling orifice
1.2 Water mining office
1.D Guide
1.E Cleaning pad
1.F Mopping module
1.6 Mopping module unlocking button
16 Dust container
17 Wi-Fi indicator
- 1917 indicato
- DESE T button
18 RESET button
19 Dust container unlocking button
20 Map module unlocking button (1/2)
- Water tank unlocking button
22 Cleaning brush
22 Cleaning brush
23 Dust container
24 Dirt suction orifice
25 Dirt extraction prifice
26 Air exhaust
20 AIPC 27 Cillor
27 Filter
28 HEPA Filter
29 Foam filter
30 Unlocking button (dirt disposal from the dust container)
KEY FEATURES
Cleaning / ON/OFF
- Press the button and hold it for 3 seconds to switch on/off the robot vacuum (the device cannot be switched off during the charging process)
- Press the button to start/interrupt the cleaning.
Charging / Local cleaning
- Press briefly to start or pause charging.
- Long press to start local cleaning.
- If the robot vacuum is in the charging base, short press the button to start dirt extraction from the device
Circular LED indicator
- White: Operation mode, battery capacity ≥ 20%
- Yellow: Low battery capacity < 20%
- Red: Robot vacuum battery discharged
Wi-Fi reset
- Press both buttons simultaneously for 3 seconds.
• Wi-Fi Indicator (17) is flashing: Charging or process start
• Wi-Fi indicator (17) is flashing red quickly: Error
INSTALLATION
- Assemble the charging base, see Fig. 1.7, 1.8 and 1.9 – insert the lower part into the main section of the charging base and secure with the locks. Then open the upper lid and install the dust bag (if the bag is not installed, extraction of dirt into the charging basis cannot be activated).
- Connect power supply cable.
Note:
- Provide a space of min. 6 cm from the wall, min. 0.5 m on both sides of the docking station and min. 1.5 m in front of the station.
- If the power cord is stretched vertically to the ground, the appliance may pull it out and the docking station may be switched off.
- In normal condition, the charging indicator light is on when switched on, and off when charged.
- Do not move the docking station or expose it to direct sunlight.
Note: Direct sunlight will interfere with the docking station signal and the appliance may not return to the docking station properly.
3. Installing the side brush
Press the side brush to its position, see Fig. 7, until a "click" was heard.
- Putting the appliance into operation and charging Press and hold the ON button for approx. 3 s. to switch on the robot vacuum. Then place the robot vacuum manually to the charging base thus allowing
the charging electrodes to get in contact. If the LED indicator on the charging base goes off, the charging process has been started.
- Connecting a mobile app (you can skip this step) Read the instructions for connecting Wi-Fi and connect the mobile app.
6. Start of cleaning
After switching on the robot vacuum, briefly press the button ⏻ on the robot vacuum or start cleaning using the mobile app.
Note:
- The sweeping robot cannot be used to remove fluids. - If the battery charge level is less than 15 %, the appliance cannot operate. In this case, recharge it.
- If the battery charge level is less than 15 %, the appliance automatically returns to the docking station.
- Before use, remove various wires (including the docking station power cord) from the floor to prevent outages and damage to objects or wires when the appliance catches these wires.
7. Installing the wiping module
a) Installing the wiping cloth: Slide the mop pad into the mop module guide. Then put it down onto the mop module and fasten the velcros, see Fig. 1.D and 1.E.
Note: Clean the wiping cloth after use to keep it in good condition.
b) Remove the water tank using the unlock button and fill it with water, see Fig. 1.B and 1.C.
c) Install the module:
Press and hold the button in the centre of the container and slide it horizontally along the back of the robot. The container is installed in place when you hear a "click" sound and a voice announcement from the appliance. After installing the container, insert the wiping module. Once you hear a "click" sound, the module is correctly inserted.
8. Removing the wiping module
Once the robot has completed its work, press the latches on both pages, see Fig. 1.G, pull to the back and clean the pad. (do not move or flip the robot during cleaning).
Then remove the water tank and empty excessive water.
9. Instructions for using the wiping module
- Do not use the wiping module unless supervised.
- For safety, make sure the wiping module is removed when charging or when not in use.
- Do not attempt to wipe the carpet.
EN
concept
concept
EN
- For a better wiping effect, the wiping module should be used after sweeping or vacuuming the floor three times.
- To refill water or clean the cloth while the appliance is operating, pause it, remove and reinsert the wiping module as described in steps 8 and 9. Do not move or flip the appliance to avoid positioning errors and map loss.
- The wiping function of the appliance is designed for wiping and aids deep cleaning. However, it cannot effectively remove stubborn dirt and thus replace human power.
• We recommend soaking the wiping cloth before mopping for better cleaning.
Note:
- The robotic vacuum cleaner cannot be used to remove fluids.
- Before use, remove various wires (including the docking station power cord) from the floor to prevent outages and damage to objects or wires when the robot catches these wires.
CHARGING
Automatic mode: The appliance automatically returns to the docking station after work. The dirt is sucked out of the container. Automatic emptying of the dust container can be set in the app.
Manual mode: When paused, press the button ⏻ briefly to start charging or you can use your mobile app to charge the appliance.
Note: If the appliance does not find the docking station, it will automatically return to its original position. In this case, place the device manually into the docking station.
COMPLETE AUTOMATIC CLEANING
Once the robot is on, it performs a search, generates a map and intelligently divides it into area (the map will be created by scanning of adjacent areas 4x4 m, until the map of the entire area has been scanned by the device). Then it sweeps the areas one after the other properly, efficiently and thoroughly along the wall and plans a curved /S-shaped cleaning path. After cleaning, the robot automatically returns to the charging base.
Note: Do not move the robot arbitrarily and often during cleaning. After moving, place the robot in its original position. When the robot is on again, it will try to take a position itself. After successful positioning, the robot will follow the planned path and continue working. If positioning fails, the robot cancels the previous task, creates a map, and cleans up again. Even if it does not find a charging base.
LOCAL CLEANING
If a local area needs more thorough cleaning, the user specifies an area of 1.5 x 1.5 m that he/she wants to clean on the map. The appliance automatically moves to this area and starts cleaning it. If the device cannot be controlled from the mobile app, relocate it manually to the area you want to clean. Press long the charging button (1.), the robot vacuum will perform local cleaning of the area 1, 5 x 1, 5 m around its starting point.
ZONE CLEANING
Select the zones to be cleaned in the mobile app. This selection can only be made after scanning the map and saving it in the mobile app.
ROOM CLEANING
Use the mobile app to select the rooms you want to clean.
RESTRICTED ZONE
Use the mobile app to set up one or more restricted areas. The robot will not clean in these restricted areas and will clean in others.
Note: The robot may reach the restricted area due to positioning errors, sensor errors or other reasons.
- A permanently restricted zone may be invalidated due to a significant change in position of the charging base and furniture. Therefore, try not to move the robot or otherwise interfere with its work during cleaning.
- The permanently restricted area will be revoked as soon as the map is restored.
NO WIPING ZONE
Use the mobile app to select a no wiping zone. If the appliance has a wiping module installed, it will not go to this area. If the appliance only vacuums, it will go to this area.
CLEANING PLANNING
You can set a fixed cleaning time using the mobile app. The appliance will automatically start cleaning at the specified time and will return to the docking station when completed.
WI-FI RESET
If the mobile phone cannot connect to the appliance due to a change in router and password configuration or other reasons, press the button ⏻ and the button for 3 seconds at the same time until you hear the "Reset WiFi" and Wi-Fi indicator (17) starts flashing.
CLEANING PERFORMANCE LEVEL/WATER DOSAGE QUANTITY
You can select one of four cleaning performance levels and four water dosage quantities in your mobile app. Use the Autoboost mode to increase device's cleaning performance automatically, after it reaches the carpet
DAILY MAINTENANCE
Main brush (clean regularly)
- Tum the appliance over and press the latch on the main brush cover to pull it out.
- Remove dust from inside and from inside the main brush with a small brush and clean the main brush.
- Reassemble the main brush and press firmly on the cover until the latch clicks into place.
Side brush (clean regularly)
- Turn the appliance over and pull the side brush up.
- Remove hair and dirt and refit the side brush. Note: Replace the side brushes every 3 to 6 months to ensure its cleaning effect.
Dust container + filters (clean regularly)
- Open the upper lid of the device.
- Press the dust container unlocking button (19.) and remove the container.
- Remove the filters from the dust container and clean them using the brush.
- Press the dirt removal button and empty the contents of the dirt container
Wiping module (clean after each use)
-
Remove and clean the cloth.
-
Wipe the water tank dry.
Sensors (clean regularly)
Clean the sensors with a soft cloth:
1. Side vertical sensor (6.)
2. Cliff sensors (8.)
3. Front laser sensors (3.)
4. Charging electrodes (9. + 1.4)
Rem.: Always switch off the robot vacuum (charging base) before cleaning.
Battery
• The appliance is equipped with high-performance lithium-ion batteries. To maintain battery performance, keep the appliance charged every day.
- If the appliance is not used for a long time, turn it off and store it properly. Charge it at least every 3 months to prevent damage to the batteries due to excessive discharge.
Firmware update
Use the mobile app to update the firmware. If new firmware is detected, update as prompted. When updating the firmware, the battery level should be ≥ 50 % and the appliance must be placed in the docking station.
Docking station
- Regularly check the bag in the docking station. If the bag is full, replace it with a new one.
- Clean the charging contacts and the suction opening.
COMMON PROBLEMS
| Problem Remedy | |
| The robot cannot be started | • If the battery is low, place the robot in the docking station and align it with the board contacts, the appliance will start automatically (if the robot is completely off, it can start automatically after a while).• Do not use the appliance if the ambient temperature is below 0 °C or above 50 °C. Use at 0-40 °C. |
| The robot cannot be charged | • Move the robot off the station, make sure the docking station indicator light turns on, and make sure both ends of the docking station power adapter are properly connected.• In case of poor contact, clean the docking station contact points and charging contacts on the robot or turn the side brush to the side. |
| The robot cannot be recharged | The robot is too far from the docking station, place it near the docking station and try again. |
| Abnormal behaviour Turn off the robot and restart it. | |
| Unusual noise is heard during use | The main brush, side brush or wheel may be wrapped with foreign objects, turn off the robot and remove foreign objects. |
| Cleaning ability is reduced or dust is dropping from the appliance | • The dust container is full. Clean it.• The filter grid is clogged. Clean or replace.• The main brush is wrapped with foreign objects, clean it. |
| Wi-Fi cannot be connected | • The Wi-Fi signal is bad. Check that the correct Wi-Fi coverage is available.• Wi-Fi is connected in an unusual way. Reset Wi-Fi, download the latest app, and try connecting again.• The password is entered incorrectly.• There is a router for the 5GHz frequency band, the robotic vacuum cleaner is equipped only for the 2.4GHz frequency band. |
| Does the robot consume power when it is always placed in the docking station? | The robot consumes a small amount of power when it is permanently placed in the docking station, allowing the best battery performance. |
| Do I need to charge the robot three times for 16 hours the first time? | The lithium battery can be used immediately after charging and has no memory effect. |
TROUBLESHOOTING
| Voice message Remedy | |
| Error 1: Front bumper stuck The bumper is stuck, check it. | |
| Error 2: Wheel stuck. Check the wheel and move it to a new position | Wheels are stuck, check them and move me please. |
| Error 3: Side brush stuck The side brush is stuck, check it. | |
| Error 4: Rolling brush stuck. Remove and clean the rolling brush | The rotary brush is stuck. Take it out and clean it. |
| Error 5: Device trapped. Clear the surrounding area I'm blocked. Please clear the surrounding area. | |
| Error 6: Anti-drop sensor blocked, please wipe. The fall sensor is dirty. Clean it. | |
| Error 7: Wheel suspended. Please move the device to a new position | The wheels are stuck, check them and move me please. |
| Error 8: Low battery, shutting down device. Please charge your device | I'm out of power, I'm shutting down. Charge me, please. |
| Error 11: Front Infrared Sensor needs cleaning Front infrared sensor needs cleaning. | |
| Error 12: Right wall sensor needs cleaning Right bumper sensor needs cleaning. | |
| Error 13: Device tilted. Please put the device on a flat surface to start | I'm tilted. Put me on a flat surface, please. |
| Error 14: Please insert dust collector and filter. | The dust container is removed. |
| Insufficient water. Add Water | There's not enough water in the water tank. |
| Error 17: Virtual Boundary detected. Move device to a different area | I'm in a restricted zone. Please move me. |
| Error 20: Front Laser sensor may be blocked, please wipe it; | The front laser sensor is blocked. Please clean it. |
| Error 21: Front obstacle avoidance sensor is blocked, please wipe it; | The front obstacle sensor is blocked. Please clear it. |
EN
concept
concept
EN
WIRELESS CONNECTION AND COMPATIBILITY
- Jindrich Valenta - CONCEPT shall in no way be liable for any incidental, indirect or consequential damages, or for any loss of data or loss due to information leakage during communication via wireless technology.
- Successful wireless communication cannot be 100% guaranteed on all Smart devices and Wi-Fi networks (routers). Due to the variety of devices on the market, there may be cases where the character or specification of a given Smart device or Wi-Fi network (router) makes connection impossible or is somehow disturbed. In addition, a number of factors, including hardware and software configuration, also affect the success of wireless communication via Wi-Fi network. The connection between the robot and your Wi-Fi network can also be adversely affected by the surrounding Wi-Fi networks, which can be tuned to the same channel and thus interfere with the connection (e.g. in housing estates, apartment buildings, etc.). These facts are not a reason to claim the appliance.
- The app is owned and operated by a third party (the "Entity") different from Jindrich Valenta - CONCEPT (the "Seller"). No personal data is transferred to the Entity by the Seller. When registering for the app, the customer submits personal data directly to the Entity, who becomes the administrator of personal data. The app and the associated protection of personal data are governed by the Entity's rules.
Compatibility:
Smart device operating system - Android 5.0 and higher
- IOS 9.0 and higher
Wi-Fi network - 2.4 GHz
- WPA1 and WPA2 security (WPA2 recommended)
NOTICE: The appliance cannot be operated on IEEE 802.1X-protected Wi-Fi networks (usually corporate Wi-Fi networks).
Before you can control the device using the app, it is necessary to connect it to your phone and give it access to your Wi-Fi network.
Recommended distance during set-up: less than 4 meters
Make sure your robotic vacuum cleaner, router, and your mobile phone are close together so that you can pair your phone with the device with no problems.
Downloading and installing the app and pairing the device
Note: Pair the vacuum cleaner with a charged battery or directly placed in the charging station.
- Scan the OR code below (Fig. 1) or find and download the "Concept Home" app from Google Play or App Store to your mobile phone.
- If you already have Concept Home, open the app, sign in, and continue with the pairing instructions.
- Make sure that both buttons on the appliance are flashing before connecting the appliance to the app.
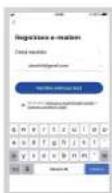
- Then press "+" or "Add device" in the app.
- Select the appliance from the list of appliances.
- Fill in the name of your Wi-Fi and password (they can also be filled in automatically).
- Press the "Next" button and then "EZ Mode" in the upper right corner.
- Select "AP mode", check that the appliance indicator is flashing and press "Next".
- Go to Wi-Fi settings on your mobile device, connect to the "SmartLife-xxx" Wi-Fi and wait for it to connect.
- Then return to the app and wait for your appliance to pair. After successful pairing, you can start controlling the appliance using the mobile app.
Fig. 1
Fig. 2
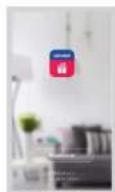
Fig. 3
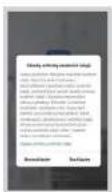
Fig. 5 Fig. 4
Pairing troubleshooting
- Verify that your Wi-Fi network password is correct.
- The device only supports 2.4 GHz Wi-Fi networks.
- The router is overwhelmed by connecting many other devices (especially in housing estates or in case of large concentrations of connected Smart devices). For stable operation it is necessary that the Wi-Fi signal reaches the places intended for use of the vacuum cleaner and at the same time is sufficiently strong.
- restart the vacuum cleaner and smart device and repeat the process; - if possible, try also restarting the Wi-Fi router itself;
• If your smart device is running Android 6.0 and above, you need to have location detection turned on.
- Once you have paired the vacuum cleaner with your smart device via the "Concept Home" app, do not move or relocate the docking station. The vacuum cleaner uses the charging station as a landmark on the map.
- By relocating the docking station, you risk losing the generated map, including the selected cleaning zones and restricted zones! The vacuum cleaner creates a new map, which overwrites the original map.
EN
concept
concept
DE
SERVICE
Extensive maintenance or repair, which requires access to internal parts of the product, has to be performed by a qualified specialist or the service centre.
ENVIRONMENTAL CONCERNS
- Packaging materials and old appliances should be recycled.
- Packaging materials may be disposed of as sorted waste.
- Dispose the plastic bags made of polyethylene (PE) of as sorted waste.
Recycling of the appliance at the end of its lifespan:

This appliance is labelled in accordance with European Directive 2012/19/EU concerning used electrical and electronic appliances (Waste Electrical and Electronic Equipment - WEEE). The symbol on the product or on its packaging indicates that this product may not be treated as household waste. Instead, it should be taken to the appropriate collection point for the recycling of electrical and electronic equipment. By ensuring this product is disposed of correctly, you will help prevent potential negative consequences for the environment and human health, which could otherwise be caused by inappropriate waste handling of this product. The disposal of such material has to be done according to the recycling regulations. For more detailed information about recycling of this appliance see the authorized local office or service for household waste disposal or the shop, where you purchased the appliance.

The product meets all the necessary requirements of the EU directives applicable to the specific product.
Changes in text, design, and technical specifications are subject to change without prior notice and we reserve the right to change them.

VR3550
DANKSAGUNG
1.0 Section interior
MÓDULO DE FREGADO
EU Declaration of conformity
Product / model
Robotic vacuum cleaner VR3550
Type:
RLF21-1
Name and address of
Jindřich Valenta – Concept
manufacturer:
Vysokomytská 1800
[Non-Text]
565 01 Chocen
This declaration of conformity is issued under the sole responsibility of the manufacturer.
Subject of the declaration: The product is intended for household. The product is designed for vacuuming and wiping dirt.
The product described above complies with the relevant harmonization legislation of the European Union:
directive 2014/35/EU (LVD),
directive 2014/30/EU (EMC),
directive 2011/65/EU (RoHS),
directive 2014/S3/EU (RED)
| Frequency range (MHz) | Max. Transmit power (dBm) |
| 2412-2472MHz | ≤18dBm |
Relevant harmonized standards used:
ETSI EN 301 489-1 V2.2.3
ETSI EN 301 489-17 V3.2.4
ETSI EN 300 328 V2.2.2
EN IEC 62311:2020
EN 6033S-2-2:2010+A11:2012+A1:2013
EN 60335-1:2012+A11:2014+A13:2017+A1:2019+A14:2019+A2:2019+A15:2021
EN 62233:2008
EN IEC 55014-1:2021
EN IEC 55014-2:2021
EN IEC 61000-3-2:2019/A1:2021
EN 61000-3-3:2013/A2:2021
Signed and followed by the name:
In: Chocen 2.1.2023
Name and function: Martin Jakl, Product engineer SDA
concept
Jindrich Valente-Concept
Vyskony/152 1900, 26:501 Cholen Tel.: 465-671400. Fax: 665-423-104
1321660-01C(26)02171317

Jindrich Valenta – Concept
- concept
- PODĚKOVÁNÍ
- IMPORTANT
- IMPORTANT SAFETY PRECAUTIONS
- EN
- PRODUCT DESCRIPTION
- LIST OF PARTS
- DESCRIPTION OF THE CHARGING STATION
- MOPPING MODULE
- KEY FEATURES
- Cleaning / ON/OFF
- Charging / Local cleaning
- Circular LED indicator
- Wi-Fi reset
- INSTALLATION
- Note:
- Installing the side brush
- Start of cleaning
- Installing the wiping module
- Removing the wiping module
- Instructions for using the wiping module
- CHARGING
- COMPLETE AUTOMATIC CLEANING
- LOCAL CLEANING
- ZONE CLEANING
- ROOM CLEANING
- RESTRICTED ZONE
- NO WIPING ZONE
- CLEANING PLANNING
- CLEANING PERFORMANCE LEVEL/WATER DOSAGE QUANTITY
- DAILY MAINTENANCE
- Main brush (clean regularly)
- Side brush (clean regularly)
- Dust container + filters (clean regularly)
- Wiping module (clean after each use)
- Sensors (clean regularly)
- Battery
- Firmware update
- Docking station
- WIRELESS CONNECTION AND COMPATIBILITY
- Compatibility:
- Downloading and installing the app and pairing the device
- Pairing troubleshooting
- SERVICE
- ENVIRONMENTAL CONCERNS
- Recycling of the appliance at the end of its lifespan:
- DANKSAGUNG
- MÓDULO DE FREGADO
- EU Declaration of conformity
Brand : Concept
Model : VisiOne 3D VR3550
Category : Robot vacuum