KG806E.9 - Hedge trimmers KRESS - Free user manual and instructions
Find the device manual for free KG806E.9 KRESS in PDF.
| Product type | Cordless hedge trimmer |
| Brand | Kress |
| Model | KG806E.9 |
| Power supply | Lithium-ion battery 20 V (max), 18 V nominal |
| Recommended battery | KAB02 (2.0 Ah) |
| Recommended charger | KAC02 (2.0 A) |
| No-load speed | 1150 rpm |
| Cutting width (grass shear) | 10 cm |
| Cut length (shrub blade) | 12/20 cm |
| Weight (bare tool) | 1.11 kg |
| Sound pressure level (LpA) | 69.5 dB(A) (K=3 dB(A)) |
| Sound power level (LwA) | 82 dB(A) (K=3 dB(A)) |
| Vibration (ah) | < 3.6 m/s² (K=1.5 m/s²) |
| Main functions | Hedge trimming, grass cutting, weeding, telescopic pole |
| Telescopic pole | Yes, adjustable height (2 positions: 25 mm and 43 mm) |
| Interchangeable blades | Yes, tool-free (unlock button) |
| Safety devices | Switch lock, blade guard, safety stop |
| Maintenance | Clean blades after each use, lubricate periodically, remove battery before maintenance |
| Environmental protection | Do not dispose with household waste, recycle at a specialized center |
Frequently Asked Questions - KG806E.9 KRESS
User questions about KG806E.9 KRESS
0 question about this device. Answer the ones you know or ask your own.
Ask a new question about this device
Download the instructions for your Hedge trimmers in PDF format for free! Find your manual KG806E.9 - KRESS and take your electronic device back in hand. On this page are published all the documents necessary for the use of your device. KG806E.9 by KRESS.
USER MANUAL KG806E.9 KRESS
natural_image
Line drawing of a Kressu electric shaver tool (no text or symbols on the device itself)| 20V 20cm cordless Grass/Shrub Shear | EN | P07 |
| 20-V 20-cm Akku-Gras-/Strauchschere | D | P20 |
| Cisaille à gazon/taille-buisson sans fil 20 V 20 cm | F | P36 |
| Cesoia per erba/cespugli a batteria da 20V 20cm | I | P51 |
| Tijera c ortacésped y arreglasetos recargable de 20 cm y 20 V | ES | P66 |
| 20V 20cm snoerloze gras-/struikschaar | NL | P81 |
| 20 V 20 cm batteridrevet græs- og buskklipper | DK | P96 |
| Аккумуляторные ножницы для стрижки травы и кустарника, 20 В, 20 см | RU | P110 |
| 20 V 20 cm trådlös gräs- och häcksax | SV | P127 |
| KG806E KG806E.X | ||
text_image
Technical diagram of a cleaning tool with numbered parts for identification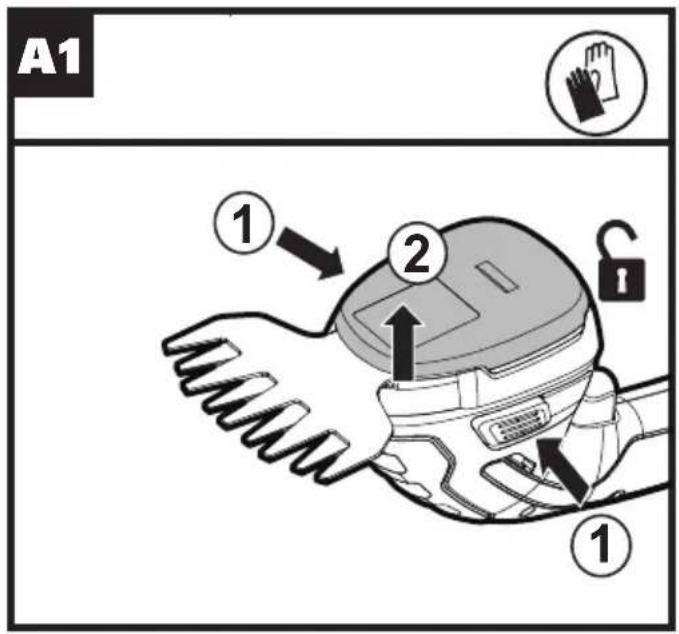
text_image
A1 ① ② ①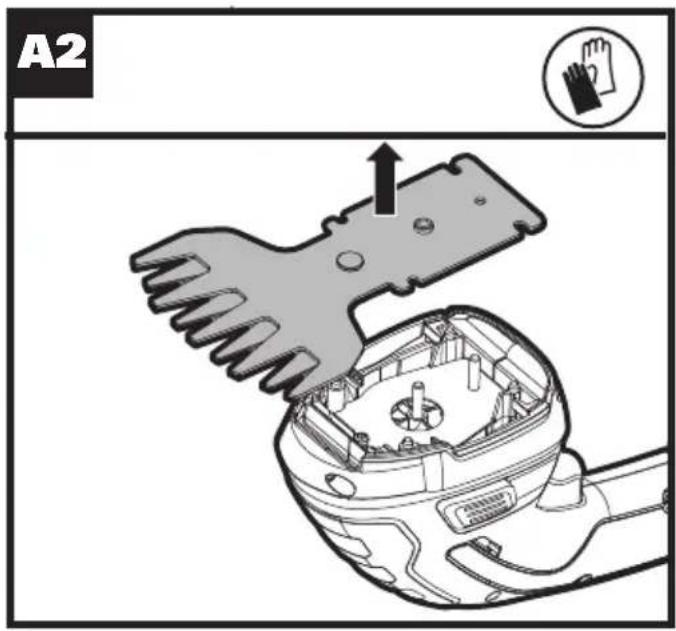
text_image
A2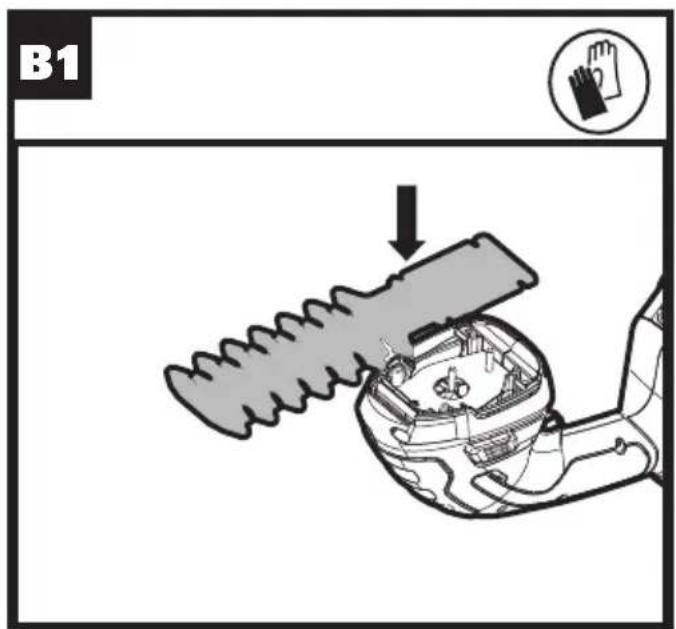
text_image
B1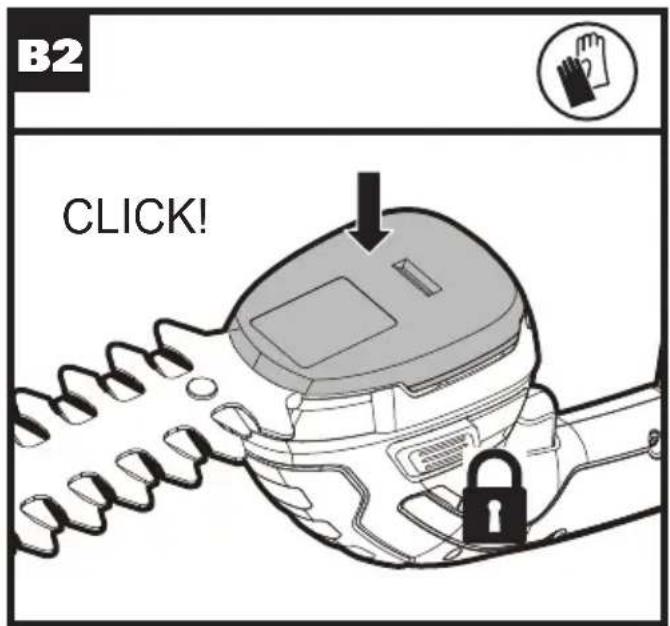
text_image
B2 CLICK!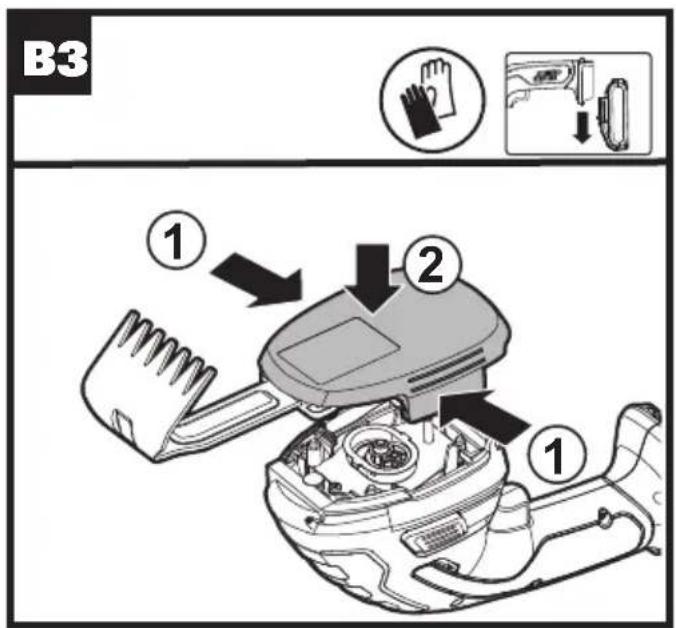
text_image
B3 ① ② ①
text_image
B4 ① ② ①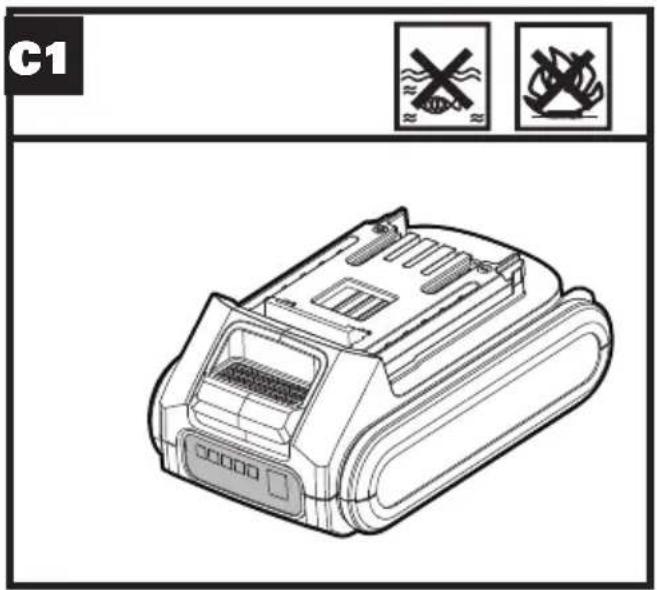
text_image
C1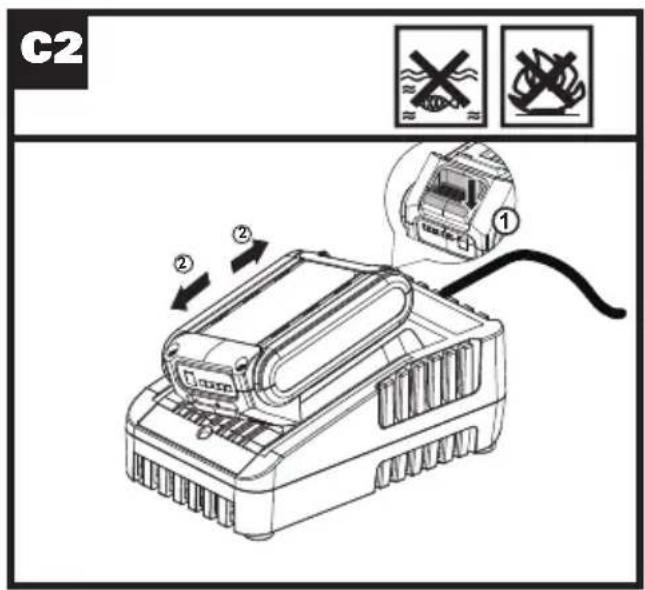
text_image
C2 ① ② ②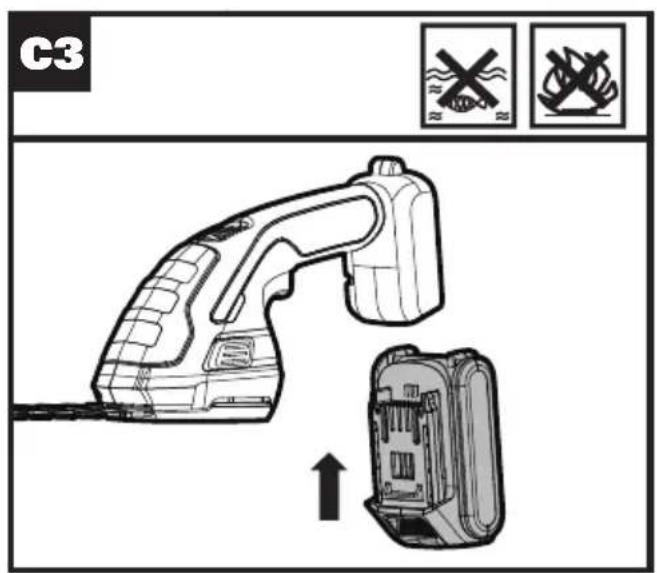
text_image
C3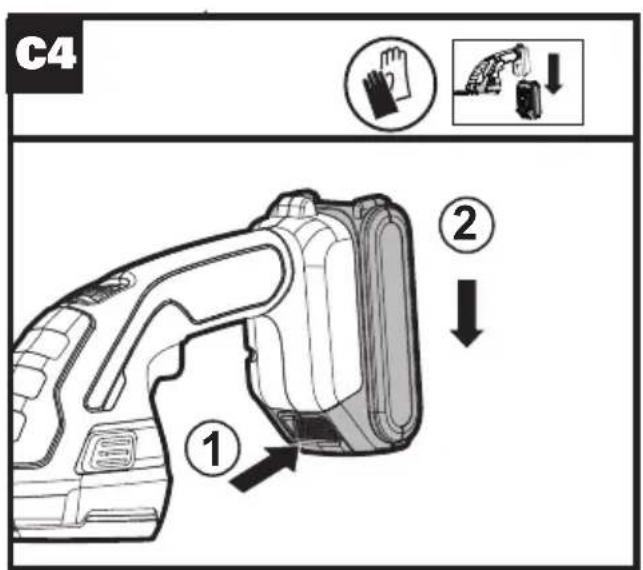
text_image
C4 ① ②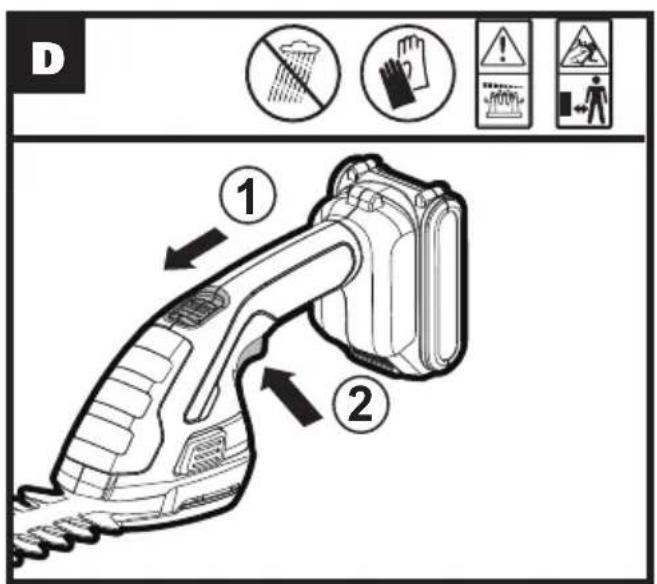
text_image
D ① ②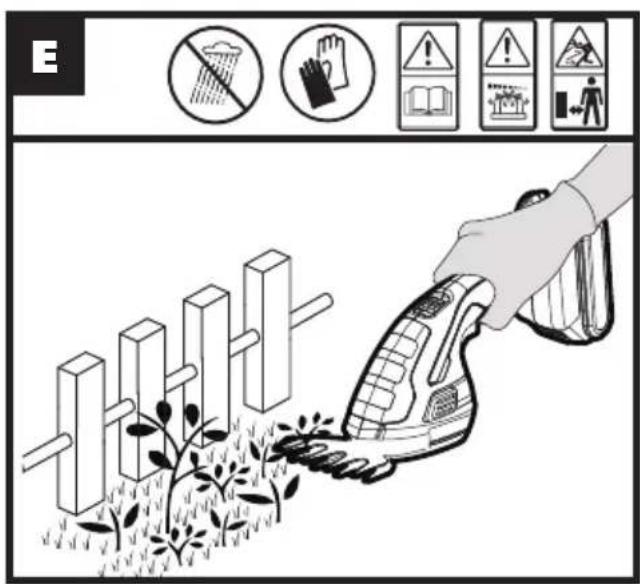
text_image
E No litter Hand Warning Warning Warning Warning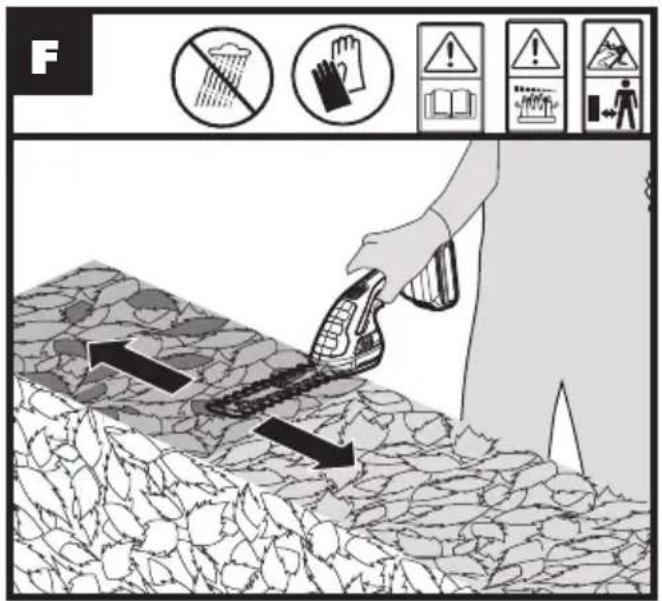
text_image
F No Hand Warning Warning Warning Warning Warning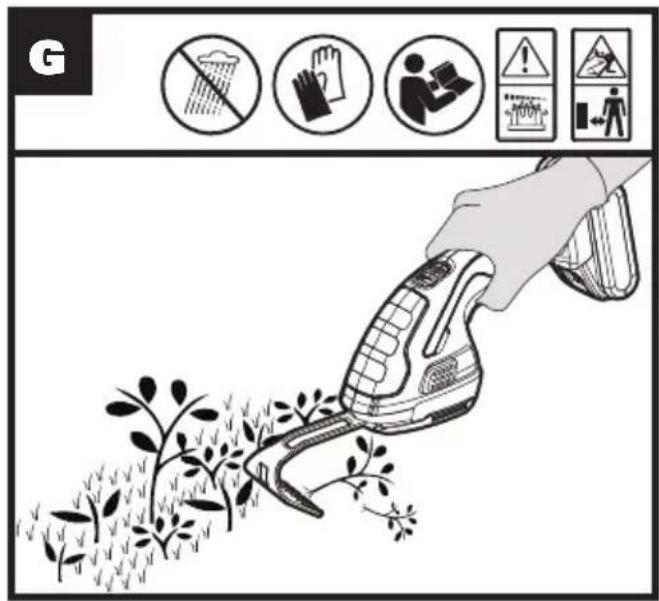
text_image
G
text_image
H1 ←→←→←→←→←→←→←→←→←→←→←→←→←→←→←→←→←→←→←→←→←→←→←→←→←→←→←→←→←→←→←→←→←→←→←→←→←→←→←→←→←→←→←→←→←→←→←→←→←→←→← → ← → ← → ← → ← → ← → ← → ← → ← → ← → ← → ← → ← → ← → ← → ← → ← → ← → ← → ← → ← → ← → ← → ← → ← → ← → ← → ← → ← → ← → ← → ← → ← → ← → ← → ← → ← → ← → ← → ← → ← → ← → ← → ← → ← → ← → ← → ← → ← → ← → ← → <-→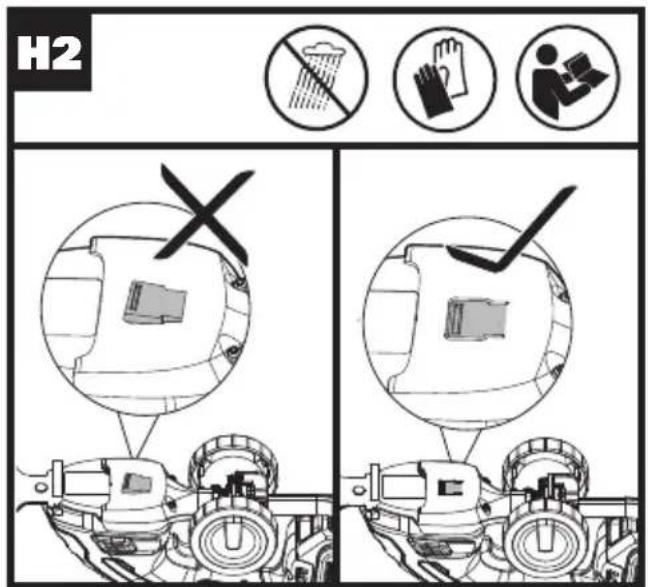
text_image
H2 NO DISKING HANDERMS H2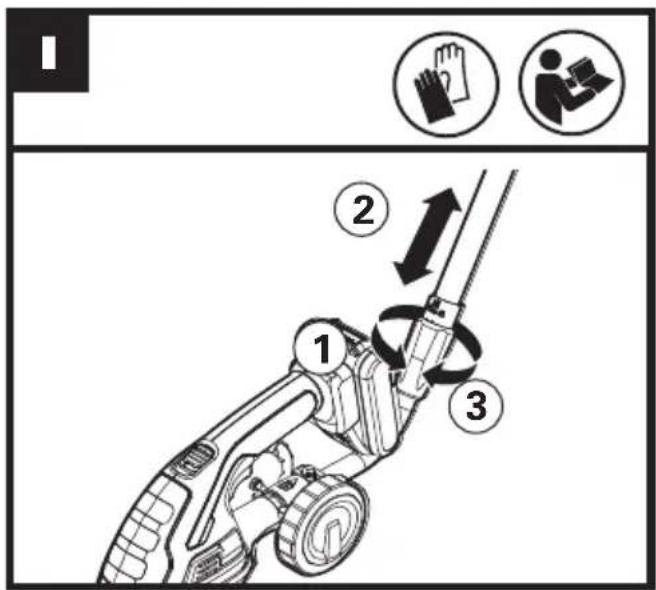
text_image
Diagram illustrating a robotic arm motion with labeled steps and icons for hand gesture and device use.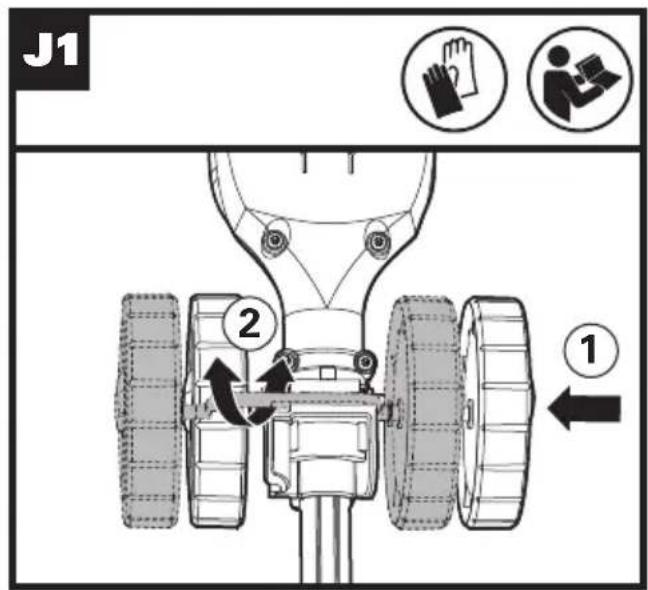
text_image
J1 ① ②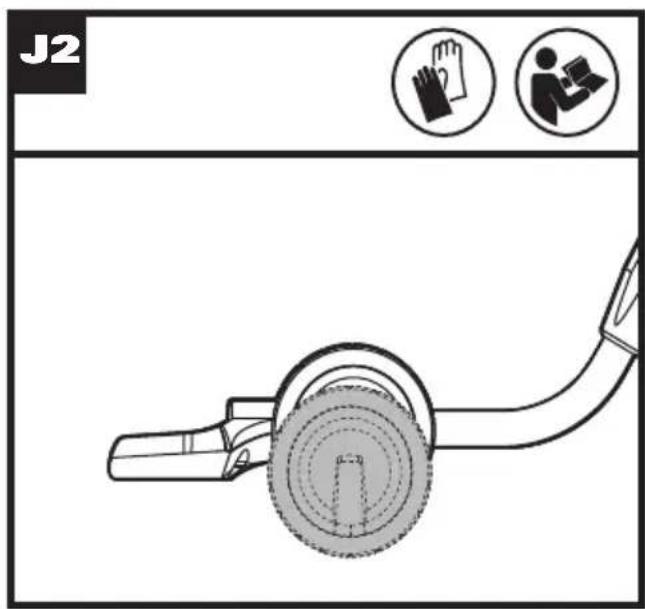
text_image
J2
text_image
K ① ②TABLE OF CONTENTS
Introduction....7
Safety Instructions....8
Component List....16
Specifications....17
Assembly&Operation....17
Cleaning/Storage....18
Maintenance....18
Environmental Protection....19
Declaration of Conformity....19
INTRODUCTION
Dear Customer,
Thank you for buying this Kress product. We are dedicated to developing high quality products to meet your lawn & garden requirements.
The Kress brand is synonymous with premium quality service. Over the years of your products life, if you have any questions or concerns about your product, please contact your location of purchase or our Customer Service Team for assistance.
We are confident you will enjoy working with your Kress product for years to come.
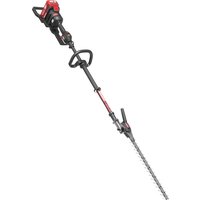
INTENDED USE OF GRASS SHEAR
The product is intended for light trimming of shrubs and lawn edges in domestic use.
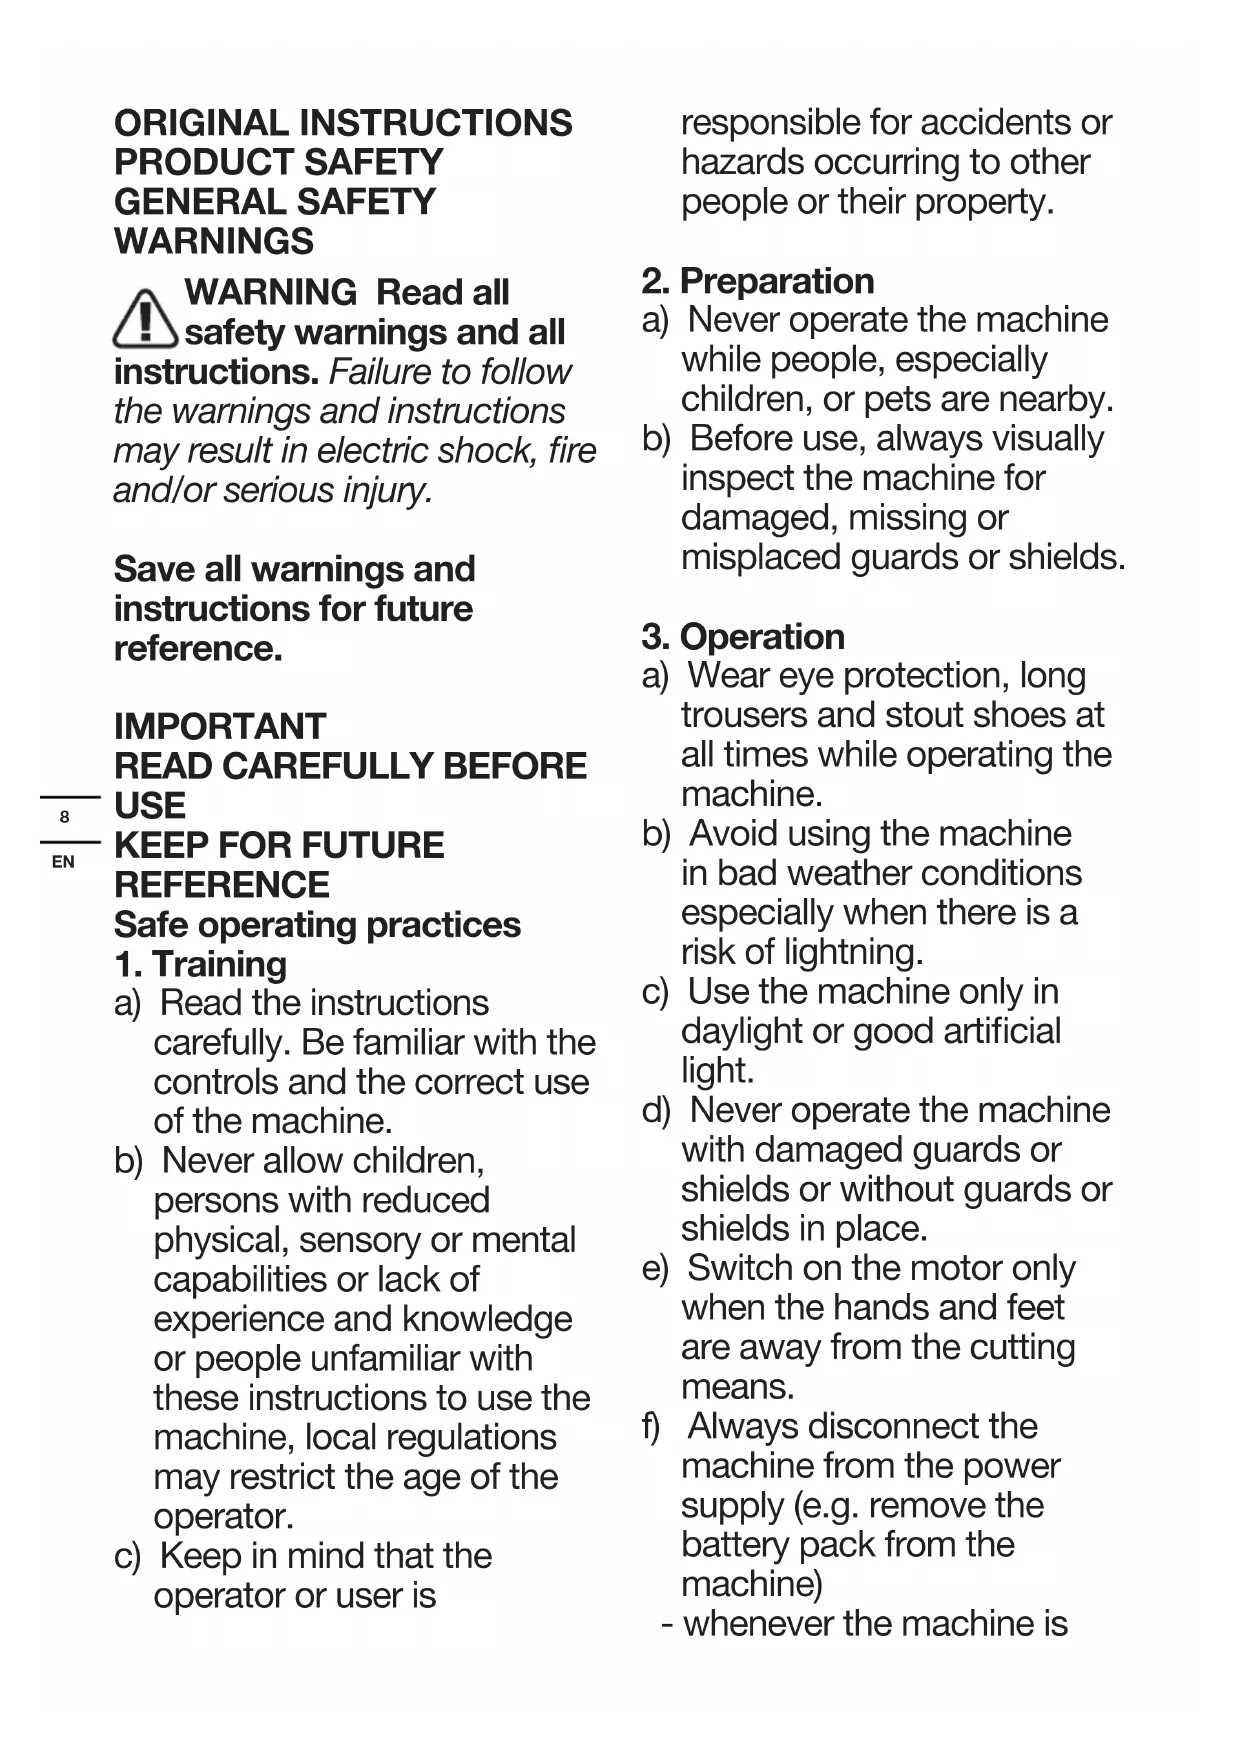
ORIGINAL INSTRUCTIONS PRODUCT SAFETY GENERAL SAFETY WARNINGS
WARNING Read all safety warnings and all instructions. Failure to follow the warnings and instructions may result in electric shock, fire and/or serious injury.
Save all warnings and instructions for future reference.
IMPORTANT READ CAREFULLY BEFORE USE KEEP FOR FUTURE REFERENCE
Safe operating practices
1. Training
a) Read the instructions carefully. Be familiar with the controls and the correct use of the machine.
b) Never allow children, persons with reduced physical, sensory or mental capabilities or lack of experience and knowledge or people unfamiliar with these instructions to use the machine, local regulations may restrict the age of the operator.
c) Keep in mind that the operator or user is
responsible for accidents or hazards occurring to other people or their property.
2. Preparation
a) Never operate the machine while people, especially children, or pets are nearby.
b) Before use, always visually inspect the machine for damaged, missing or misplaced guards or shields.
3. Operation
a) Wear eye protection, long trousers and stout shoes at all times while operating the machine.
b) Avoid using the machine in bad weather conditions especially when there is a risk of lightning.
c) Use the machine only in daylight or good artificial light.
d) Never operate the machine with damaged guards or shields or without guards or shields in place.
e) Switch on the motor only when the hands and feet are away from the cutting means.
f) Always disconnect the machine from the power supply (e.g. remove the battery pack from the machine)
- whenever the machine is
left unattended;
- before clearing a blockage;
- before checking, cleaning or working on the machine;
- after striking a foreign object;
- whenever the machine starts vibrating abnormally.
g) Take care against injury to feet and hands from the cutting means.
h) Always ensure that the ventilation openings are kept clear of debris.
i) Always be sure of your footing on slopes.
j) Walk, never run.
k) Not overreach and keep the balance at all times.
I) Not to touch moving hazardous parts before removing the battery pack from the machine and the moving hazardous parts have come to a complete stop.
4. Maintenance and storage
a) Disconnect the machine from the power supply (e.g. remove the battery pack from the machine) before carrying out maintenance or clean work.
b) Use only the manufacturer's recommended replacement parts and accessories.
c) Inspect and maintain the machine regularly. Have the
machine repaired only by an authorized repairer.
d) When not in use, store the machine out of the reach of children.
GENERAL POWER TOOL SAFETY WARNINGS
WARNING: Read all safety warnings, instructions, illustrations and specifications provided with this power tool. Failure to follow all instructions listed below may result in electric shock, fire and/or serious injury.
Save all warnings and instructions for future reference.
The term “power tool” in the warnings refers to your mains-operated (corded) power tool or battery-operated (cordless) power tool.
1. WORK AREA SAFETY
a) Keep work area clean and well lit. Cluttered or dark areas invite accidents.
b) Do not operate power tools in explosive atmospheres, such as in the presence of flammable liquids, gases or dust. Power tools create
sparks which may ignite the dust or fumes.
c) Keep children and bystanders away while operating a power tool. Distractions can cause you to lose control.
2.ELECTRICAL SAFETY
a) Power tool plugs must match the outlet. Never modify the plug in any way. Do not use any adapter plugs with earthed (grounded) power tools. Unmodified plugs and matching outlets will reduce risk of electric shock.
b) Avoid body contact with earthed or grounded surfaces, such as pipes, radiators, ranges and refrigerators. There is an increased risk of electric shock if your body is earthed or grounded.
c) Do not expose power tools to rain or wet conditions. Water entering a power tool will increase the risk of electric shock.
d) Do not abuse the cord. Never use the cord for carrying, pulling or unplugging the power tool. Keep cord away from heat, oil, sharp edges or moving parts. Damaged or
entangled cords increase the risk of electric shock.
e) When operating a power tool outdoors, use an extension cord suitable for outdoor use. Use of a cord suitable for outdoor use reduces the risk of electric shock.
f) If operating a power tool in a damp location is unavoidable, use a residual current device (RCD) protected supply. Use of an RCD reduces the risk of electric shock.
3. PERSONAL SAFETY
a) Stay alert, watch what you are doing and use common sense when operating a power tool. Do not use a power tool while you are tired or under the influence of drugs, alcohol or medication. A moment of inattention while operating power tools may result in serious personal injury.
b) Use personal protective equipment. Always wear eye protection.
Protective equipment such as dust mask, non-skid safety shoes, hard hat, or hearing protection used for appropriate conditions will reduce personal injuries.
c) Prevent unintentional starting. Ensure the switch is in the off-position before connecting to power source and/or battery pack, picking up or carrying the tool. Carrying power tools with your finger on the switch or energising power tools that have the switch on invites accidents.
d) Remove any adjusting key or wrench before turning the power tool on. A wrench or a key left attached to a rotating part of the power tool may result in personal injury.
e) Do not overreach. Keep proper footing and balance at all times. This enables better control of the power tool in unexpected situations.
f) Dress properly. Do not wear loose clothing or jewellery. Keep your hair and clothing away from moving parts. Loose clothes, jewellery or long hair can be caught in moving parts.
g) If devices are provided for the connection of dust extraction and collection facilities, ensure these are connected and properly used. Use of dust collection
can reduce dust-related hazards.
h) Do not let familiarity gained from frequent use of tools allow you to become complacent and ignore tool safety principles. A careless action can cause severe injury within a fraction of a second.
4. POWER TOOL USE AND CARE
a) Do not force the power tool. Use the correct power tool for your application. The correct power tool will do the job better and safer at the rate for which it was designed.
b) Do not use the power tool if the switch does not turn it on and off. Any power tool that cannot be controlled with the switch is dangerous and must be repaired.
c) Disconnect the plug from the power source and/or remove the battery pack, if detachable, from the power tool before making any adjustments, changing accessories, or storing power tools. Such preventive safety measures reduce the risk of starting the power tool accidentally.
d) Store idle power tools out of the reach of children and do not allow persons unfamiliar with the power tool or these instructions to operate the power tool. Power tools are dangerous in the hands of untrained users.
e) Maintain power tools and accessories. Check for misalignment or binding of moving parts, breakage of parts and any other condition that may affect the power tool's operation. If damaged, have the power tool repaired before use. Many accidents are caused by poorly maintained power tools.
f) Keep cutting tools sharp and clean. Properly maintained cutting tools with sharp cutting edges are less likely to bind and are easier to control.
g) Use the power tool, accessories and tool bits etc. in accordance with these instructions, taking into account the working conditions and the work to be performed. Use of the power tool for operations different from those intended could result in a hazardous situation.
h) Keep handles and grasping surfaces dry, clean and free from oil and grease. Slippery handles and grasping surfaces do not allow for safe handling and control of the tool in unexpected situations.
5. BATTERY TOOL USE AND CARE
a) Recharge only with the charger specified by the manufacturer. A charger that is suitable for one type of battery pack may create a risk of fire when used with another battery pack.
b) Use power tools only with specifically designated battery packs. Use of any other battery packs may create a risk of injury and fire.
c) When battery pack is not in use, keep it away from other metal objects, like paper clips, coins, keys, nails, screws or other small metal objects, that can make a connection from one terminal to another. Shorting the battery terminals together may cause burns or a fire.
d) Under abusive conditions, liquid may be ejected from the
battery; avoid contact. If contact accidentally occurs, flush with water. If liquid contacts eyes, additionally seek medical help. Liquid ejected from the battery may cause irritation or burns.
e) Do not use a battery pack or tool that is damaged or modified. Damaged or modified batteries may exhibit unpredictable behaviour resulting in fire, explosion or risk of injury.
f) Do not expose a battery pack or tool to fire or excessive temperature. Exposure to fire or temperature above 130 °C may cause explosion.
g) Follow all charging instructions and do not charge the battery pack or tool outside the temperature range specified in the instructions.
Charging improperly or at temperatures outside the specified range may damage the battery and increase the risk of fire.
6.SERVICE
a) Have your power tool serviced by a qualified repair person using only identical replacement
parts. This will ensure that the safety of the power tool is maintained.
b) Never service damaged battery packs. Service of battery packs should only be performed by the manufacturer or authorized service providers.
HEDGE TRIMMER SAFETY WARNINGS
a) Keep all parts of the body away from the blade. Do not remove cut material or hold material to be cut when blades are moving. Blades continue to move after the switch is turned off. A moment of inattention while operating the hedge trimmer may result in serious personal injury.
b) Carry the hedge trimmer by the handle with the blade stopped and taking care not to operate any power switch. Proper carrying of the hedge trimmer will decrease the risk of inadvertent starting and resultant personal injury from the blades.
c) When transporting or storing the hedge trimmer, always fit the blade cover. Proper
handling of the hedge trimmer will decrease the risk of personal injury from the blades.
d) When clearing jammed material or servicing the unit, make sure all power switches are off and the battery back is removed or disconnected. Unexpected actuation of the hedge trimmer while clearing jammed material or servicing may result in serious personal injury.
e) Hold the hedge trimmer by insulated gripping surfaces only, because the blade may contact hidden wiring. Blades contacting a "live" wire may make exposed metal parts of the hedge trimmer "live" and could give the operator an electric shock.
f) Keep all power cords and cables away from cutting area. Power cords or cables may be hidden in hedges or bushes and can be accidentally cut by the blade.
g) Do not use the hedge trimmer in bad weather conditions, especially when there is a risk of lightning. This decreases the risk of being struck by lightning.
h) Check the hedges and bushes for foreign objects, e.g. wire fences and hidden wiring.
i) Hold the hedge trimmer properly, e.g. with both hands if two handles are provided.
j) The hedge trimmer is intended to be used by the operator at ground level and not on ladders or any other unstable support.
k) Before operating the hedge trimmer, the user should make sure the locking device(s) of any moving elements (e.g. the extended shaft and pivoting element), if any, are in the locked position.
I) Have any adjustable stopping mechanism maintained at regular intervals.
SAFETY WARNINGS FOR BATTERY PACK
a) Do not dismantle, open or shred cells or battery pack.
b) Do not short-circuit a battery pack. Do not store battery packs haphazardly in a box or drawer where they may short-circuit each other
or be short-circuited by conductive materials.
When battery pack is not in use, keep it away from other metal objects, like paper clips, coins, keys, nails, screws or other small metal objects, that can make a connection from one terminal to another. Shorting the battery terminals together may cause burns or a fire.
c) Do not expose battery pack to heat or fire. Avoid storage in direct sunlight.
d) Do not subject battery pack to mechanical shock.
e) In the event of battery leaking, do not allow the liquid to come into contact with the skin or eyes. If contact has been made, wash the affected area with copious amounts of water and seek medical advice.
f) Keep battery pack clean and dry.
g) Wipe the battery pack terminals with a clean dry cloth if they become dirty.
h) Battery pack needs to be charged before use. Always refer to this instruction and use the correct charging procedure.
i) Do not maintain battery pack on charge when not in use.
j) After extended periods of storage, it may be necessary to charge and discharge the battery pack several times to obtain maximum performance.
k) Recharge only with the charger specified by Kress. Do not use any charger other than that specifically provided for use with the equipment.
I) Do not use any battery pack which is not designed for use with the equipment.
m) Keep battery pack out of the reach of children.
n) Retain the original product literature for future reference.
o) Remove the battery from the equipment when not in use.
p) Dispose of properly.
q) Do not mix cells of different manufacture, capacity, size or type within a device.
r) Keep the battery away from microwaves and high pressure.
SYMBOLS
 | Read operator's manual |
 | Wear ear protection |
 | Wear eye protection |
 | Wear dust mask |
 | Keep hands away from blade |
 | Do not expose to rain |
 | WARNING: cutting means continues to run after the motor is switched off |
 | Keep bystanders away |
 | Class III appliance |
 | Waste electrical products must not be disposed of with house-hold waste. Please recycle where facilities exist. Check with your local authorities or retailer for recycling advice. |
 | Li-Ion battery This product has been marked with a symbol relating to ‘separate collection’ for all battery packs and battery pack. It will then be recycled or dismantled in order to reduce the impact on the environment. Battery packs can be hazardous for the environment and for human health since they contain hazardous substances. |
 | |
 | Batteries may enter water cycle if disposed improperly, which can be hazardous for ecosystem. Do not dispose of waste batteries as unsorted municipal waste. |
 | Do not burn |
 | Make sure the battery is removed prior to changing accessories. |
 | Wear protective gloves. |
 | Lock |
 | Unlock |
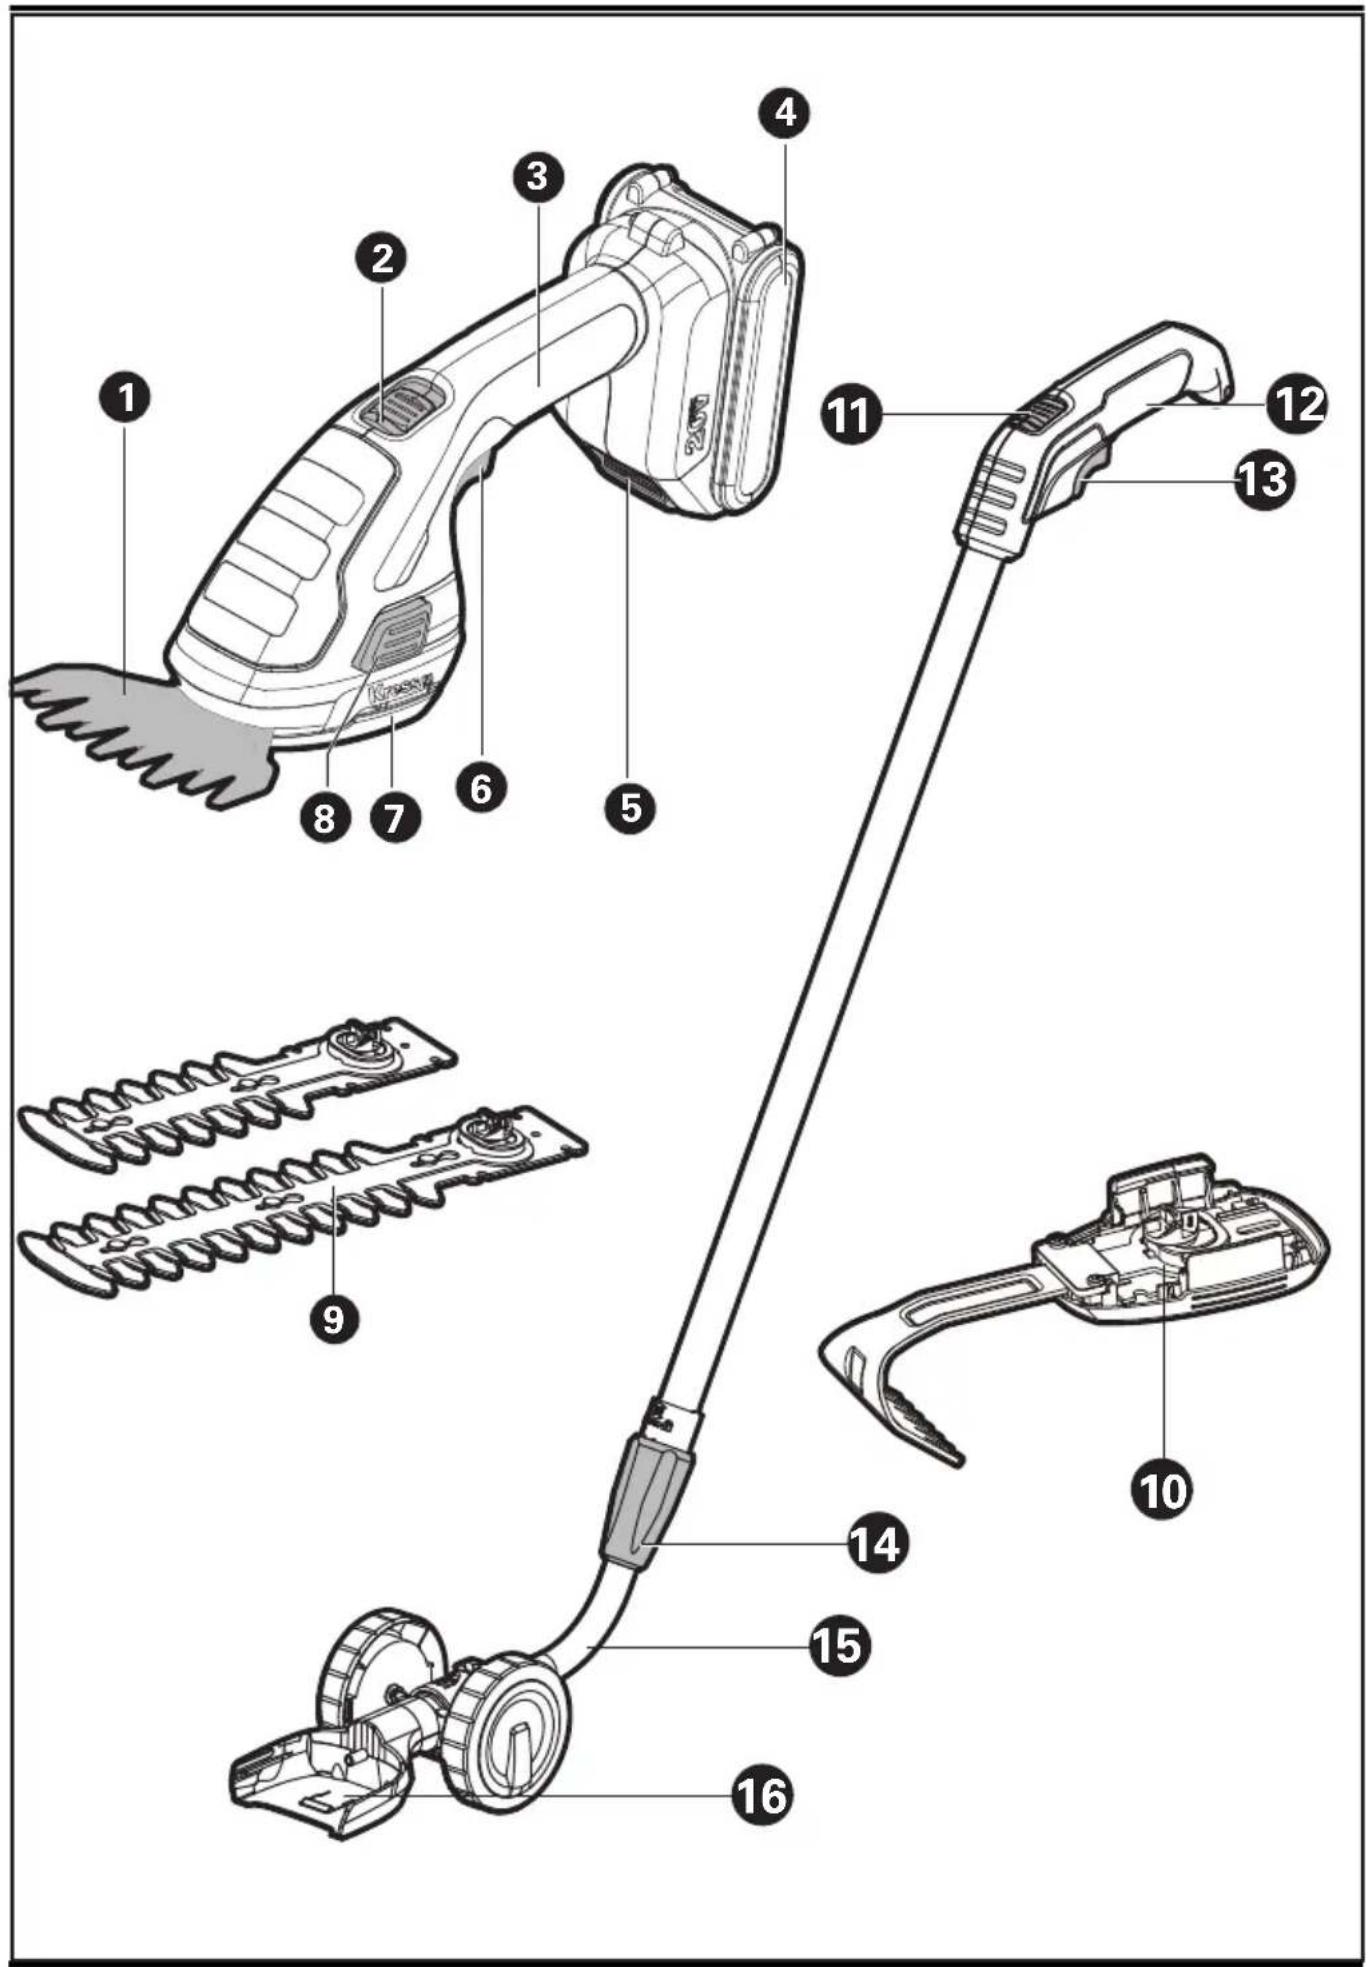
COMPONENT LIST
| 1. GRASS SHEAR BLADE |
| 2. LOCK-OFF BUTTON |
| 3. HANDLE |
| 4. BATTERY PACK * |
| 5. BATTERY PACK RELEASE BUTTON * |
| 6. ON/OFF SWITCH |
| 7. TOOL-FREE DRIVE COVER |
| 8. TOOL-FREE DRIVE COVER RELEASE BUTTON |
| 9. SHRUB SHEAR BLADES (2 PCS) * |
| 10. WEEDER BLADE * |
| 11. LOCK-OFF BUTTON ON TELESCOPIC HANDLE |
| 12. | TELESCOPIC POLE HANDLE * |
| 13. | ON/OFF SWITCH ON TELESCOPIC HANDLE |
| 14. | LOCKING KNOB |
| 15. | INNER HANDLE |
| 16. | CONNECTION BRACKET |
* Not all the accessories illustrated or described are included in standard delivery.
TECHNICAL DATA
Type Designation: KG806E KG806E.X (8-designation of machinery, representative of Grass/Shrub Shear)
| KG806E KG806E.X ** | |
| Voltage 20 V Max *** | --- |
| No Load Speed 1 | 150 rpm |
| Cutting width | 10cm with grass shear blade |
| / | |
| Cutting length 12 | 20cm with shrub blade |
| Machine weight (bare tool) | 1.11 kg |
** X=1-999, A-Z, M1-M9 there are only used for different customers, there are no safe relevant changes between these models
*** Voltage measured without workload. Initial battery voltage reaches maximum of 20 volts. Nominal voltage is 18 volts.
| Category Model Capacity | |||
| 20V Battery | KAB02 | 2.0Ah | |
| 20V Charger | KAC02 | 2.0A | |
We recommend that you purchase your accessories from the same store that sold you the tool. Refer to the accessory packaging for further details. Store personnel can assist you and offer advice.
NOISE INFORMATION
| A weighted sound pressure L | _pA : 69.5dB(A) |
| K_pA | 3.0dB(A) |
| A weighted sound power L | _wA :82dB(A) |
| K_wA | 3.0dB(A) |
Wear ear protection

VIBRATION INFORMATION
| Typical weighted vibration | a_h < 3.6m/s^2 |
| uncertainty K=1.5m/s2 |
WARNING: The vibration emission value during actual use of the power tool can differ from the declared value depending on the ways in which the tool is used dependant on the following examples and other variations on how the tool is used: How the tool is used and the materials being cut or drilled. The tool being in good condition and well maintained. Using the correct accessory for the tool and ensuring it is sharp and in good condition. The tightness of the grip on the handles and if any anti vibration accessories are used. And the tool is being used as intended by its design and these instructions.
This tool may cause hand-arm vibration syndrome if its use is not adequately managed.
WARNING: To be accurate, an estimation of exposure level in the actual conditions of use should also take account of all parts of the operating cycle such as the times when the tool is switched off and when it is running idle but not actually doing the job. This may significantly reduce the exposure level over the total working period. Helping to minimise your vibration exposure risk. Maintain this tool in accordance with these instructions and keep well lubricated (where appropriate). If the tool is to be used regularly then invest in anti vibration accessories. Plan your work schedule to spread any high vibration tool use across a number of days.
NOTE: Before using the tool, read the instruction book carefully.
BEFORE OPERATION:
Assembling (Fitting/removing the blade) Removing
-
Press the Tool-free blade cover release button.
-
Remove away from the housing. (See Fig.A1)
3.Lift the blade out. (See Fig.A2)
Fitting
Fit the blade as shown aligning the holes in the blade onto the drive pins. (See Fig.B1)
Press the blade cover back to the housing until you hear click. (See Fig.B2)

WARNING: Wear gloves when changing the blade.
Checking the battery charge condition (See Fig. C1)
NOTE: Fig. C1 only applies for the battery pack with battery indicator light.
The battery level can be known from the battery indicator light by pressing the button beside the lights. Before starting or after use, press the button beside the power indicator light on the battery pack to check the battery capacity.
Charging the battery pack (See Fig.C2)
Your battery pack is partly charged and needs to be fully charged before first use.
More details can be found in charger's manual.
WARNING: The charger and battery pack are specially designed to work together, so do not attempt to use any other devices. Never insert or allow metallic objects into your charger or battery pack connections because of an electrical failure and hazard will occur.
Installing & removing the battery pack (See Fig. C3,C4)
-
Slide the battery pack into the battery compartment until you hear a click.
-
Press the battery release button to release battery pack from your tool.
NOTE: After recharging, insert the battery pack into tool's battery port. A simple push and slight pressure will be sufficient.
OPERATION:
Starting/Stopping the weeder (See Fig. D)
Press the lock-off button first, then press the switch trigger to start the machine.
WARNING: The cutting head continues to rotate after the weeder has been switched off; wait until it has completely stopped then lay down the tool.
Trimming grass (See Fig.E)
NOTE: Keep the tool away from hard objects and delicate plants. A slight downward tilt of the cutting blades in the direction of motion gives the best cutting results.
Trimming hedges and shrubs (See Fig. F)
Use a wide sweeping motion
NOTE: Take care to avoid any foreign objects. Especially avoid hard objects such as metal wire and railings, as these could damage the blades.
Weeding grass (See Fig.G)
NOTE: To ensure efficient operation, blade cleaning should be performed in time after each work.
Operating with the telescopic handle
Assembling/removing the telescopic handle
(See Fig.H1,H2)
NOTE:
-Install the battery pack first before assembling the telescopic handle.
-Make sure the telescopic handle is locked into position securely before operation.
-Keep hands away from the on/off switch when attach or remove the telescopic handle to prevent accidental start.
Adjusting the handle length (See Fig.1)
NOTE: The locking knob is used to hold the handle in position at any extended length.
Adjusting the cutting height (See Fig.J1,J2)
NOTE: The telescopic handle has two cutting height levels (25mm &43mm).
Starting and stopping with the telescopic handle (See Fig.K)
Press the lock-off button first, then press the switch trigger to start the machine.
WARNING: Do not use the shrub shear blades (12cm/20cm) when working with the telescopic handle.
CLEANING/STORAGE
Clean the exterior of the machine thoroughly using a soft brush and cloth. Do not use water, solvents or polishes. Remove all debris, especially from the ventilation slots.
Store the machine in a secure dry place out of reach of children. Do not place other objects on top of the machine.
MAINTENANCE
To ensure long and reliable service, carry out the following maintenance regularly.
Remove the battery before carrying out any adjustment, servicing or maintenance.
Check for obvious defects such as loose, dislodged or damaged blade, loose fixings and worn or damaged components.
Check that covers and guards are undamaged and correctly fitted. Carry out necessary maintenance or repairs before using.
BLADE MAINTENANCE
Always clean the cutting blades after operation and periodically lubricating the cutting blade.
Visually check the condition of the cutting edges of
the cutting blade.
Ensure that the blade is covered with the blade guard supplied when not in use.
ENVIRONMENTAL PROTECTION

Waste electrical products must not be disposed of with household waste. Please recycle where facilities exist. Check with your authorities or retailer for recycling advice.
DECLARATION OF CONFORMITY
We,
Positec Germany GmbH
Postfach 32 02 16, 50796 Cologne, Germany
Declare that the product
Description Battery-powered grass shear
Type KG806E KG806E.X (8-designation of machinery, representative of Grass Shear)
Function cutting grass
Complies with the following Directives:
2006/42/EC, 2014/30/EU
2011/65/EU&(EU)2015/863
2000/14/EC amended by 2005/88/EC
2000/14/EC amended by 2005/88/EC:
- Conformity Assessment Procedure as per Annex V
- Measured Sound Power Level
82 dB (A)
- Declared Guaranteed Sound Power Level 88dB (A)
Standards conform to
EN62841-1, EN62841-4-2
EN 60335-1, EN 50636-2-94
EN 62233, EN ISO 3744
EN 55014-1, EN 55014-2
The person authorized to compile the technical file, Name Marcel Filz
Address Positec Germany GmbH
Postfach 32 02 16, 50796 Cologne, Germany

text_image
M A
2021/09/08
Allen Ding
Deputy Chief Engineer, Testing & Certification
Positec Technology (China) Co., Ltd
18, Dongwang Road, Suzhou Industrial
Park, Jiangsu 215123, P. R. China
INHALTSVERZEICHNIS
Einführung......20
18, Dongwang Road, Suzhou Industrial
Park, Jiangsu 215123, P. R. China
SOMMAIRE
Introduction....36
Nettoyage/Stockage....49
Entretien....49
INFORMATIONS RELATIVES AU BRUIT
INFORMATIONS RELATIVES AUX VIBRATIONS
2000/14/EC amended by 2005/88/EC
18, Dongwang Road, Suzhou Industrial
Park, Jiangsu 215123, P. R. China
ÍNDICE
Cleaning/Storage....79
Maintenance....79
Environmental Protection....80
Declaration of Conformity....80
INTRODUCCIÓN
Estimado cliente:
2000/14/EC amended by 2005/88/EC
18, Dongwang Road, Suzhou Industrial
Park, Jiangsu 215123, P. R. China
INHOUDSOPGAVE
Inleiding....81
Specifications....93
Assemblage En Bediening....95
Reinigen/Bewaren....95
Onderhoud....95
PRODUCTVEILIGHEID ALGEMENE VEILIGHEIDSWAARSCHUWINGEN VOOR VERMOGENSMACHINE

WAARSCHUWING:
Lees alle
the cutting blades in the direction of motion gives the best cutting results.
Adjusting the cutting height (Zie Fig.J1,J2)
Adjusting the cutting height (Se Fig.J1,J2)
18, Dongwang Road, Suzhou Industrial
Park, Jiangsu 215123, P. R. China
СОДЕРЖАНИЕ
Введение....110
Save all warnings and instructions for future reference.
ВНИМАНИЕ!
ПЕРЕД НАЧАЛОМ
ЭКСПЛУАТАЦИИ
ВНИМАТЕЛЬНО
ПРОЧИТАЙТЕ
СОХРАНИТЕ ДЛЯ
ДАЛЬНЕЙШЕГО
ИСПОЛЬЗОВАНИЯ
18, Dongwang Road, Suzhou Industrial
Park, Jiangsu 215123, P. R. China
INNEHÅLLSFÖRTECKNING
Introduktion....127
Start Och Stopp (Se Fig.D)
18, Dongwang Road, Suzhou Industrial
Park, Jiangsu 215123, P. R. China