BELLE RPX 35/60D - Vibratory plate ALTRAD - Free user manual and instructions
Find the device manual for free BELLE RPX 35/60D ALTRAD in PDF.
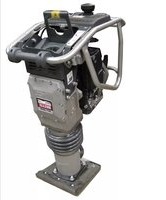
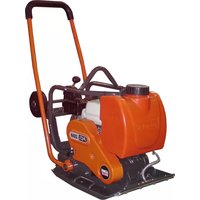
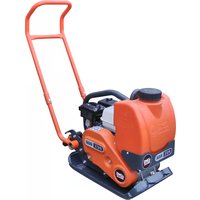
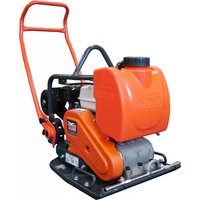
| Product type | Reversible vibratory plate |
| Brand | Altrad Belle |
| Model | RPX 35/60D |
| Dimensions (L x W x H) | 1067 x 700 x 1205 mm |
| Weight | Approximately 170 kg (depending on engine) |
| Engine | Petrol Honda GX200 (5.5 hp) or Diesel Hatz 1B20 |
| Fuel | Unleaded petrol or Diesel |
| Tank capacity | Petrol: 3.1 L; Diesel: see engine manual |
| Noise level | Compliant with directive 2000/14/EC (values on label) |
| Main functions | Soil compaction, trenches, road repairs; forward/reverse travel |
| Clutch | Centrifugal |
| Controls | Adjustable steering handle, forward/reverse lever, throttle lever |
| Safety devices | Emergency stop, engine stop button, automatic return to forward if released |
| Routine maintenance | Check engine and hydraulic oil, air filter, spark plug, belt |
| Maintenance every 8 hours | Check engine oil level |
| Maintenance every 50 hours | Change engine oil (first month) |
| Spare parts | Use exclusively genuine Altrad Belle parts |
| Warranty | 12 months for the original purchaser (excluding normal wear) |
| General information | CE declaration of conformity available; recyclable at end of life |
Frequently Asked Questions - BELLE RPX 35/60D ALTRAD
User questions about BELLE RPX 35/60D ALTRAD
0 question about this device. Answer the ones you know or ask your own.
Ask a new question about this device
Download the instructions for your Vibratory plate in PDF format for free! Find your manual BELLE RPX 35/60D - ALTRAD and take your electronic device back in hand. On this page are published all the documents necessary for the use of your device. BELLE RPX 35/60D by ALTRAD.
USER MANUAL BELLE RPX 35/60D ALTRAD
natural_image
Technical line drawing of a mechanical pump or scrubber device (no text or symbols visible)2
UKCA Declaration of Conformity
3 - 12
EC Declaration of Conformity
GB Operators Manual
US Operators Manual
F Manuel De L'Opérateur
E Manual del Operador
NL Handleiding
DK Betjeningsvejledning
D Bedienungshandbuch
s Bruksanvisning
NO Betjene Håndbok
SF Käyttöohje
PL Instrukcja Obstugi
RUS Руководство для оператора
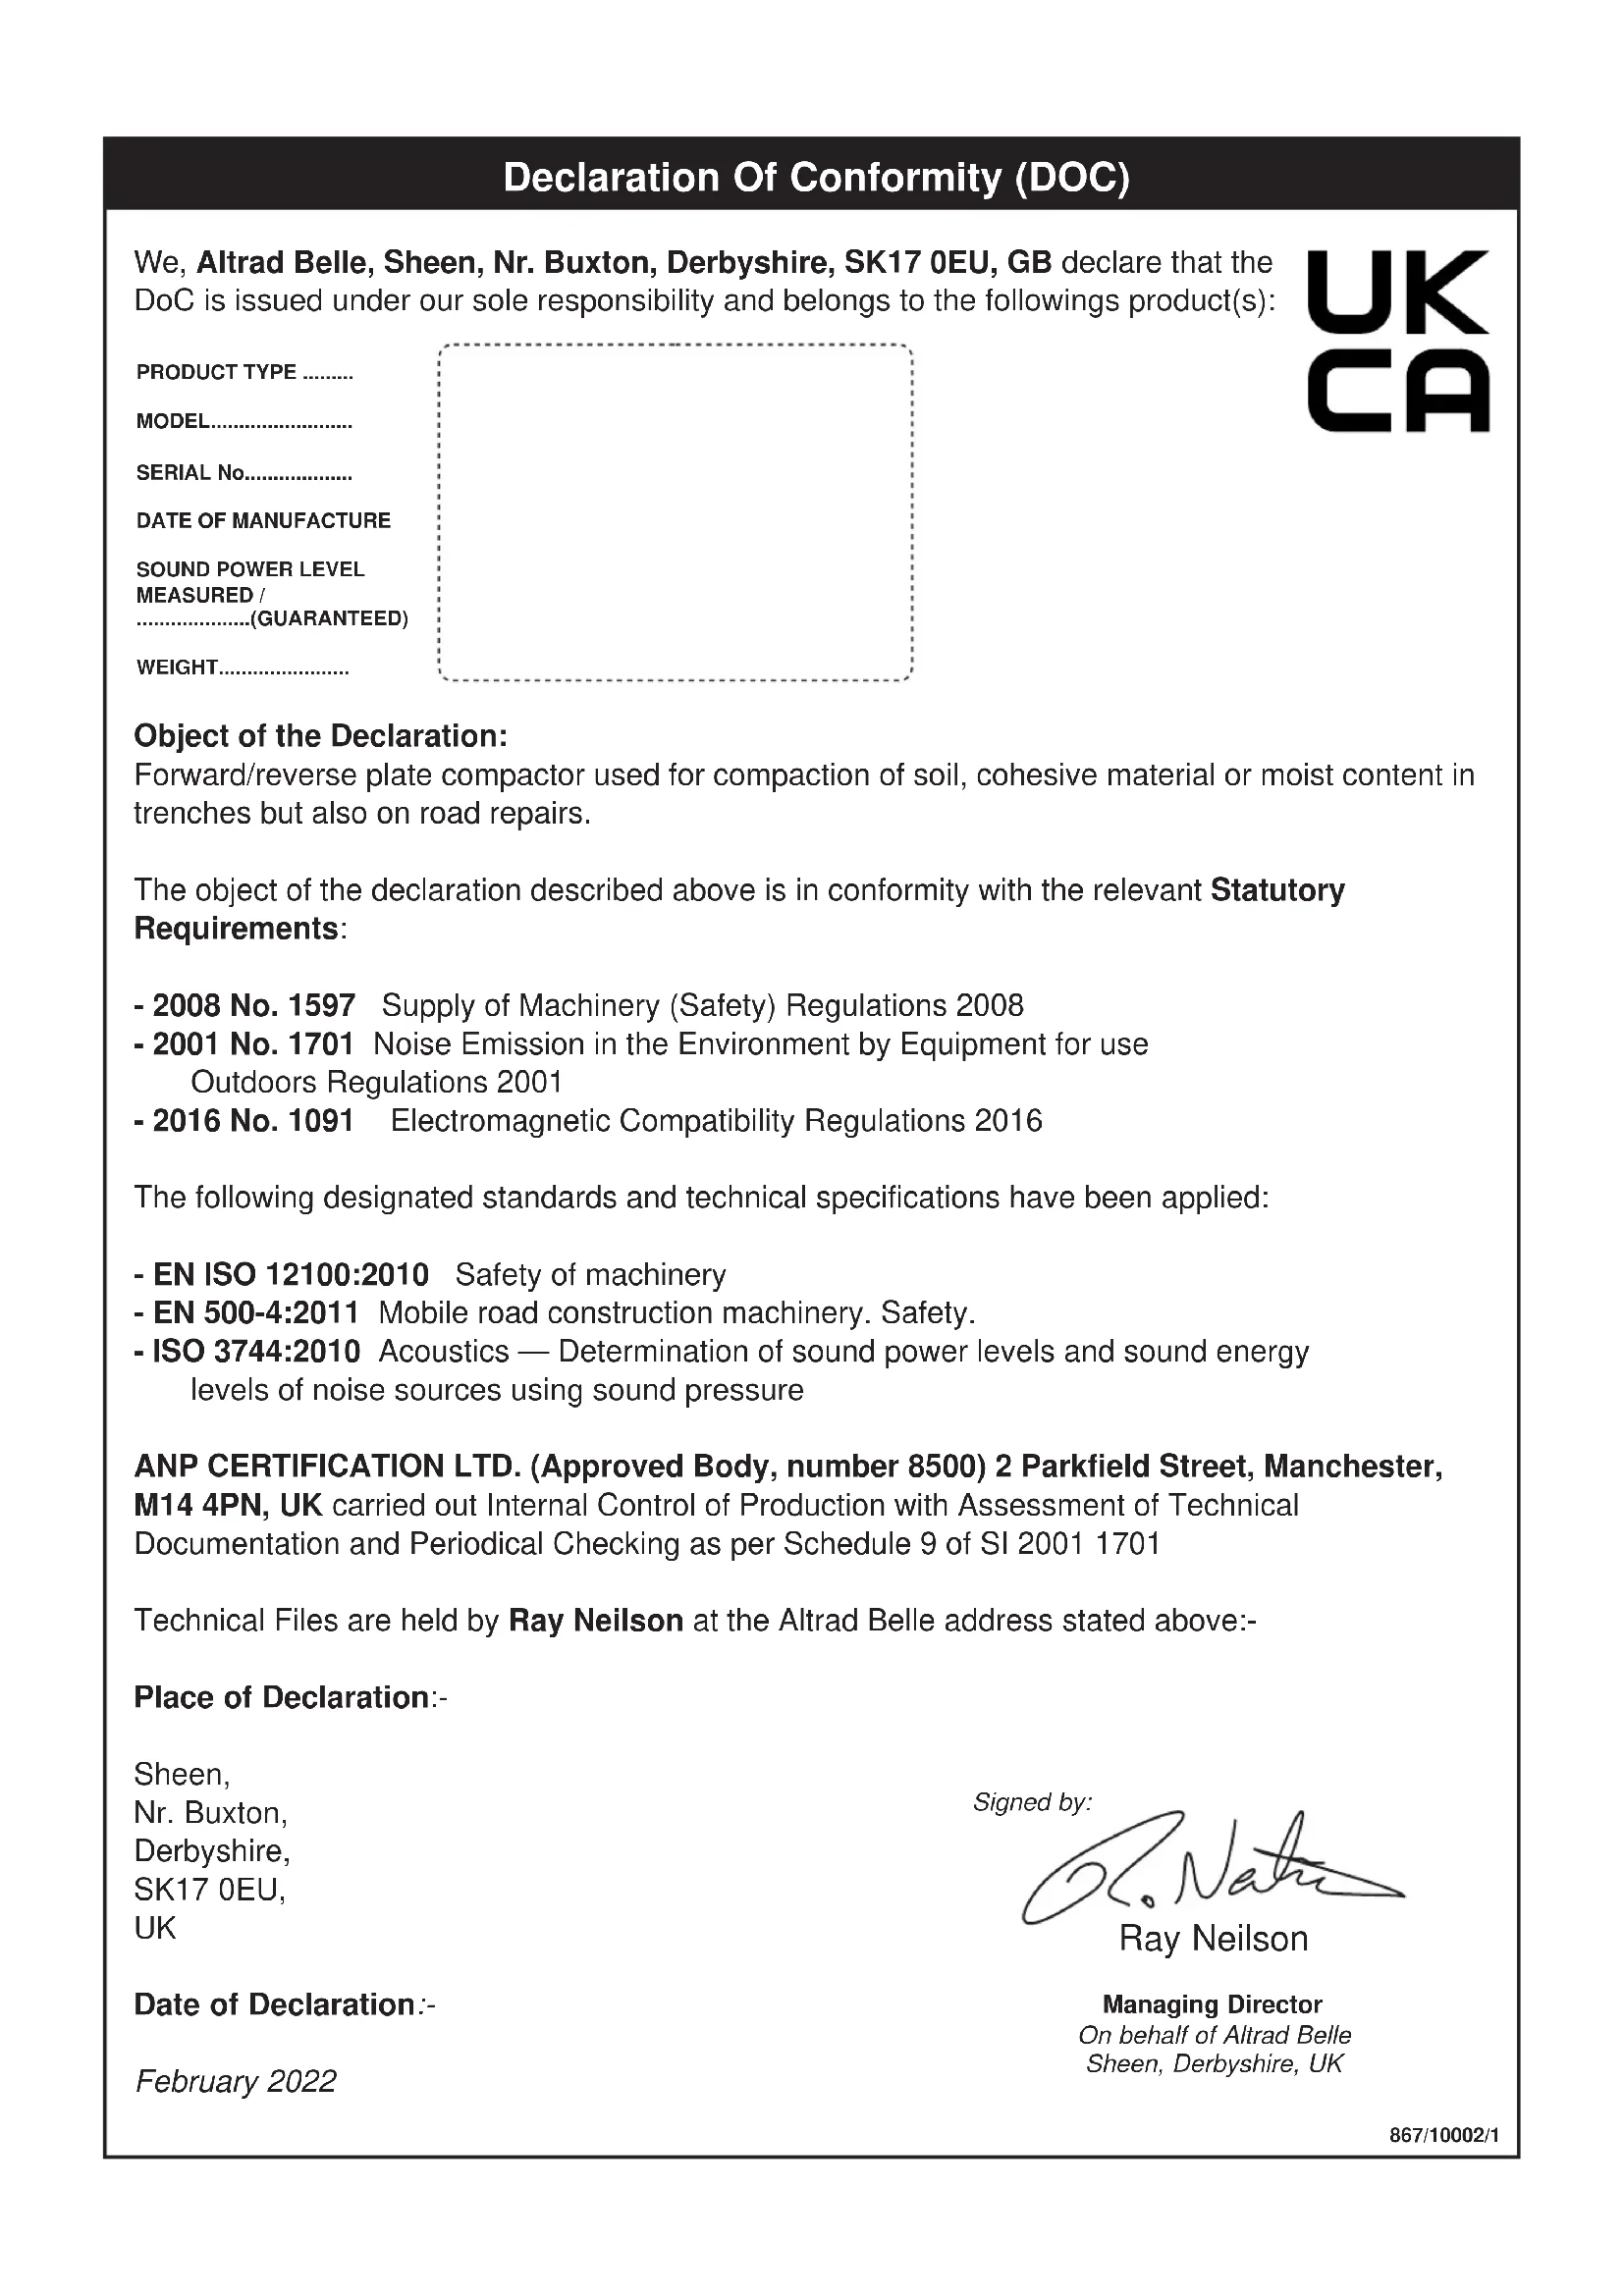
Declaration Of Conformity (DOC)
We, Altrad Belle, Sheen, Nr. Buxton, Derbyshire, SK17 0EU, GB declare that the DoC is issued under our sole responsibility and belongs to the followings product(s):
UK CA
PRODUCT TYPE ......
MODEL......
SERIAL No......
DATE OF MANUFACTURE
SOUND POWER LEVEL MEASURED / ........(GUARANTEED)
WEIGHT......
Object of the Declaration:
Forward/reverse plate compactor used for compaction of soil, cohesive material or moist content in trenches but also on road repairs.
The object of the declaration described above is in conformity with the relevant Statutory Requirements:
- 2008 No. 1597 Supply of Machinery (Safety) Regulations 2008
- 2001 No. 1701 Noise Emission in the Environment by Equipment for use Outdoors Regulations 2001
- 2016 No. 1091 Electromagnetic Compatibility Regulations 2016
The following designated standards and technical specifications have been applied:
- EN ISO 12100:2010 Safety of machinery
- EN 500-4:2011 Mobile road construction machinery. Safety.
- ISO 3744:2010 Acoustics — Determination of sound power levels and sound energy levels of noise sources using sound pressure
ANP CERTIFICATION LTD. (Approved Body, number 8500) 2 Parkfield Street, Manchester, M14 4PN, UK carried out Internal Control of Production with Assessment of Technical Documentation and Periodical Checking as per Schedule 9 of SI 2001 1701
Technical Files are held by Ray Neilson at the Altrad Belle address stated above:-
Place of Declaration:-
Sheen,
Nr. Buxton,
Derbyshire,
SK17 0EU,
UK
Date of Declaration:-
February 2022
Signed by:

text_image
Dr. Nath Ray NeilsonManaging Director
On behalf of Altrad Belle
Sheen, Derbyshire, UK
We, Altrad Belle, Sheen, Nr. Buxton, Derbyshire, SK17 0EU, GB declare that the DoC is issued under our sole responsibility and belongs to the followings product(s):
CE
PRODUCT TYPE ......
MODEL......
SERIAL No......
DATE OF MANUFACTURE .....
SOUND POWER LEVEL MEASURED / ........(GUARANTEED)
WEIGHT......
Signed by:

Ray Neilson
Managing Director
On behalf of Altrad Belle, Sheen, Derbyshire, UK
Place of Declaration:-
Sheen, Nr. Buxton, Derbyshire, SK17 0EU, UK
Date of Declaration:-
April 2021
Object of the Declaration:
Forward/reverse plate compactor used for compaction of soil, cohesive material or moist content in trenches but also on road repairs.
The object of the declaration described above is in conformity with the relevant Union Harmonisation Legislation:
- 2006/42/EC - New machinery directive
- 2000/14/EC - Noise - equipment for use outdoors
The following harmonised standards and technical specifications have been applied:
- EN ISO 12100:2010 Safety of machinery
- EN 500-4:2011 Mobile road construction machinery. Safety.
- ISO 3744:2010 Acoustics — Determination of sound power levels and sound energy levels of noise sources using sound pressure
VINÇOTTE nv/sa (NB0026) carried out Internal Control of Production with Assessment of Technical Documentation and Periodical Checking as per Annex VI of 2000/14/EC
Technical Files are held by Hugues Menager at the following address:-
Altrad (Group Holding), 125 Rue du Mas Carbonnier, 34000, Montpellier, France.
GBGB
EU Declaration Of Conformity (DOC)
We, Altrad Belle, Sheen, Nr. Buxton, Derbyshire, SK17 0EU, GB declare that the DoC is issued under our sole responsibility and belongs to the followings product(s):

PRODUCT TYPE ....
MODEL......
SERIAL No......
DATE OF MANUFACTURE .....
SOUND POWER LEVEL MEASURED / ........(GUARANTEED)
WEIGHT......
See information on sticker above
Signed by:

Ray Neilson
Managing Director
On behalf of Altrad Belle, Sheen, Derbyshire, UK
Place of Declaration:-
Sheen, Nr. Buxton, Derbyshire, SK17 0EU, UK
Date of Declaration:-
April 2021
Object of the Declaration:
Forward/reverse plate compactor used for compaction of soil, cohesive material or moist content in trenches but also on road repairs.
The object of the declaration described above is in conformity with the relevant Union Harmonisation Legislation:
- 2014/30/EU - EMC Directive
The following harmonised standards and technical specifications have been applied:
- EN ISO 12100:2010 Safety of machinery
- EN 500-4:2011 Mobile road construction machinery. Safety.
- ISO 3744:2010 Acoustics — Determination of sound power levels and sound energy levels of noise sources using sound pressure
VINÇOTTE nv/sa (NB0026) carried out Internal Control of Production with Assessment of Technical Documentation and Periodical Checking as per Annex VI of 2000/14/EC
Technical Files are held by Hugues Menager at the following address:-
Altrad (Group Holding), 125 Rue du Mas Carbonnier, 34000, Montpellier, France.
- 2006/42/EC - Directive relative aux machines
Ray Neilson Director General
PRODUKTIONSDATO......
LYDNIVEAU VED DRIFT MÄLT /......(GARANTERET)
VÆGT......
Se side 3 for denne information
Underskrevet af:

Ray Neilson
PRODUKTIONSDATO......
LYDNIVEAU VED DRIFT MÄLT /......(GARANTERET)
VÆGT......
Underskrevet af:
CE
Ray Neilson
VALMISTUSPÄIVÄ......
ÄÄNITEHOTASO
MITATTU / ....(TAATTU)
PAINO ....
VALMISTUSPÄIVÄ......
ÄÄNITEHOTASO
MITATTU / ....(TAATTU)
PAINO ....
This manual has been written to help you operate and service the 'RPX' safely. This manual is intended for dealers and operators of the 'RPX'.
Foreword
The 'Machine Description' section helps you to familiarise yourself with the machine's layout and controls.
The ‘Environment’ section gives instructions on how to handle the recycling of discarded apparatus in an environmentally friendly way.
The ‘General Safety’ and ‘Health and Safety’ sections explain how to use the machine to ensure your safety and the safety of the general public.
The 'Start and Stop Procedure' helps you with starting and stopping the machine.
The 'Trouble Shooting Guide' helps you if you have a problem with your machine.
The 'Service & Maintenance' section is to help you with the general maintenance and servicing of your machine.
The 'Warranty' Section details the nature of the warranty cover and the claims procedure.
Directives with regard to the notations.
Text in this manual to which special attention must be paid are shown in the following way:

CAUTION
The product can be at risk. The machine or yourself can be damaged or injured if procedures are not carried out in the correct way.

WARNING
The life of the operator can be at risk.

WARNING

WARNING
Before you operate or carry out any maintenance on this machine YOU MUST READ and STUDY this manual.
KNOW how to safely use the unit's controls and what you must do for safe maintenance. (NB Be sure that you know how to switch the machine off before you switch on, in case you get into difficulty.)
ALWAYS wear or use the proper safety items required for your personal protection. If you have ANY QUESTIONS about the safe use or maintenance of this unit, ASK YOUR SUPERVISOR OR CONTACT: Altrad Belle (UK): +44 (0)1298 84606

Contents
How To Use This Manual....14
Warning 14
Machine Description....15
Environment 15
Decals 16 - 17
Technical Data....18
Reasons For Compaction....18
General Safety 19
Health and Safety....19
Pre-Start Checks....20
Start and Stop Procedure....20 - 21
Operating Instructions 22
Service & Maintenance 23 - 24
Trouble Shooting Guide ....25
Warranty 26
Replacement Parts....26
UKCA Declaration of Conformity....2
EC Declaration of Conformity....3
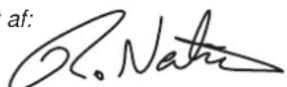
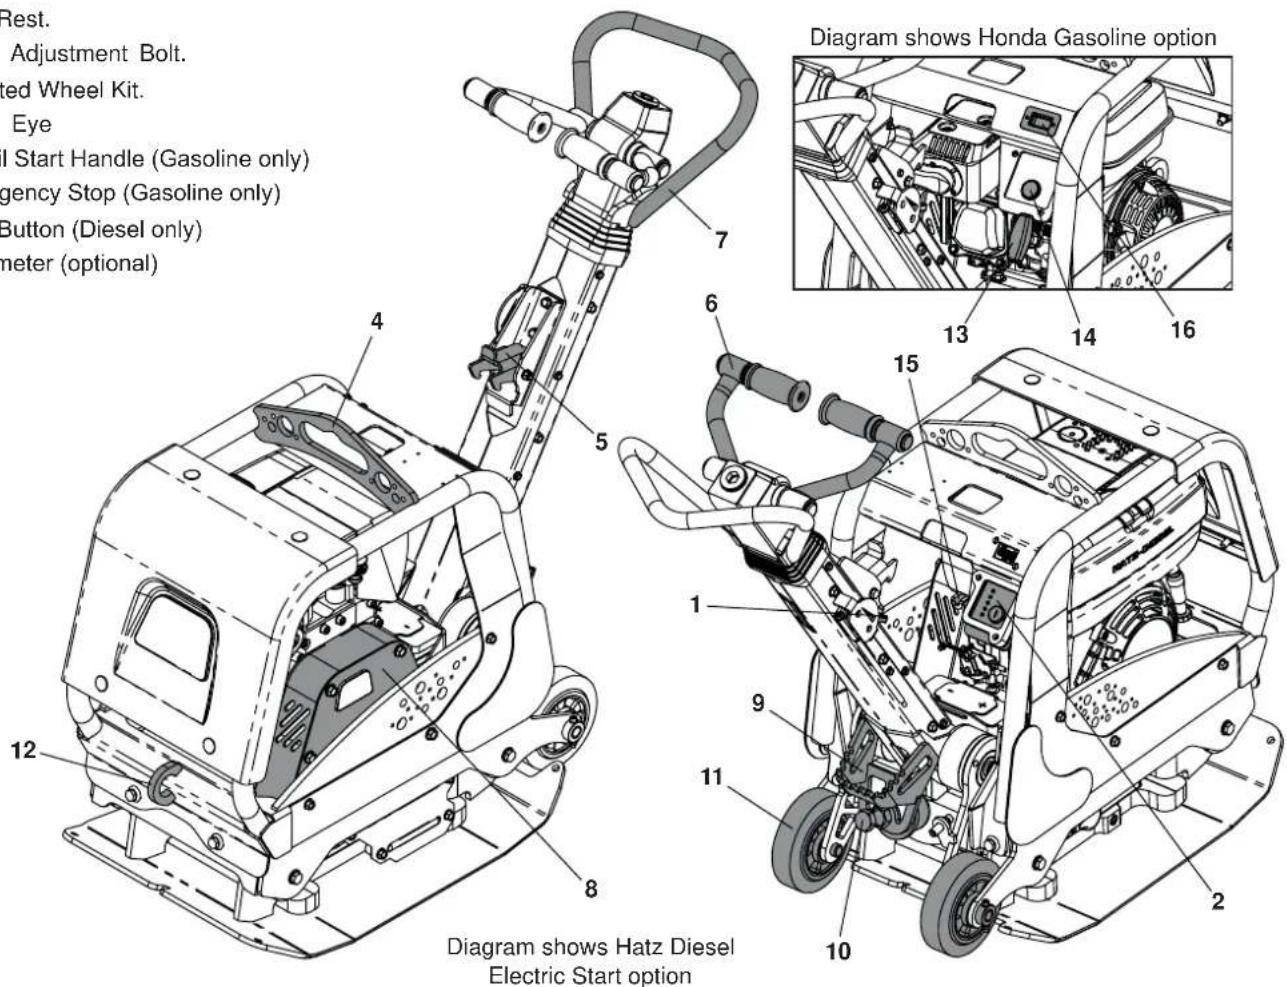
Machine Description
- Throttle lever.
-
Electric Start (Diesel Electric Start only).
-
Lifting Point.
-
Handle Release Catch.
-
Forward / Reverse Control Handle.
-
Steering Handle.
-
Belt Guard.
-
Foot Rest.
-
Handle Adjustment Bolt.
-
Integrated Wheel Kit.
-
Towing Eye
-
Recoil Start Handle (Petrol only)
-
Emergency Stop (Petrol only)
-
Stop Button (Diesel only)
-
Hourmeter (optional)
text_image
Rest. Adjustment Bolt. ed Wheel Kit. Eye I Start Handle (Petrol only) gency Stop (Petrol only) Button (Diesel only) meter (optional) Diagram shows Honda Petrol option 12 8 7 6 5 4 1 9 11 10 2 13 14 16 Diagram shows Hatz Diesel Electric Start optionEnvironment

Safe Disposal.

Instructions for the protection of the environment. The machine contains valuable materials. Take the discarded apparatus and accessories to the relevant recycling facilities.
| Component Material | |
| Handle Steel | |
| Front Cover Hdpe | |
| Main Frame Steel | |
| Baseplate Steel | |
| Hand Grips Polyurethane Foam | |
| Engine Aluminium | |
| Flexible Mounts Steel And Rubber | |
| Various Parts | Steel And Aluminium |
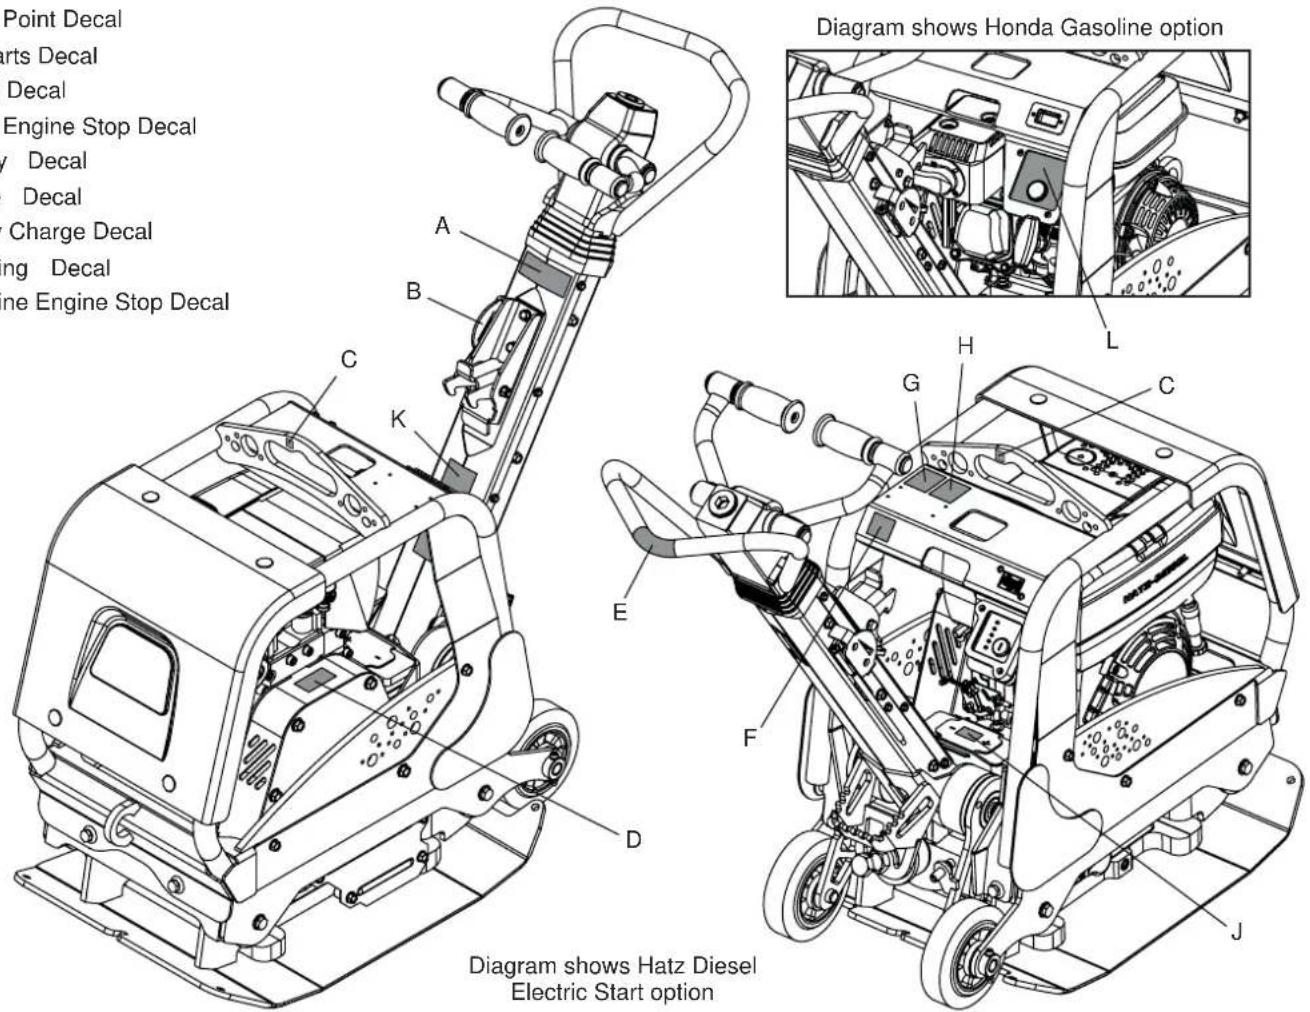
A. Forward / Reverse & No Lift Decal
B. Throttle Decal
C. Lifting Point Decal
D. Hot Parts Decal
E. No Lift Decal
F. Diesel Engine Stop Decal
G. Safety Decal
H. Noise Decal
J. Battery Charge Decal
K. Warning Decal
L. Petrol Engine Stop Decal

text_image
Point Decal Parts Decal Decal Engine Stop Decal y Decal Decal Charge Decal ing Decal Engine Stop Decal Diagram shows Honda Petrol option Diagram shows Hatz Diesel Electric Start optionA. Forward / Reverse & No Lift Decal
Indicates how to move the compactor forwards and backwards and highlights that the Forward / Reverse Control Handle and Steering Handle should not be used as Lifting Points.
B. Throttle Decal

Fast Engine
Speed Position

Slow Engine
Speed Position
C. Lifting Point Decal
Identifies the correct lifting point on the compactor.
D. Hot Parts Decal
This area may get hot - DO NOT touch.
E. No Lift Decal
This area should not be used as a Lifting Point.
F. Diesel Engine Stop Decal
Identifies the position of the Engine Stop Button.
G. Safety Decal

Please Read
Operators
Manual

Wear Protective Footwear

Wear Ear Protection

Wear Eye Protection
H. Noise Decal
Identifies the Noise Level of the machine
J. Battery Charge Decal (Diesel Electric Start model only)
Read the Operators Manual for information on charging the Li-Ion battery.
K. Warning Decal
A. DO NOT run the engine whilst the machine is being maneuvered on its wheels.
B. DO NOT operate the machine in reverse on an incline.
C. DO NOT operate in reverse up to an enclosed or restrictive space.
L. Petrol Engine Stop Decal
Press and hold the Stop Button for 5 seconds to stop the engine.
text_image
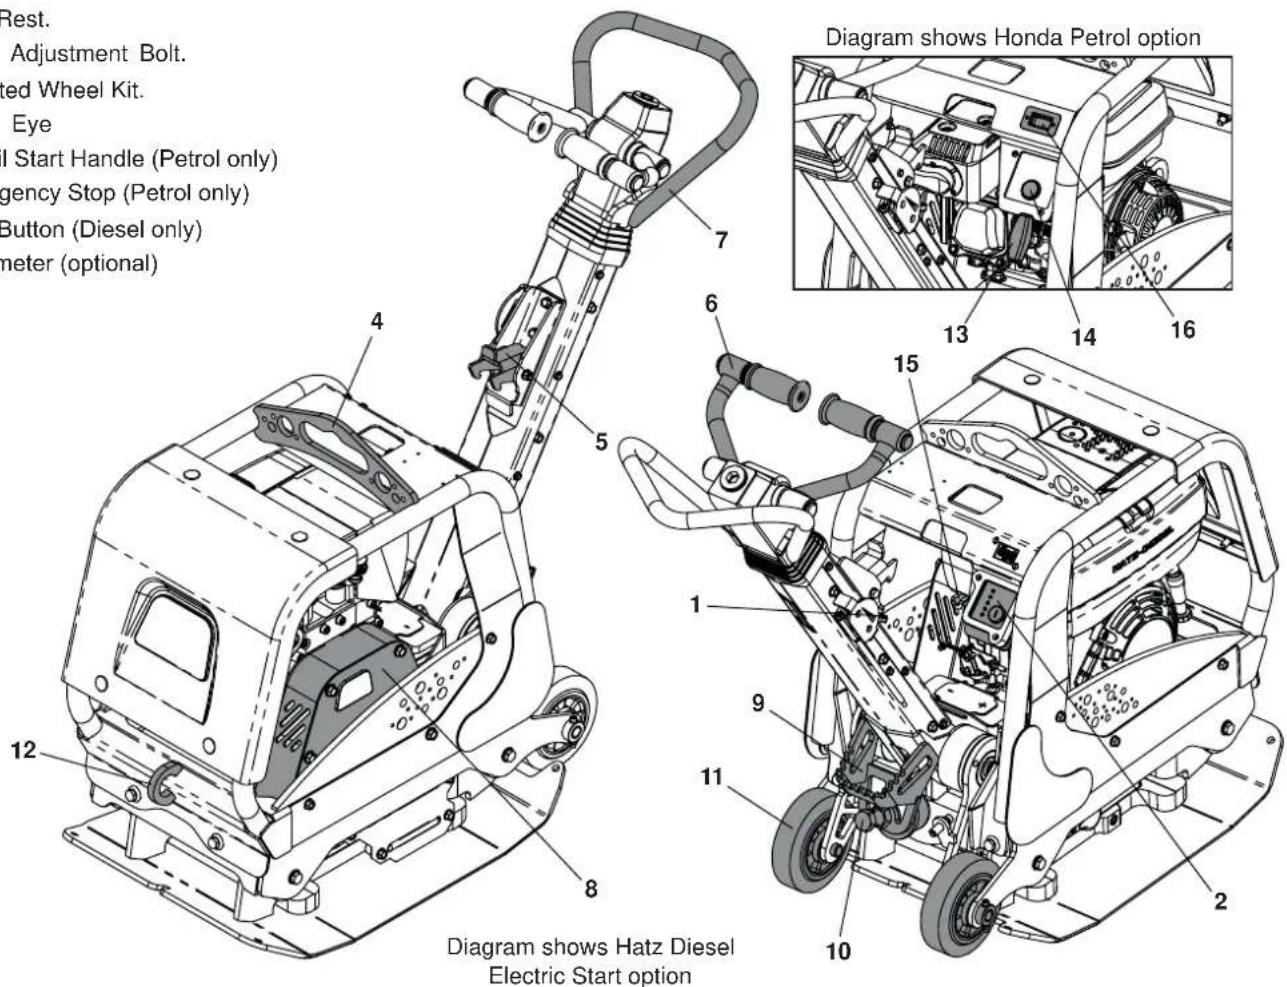
1067 700 1205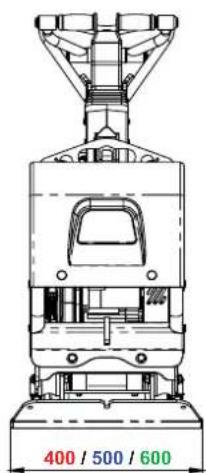
natural_image
Technical line drawing of a mechanical device with no visible text or symbols
text_image
1264 326 809| Model RPX 35/40 RPX 35/50 RPX 35/60 | |||||||||
| Engine | Honda GX200 | Hatz 1B20 | Hatz 1B20 Electric Start | Honda GX200 | Hatz 1B20 | Hatz 1B20 Electric Start | Honda GX200 | Hatz 1B20 | Hatz 1B20 Electric Start |
| Engine Power (Hp / kW) | 5.5/4.0 | 4.2/3.1 | 4.2/3.1 | 5.5/4.0 | 4.2/3.1 | 4.2/3.1 | 5.5/4.0 | 4.2/3.1 | 4.2/3.1 |
| Engine RPM 3000 3000 3000 3000 3000 3000 3000 3000 3000 3000 3000 3000 3000 3000 3000 3000 3000 3000 3000 3000 300 | 3000 3000 3000 3000 3000 3000 3000 3000 3000 3000 3000 3000 3000 3000 3000 3000 3000 3000 3000 3000 | ||||||||
| Weight (Kg) | 176 | 187 | 189 | 1800 | 191 | 194 | 185 | 196 | 207 |
| Static Pressure (kg/m2) | 1351 | 1436 | 1449 | 1104 | 1172 | 1190 | 944 | 1000 | 1057 |
| Centrifugal Force (kN) | 35 | 35 | 35 | 35 | 35 | 35 | 35 | 35 | 35 |
| Frequency (Hz) | 81 | 81 | 81 | 81 | 81 | 81 | 81 | 81 | 81 |
| Max Gradient (°) | 20 | 20 | 20 | 20 | 20 | 20 | 20 | 20 | 20 |
| Maximum Travel Speed (m/min) | 27 | 27 | 27 | 26 | 26 | 26 | 25 | 25 | 25 |
| *3-Axis Vibration (m/sec ^2 ) | 3.1 | 2.4 | 2.4 | 3.1 | 2.4 | 2.4 | 3.1 | 2.4 | 2.4 |
| Noise Level (dB(A)) | 108 | 108 | 108 | 108 | 108 | 108 | 108 | 108 | 108 |
* Minimum level to EN500 Part 4

Reasons For Compaction
Soil, which has been disturbed or new infill, subbase and blacktop, will have small voids or air pockets which, if not compacted, will lead to one or more problems occurring.
- As traffic crosses the surface of an uncompacted area, the material is compressed. This leads to subsidence of the top surface as the material fills the voids.
- A similar situation occurs with static loads on uncompacted ground. The load (e.g. a building) will sink.
- Materials with voids are more susceptible to water seepage, leading to erosion. Water ingress may also cause the soil to expand during freezing temperatures and contract during dry spells. Expansion and contraction is a major cause of damage to building foundations and normally leads to the structure requiring underpinning.
Compaction increases the density of the material and therefore increases its load bearing capacity. Reduces air voids and therefore reduces the risk of subsidence, expansion and contraction, due to ingress of water.
General Safety
For your own personal protection and for the safety of those around you, please read and ensure you fully understand the following safety information. It is the responsibility of the operator to ensure that he/she fully understands how to operate this equipment safely. If you are unsure about the safe and correct use of the 'RPX', consult your supervisor or Altrad Belle.

CAUTION
Improper maintenance can be hazardous. Read and Understand this section before you perform any maintenance, service or repairs.
• This equipment is heavy and must not be lifted single-handedly, either GET HELP or use suitable lifting equipment.
• Cordon off the work area and keep members of the public and unauthorised personnel at a safe distance.
• Personal Protective Equipment (PPE) must be worn by the operator whenever this equipment is being used (see Health & Safety).
• Make sure you know how to safely switch this machine OFF before you switch it ON in case you get into difficulty.
• Always switch OFF the engine before transporting, moving it around the site or servicing it.
- During use the engine becomes very hot, allow the engine to cool before touching it. Never leave the engine running and unattended.
- Never remove or tamper with any guards fitted, they are there for your protection. Always check guards for condition and security, if any are damaged or missing, DO NOT USE THE COMPACTOR until the guard has been replaced or repaired.
• DO NOT operate the Compactor when you are ill, feeling tired, or when under the influence of alcohol or drugs.

CAUTION
Fuel is flammable. It may cause injury and property damage. Shut down the engine, extinguish all open flames and do not smoke while filling the fuel tank. Always wipe up any spilled fuel.
Fuel Safety.
• Before refuelling, switch off the engine and allow it to cool.
- When refuelling, DO NOT smoke or allow naked flames in the area.
- Spilt fuel must be made safe immediately, using sand. If fuel is spilt on your clothes, change them.
• Store fuel in an approved, purpose made container away from heat and ignition sources.
Health & Safety

Vibration
Some vibration from the compaction operation is transmitted through the handle to the operator's hands. The Altrad Belle RPX range has been specifically designed to reduce hand/arm vibration levels. Refer to specifications & technical data for vibration levels and usage times (recommended maximum daily exposure time). DO NOT exceed the maximum usage times.
PPE (Personal Protective Equipment)
Suitable PPE must be worn when using this equipment i.e. Safety Goggles, Gloves, Ear Defenders, Dust Mask and Steel Toe capped footwear. Wear clothing suitable for the work you are doing. Tie back long hair and remove any jewellery which may catch in the equipment's moving parts. Always protect skin from contact with concrete.
Dust
The compacting process will occasionally produce dust, which may be hazardous to your health. Always wear a mask that is suited to the type of dust being produced.
Fuel
DO NOT ingest fuel or inhale fuel vapours and avoid contact with your skin. Wash fuel splashes immediately. If you get fuel in your eyes, irrigate with copious amounts of water and seek medical attention as soon as possible.
Exhaust Fumes
DO NOT operate the compactor indoors or in a confined space, make sure the work area is adequately ventilated.

WARNING
The exhaust fumes produced by this equipment are highly toxic and can kill!
Pre start-up inspection
The following Pre-start-up inspection must be performed before the start of each work session or after every four hours of use, whichever is first. Please refer to the service section for detailed guidance. If any fault is discovered, the compactor must not be used until the fault is rectified.
- Thoroughly inspect the compactor for signs of damage. Check components are present and secure. Pay special attention to the belt guard.
- Check the engine oil and hydraulic oil level and top up as necessary.
- Check the engine fuel level and top up as necessary.
- Check for fuel, oil and hydraulic leaks.

Start And Stop Procedure
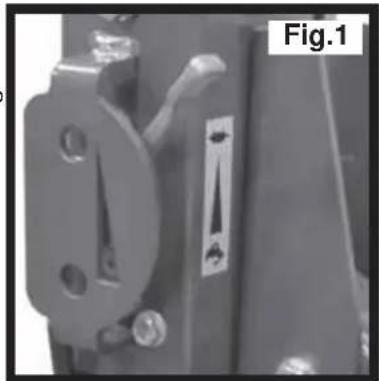
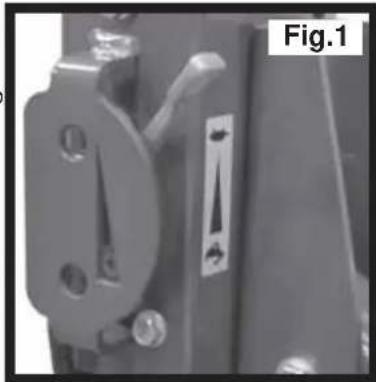
Honda GX200 Petrol Engine
Stopping the Engine
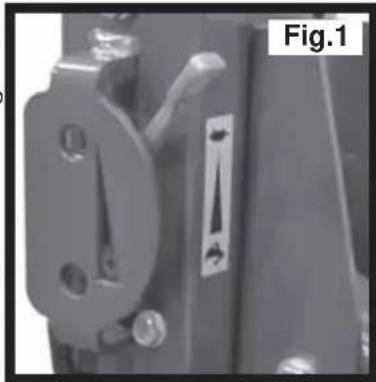
- To stop the engine, set the throttle control to idle (See Fig. 1), then press and hold the red stop button for 5 seconds until the engine stops (See Fig. 2).
- Turn the fuel OFF
Starting the Engine
- Open the fuel tap by moving the fuel ON / OFF lever fully to the right.
-
If starting the engine from cold, set the choke ON by moving the choke lever fully to the left. If restarting a warm engine, the choke is usually not required, however, if the engine has cooled to a degree, partial choke may be required.
-
Set the throttle to the idle position by moving the throttle lever fully to the right.
-
Taking a firm hold of the frame with one hand, grasp the recoil starter handle with the other. Pull the recoil starter until engine resistance is felt, then let starter return.
-
Taking care not to pull the starter's rope fully out, pull the starter handle briskly.
-
Repeat until the engine fires.
-
Once the engine fires gradually set the choke lever to the OFF position by moving it to the right.
-
If the engine fails to fire after several attempts, follow the Troubleshooting Guide.

natural_image
Close-up of a mechanical component with mounting holes and a vertical lever, labeled Fig.1 (no readable text or symbols)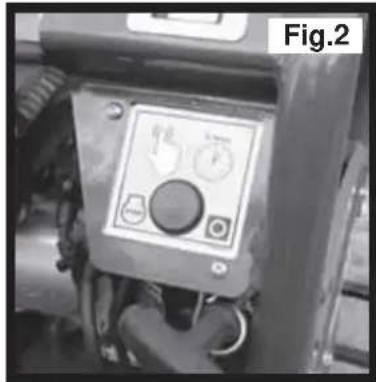
text_image
Fig.2Start And Stop Procedure
Hatz 1B20 Diesel Engine
Stopping the Engine
- To stop the engine, set the throttle control to idle (See Fig. 1), then press and hold the red stop button until the engine stops (See Fig. 2).
Starting the Engine
- Turn ON the fuel by moving the fuel ON/OFF lever fully to the right.
- Set the engine speed control to start.
-
Taking a firm hold of the control handle with one hand, grasp the recoil starter handle with the other. Pull the handle until engine resistance is felt, then let the starter return.
-
Taking care not to pull the starter's rope fully out, pull the starter handle briskly with both hands.
-
Repeat this procedure until the engine fires.
-
If the engine fails to start after several attempts, Follow the troubleshooting guide.
Hatz 1B20 Diesel Engine (Electric Start)
Stopping the Engine
- To stop the engine, set the throttle control to idle (See Fig. 1), then press and hold the red stop button until the engine stops (See Fig. 2).
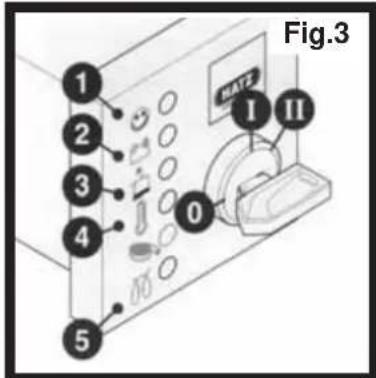
- Turn the key to position '0' and remove it. All the indicator lights must go out.
NOTE:- Failure to return the starter key to position '0' may result in the battery being totally discharged.
natural_image
Close-up of a mechanical switch or bracket component with mounting holes and a labeled section 'Fig.1' (no other text or symbols visible)
text_image
Fig.2 STOPStarting the Engine
- Insert the key and turn it to position 'I' (The battery charge light and oil pressure warning light will light up)
- Turn start key to position 'll'
- Release the key as soon as the engine runs. The starting key must spring back to position 'I' and remain there during engine operation. The battery charge light and oil pressure warning light must go out immediately after starting. Indicator light '1' lights up to show that the engine is running.
- If anything seems to be incorrect, stop the engine immediately and rectify the fault. (See the Troubleshooting Guide)
text_image
Fig.3 1 2 3 4 0 I II
CAUTION
Never operate the electric starter when the engine is running or coasting to a standstill. There is a risk of broken starter pinion or ring gear teeth. Never stop the engine by moving the decopression lever. During breaks in work or at the end of the working period, keep the starting handle and starting key in a safe place, out of reach of unauthorised persons.
- Always turn the start key back to position '0' before re-starting the engine. The repeat lock prevents the starter motor from engaging and possibly being damaged whilst the engine is still running.
• Take the compactor to where it is required.
Where it is necessary to use lifting equipment to position the compactor, make sure the lifting equipment has a WLL (Working Load Limit) suitable for the compactors weight (see Technical Data section or the machine serial plate). Attach suitable chains or slings ONLY to the lifting point (Item 4 of the Machine Description) on the top of the compactor.
- Moving the compactor using the integrated wheel kit
• Use the Fixed Steering Handle (Item 7) to tilt the machine backwards onto the integrated wheels (Item 11).
• Manouvre only on smooth, flat, firm surfaces. These wheels are not designed for soft, uneven surfaces.
- To lower the machine off it's wheels - stand on the foot rest (Item 9) and allow the machine to lower using your body weight as a counter balance.

CAUTION
NEVER leave the engine running whilst the machine is being maneuvered on its wheels.
- Having carried out the checks listed in the 'Pre Start' section, you may start the engine.
The Altrad Belle 'RPX' range of compactors are fitted with a centrifugal clutch, this allows the engine to run at idle without driving the gearbox.
As the engine speed is increased the clutch will engage and will drive the gearbox. For correct operation, the engine speed should be set to maximum.
- Set the throttle to maximum and use the control handle for direction and to steer or turn the compactor.
The control handle has been designed so that when it is being used in reverse and the operator lets go for any reason, the handle automatically moves into forward mode. This is a significant safety feature of the machine.
During normal operation you should not have to push the compactor but allow it to travel at its own pace.
The speed of travel will be determined by the condition of the surface being compacted.
Caution must be used when operating the compactor in reverse. Ensure that there are no obstructions or trip hazards when operating in reverse.
If the surface to be compacted is on a slope, great care must be taken when controlling the compactor's direction of travel. If necessary, use a suitable rope attached to the compactor at a low point on the chassis, to allow a helper to take part of the compactor's weight. Work up and down a slope not across.
• Work the compactor over the surface in an organised pattern until the required compaction has been achieved.
Where there are a number of different layers to be compacted on top of each other, compact each layer individually.
• To stop the compactor vibrating, set the throttle to idle. To stop the engine refer to the relevant Start / Stop procedure.

CAUTION
DO NOT operate the machine in reverse on an incline.
DO NOT operate in reverse up to an enclosed or restrictive space.

CAUTION
DO NOT use on boggy, waterlogged ground as the compactor will sink and cause excessive loading to the engine and drive system.
Service & Maintenance
The Altrad Belle 'RPX' range of Reversible Plate Compactors are designed to give many years of trouble free operation. It is, however, important that the simple regular maintenance listed in this section is carried out. It is recommended that an approved Altrad Belle dealer carries out all major maintenance and repairs. Always use genuine Altrad Belle replacement parts, the use of spurious parts may void your warranty.
Before any maintenance is carried out on the machine, switch off the engine. If working on a diesel engine, make sure that the stop switch is in the stop position.
Always set the compactor on level ground to ensure any fluid levels will be correctly read. Only use recommended oils (see chart on following page).
Running In Period
When the compactor is first used from new, the engine oil must be changed after the initial running in period (see engine manufacturer's manual for full detail). The belt tension should be checked after 4 hours use.
Drive Belt
Remove the belt guard then check the belt tension by placing light finger pressure on the top of the belt, as near central between the engine drive and gearbox pulley. The belt should deflect by approx. 10 to 15mm. If the belt tension requires adjustment, loosen the setscrew on the Belt Tensioning device and slide to the right. Once set, retighten the setscrew and check belt tension a second time. Finally, replace the belt guard ensuring it is correctly and securely fitted.
| Routine Maintenance | Every 8 Hours | First Month / 50 Hours | 150 Hours | 250 Hours | 500 Hours | |
| Engine Oil | Check Level | √ | ||||
| Change | √ | √ | ||||
| Air Filter | Check Condition / Clean | √ | ||||
| Replace when necessary / Every 12 months | ||||||
| Spark Plug Change | √ | |||||
| Drive Belt Tension | √ | √ | ||||
Oil / Fuel Type & Quantity - Spark Plug Type
| Oil Type | Quantity (Litre) | Fuel Type | Capacity (Litre) | Spark Plug Type | Electrode Gap (mm) | |
| Honda GX200 Petrol S.A.E. 10W 30 0.6 | Unleaded Petrol | 3.1 | BPR6ES (NGK) | 0.7 - 0.8mm | ||
| Hatz 1B20 Diesel | S.A.E. 10W 30 0.9 | Diesel (BS2869) | Refer to Manual | N/A N/A |
Oil Type & Quantity
| Component Oil Type | Honda GX200 (Litres) | Hatz 1B20 (Litres) | ||
| Gearbox S.A.E. 10W 40 0.72 0.72 | ||||
| Hydraulic Control | Shell Tellus 32 0.2 | 0.2 | ||
| Fuchs Renolin MR520 | 0.2 | 0.2 | ||
Li-Ion Battery - Charging (Hatz 1B20 Diesel Electric model only)
• Use ONLY specific Li-ion battery chargers
• DO NOT charge the battery with charging voltage of over 15.0V
• DO NOT use any charger with automatic desulphation function
- When possible, remove the battery from the vehicle before charging
- Charging voltage should be 14.0 – 15.0V for both vehicle and battery charger. Lower voltage will result in insufficient charge.
Higher voltage will cause damage to the battery
- Respect the standard & maximum charge current indicated on the battery labels
- Avoid draining the battery to less than 8V. If the voltage drops to below 8V, refer to the charger manual
• If the battery becomes hot to the touch, stop charging and allow the battery to cool before resuming
• After charging, wait 1 to 2 hours before checking the voltage. If the voltage is less than 12.8V, additional charging is necessary

CAUTION
WHILST RUNNING THIS MACHINE DURING THIS PROCEDURE, IT IS ADVISABLE TO PUT THE MACHINE ONTO A RUBBER MAT OR EQUIVALENT TO ABSORB SOME OF THE VIBRATION.
Bleeding the Hydraulic System
- Ensure the machine is in a stationary position, and situated on level ground.
- Remove the filler cap, and fill the control pump head with oil. Stop once you have reached the maximum level indicator, which is within the head.
- Slowly pump the control handle from the 'Forward Motion' position, to the 'Reverse Motion' position, until the oil level drops.
- Re-fill the control pump head up to the maximum level. Continue to pump the handle until resistance is felt, and the handle locks in the 'Reverse Motion' position.
- Again, re-fill the control pump head up to the maximum level.
- Re-fit the Filler Bung, and test the machine.
Assembly of the Control Pump
- Carefully clean the housing with compressed air on the inside. Check for scratches on sliding bores for O Rings and there are no sharp edges.
- Press the Bushing in to Housing.
- Lubricate the Lip Seal with Hydraulic Oil and slip it on the Rack (open side away from the rack).
- Lubricate the Rack with Hydraulic Oil and slide it into the Housing until the Lip Seal is in the groove, making sure the teeth are in the right position. When the Lip Seal is in the Groove this represents forward motion.

CAUTION
In reverse motion the Control Handles run parallel with the Housing in the direction of the operator.
- After lubricating the Pinion (without O Rings), insert it into the Housing and Rack. Check the movement of the Rack from Forward to Reverse. (See CAUTION).
6 Take the Pinion out and fit the two O Rings, making sure they are not damaged. - Lubricate the Pinion and O Rings with hydraulic oil and carefully insert in to the Housing. Make sure the Rack is in the right position and this is easiest when in reverse motion.
- Fit the Shim and Retaining Ring. It may be necessary to push the Pinion from the opposite side to get them assembled.
- Place the Housing on the filler side and fit the O Rings to the bottom face. LOCTITE seal 518 is recommended.
- Assemble the Hydraulic Connector and Dowty Washer using LOCTITE 243.
- Assemble the Bracket and fix with 4 screws and washers using LOCTITE 243.
- Loosely fit the Plug Screw and Washer DO NOT TIGHTEN.
Trouble Shooting Guide
| Problem Cause Remedy | ||
| Engine will not start. | No fuel. | Open fuel tap. |
| Fill fuel tank. | ||
| Engine switched off. Switch engine on. | ||
| Spark plug fouled. Clean and reset plug gap. | ||
| Engine cold. Close choke. | ||
| Engine Flooded. | Honda, open choke, fully open throttle, pull recoil starter until engine fires. | |
| Hatz, move speed control to stop, pull recoil starter 5 times then repeat start procedure. | ||
| Engine still will not start. | Major Fault. Contact Agent or Altrad Belle. | |
| Unit will not move. | Engine speed too slow. Set engine speed control to fast. | |
| Drive belt tension loose. Adjust belt tension | ||
| Air filter blocked. Clean or renew air filter. | ||
| Worn or Damaged Clutch. Repair or Replace as necessary. | ||
| Drive failure. Contact Agent or Altrad Belle. | ||
| Gearbox failure. | Contact Agent or Altrad Belle. | |
| Forward speed too slow. | Too much oil in hydraulic head. | Reduce oil level. |
| Wrong adjustment of control system | Contact Agent or Altrad Belle. | |
| Reverse speed too slow. | Not enough oil in hydraulic head. | Fill and bleed system. |
| Air in control system. | Bleed control system. | |
| Wrong adjustment of control system | Contact Agent or Altrad Belle. | |
| Loss of Hydraulic Oil. | Connectors leaking. | Reseal connectors. |
| Defective hydraulic hose. | Replace hose. | |
| Piston seal in gearbox defective. | Contact Agent or Altrad Belle. | |
| Machine operates erratically. | Shock mounts damaged. | Replace all four mounts. |
Your new Altrad Belle 'RPX' reversible plate compactor is warranted to the original purchaser for a period of one-year (12 months) from the original date of purchase.
The Altrad Belle warranty is against defects in design, materials an workmanship.
The following are not covered under the Altrad Belle warranty:
- Damage caused by abuse, misuse, dropping or other similar damage caused by or as a result of failure to follow assembly, operation or user maintenance instructions.
- Alterations, additions or repairs carried out by persons other than Altrad Belle or their recognised agents.
- Transportation or shipment costs to and from Altrad Belle or their recognised agents, for repair or assessment against a warranty claim, on any machine.
- Materials and/or labour costs to renew, repair or replace components due to fair wear and tear.
The following components are not covered by warranty.
- Drivebelt/s
- Engine Air Filter
- Engine Spark Plug
Altrad Belle and/or their recognised agents, directors, employees or insurers will not be held liable for consequential or other damages, losses or expenses in connection with or by reason of or the inability to use the machine for any purpose.
Warranty Claims
All warranty claims should firstly be directed to Altrad Belle, either by telephone, by Fax, by Email, or in writing.
For warranty claims:
Tel : +44 (0)1298 84606, Fax : +44 (0)1298 84073, Email : Warranty@altrad-belle.com
or Write to:
Altrad Belle Warranty Department,
Sheen, Nr. Buxton
Derbyshire
SK17 0EU
England
Warranty Registration:
In the bid for ALTRAD Belle to become greener and more eco friendly, we have now introduced online Warranty registration. To access the registration page of our website, please use the following address:-
http://www.bellegroup.com/index.php?p=warranty_registration
Alternatively, please scan the adjacent QR Code (Quick Response Code) using your smartphone to access the registration page.


Replacement Parts
When maintaining this product only the manufacturers original, genuine replacement parts may be used.
The user will lose any possible claims if replacement parts used are other than the makers original replacement parts.
Replacement parts for this product can be ordered online 24 hours a day, 7 days a week at www.Altrad-Belle247.com
For more information regarding the availability of replacement parts for this product, please contact Altrad Belle using the following contact details:-
Tel:- +44 (0)1298 84606 Fax:- +44 (0)1298 84073 Email:- sales@altrad-belle.com
Alternatively, please scan the adjacent QR Code (Quick Response Code) using your smartphone to access the Altrad Belle online parts portal.

How To Use This Manual
This manual has been written to help you operate and service the 'RPX' safely. This manual is intended for dealers and operators of the 'RPX'.
Foreword
The 'Machine Description' section helps you to familiarise yourself with the machine's layout and controls.
The ‘Environment’ section gives instructions on how to handle the recycling of discarded apparatus in an environmentally friendly way.
The ‘General Safety’ and ‘Health and Safety’ sections explain how to use the machine to ensure your safety and the safety of the general public.
The 'Start and Stop Procedure' helps you with starting and stopping the machine.
The 'Trouble Shooting Guide' helps you if you have a problem with your machine.
The 'Service & Maintenance' section is to help you with the general maintenance and servicing of your machine.
The 'Warranty' Section details the nature of the warranty cover and the claims procedure.
Directives with regard to the notations.
Text in this manual to which special attention must be paid are shown in the following way:

CAUTION
The product can be at risk. The machine or yourself can be damaged or injured if procedures are not carried out in the correct way.

WARNING
The life of the operator can be at risk.

WARNING

WARNING
Before you operate or carry out any maintenance on this machine YOU MUST READ and STUDY this manual.
KNOW how to safely use the unit's controls and what you must do for safe maintenance. (NB Be sure that you know how to switch the machine off before you switch on, in case you get into difficulty.)
ALWAYS wear or use the proper safety items required for your personal protection. If you have ANY QUESTIONS about the safe use or maintenance of this unit, ASK YOUR SUPERVISOR OR CONTACT: Altrad Belle (UK): +44 (0)1298 84606

Contents
How To Use This Manual....27
Warning 27
Machine Description....28
Environment 28
Decals 29 - 30
Technical Data....31
Reasons For Compaction....31
General Safety 32
Health and Safety 32
Pre-Start Checks....33
Start and Stop Procedure.... 33 - 34
Operating Instructions....35
Service & Maintenance 36 - 37
Trouble Shooting Guide ....38
Warranty 39
Replacement Parts....39
- Throttle lever.
-
Electric Start (Diesel Electric Start only).
-
Lifting Point.
-
Handle Release Catch.
-
Forward / Reverse Control Handle.
-
Steering Handle.
-
Belt Guard.
-
Foot Rest.
-
Handle Adjustment Bolt.
-
Integrated Wheel Kit.
-
Towing Eye
-
Recoil Start Handle (Gasoline only)
-
Emergency Stop (Gasoline only)
-
Stop Button (Diesel only)
-
Hourmeter (optional)
text_image
Rest. Adjustment Bolt. ed Wheel Kit. Eye I Start Handle (Gasoline only) gency Stop (Gasoline only) Button (Diesel only) meter (optional) Diagram shows Honda Gasoline option 12 8 7 6 5 4 1 9 11 10 2 13 14 16 Diagram shows Hatz Diesel Electric Start option
Environment
Safe Disposal.

Instructions for the protection of the environment. The machine contains valuable materials. Take the discarded apparatus and accessories to the relevant recycling facilities.
| Component Material | |
| Handle Steel | |
| Front Cover Hdpe | |
| Main Frame Steel | |
| Baseplate Steel | |
| Hand Grips Polyurethane Foam | |
| Engine Aluminium | |
| Flexible Mounts Steel And Rubber | |
| Various Parts | Steel And Aluminium |
A. Forward / Reverse & No Lift Decal
B. Throttle Decal
C. Lifting Point Decal
D. Hot Parts Decal
E. No Lift Decal
F. Diesel Engine Stop Decal
G. Safety Decal
H. Noise Decal
J. Battery Charge Decal
K. Warning Decal
L. Gasoline Engine Stop Decal
text_image
Point Decal Parts Decal Decal Engine Stop Decal y Decal Decal Charge Decal ing Decal ne Engine Stop Decal Diagram shows Honda Gasoline option Diagram shows Hatz Diesel Electric Start optionA. Forward / Reverse & No Lift Decal
Indicates how to move the compactor forwards and backwards and highlights that the Forward / Reverse Control Handle and Steering Handle should not be used as Lifting Points.
B. Throttle Decal

Fast Engine
Speed Position

Slow Engine
Speed Position
C. Lifting Point Decal
Identifies the correct lifting point on the compactor.
D. Hot Parts Decal
This area may get hot - DO NOT touch.
E. No Lift Decal
This area should not be used as a Lifting Point.
F. Diesel Engine Stop Decal
Identifies the position of the Engine Stop Button.
G. Safety Decal

Please Read Operators Manual

Wear Protective Footwear

Wear Ear Protection

Wear Eye Protection
H. Noise Decal
Identifies the Noise Level of the machine
J. Battery Charge Decal (Diesel Electric Start model only)
Read the Operators Manual for information on charging the Li-Ion battery.
K. Warning Decal
A. DO NOT run the engine whilst the machine is being maneuvered on its wheels.
B. DO NOT operate the machine in reverse on an incline.
C. DO NOT operate in reverse up to an enclosed or restrictive space.
L. Gasoline Engine Stop Decal
Press and hold the Stop Button for 5 seconds to stop the engine.

text_image
42In 27.5In 47.4In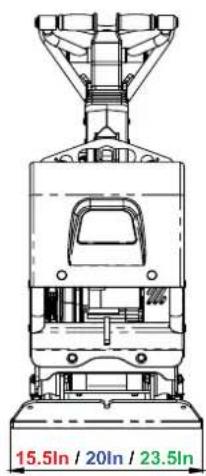
text_image
15.5In / 20In / 23.5In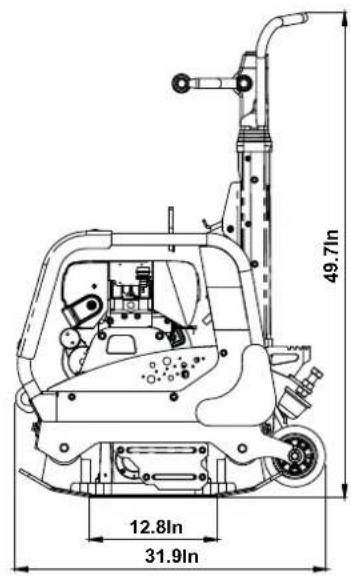
text_image
49.7In 12.8In 31.9In| Model RPX 35/40 RPX 35/50 RPX 35/60 | |||||||||
| Engine | Honda GX200 | Hatz 1B20 | Hatz 1B20 Electric Start | Honda GX200 | Hatz 1B20 | Hatz 1B20 Electric Start | Honda GX200 | Hatz 1B20 | Hatz 1B20 Electric Start |
| Engine Power (Hp / kW) | 5.5/4.0 | 4.2/3.1 | 4.2/3.1 | 5.5/4.0 | 4.2/3.1 | 4.2/3.1 | 5.5/4.0 | 4.2/3.1 | 4.2/3.1 |
| Engine RPM 3000 3000 3000 3000 3000 3000 3000 3000 3000 3000 3000 3000 3000 3000 3000 3000 3000 3000 3000 3000 300 | 3000 3000 | ||||||||
| Weight (lbs) 388 412 416 397 421 428 408 | 432 456 | ||||||||
| Static Pressure (PSI) | 1.92 | 2.04 | 2.06 | 1.57 | 1.66 | 1.69 | 1.34 | 1.42 | 1.50 |
| Centrifugal Force (lbf) | 7868 | 7868 | 7868 | 7868 | 7868 | 7868 | 7868 | 7868 | 7868 |
| Frequency (Hz) | 81 | 81 | 81 | 81 | 81 | 81 | 81 | 81 | 81 |
| Max Gradient (°) | 20 | 20 | 20 | 20 | 20 | 20 | 20 | 20 | 20 |
| Maximum Travel Speed (ft/min) | 88.6 | 88.6 | 88.6 | 85.3 | 85.3 | 85.3 | 82 | 82 | 82 |
| *3-Axis Vibration (m/sec ^2 ) | 3.1 | 2.4 | 2.4 | 3.1 | 2.4 | 2.4 | 3.1 | 2.4 | 2.4 |
| Noise Level (dB(A)) | 108 | 108 | 108 | 108 | 108 | 108 | 108 | 108 | 108 |
* Minimum level to EN500 Part 4

Reasons For Compaction
Soil, which has been disturbed or new infill, subbase and blacktop, will have small voids or air pockets which, if not compacted, will lead to one or more problems occurring.
- As traffic crosses the surface of an uncompacted area, the material is compressed. This leads to subsidence of the top surface as the material fills the voids.
- A similar situation occurs with static loads on uncompacted ground. The load (e.g. a building) will sink.
- Materials with voids are more susceptible to water seepage, leading to erosion. Water ingress may also cause the soil to expand during freezing temperatures and contract during dry spells. Expansion and contraction is a major cause of damage to building foundations and normally leads to the structure requiring underpinning.
Compaction increases the density of the material and therefore increases its load bearing capacity. Reduces air voids and therefore reduces the risk of subsidence, expansion and contraction, due to ingress of water.
For your own personal protection and for the safety of those around you, please read and ensure you fully understand the following safety information. It is the responsibility of the operator to ensure that he/she fully understands how to operate this equipment safely. If you are unsure about the safe and correct use of the 'RPX', consult your supervisor or Altrad Belle.

CAUTION
Improper maintenance can be hazardous. Read and Understand this section before you perform any maintenance, service or repairs.
• This equipment is heavy and must not be lifted single-handedly, either GET HELP or use suitable lifting equipment.
• Cordon off the work area and keep members of the public and unauthorised personnel at a safe distance.
• Personal Protective Equipment (PPE) must be worn by the operator whenever this equipment is being used (see Health & Safety).
• Make sure you know how to safely switch this machine OFF before you switch it ON in case you get into difficulty.
• Always switch OFF the engine before transporting, moving it around the site or servicing it.
- During use the engine becomes very hot, allow the engine to cool before touching it. Never leave the engine running and unattended.
- Never remove or tamper with any guards fitted, they are there for your protection. Always check guards for condition and security, if any are damaged or missing, DO NOT USE THE COMPACTOR until the guard has been replaced or repaired.
• DO NOT operate the Compactor when you are ill, feeling tired, or when under the influence of alcohol or drugs.

CAUTION
Fuel is flammable. It may cause injury and property damage. Shut down the engine, extinguish all open flames and do not smoke while filling the fuel tank. Always wipe up any spilled fuel.
Fuel Safety.
• Before refuelling, switch off the engine and allow it to cool.
- When refuelling, DO NOT smoke or allow naked flames in the area.
- Spilt fuel must be made safe immediately, using sand. If fuel is spilt on your clothes, change them.
• Store fuel in an approved, purpose made container away from heat and ignition sources.

Health & Safety
Vibration
Some vibration from the compaction operation is transmitted through the handle to the operator's hands. The Altrad Belle RPX range has been specifically designed to reduce hand/arm vibration levels. Refer to specifications & technical data for vibration levels and usage times (recommended maximum daily exposure time). DO NOT exceed the maximum usage times.
PPE (Personal Protective Equipment)
Suitable PPE must be worn when using this equipment i.e. Safety Goggles, Gloves, Ear Defenders, Dust Mask and Steel Toe capped footwear. Wear clothing suitable for the work you are doing. Tie back long hair and remove any jewellery which may catch in the equipment's moving parts. Always protect skin from contact with concrete.
Dust
The compacting process will occasionally produce dust, which may be hazardous to your health. Always wear a mask that is suited to the type of dust being produced.
Fuel
DO NOT ingest fuel or inhale fuel vapours and avoid contact with your skin. Wash fuel splashes immediately. If you get fuel in your eyes, irrigate with copious amounts of water and seek medical attention as soon as possible.
Exhaust Fumes
DO NOT operate the compactor indoors or in a confined space, make sure the work area is adequately ventilated.

WARNING
The exhaust fumes produced by this equipment are highly toxic and can kill!
Pre start-up inspection
The following Pre-start-up inspection must be performed before the start of each work session or after every four hours of use, whichever is first. Please refer to the service section for detailed guidance. If any fault is discovered, the compactor must not be used until the fault is rectified.
- Thoroughly inspect the compactor for signs of damage. Check components are present and secure. Pay special attention to the belt guard.
- Check the engine oil and hydraulic oil level and top up as necessary.
- Check the engine fuel level and top up as necessary.
- Check for fuel, oil and hydraulic leaks.
Start And Stop Procedure

Honda GX200 Gasoline Engine
Stopping the Engine
- To stop the engine, set the throttle control to idle (See Fig. 1), then press and hold the red stop button for 5 seconds until the engine stops (See Fig. 2).
- Turn the fuel OFF
Starting the Engine
- Open the fuel tap by moving the fuel ON / OFF lever fully to the right.
-
If starting the engine from cold, set the choke ON by moving the choke lever fully to the left. If restarting a warm engine, the choke is usually not required, however, if the engine has cooled to a degree, partial choke may be required.
-
Set the throttle to the idle position by moving the throttle lever fully to the right.
-
Taking a firm hold of the frame with one hand, grasp the recoil starter handle with the other. Pull the recoil starter until engine resistance is felt, then let starter return.
-
Taking care not to pull the starter's rope fully out, pull the starter handle briskly.
-
Repeat until the engine fires.
-
Once the engine fires gradually set the choke lever to the OFF position by moving it to the right.
-
If the engine fails to fire after several attempts, follow the Troubleshooting Guide.
natural_image
Close-up of a mechanical component with mounting holes and a vertical slot, labeled Fig.1 (no readable text or symbols)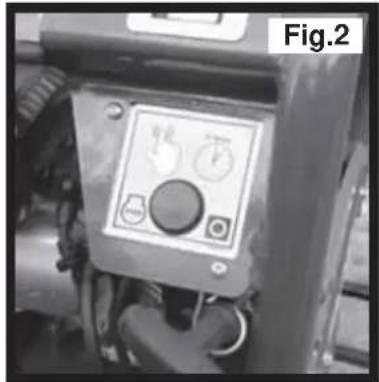
text_image
Fig.2Hatz 1B20 Diesel Engine
Stopping the Engine
- To stop the engine, set the throttle control to idle (See Fig. 1), then press and hold the red stop button until the engine stops (See Fig. 2).
Starting the Engine
- Turn ON the fuel by moving the fuel ON/OFF lever fully to the right.
- Set the engine speed control to start.
-
Taking a firm hold of the control handle with one hand, grasp the recoil starter handle with the other. Pull the handle until engine resistance is felt, then let the starter return.
-
Taking care not to pull the starter's rope fully out, pull the starter handle briskly with both hands.
-
Repeat this procedure until the engine fires.
-
If the engine fails to start after several attempts, Follow the troubleshooting guide.
Hatz 1B20 Diesel Engine (Electric Start)
Stopping the Engine
- To stop the engine, set the throttle control to idle (See Fig. 1), then press and hold the red stop button until the engine stops (See Fig. 2).
- Turn the key to position '0' and remove it. All the indicator lights must go out.
NOTE:- Failure to return the starter key to position '0' may result in the battery being totally discharged.
natural_image
Close-up of a mechanical switch or bracket component with mounting holes and a labeled section 'Fig.1' (no other text or symbols visible)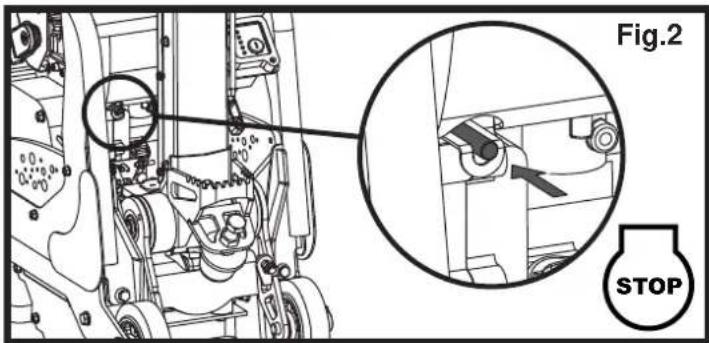
text_image
Fig.2 STOPStarting the Engine
- Insert the key and turn it to position 'I' (The battery charge light and oil pressure warning light will light up)
- Turn start key to position 'll'
- Release the key as soon as the engine runs. The starting key must spring back to position 'I' and remain there during engine operation. The battery charge light and oil pressure warning light must go out immediately after starting. Indicator light '1' lights up to show that the engine is running.
- If anything seems to be incorrect, stop the engine immediately and rectify the fault. (See the Troubleshooting Guide)

text_image
Fig.3 1 2 3 4 0 I II 5
CAUTION
Never operate the electric starter when the engine is running or coasting to a standstill. There is a risk of broken starter pinion or ring gear teeth. Never stop the engine by moving the decopression lever. During breaks in work or at the end of the working period, keep the starting handle and starting key in a safe place, out of reach of unauthorised persons.
- Always turn the start key back to position '0' before re-starting the engine. The repeat lock prevents the starter motor from engaging and possibly being damaged whilst the engine is still running.
• Take the compactor to where it is required.
Where it is necessary to use lifting equipment to position the compactor, make sure the lifting equipment has a WLL (Working Load Limit) suitable for the compactors weight (see Technical Data section or the machine serial plate). Attach suitable chains or slings ONLY to the lifting point (Item 4 of the Machine Description) on the top of the compactor.
- Moving the compactor using the integrated wheel kit
• Use the Fixed Steering Handle (Item 7) to tilt the machine backwards onto the integrated wheels (Item 11).
• Manouvre only on smooth, flat, firm surfaces. These wheels are not designed for soft, uneven surfaces.
- To lower the machine off it's wheels - stand on the foot rest (Item 9) and allow the machine to lower using your body weight as a counter balance.

CAUTION
NEVER leave the engine running whilst the machine is being maneuvered on its wheels.
- Having carried out the checks listed in the 'Pre Start' section, you may start the engine.
The Altrad Belle 'RPX' range of compactors are fitted with a centrifugal clutch, this allows the engine to run at idle without driving the gearbox.
As the engine speed is increased the clutch will engage and will drive the gearbox. For correct operation, the engine speed should be set to maximum.
- Set the throttle to maximum and use the control handle for direction and to steer or turn the compactor.
The control handle has been designed so that when it is being used in reverse and the operator lets go for any reason, the handle automatically moves into forward mode. This is a significant safety feature of the machine.
During normal operation you should not have to push the compactor but allow it to travel at its own pace.
The speed of travel will be determined by the condition of the surface being compacted.
Caution must be used when operating the compactor in reverse. Ensure that there are no obstructions or trip hazards when operating in reverse.
If the surface to be compacted is on a slope, great care must be taken when controlling the compactor's direction of travel. If necessary, use a suitable rope attached to the compactor at a low point on the chassis, to allow a helper to take part of the compactor's weight. Work up and down a slope not across.
• Work the compactor over the surface in an organised pattern until the required compaction has been achieved.
Where there are a number of different layers to be compacted on top of each other, compact each layer individually.
• To stop the compactor vibrating, set the throttle to idle. To stop the engine refer to the relevant Start / Stop procedure.

CAUTION
DO NOT operate the machine in reverse on an incline.
DO NOT operate in reverse up to an enclosed or restrictive space.

CAUTION
DO NOT use on boggy, waterlogged ground as the compactor will sink and cause excessive loading to the engine and drive system.
The Altrad Belle 'RPX' range of Reversible Plate Compactors are designed to give many years of trouble free operation. It is, however, important that the simple regular maintenance listed in this section is carried out. It is recommended that an approved Altrad Belle dealer carries out all major maintenance and repairs. Always use genuine Altrad Belle replacement parts, the use of spurious parts may void your warranty.
Before any maintenance is carried out on the machine, switch off the engine. If working on a diesel engine, make sure that the stop switch is in the stop position.
Always set the compactor on level ground to ensure any fluid levels will be correctly read. Only use recommended oils (see chart on following page).
Running In Period
When the compactor is first used from new, the engine oil must be changed after the initial running in period (see engine manufacturer's manual for full detail). The belt tension should be checked after 4 hours use.
Drive Belt
Remove the belt guard then check the belt tension by placing light finger pressure on the top of the belt, as near central between the engine drive and gearbox pulley. The belt should deflect by approx. 10 to 15mm. If the belt tension requires adjustment, loosen the setscrew on the Belt Tensioning device and slide to the right. Once set, retighten the setscrew and check belt tension a second time. Finally, replace the belt guard ensuring it is correctly and securely fitted.
| Routine Maintenance | Every 8 Hours | First Month / 50 Hours | 150 Hours | 250 Hours | 500 Hours | |
| Engine Oil | Check Level | √ | ||||
| Change | √ | √ | ||||
| Air Filter | Check Condition / Clean | √ | ||||
| Replace when necessary / Every 12 months | ||||||
| Spark Plug Change | √ | |||||
| Drive Belt Tension | √ | √ | ||||
Oil / Fuel Type & Quantity - Spark Plug Type
| Oil Type | Quantity (Gal) | Fuel Type | Capacity (Gal) | Spark Plug Type | Electrode Gap (mm) | |
| Honda GX200 Gasoline S.A.E. | 10W 30 0.16 | Unleaded Gasoline | 0.82 | BPR6ES (NGK) | 0.7 - 0.8mm | |
| Hatz 1B20 Diesel | S.A.E. 10W 30 0.23 | Diesel (BS2869) | Refer to Manual | N/A N/A |
Oil Type & Quantity
| Component Oil Type | Honda GX200 (Gal) | Hatz 1B20 (Gal) | |
| Gearbox S.A.E. 10W 40 0.19 0.19 | 19 | ||
| Hydraulic Control | Shell Tellus 32 0.05 0.05 | ||
| Fuchs Renolin MR520 | 0.05 0.05 |
Li-Ion Battery - Charging (Hatz 1B20 Diesel Electric model only)
• Use ONLY specific Li-ion battery chargers
• DO NOT charge the battery with charging voltage of over 15.0V
• DO NOT use any charger with automatic desulphation function
- When possible, remove the battery from the vehicle before charging
- Charging voltage should be 14.0 – 15.0V for both vehicle and battery charger. Lower voltage will result in insufficient charge.
Higher voltage will cause damage to the battery
- Respect the standard & maximum charge current indicated on the battery labels
- Avoid draining the battery to less than 8V. If the voltage drops to below 8V, refer to the charger manual
• If the battery becomes hot to the touch, stop charging and allow the battery to cool before resuming
• After charging, wait 1 to 2 hours before checking the voltage. If the voltage is less than 12.8V, additional charging is necessary

CAUTION
WHILST RUNNING THIS MACHINE DURING THIS PROCEDURE, IT IS ADVISABLE TO PUT THE MACHINE ONTO A RUBBER MAT OR EQUIVALENT TO ABSORB SOME OF THE VIBRATION.
Bleeding the Hydraulic System
- Ensure the machine is in a stationary position, and situated on level ground.
- Remove the filler cap, and fill the control pump head with oil. Stop once you have reached the maximum level indicator, which is within the head.
- Slowly pump the control handle from the 'Forward Motion' position, to the 'Reverse Motion' position, until the oil level drops.
- Re-fill the control pump head up to the maximum level. Continue to pump the handle until resistance is felt, and the handle locks in the 'Reverse Motion' position.
- Again, re-fill the control pump head up to the maximum level.
- Re-fit the Filler Bung, and test the machine.
Assembly of the Control Pump
- Carefully clean the housing with compressed air on the inside. Check for scratches on sliding bores for O Rings and there are no sharp edges.
- Press the Bushing in to Housing.
- Lubricate the Lip Seal with Hydraulic Oil and slip it on the Rack (open side away from the rack).
- Lubricate the Rack with Hydraulic Oil and slide it into the Housing until the Lip Seal is in the groove, making sure the teeth are in the right position. When the Lip Seal is in the Groove this represents forward motion.

CAUTION
In reverse motion the Control Handles run parallel with the Housing in the direction of the operator.
- After lubricating the Pinion (without O Rings), insert it into the Housing and Rack. Check the movement of the Rack from Forward to Reverse. (See CAUTION).
6 Take the Pinion out and fit the two O Rings, making sure they are not damaged. - Lubricate the Pinion and O Rings with hydraulic oil and carefully insert in to the Housing. Make sure the Rack is in the right position and this is easiest when in reverse motion.
- Fit the Shim and Retaining Ring. It may be necessary to push the Pinion from the opposite side to get them assembled.
- Place the Housing on the filler side and fit the O Rings to the bottom face. LOCTITE seal 518 is recommended.
- Assemble the Hydraulic Connector and Dowty Washer using LOCTITE 243.
- Assemble the Bracket and fix with 4 screws and washers using LOCTITE 243.
- Loosely fit the Plug Screw and Washer DO NOT TIGHTEN.
| Problem Cause Remedy | ||
| Engine will not start. | No fuel. | Open fuel tap. |
| Fill fuel tank. | ||
| Engine switched off. Switch engine on. | ||
| Spark plug fouled. Clean and reset plug gap. | ||
| Engine cold. Close choke. | ||
| Engine Flooded. | Honda, open choke, fully open throttle, pull recoil starter until engine fires. | |
| Hatz, move speed control to stop, pull recoil starter 5 times then repeat start procedure. | ||
| Engine still will not start. | Major Fault. Contact Agent or Altrad Belle. | |
| Unit will not move. | Engine speed too slow. Set engine speed control to fast. | |
| Drive belt tension loose. Adjust belt tension | ||
| Air filter blocked. Clean or renew air filter. | ||
| Worn or Damaged Clutch. Repair or Replace as necessary. | ||
| Drive failure. Contact Agent or Altrad Belle. | ||
| Gearbox failure. | Contact Agent or Altrad Belle. | |
| Forward speed too slow. | Too much oil in hydraulic head. | Reduce oil level. |
| Wrong adjustment of control system | Contact Agent or Altrad Belle. | |
| Reverse speed too slow. | Not enough oil in hydraulic head. | Fill and bleed system. |
| Air in control system. | Bleed control system. | |
| Wrong adjustment of control system | Contact Agent or Altrad Belle. | |
| Loss of Hydraulic Oil. | Connectors leaking. | Reseal connectors. |
| Defective hydraulic hose. | Replace hose. | |
| Piston seal in gearbox defective. | Contact Agent or Altrad Belle. | |
| Machine operates erratically. | Shock mounts damaged. | Replace all four mounts. |
Your new Altrad Belle ‘RPX’ reversible plate compactor is warranted to the original purchaser for a period of one-year (12 months) from the original date of purchase.
The Altrad Belle warranty is against defects in design, materials an workmanship.
The following are not covered under the Altrad Belle warranty:
- Damage caused by abuse, misuse, dropping or other similar damage caused by or as a result of failure to follow assembly, operation or user maintenance instructions.
- Alterations, additions or repairs carried out by persons other than Altrad Belle or their recognised agents.
- Transportation or shipment costs to and from Altrad Belle or their recognised agents, for repair or assessment against a warranty claim, on any machine.
- Materials and/or labour costs to renew, repair or replace components due to fair wear and tear.
The following components are not covered by warranty.
- Drivebelt/s
- Engine Air Filter
- Engine Spark Plug
Altrad Belle and/or their recognised agents, directors, employees or insurers will not be held liable for consequential or other damages, losses or expenses in connection with or by reason of or the inability to use the machine for any purpose.
Warranty Claims
All warranty claims should firstly be directed to Altrad Belle, either by telephone, by Fax, by Email, or in writing.
For warranty claims:
Tel : +44 (0)1298 84606,
Fax : +44 (0)1298 84073,
Email : warranty.dept@altrad-belle.com
or Write to:
Altrad Belle Warranty Department, Sheen, Nr. Buxton, Derbyshire, SK17 0EU, England
Warranty Registration:
In the bid for ALTRAD Belle to become greener and more eco friendly, we have now introduced online Warranty registration. To access the registration page of our website, please use the following address:-
http://www.bellegroup.com/index.php?p=warranty_registration
Alternatively, please scan the adjacent QR Code (Quick Response Code) using your smartphone to access the registration page.

text_image
QR code image containing encoded data, no visible human-readable textReplacement Parts

When maintaining this product only the manufacturers original, genuine replacement parts may be used.
The user will lose any possible claims if replacement parts used are other than the makers original replacement parts.
A PDF of parts listings for this product can be found in the 'product' section of our website www.Altrad-Belle.com Information on sourcing replacement parts from your local dealer can then be found in the 'contact us' section
natural_image
Technical line drawing of a mechanical device with no visible text or symbols
text_image
1264 326 809| Modèle RPX 35/40 RPX 35/50 RPX 35/60 | |||||||||
| Moteur | Honda GX200 | Hatz 1B20 | Hatz 1B20 Electric Start | Honda GX200 | Hatz 1B20 | Hatz 1B20 Electric Start | Honda GX200 | Hatz 1B20 | Hatz 1B20 Electric Start |
| Puissance Moteur (Hp / kW) | 5.5/4.0 | 4.2/3.1 | 4.2/3.1 | 5.5/4.0 | 4.2/3.1 | 4.2/3.1 | 5.5/4.0 | 4.2/3.1 | 4.2/3.1 |
| Régime du Moteur 3000 3000 3000 3000 3000 3000 3000 3000 3000 3000 3000 3000 3000 3000 3000 3000 3000 3000 3000 3000 300 | |||||||||
| Poids (Kg) | 176 | 187 | 189 | 1800 | 191 | 194 | 185 | 196 | 207 |
| Force de Compaction (kg/m2) | 1351 | 1436 | 1449 | 1104 | 1172 | 1190 | 944 | 1000 | 1057 |
| Force Centrifuge (kN) | 35 | 35 | 35 | 35 | 35 | 35 | 35 | 35 | 35 |
| Fréquence (Hz) | 81 | 81 | 81 | 81 | 81 | 81 | 81 | 81 | 81 |
| Déclivité Maximale (°) | 20 | 20 | 20 | 20 | 20 | 20 | 20 | 20 | 20 |
| Max. Vitesse de déplacement (m/min) | 27 | 27 | 27 | 26 | 26 | 26 | 25 | 25 | 25 |
| *Vibration sur 3 Axes (m/sec ^2 ) | 3.1 | 2.4 | 2.4 | 3.1 | 2.4 | 2.4 | 3.1 | 2.4 | 2.4 |
| Niveau Sonore (dB(A)) | 108 | 108 | 108 | 108 | 108 | 108 | 108 | 108 | 108 |
*Niveau minimum de En500 Part4

natural_image
Close-up of a mechanical component with mounting holes and a vertical switch (no visible text or symbols)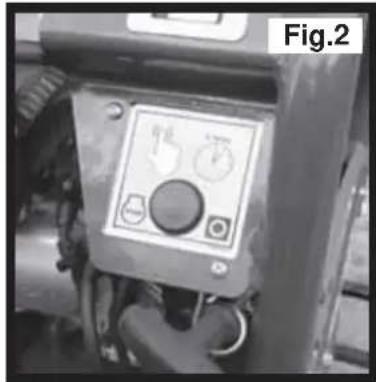
text_image
Fig.2natural_image
Close-up of a mechanical switch or bracket component with mounting holes and a labeled section 'Fig.1' (no other text or symbols visible)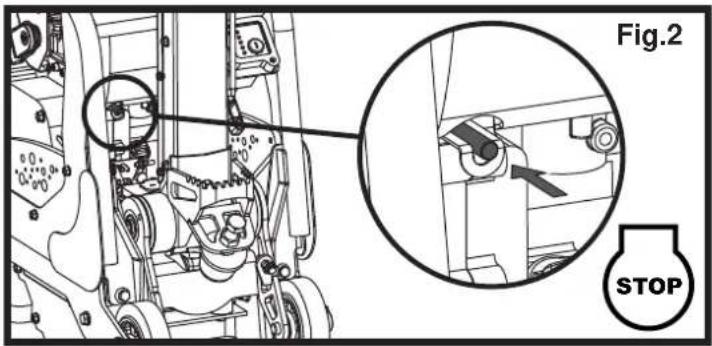
text_image
Fig.2 STOP
text_image
Fig.3 1 2 3 4 0 I IIAltrad Belle Warranty Department,
Sheen, Nr. Buxton
Derbyshire
SK17 0EU
England.
Angleterre
text_image
QR code image containing encoded data, no visible human-readable text
Pièces de Rechange
natural_image
Technical diagram of a vehicle engine compartment showing internal components and labeled parts H and L (no text or symbols beyond labels)natural_image
Technical line drawing of a mechanical device with no visible text or symbols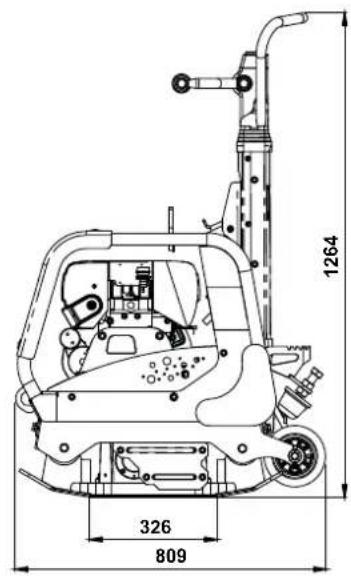
text_image
1264 326 809| Modelo RPX 35/40 RPX 35/50 RPX 35/60 | |||||||||
| Motor | Honda GX200 | Hatz 1B20 | Hatz 1B20 Electric Start | Honda GX200 | Hatz 1B20 | Hatz 1B20 Electric Start | Honda GX200 | Hatz 1B20 | Hatz 1B20 Electric Start |
| Potencia del Motor (Hp / kW) | 5.5/4.0 | 4.2/3.1 | 4.2/3.1 | 5.5/4.0 | 4.2/3.1 | 4.2/3.1 | 5.5/4.0 | 4.2/3.1 | 4.2/3.1 |
| Tirador del Motor 3000 3000 3000 3000 3000 3000 3000 3000 3000 3000 3000 3000 3000 3000 3000 3000 3000 3000 3000 3000 300 | 3000 3000 3000 3000 3000 3000 3000 3000 3000 3000 3000 3000 3000 3000 3000 3000 3000 3000 3000 3000 | 3000 3000 3000 3000 3000 3000 3000 3000 3000 3000 3000 3000 3000 3000 3000 3000 3000 3000 3000 3 | 3000 3000 3000 3000 3000 3000 3000 3000 3000 3000 3000 3000 3000 3000 3000 3000 3000 3000 3000 300 | 196 | 207 | ||||
| Fuerza de Compactación (kg/m2) | 1351 | 1436 | 1449 | 1104 | 1172 | 1190 | 944 | 1000 | 1057 |
| Fuerza Vibrador (kN) | 35 | 35 | 35 | 35 | 35 | 35 | 35 | 35 | 35 |
| Frecuencia (Hz) | 81 | 81 | 81 | 81 | 81 | 81 | 81 | 81 | 81 |
| Máxima Pendiente Cuesta Abajo (°) | 20 | 20 | 20 | 20 | 20 | 20 | 20 | 20 | 20 |
| Velocidad máxima de viaje (m/min) | 27 | 27 | 27 | 26 | 26 | 26 | 25 | 25 | 25 |
| *Vibración a 3 Planos (m/sec ^2 ) | 3.1 | 2.4 | 2.4 | 3.1 | 2.4 | 2.4 | 3.1 | 2.4 | 2.4 |
| Nivel de potencia acústica (dB(A)) | 108 | 108 | 108 | 108 | 108 | 108 | 108 | 108 | 108 |
* Niveau minimum de EN500 Part4
natural_image
Close-up of a mechanical component with mounting holes and a switch, labeled Fig.1 (no readable text or symbols)
text_image
Fig.2natural_image
Close-up of a mechanical switch or bracket component with mounting holes and a labeled section 'Fig.1' (no other text or symbols visible)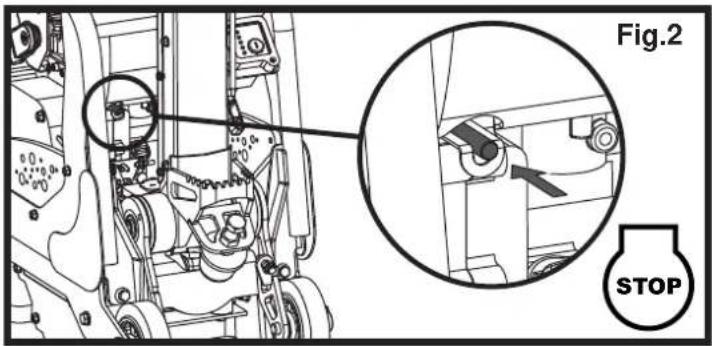
text_image
Fig.2 STOP
text_image
Fig.3 1 2 3 4 0 I II 5Altrad Belle Warranty Department,
Sheen, Nr. Buxton
Derbyshire
SK17 0EU
Inglaterra
Registro de Garantia :
text_image
QR code image containing encoded data, no visible human-readable textPiezas de Repuesto

natural_image
Technical line drawing of a mechanical device with no visible text or symbols
text_image
1264 326 809| Modell RPX 35/40 RPX 35/50 RPX 35/60 | |||||||||
| Motor | Honda GX200 | Hatz 1B20 | Hatz 1B20 Electric Start | Honda GX200 | Hatz 1B20 | Hatz 1B20 Electric Start | Honda GX200 | Hatz 1B20 | Hatz 1B20 Electric Start |
| Motorvermogen (Hp / kW) | 5.5/4.0 | 4.2/3.1 | 4.2/3.1 | 5.5/4.0 | 4.2/3.1 | 4.2/3.1 | 5.5/4.0 | 4.2/3.1 | 4.2/3.1 |
| Motortoerental 3000 3000 3000 3000 3000 3000 3000 3000 3000 3000 3000 3000 3000 3000 3000 3000 3000 3000 3000 3000 300 | 3000 3000 3000 3000 3000 3000 3000 3000 3000 3000 3000 3000 3000 3000 3000 3000 3000 3000 3000 3000 | ||||||||
| Gewicht (Kg) 176 187 189 1800 191 194 185 196 | 207 | ||||||||
| Statische Druk (kg/m2) | 1351 | 1436 | 1449 | 1104 | 1172 | 1190 | 944 | 1000 | 1057 |
| Kracht van Trilelement (kN) | 35 | 35 | 35 | 35 | 35 | 35 | 35 | 35 | 35 |
| Frequentie (Hz) | 81 | 81 | 81 | 81 | 81 | 81 | 81 | 81 | 81 |
| Maximale Hellingshoek (°) | 20 | 20 | 20 | 20 | 20 | 20 | 20 | 20 | 20 |
| Maximumloopsnelheid (m/min) | 27 | 27 | 27 | 26 | 26 | 26 | 25 | 25 | 25 |
| *Drieastrilling (m/sec ^2 ) | 3.1 | 2.4 | 2.4 | 3.1 | 2.4 | 2.4 | 3.1 | 2.4 | 2.4 |
| Gemeten Geluidssterkteniveau (dB(A)) | 108 | 108 | 108 | 108 | 108 | 108 | 108 | 108 | 108 |
* Minimum niveau EN500 Deel 4.

natural_image
Close-up of a mechanical component with mounting holes and a vertical switch (no visible text or symbols)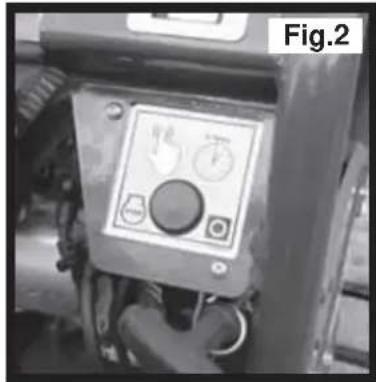
text_image
Fig.2Aan-en Uitzetten
Hatz 1B20 Diesel Motor
De motor stoppen
natural_image
Close-up of a mechanical switch or lever mechanism with mounting holes and a labeled section 'Fig.1' (no other text or symbols visible)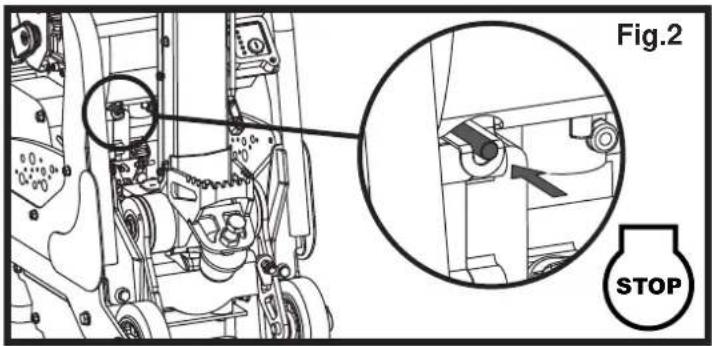
text_image
Fig.2 STOP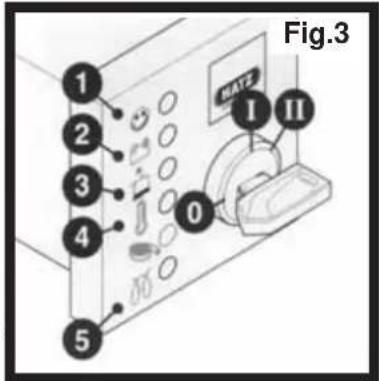
text_image
Fig.3 1 2 3 4 0 I II 5
VOORZICHTIG
Altrad Belle Warranty Department,
Sheen, Nr. Buxton
Derbyshire
SK17 0EU
England
text_image
QR code image containing encoded data, no visible human-readable text
natural_image
Technical line drawing of a mechanical device with no visible text or symbols
text_image
1264 326 809| Model RPX 35/40 RPX 35/50 RPX 35/60 | |||||||||
| Motor | Honda GX200 | Hatz 1B20 | Hatz 1B20 Electric Start | Honda GX200 | Hatz 1B20 | Hatz 1B20 Electric Start | Honda GX200 | Hatz 1B20 | Hatz 1B20 Electric Start |
| Motoreffekt (Hp / kW) | 5.5/4.0 | 4.2/3.1 | 4.2/3.1 | 5.5/4.0 | 4.2/3.1 | 4.2/3.1 | 5.5/4.0 | 4.2/3.1 | 4.2/3.1 |
| Motorens Omdrejninger pr.minut 3000 3000 3000 3000 3000 3000 3000 3000 3000 3000 3000 3000 3000 3000 3000 3000 3000 3000 3000 3000 300 | 3000 3000 3000 3000 3000 3000 3000 3000 3000 3000 3000 3000 3000 3000 3000 3000 3000 3000 3000 3000 | 3000 3000 3000 3000 3000 3000 3000 3000 3000 3000 3000 3000 3000 3000 3000 3000 3000 3000 3000 3 | 3000 3000 3000 3000 3000 3000 3000 3000 3000 3000 3000 3000 3000 3000 3000 3000 3000 3000 3000 300 | 1800 | 191 | 194 | 185 | 196 | 207 |
| Vægt (Kg) | 176 | 187 | 189 | 1800 | 191 | 194 | 185 | 196 | 207 |
| Static Pressure (kg/m2) | 1351 | 1436 | 1449 | 1104 | 1172 | 1190 | 944 | 1000 | 1057 |
| Vibratorkraft (kN) | 35 | 35 | 35 | 35 | 35 | 35 | 35 | 35 | 35 |
| Frekvens (Hz) | 81 | 81 | 81 | 81 | 81 | 81 | 81 | 81 | 81 |
| Maksimale Stigning (°) | 20 | 20 | 20 | 20 | 20 | 20 | 20 | 20 | 20 |
| Maks. Kørehastighed (m/min) | 27 | 27 | 27 | 26 | 26 | 26 | 25 | 25 | 25 |
| *3-Akset Vibration (m/sec ^2 ) | 3.1 | 2.4 | 2.4 | 3.1 | 2.4 | 2.4 | 3.1 | 2.4 | 2.4 |
| Stojniveau (dB(A)) | 108 | 108 | 108 | 108 | 108 | 108 | 108 | 108 | 108 |
* Minimalt niveau i henhold til EN500, 4. del
natural_image
Close-up of a mechanical component with mounting holes and a vertical slot, labeled Fig.1 (no readable text or symbols)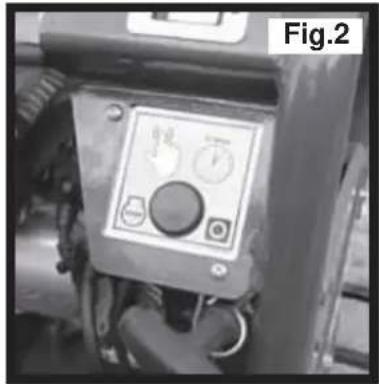
natural_image
Close-up of a mechanical control panel with buttons and gauges, labeled Fig.2 (no readable text or symbols beyond label)Hatz 1B20 Diesel Motor
Stoppe motoren
natural_image
Close-up of a mechanical switch or bracket component with mounting holes and a labeled section 'Fig.1' (no other text or symbols visible)Hatz 1B20 Diesel Motor (Elektrisk start)
Stoppe motoren
text_image
Fig.2 STOP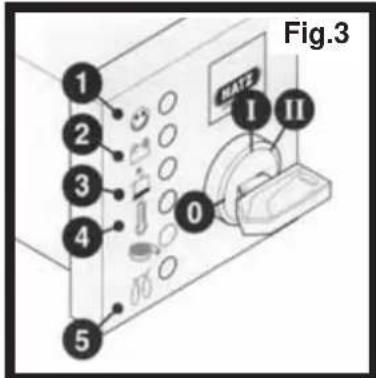
text_image
Fig.3 1 2 3 4 0 I II 5
FORSIGTIG
Altrad Belle Warranty Department
Sheen, Nr. Buxton
Derbyshire
SK17 0EU
England
Garantiregistrering:
text_image
QR code image containing encoded data, no visible human-readable textReservedele

natural_image
Technical line drawing of a mechanical device with no visible text or symbols
text_image
1264 326 809| Modell RPX 35/40 RPX 35/50 RPX 35/60 | |||||||||
| Motor | Honda GX200 | Hatz 1B20 | Hatz 1B20 Electric Start | Honda GX200 | Hatz 1B20 | Hatz 1B20 Electric Start | Honda GX200 | Hatz 1B20 | Hatz 1B20 Electric Start |
| Motorstärke (Hp / kW) | 5.5/4.0 | 4.2/3.1 | 4.2/3.1 | 5.5/4.0 | 4.2/3.1 | 4.2/3.1 | 5.5/4.0 | 4.2/3.1 | 4.2/3.1 |
| Motordrehzahl 3000 3000 3000 3000 3000 3000 3000 3000 3000 3000 3000 3000 3000 3000 3000 3000 3000 3000 3000 3000 300 | 3000 3000 3000 3000 3000 3000 3000 3000 3000 3000 3000 3000 3000 3000 3000 3000 3000 3000 3000 3000 | ||||||||
| Gewicht (Kg) 176 187 189 1800 191 194 185 196 | 207 | ||||||||
| Verdichtungskraft (kg/m2) | 1351 | 1436 | 1449 | 1104 | 1172 | 1190 | 944 | 1000 | 1057 |
| Vibrationskraft (kN) | 35 | 35 | 35 | 35 | 35 | 35 | 35 | 35 | 35 |
| Frequenz (Hz) | 81 | 81 | 81 | 81 | 81 | 81 | 81 | 81 | 81 |
| Maximale Steigfähigkeit (°) | 20 | 20 | 20 | 20 | 20 | 20 | 20 | 20 | 20 |
| Maximale Fahrgeschwindigkeit (m/min) | 27 | 27 | 27 | 26 | 26 | 26 | 25 | 25 | 25 |
| *Dreidimensionale Vibration (m/sec ^2 ) | 3.1 | 2.4 | 2.4 | 3.1 | 2.4 | 2.4 | 3.1 | 2.4 | 2.4 |
| Schalldruckpegel (dB(A)) | 108 | 108 | 108 | 108 | 108 | 108 | 108 | 108 | 108 |
* EN500 Part 4 Unterer Füllstand.

Warum Rütteln?
natural_image
Close-up of a mechanical device with mounting holes and a switch, labeled Fig.1 (no readable text or symbols)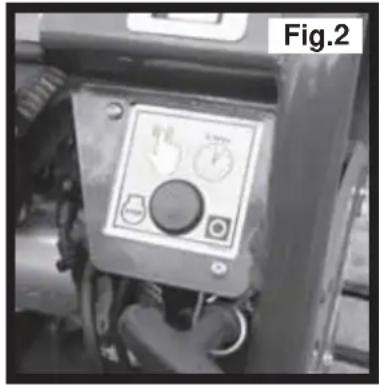
text_image
Fig.2Hatz 1B20 Diesel Motor
natural_image
Close-up of a mechanical switch or bracket component with mounting holes and a labeled section 'Fig.1' (no other text or symbols visible)
text_image
Fig.2 STOP
text_image
Fig.3 1 2 3 4 0 I II 5
WARNEN
Altrad Belle Warranty Department,
Sheen, Nr. Buxton
Derbyshire
SK17 0EU
England
text_image
QR code image containing encoded data, no visible human-readable text
Ersatzteile
natural_image
Technical line drawing of a mechanical device with no visible text or symbols
text_image
1264 326 809| Model RPX 35/40 RPX 35/50 RPX 35/60 | |||||||||
| Motor | Honda GX200 | Hatz 1B20 | Hatz 1B20 Electric Start | Honda GX200 | Hatz 1B20 | Hatz 1B20 Electric Start | Honda GX200 | Hatz 1B20 | Hatz 1B20 Electric Start |
| Motoreffekt (Hp / kW) | 5.5/4.0 | 4.2/3.1 | 4.2/3.1 | 5.5/4.0 | 4.2/3.1 | 4.2/3.1 | 5.5/4.0 | 4.2/3.1 | 4.2/3.1 |
| Motor Varvtal 3000 3000 3000 3000 3000 3000 3000 3000 3000 3000 3000 3000 3000 3000 3000 3000 3000 3000 3000 3000 300 | |||||||||
| Vikt (Kg) | 176 | 187 | 189 | 1800 | 191 | 194 | 185 | 196 | 207 |
| Packningskraft (kg/m2) | 1351 | 1436 | 1449 | 1104 | 1172 | 1190 | 944 | 1000 | 1057 |
| Vibrationskraft (kN) | 35 | 35 | 35 | 35 | 35 | 35 | 35 | 35 | 35 |
| Frekvens (Hz) | 81 | 81 | 81 | 81 | 81 | 81 | 81 | 81 | 81 |
| Maximalt Lutning (°) | 20 | 20 | 20 | 20 | 20 | 20 | 20 | 20 | 20 |
| Maximum Travel Speed (m/min) | 27 | 27 | 27 | 26 | 26 | 26 | 25 | 25 | 25 |
| *3 Axelvibration (m/sec2) | 3.1 | 2.4 | 2.4 | 3.1 | 2.4 | 2.4 | 3.1 | 2.4 | 2.4 |
| Ljudeffektnivå (dB(A)) | 108 | 108 | 108 | 108 | 108 | 108 | 108 | 108 | 108 |
natural_image
Close-up of a mechanical component with mounting holes and a vertical slot, labeled Fig.1 (no readable text or symbols)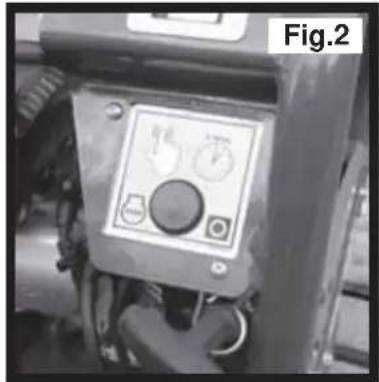
text_image
Fig.2Start och Stopp
Hatz 1B20 Diesel Motor
Stänga av motorn
- To stop the engine, set the throttle control to idle (See Fig. 1), then press and hold the red stop button until the engine stops (See Fig. 2).
Start av motorn
natural_image
Close-up of a mechanical switch or bracket component with mounting holes and a labeled section 'Fig.1' (no other text or symbols visible)Hatz 1B20 Diesel Motor (elektrisk start)
Stänga av motorn
text_image
Fig.2 STOPStart av motorn
text_image
Fig.3 1 2 3 4 0 I II
SE UPP
Altrad Belle Warranty Department,
Sheen, Nr. Buxton
Derbyshire
SK17 0EU
England
Garantiregistrering:
text_image
QR code image containing encoded data, no visible human-readable textReservdelar

natural_image
Technical line drawing of a mechanical device with no visible text or symbols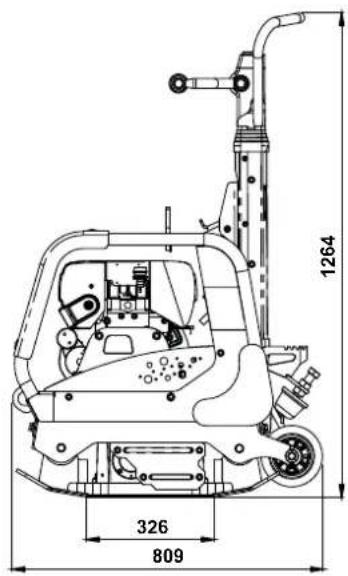
text_image
1264 326 809| Model RPX 35/40 RPX 35/50 RPX 35/60 | |||||||||
| Motor | Honda GX200 | Hatz 1B20 | Hatz 1B20 Electric Start | Honda GX200 | Hatz 1B20 | Hatz 1B20 Electric Start | Honda GX200 | Hatz 1B20 | Hatz 1B20 Electric Start |
| Motorkraft (Hp / kW) | 5.5/4.0 | 4.2/3.1 | 4.2/3.1 | 5.5/4.0 | 4.2/3.1 | 4.2/3.1 | 5.5/4.0 | 4.2/3.1 | 4.2/3.1 |
| Motor RPM 3000 3000 3000 3000 3000 3000 3000 3000 3000 3000 3000 3000 3000 3000 3000 3000 3000 3000 3000 3000 300 | 3000 3000 3000 3000 3000 3000 3000 3000 3000 3000 3000 3000 3000 3000 3000 3000 3000 3000 3000 3000 | ||||||||
| Vekt (Kg) | 176 | 187 | 189 | 1800 | 191 | 194 | 185 | 196 | 207 |
| Komprimeringskraft (kg/m2) | 1351 | 1436 | 1449 | 1104 | 1172 | 1190 | 944 | 1000 | 1057 |
| Vibratorkraft (kN) | 35 | 35 | 35 | 35 | 35 | 35 | 35 | 35 | 35 |
| Frekvens (Hz) | 81 | 81 | 81 | 81 | 81 | 81 | 81 | 81 | 81 |
| Maksimal Stigning (°) | 20 | 20 | 20 | 20 | 20 | 20 | 20 | 20 | 20 |
| Maksimal Ganghastighet (m/min) | 27 | 27 | 27 | 26 | 26 | 26 | 25 | 25 | 25 |
| *3 Aksevibrasjon (m/sec ^2 ) | 3.1 | 2.4 | 2.4 | 3.1 | 2.4 | 2.4 | 3.1 | 2.4 | 2.4 |
| Lydeffekt (dB(A)) | 108 | 108 | 108 | 108 | 108 | 108 | 108 | 108 | 108 |
natural_image
Close-up of a mechanical switch or lever mechanism with mounting flanges and a labeled section 'Fig.1' (no other text or symbols visible)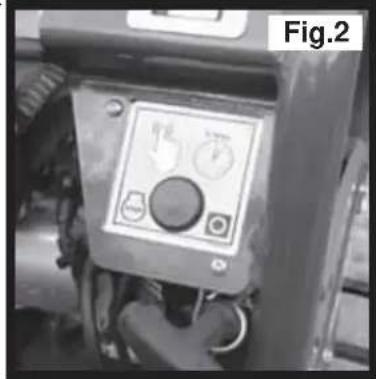
text_image
Fig.2Hatz 1B20 Diesel Motor
Stoppe motoren
natural_image
Close-up of a mechanical switch or bracket component with mounting holes and a labeled section 'Fig.1' (no other text or symbols visible)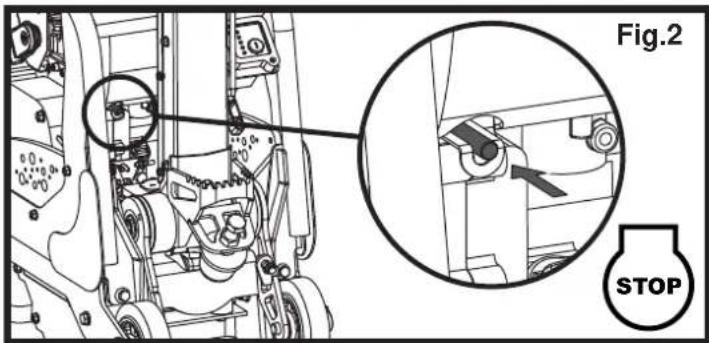
text_image
Fig.2 STOPStarte motoren
text_image
Fig.3 1 2 3 4 0 I II 5
OBS
text_image
QR code image containing encoded data, no visible human-readable text
Reservedeler
natural_image
Technical line drawing of a mechanical device with no visible text or symbols
text_image
1264 326 809| Malli RPX 35/40 RPX 35/50 RPX 35/60 | |||||||||
| Moottor | Honda GX200 | Hatz 1B20 | Hatz 1B20 Electric Start | Honda GX200 | Hatz 1B20 | Hatz 1B20 Electric Start | Honda GX200 | Hatz 1B20 | Hatz 1B20 Electric Start |
| Moottorin Teho (Hp / kW) | 5.5/4.0 | 4.2/3.1 | 4.2/3.1 | 5.5/4.0 | 4.2/3.1 | 4.2/3.1 | 5.5/4.0 | 4.2/3.1 | 4.2/3.1 |
| Moottorin RPM 3000 3000 3000 3000 3000 3000 3000 3000 3000 3000 3000 3000 3000 3000 3000 3000 3000 3000 3000 3000 300 | |||||||||
| Massa (Kg) | 176 | 187 | 189 | 1800 | 191 | 194 | 185 | 196 | 207 |
| Tiivistysvoima (kg/m2) | 1351 | 1436 | 1449 | 1104 | 1172 | 1190 | 944 | 1000 | 1057 |
| Tärinävoima (kN) | 35 | 35 | 35 | 35 | 35 | 35 | 35 | 35 | 35 |
| Taajuus (Hz) | 81 | 81 | 81 | 81 | 81 | 81 | 81 | 81 | 81 |
| Maksimi Kaltevuus (°) | 20 | 20 | 20 | 20 | 20 | 20 | 20 | 20 | 20 |
| Suurin kulkunopeus (m/min) | 27 | 27 | 27 | 26 | 26 | 26 | 25 | 25 | 25 |
| *3 Suunnan Tärinä (m/sec2) | 3.1 | 2.4 | 2.4 | 3.1 | 2.4 | 2.4 | 3.1 | 2.4 | 2.4 |
| Äänen Voimakkuustaso (dB(A)) | 108 | 108 | 108 | 108 | 108 | 108 | 108 | 108 | 108 |
natural_image
Close-up of a mechanical switch or lever assembly with mounting holes and a labeled section 'Fig.1' (no readable text or symbols on the main subject)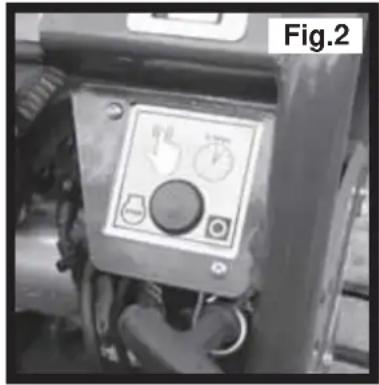
text_image
Fig.2Hatz 1B20 Diesel Moottori
Moottorin sammutus
natural_image
Close-up of a mechanical switch or bracket component with mounting holes and a labeled section 'Fig.1' (no other text or symbols visible)
text_image
Fig.2 STOPtext_image
Fig.3 1 2 3 4 0 I II 5
VAARA
Altrad Belle Warranty Department,
Sheen, Nr. Buxton
Derbyshire
SK17 0EU
England
text_image
QR code image containing encoded data, no visible human-readable textVaraosat

natural_image
Technical diagram of a vehicle engine compartment showing internal components and labeled parts H and L (no text or symbols beyond labels)natural_image
Technical line drawing of a mechanical device with no visible text or symbols
text_image
1264 326 809Procedura Start i Stop
natural_image
Close-up of a mechanical component with mounting holes and a vertical slot, labeled 'Rys.1' in the top right corner (no other text or symbols visible)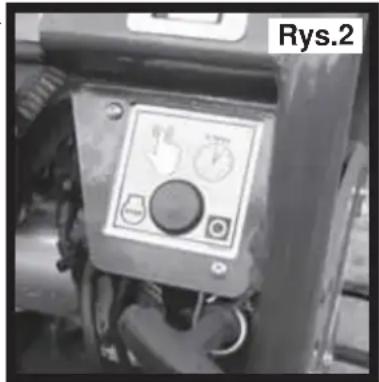
text_image
Rys.2Procedura Start i Stop
Hatz Silnik Diesla 1B20
Wyłączanie silnika
natural_image
Close-up of a mechanical switch or bracket component with mounting holes and a label 'Rys.1' in the corner (no other text or symbols visible)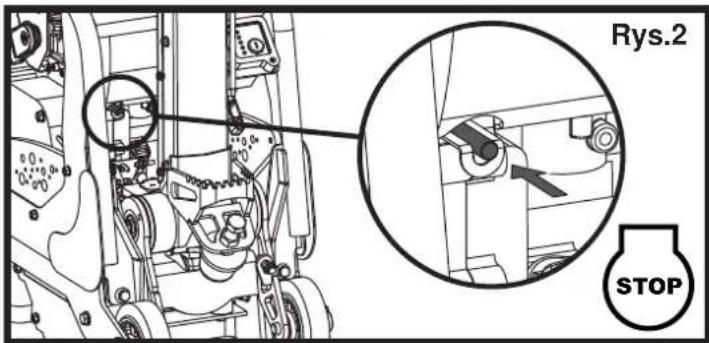
text_image
Rys.2 STOP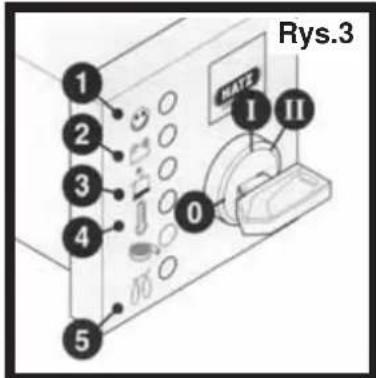
text_image
Rys.3 1 2 3 4 0 I II
UWAGA
Altrad Belle Warranty Department
Sheen, Nr. Buxton,
Derbyshire,
SK17 0EU
England.
natural_image
Technical line drawing of a mechanical device with no visible text or symbols
text_image
1264 326 809natural_image
Close-up of a mechanical component with mounting holes and a vertical slot, labeled Fig.1 (no readable text or symbols)
text_image
Fig.2Hatz 1B20 Дизель
Останов двигателя
natural_image
Close-up of a mechanical switch or bracket component with mounting holes and a labeled section 'Fig.1' (no other text or symbols visible)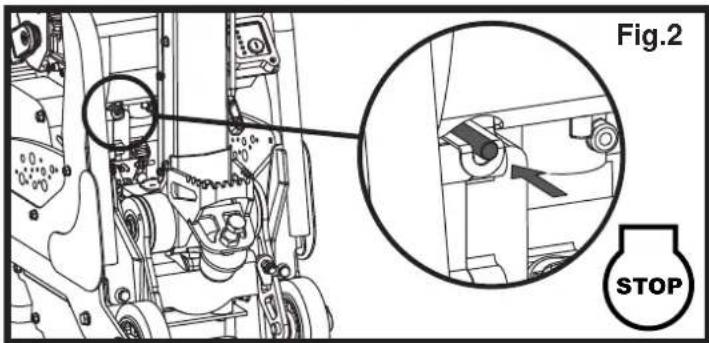
text_image
Fig.2 STOP
text_image
Fig.3 1 2 3 4 0 I II
ВНИМАНИЕ
Altrad Belle Warranty Department
Sheen, Nr. Buxton
Derbyshire
SK17 0EU
England
text_image
QR code image containing encoded data, no visible human-readable textЗапасные Части