CPRT615NR - Warming drawers and cabinets SMEG - Free user manual and instructions
Find the device manual for free CPRT615NR SMEG in PDF.
| Product type | Warming drawer |
| Brand | Smeg |
| Model | CPRT615NR |
| Dimensions (W x D x H) | 597 x 560 x 127.5 mm |
| Maximum load capacity | 15 kg |
| Power supply | 230 V, 50/60 Hz |
| Temperature range | 30 °C to 85 °C (in 5 °C increments) |
| Timer | 30 min to 24 h |
| Delayed start | 1 h to 24 h (in 1 h increments) |
| Heating functions | Rising (30-35 °C), defrosting (40-45 °C), cup warming (50-55 °C), dish warming (60-65 °C), reheating (70-75 °C), low-temperature cooking (80-85 °C) |
| Sabbath function | Yes, 80 h at 45 °C |
| Display | Digital LED with icons |
| Fan | Yes, hot air circulation |
| Non-slip base | Yes, removable |
| Surface material | Stainless steel and enamel |
| Cleaning | Damp cloth, non-abrasive detergent; non-slip base washable with warm water |
| Safety | Child lock (not specified), automatic shut-off after 10 h if >65 °C |
| Installation | Built-in, requires a rear opening of 20 mm |
| Weight (approx.) | Approximately 12 kg (estimated) |
Frequently Asked Questions - CPRT615NR SMEG
User questions about CPRT615NR SMEG
0 question about this device. Answer the ones you know or ask your own.
Ask a new question about this device
Download the instructions for your Warming drawers and cabinets in PDF format for free! Find your manual CPRT615NR - SMEG and take your electronic device back in hand. On this page are published all the documents necessary for the use of your device. CPRT615NR by SMEG.
USER MANUAL CPRT615NR SMEG
text_image
Diagram of a device control panel with numbered labels pointing to various function icons and symbols.natural_image
Technical line drawing of a mechanical frame assembly (no text or symbols)natural_image
Technical line drawing of a structural frame with mounting brackets and directional arrows indicating movement (no text or symbols)1.1 General safety warnings
Risk of personal injury
- This appliance and its accessible parts become very hot during use.
- Do not touch the heating elements during use.
- Keep children under the age of eight at a safe distance unless they are constantly supervised.
- Children must not play with the appliance.
- This appliance may be used by children aged at least 8 and by people of reduced physical, sensory or mental capacity, or lacking in experience in the use of electrical appliances, provided that they are supervised or instructed by adults who are responsible for their safety.
- Never rest metallic objects such as knives, forks, spoons and lids on the appliance during use.
- Turn off the appliance after use.
- Do not attempt to put out a fire or flames with water: turn off the appliance and smother the flames with a lid or a fire blanket.
- Cleaning and maintenance must not be carried out by unsupervised children.
- Installation and maintenance should be carried out by qualified personnel in compliance with the regulations in force.
- Do not modify this appliance.
- Do not insert pointed metal objects (cutlery or utensils) into the slots in the appliance.
- Do not try to repair the appliance yourself or without the intervention of a qualified technician.
- Do not place plastic containers or inflammable objects in the drawer.
- If the power cable becomes damaged, contact technical support immediately to arrange for its replacement.
Risk of damaging the appliance
- Do not use abrasive or corrosive detergents (e.g. scouring powders, stain removers or metallic scourers).
- Do not seat on the appliance.
- Do not use steam jets to clean the appliance.
- Do not obstruct openings, ventilation slots and heat dissipation vents.
- Do not use the appliance to heat the room for any reason.
For this appliance:
- Do not rest any weight or sit on the open drawer.
• Take care that no objects are stuck in the drawer.
1.2 Manufacturer's liability
The manufacturer declines all liability for damage to persons or property caused by:
- Using the appliance other than for the use intended;
- Failure to comply with the instructions in the user manual;
- Tampering with any part of the appliance;
- The use of non-original spare parts.
1.3 Intended use
- This appliance is intended for heating food and dishes in the home. Every other use is considered improper.
- This appliance may be used by children aged at least 8 and by people of reduced physical, sensory or mental capacity, or lacking in experience in the use of electrical appliances, provided that they are supervised or instructed by adults who are responsible for their safety.
- This appliance is not designed to work with external timers or remote control systems.
- The front panel of the drawer is fitted with a light guide that allows you see whether the device is switched on or off from various angles.
1.4 Disposal
This appliance must be disposed of separately from other waste (Directives 2002/95/EC, 2002/96/EC, 2003/108/EC).
The appliance does not contain substances in quantities sufficient to be considered hazardous to health and the environment, in accordance with current European directives. To dispose of the appliance:
- Cut the power cable.
Remove the power cable together with the plug.
Live components Electrocution hazard
- Switch off the mains power supply
-
Unplug the power cable from the power outlet
-
Take the appliance to a recycling centre for electrical and electronic equipment waste, or return it to the retailer when purchasing an equivalent product, on a one for one basis.
Our appliances are packaged in non-polluting and recyclable materials. - Deliver the packing materials to the appropriate recycling centre.
Plastic packaging Danger of suffocation
- Do not leave the packaging or any part of it unattended.
- Do not let children play with the plastic bags.
1.5 Identification plate
The identification plate bears the technical data, serial number and brand name of the appliance. Do not remove the identification plate for any reason.
1.6 About this user manual
We recommend that you read this manual carefully, as it contains the instructions necessary for maintaining the appliance's aesthetic and functional qualities.
This user manual is an integral part of the appliance and must be kept intact and available to users for the entire life cycle of the appliance.
For further information on the product: www.smeg.com
Read this user manual carefully before using the appliance.
1.7 How to read the user manual
This user manual uses the following reading conventions:

Warnings, general information about this user manual

Description of the appliance and its accessories

Information on the use of the appliance and its accessories. Cooking advice

Cleaning and maintenance, information on how to clean and maintain the appliance correctly
Safety warning

uggestion
Information
2 Description
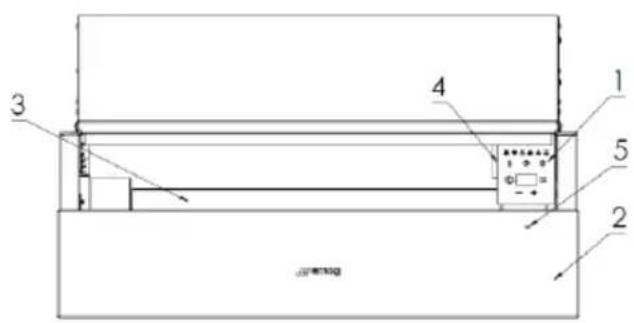
2.1 General description
text_image
Technical diagram of a refrigerator or refrigerator with labeled components and internal structure- Control panel
- Front panel with push-push mechanism
- Non-slip base
- Heating fan
- Operation indicator
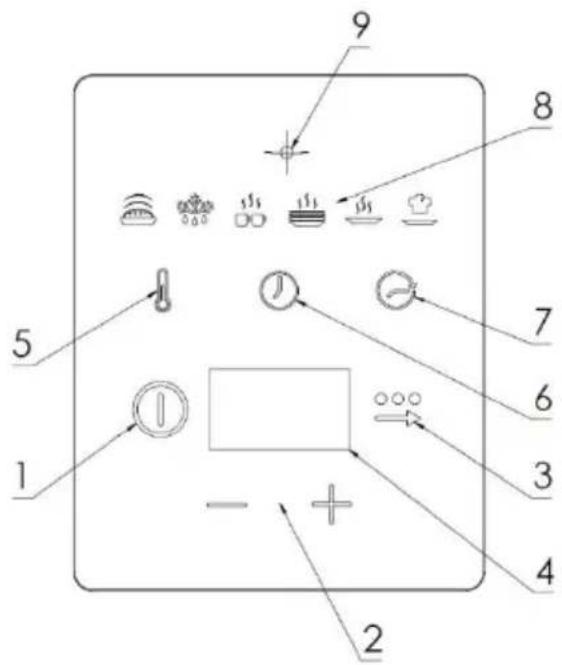
2.2 Control panel
text_image
Diagram of a device control panel with numbered labels pointing to various function icons and buttons.- Warming drawer on/off.
- Increase or decrease the value selected “+ -”.
- Menu settings. Used to set the heating temperature (5), timer (6) and delayed start (7).
- Display; displays the set values.
- Indicates that the "heating temperature" selection function is enabled.
- Indicates that the "timer" function is enabled.
- Indicates that the "delayed start" function is enabled.
- Shows the heating functions that have been set.
- ON/OFF LED. Lights up when the drawer is in operation or is programmed with a delayed start.
3 Use
This appliance is equipped with a warm air circulation system. A fan distributes the heat generated by the heating element uniformly throughout the drawer.
The display can be used to check that the temperature set for dishes and food in the draw is correct. The circulating warm air heats up the food quickly and evenly.
A protective grille prevents accidental contact with the heating element and fan. A non-slip mat on the bottom of the drawer prevents the dishes from moving when the drawer is opened or closed.
Capacity:
Incorrect use Risk of damage to the appliance
- Load the drawer with a maximum of 15 kg.
3.1 Warnings

Warnings regarding the
warming drawer when in use.
- Keep the drawer closed when in operation.
- Wear oven gloves to protect your hands when handling dishes and food inside the drawer.
- Do not touch the heating elements inside the drawer.
- Do not allow children to get near to the drawer when it is in use.
- High temperature inside the drawer during use; danger of fire or explosion
- Do not spray aerosol products near the drawer.
- Do not use or leave flammable materials near the drawer.
- Do not use plastic dishes or containers to warm food.
- Do not place metal containers or closed containers in the drawer.
3.2 First use
- Remove any protective film from the outside or inside of the appliance.
- Remove all labels (apart from the identification label)
- Clean the appliance using a damp cloth.
• Dry the appliance thoroughly. - Heat the empty appliance at maximum temperature for at least two hours to remove any residues left by the manufacturing process.
3.3 Daily Use
To use the warming drawer, proceed as follows:
- Place the food on a plate or in a dish.
- Do not obstruct the slots of the electric heater. The hot air should be free to escape from the grid. This allows the best heat distribution inside the drawer.
- Switch on the drawer and select the temperature in order to set the required function. Select the timer or delayed start, if necessary.
- Close the drawer carefully, without using excessive force. It may remain open.
3.4 Switching on
Press and hold the button for at least 1 second. The drawer will emit a beep.
3.5 Setting the heating temperature
When starting the appliance you can use the buttons to set the temperature from 30°C and 85°C in steps of 5°C. The drawer will emit three beeps when it reaches the set temperature.
3.6 Setting the TIMER
Once the temperature has been set, press and hold the button until the icon lights up. It is possible to set a timer having a duration ranging from 30 minutes to 24h, with 15-minute selection intervals for the first 10h and with 1h intervals from 10h to 24h. If the set temperature is higher than 65°C, the drawer will switch off automatically after 10 h of operation.
3.7 Setting a delayed start
A delayed start, from 1h to 24h, in 1h intervals, can be set for the warming drawer by pressing and holding the button until the icon is activated. The drawer automatically enables the function that has been set when the selected time elapses.
4 Warming functions
| Symbol | °C | Function |
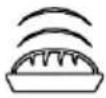 | 30°C35°C | Proving |
 | 40°C45°C | Defrosting |
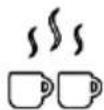 | 50°C55°C | Warming cups |
 | 60°C65°C | Warming dinner plates |
 | 70°C75°C | Reheating food |
 | 80°C85°C | Low-temperature cooking |
4.1 Heating times
Various factors affect food heating times:
- The material and thickness of the dishes used.
• The amount of food.
• How the dishes are arranged.
• The temperature setting. - Repeated opening and closing of the warming drawer.
It is therefore not possible to give precise heating times. Using the appliance regularly will allow you to determine the most suitable settings
for achieving the required result. For best results, preheat the warming drawer at the required temperature for 15 minutes.
4.2 Start of heating
Heating will start if you do not interact with the display for 10 consecutive seconds. The LED (9) remains lit for the entire duration of the selected function.
If you do not interact with the display when you switch the appliance on, the drawer is automatically set to 30°C for 30 minutes.
4.3 During heating
When the "delayed start"
function is set, the icon lights up, the LED (9) starts to flash and the display indicates the time remaining until switch on.
Once the "delayed start" function has ended, the drawer is activated, the LED (9) becomes steady and the icon lights up while the display shows the heating temperature.
4.4 Switching off
The appliance is switched off by touching the button for about 1 second. Once switched off, the drawer
reverts to the default configuration. When a timer is set, the drawer switches off automatically once the heating cycle has ended.
4.5 Modifying parameters during heating
Touch the button while the drawer is in operation and choose either the temperature or timer parameter to modify. To activate the "delay start" function, switch the drawer off and on again using the button
4.6 Sabbath function
The Sabbath function can be activated within the first 10 seconds after switching on the warming drawer. To activate it, press and hold the buttons simultaneously for about 4 seconds. Appears on the display.
None of the parameters can be modified during this function and the temperature is automatically set to a value of approximately 45^ C for 80 consecutive hours. To return to the initial settings, switch off the warming drawer. The drawer switches off automatically after 80 hours of operation.
4.7 Low-temperature cooking
This setting is used for slow cooking, at a low temperature and to continue cooking small to medium fine cuts, such as beef, veal, pork and lamb with a maximum diameter of 6 cm. For larger cuts, we recommend preparing them in an oven or combi steam oven.
With a longer cooking time of about 2/3 hours at low temperature, the meat remains succulent and tender.
Preparation: brown the meat before slow cooking it.
- Use suitable glass, porcelain or ceramic dishes
- Pre-heat the drawer with the dishes inside for 15 minutes
- Heat the oil or butter in a frying pan and brown the meat over high heat.
4.8 Suggestions
common everyday foods. Bread leavening, yoghurt fermentation and drying processes are indicated.
The following table shows the instructions for preparing some
| Symbol | Dish | °C | Function | Qty | Notes | Cooking time |
 | Focaccia | 30°C35°C | Dough proving | 500 g | Place the focaccia on aluminium foil | 1.5 h |
 | Yoghurt | 40°C45°C | Fermentation | Whole milk 1.5 l, milk yoghurt 375g, 9 glass bowls | Pour the milk and yoghurt into a bowl, blend well using an immersion blender and pour into glass jars. Close them with caps/lids and place them in the drawer. | 8 h |
 | Tomatoes | 60°C65°C | Drying | 250 g | Use sheets of oven paper in direct contact with the glass, cut the tomatoes in half, add salt. Turn the tomatoes over every 3 hours | 8/10 h |
| Herbs: rosemary, sage, parsley | 200 g | Use sheets of oven paper in direct contact with the glass | ||||
| Apples | 1 apple, 1⁄2 lemon, water | Cut the apple into thin slices. Heat in a bowl with water and lemon for 5 minutes. Then place on the oven paper. |
5 Cleaning and Maintenance
5.1 Warnings

Improper use Risk of damage to surfaces
- Do not use steam jets to clean the appliance
- Do not use detergents which are abrasive, corrosive or which contain chlorine, ammonia or bleach (e.g. scouring powders, stain removers, etc.).
- Do not use rough or abrasive materials or sharp metal scrapers.
5.2 Cleaning the appliance
To keep the surfaces in good condition, they should be cleaned regularly after use. Let them cool first.
Do not allow food residues to dry inside the drawer as it could damage the enamel.
To clean the drawer:
- Remove the non-slip base.
- Apply some non-abrasive detergent to a damp cloth and wipe the surfaces.
- Rinse thoroughly.
- Dry with a soft cloth or a microfibre cloth.
To clean the non-slip base:
-
Remove the non-slip base.
-
Clean with lukewarm water or a non-abrasive detergent.
- Dry thoroughly with a soft cloth or a microfibre cloth.
- Put the base back in the drawer when thoroughly dry.
5.3 What to do if...
Below is a list of possible solutions to malfunctions that may occur.
If the problem has not been resolved or for other types of fault, contact Technical Assistance.
The dishes do not warm up:
- Make sure that the appliance is connected to the mains power supply.
- Make sure that the mains power supply switch is on.
- Make sure that the ventilation openings are unobstructed.
- Make sure that you can hear the fan and contact Technical Assistance.
- Leave the dishes in the drawer for longer.
The draw does not open:
- Grasp the bottom of the drawer and pull until it is released.
The main switch or the circuit breaker of the mains power supply trip repeatedly:
- Contact Technical Assistance or an electrician.
6 Installation
6.1 Electrical connection

Live components Electrocution hazard
- The electrical connection should be performed by a qualified technician.
- The appliance should be earthed in compliance with electrical safety standards.
- Switch off the mains power supply.

Heat is generated when the appliance is in operation Fire hazard
- Make sure that the furniture is heat resistant.
- Make sure that the piece of furniture has the required openings.

Force on the open drawer Risk of damage to the appliance
- Never use the open drawer to lever the appliance into place when fitting.
- Avoid exerting too much pressure on the drawer when open.
General information:
Make sure that the characteristics of the mains power supply are compatible with the specifications indicated on the plate.
The identification plate bearing the technical data, serial number and brand name is located in a visible position on the appliance.
Do not remove the plate for any reason. The appliance works at 230V. Use the power cable supplied with the appliance.
Fixed connection:
Fit an all-pole circuit breaker to the power line in compliance with installation regulations.
The circuit breaker should be located near the appliance and in an easily accessible position.
Connection with plug and socket
Make sure that the plug and socket are of the same type. Avoid using adapters and shunts as these could cause overheating and burns.
6.2 Positioning

Heavy appliance Crushing hazard
- Position the appliance into the cabinet cutout with the help of a second person.
General instructions:
- Position the drawer on a stable shelf.
- The supporting surface must have a 20 mm rear opening.
- The unit in which the drawer is installed must not have a back panel.
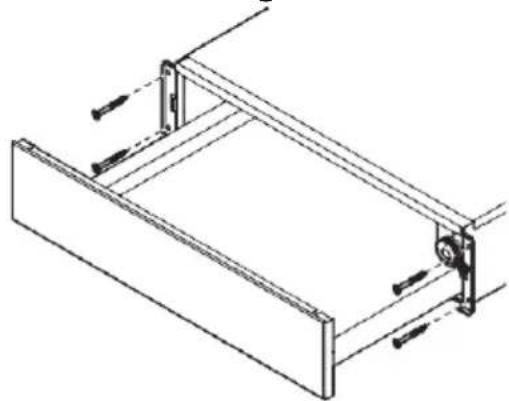
Installing the appliance
- Centre and line up the drawer in the opening. Ensure that the frame is perfectly flush with the furniture unit.
- Open the drawer.
- Secure the appliance to the carcase using the screws.
natural_image
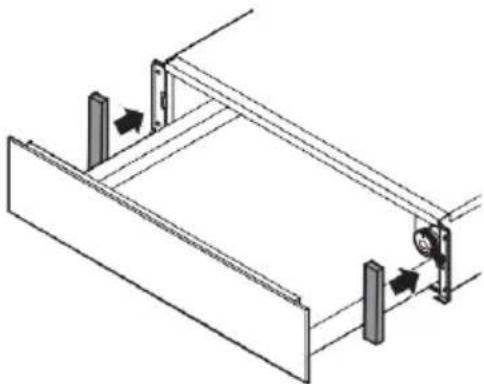
Technical line drawing of a mechanical frame assembly (no text or symbols)- Position the side covers
natural_image
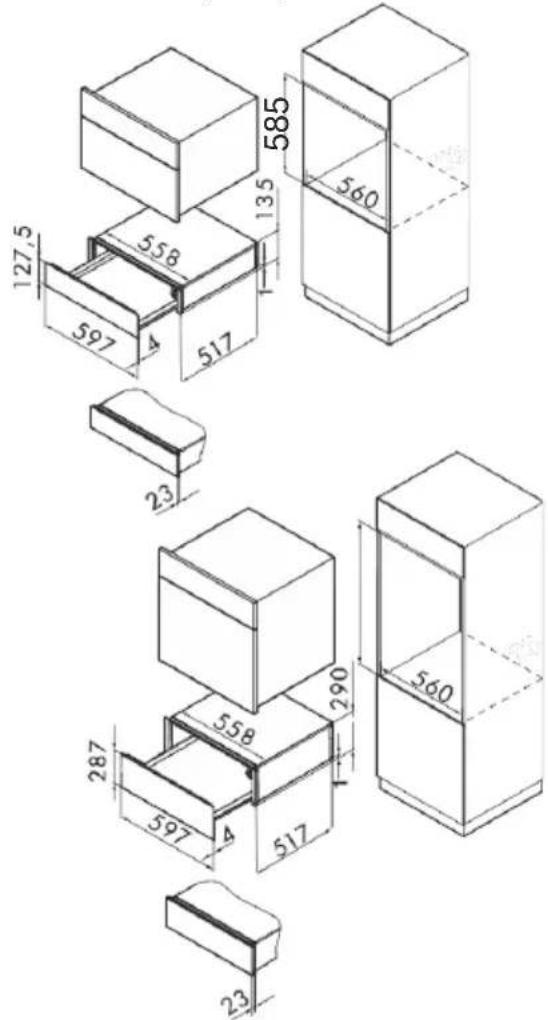
Technical line drawing of a mechanical assembly with two vertical supports and a central mounting bracket (no text or symbols)Appliance dimensions (mm)
text_image
127,5 597 558 4 517 135 585 560 23 287 597 4 517 290 560 237 Environmental protection

Recycle materials with the symbol. Place the packaging in the corresponding recycling containers.
Help protect the environment and human health and to recycle waste from electrical and electronic appliances.

Do not dispose of appliances marked with the following
symbol together with general household waste. Take the product to your local recycling facility or contact your local council.
1 Avertissements
text_image
Diagram of a device control panel with numbered labels pointing to various function icons and symbols.natural_image
Technical line drawing of a mechanical frame assembly (no text or symbols)natural_image
Technical line drawing of a mechanical assembly with two vertical supports and a central mounting bracket (no text or symbols)text_image
Diagram of a device control panel with numbered labels pointing to various function icons and symbols.natural_image
Technical line drawing of a mechanical frame assembly (no text or symbols)natural_image
Technical line drawing of a mechanical assembly with two vertical supports and a central component (no text or symbols)text_image
Diagram of a device control panel with labeled components and icons for display or navigationnatural_image
Technical line drawing of a mechanical frame assembly (no text or symbols)- Posicione as tampas laterais

natural_image
Technical line drawing of a mechanical assembly with two vertical supports and a central rotating component (no text or symbols)text_image
Technical diagram of a refrigerant unit with labeled components and control paneltext_image
Diagram of a device control panel with numbered labels pointing to various function icons and buttons.natural_image
Technical line drawing of a mechanical frame assembly (no text or symbols)natural_image
Technical line drawing of a mechanical assembly with two vertical supports and a central mounting bracket (no text or symbols)Dimensiones del aparato (mm)
text_image
127,5 597 4 558 517 135 585 560
text_image
23 558 290 560 287 597 4 517 23text_image
Diagram of a device control panel with numbered labels pointing to various function icons and symbols.natural_image
Technical line drawing of a mechanical frame assembly (no text or symbols)natural_image
Technical line drawing of a mechanical assembly with two vertical supports and a central bracket (no text or symbols)text_image
Technical diagram of a mechanical or electrical component with numbered parts and labeled parts 1 through 5.text_image
Diagram of a device control panel with numbered labels pointing to various function icons and buttons.natural_image
Technical line drawing of a mechanical frame assembly (no text or symbols)natural_image
Technical line drawing of a mechanical assembly with two vertical supports and a central rotating component (no text or symbols)text_image
Diagram of a device control panel with numbered labels pointing to various function icons and symbols.natural_image
Technical line drawing of a mechanical frame assembly (no text or symbols)natural_image
Technical line drawing of a mechanical assembly with two vertical supports and a central valve (no text or symbols)Apparatets pladsbehov (mm)

text_image
127,5 597 558 4 517 585 135 560 23 287 597 4 517 290 560 237 Miljøhensyn

Genbrug materialer med symbolet. Anbring emballagematerialet i passende beholdere til genbrug.
text_image
Technical diagram of a mechanical or electrical component with numbered parts and labeled parts 1 through 5.text_image
Diagram of a device control panel with numbered labels pointing to various function icons and buttons.4.3 Under oppvarmingen
natural_image
Technical line drawing of a mechanical frame assembly (no text or symbols)- Plasser sidedekslene
natural_image
Technical line drawing of a mechanical assembly with two vertical supports and a central pressure gauge (no text or symbols)Produktets størrelse (mm)

text_image
127,5 597 558 4 517 585 135 560 23 287 597 558 4 517 290 560 237 Miljøvern

text_image
Diagram of a device control panel with numbered labels pointing to various function icons and symbols.natural_image
Technical line drawing of a mechanical frame assembly (no text or symbols)natural_image
Technical line drawing of a mechanical assembly with two vertical supports and a central mounting bracket (no text or symbols)text_image
Technical diagram of a mechanical or electrical component with numbered parts labeled 1 to 5text_image
Diagram of a device control panel with numbered labels pointing to various function icons and buttons.natural_image
Technical line drawing of a mechanical frame assembly (no text or symbols)natural_image
Technical line drawing of a mechanical assembly with two vertical supports and a central mounting bracket (no text or symbols)natural_image
Technical line drawing of a mechanical frame assembly (no text or symbols)- Aseta sivukannet

natural_image
Technical line drawing of a mechanical assembly with two vertical supports and a central mounting bracket (no text or symbols)Laitteen mitat (mm)
text_image
127,5 597 4 558 517 135 585 560 23 287 597 4 558 290 517 23 5607 Ympäristönsuojelu

natural_image
Technical line drawing of a mechanical frame assembly (no text or symbols)natural_image
Technical line drawing of a mechanical frame with mounting brackets and directional arrows indicating movement (no text or symbols)معلومات عامة:
text_image
Labeled diagram of a kitchen appliance with numbered parts and icons for cooking, heating, and cleaning functions.text_image
Technical diagram of a mechanical or electrical component with numbered parts labeled 1 through 5.text_image
Warning symbol collage showing warning, open book, hand holding pen, and toolY.(2003/108/EC·2002/96/EC