
SMSG01 - Other Kitchen Appliances SMEG - Free user manual and instructions
Find the device manual for free SMSG01 SMEG in PDF.


| Product type | Espresso coffee machine with milk frother |
| Brand | Smeg |
| Model | SMSG01 |
| Dimensions (L x W x H) | 30 x 20 x 30 cm |
| Weight | 4 kg |
| Power supply | 220-240 V, 50/60 Hz |
| Power | 1350 W |
| Pump pressure | 15 bar |
| Water tank capacity | 1.4 L |
| Main functions | Espresso, cappuccino, latte macchiato, steam function |
| Heating system | Stainless steel thermoblock |
| Coffee type | Ground coffee or ESE pods (Easy Serving Espresso) |
| Milk frother | Integrated, adjustable, to froth and heat milk |
| Maintenance and cleaning | Regular descaling with citric acid, clean filter holder and frother after each use |
| Safety | Automatic shut-off after 30 minutes of inactivity, overheat protection |
| Spare parts and repairability | Water tank, filter holder, coffee basket, milk frother available online |
| Color | Black, white, red, cream (subject to availability) |
| General information | 1950s design kitchen appliance, Italian manufacturing, 2-year warranty |
Frequently Asked Questions - SMSG01 SMEG
User questions about SMSG01 SMEG
0 question about this device. Answer the ones you know or ask your own.
Ask a new question about this device
Download the instructions for your Other Kitchen Appliances in PDF format for free! Find your manual SMSG01 - SMEG and take your electronic device back in hand. On this page are published all the documents necessary for the use of your device. SMSG01 by SMEG.
USER MANUAL SMSG01 SMEG
natural_image
Line drawing of a kitchen grater with a side panel and handle (no text or symbols)SMSG01
Accessorio Grattugia a cilindri
Sommario
1 Avvertenze 4
SMSG01 - Accessorio grattugia a cilindri
natural_image
Illustration of a cylindrical mechanical component with multiple circular indentations and a central shaft (no text or symbols)natural_image
Technical line drawing of a conical mechanical component with internal blades and a protruding shaft (no text or symbols)natural_image
Technical line drawing of a rectangular mechanical component with textured surface (no text or symbols)natural_image
Illustration of a hand using a tool to adjust or install a mechanical component, with no visible text or symbols.Sminuzzatura media
natural_image
Illustration of a cylindrical mechanical component with evenly spaced slots and a protruding handle (no text or symbols)natural_image
Technical line drawing of a conical bell device (no text or symbols)Thank you for choosing a Smeg product.
By choosing Smeg, you have selected an appliance which combines iconic style with innovative technical design and attention to detail.
This appliance coordinates perfectly with other Smeg products, or works equally well as a standalone statement piece in your kitchen.
We hope you enjoy using your new appliance!
For any further information please visit www.smeg.com or www.smegusa.com (website valid only for the USA, Canada and South America).

natural_image
Line drawing of a kitchen grater with a side panel and handle (no text or symbols)SMSG01 Rotary slicer and shredder accessory
The manufacturer reserves the right to make any changes deemed useful for improvement of its products without prior notice. The illustrations and descriptions contained in this manual are therefore not binding and are merely indicative.
Contents
1 Instructions 21
1.1 Introduction 21
1.2 User manual 21
1.3 Intended use 21
1.4 Manufacturer liability 22
1.5 Disposal 22
2 Description 23
2.1 Product description 23
2.2 Description of parts 24
3 Use 25
3.1 Before first use 25
3.2 Installing on the stand mixer attachment 26
3.3 Using the rotary slicer and shredder accessory 29
4 Cleaning and Care 30
4.1 Instructions 30
4.2 Maintenance 30
4.3 Cleaning the rotary slicer and shredder accessory 30
Important Safeguards
WARNING: If the instructions contained in this manual are not followed precisely, fire or explosion may result causing property damage, personal injury or death.

READ AND SAVE THESE INSTRUCTIONS - Your safety and the safety of others are very important.
We have provided many important safety messages throughout this manual and on the appliance.
Read all the instructions before using the appliance and always obey all safety messages.


Important Safeguards

RECOGNIZE SAFETY INFORMATION
This is a safety alert symbol. This symbol alerts you to potential hazards that can result in severe personal injury or death.
UNDERSTAND SIGNAL WORDS
A signal word - DANGER, WARNING or CAUTION - is used with the safety alert symbol. DANGER denotes the most serious hazards. It means you could be killed or seriously injured if you do not immediately follow the instructions.
WARNING means you could be killed or seriously injured if the instructions are not followed. CAUTION indicates a potentially hazardous situation, which, if not avoided, could result in minor to moderate injury.
WARNING

• This appliance is intended for use in the home only.
- Use this appliance only for its intended purpose. The manufacturer cannot be held liable for damage caused by improper use of this appliance.
- This appliance complies with current safety regulations. Improper use of this appliance can result in personal injury and material damage.
- Read all the instructions before installing or using the appliance for the first time.
- Keep these operating instructions in a safe place and pass them on to any future user.
The safety messages will inform you of potential hazards, on how to avoid the risk of injury and what can occur if the instructions are not followed.
IMPORTANT: Observe all codes and ordinances in force.
WARNING: For your safety, the instructions contained in this manual must be followed to minimize the risk of fire or explosion and to prevent property damage, personal injury or death.
Do not store or use gasoline or other flammable vapors, liquids or materials near this or any other appliance.

NOTE: This appliance is NOT designed for installation in manufactured (mobile) homes or in recreational vehicles (RVs).
DO NOT install this appliance outdoors.
Important Safeguards
WARNING

To reduce the risk of fire, electrical shock, personal injury, or damage when using the appliance, follow basic safety precautions, including the following:
The rotary slicer and shredder accessory is an accessory of the stand mixer.
Follow all safety instructions in order to use the appliance safely.
- Read this user manual and the manual supplied with the stand mixer carefully before using the appliance.
- To protect against electric shock, do not immerse the appliance, the power cord or the plug in water or any other liquid.
- Do not use the stand mixer when the power cord or the plug is damaged or after the appliance malfunctions, or when the appliance has fallen or is damaged in any manner. Return appliance to the nearest authorized service center for examination, repair or adjustment.
- If the power cord is damaged, it must be replaced by the manufacturer, its service agent or similarly qualified persons in order to avoid a hazard.
- The cable is short to prevent accidents. Do not use an extension cord.
- Do not let cord hang over edge of table or counter or touch hot surfaces.
- This appliance shall not be used by children.
-
Keep the appliance and its cord out of reach of children.
-
Do not place the appliance above or near lit gas or electric burners, inside an oven or near other heat sources.
- Switch off the appliance immediately after use.
- Turn the appliance OFF, then unplug from the outlet when not in use, before assembling or disassembling parts and before cleaning. To unplug, grasp the plug and pull from the outlet. Never pull from the power cord.
- This appliance is not intended for use by persons (including children) with reduced physical, sensory, or mental capabilities, or lack of experience and knowledge, unless they are closely supervised and instructed concerning use of the appliance by a person responsible for their safety.
- Do not attempt to defeat any safety interlock mechanisms.
- Do not leave the appliance unattended while it is operating.
- In case of fault, repairs should only be carried out by a qualified technician.
- Never try to put out a fire or flames with water: turn off the appliance, remove the plug from the socket and smother the flames with a fire blanket or any other appropriate cover.
- Do not modify the appliance.

Important Safeguards
For the appliance and the rotary slicer and shredder accessory
- Unplug the appliance from the power socket after use and before cleaning it.
- Do not use the rotary slicer and shredder accessory if the stand mixer power cord or the plug is damaged, or if the stand mixer has been dropped or is damaged in any manner.
- Do not use the rotary slicer and shredder accessory if it is damaged.
- Do not leave the rotary slicer and shredder accessory unattended while it is operating.
- Do not modify the rotary slicer and shredder accessory.
- Do not try to repair the rotary slicer and shredder accessory yourself or without the assistance of a qualified technician.
- Do not install, remove or replace standard accessories with the safety lock disengaged (motor head lowered).
- Do not use your hands to push foods into the funnel. Use the specific pusher accessory.
- The blades of the rotary slicer and shredder's cylinders are sharp. Be very careful when handling them.
- Never use your fingers to remove food residue from the rotary slicer and shredder's cylinders while the appliance is plugged in or operational. Danger of cuts!
- Foods must not contain stones, pits or other hard objects.
- Let cooked food cool down before cutting it, as the thicker consistency will give better results.
- Do not touch moving parts while the appliance is operating. Keep hands,
hair, clothing, spoons, spatulas and other objects at a safe distance from the rotary slicer and shredder accessory to avoid personal injury and/or damage to the stand mixer and rotary slicer and shredder accessory.
- Let the appliance cool down before cleaning.
- Only use original accessories provided and supplied by the manufacturer. The use of non-original components, utensils and accessories could lead to personal injury or damage to the stand mixer and rotary slicer and shredder accessory.
- Do not use harsh detergents or sharp objects to wash or remove residue from the bowl, utensils and rotary slicer and shredder accessory.
- Keep a close eye on children and ensure they do not play with the appliance.
- Turn off the stand mixer before fitting or removing the rotary slicer and shredder accessory.
- Do not remove the rotary slicer and shredder accessory while the stand mixer is operational. Check that the speed selector is in the 0 (OFF) position.
- Let the rotary slicer and shredder accessory cool down before cleaning.
- In order to avoid a hazard due to inadvertent resetting of the thermal cut-out, this appliance must not be supplied through an external switching device, such as a timer, or connected to a circuit that is regularly switched on and off by the utility.
SAVE THESE INSTRUCTIONS
Important Safeguards

1 Instructions
1.1 Introduction
Key information for the user:
Instructions

General information about this manual, safety and final disposal.
Description

Description of the rotary slicer and shredder accessory.
Use
Information on use of the rotary slicer and shredder accessory.
Cleaning and care

Information for proper cleaning and maintenance of the rotary slicer and shredder accessory.

Safety instructions

Information

Advice
1.2 User manual
This user manual is an integral part of the rotary slicer and shredder accessory and must therefore be kept in its entirety and in an accessible place for the whole working life of the appliance.
1.3 Intended use
- The rotary slicer and shredder accessory has been designed specifically for domestic use.
- Use the rotary slicer and shredder accessory only in combination with the same manufacturer's stand mixer.
- Use the rotary slicer and shredder accessory indoors.
- The rotary slicer and shredder accessory can be used for grating and slicing fruit, vegetables and nuts.
- Do not use the rotary slicer and shredder accessory for anything other than its intended use.
- The rotary slicer and shredder accessory may not be used by people of reduced physical and mental capacity, or without sufficient experience and knowledge (including children), unless they are supervised or instructed by adults who are responsible for their safety.


Important Safeguards
1.4 Manufacturer liability
The manufacturer shall not be held responsible for personal injuries or property damage caused by:
- Use of the rotary slicer and shredder accessory for purposes other than those envisaged
• Not having read the user manual. - Tampering with any part of the rotary slicer and shredder accessory
• The use of non-original spare parts.
• Not following the safety instructions.
The California Safe Drinking Water and Toxic Enforcement Act requires the Governor of California to publish a list of substances known to the State of California to cause cancer, birth defects or other reproductive harm, and requires businesses to warn customers of potential exposure to such substances.

Warning
- This product contains a chemical known by the State of California to cause cancer, birth defects or other reproductive harm.
- This appliance can cause low-level exposure to some of the substances listed, including benzene, formaldehyde, carbon monoxide, toluene, and soot.
1.5 Disposal
Old appliances should not be disposed of together with household waste! To comply with applicable legislation, old appliances, on reaching the end of their useful lives, should be taken to a disposal facility where they can be sorted. In this way, any valuable material contained in the old appliances can be recycled, helping to protect the environment. The relevant local authorities or their waste disposal operators can provide further information.
The rotary slicer and shredder accessory is packed in non-polluting and recyclable materials.
- Dispose of the packaging materials at an appropriate disposal facility.

Plastic packaging Danger of suffocation
- Do not leave the packaging or any part of it unattended.
- Do not let children play with the plastic bags.
2 Description
2.1 Product description

SMSG01 - Rotary slicer and shredder accessory
1 Grater body
2 Closure
3 Coarse grating cylinder
4 Medium grating cylinder
5 Thick slicing cylinder (ref. 1)
Medium slicing cylinder (ref. 2)
6 Pusher
2.2 Description of parts
Coarse grating cylinder

natural_image
Illustration of a cylindrical mechanical component with multiple circular indentations and a central shaft (no text or symbols)To be used to grate vegetables, fruit, nuts, chocolate, cheeses and cheese rinds.
Medium grating cylinder
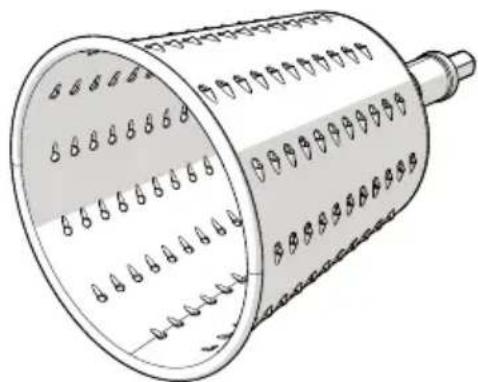
To be used to grate raw vegetables, fruit, nuts, and soft cheeses.
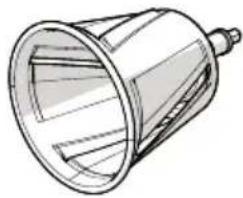
Slicing cylinders (2 pieces)

natural_image
Technical line drawing of a conical mechanical component with internal blades and a protruding shaft (no text or symbols)To be used to slice potatoes, onions, other raw vegetables and fruits.
Pusher

natural_image
Technical line drawing of a mechanical component with textured surface (no text or symbols)Facilitates introduction of food to be grated or sliced inside the body of the rotary slicer and shredder accessory.

The accessories that may come into contact with food are made of materials that comply with the requirements of current legislation.
3 Use

Electrical Shock Hazard
- Plug into a grounded 3-prong outlet.
- Do not remove the ground prong.
- Do not use an adapter.
- Do not use an extension cord.
- Failure to follow these instructions can result in death, fire, or electrical shock.
Stand Mixer US version only
Volts: 120 Volts AC only.
Hertz: 60 Hz

Your stand mixer has a 3-prong grounded plug. To reduce the risk of electrical shock, this plug will fit into an outlet only one way. If the plug does not fit in the outlet, contact a qualified electrician. Do not modify the plug in any way.
- Do not use an extension cord. If the power supply cord is too short, have a qualified electrician or service technician install an outlet near the appliance.
- A short power supply cord (or detachable power supply cord) should be used to reduce the risk resulting from becoming entangled in or tripping over a longer cord.
- Longer detachable power supply cords or extension cords are available and may be used if care is taken when using them.
If a longer detachable power supply cord or extension cord is used:
- The marked electrical rating of the power supply cord or extension cord should be at least as great as the electrical rating of the appliance.
- The cord should be arranged so that it will not hang over the countertop or tabletop where it can be pulled on by children or tripped over unintentionally.
- If the appliance is of the grounded type, the extension cord should be a grounded, 3-prong cord.
3.1 Before first use
- Remove any protective packaging from the outside or inside of the rotary slicer and shredder accessory.
- Remove any labels from the rotary slicer and shredder accessory.
- Clean the rotary slicer and shredder accessory (see "4 Cleaning and Care").

3.2 Installing on the stand mixer attachment
- Turn off the stand mixer by moving the stand mixer speed selector (1) to the '0' (OFF) position.

- Remove the plug from the power socket.
- Press the release button (2).
- Hold down the button and raise the head (3), accompanying its movement with your hand.
- Remove any standard accessories (dough hook, wire whisk, flat beater) which may be fitted.

- Grasp the front attachment hub cover (4) at the centre and turn it clockwise.

- Pull the cover (4) to remove it.

natural_image
Illustration of a hand holding a mechanical component with a black arrow indicating rotation (no text or symbols present)Use

- Insert the rotary slicer and shredder body (5) following the guide in the attachment hub (6), then turn it 60°.

-
Press the release button and lower the stand mixer head, supporting it with your hand as you lower it.
-
Lift the closure (7) and insert the required cylinder (8) inside the body of the rotary slicer and shredder.

- Lock the cylinder by lowering the closure (7).
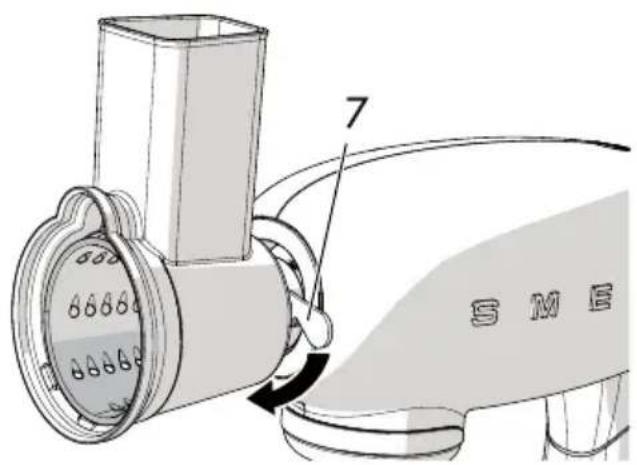
- Position the stand mixer bowl (9) underneath the grater to collect the grated food. Use the pusher (10) to help introduce food inside the grater body.

- To remove the body of the rotary slicer and shredder from the stand mixer attachment, follow the instructions given in point 8 in reverse order.

Moving parts Danger of personal injury and damage to the appliance
- Do not attach the cylinders directly to the stand mixer attachment. The cylinders must always be inserted inside the body of the rotary slicer and shredder.
- The cylinder blade is sharp. Be very careful when handling it.
- Keep fingers away from the openings.
- Do not touch the rotary slicer and shredder accessory during operation.
- Do not use the rotary slicer and shredder accessory for anything other than the uses specified.
3.3 Using the rotary slicer and shredder accessory
- Cut the food to be grated or sliced into pieces small enough to fit through the top opening of the grater body.
- Position the body of the rotary slicer and shredder in the stand mixer attachment. Insert the required cylinder inside the rotary slicer and shredder body.
- Plug the stand mixer into a power socket and select speed 4.
- Use the pusher to help introduce food inside the grater body. Take care not to push too hard in order to avoid damage to the rotary slicer and shredder.
- Move the stand mixer speed selector to the '0' (OFF) position to stop it.
Tool Vegetable Amount Operate time
| Slice(Thick/Medium) | Carrot 700g 30s |
| Cucumber 600g | |
| Grate(Coarse/Medium) | Carrot 600g |
| Cucumber 300g |
Cylinder selection
Cylinder Suitable for
Coarse grating
Fruit and vegetables, shelled nuts, chocolate, cheese and cheese rinds.
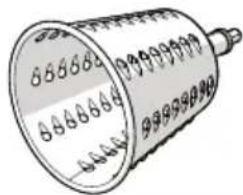
Medium grating
Raw vegetables, fruit, shelled nuts, soft cheeses.

natural_image
Illustration of a cylindrical mechanical component with evenly spaced holes and a protruding rod (no text or symbols)Thick or medium slicing
Potatoes, onions, raw vegetables and fruit.
natural_image
Technical line drawing of a conical mechanical component with internal blades (no text or symbols)4 Cleaning and Care
4.1 Instructions

Improper use Danger of electrocution
- Switch off and unplug the stand mixer before cleaning it and its standard and optional accessories.

Improper use Risk of damage to surfaces
- Do not use steam jets to clean the rotary slicer and shredder accessory.
- Do not use cleaning products that contain chlorine, ammonia or bleach.
- Do not use abrasive or corrosive detergents (e.g. powder products, stain removers and metallic sponges).
- Do not use rough or abrasive materials or sharp metal scrapers.
4.2 Maintenance
All service should be performed by an authorized service representative.
4.3 Cleaning the rotary slicer and shredder accessory
The rotary slicer and shredder body, the pusher and the cylinders must be washed by hand with warm water and neutral soap. Ensure all parts of the rotary slicer and shredder accessory are thoroughly dry before putting them away or reassembling them.
Cher Client,
natural_image
Technical line drawing of a kitchen grater with a side panel and handle (no text or symbols)natural_image
Illustration of a cylindrical mechanical component with multiple circular indentations and a central shaft (no text or symbols)natural_image
Illustration of a cylindrical mechanical component with evenly spaced holes and a central shaft (no text or symbols)natural_image
Technical line drawing of a conical mechanical component with internal blades and a protruding shaft (no text or symbols)natural_image
Technical line drawing of a mechanical component with textured surface (no text or symbols)natural_image
Illustration of a hand using a tool to adjust or install a car wheel component, with no visible text or symbols.Utilisation

natural_image
Illustration of a cylindrical mechanical component with evenly spaced holes and a protruding shaft (no text or symbols)natural_image
Technical line drawing of a conical mechanical component with internal blades (no text or symbols)natural_image
Line drawing of a kitchen grater with a side panel and handle (no text or symbols)SMSG01
natural_image
Illustration of a cylindrical mechanical component with multiple circular indentations and a central shaft (no text or symbols)natural_image
Technical line drawing of a conical mechanical component with internal blades and a protruding shaft (no text or symbols)natural_image
Technical line drawing of a mechanical component with textured surface (no text or symbols)Gebrauch

natural_image
Illustration of a hand using a tool to adjust or install a car wheel component, with no visible text or symbols.natural_image
Illustration of a cylindrical mechanical component with evenly spaced holes and a protruding rod (no text or symbols)natural_image
Technical line drawing of a conical mechanical component (no text or symbols)natural_image
Technical line drawing of a kitchen grater with a side panel and handle (no text or symbols)SMSG01
Cilinderrasp
Inhoudsopgave
1 Waarschuwingen 64
SMSG01 - Cilinderrasp
natural_image
Illustration of a cylindrical showerhead with perforated design and no visible text or symbolsnatural_image
Technical line drawing of a conical mechanical component with internal blades and a protruding shaft (no text or symbols)natural_image
Technical line drawing of a mechanical component with textured surface (no text or symbols)Gebruik

natural_image
Illustration of a hand using a tool to adjust or install a mechanical component, labeled with number 4 (no text or symbols beyond label)natural_image
Illustration of a cylindrical mechanical component with evenly spaced slots and a protruding rod (no text or symbols)Medium of grove plakken
natural_image
Technical line drawing of a conical mechanical component with internal blades (no text or symbols)natural_image
Line drawing of a kitchen grater with a side panel and handle (no text or symbols)natural_image
Illustration of a cylindrical mechanical component with multiple circular indentations and a central shaft (no text or symbols)natural_image
Technical line drawing of a conical mechanical component with internal blades and a protruding shaft (no text or symbols)natural_image
Technical line drawing of a mechanical component with textured surface (no text or symbols)natural_image
Illustration of a hand using a tool to adjust or install a car wheel component, with no visible text or symbols.natural_image
Illustration of a cylindrical mechanical component with evenly spaced slots and a protruding rod (no text or symbols)natural_image
Technical line drawing of a conical mechanical component (no text or symbols)natural_image
Line drawing of a kitchen grater with a side panel and handle (no text or symbols)SMSG01
natural_image
Illustration of a cylindrical mechanical component with multiple circular indentations and a central shaft (no text or symbols)natural_image
Technical line drawing of a conical mechanical component with internal blades and a protruding shaft (no text or symbols)natural_image
Technical line drawing of a mechanical component with textured surface (no text or symbols)Utilização

natural_image
Illustration of a hand using a tool to adjust or install a mechanical component, labeled with number 4 (no text or symbols beyond label)natural_image
Illustration of a cylindrical mechanical component with evenly spaced slots and a protruding rod (no text or symbols)natural_image
Technical line drawing of a conical mechanical component (no text or symbols)natural_image
Line drawing of a kitchen grater with a side panel and handle (no text or symbols)natural_image
Illustration of a cylindrical showerhead with multiple teeth and a central shaft (no text or symbols)natural_image
Technical line drawing of a conical mechanical component with internal blades and a protruding shaft (no text or symbols)natural_image
Technical line drawing of a mechanical component with textured surface (no text or symbols)Användning

natural_image
Illustration of a hand using a tool to adjust or install a mechanical component, labeled with number 4 (no text or symbols beyond label)
natural_image
Technical diagram of a mechanical assembly with labeled parts (no readable text or symbols)natural_image
Illustration of a cylindrical mechanical component with evenly spaced holes and a protruding shaft (no text or symbols)natural_image
Technical line drawing of a conical mechanical component with internal blades (no text or symbols)natural_image
Line drawing of a kitchen grater with a side panel and handle (no text or symbols)SMSG01
natural_image
Illustration of a cylindrical showerhead with multiple teeth and a central shaft (no text or symbols)natural_image
Technical line drawing of a conical mechanical component with internal blades and a protruding shaft (no text or symbols)natural_image
Technical line drawing of a rectangular mechanical component with a textured surface and flange (no text or symbols)Использование
natural_image
Illustration of a hand using a tool to adjust or install a mechanical component, labeled with number 4 (no text or symbols beyond label)Измельчение мелкое
natural_image
Illustration of a cylindrical mechanical component with evenly spaced holes and a protruding rod (no text or symbols)natural_image
Technical line drawing of a conical mechanical component with internal blades (no text or symbols)natural_image
Illustration of a cylindrical showerhead with multiple teeth and a central shaft (no text or symbols)natural_image
Technical line drawing of a conical mechanical component with internal blades and a protruding shaft (no text or symbols)natural_image
Technical line drawing of a rectangular mechanical component with a textured surface and mounting bracket (no text or symbols)Anvendelse

- Tag fat i låget på den forreste monteringsarm (4) på midten og drej den med uret.

natural_image
Illustration of a hand using a tool to adjust or install a mechanical component, labeled with number 4 (no text or symbols beyond label)- Bloker cylinderen ved at skubbe läsekrogen nedad (7).

natural_image
Illustration of a cylindrical mechanical component with evenly spaced holes and a protruding shaft (no text or symbols)natural_image
Technical line drawing of a conical mechanical component (no text or symbols)natural_image
Line drawing of a kitchen grater with a side panel and handle (no text or symbols)SMSG01
Tarka bębnowa
Spis treści
1 Ostrzeżenia 150
SMSG01 - Tarka bębnowa
natural_image
Illustration of a cylindrical showerhead with multiple teeth and a central shaft (no text or symbols)natural_image
Technical line drawing of a conical mechanical component with internal blades and a protruding shaft (no text or symbols)natural_image
Technical line drawing of a mechanical component with textured surface (no text or symbols)Użytkowanie

natural_image
Illustration of a hand holding a car tire with a mechanical component, showing a step labeled '4' (no text or symbols beyond label)natural_image
Illustration of a cylindrical mechanical component with evenly spaced holes and a protruding rod (no text or symbols)natural_image
Technical line drawing of a conical mechanical component (no text or symbols)natural_image
Illustration of a cylindrical mechanical component with evenly spaced holes and a protruding shaft (no text or symbols)ل blossطاس والبصل
natural_image
Technical line drawing of a conical mechanical component with internal blades (no text or symbols)
natural_image
Mechanical assembly diagram showing a pipe fitting with a valve and clamped components (no text or symbols)3 خدام
خطر الصعق الكهربائي

natural_image
Technical line drawing of a conical mechanical component with internal blades and a protruding shaft (no text or symbols)natural_image
Technical line drawing of a mechanical component with textured surface (no text or symbols)natural_image
Illustration of a cylindrical showerhead with multiple teeth and a central shaft (no text or symbols)natural_image
Technical line drawing of a mechanical device with a central housing and side ports (no text or symbols)


- Sommario
- Avvertenze 4
- Contents
- Instructions 21
- Description 23
- Use 25
- Cleaning and Care 30
- Important Safeguards
- RECOGNIZE SAFETY INFORMATION
- UNDERSTAND SIGNAL WORDS
- WARNING
- For the appliance and the rotary slicer and shredder accessory
- SAVE THESE INSTRUCTIONS
- Instructions
- Introduction
- User manual
- Intended use
- Manufacturer liability
- Disposal
- Plastic packaging Danger of suffocation
- Description
- Product description
- Description of parts
- Use
- Electrical Shock Hazard
- Stand Mixer US version only
- Before first use
- Installing on the stand mixer attachment
- Use
- Moving parts Danger of personal injury and damage to the appliance
- Using the rotary slicer and shredder accessory
- Cylinder selection
- Cylinder Suitable for
- Cleaning and Care
- Instructions
- Improper use Danger of electrocution
- Improper use Risk of damage to surfaces
- Maintenance
- Cleaning the rotary slicer and shredder accessory
- Utilisation
- Gebrauch
- Inhoudsopgave
- Waarschuwingen 64
- Gebruik
- Utilização
- Användning
- Использование
- Anvendelse
- Spis treści
- Ostrzeżenia 150
- Użytkowanie
Brand : SMEG
Model : SMSG01
Category : Other Kitchen Appliances