K 5 UM - Pressure washer Kärcher - Free user manual and instructions
Find the device manual for free K 5 UM Kärcher in PDF.
| Product type | High-pressure cleaner |
| Brand | Kärcher |
| Model | K 5 UM |
| Voltage | 220-240 V ~50-60 Hz |
| Power consumption | 2.1 kW |
| Operating pressure | 12 MPa |
| Maximum admissible pressure | 14.5 MPa |
| Nominal water flow | 6.7 l/min |
| Maximum water flow | 8.3 l/min |
| Detergent flow | 0.3 l/min |
| Max. supply pressure | 1.2 MPa |
| Max. supply temperature | 40 °C |
| Max. suction height | 0.5 m |
| Dimensions (L × W × H) | 310 × 336 × 860 mm |
| Operating weight | 9.5 kg |
| Protection class | II |
| Type of protection | IPX5 |
| Sound pressure level LpA | 79 dB(A) |
| Sound power level LWA | 95 dB(A) |
| Safety devices | Main switch, trigger gun lock, pressure relief valve with pressure switch, motor circuit breaker |
| Main functions | High pressure, low pressure with detergent, rotary wash brush, foam nozzle |
| Included accessories | Vario Power lance, Rotabuse lance, rotary wash brush, foam nozzle, detergent tank |
| Recommended maintenance | Regular cleaning of water inlet sieve and detergent filter |
| Intended use | Private cleaning of machines, vehicles, buildings, façades, terraces, garden tools |
| Warranty | According to country-specific conditions, contact dealer or authorized customer service |
Frequently Asked Questions - K 5 UM Kärcher
User questions about K 5 UM Kärcher
0 question about this device. Answer the ones you know or ask your own.
Ask a new question about this device
Download the instructions for your Pressure washer in PDF format for free! Find your manual K 5 UM - Kärcher and take your electronic device back in hand. On this page are published all the documents necessary for the use of your device. K 5 UM by Kärcher.
USER MANUAL K 5 UM Kärcher
natural_image
Line drawing of a water heater with attached wheels and handle (no text or symbols)Deutsch 4
English 9
Français 14
Italiano 19
Nederlands 24
Español 29
Português 34
Dansk 39
Norsk 44
Svenska 49
Suomi 54
Ελληνικά 59
Türkçe 64
Русский 69
Magyar 74
Čeština 79
Slovenščina 84
Polski 89
Românește 94
Slovenčina 99
Hrvatski 104
Srpski 109
Български 114
Eesti 119
Latviešu 124
Lietuviškai 129
Українська 134
natural_image
Line drawing of a mechanical device with a curved pipe and connector (no text or symbols)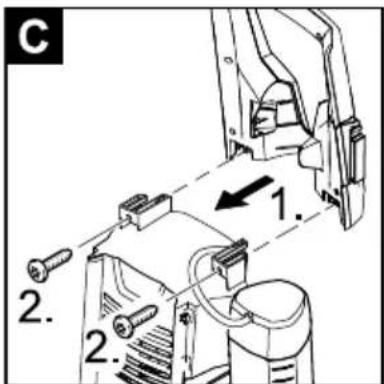
natural_image
Mechanical device with a black arrow indicating a force or movement (no text or symbols present)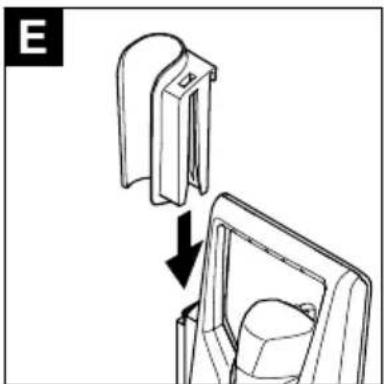
natural_image
Technical line drawing of a mechanical component with a downward arrow indicating a process (no text or symbols)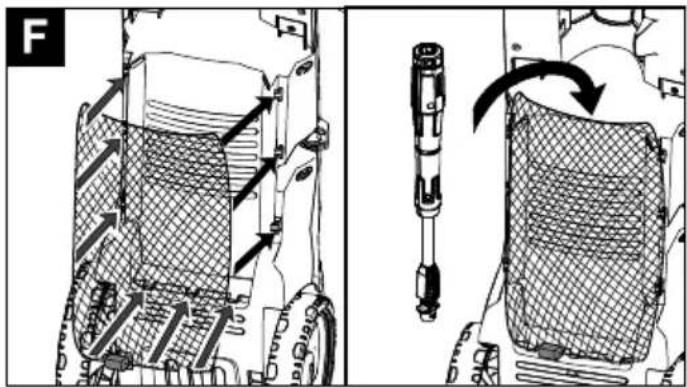
natural_image
Illustration of two hand-painted views showing a finger pointing to a lock icon (no text or symbols present)Inhaltsverzeichnis
www.kaercher.com/dealersearch
Technische Daten

Chairman of the Board of Management
S. Reiser
Director Regulatory Affairs & Certification
71364 Winnenden (Germany)
Tel.: +49 7195 14-0
Fax: +49 7195 14-2212
Winnenden, 2021/06/01
Contents
Safety ...... EN 5
Proper use.....EN 5
Accessories and Spare Parts ..... EN 5
Environmental protection....EN 5
Description of the Appliance ..... EN 6
Assembly.....EN 6
Start up....EN 6
Operation. E N
Transport.... E N
Storage....EN 8
Care and maintenance ..... EN 8
Troubleshooting.....EN 8
Warranty E N
Technical specifications.....EN 9
EU Declaration of Conformity ..... EN 9
Safety
Please read these original operating instructions and the enclosed safety in-
structions prior to the initial use of your device. Proceed accordingly. Keep both booklets for future reference or subsequent owners.
Symbols on the machine
The high pressure jet must not be directed at persons, animals, live electrical equipment or at the appliance itself.
Protect the appliance against frost.
The appliance must not be directly connected to the public drinking water network.
Safety Devices
△CAUTION
■ Safety installations serve the protection of the user and may not be modified or bypassed.
Appliance switch
The appliance switch prevents unintentional operation of the appliance.
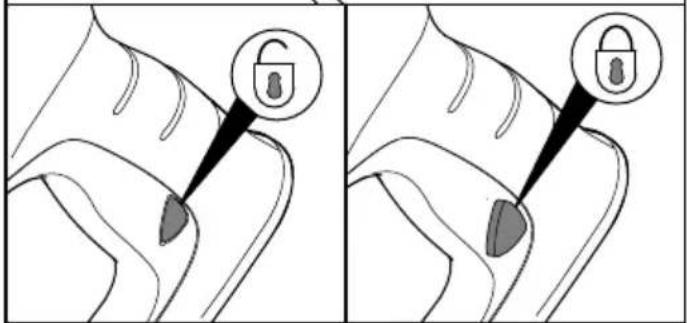
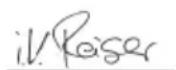
Lock trigger gun
This lock locks the lever of the trigger gun and prevents the inadvertent start of the appliance.
Overflow valve with pressure switch
The overflow valve prevents the permissible working pressure from being exceeded.
If the lever on the trigger gun is released the pressure switch turns off the pump, the high pressure jet is stopped. If the lever is pulled the pump is turned on again.
Motor protection switch
The motor protection switch switches off the device if the power consumption is high.
Proper use
This high pressure cleaner is designed for domestic use only.
– for cleaning machines, vehicles, buildings, tools, facades, terraces, gardening tools, etc. by means of a high-pressure water jet (if necessary, with additional cleaning agents).
– with accessories, replacement parts and cleaning agents approved by KÄRCHER. Please observe the information accompanying the cleaning agents.
Accessories and Spare Parts
Only use original accessories and spare parts, they ensure the safe and trouble-free operation of the device.
For information about accessories and spare parts, please visit www.kaercher.com.
Environmental protection

The packaging material can be recycled. Please arrange for the environmentally appropriate disposal of the packaging.

Electrical and electronic devices often contain components which could potentially pose a danger to human health and the environment if handled or disposed of incorrectly. However, these components are necessary for the proper operation of the device. Devices marked with this symbol must not be disposed of with regular household rubbish.
Old appliances contain valuable recyclable materials that should be recycled properly. Please arrange for the environmentally appropriate disposal of the old devices.

Cleaning operations which produce oily waste water, e.g. engine washes, underbody washes, may only be carried out using washing stations equipped with an oil separator.

Work with detergents must only be performed on liquid-tight work surfaces with a connection to the sewer system. Do not let release detergent into waters or earth.
Notes about the ingredients (REACH)
You will find current information about the ingredients at:
www.kaercher.com/REACH
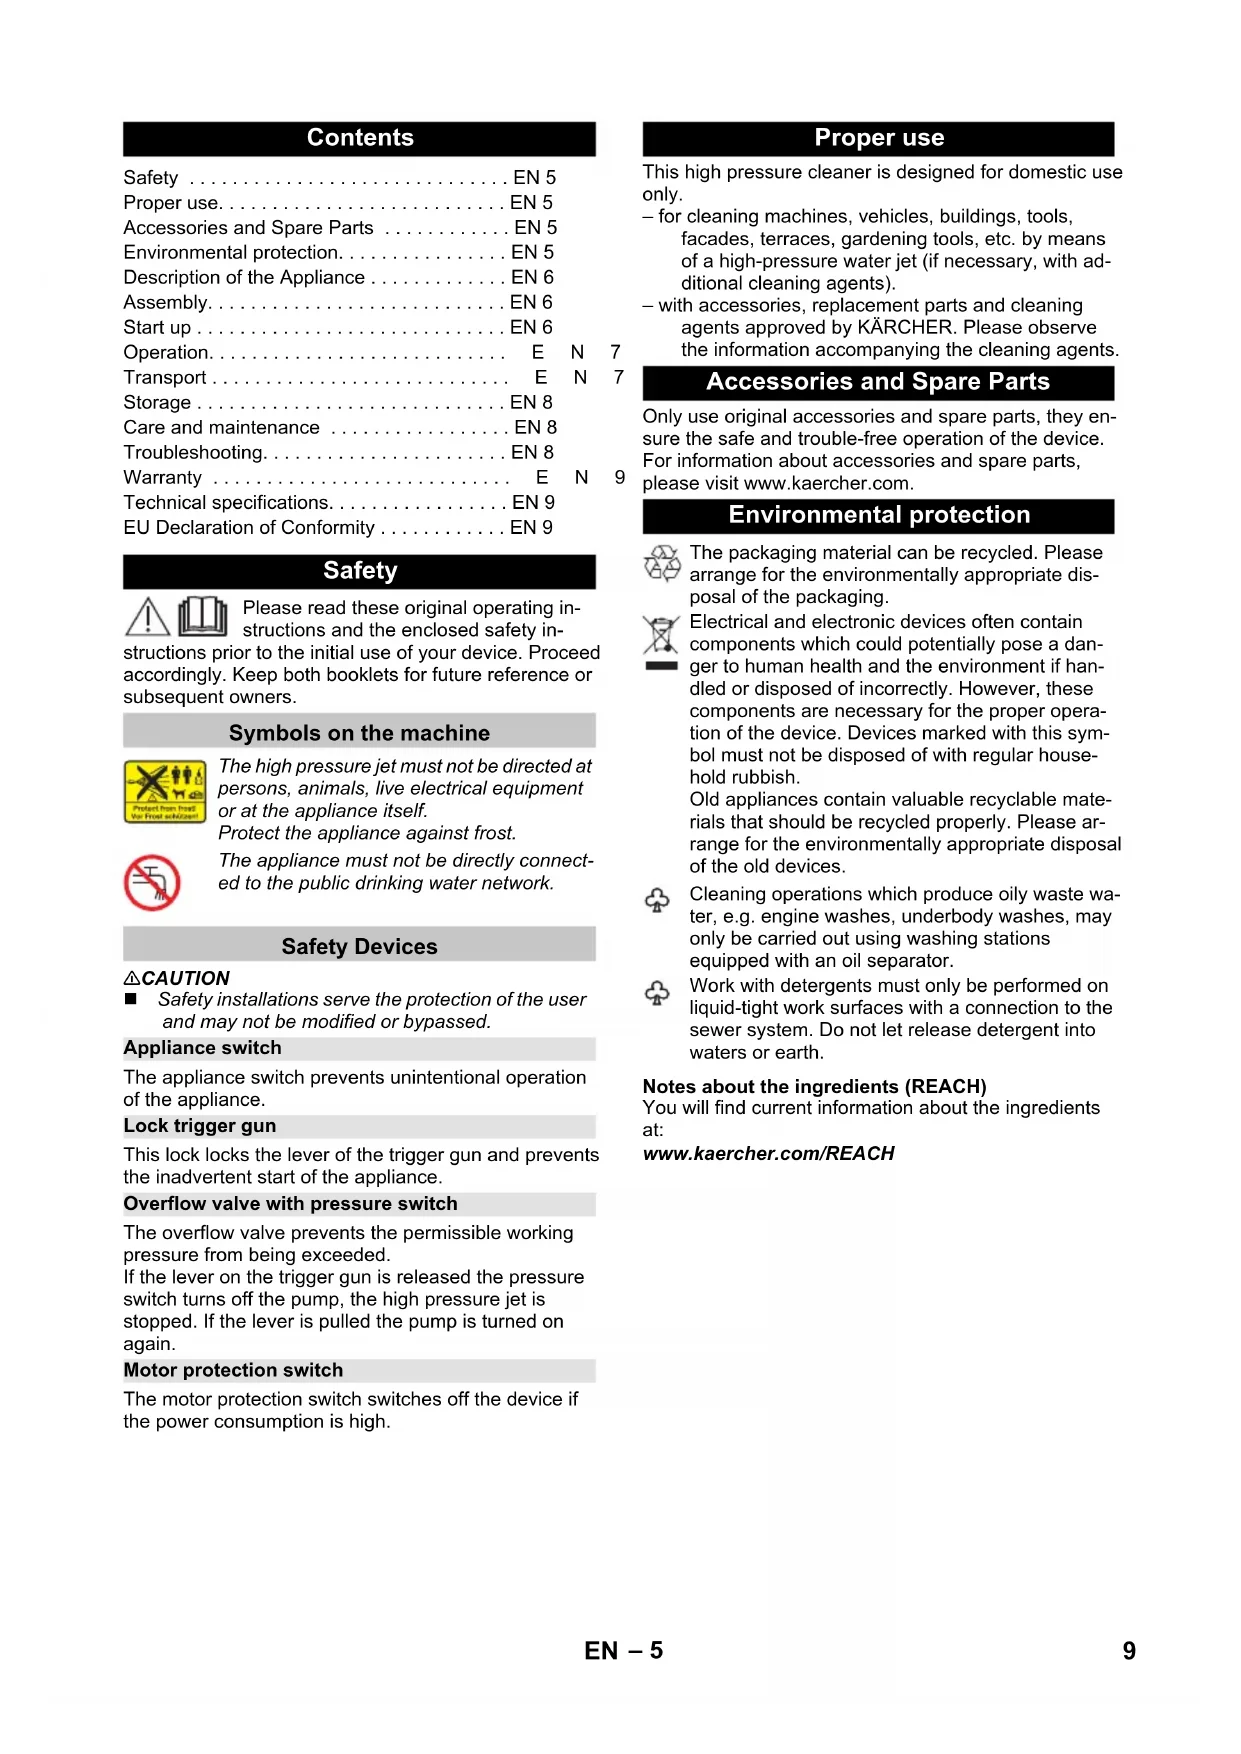
Description of the Appliance
The scope of delivery of the device (depending on the model) is illustrated on the packaging. These operating instructions describe all possible options.
Illustrations on Page 2
1 Water connection with integrated sieve
2 Coupling element for water connection
3 Quick coupling for high pressure hose
4 High pressure connection
5 Appliance switch „0/OFF“ / „I/ON“
6 Detergent Tank
7 Storage for trigger gun
8 Suction hose for detergent
9 Transport handle
10 Storage for spray lance
11 Mains cable with mains plug
12 Bearing wheel
13 Trigger gun
14 Lock trigger gun
15 Key to detach the high pressure hose from the trigger gun
16 High pressure hose
17 Spray lance with pressure regulation (Vario Power) Carrying out the most common cleaning tasks. The working pressure can be continuously increased from "SOFT" to "HARD". To adjust the working pressure, release the trigger gun lever and turn the spray lance to the desired position. Suitable for use with detergents.
\* Optional
18 Spray lance with Dirtblaster For strong contaminations.
19 Rotary washing brush Especially suitable for cleaning cars.
20 Foam nozzle with detergent container With powerful foam for effortless cleaning.
Additionally required
Fabric-reinforced water hose with commercially available coupling.
– Minimum diameter, 1/2 inches (13 mm).
- Minimum length 7.5 m.
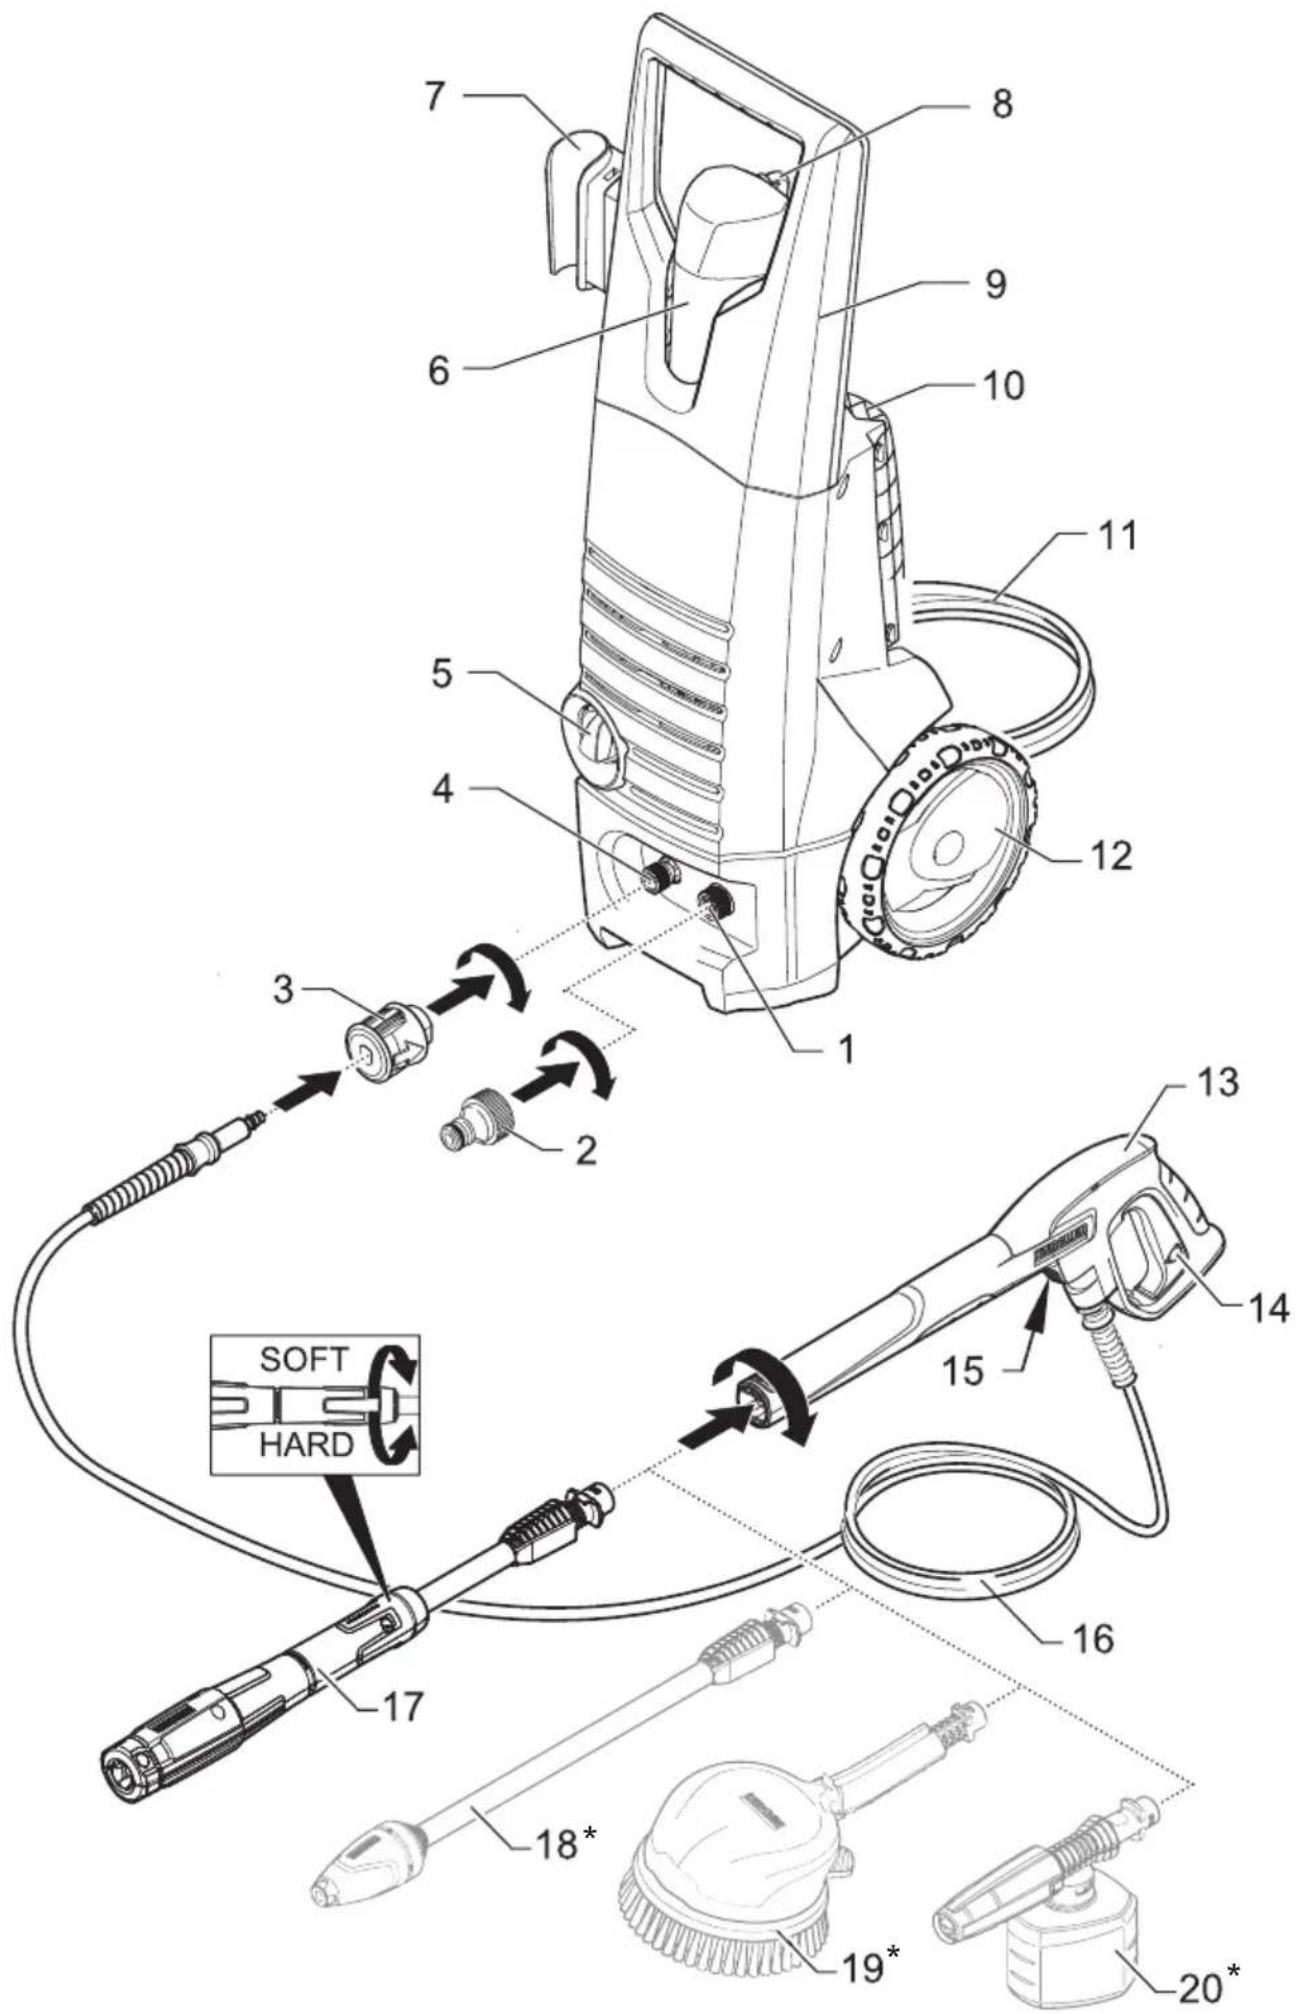
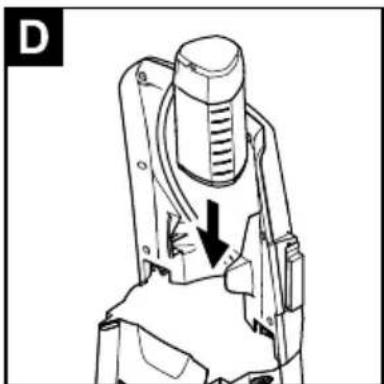
Assembly
Illustrations on Page 3
→ Illustrations A F
Mount loose parts delivered with appliance prior to start-up.
→ Fasten the quick coupling for the high pressure hose to the high pressure connection.
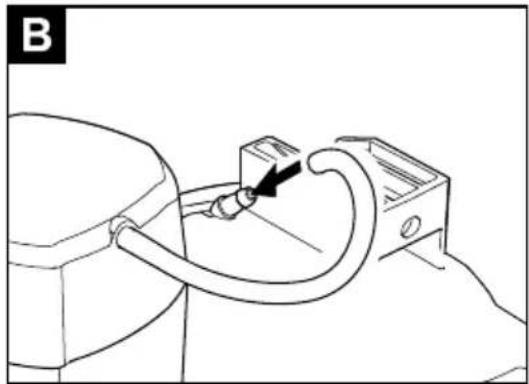
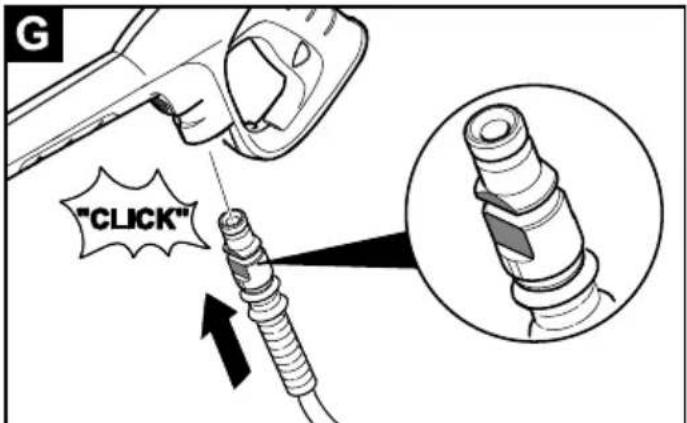
→ Illustration G
Push the high pressure hose into the trigger gun until it locks audibly.
Note: Make sure the connection nipple is aligned correctly.
→ Check the secure connection by pulling on the high pressure hose.
Start up
→ Park the appliance on an even surface.
→ Push the high pressure hose into the quick coupling until it locks audibly.
Note: Make sure the connection nipple is aligned correctly.
Check the secure connection by pulling on the high pressure hose.
→ Insert the mains plug into the socket.
Water supply
For connection values, see type plate/technical data.
ATTENTION
Impurities in the water can damage the high-pressure pump and the accessories. For protection, the use of the KÄRCHER water filter (optional accessory, order no. 4.730-059) is recommended.
Water supply from mains
Observe regulations of water supplier.
→ Attach the water supply hose to the coupling on the water connection.
→ Connect the water supply hose to the water supply.
→ Completely open the water tap.
Drawing in water from open reservoirs
Note: The max. suction height is 0.5 m.
This high-pressure cleaner is suited to work with the KÄRCHER suction hose with backflow valve (Optional accessory, order no. 2.643-100) to draw in surface water, e.g. from water butts or ponds (see specifications for max. suction height).
→ Remove coupling from the water connection.
→ Fill the suction hose with water.
→ Screw the suction hose into the water connection of the appliance and insert it into the water source (e.g. rainwater drum).
Remove air from appliance before operation.
→ Turn on the appliance "I/ON".
→ Unlock the lever on the trigger gun.
→ Pull on the lever of the trigger gun; the device will switch on.
→ Let the appliance work until the water exits at the trigger gun without bubbles (max. 2 minutes).
→ Release the lever on the trigger gun.
Note: Release the lever of the trigger gun; the device will switch off again. High pressure remains in the system.
→ Lock the lever on the trigger gun.
Operation
ATTENTION
Dry running of more than 2 minutes leads to damage of the high-pressure pump. If the appliance does not build up pressure within 2 minutes, switch the appliance off and proceed in accordance with the instructions in Chapter "Troubleshooting".
High pressure operation
△CAUTION
Keep a distance of at least 30 cm when using the jet for cleaning painted surfaces to avoid damage.
ATTENTION
Car tyres, paint or sensitive surfaces such as wood should not be cleaned with the dirt blaster, as there is a risk of damage.
→ Push the spray lance into the trigger gun and fasten it by turning it through 90°.
→ Turn on the appliance "I/ON".
→ Unlock the lever on the trigger gun.
→ Pull on the lever of the trigger gun; the device will switch on.
Note: Release the lever of the trigger gun; the device will switch off again. High pressure remains in the system.
Operation with washing brush
ATTENTION
Risk of damage to the paintwork
When working with the washing brush, it must be free of dirt or other particles.
→ Push the washing brush into the trigger gun and fasten it by a 90° turn.
Note: If required, the washing brushes can be used to work with detergent.
Operation with detergent
Note: Detergent can only be added when the device is operated in low pressure mode.
⚠️DANGER
When using detergents, the material data safety sheet issued by the detergent manufacturer must be adhered to, especially the instructions regarding personal protective equipment.
→ Fill the detergent solution in the detergent tank (observe dosage instructions on the packaging of the detergent).
→ Close the detergent tank with the lid.
→ Lock the detergent tank in place on the appliance.
→ Use spray lance with pressure regulation (Vario Power).
→ Turn the spray lance as far as it will go in the direction of "SOFT".
Note: This will mix the detergent with the water stream.
Recommended cleaning method
→ Spray the detergent sparingly on the dry surface and allow it to react, but not to dry.
→ Spray off loosened dirt with the high pressure jet.
Optional
Foam nozzle
→ Fill the detergent solution in the detergent tank of the foam nozzle (observe dosage instructions on the packaging of the detergent).
→ Connect the detergent tank to the foam nozzle.
→ Connect the foam nozzle to the trigger gun.
Interrupting operation
→ Release the lever on the trigger gun.
→ Lock the lever on the trigger gun.
→ Insert the trigger gun in its holder.
→ During longer breaks (more than 5 minutes), also turn the appliance off using the "0/OFF" switch.
Finish operation
△CAUTION
Only separate the high-pressure hose from the trigger gun or the appliance when there is no pressure in the system.
→ After operation with detergent: Run the machine for approximately 1 minute for a clear rinse.
→ Release the lever on the trigger gun.
→ Turn off the appliance "0/OFF".
→ Disconnect the mains plug from the socket.
→ Turn off tap.
→ Press the lever on the trigger gun to release any remaining pressure in the system.
→ Lock the lever on the trigger gun.
→ Detach the appliance from the water supply.
Transport
△CAUTION
Risk of personal injury or damage! Mind the weight of the appliance during transport.
When transporting by hand
→ Pull the appliance by its transport handle.
When transporting in vehicles
→ Empty detergent tank.
→ Secure the appliance against shifting and tipping over.
Storage
△CAUTION
Risk of personal injury or damage!
Consider the weight of the appliance when storing it.
Storing the Appliance
Prior to extended storage periods, as during the winter, also observe the instructions in the Care section.
→ Park the machine on an even surface.
→ Push the casing of the quick coupling for the high pressure hose toward the rear and disconnect the high pressure hose from the appliance.
→ Press the disconnect on the trigger gun and remove the high pressure hose from the trigger gun.
→ Insert the trigger gun in its holder.
→ Stow away the mains cable, the high-pressure hose and accessory on the appliance.
Frost protection
ATTENTION
Appliances and accessories that are not completely drained can be destroyed by frost. Completely drain appliance and accessories and protect them against frost. To avoid damage:
→ Completely drain all water from the appliance: Switch the appliance on with detached high pressure hose and detached water supply (max. 1 minute) and wait, until no more water exits at the high pressure connection. Turn off the appliance.
→ Store the appliance and the entire accessories in a frost free room.
Care and maintenance
⚠️DANGER
Risk of electric shock.
■ Prior to all work on the appliance, switch off the appliance and pull the power plug.
Clean the sieve in the water connection
Clean the sieve in the water connection regularly. ATTENTION
The sieve must not be damaged.
→ Remove coupling from the water connection.
→ Pull the sieve out using flat pliers.
→ Clean the sieve under running water.
→ Reinsert the sieve into the water connection.
Cleaning the detergent filter
Prior to longer periods of storage, e.g. in the winter:
→ Remove filter from suction hose for detergent and clean under running water.
Troubleshooting
You can rectify minor faults yourself with the help of the following overview.
If in doubt, please consult the authorized customer service.
⚠️DANGER
Risk of electric shock.
→ Prior to all work on the appliance, switch off the appliance and pull the power plug.
Appliance is not running
→ Pull on the lever of the trigger gun; the device will switch on.
→ Check whether the voltage indicated on the type plate corresponds to the voltage of the mains supply.
→ Check the mains connection cable for damages.
Pressure does not build up in the appliance
→ Check setting at the spray lance.
→ Check water supply for adequate delivery rate.
→ Pull out the sieve in the water connection using flat-nose pliers and clean under running water.
→ Appliance ventilation: Switch the appliance on with the high-pressure hose detached and operate (max. 2 minutes) until the water exits the high-pressure connection without bubbles. Switch off appliance and reconnect high-pressure hose.
Strong pressure fluctuations
→ Clean high-pressure nozzle: Remove dirt and debris from the nozzle bore, using a needle and rinse through with water from the front.
→ Check water flow quantity.
Appliance is leaking
→ Slight leakage from the appliance pump is normal. If the leakage increases contact the authorized customer service.
No detergent infeed
→ Turn the spray lance as far as it will go in the direction of "SOFT".
→ Clean the detergent suction hose filter.
→ Check the detergent suction hose for kinks.
Warranty
The warranty terms published by the relevant sales company are applicable in each country. We will repair potential failures of your appliance within the warranty period free of charge, provided that such failure is caused by faulty material or defects in manufacturing. In the event of a warranty claim please contact your dealer or the nearest authorized Customer Service center. Please submit the proof of purchase.
Addresses can be found under:
www.kaercher.com/dealersearch
Technical specifications
| Electrical connection | |
| Voltage 220-240 | V1~50-60 Hz |
| Connected load 2,1 kW | |
| Protection class IP X5 | |
| Protective class II | 回 |
| Mains fuse (slow-blow) 10 A | |
| Water connection | |
| Max. feed pressure 1,2 MPa | |
| Max. feed temperature 40 °C | |
| Min. feed volume 9 l/min | |
| Max. Suction height 0,5 m | |
Performance data
| Working pressure 12 MPa | |
| Max. permissible pressure 14,5 MPa | |
| Water flow rate 6,7 l/min | |
| Max. flow rate 8,3 l/min | |
| Detergent flow rate | 0,3 l/min |
| Recoil force of trigger gun | 17 N |
Dimensions and weights
| Length | 310 mm |
| Width | 336 mm |
| Height | 860 mm |
| Typical operating weight | 9,5 kg |
Values determined as per EN 60335-2-79
| Hand-arm vibration value | <2,5 m/s2 |
| Uncertainty K | 0,6 m/s2 |
| Sound pressure level LpA | 79 dB(A) |
| Uncertainty KpA | 3 dB(A) |
| Sound power level LWA + Uncertainty KWA | 95 dB(A) |
| Reason for exception according to regulation (EU) | |
| 2019/1781 Annex I Section 2 (12): (j) | |
Subject to technical changes.
EU Declaration of Conformity
We hereby declare that the machine described below complies with the relevant basic safety and health requirements of the EU Directives, both in its basic design and construction as well as in the version put into circulation by us. This declaration shall cease to be valid if the machine is modified without our prior approval.
Product: High pressure cleaner
Type: 1.950-xxx
Relevant EU Directives
2014/30/EU
2006/42/EC (+2009/127/EC)
2011/65/EU
2000/14/EC
2009/125/EC
Applied regulations
(EU) 2019/1781
Applied harmonized standards
EN 60335-1
EN 60335-2-79
EN 62233: 2008
EN 55014-1: 2017
EN 55014-2: 2015
EN 61000-3-2: 2014
EN 61000-3-3: 2013
EN IEC 63000: 2018
Applied conformity evaluation method
2000/14/EC: Appendix V
Sound power level dB(A)
Measured: 92
Guaranteed: 95
The signatories act on behalf of and with of the authority of the company management.

Chairman of the Board of Management
S. Reiser
Director Regulatory Affairs & Certification
Documentation supervisor:
S. Reiser
Alfred Kärcher SE & Co. KG
71364 Winnenden (Germany)
Tel.: +49 7195 14-0
Fax: +49 7195 14-2212
Winnenden, 2021/06/01
Table des matières
Sécurité FR 5
www.kaercher.com/REACH
5 Interrupteur principal "0/OFF" / "I/ON"
www.kaercher.com/dealersearch
2006/42/CE (+2009/127/CE)
2011/65/UE
2000/14/CE
2009/125/CE
Décrets appliqués
(UE) 2019/1781
Chairman of the Board of Management
Director Regulatory Affairs & Certification
71364 Winnenden (Germany)
Tel.: +49 7195 14-0
Fax: +49 7195 14-2212
Winnenden, 2021/06/01
Indice
Sicurezza. I T
www.kaercher.com/REACH
www.kaercher.com/dealersearch
Dati tecnici
2006/42/CE (+2009/127/CE)
2011/65/UE
2000/14/CE
2009/125/CE
Chairman of the Board of Management
S. Reiser
Director Regulatory Affairs & Certification
71364 Winnenden (Germany)
Tel.: +49 7195 14-0
Fax: +49 7195 14-2212
Winnenden, 2021/06/01
Inhoud
Veiligheid ....NL 5
www.kaercher.com/dealersearch
Technische gegevens

Chairman of the Board of Management

Director Regulatory Affairs & Certification
71364 Winnenden (Germany)
Tel.: +49 7195 14-0
Fax: +49 7195 14-2212
Winnenden, 2021/06/01
www.kaercher.com/REACH
www.kaercher.com/dealersearch
Datos técnicos
2006/42/CE (+2009/127/CE)
2011/65/UE
2000/14/CE
2009/125/EG

Chairman of the Board of Management

S. Reiser
Director Regulatory Affairs & Certification
71364 Winnenden (Germany)
Tel.: +49 7195 14-0
Fax: +49 7195 14-2212
Winnenden, 2021/06/01
Índice
Segurança PT5
www.kaercher.com/REACH
5 Interruptor do aparelho "0/OFF" / "I/ON"
www.kaercher.com/dealersearch
Dados técnicos
2006/42/CE (+2009/127/CE)
2011/65/UE
2000/14/CE
2009/125/CE
Chairman of the Board of Management

S. Reiser
Director Regulatory Affairs & Certification
71364 Winnenden (Germany)
Tel.: +49 7195 14-0
Fax: +49 7195 14-2212
Winnenden, 2021/06/01
Indholdsfortegnelse
Sikkerhed DA 5
www.kaercher.com/dealersearch
Tekniske data
2006/42/EF (+2009/127/EF)
2011/65/EU
2000/14/EF
2009/125/EF
Anvendte direktiver
(EU) 2019/1781

Chairman of the Board of Management

Director Regulatory Affairs & Certification
71364 Winnenden (Germany)
Tel.: +49 7195 14-0
Fax: +49 7195 14-2212
Winnenden, 2021/06/01
Innholdsfortegnelse
Sikkerhet N O
www.kaercher.com/REACH
5 Apparatbryter "0/OFF" / "I/ON"
2006/42/EF (+2009/127/EF)
2011/65/EU
2000/14/EF
2009/125/EU
Anvendte direktiver
(EU) 2019/1781
2000/14/EF: Vedlegg V
Lydeffektnivå dB(A)
Målt: 92
Garantert: 95

Chairman of the Board of Management

Director Regulatory Affairs & Certification
71364 Winnenden (Germany)
Tel.: +49 7195 14-0
Fax: +49 7195 14-2212
Winnenden, 2021/06/01
www.kaercher.com/REACH
www.kaercher.com/dealersearch
Tekniska data

Chairman of the Board of Management
Director Regulatory Affairs & Certification
71364 Winnenden (Germany)
Tel.: +49 7195 14-0
Fax: +49 7195 14-2212
Winnenden, 2021/06/01
Sisällysluettelo
www.kaercher.com/REACH
Laitekuvaus

Chairman of the Board of Management
S. Reiser
Director Regulatory Affairs & Certification
71364 Winnenden (Germany)
Tel.: +49 7195 14-0
Fax: +49 7195 14-2212
Winnenden, 2021/06/01
www.kaercher.com/REACH
Περιγραφή συσκευής

Chairman of the Board of Management

Director Regulatory Affairs & Certification
71364 Winnenden (Germany)
Tel.: +49 7195 14-0
Fax: +49 7195 14-2212
Winnenden, 2021/06/01
İçindekiler
Güvenlik T R
www.kaercher.com/REACH
Cihaz tanımı

Chairman of the Board of Management

Director Regulatory Affairs & Certification
71364 Winnenden (Germany)
Tel.: +49 7195 14-0
Fax: +49 7195 14-2212
Winnenden, 2021/06/01
Оглавление
www.kaercher.com/REACH
Описание прибора
www.kaercher.com/dealersearch
Технические данные

Chairman of the Board of Management
S. Reiser
Director Regulatory Affairs & Certification
71364 Winnenden (Germany)
Tel.: +49 7195 14-0
Fax: +49 7195 14-2212
Winnenden, 2021/06/01
Tartalomjegyzék
www.kaercher.com/REACH
Készülék leírása

Chairman of the Board of Management

Director Regulatory Affairs & Certification
71364 Winnenden (Germany)
Tel.: +49 7195 14-0
Fax: +49 7195 14-2212
Winnenden, 2021/06/01
Obsah
Bezpečnost CS5
www.kaercher.com/REACH
Popis zařízení
www.kaercher.com/dealersearch
Technické údaje
2006/42/ES (+2009/127/ES)
2011/65/EU
2000/14/ES
2009/125/ES
Použitá ustanoven'
(EU) 2019/1781

Chairman of the Board of Management
Director Regulatory Affairs & Certification
71364 Winnenden (Germany)
Tel.: +49 7195 14-0
Fax: +49 7195 14-2212
Winnenden, 2021/06/01
Vsebinsko kazalo
Varnost SL 5
Namenska uporaba .... SL 5
Pribor in nadomestni deli. SL 5
Varstvo okolja SL5
Opis naprave SL 6
Montaža. S
Zagon SL 6
Obratovanje. SL7
Transport S
Skladiščenje SL8
Vzdrževanje. SL8
www.kaercher.com/REACH
Opis naprave
Obseg dobave naprave (odvisno od modela) je prika-zan na embalaži. V teh navodilih za uporabo so opisane vse možne opcije.
www.kaercher.com/dealersearch
Tehnični podatki
2006/42/ES (+2009/127/ES)
2011/65/EU
2000/14/ES
2009/125/EG
Uporabne uredbe
(EU) 2019/1781
Chairman of the Board of Management

S. Reiser
Director Regulatory Affairs & Certification
71364 Winnenden (Germany)
Tel.: +49 7195 14-0
Fax: +49 7195 14-2212
Winnenden, 2021/06/01
Spis treści
Bezpieczeństwo PL 5
www.kaercher.com/REACH
Opis urządzenia
www.kaercher.com/dealersearch
Dane techniczne
2006/42/WE (+2009/127/WE)
2011/65/UE
2000/14/WE
2009/125/UE
Chairman of the Board of Management

S. Reiser
Director Regulatory Affairs & Certification
71364 Winnenden (Germany)
Tel.: +49 7195 14-0
Fax: +49 7195 14-2212
Winnenden, 2021/06/01
Cuprins
Siguranța R O
www.kaercher.com/REACH
www.kaercher.com/dealersearch
Date tehnice
Directive UE respectate:
2014/30/UE
2006/42/CE (+2009/127/CE)
2011/65/UE
2000/14/CE
2009/125/CE
Regulamente aplicabile
(UE) 2019/1781
Norme armonizate utilize:
EN 60335-1
EN 60335-2-79
EN 62233: 2008
EN 55014-1: 2017
EN 55014-2: 2015
EN 61000-3-2: 2014
EN 61000-3-3: 2013
EN IEC 63000: 2018

Chairman of the Board of Management
Director Regulatory Affairs & Certification
71364 Winnenden (Germany)
Tel.: +49 7195 14-0
Fax: +49 7195 14-2212
Winnenden, 2021/06/01
Obsah
www.kaercher.com/REACH
Popis prístroja
www.kaercher.com/dealersearch
Technické údaje
2006/42/ES (+2009/127/ES)
2011/65/EÚ
2000/14/ES
2009/125/EÚ
Použité nariadenia
(EÚ) 2019/1781
Uplatňované harmonizované normy:
EN 60335-1
EN 60335-2-79
EN 62233: 2008
EN 55014-1:2017
EN 55014-2: 2015
EN 61000-3-2: 2014
EN 61000-3-3: 2013
EN IEC 63000: 2018

Chairman of the Board of Management

Director Regulatory Affairs & Certification
71364 Winnenden (Germany)
Tel.: +49 7195 14-0
Fax: +49 7195 14-2212
Winnenden, 2021/06/01
Pregled sadržaja
Sigurnost.... H R
www.kaercher.com/REACH
Opis uređaja
www.kaercher.com/dealersearch
Tehnički podaci
| Električni priključak | |
| Napon 220-240 | V1~50-60 Hz |
| Priključna snaga 2,1 kW | |
| Stupanj zaštite IP X5 | |
| Klasa zaštite II | 回 |
| Strujna zaštita (inertna) 10 A | |
| Priključak za vodu | |
| Dovodni tlak (maks.) 1,2 MPa | |
| Dovodna temperatura (maks.) 40 °C | |
| Dovodni protok (min.) 9 l/min | |
| Maks. usisna visina 0,5 m | |
| Podaci o snazi | |
| Radni tlak 12 MPa | |
| Maks. dozvoljeni tlak 14,5 MPa | |
| Protok vode 6,7 l/min | |
| Maksimalni protok 8,3 l/min | |
| Protok sredstva za čišćenje 0,3 l/min | |
| Povratna udarna sila ručnog pištolja za prskanje | 17 N |
| Dimenzije i težine | |
| Duljina | 310 mm |
| Širina | 336 mm |
| Visina | 860 mm |
| Težina u stanju pripravnosti za rad, s priborom | 9,5 kg |
| Utvrdene vrijednosti prema EN 60335-2-79 | |
| Vrijednost vibracije na ruci | <2,5 m/s ^2 |
| Nepouzdanost K | 0,6 m/s ^2 |
| Razina zvučnog tlaka L _pA | 79 dB(A) |
| Nepouzdanost K _pA | 3 dB(A) |
| Razina zvučne snage L _WA + nepouz-danost K _WA | 95 dB(A) |
| Motif d'exemption conformément au règlement (UE) 2019/1781, annexe I, section 2, point 12): j) | |
2006/42/EZ (+2009/127/EZ)
2011/65/EU
2000/14/EZ
2009/125/EZ

Chairman of the Board of Management
S. Reiser
Director Regulatory Affairs & Certification
71364 Winnenden (Germany)
Tel.: +49 7195 14-0
Fax: +49 7195 14-2212
Winnenden, 2021/06/01
Pregled sadržaja
Sigurnost S R
Namensko korišćenje .... SR 5
Pribor i rezervni delovi. . . . . . . . . . . . . . . . . . . . . . . . . SR 5
Zaštita životne sredine ....SR 5
Opis uređaja ....SR6
Montaža. S R
Stavljanje u pogon. . . . . . . . . . . . . . . . . . . . . . . . . . . . . . . . . . . . . . . . SR 6
Rad ....SR 7
Transport S R
www.kaercher.com/REACH
Opis uređaja
Obim isporuke uređaja (u zavisnosti od modela) je prikazan na ambalaži. Ovo uputstvo za rad opisuje sve moguće opcije.
Slike pogledajte na stranici 2
www.kaercher.com/dealersearch
Tehnički podaci
| Električni priključak | |
| Napon 220-240 | V1~50-60 Hz |
| Priključna snaga 2,1 kW | |
| Stepen zaštite IP X5 | |
| Klasa zaštite II | 回 |
| Mrežni osigurač (inertan) 10 A | |
| Priključak za vodu | |
| Dovodni pritisak (maks.) 1,2 MPa | |
| Dovodna temperatura (maks.) 40 °C | |
| Dovodni protok (min.) 9 l/min | |
| Maks. usisna visina 0,5 m | |
| Podaci o snazi | |
| Radni pritisak 12 MPa | |
| Maks. dozvoljeni pritisak 14,5 MPa | |
| Protok vode 6,7 l/min | |
| Maksimalni protok 8,3 l/min | |
| Protok sredstva za čišćenje | 0,3 l/min |
| Povratna udarna sila ručnog pištolja za prskanje | 17 N |
| Dimenzije i težine | |
| Dužina | 310 mm |
| Širina | 336 mm |
| Visina | 860 mm |
| Težina u stanju spremnom za rad, sa priborom | 9,5 kg |
| Izračunate vrednosti prema EN 60335-2-79 | |
| Vrednost vibracije na ruci | <2,5 m/s2 |
| Nepouzdanost K | 0,6 m/s2 |
| Nivo zvučnog pritiska L_pA | 79 dB(A) |
| Nepouzdanost K_pA | 3 dB(A) |
| Nivo zvučne snage L_WA + nepouzdanost K_WA | 95 dB(A) |
| Razlog izuzetka prema uredbi (EU) 2019/1781 prilog I odeljak 2 (12): j) | |
Pridržano pravo na tehničke promene.
Izjava o usklađenosti sa propisima EU
Ovim izjavljujemo da ovde opisana mašina po svojoj koncepciji i načinu izrade, sa svim njenim modelima koje smo izneli na tržište, odgovara osnovnim zahtevima dole navedenih propisa Evropske Zajednice o sigurnosti i zdravstvenoj zaštiti. Ova izjava prestaje da važi ako se bez naše saglasnosti na mašini izvedu bilo kakve promene.
Proizvod: Uređaj za čišćenje pod visokim pritiskom
Tip: 1.950-xxx
2006/42/EZ (+2009/127/EZ)
2011/65/EU
2000/14/EZ
2009/125/EZ
Primenjene odredbe
(EU) 2019/1781
Primenjene uskladene norme:
EN 60335-1
EN 60335-2-79
EN 62233: 2008
EN 55014-1:2017
EN 55014-2: 2015
EN 61000-3-2: 2014
EN 61000-3-3: 2013
EN IEC 63000: 2018
Chairman of the Board of Management
Director Regulatory Affairs & Certification
Opunomoćeni za izradu dokumentacije: S. Reiser
Alfred Kärcher SE & Co. KG
71364 Winnenden (Germany)
Tel.: +49 7195 14-0
Fax: +49 7195 14-2212
Winnenden, 2021/06/01
Съдържание
Сигурност......BG5
Употреба по предназначение ..... BG 5
www.kaercher.com/REACH
Описание на уреда
www.kaercher.com/dealersearch
Технически данни
Chairman of the Board of Management
S. Reiser
Director Regulatory Affairs & Certification
71364 Winnenden (Germany)
Tel.: +49 7195 14-0
Fax: +49 7195 14-2212
Winnenden, 2021/06/01
Sisukord
Ohutus.... ET 5
www.kaercher.com/REACH
Seadme osad
www.kaercher.com/dealersearch
Tehnilised andmed
Toode: Körgsurvepesur
Tüüp: 1.950-xxx

Chairman of the Board of Management

Director Regulatory Affairs & Certification
71364 Winnenden (Germany)
Tel.: +49 7195 14-0
Fax: +49 7195 14-2212
Winnenden, 2021/06/01
Satura rādītājs
www.kaercher.com/REACH
Aparāta apraksts
www.kaercher.com/dealersearch
Tehniskie dati

Chairman of the Board of Management

S. Reiser
Director Regulatory Affairs & Certification
71364 Winnenden (Germany)
Tel.: +49 7195 14-0
Fax: +49 7195 14-2212
Winnenden, 2021/06/01
Turinys
www.kaercher.com/REACH
Prietaiso aprašymas
www.kaercher.com/dealersearch
Techniniai duomenys

Chairman of the Board of Management
S. Reiser
Director Regulatory Affairs & Certification
71364 Winnenden (Germany)
Tel.: +49 7195 14-0
Fax: +49 7195 14-2212
Winnenden, 2021/06/01
3MICT
Безпека. U K
www.kaercher.com/REACH
Опис пристрою
www.kaercher.com/dealersearch
Chairman of the Board of Management
Director Regulatory Affairs & Certification
71364 Winnenden (Germany)
Tel.: +49 7195 14-0
Fax: +49 7195 14-2212
Winnenden, 2021/06/01

natural_image
Black silhouette of a hand giving a thumbs-up gesture (no text or symbols)THANK YOU!
MERCI! DANKE! iGRACIAS!

Register your product and benefit from many advantages.
www.kaercher.com/welcome


Rate your product and tell us your opinion.
natural_image
Icon showing a gear and wrench inside a square frame (no text or symbols)www.kaercher.com/service
Alfred Kärcher SE & Co. KG
Alfred-Kärcher-Str. 28-40
71364 Winnenden (Germany)