IEVL 1738 - Lawn mower IKRA - Free user manual and instructions
Find the device manual for free IEVL 1738 IKRA in PDF.

| Product type | Electric scarifier and dethatcher |
| Brand | IKRA |
| Model | IEVL 1738 |
| Power supply | 230-240 V ~ 50 Hz |
| Power | 1700 W |
| Working width | 380 mm |
| Collection bag capacity | 50 L |
| Weight | 15 kg |
| Height adjustment | Continuous from +5 to -12 mm |
| Rotation speed | 4000 min⁻¹ |
| Sound pressure level | 81.0 dB(A) (K=3) |
| Guaranteed sound power level | 94 dB(A) |
| Handle vibration | 3.05 m/s² (K=1.5) |
| Protection class | II (double insulation) |
| Protection rating | IPX4 |
| Transmission | Toothed belt |
| Number of rollers supplied | 2 (scarifier and dethatcher) |
| Safety devices | Circuit breaker-protector, two-hand safety switch |
| Warranty | 24 months (private use) |
| Use | Private (private gardens) |
Frequently Asked Questions - IEVL 1738 IKRA
User questions about IEVL 1738 IKRA
0 question about this device. Answer the ones you know or ask your own.
Ask a new question about this device
Download the instructions for your Lawn mower in PDF format for free! Find your manual IEVL 1738 - IKRA and take your electronic device back in hand. On this page are published all the documents necessary for the use of your device. IEVL 1738 by IKRA.
USER MANUAL IEVL 1738 IKRA
Operating Instructions - Translation of the original Operating Instructions Read operating instructions before use!
text_image
Technical diagram of a lawn mower with numbered parts and close-up insets for mechanical assembly details.DE
1 Griff
1a Obere Griffstange
3 Cord strain relief
4 Mounting set (x4) for handle bar
4a Knurled nut and washer (x4)
FR
1 Poignée
7 Rotary knob (height adjustment)
8 Wheel
9 Quick-release fasteners (x2)
10 Scarifying cylinder
11 Raking cylinder
12 Cord clip (x2)
13 Discharge opening
14 Allen key
4b Vis (x2)
natural_image
Technical line drawing of a mechanical housing or enclosure with internal components and an arrow indicating direction (no text or symbols)
text_image
6 5 6
text_image
7 + - 7
text_image
8 14 A
text_image
9 C B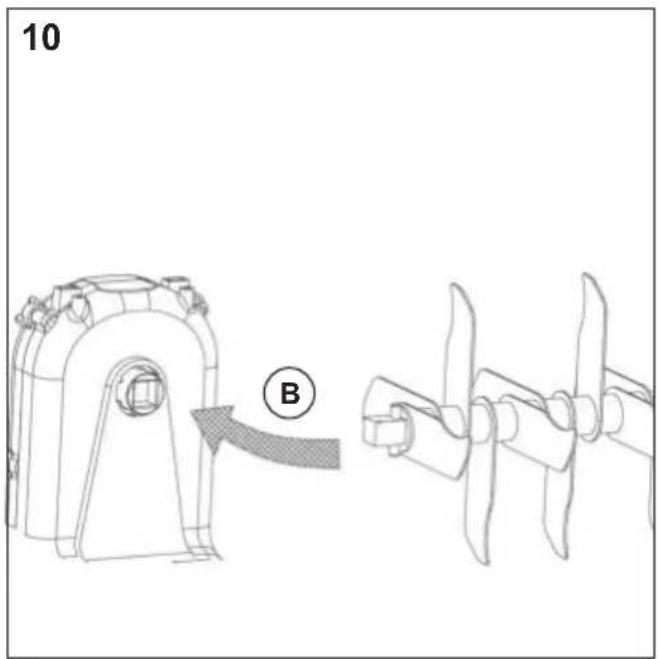
text_image
10 B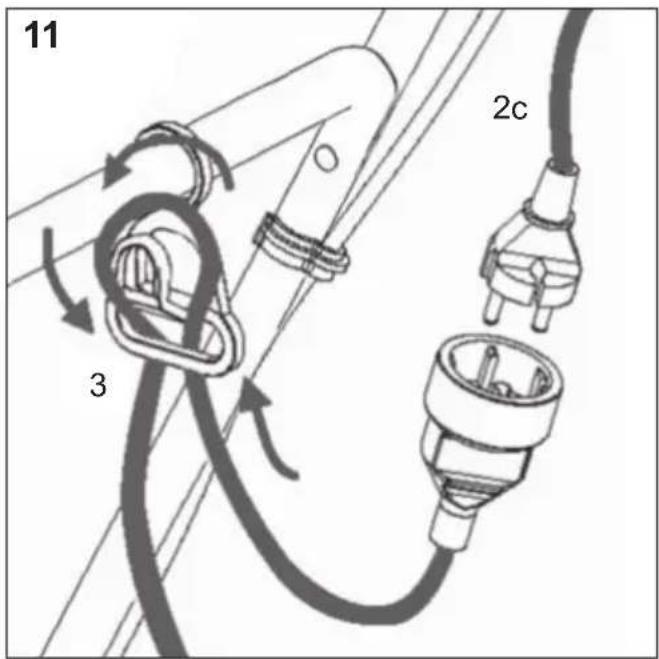
text_image
11 2c 3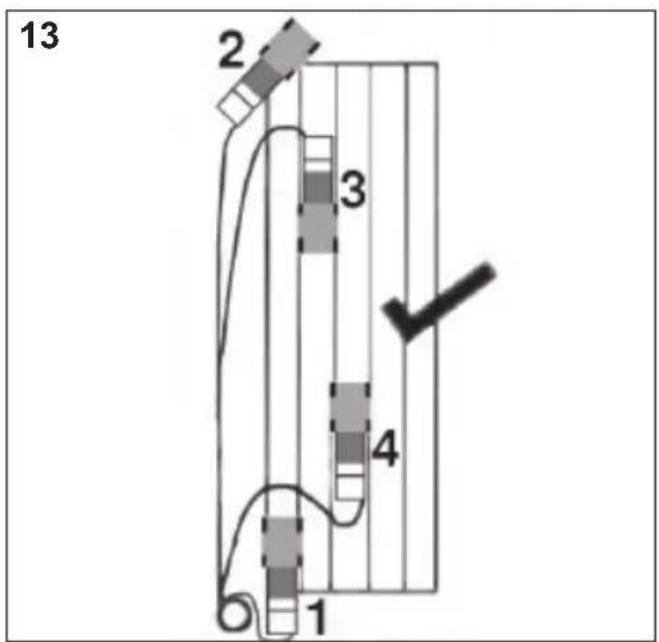
text_image
13 2 3 4 1
text_image
15 4 9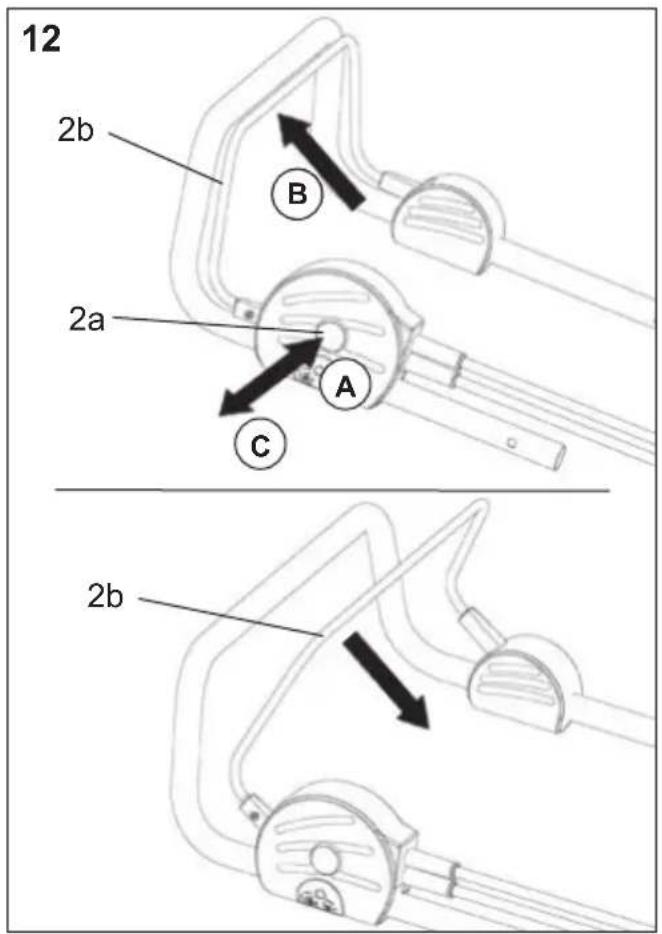
text_image
12 2b B 2a A C 2b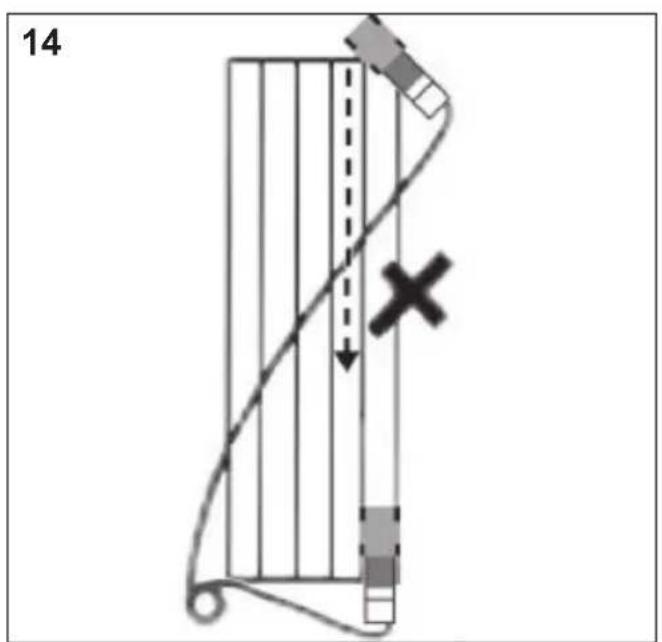
text_image
14GB | Operating Instructions
CONTENT
Page
PICTURES 1 - 4
- GENERAL INFORMATIONS GB-2
- GENERAL SAFETY INSTRUCTIONS FOR GARDENING TOOLS GB-2
Technical safety
Notes
Preparation
Handling
Maintenance and storage
Safety instructions for lawn scarifiers & rakers
Notes
Warnings
Recommendation
Additional safety instructions for lawn scarifiers & rakers
General safety instructions
Electrical safety
Replacing the power cable
- SYMBOLS GB-6
- INTENDED USE GB-7
- TECHNICAL DATA GB-7
- SAFETY INFORMATION GB-8
Motor safety switch
- DESCRIPTION AND PACKAGE CONTENTS GB-8
- ASSEMBLY GB-8
Assembling the handle
Assembling the grass collection box
Adjusting the height of the wheels
Changing the working rollers
- OPERATING INSTRUCTIONS GB-8
How to use the scarifier
How to use the raker
Switching On / Off
GB | Operating Instructions
Electric Lawn Scarifier & Raker IEVL 1738
1. GENERAL INFORMATIONS
This manual has been prepared by the manufacturer and is part of your machine's equipment and must be kept with the machine; this manual describes the aims according which this machine has been designed for and contains all information for correct and safe use. The manual must be read before attempting to operate the machine, before attempting to make any adaptation and maintenance on the machine. Safety instructions enclosed in the manual guarantee user's health and longer machine's life: it's important to follow them accurately. All pictures and photos enclosed in the manual are supplied by the manufacturer to show to the user the machine's operation. All possible efforts have been made to insure accuracy of information enclosed in this manual; due to manufacturer's quality policy and continuing program of development, product specifications may be modified without previous notice.

When using the machine certain safety precautions must be taken in order to prevent injuries and damage:
- Read through the operating instructions carefully and observe the instructions contained therein. Familiarise yourself with the machine, its correct use and the safety devices by means of these operating instructions.
- Store these carefully so that the information is always available to you.
- In the event of the machine being handed over to another party, please include these operating instructions with it.
We accept no liability for accidents and damage caused as a result of disregarding these instructions.
2. GENERAL SAFETY INSTRUCTIONS FOR GARDENING TOOLS

WARNING – Read all safety instructions! Failure to observe the safety instructions may result in electric shock, burns and/or severe injury.
Keep the safety instructions für future reference.
- This device is not intended to be used by persons (incl. children) with limited physical, sensory or mental abilities or with a lack of experience and/or knowledge unless they are supervised by a person responsible for their safety or were instructed on the proper use of the device by that person.
- Children should be under supervision to ensure that they do not play with the device.
Technical safety Notes
a) Read the Operating Instructions carefully. Make sure to be thoroughly familiar with controls and proper use of the tool.
Preparation
a) Never allow children or other persons that are not familiar with the Operating Instructions to use the tool. The minimum age for operating the tool may be determined by local regulations.
b) Do not operate the tool while other persons – in particular children – or animals are nearby.
c) Keep in mind that the operator of the tool is liable for accidents or risks that may occur to other persons or their property.
d) Wear ear and eye protection while operating the tool.
e) Always wear sturdy footwear and long trousers when operating the tool. Do not operate the tool with bare feet or open sandals.
f) Check the area, in which you are going to operate the tool, and remove all stones, sticks, wires, bones and other objects that may get caught and hurled away.
g) Visually inspect the work tools and bolts for signs of wear and tear or damages each time before you start using the tool. To avoid imbalances worn-out or damaged work tools and/or bolts may only be replaced in sets.
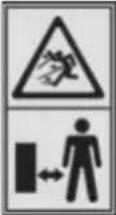
h) If tools with ejection openings pointing to the backside and uncovered rear rollers without collection or protection devices full eye protection (safety goggles) must be worn.
Handling
a) Operate the tool in daylight or good artificial lighting only.
b) If possible avoid to use the tool with wet grass or apply particular care to avoid slipping.
c) Make sure to have a safe stand when working on inclines.
GB | Operating Instructions
d) Move the tool at walking speed only.
e) Always work in a perpendicular position/direction to the slope. Never work in upward or downward direction!
f) Take particular care when changing the working direction on the slope.
g) Do not work on extremely steep slopes.
h) Take particular care when turning the tool around or pulling it towards yourself.
i) Stop the work tools if the tool must be tilted for transport purposes. Stop the work tools if areas other than grass patches must be crossed and whenever the tool is moved to and from the area to be worked.
j) Do not use the tool with damaged or no safety devices installed, e.g., without baffle plates and/or collection devices.
k) Do not change the motor settings and do not overrev the motor.
I) Disengage ('declutch') all work tools and drives prior to starting the motor.
m) Start the tool with due care in accordance with the manufacturer's instructions. Make sure to keep a safe distance between your feet and the the work tools.
n) The tool must never be tilted when starting the motor unless the tool must be lifted off the ground to be started. If this should be the case only tilt the tool as far as necessary and only lift the side pointing away from the operator off the ground.
o) Do not start the motor while standing in front of the ejection chute.
p) Never reach under or touch rotating parts with your hands or feet. Keep away from the ejection opening.
q) Never lift or carry a tool with the motor running.
r) Switch off the motor and pull the mains plug in the following cases:
- before removing blockages or obstructions in the ejection chute.
- before inspecting or cleaning the tool or be fore performing any works on it.
- if an object got caught or hit. Check the tool for damages and perform the required repairs before you restart and continue working with the tool.
- if the tool starts to vibrate abnormally (in spect immediately!).
s) Switch off the motor and pull the mains plug whenever you leave the tool alone.
Maintenance and storage
a) Make sure that all nuts, bolts and screws are firmly tightened to ensure the tool's safe working condition.
c) Let the engine cool down before you store the tool in a closed room.
e) Regularly check the collecting device for signs of wear and tear or damaged parts.
f) Inspect the tool regularly and replace worn-out or damaged parts for reasons of safety.
Safety instructions for Electric Lawn Scarifier & Raker
Notes
a) Check the mains and extensions cables for signs of damage or ageing before use. Do not use a device with defective cables.
b) Pull the mains plug in case the cable gets damaged during use. Do not touch the cable under any circumstances!
c) Visually inspect the cutting unit for signs of wear and tear or damages each time before you start using the device. If the device starts to vibrate abnormally it is required to inspect it immediately!
d) Do not unnecessarily tilt the device when starting the motor. Only tilt the device as far as necessary and only lift the side pointing away from the operator off the ground. Make sure to hold the device with both hands in working position before you put it back on the ground.
e) Safety devices must be replaced by our after-sales service only.
Warnings
a) Warning! The device is not intended for use by children.
b) Do not use the lawn scarifier & raker if the cables are damaged or worn.
c) Do not connect a damaged cable to the mains supply and do not touch a damaged cable as long as it is connected to the mains supply. A damaged cable may lead to the contact with active parts.
d) Do not touch the tines unless the device's power supply has been disconnected and the tines fully stopped moving.
e) Keep extension cords away from the tines. A damaged cable may come into contact with active parts (hazard of electric shock).
GB | Operating Instructions
f) Disconnect the power supply (e.g., pull the plug from the mains socket) in the following cases:
- every time you leave the device unattended;
- before removing blockages/obstructions of the tool;
- before inspecting, cleaning or performing any other works on the device;
- after an object got caught or hit.
g) Thoroughly read the "Rules for Safe Operation" of the device.
Recommendation
Only connect the device to a power source that is protected via a residual current protective device (RCD) with a maximum release current of 30 mA.

The use of an RCD or other circuit breaker unit does not release the operator of your Machine from the safety instructions and safe working practice - es given in this manual.
Additional safety instructions for lawn scarifiers & rakers
- The device is intended for private use only. It must not be used in public gardens, parks, sports facilities, grass verges, and professional agriculture and forestry.
- A feeling of tingling or numbness in the hands is an indicator for excessive vibration. Limit operating times, make sufficiently long work breaks, distribute the work with the device among several persons, or wear anti-vibration protection gloves when working with the device for longer periods of time.
- When working with the device, a certain level of noise cannot be avoided. Noisy work should be scheduled for hours, during which it is allowed by statute or other local regulations. Adhere to any applicable rest times and limit your working time to the necessary minimum time. For your personal protection and the protection of people nearby, suitable hearing protection must be worn.
- Do not get distracted and always concentrate on what you are doing. Use common sense. Never operate the tool when you are tired, sick or under the influence of alcohol or other drugs.
Additional general safety instructions
- Do not handle the plug or the tool with wet hands and do not use the tool in the rain.
- Use only outdoor rated extension leads that are so marked. Keep the extension cord away from heat, oil and sharp edges.
- Use a power cable H05 RN-F or H05 VVF or greater, with minimum cross section of 2 x1.5 mm² and max length of 20 m.
- Use a face mask if dusty.
- Keep clear of discharge openings at all times.
- Do not use solvents or cleaning liquids to clean your Machine - use a blunt scraper to remove grass and dirt. Always disconnect from the electrical supply before cleaning.
- Keep your working area clean and tidy. Untidy and poorly lit working areas may lead to accidents.
- Do not operate the tool in potentially explosive environments containing combustible fluids, gases or dusts.
- Avoid physical contact with earthed surfaces as pipes, heaters, ovens and refrigerators.
- Store power tools out of the reach of children. Do not allow persons to use the tool if they are not familiar with the tool or these instructions.
- Do not overtax the power tool. Use the power tool intended for your type of work in each case.
- Do not use the cable to carry or hang up the tool or to pull the plug out of the socket. Keep the cable away from heat, oil and sharp edges or moving parts of the tool. Damaged or tangled cables increase the risk of electric shock.
- Do not overestimate your abilities. Take care of a safe footing and keep your balance at all times.
- Remove adjustment tools or wrenches and the like before you switch the tool on.
- Avoid unintentional operation. Make sure that the switch is in 'OFF' position before pulling the plug from the mains socket. When carrying the tool with your finger on the on/off switch or connecting the tool to the mains supply with the switch in 'ON' position, this may result in accidents.
- Always pay attention to what you do and apply reasonable care when working with a power tool. Do not use the tool when you are tired or under the influence of medication, drugs or alcohol.
- Thoroughly maintain your power tool. Check whether moving parts are working properly and are not jamming/sticking, and whether parts are broken or otherwise damaged in a
GB | Operating Instructions
way that affects the function of the tool. Have damaged parts repaired before using the tool.
- Use power tools, accessories, add-on tools, etc. in accordance with these instructions and in the way prescribed for the respective type of tool. You should also consider the working conditions and the work to be carried out.
- Have the power tool serviced by qualified technical personnel only; repairs should be carried out using exclusively original spare parts.
- Replace worn or damaged parts for reasons of safety. Use only original spare parts. Parts not produced by the original manufacturer may have a poor fit and possibly cause injury.
- Grip guide bar firmly with both hands. Never operate the tool with only one hand.
- Hold the guide bar and lift the tool to move it from one place to another. Always switch off the tool, disconnect the plug and wait until the application stops before carrying out maintenance.
Electrical safety
- The electric motor has been designed to use single phase voltage only.
- Make sure your voltage corresponds to the one written on the rating label.

Your machine has double insulation in conformity to Directive EN 60335, you do not therefore need to earth.
- Always use a plug compulsory for double insulation electric tooling when replacing the cable.
- Always switch your machine off before disconnecting any plug, socket or extension.
- Use only extension cords that are approved for out-door use and are not lighter than rubber-sheathed cables of type H07 RN-F according to DIN/VDE 0282 with a diameter of at least 1.5 sq. mm. They cords must be splash-proof.
Replacing the power cable
If the power cable of the device should be damaged it must be replaced by the manufacturer or their after-sales service or an equally qualified person to avoid any risks.
Warning!
The prolonged utilisation of a tool will subject the user to vibration and shocks that could lead to Raynaud's syndrome or Carpal tunnel syndrome.
This condition reduces the ability of the hand to
sense and regulate temperature, causes numbness and a sensation of heat and can lead to damage to the nervous system and the circulatory system and to necrosis.
Not all factors that lead to Raynaud's syndrome are known but cold water, smoking and illnesses that impact the blood vessels and the circulatory system as well as severe or long-lasting exposure to vibrations are known to be factors in the development of Raynaud's syndrome. Observe the following in order to reduce the risk of Raynaud's syndrome and Carpal tunnel syndrome:
- Wear gloves and keep your hands warm.
- Make sure the device is well maintained. A tool with loose components or with damaged or worn-out dampers will have a disposition towards increased vibrations.
• Always hold the handle firmly but do not clutch it constantly with excessive force. Take breaks often.
All of the above precautions cannot exclude the risk of Raynaud's syndrome or Carpal tunnel syndrome. Therefore, with long-term or regular use it is advisable to keep a close watch on the condition of your hands and fingers. Seek medical attention immediately in the event of any of the above symptoms appearing.
WARNING! This product produces an electromagnetic field during operation!
This field may under some circumstances interfere with active or passive medical implants! To reduce the risk of serious or fatal injury, we recommend persons with medical implants to consult their doctor and the medical implant manufacturer before operating this product!
GB | Operating Instructions
3. SYMBOLS
These Operating Instructions describe safety symbols and international symbols and pictographs that may be applied to the device.
 | Warning | 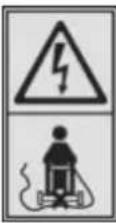 | Keep supply cord away from the cutting device. |
 | Compliance with relevant safety standards | 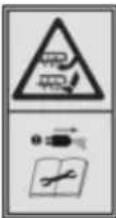 | Beware of sharp tines. Tines continue to rotate after the motor is switched Off.Switch off! Remove plug from mains before cleaning or maintenance |
 | Wear eye and ear protection devices when operating this device. |  | Guaranteed sound power level |
 | Read the instruction manual | 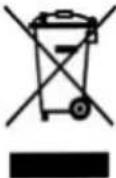 | Waste electrical products should not be disposed of with household waste, please recycle where facilities exist. Check with your local authority or retailer for recycling advice. |
 | Objects thrown by the product could hit the user or other bystanders.Always ensure that other people and pets remain at a safe distance from the product when it is in operation. | 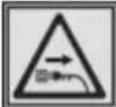 | Switch off! Remove plug from the mains immediately if the cable is damaged or cut. |
 | Protection class IIDouble insulation |
GB | Operating Instructions
4. INTENDED USE
Proper use
Depending on the fitted cutting device this product it is either intended for scarifying and removing thatch from lawns or for raking in domestic and hobby gardens.
- When used as a scarifier, this product works by scratching through and between the gras with specially adapted prongs that collect and remove any unwanted parts from the lawn whilst leaving the grass blades intact. At the same time the product scarifies the ground resulting in a better airing.
- When used as a raker, the fine needles will scratch the surface of the lawn while simultaneously picking light debris for better oxygen absorption, airing and draining.
Improper use
The appliance must not be used in permanent operation and not in industrial environments.
Residual risks
Even if you are operating this product in accordance with all the safety requirements, potential risks of injury and damage remain. The following dangers can arise in connection with the structure and design of this product:
- Health defects resulting from vibration emission if the product is being used over long periods of time or not adequately managed and properly maintained.
- Injuries and damage to property due to broken application tools or the sudden impact of hidden objects during use.
- Danger of injury and property damage caused by flying objects.
5. TECHNICAL DATA: Electric Lawn Scarifier & Raker IEVL 1738
Supply voltage V\~/Hz 230-240 / 50
| Power W 1700 | ||
| No-load speed n0 min | -1 | 4000 |
| Weight kg 15 | ||
| Grass bag L 50 | ||
| Working width mm 380 | ||
| Height adjustment (stepless) mm +5 to -12 | ||
| Sound pressure level (EN 50636-2-92:2014) | dB(A) | 81,0 [K=3,0 dB (A)] |
| Measured sound power level (2000/14/EU) | dB(A) | 89,5 [K=3,0 dB (A)] |
| Guaranteed sound power level (2000/14/EU) | dB(A) | 94 |
| Vibration on the handle (EN 50636-2-92:2014) m/s | 2 | 3,05 [K=1,5 m/s2] |
| Transmission | Drive belt | |
| Insulation class | II | |
| Safety class | IPX4 | |
Emissions
- The specified vibration emission value was measured by a standardized test methods and can compare with other power tools are used.
- The specified vibration emission value can also be necessary for the assessment of work breaks are used.
- The specified vibration emission value can vary during the actual use of the electric tool by specifying the value, depending on the way how to use the power tool.
- Note: You create the privilege against vascular pulsations of the hands in time breaks

Please wear ear protectors!
Noise emission information in accordance with the German Product Safety Act (ProdSG) and the EC Machine Directive: the noise pressure level at the place of work can exceed 80 dB(A). In such cases the operator will require noise protection (e.g. wearing of ear protectors).
Please do also consider any local regulations concerning noise protection!
GB | Operating Instructions
6. SAFETY INFORMATION
Motor safety switch
The motor safety switch turns off the motor in the event of a capacity overloaded. The function of the motor safety switch may not be taken out of operation.
If the motor safety switch has turned off the appliance, proceed as follows:
- Disconnect the appliance from the power supply
- Correct the cause for the capacity overload.
- After a cooling time of 15 minutes, connect it again to the power supply and start the appliance up again
7. DESCRIPTION AND PACKAGE CONTENTS
The package contains (fig. 1):
1x machine and scarifying roller
1x bottom part of the handle
2x middle part of the handle
4x screws and knurled nuts
1x top part of the handle
1x grass collecting bag
1x collecting bag frame
1x cable holder
2x cable clips
1x rake roller
2x quick-release fasteners
1x allen key
1x operating instructions
NOTE: make sure that the Machine and accessories in the package are not damaged.
8. ASSEMBLY

Always disconnect plug from mains before assembly and setting up
Assembling the handle (figs. 2, 3 and 4)
- Slide the cable strain relief (3) onto the bottom part of the handle (1c).
- Insert the bottom part of the handle (1c) into the swivel block (A). Then insert the quick clamp lever with the screw from the outside through the openings in the lower part of the handle (1c). Screw the quick clamp screw (9) into the mounting (B) on the housing.
- Press the quick coupler lever (9) with light pressure to lock (loosen the screw a little or tighten it a little if required).
- The height of the handle can be changed between 4 positions by loosening the quick clamp (9).
-
Insert the two fastening screws (4b) from the inside through the openings in the bottom part of the handle (1c) and secure the middle parts of the handle (1b) with two knurled nuts (4a).
-
Insert the two fastening screws (4b) from the inside through the openings in the top part of the handle (7) and secure these to the middle parts of the handle (1b) with two knurled nuts (4a).
- Tighten all screws hand-tight.
- Fasten the mains cable to the handle with the clips (12) (fig. 4)
Assembling the grass collection box (fig. 5 and 6)
- Slide the collecting bag (6) over the metal frame and fasten it to the frame with the clips (fig. 5).
- Lift up the protective cover (5).
- Hang the grass collecting box in place by hooking the 2 hooks into the corresponding holes on the discharge opening (13).
Note: If you do not wish to collect the grass, the machine can also be operated without the collecting bag. In this case the protective cover (5) folds downwards.
Adjusting the height of the wheels (fig. 7)
The machine has stepless height adjustment. The desired working depth can be set by turning the adjusting knob (7).
Changing the working rollers (scarifier/rake) (fig. 8, 9 and 10)
Before starting work, pull the mains plug out of the outlet and wait until the roller has come to a standstill.

Danger! The roller can cause injuries. Wear work gloves.
- Use an Allen key (14) to replace the working roller.
- Turn the machine over and loosen the two screws (A) on the bearing shell (C) (fig. 9).
- Lift the roller on the bearing side and pull it out of the drive (B) (fig. 9).
- Lift the complete roller upwards out of the machine.
- Pull the bearing shell (C) (fig. 9) off the roller. Fit the bearing shell (C) to the new work roller (fig. 10).
- Slide the square drive axle of the new roller into the drivebushing (B) of the machine (fig. 10).
- Fit the other end of the work roller with the bearing shell (C) into the corresponding mount on the machine.
- Fasten the roller with the two screws (A) and tighten these with the Allen key (fig. 10). Then turn the machine back over again.
9. OPERATING INSTRUCTIONS
(9)

Always keep to instructions on safety and current rules and regulations.
HINTS AND SUGGESTIONS
How to use the scarifier (using scarifying roller 10)
- By scarifying you remove the hardened surface, grass felt and flat-growing weeds and the crusted over grassroots are loosened up. The lawn will start to breath again and assimilate the nourishing substances, oxygen and water. This also prevents the establishing of bacteria in the lawn felt during the wintertime.
GB | Operating Instructions
- Cut the grass to a height of about 40 mm before scarifying. The lawn must be dry when using the machine. The best time for an scarifying is any time during the vegetative season, from end April through to September. Scarify it at least once a year. We recommend using a fertilizer straight after airing if you want a green carpet.
How to use the raker (using rake roller 11)
- By raking you remove the dead matter, moss and weed which disfigures a lawn. The build up of dead grass provides a mat of absorbent fibres which prevents water getting through to the ground.
- Do not force your rake through grass that is longer than 75mm. The lawn must be dry when using the machine. It's recommend that your raker is used at the beginning and the end of each grass cutting season to give your lawn a thorough raking. Your raker should also be used after each mowing to remove any grass cutting that may be left by your mower.
Switching On / Off (Fig. 11 and 12)
- This Machine is provided with an electric safety switch against accidental starts. Push the safety lock-off button (2a) on the switchbox, then pull the switch lever (2b) towards the handle (Fig. 12). After the tool has been switched on, you do not have to hold the switch-on lock (2a) any longer.
- The top handle is equipped with a hooked ring (3) which holds the extension cable. Hook the cable to protect socket and plug from accidental tears (Fig. 11).

Danger!
After the motor has been switched off, the roller continues to rotate for a few seconds – therefore, do not put your hands under the appliance straight away.
10. GENERAL OPERATION
WARNING! In some countries regulations define at what time of the day and on what special days products are allowed to be used and what restrictions apply!
Ask your community for detailed information and observe the regulations in order to preserve a peaceful neighbor hood and avoid committing administrative offences!
WARNING! If the product strikes a foreign object stop the motor! Switch the product off, disconnect it from the power supply and let it cool down. Inspect the product thoroughly for damage! Have any damage repaired before restarting!
WARNING! Extensive vibration of the product during operation is an indication of damage! The product should be promptly inspected and repaired!
- Check the product, its power cord and plug as well as accessories for damage before each use. Do not use the product if it is damaged or shows wear.
- Double check that accessories are properly fixed.
- Push the product forward by its handle. Keep the handle dry to ensure safe support.
- Ensure that the air vents are always unobstructed
and clear. Clean them if necessary with a soft brush. Blocked air vents may lead to overheating and damage the product.
5. Switch the product off immediately if you are disturbed while working by other people entering the working area. Always let the product come to complete stop before putting it down.
6. Do not overwork yourself. Take regular breaks to ensure you can concentrate on the work and have full control over the product.
7. Mow the lawn before working and fertilise afterwards.
8. Make sure that the lawn is clear of stones, sticks, wire or other objects that could damage the product or its motor.
9. Select the suitable cutting depth for the actual grass height.
10. Do not work with this product on a wet lawn because it tends to stick to the underbody of the product, preventing the proper discharge of collected material, and it could also cause you to slip and fall.
11. Slowly push the product forward. Move the product at appropriate speed. Do not move it too fast to prevent the discharge opening from getting blocked and engine from useless overloading.
12. Work in slight overlapping rows. The most effective pattern for scarifying/raking lawns is straight lines along one of the sides. This will keep the rows even and ensures that all the lawn is scarified/raked without missing any spots. (See Fig. 10).
13. Circle around flower beds. When reaching a flower bed in the middle of the lawn, make a row or two around the circumference of the bed.
14. Pay special attention when changing direction.
15. Never tilt or transport appliance with running motor
16. Never leave the appliance unattended.
17. When leaving, disconnect the appliance from the power supply.
Checking by an expert is necessary
-after hitting an obstacle
-if the motor comes to an immediate standstill
-if the blades of the scarifier roller are bent
-if the toothed belt is defective
-if the wire leading to the motor is damaged
-if there are other damages.
GENERAL OPERATION (Fig. 13)
We recommend the directional method of operation to obtain the maximum cutting performance from your unit and to reduce the risk of the trailing the extension lead from entering the cutting path.
- Place the bulk of the supply cable on the lawn close to the starting point (position 1, Fig. 13).
- Hold the handle assembly with both hands.
WARNING: Do not attempt to operate your Machine with one hand - you must guide it with both hands. Do not operate your machine on sanded, concrete or wooden ground.
- Tilt the handle downwards to slightly raise the front of your unit and to reduce the risk of lawn damage while starting, depress the safety lock-off button (2a) on the
GB | Operating Instructions
switchbox and while still depressed pull the switch lever (2b) towards you. Your machine will start and you can now allow the lock-off button (2a) to be released and lower your Machine to its proper cutting position, and commence cutting.
- Proceed down the cutting area as shown in Fig. 13, working from position 1 towards position 2 and, on reaching position 2, turn to the right and proceed towards position 3. Always working away from the cable. Do not adopt the method as shown in Fig. 14, working towards the cable, as this is dangerous practice.
Adjusting the working depth
It is generally recommended to aerate the grass up to a depth of max. 4 mm.
11. MAINTENANCE

WARNING! Before carrying out any repairs or servicing work, you must ensure that the product has been disconnected from the power supply. Repairs and maintenance work other than described within this instruction manual may be performed only by qualified specialist!
Service and storage
To ensure long and reliable service, carry out the following maintenance regularly. Servicing and cleaning work on the product and the removal of the guards may only be carried out after the motor has been switched off and the plug disconnected from the power supply.
- Regularly check for obvious defects such as loose, dislodged or damaged chain and guide bar, loose fixings and worn or damaged components.
- Check that covers and guards are undamaged and correctly fitted. Carry out necessary maintenance or repairs before using the product.
-
If the cutting device should happen to fail despite the care taken in manufacturing and testing, repair should be carried out by an authorized specialist.
-
Do not clean the product while it is running.
-
Ensure that all the fastening elements (screws, nuts, etc.) are tight at all times so that you can safely work with the product.
-
Check the product frequently for signs of wear. Replace worn or damaged parts.
-
Store your product in a dry place. To ensure a long service life all screw parts should be cleaned and then oiled.
-
Clean the product with a brush or cloth. Do not use any solvents or water to remove dirt.
-
The component that is subject to most wear is the cutting device. You should therefore check the condition of the cutting device and its mounting at regular intervals.
-
If the cutting device is worn or blunt it must be replaced immediately;
- If the product starts to suffer from excessive vibrations, this means that the cutting device has not been balanced correctly or has suffered deform
tion due to impacts. In this case it must be repaired or replaced.
After use
- Switch the product off, disconnect it from the power supply and let it cool down.
- Check, clean and store the product as described below.
- Turn the adjusting knob (7) to the „HIGH“ position.
- Loosen the fasteners (4) and (9), with which the handle parts are locked in place. The handle can then be folded down into a Z-shape to save storage space (fig. 15).
Grass catcher
- Inspect the grass catcher before each use. Do not use it if you find any damage.
- Clean the grass catcher after operation. Let the grass catcher dry thoroughly before storing to avoid mildew.
Transportation
- Switch the product off and disconnect it from power supply before transporting it anywhere.
- Turn the adjusting knob (7) to the „HIGH“ position.
- Attach transportation guards, if applicable.
- Always transport the product by its handle.
- Protect the product from any heavy impact or strong vibrations which may occur during transportation in vehicles.
- Secure the product to prevent it from slipping or falling over.
12. TROUBLESHOOTING

WARNING! Only perform the steps described in these instructions! All further inspection, maintenance and repair work must be performed by a qualified specialist! Contact a specialist if the problem cannot be solved by yourself!

WARNING! If the product does not perform properly, or sound are abnormal, or motor cannot be started, or stopped as described, or the cutting device does not work properly, or any other irregularity, or malfunction occurs, do not attempt to repair the product by yourself. Please contact helpline or service center.

Before carrying out any maintenance operations, cut off the electric power supply by disconnecting the plug from the extension cable.
GB | Operating Instructions
| Fault Cause Remedy | ||
| Motor does not run No voltage Check | connection line and connec- | tion protection switch |
| Roller blocked Check roller | ||
| Roller does not rotate Toothed belt defective Workshop | ||
| Motor output drops Working depth too | high Selected lower working depth | |
| Dirty housing Clean housing | ||
| Lawn too long for scarifying Lawn too | long for scarifying | |
| Poor scarifying performance Working | depth too high Select lower working depth | |
| Worn blades Replace worn blade | ||
| Noisy running, application vibrates Balde damaged Workshop | ||
| Fault, which cannot be rectified with the help of this table, may only be attended to be an authorized company (workshop). | ||
GB | Operating Instructions
13. REPAIR SERVICE
Attention! Electrical repairs may only be carried out by a skilled electrician or a customer service workshop!
If you send the machine to us for repair, please describe the fault.
14. SPARE PARTS
If you need accessories or spare parts, please contact our Service department.
When working with this tool, do not use any accessory parts other than those recommended by our company. Otherwise the operator or others in the vicinity could suffer serious injuries, or the tool could be damaged.
The following information should be provided when ordering spare parts:
- Type of machine
- Item number of the machine
15. WASTEDISPOSALANDENVIRONMENTAL PROTECTION
Dispose of the machine properly after it is worn out. Disconnect the mains cable in order to prevent misuse. Do not dispose of the machine with the household waste. In the interest of environmental protection, take it to a collection point for electric machines. Your responsible local authority can provide you with addresses and operating times. Also take the packaging materials and worn out accessories to the appropriate collection points.

Only for EU countries
Do not discard electric tools in the household waste!
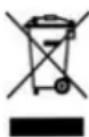
In accordance with European Directive 2012/19/EC on waste electrical and electronic equipment and its implementation in national law, waste electric tools must be collected separately for environmentally-compatible re-use.
Recycling alternative to the return invitation:
Instead of returning the electric equipment, the owner is alternatively obligated to take part in the proper recycling in the case of relinquishment of ownership. The waste equipment can also be taken to a collection facility which disposes of it in the sense of the national recycling management and waste acts. This does not pertain to the accessory parts and auxiliary equipment without electrical components accompanying the waste equipment.
16. WARRANTY
For this electric tool, the company provides the end user - independently from the retailer's obligations resulting from the purchasing contract - with the following warranties:
The warranty period is 24 months beginning from the hand-over of the device which has to be proved by the original purchasing document. For commercial use and use for rent, the warranty period is reduced to 12 months. Wearing parts and defects caused by the use of not fitting accessories, repair with parts that are no original parts of the manufacturer, use of force, strokes and breaking as well as mischievous overloading of the motor are excluded from this warranty. Warranty replacement does only include defective parts, not complete devices. Warranty repair shall exclusively be carried out by authorized service partners or by the company's customer service. In the case of any intervention of not authorized personnel, the warranty will be held void.
All postage or delivery costs as well as any other subsequent expenses will be borne by the customer.
17. EC DECLARATION OF CONFORMITY
We, ikra GmbH, Schlesier Straße 36, D-64839 Münster - Germany, declare under our sole responsibility that the product Electric Lawn Scarifier & Raker IEVL 1738, to which this declaration relates correspond to the relevant basic safety and health requirements of Directives 2006/42/EC (Machinery Directive), 2014/30/EU (EMC-Guideline), 2011/65/EU (RoHS-Guideline) and 2000/14/EC+2005/88/EC (noise directive) incl. modifications. For the relevant implementation of the safety and health requirements mentioned in the Directives, the following standards and/or technical specification(s) have been respected:
EN 60335-1:2012+A11:14; EN 50636-2-92:2014
EN 62233:2008 AfPS GS 2014:01 PAK
EN 50581:2012
EN 55014-1:2017; EN 55014-2:2015
EN 61000-3-2:2014; EN 61000-3-3:2013
measured acoustic capacity level 89,5 dB(A)
guaranteed acoustic capacity level 94,0 dB(A)
Conformity assessment method to annexe V / Directive 2000/14/EC
The year of manufacture is printed on the nameplate and can be additionally retrieved via the consecutive serial number.
Münster, 06.11.2018
Matthias Fiedler, Senior Product Manager Ikra GmbH
Maintenance of technical documentation:
Ikra GmbH, Schlesierstrasse 36, 64839 Münster, Germany
SOMMAIRE
Page
ILLUSTRATIONS
1 - 5
-
PASKIRTIS LT-8
-
TECHNINIAI DUOMENYS
LT-8
- SAUGOS INFORMACIJA
LT-9
Variklio apsaugos jungiklis
- APRAŠYMAS IR PAKUOTĖS TURINYS
LT-9
- SURINKIMAS LT-9
Rankenos surinkimas
Drujba1, 5038 Str, near block 86a 1592 Sofia
+359 2 4830225
+359 2 9786477
markovad@dezmomotors.com
11 Othellos Street, Dali Industrial Zone
2540 Nicosia
+357 22667908
+357 22667157
info@lambrouagro.com.cy
CZ |Drupol
FR | ikra Service France
GB-Northampton, NN3 8RH
UK/N.Ireland: 0344 824 3524
customerservice@b-gr8.co.uk
GR | Panos Vrontanis & Co
3 Molas Street
13679 Aharnes
+30 210 2402020
+30 210 2463300
sales@bulbcenter.gr
HR |VAR - ERCO d.o.o.
Stipana Vilova 14A
10090 ZAGREB
+385 91 571 3164
+385 1 3454 906
var.erco@gmail.com
HU |Tooltechnic Kft.
Budaörsi út 165.
1112 Budapest
+36 1 330 4465
+36 1 283 6550
info@tooltechnic.net
IN | Agritech Floritech Inc.
206 - B Rajindera Arihant Tower
B-1 Community Centre Janak Puri
New Delhi - 110058 / India
+91 11 45662679
+91 11 25597432
info@agrifloritech.com
IR | BGR8 Ltd. c/o Seabourne Group
South Portway Close, Round Spinney
Northampton, NN3 8RH
+353 1890 8823 74
+44 113 385 1115
enquiries@gardenhomepower.com
IT | Ikra Service Italia, by BRUMAR
Loc. Valgera 110/B
14100 ASTI (AT)
+39 0141 477309
+39 0141 440385
brumargp@brumargp.it
JO | Taha & Qashou Agri Co. (LLC)
205 Mekka Street
Amman 11821, Jordan
+962 6 585 0251
+962 6 582 5728
info@tahaandqashou.net
LT | ikra Lithuania
Kalvariju g. 206
08314 Vilnius
+370 641 76434 / +370 6491 5665
parduotuve@fokusgroup.lt
LU | Bobinage Georges Back
53 Rue Nic. Meyers
4918 Bascharage
+352 507622
+352 504889
MK | FEROELEKTRO D.O.O.
Str.Nikola Parapunov br.35A/3
1000 Skopje
+389 2 3063190
+389 2 3063190
fero@t-home.mk
MD | OLSOM S.R.L.
Mateevici Str., 38/1
2009 Chisinau
+373 22 214075
+373 22 225009
olsommtd@googlemail.com
NL | Muldertechniek
Noorderkijl 1
9571 AR 2 e Exloermond
+31 599 745024
+31 599 672650
RO I BRONTO COMPROD S.R.L.
Str. Corneliu Coposu nr. 35-37
400235 Cluj-Napoca
+40 264 435 337
+40 264 406 703
tehnic@bronto.ro
SE | ikra Service Sweden
Verkstadsgatan 8
57341 Tranås
+46 763 268982
ikrawinbladh@gmail.com
SI | BIBIRO d.o.o.
Tržaška cesta 233
1000 Ljubljana
+386 1256 4868
+386 1 256 4867
bibiro.ljubljana@siol.net
SKI AGF Invest s.r.o.
Hlinikova 365/39
95201 Vráble
+421 02 62 859549
+421 02 62 859052
info@agfinvest.sk
(LLC "TC "Euroinstrument")
бул. I. Лепсе, 79