YT-82002 - Drill Yato - Free user manual and instructions
Find the device manual for free YT-82002 Yato in PDF.
Questions des utilisateurs sur YT-82002 Yato
0 question sur cet appareil. Repondez a celles que vous connaissez ou posez la votre.
Poser une nouvelle question sur cet appareil
Download the instructions for your Drill in PDF format for free! Find your manual YT-82002 - Yato and take your electronic device back in hand. On this page are published all the documents necessary for the use of your device. YT-82002 by Yato.
USER MANUAL YT-82002 Yato
1. body with main grip holder
3. electric switch lock
5. lock of tool chuck
6. auxiliary grip handle
7. power cord with plug
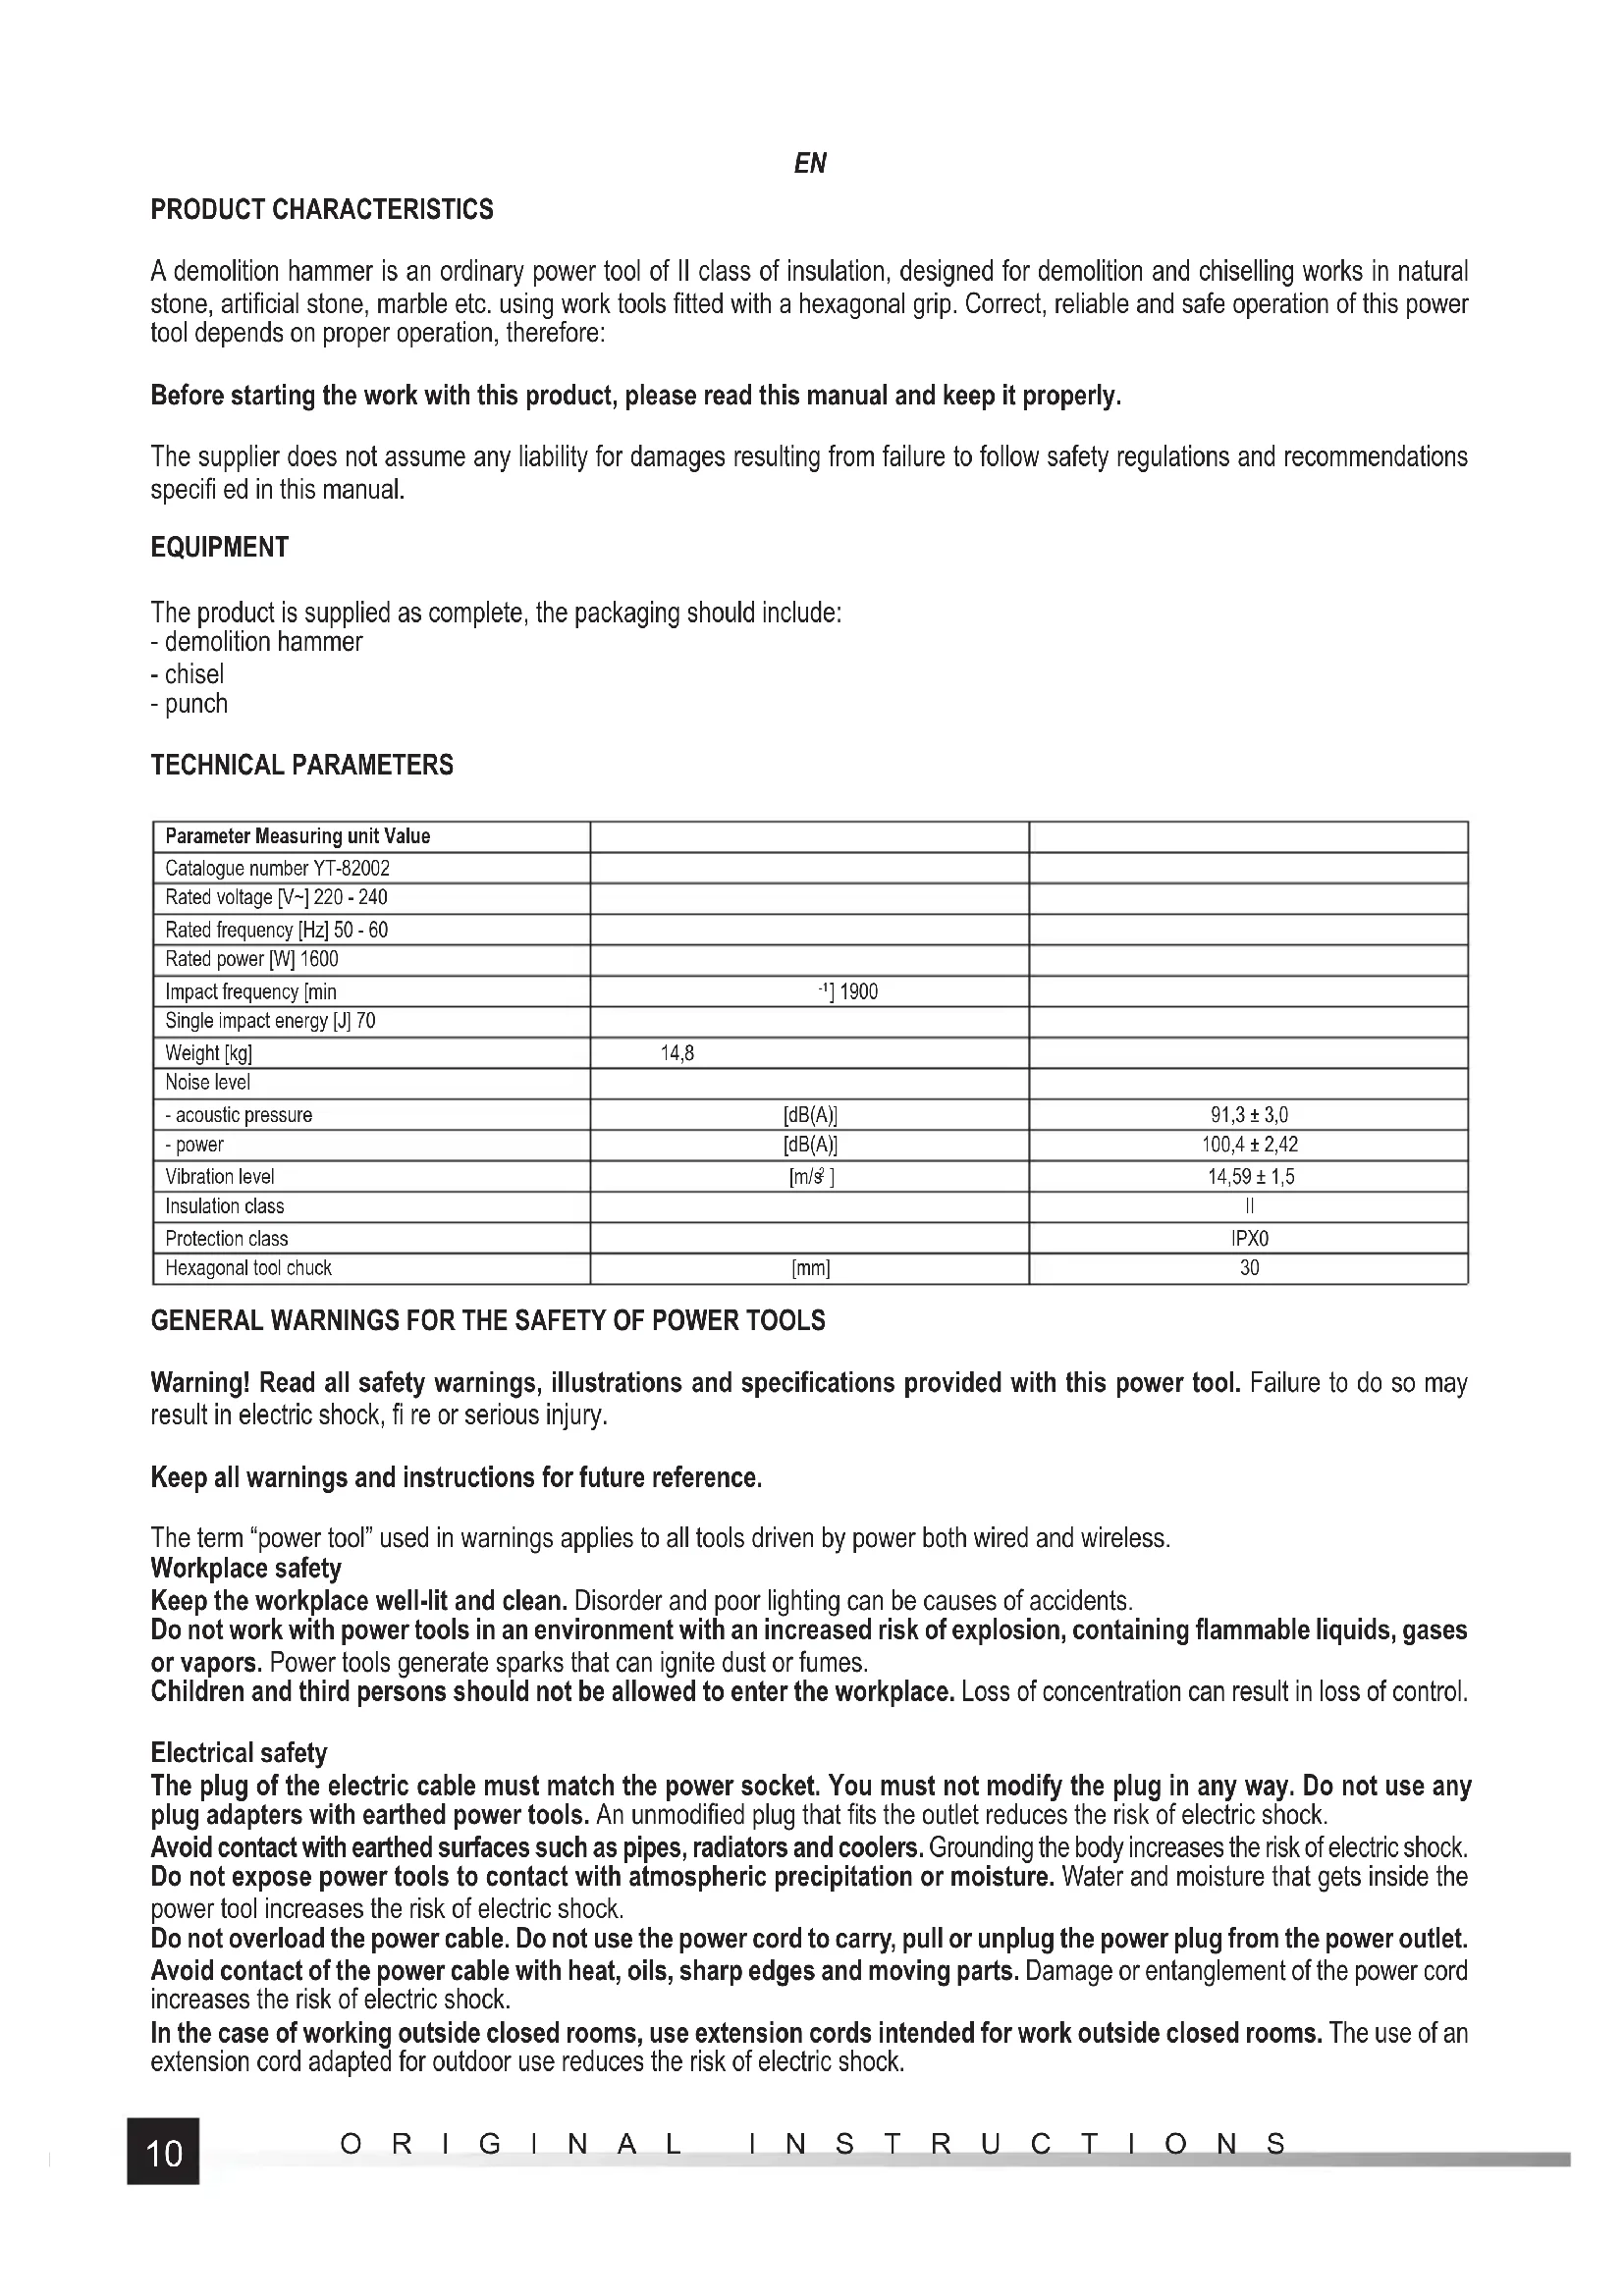
ORIGINAL INSTRUCTIONS PRODUCT CHARACTERISTICS A demolition hammer is an ordinary power tool of II class of insulation, designed for demolition and chiselling works in natural stone, artifi cial stone, marble etc. using work tools fi tted with a hexagonal grip. Correct, reliable and safe operation of this power tool depends on proper operation, therefore: Before starting the work with this product, please read this manual and keep it properly. The supplier does not assume any liability for damages resulting from failure to follow safety regulations and recommendations specifi ed in this manual. EQUIPMENT The product is supplied as complete, the packaging should include: - demolition hammer - chisel - punch TECHNICAL PARAMETERS Parameter Measuring unit Value Catalogue number YT-82002 Rated voltage [V~] 220 - 240 Rated frequency [Hz] 50 - 60 Rated power [W] 1600 Impact frequency [min
] 14,59 ± 1,5 Insulation class II Protection class IPX0 Hexagonal tool chuck [mm] 30 GENERAL WARNINGS FOR THE SAFETY OF POWER TOOLS Warning! Read all safety warnings, illustrations and specifi cations provided with this power tool. Failure to do so may result in electric shock, fi re or serious injury. Keep all warnings and instructions for future reference. The term “power tool” used in warnings applies to all tools driven by power both wired and wireless. Workplace safety Keep the workplace well-lit and clean. Disorder and poor lighting can be causes of accidents. Do not work with power tools in an environment with an increased risk of explosion, containing fl ammable liquids, gases or vapors. Power tools generate sparks that can ignite dust or fumes. Children and third persons should not be allowed to enter the workplace. Loss of concentration can result in loss of control. Electrical safety The plug of the electric cable must match the power socket. You must not modify the plug in any way. Do not use any plug adapters with earthed power tools. An unmodifi ed plug that fi ts the outlet reduces the risk of electric shock. Avoid contact with earthed surfaces such as pipes, radiators and coolers. Grounding the body increases the risk of electric shock. Do not expose power tools to contact with atmospheric precipitation or moisture. Water and moisture that gets inside the power tool increases the risk of electric shock. Do not overload the power cable. Do not use the power cord to carry, pull or unplug the power plug from the power outlet. Avoid contact of the power cable with heat, oils, sharp edges and moving parts. Damage or entanglement of the power cord increases the risk of electric shock. In the case of working outside closed rooms, use extension cords intended for work outside closed rooms. The use of an extension cord adapted for outdoor use reduces the risk of electric shock.11
ORIGINAL INSTRUCTIONS When using a power tool in a humid environment is unavoidable as a protection against supply voltage use a residual current device (RCD). The use of RCD reduces the risk of electric shock. Personal safety Stay alert, pay attention to what you do and keep common sense while working with the power tool. Do not use a power tool when you are tired or under the infl uence of alcohol or medication. Even a moment of inattention while working can lead to serious personal injury. Use personal protective equipment. Always wear eye protection. The use of personal protective equipment such as dust masks, anti-slip safety shoes, helmets and hearing protection reduce the risk of serious personal injury. Prevent accidental operation. Make sure that the electric switch is in the “off ” position before connecting to the power supply and / or battery, lifting or moving the power tool. Moving the power tool with the fi nger on the switch or powering the power tool, when the switch is in the “on” position can lead to serious injuries. Before turning on the power tool remove any keys and other tools that were used to adjust it. The key left on the rotating parts of the power tool can lead to serious injuries. Do not reach and do not lean too far. Keep the right attitude and balance all the time. This will allow easier control over the power tool in case of unexpected work situations. Dress accordingly. Do not wear loose clothing or jewelry. Keep your hair and clothing away from moving parts of the power tool. Loose clothing, jewelry or long hair can be caught by moving parts. If the devices are fi tted for the connection of dust extraction or dust collection, make sure that they are connected and used properly. The use of dust extraction reduces the risk of dust hazards. Do not let the experience acquired from frequent use of the tool resulted in carelessness and ignoring safety rules. Carefree action can cause serious injuries in a fraction of a second. Use and care of the power tool Do not overload the power tool. Use the power tool appropriate for the selected application. The right power tool will provide a better and safer job if used according to the designed load. Do not use the power tool, if the electric switch does not allow switching on and off . Power tool, which cannot be controlled by means of a power switch is dangerous and must be returned for repair. Disconnect the plug from the power socket and / or remove the battery if it is detachable from the power tool before adjusting, changing accessories or storing the tool. Such preventive measures will allow you to avoid accidentally turning on the power tool. Keep the tool out of the reach of children, do not let people who do not know how to operate the power tool or these instructions use a power tool. Power tools are dangerous in the hands of untrained users. Maintain power tools and accessories. Check the tool for mismatches or jams of moving parts, damage to parts and any other conditions that may aff ect the operation of the power tool. Damage must be repaired before using the power tool. Many accidents are caused by incorrectly maintained tools. Keep cutting tools sharp and clean. Properly maintained cutting tools with sharp edges are less prone to jamming and are easier to control when working. Use power tools, accessories and inserted tools etc. in accordance with these instructions, taking into account the type and conditions of work. The use of tools for work other than designed is likely to result in a dangerous situation. Handles and gripping surfaces must be dry, clean and free from oil and grease. Slippery handles and gripping surfaces do not allow for safe operation and control of the tool in dangerous situations. Repairs Repair the power tool only in authorized facilities using only original spare parts. This ensures proper operation safety of the power tool.
ADDITIONAL SAFETY CONDITIONS
Wear hearing protection. Exposure to sound may come from the auditory pathway. Tools from molding and workmanship with handles from the assembly. Losing control can be the boss of the place. Use dust masks. The use of dust masses reduces the risk of layer breakage. While doing your job, for security advice, you may come across a hidden security feature that prevents you from moni- toring or reviewing information about the security of an electronic device with technology. Restricting access to a tool that could be guided through the handling process could make the tool handling tools operable. Warnings related to drilling with drill bits It is always checked whether an equal limit is set to double check or check the date. At higher speed, the drill is likely to bend, if allowed to freely contact the rotary tool, it will accumulate trauma. Apply only in-line with a drill and do not apply to the application. The drill bit may bend, causing it to break and lose control, resulting in injury.12
NOTE! Installation of accessories may be carried out only with the supply voltage disconnected. Pull out the plug of power cable from the mains socket! Setting of auxiliary grip handle (II) An auxiliary grip handle can be set in a position that provides the most safe, ergonomic and effi cient work. Set the chuck in the desired position and then lock the possibility of any changes of its position by tightening the lock knob fi rmly and securely. Due to the nature of work, check the degree of tightening the lock knob during the use of the product. Assembly and disassembly of work tools (III) Work tool in the form of a chisel, fl at chisel or punch is locked in the chuck by means of a rotating lock. Pull off the lock of tool chuck and turn it 180 degrees so that the lock does not interfere with sliding in and out a work tool to and from the chuck. Hexagonal chuck on one wall has a groove that allows turning the chuck’s lock and locking the work tool in the chuck. Slip the work tool into the chuck so that the groove is at the level of a lock. Then pull off the lock of tool chuck and turn it 180 degrees so as to lock the possibility of sliding out the work tool from the chuck. Make sure of it by grabbing the tool and trying to slide it out of the chuck. If the attempt is successful, repeat the work tool assembly procedure. PRODUCT USE Before starting the work make sure that the housing and connecting cable with a plug are not damaged. If any damage is found, it is forbidden to continue the work! Preparations Select proper work tool: punch or chisel. Clean the tool, apply a thin layer of grease on the chuck of selected tool. Insert the work tool into the tool chuck of the product. Insert the cable plug into the mains socket. Put on hearing protectors, eye protection, work gloves. Starting and stopping the product Take a posture guaranteeing your balance, grab the hammer with both hands and having made sure that the work tool does not touch anything, start the product by pressing and holding down the switch with your fi nger (IV). Hold the tool in this position for several seconds to allow grease reaching all the elements of the drive mechanism and check at the same time whether the product shows any signs of abnormal operation. Too much noise, vibration level too high, suspicious odour or emergence of smoke. If no signs of abnormal operation are observed, the product may be used. After completion of work, switch off the hammer by releasing the pressure on the switch. The switch may be locked in the ON position, which may be useful during long-term operation. In order to lock the switch, press the lock button with the switch pressed (IV). Lock is released by pressing the switch. Working with product It is recommended that in the initial period of use, operation of tool is not too intensive, it will allow mechanical parts to run-in. It is also recommended to use longer breaks in order to cool the hammer. As the elements inside the hammer run in, you can increase the intensity of operation and shorten the breaks needed for cooling the tool. Note! Sometimes it may happen that the hammer fails to transfer impact to the work tool, even though the engine works. Usually this may be caused by too thick oil. If the product is used at low temperature, let it work for approx. 5 minutes to warm it up. Lean the work tool against work surface, grab both grip handles of the hammer and start it with the switch. If the work tool has failed to start, push the hammer towards the work surface. This does not result from incorrect operation but the protection against operation with no load. During the work, apply only pressure necessary for the correct operation of the tool. Applying too much pressure on the work tool may cause damage to the work tool and hammer drill mechanisms, and it will also reduce its effi ciency. If the product is used to remove large-thickness surfaces, this operation should be carried out by layers. Each time, remove a layer of small thickness. Make regular breaks during the work. Additional notes Do not apply too much pressure on the processed material during operation and do not make sudden movements to prevent dam- age to the work tool and drill. Make regular breaks during the work. Do not overload the tool, temperature of outside surfaces can never exceed 60 °C. After completed work, turn off the drill, unplug the tool from the mains socket and carry out the maintenance13
ORIGINAL INSTRUCTIONS and inspection operations. Declared total value of vibration was measured by means of standardized test method and can be used to compare one tool with the other. Declared total value of vibration can be used in the initial exposure assessment. Note! Emission of vibration when working with the tool may vary from the declared value, depending on how the tool is used. Note! It is required to determine safety measures to protect the operator, which are based on the exposure assessment in real conditions of use (including all elements of work cycle, such as for example time when tool is switched off or idling and time of activation).
MAINTENANCE AND CHECKS
Lubrication Always before using drill bits or chisels, clean them and apply a thin layer of grease onto the tool chuck. Oil refi lling (V) The hammer drill mechanism is lubricated by means of an oil bath. At the bottom of the housing there is an oil fi ller with an inspec- tion glass. If the hammer is set with the tool chuck pointing upwards and the oil in the inspection glass is not visible, it should be refi lled. Oil level should be approx. 3 mm measured from the lower edge of the inspection glass. It is recommended to use SAE 20W-50 viscosity class engine oil . Oil refi lling should be carried out as follows. Unplug the power cord plug from a mains socket. Turn the hammer so that the oil fi ller is directed upwards. Unscrew the fi ller plug with inspection glass. Take precaution measures not to lose or damage the rubber seal under the plug. Refi ll the oil and screw the fi ller plug. Tighten the plug with suffi cient force required to obtain tightness. Excessive force may dam- age the sealing or the threaded connection of the plug. Check the oil level before the start of work. Oil should be refi lled every 20 days of operation, assuming that the hammer works for about 3-4 hours per day. ATTENTION! Before any adjustment, technical service or maintenance operations unplug the tool. Once the operations have been fi nished, the technical conditions of the tool must be assessed by means of external evaluation and inspection of the following elements: body and handle, conductor with a plug and defl ection, functioning of the electric switch, patency of ventilation slots, sparking of brushes, noise level of functioning of bearings and gears, start-up and smoothness of operation. During the guarantee period, the user cannot dismantle the electric tools or change any sub-assemblies or elements, since it will cancel any guarantee rights. All irregularities detected at overhaul or during functioning of the tools are a signal to have the tool repaired at a service shop. Once the functioning has been concluded, the casing, ventilation slots, switches, additional handle and protections must be cleansed with a stream of air (at a pressure not exceeding 0.3 MPa), with a brush or a cloth without any chemical substances or cleaning liquids. Tools and handles must be cleansed with a clean cloth.14 ORIGINALANLEITUNG
CARACTERISTIQUES DU PRODUIT
DECLARATION OF CONFORMITY
(Name and signature of authorized person) (Place and date of issue) We declare and guarantee with full responsibility that the following products: meet requirements of the following European Standards / Technical Specifications: and fulfill requirements of the following European Directives: 2006/42/EC Machinery and safety elements 2014/30/EU Electromagnetic compatibility (EMC) Directive 2011/65/EU Restriction of the Use of Certain Hazardous Substances Serial number: concern all serials numbers of item(s) mentioned in this declaration The person authorized to compile the technical file: Agnieszka Rędziak TOYA S.A., ul. Sołtysowicka 13 - 15, 51-168 Wrocław, Polska Demolition hammer 220-240 V~ 50/60 Hz; 1600 W, 1900 min
gnature of authori zed