PC-SV 1112 - Other kitchen appliances PROFICOOK - Free user manual and instructions
Find the device manual for free PC-SV 1112 PROFICOOK in PDF.

| Product Type | Sous-vide cooker (Sous-vide-pan) |
| Brand | ProfiCook |
| Model | PC-SV 1112 |
| Power Supply | 220-240 V~, 50/60 Hz |
| Power Consumption | 520 W |
| Capacity | 6 liters maximum |
| Net Weight | Approximately 2.85 kg |
| Protection Class | I |
| Temperature Range | 45 °C to 90 °C (adjustable) |
| Timer | 1 minute to 72 hours |
| Display | Digital with control buttons |
| Main Functions | Sous-vide cooking, yogurt preparation, keep warm |
| Included Accessories | Food rack, tongs |
| Housing Material | Heat-resistant plastic |
| Care and Cleaning | Clean with a damp cloth, do not immerse |
| Safety | Fire protection fuse, insulated handles |
| Intended Use | Household use only, on a flat, heat-resistant surface |
Frequently Asked Questions - PC-SV 1112 PROFICOOK
User questions about PC-SV 1112 PROFICOOK
0 question about this device. Answer the ones you know or ask your own.
Ask a new question about this device
Download the instructions for your Other kitchen appliances in PDF format for free! Find your manual PC-SV 1112 - PROFICOOK and take your electronic device back in hand. On this page are published all the documents necessary for the use of your device. PC-SV 1112 by PROFICOOK.
USER MANUAL PC-SV 1112 PROFICOOK
natural_image
Metal wire cage structure with no text or symbols, labeled '8' on the right side (no other text or symbols)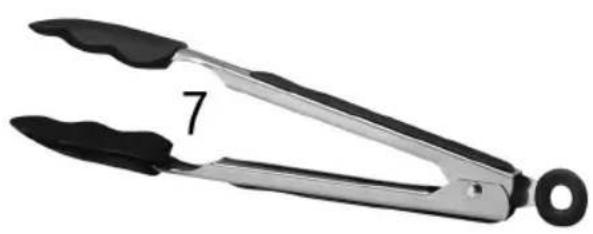
natural_image
Close-up of a metal tangle with black calipers and a numbered label '7' (no text or symbols on the tool itself)Bedienungsanleitung
Thank you for choosing our product. We hope you will enjoy using the appliance.
Symbols in these Instructions for Use
Important information for your safety is specially marked. It is essential to comply with these instructions in order to avoid accidents and prevent damage to the machine:

WARNING:
This warns you of dangers to your health and indicates possible injury risks.

CAUTION:
This refers to possible hazards to the machine or other objects.

NOTE: This highlights tips and information.
Contents
Overview of the Components ....3
General Notes......43
Special Safety Instructions for the Appliance.....44
Designated Use 45
Unpacking the Appliance....45
Overview of the Components /
Delivery Scope 45
Interesting Facts concerning
Sous Vide Cooking 45
Vacuuming Food 45
Application Instructions for the Appliance.....46
Location 46
Mains Cable 46
Electric Connection....46
Function Buttons....46
Water Quantity 46
Use of the Rack 46
Setting the Temperature 46
Setting the Cooking Time 46
First Use 47
Power Failure....47
Use....47
After Cooking 47
Keeping Food warm 47
Serve the Food immediately....48
Storing of cooked Food 48
Preparation of Yoghurt....48
Interesting Facts about Yoghurt....48
Preparation of Yoghurt....48
Cleaning 48
Storage....49
Troubleshooting....49
Technical Data 49
Disposal 49
Meaning of the "Dustbin" Symbol....49
General Notes
Read the operating instructions carefully before putting the appliance into operation and keep the instructions including the warranty, the receipt and, if possible, the box with the internal packing. If you give this device to other people, please also pass on the operating instructions.
- The appliance is designed exclusively for private use and for the envisaged purpose. This appliance is not fit for commercial use.
- Do not use it outdoors. Keep it away from sources of heat, direct sunlight, humidity (never dip it into any liquid) and sharp edges. Do not use the appliance with wet hands. If the appliance is humid or wet, unplug it immediately.
- When cleaning or putting it away, switch off the appliance and always pull out the plug from the socket (pull the plug itself, not the lead) if the appliance is not being used and remove the attached accessories.
- The device and the mains lead have to be checked regularly for signs of damage. If damage is found the device must not be used.
- Use only original spare parts.
- In order to ensure your children's safety, please keep all packaging (plastic bags, boxes, polystyrene etc.) out of their reach.

WARNING:
Do not allow small children to play with the foil. There is a danger of suffocation!
Special Safety Instructions for the Appliance
WARNING: Risk of burns!
During operation and afterwards, the temperature of the accessible surfaces will be very high.
- Hold the appliance only at the handles.
- Open and close the lid only with the handles on the lid.
CAUTION:
- Never operate the appliance without water. This can trigger a fire protection fuse and can lead to a damage of the appliance.
-
Do not immerse the device into water for cleaning. Please follow the instructions as stipulated in the chapter “Cleaning”.
-
The water level must be between the MAX and MIN marks.
- Use the appliance only on a level work surface.
- Do not move the device and do not touch it when it is working.
- Do not leave the unit unattended for hours at a time. Do not leave your home whilst the unit is in operation.
- This appliance can be used by children aged from 8 years and above if they have been given supervision or instruction concerning the safe use of the appliance understand the hazards involved.
- Cleaning and maintenance by the user shall not be made by children unless they are older 8 years and supervised.
- Keep the appliance and its cord out of reach of children less than 8 years.
• Children shall not play with the appliance. - Appliances can be used by persons with reduced physical, sensory or mental capabilities or lack of experience and knowledge if they have been given supervision or instruction concerning use of the appliance in a safe way and if they understand the hazards involved.
- Do not try to repair the appliance on your own. Always contact an authorized technician. If the supply cord is damaged, it must be replaced by the manufacturer, its service agent or similarly qualified persons in order to avoid a hazard.
Designated Use
This appliance is intended exclusively for normal domestic use. It is not intended for use in the following locations:
- in staff kitchens in shops, offices, and other commercial areas;
• in agricultural enterprises; - by guests in hotels, motels, and other housing facilities;
- in bed & breakfasts.
Unpacking the Appliance
- Remove the device from its packaging.
- Remove all packaging materials like foils, filling materials, cable holders, and carton packaging.
- Check the scope of deliveries for completeness.
- If there are missing parts or obvious damage, do not use the device. Return it to your retailer immediately.

NOTE:
There may still be dust or production remains on the device. We recommend that you clean the device as described under "Cleaning".
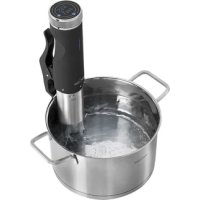
Overview of the Components / Delivery Scope
1 Marking MAX (max. water quantity)
2 Lid
3 Handles
4 Housing
5 Function buttons
6 Display
7 Tongs
8 Rack
Interesting Facts concerning Sous Vide Cooking
Sous Vide cooking (French sous “under”, vide “vacuum”) is a method for slow cooking of meat, fish, or vegetables at low temperatures. The food is welded into a plastic bag before cooking, the air is sucked out with a vacuuming unit, and then the food is cooked at constant water temperatures in the range from 45 to 90 °C.
With this cooking method, the food is pasteurized and the storage life is extended.

WARNING:
- Pasteurized food must either be consumed immediately or must be cooled and frozen quickly to prevent the growth and increase of spores.
- Food prepared with Sous Vide cooking is not suitable for immuno-compromised persons.
Vacuuming Food
Vacuuming preserves the original flavors and aromas of the food. When you add ingredients like spices or herbs to the foil bag, the taste becomes more intensive.
- Use only foil bags that are especially suited for vacuuming and heat-resistant. Other bags do not guarantee the required correct closure.
-
Keep the area at the welding seam dry and clean. Avoid wrinkles. The seam may leak at such places.
-
You can purchase a vacuum sealer in a specialist shop. From our product line we recommend the vacuum sealer PC-VK 1080 and the corresponding spare bags and foils. Contact your dealer.
• Vacuum Sealer PC-VK 1080 Item No.: 501 080 - Spare bag, size 22 x 30 cm Item No.: 8 910 151
- Spare bag, size 28 x 40 cm Item No.: 8 910 152
- Foil roll, size 28 cm x 6 m Item No.: 8 910 155
Application Instructions for the Appliance
Location
- Set the appliance onto a non-slip, level, and heat-resistant surface.
• Take care that the appliance and the mains cable never are placed onto hot surfaces or near heat sources (e.g. range, hob).
Mains Cable
A cable holder is located on the bottom of the appliance. Unwind the mains cable completely.
Electric Connection
- Before inserting the power plug into the outlet, check that the mains voltage to be used matches that of the device. You can find the required information on the nameplate.
- Observe the cable guidance on the rear of the appliance. Connect the device only to a correctly installed safety socket.
Function Buttons
| Button Function description | |
| Turn the appliance on / off | |
| Timer / Temp | Set the desired water temperature / cooking time |
| - | Reduce the temperature / cooking time setting |
| + | Increase the temperature / cooking time setting |
| °F / °C Selection of the temperature unit | |
| Start / Stop | Start the heating phase; start the cooking time / stop the process |
When switched on, each button press is confirmed with a beep.
Water Quantity
- Always fill the Sous Vide pan including the food to be cooked with water up to the MAX mark. This ensures that the set temperatures are maintained within + / - 1^ .
- The weld-sealed food always must be covered with water.
- If the food should not be surrounded by water because of an air bubble, place a weight (e.g. a dish) onto the bag or fix the bag with the supplied rack.
Use of the Rack
You can position up to 3 individually weld-sealed foods (e.g. steaks) in the rack. This ensures that each bag is surrounded by water.
Setting the Temperature
- To change the temperature unit, press the button °F / °C for app. 5 seconds.
- Use the buttons - / + to select a temperature between 45^ and 90^ (115°F and 195°F).
- Keeping the button - or + pressed starts rapid change.
- Confirm your setting with the button TIMER / TEMP.
Setting the Cooking Time
- When you press the button = /+ shortly, the setting is changed in steps of 0.5 hours in the range from 2 to 72 hours and in steps of 1 minute in the range under 2 hours.
- Keeping the buttons -/+ pressed starts rapid change.
- Confirm your setting with the button START / STOP.
- The cooking time depends on the thickness of the food. The times may vary due to quantity and consistency of the food as well. Accordingly, the following time settings are only guidelines and should be adapted according to your taste.
- Extend the time by at least 20 % for deep-frozen food.
• Double the time for tough meat.
WARNING:
The temperatures listed in the tables must not be fallen short of!
- Meat: Temperature 58°C - 62°C
| Thickness Time in minutes | |
| 10 mm 30 | |
| 20 mm 45 | |
| 30 mm 95 | |
| 40 mm 120 | |
| 50 mm 180 | |
| 60 mm 250 | |
- Poultry: Temperature 63°C - 65°C
| Thickness Time in minutes | |
| 10 mm 20 | |
| 20 mm 40 | |
| 30 mm 75 | |
| 40 mm 90 | |
- Fish: Temperature 55°C - 58°C
| Thickness Time in minutes | |
| 10 mm 10 | |
| 20 mm 20 | |
| 30 mm 30 | |
| 40 mm 40 | |
| 50 mm 50 | |
| 60 mm 60 | |
- Vegetables: Temperature 80°C - 85°C
| Type Time in minutes | |
| Potatoes 40 | |
| Asparagus 25 | |
| Root vegetables 70 | |
| Crisp vegetables 70 | |
First Use
Some smell occurs at the time of first use. This is caused by the protective coating of the heating elements. This is normal and harmless.
Power Failure
In case of a power failure, the appliance automatically continues the cooking process if power is supplied again within 30 minutes. In case of a longer power failure, the temperature and the time must be set again and the process must be started again.
Use
- Place the vacuumed food into the appliance.
- Fill warm water into the appliance to reduce the heating time.
- Important: Close the lid to ensure a constant temperature.
- Turn the device on. The display shows the preset: 056 °C cooking temperature and 08:00 hours cooking time. The temperature display is flashing.
- Set the desired temperature.
- Set the cooking time.
- Press the START / STOP button. The current water temperature is displayed. The appliance starts to heat the water.
- A beep sounds when the set temperature is reached. The timer display flashes. The temperature is maintained. Press the START / STOP button to start the set cooking time. The timer count-down starts. The colon in the time display flashes.
- You hear a beep at the end of the time. The illumination of the display goes out. The device will switch off automatically.
After Cooking
After cooking, you can use the food in different ways:
Keeping Food warm
You can keep pasteurized food warm at 55 °C or higher until it is served. While keeping the food warm prevents growth of any germs, meat and vegetables are further cooked and may turn mushy when they are kept warm too long. This depends on the temperature and the type of food. Tough pieces of beef may be cooked and kept for 24 to 48 hours in a water bath at 55 °C. However, most food can be kept only for 8 to 10 hours before becoming too soft.
Operate the Sous Vide pan as described above.
- Set a temperature of 55^ .
- Select the max. time for keeping the food warm after cooking.
Some hints in the following:
| Food | Max. time in hours |
| Meat | 6-10 |
| Poultry | 2-3 |
| Fish | 1 |
| Vegetables | 2 |
Serve the Food immediately
You can eat the food immediately after Sous Vide cooking.
i HINT:
- Fry cooked meat in a hot pan with a little oil crisply for max. 1 minute on each side. The meat remains juicier with shorter frying.
- By seasoning the raw meat before cooking, frying it for a short time, and then vacuuming it, the meat is completely ready for eating after Sous Vide cooking.
Storing of cooked Food
IMPORTANT:
When you want to keep pasteurized food, cool it down in ice water to 5 °C. The water bath should be filled at least half with ice.
Then you can freeze the food in the vacuum bag or store it at refrigerator temperatures for app. 5 days.
To use frozen, already cooked food, thaw the vacuumed food at 55 °C in the Sous Vide pan. Then remove it from the bag for further processing or consumption.
Preparation of Yoghurt
Interesting Facts about Yoghurt
Yoghurt is a product that is similar to curdled milk and that is acquired from milk through the action of bacteria.
The milk is enriched with yoghurt cultures (high bacterial count). The bacteria multiply at an average temperature of 45 °C . The milk sugar (lactose) present in the milk is converted to lactic acid. As a result, the milk congeals.
Preparation of Yoghurt
- You need pasteurized milk (H-milk) and natural yoghurt at a mixing ratio of 100 ml : 15 ml (or 140 ml : 20 ml).
- You can purchase yoghurt jars in a specialist shop.
CAUTION:
Set maximally so many jars into the appliance that the temperature sensor on the pan bottom is not touched.
- Select the location so that the appliance does not have to be moved during the yoghurt preparation and is not subject to vibrations. Otherwise, the yoghurt remains liquid.
- Heat the H-milk in a pot to ca. 45 °C and blend in the natural yoghurt or the yoghurt culture. If you would like to use fresh milk, boil this beforehand and allow it to cool down to approx. 45 °C.
- Fill this mixture into the previously cleaned jars. Screw the lids onto the jars.
- Set the closed jars into the Sous Vide pan.
- Fill warm water (max. 45 °C) into the appliance and close the lid.
-
Operate the Sous Vide pan as described above.
-
Set a temperature of 45^ .
- Set the timer for 12 hours.
i NOTE:
- The longer the yoghurt matures, the stronger the taste becomes.
- A jar of finished yoghurt can be used again as a start culture, but not more than ca. 20 times, as the effect weakens with time.
- Fruits, nuts, jam or similar items should be added after preparation only.
- Always store the finished yoghurt in the refrigerator.
Cleaning
WARNING:
- Always turn the device off before cleaning it and remove the mains plug. Wait until the device has cooled down.
- Do not immerse the appliance in water! Doing so may result in an electric shock or fire.

CAUTION:
- Do not use any wire brush or other abrasive objects.
- Do not use any acidic or abrasive detergents.
- Do not immerse the lid in a rinsing bath. It is difficult to remove any entered water.
Clean the inside and the outside of the appliance and the accessories with a moist cloth. Then dry off with a dry cloth.
Storage
- Clean the device as described. Let the accessories dry completely.
- The mains cable can be wound up on the base.
- We recommend that you store the device in its original packaging when it is not to be used for a longer period.
- Always store the device at a well ventilated and dry place outside the reach of children.
Troubleshooting
| Problem Possible Cause Remedy | ||
| The device is not working. | The device has no power supply. | Check the socket with another appliance. |
| Plug in the mains plug correctly. | ||
| Check the main circuit breaker. | ||
| The fire protection fuse was triggered. | Contact our service center or a specialist. | |
Technical Data
Model: PC-SV 1112
Power supply: 220 - 240 V\~, 50 / 60 Hz
Power rating: 520 W
Protection class:....I
Capacity: max. 6ℓ
Net weight: .... approx. 2,85 kg
The right to make technical and design modifications in the course of continuous product development remains reserved.
This device has been tested according to all relevant current CE guidelines, such as electromagnetic compatibility and low voltage directives, and has been constructed in accordance with the latest safety regulations.
Disposal
Meaning of the "Dustbin" Symbol
Protect our environment: do not dispose of electrical equipment in the domestic waste.
Please return any electrical equipment that you will no longer use to the collection points provided for their disposal.
This helps avoid the potential effects of incorrect disposal on the environment and human health.
This will contribute to the recycling and other forms of re-utilisation of electrical and electronic equipment.
Information concerning where the equipment can be disposed of can be obtained from your local authority.
Instrukcja obsługi
CTC Clatronic Sp. z o.o