BD7 Pro - Vacuum Cleaner JIMMY - Free user manual and instructions
Find the device manual for free BD7 Pro JIMMY in PDF.
Document temporarily unavailable
The manual is currently being transferred to our new server. It will be accessible again in a few hours. Thank you for your patience.
| Brand | JIMMY |
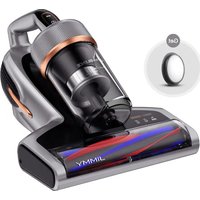
| Model | BD7 Pro |
| Product type | Anti-dust mite vacuum |
| Rated voltage | 28.8 V |
| Rated power | 250 W |
| Battery capacity | 2000 mAh |
| Charging time | 3 to 4 hours |
| Charger input | 100‑240 V~, 50/60 Hz, 0.8 A |
| Charger output | 34.2 V, 600 mA |
| Filter | Washable HEPA |
| UV‑C light | Yes |
| Functions | Suction, tapping, UV‑C light, negative ions |
| Modes | Normal and Turbo |
| Dust level indicator | Yes (blue, orange, red) |
| Charge indicator | Yes (LED, 5 bars) |
| Brush | Removable, cleanable |
| Warranty | 1 year |
| Included accessories | Adapter, battery pack, cleaning brush, HEPA filter, manual |
| Cleaning | Removable dust cup, washable HEPA filter, cleanable brush |
| Battery | Built-in lithium-ion, replacement by technician |
Frequently Asked Questions - BD7 Pro JIMMY
User questions about BD7 Pro JIMMY
0 question about this device. Answer the ones you know or ask your own.
Ask a new question about this device
Download the instructions for your Vacuum Cleaner in PDF format for free! Find your manual BD7 Pro - JIMMY and take your electronic device back in hand. On this page are published all the documents necessary for the use of your device. BD7 Pro by JIMMY.