
Royal AT 18 - Brush cutter EINHELL - Free user manual and instructions
Find the device manual for free Royal AT 18 EINHELL in PDF.
| Product Type | Cordless Brushcutter |
| Brand and Model | Einhell Royal AT 18 |
| Battery Voltage | 18 V (Ni-Cd) |
| Rotation Speed | 10,000 rpm |
| Cutting Diameter | 26 cm |
| Maximum Runtime | Approx. 30 minutes |
| Sound Pressure Level (LPA) | 80 dB(A) |
| Sound Power Level (LWA) | 96 dB(A) |
| Handle Vibration | 6.4 m/s² |
| Safety Class | III |
| Mains Charger | 230 V - 50 Hz, output 23 V / 400 mA |
| Charging Time (empty battery) | Approx. 4 hours |
| Cutting Line Type | Nylon line (original) |
| Line Feed System | Semi-automatic (by pressing the button) |
| Height Adjustment | Yes, sliding part |
| Tilt Adjustment | Yes, via pedal (tilt angle) |
| Edging Position | Handle rotation by 180° |
| Protective Guard | Yes, included |
| Weight (approx.) | 2.5 kg (without battery) |
| Intended Use | Cutting grass and edges in private gardens |
| Maintenance and Cleaning | Clean with a damp cloth, do not spray water, remove the battery before any maintenance |
| Spare Parts Available | Yes (see list in the manual) |
| Warranty | 2 years (according to manufacturer's conditions) |
Frequently Asked Questions - Royal AT 18 EINHELL
User questions about Royal AT 18 EINHELL
0 question about this device. Answer the ones you know or ask your own.
Ask a new question about this device
Download the instructions for your Brush cutter in PDF format for free! Find your manual Royal AT 18 - EINHELL and take your electronic device back in hand. On this page are published all the documents necessary for the use of your device. Royal AT 18 by EINHELL.
USER MANUAL Royal AT 18 EINHELL
3
natural_image
Close-up of a mechanical device with a curved handle and a circular base, showing a force or movement indicator (no text or symbols visible)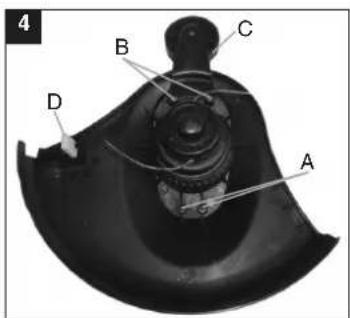

natural_image
Close-up of a hand gripping a mechanical component, labeled A and B (no text or symbols beyond labels)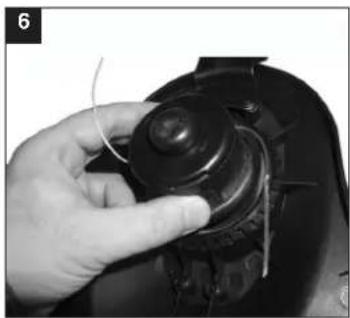
natural_image
Close-up of a hand adjusting a black mechanical component with a curved line (no visible text or symbols)
natural_image
Close-up of hands adjusting a mechanical component with a tool (no visible text or symbols)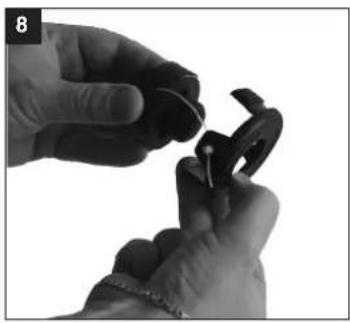
natural_image
Close-up of hands holding a small black mechanical component (no visible text or symbols)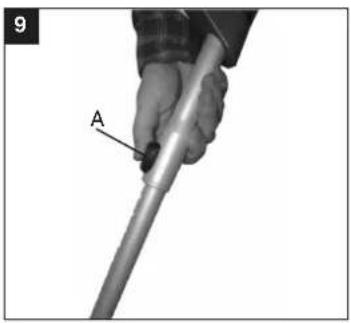
natural_image
Close-up of a mechanical device with a white tool and labeled component 'A' (no readable text or symbols beyond label)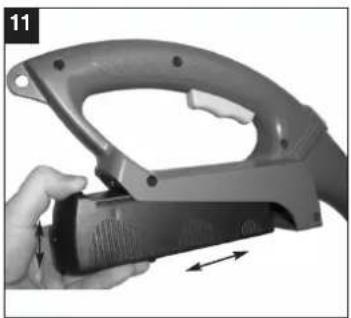
natural_image
Close-up of a handheld device with a handle and lever mechanism, showing a hand holding the lever (no text or symbols visible)
natural_image
Mechanical component with labeled part A, no visible text or symbols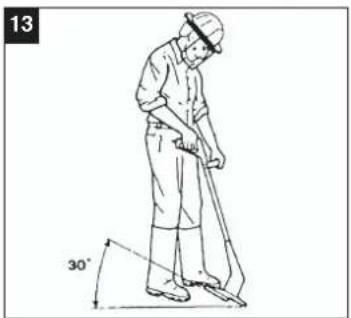
natural_image
Line drawing of a person using a power tool to clean or spray (no text or symbols)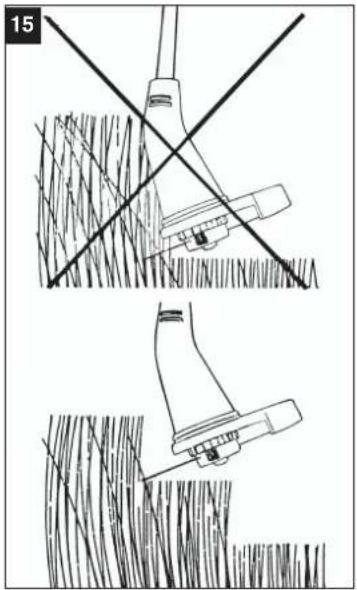
natural_image
Technical line drawing showing two mechanical assembly steps with no visible text or symbols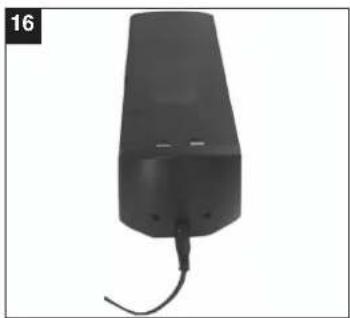
natural_image
Black cylindrical device with a curved cable and a small protrusion, labeled '16' in the top-left corner (no other text or symbols visible)
natural_image
Mechanical tool with articulated arm and handle, no visible text or symbols6
natural_image
Three abstract symbols: tree, hand gesture, and fish-like shape (no text or labels)- Rechargeable battery (18 V)
- ON/OFF switch
- Adjuster knob for turning the handle
- Additional handle
- Height adjuster
- Edge guide
- Line spool
- Guard hood
- Tilt adjustment pedal
- Power supply unit
2. Important notes


Please read the instructions for use carefully and observe the information provided. It is important to consult these instructions in order to acquaint yourself with the tool, its proper use and safety precautions.
Important!
For safety reasons, the rechargeable grass trimmer is not to be used by children, young people under 16 years of age, or any other persons who are not acquainted with these directions for use.
Safety information
Please refer to the booklet included in delivery for the relevant safety instructions.
Additional safety instructions
-
Inspect the items you want to cut before starting to work. Remove any foreign objects. If you hit upon an obstacle while cutting, turn off the machine and remove the obstacle.
● Work only in good visibility.
● Always make sure of your footing while working. Be careful when stepping backwards. Risk of stumbling!
● Never leave the tool unattended at your work place. Store the tool in a safe place during interruptions. -
If you interrupt your work to move to a different position it is imperative to switch off the tool while you are moving there.
● Never use the tool in the rain or in moist or wet conditions.
● Protect the tool from the damp and rain.
● Before you switch on the tool, make sure that there are no stones or other objects touching the nylon line.
● Always wear suitable clothing to protect your head, hands and feet from injury. Wear a helmet, goggles or visor, high boots or strong shoes, long trousers made of tough material, and work gloves.
● Be sure to hold the tool away from your body when it is switched on! - If the tool is turned over or if it is not in working position, do not switch it on.
- Switch off the motor when you are not using the tool, when you leave the tool unattended, when you are checking the tool, if the power cable is damaged, when you want to remove and replace the reel, and when you are moving the tool to another location.
- Keep the tool away from other persons, particularly children and pets. There may be stones and other objects in the flying cut grass.
- Keep at least 5 m away from other persons and animals when you are working with the tool.
● To prevent injury to yourself and damage to the tool, never cut against hard objects. - Use the edge of the guard to keep the tool away from walls, changes of surface and fragile objects.
● Never use the tool without a guard.
⚠️CAUTION! The guard is vital for your safety and for the safety of others, and it is also essential for the grass trimmer to work correctly. Failure to observe this instruction will not only create a potential hazard, it will also result in the loss of your rights under the warranty.
● Never try to stop the cutter (nylon line) with your hands. Wait until it stops by itself. It is imperative to use only the original nylon line.
● Never use metal wire Instead of the nylon line. Beware of injuring yourself on the line cutting device. Keep the air vents clear of dirt. After use, unplug the machine and check it for damage.
● Never attempt to cut grass that is not growing on the ground. For example, do not try to cut grass growing on walls, rocks, etc. Within the working radius of the grass trimmer the user is responsible for any damage caused to third persons by use of the trimmer.
GB
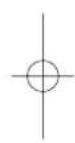
3. Explanation of the warning notice (see Figure 2) on the grass trimmer
● Never cross roads or pebble paths with the grass trimmer switched on.
- When you are not using the grass trimmer, keep it in a dry place out of the reach of children.
● Use the grass trimmer only as described in these directions for use and always hold it vertical to the ground. All other positions are dangerous.
- Check the screws regularly to see that they are properly tightened.
- Keep cables and other objects out of the area you want to cut.
- If you have to lift the grass trimmer to move it, switch off the motor and wait for the rotating tool to stop.
● Before you connect the grass trimmer to the power supply, make sure that none of its moving parts are damaged and that the line spool is correctly inserted and fastened.
● Never cut against hard objects when using the grass trimmer. This is imperative to avoid causing injury to the user and damage to the trimmer.
- Use only original replacement parts for repair and maintenance purposes.
● Examine the grass trimmer for signs of wear or damage each time before you use it and after any collisions. Have essential repairs carried out without delay.
● Always keep your hands and feet away from the cutting mechanism, particularly when you switch on the trimmer.
● After pulling out new line, always return the trimmer to normal working position before you switch it on again.
● Never use replacement parts or accessories which are not foreseen or recommended by the manufacturer.
● Unplug the rechargeable battery before checking, cleaning or doing any work on the machine and when it is not being used.
Caution! The nylon line will run on for a few seconds after the tool is switched off!
1: Caution!
2: Wear safety goggles!
3: Protect from the damp!
4: Read the directions for use before putting into operation for the first time!
5: Keep third parties away from the danger zone!
6: The tool runs on after being switched off!
4. Technical data
Speed n0: 10.000 min
Cutting range: 26 cm diameter
Max. running period: approx. 30 min
Nylon cutting line ∅ 1,6 mm
Type of protection: III
Sound power level LWA: 96 dB(A)
Sound pressure level LPA: 80 dB(A)
Replaceable NC battery: 18 V
Vibration A: 6,4 m/s
Power supply unit:
Mains voltage: 230 V \~ 50 Hz
Output:
Rated voltage: 23 V
Rated current: 400 mA
The noise level of this machine may exceed 85 dB(A). In this case, noise protection measures need to be introduced for the user. The machine's noise was measured in accordance with IEC 59 CO 11, IEC 704, DIN 45635 Part 21, NFS 31-031 (84/538/EEC). The level of vibrations emitted from the handle is 6,4 m/s ^2 . Measurements were taken in accordance with EN 786 part D: 1996+A1:2001.
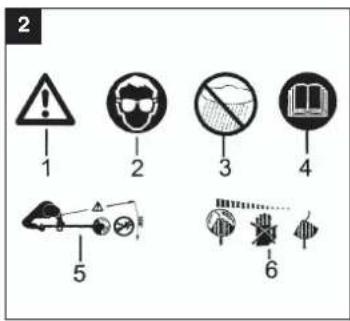
5. Fitting the guard hood
● Plug the guard hood on the motor head and
fasten with the supplied screws (see Figure 3).
- First fasten the screws shown in Figure 4, then you can fasten the two screws in conjunction with the edge guide.

GB
6. Fitting the handle (fig. 5)
Slide the handle (A) onto the two adjuster knobs (B), pressing the adjuster knobs (B) firmly together in the process.
7. Proper use
The trimmer is designed for cutting lawns and small areas of grass in private and hobby gardens. Tools for private and hobby gardens are not suitable for use in public facilities, parks and sport centers, along roadways, on farms or in the forestry sector. For the tool to be used properly it is imperative to follow the instructions set out in the manufacturer's directions for use.
Important! It is prohibited to use the tool to chop material for composting because of the potential danger to persons and property.
8. Before starting
You can adjust the height of the grass trimmer and the position of the auxiliary handle to obtain the optimal working position.
Adjusting the height (Fig. 9)
Rest the grass trimmer firmly on the ground. Using the slide button (A) each user can now adjust the height of the trimmer to suit his own stature. Make sure the height adjuster latches securely in place.
Adjusting the position of the auxiliary handle (Fig. 5)
Set the grass trimmer down firmly on the ground. Press the two adjuster knobs (B) and set the optimum position for the auxiliary handle (A). Release the adjuster knobs. The auxiliary handle is now fastened.
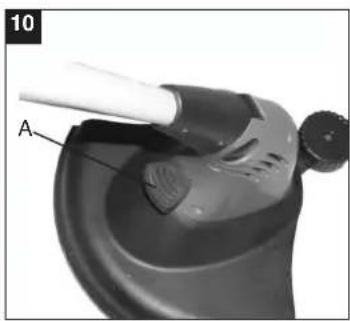
Adjusting the tilt of the handle (Fig. 10)
Rest the grass trimmer firmly on the ground. Press with you foot on the pedal (A) on the side of the motor housing. You can now adjust the handle to the required angle of tilt. To fix the handle at this angle, let go of the pedal and allow to handle to latch home.
9. Starting for the first time and operation
The grass trimmer is designed only for cutting grass. A short or worn nylon line will result in poor cutting
performance.
IMPORTANT! Make sure that you unplug the rechargeable battery before adjusting the line length (Fig. 11+12)!
The grass trimmer has a semi-automatic line extension system. Each time you activate the semi-automatic line extension system, the line will be extended to ensure that you can cut your lawn with the perfect cutting width at all times. Please note that the wear on the line will be increased if you activate the semi-automatic line extension system frequently.
Note
If the line is too long when you use the machine for the first time, the surplus end of it will be cut by the blade on the safety hood.
If the line is too short when you start the machine for the first time, press the knob on the line spool and pull the line hard. When you then start the machine for the first time the line will be cut to the perfect length automatically.
Remove the knife guard (Fig. 4/D). Caution: Risk of injury! Now insert the rechargeable battery (Fig. 11+12). The line will be cut to the correct length when the cutting head starts up again. A short or worn nylon line produces poor cutting results.
Your grass trimmer will work at its best if you observe the following instructions:
● Never use the grass trimmer without its safety devices.
- Do not cut grass when it is wet. The best results are had on dry grass.
● To switch on your grass trimmer, press the safety lock-off and the ON/OFF switch (Fig.1/Pos. 2).
● To switch off your grass trimmer, let go of the ON/OFF switch (Fig. 1/Pos. 2).
- Do not move the grass trimmer against the grass until the switch is pressed, i.e. wait until the trimmer is running.
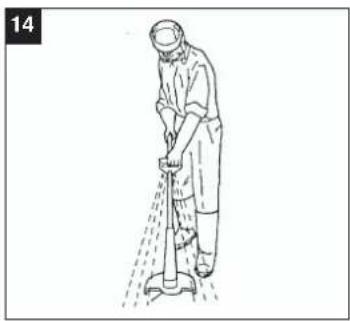
- For the correct cutting action, swing the grass trimmer to the side as you walk forward, holding it at an angle of approx. 30^ as you do so (see Figure 13 and Figure 14).
● Make several passes to cut long grass shorter step by step from the top (see Figure 15).
● Make full use of the guide hood in order to avoid unnecessary line wear.
- Keep the grass trimmer away from hard objects in order to avoid unnecessary line wear.
GB
10. Using the grass trimmer as an edge cutter
The grass trimmer can be adapted in the following way to cut the edges of lawns and flower beds:
● Removing the rechargeable battery (Fig. 11+12)
- Press the handle adjusting button (Fig. 1/Pos. 3)
● while pressing the handle adjusting button, turn the upper handle through 180° until it latches in place.
● The grass trimmer has now been converted into an edge cutter suitable for vertical cutting (Figure 17).
11. Replacing the line spool
IMPORTANT! Make sure that you unplug the rechargeable battery before replacing the line spool (Fig. 11-12)!
- Attach the knife guard (Fig 4/D).
- Press the sides of the spool cover as shown and remove it with the spool (Figure 6+7). Ensure that you do not lose the spring.
- Remove the empty line spool.
● Thread the ends of the line on the new line spool through the eyelets in the spool cover (fig. 8)
● Fit the spool cover and spool back into the spool mounting. - Remove the knife guard. Caution: Risk of injury.
● The line will be cut to the correct length when the cutting head starts up again.
Caution! Catapulted pieces of nylon line may cause injury!
12. Charging the rechargeable battery
● To remove the rechargeable battery, press the two locking clips (A) firmly and at the same pull the battery backwards and out, as shown in Figs. 11 + 12.
- Check that the mains voltage is the same as that marked on the rating plate of the battery charger. Connect the power supply unit to the rechargeable battery. Plug the power supply unit in the plug socket. The green and the red LEDs on the rechargeable battery will illuminate (Fig. 16). An empty battery requires approx. 4 hours to recharge. The recharging time is correspondingly shorter if the battery has any residual capacity. The temperature of the battery may rise slightly during the charging operation. This is normal.
● To install the rechargeable battery, insert it in the battery compartment on the trimmer as shown in Fig. 11. Make sure that the battery interlocks with the battery guide in the trimmer housing. Then slide the battery into the battery compartment as far as the stop. The two locking clips (Fig. 12/A) will lock into the trimmer housing in the process.
● As an alternative you can charge the rechargeable battery directly on the device. Never switch on the device during recharging.
If the battery pack fails to charge, please check
● whether there is voltage at the socket-outlet
● whether there is good contact at the charging contacts
If the battery pack still fails to charge, we request that you send
● the battery charger with charging adapter
● and the rechargeable battery pack
to our customer services department.
To ensure that the NC battery pack provides long service, you should take care to recharge it promptly. You must recharge the battery pack when you notice that the power of the hammer screwdriver drops.
Never allow the battery pack to become fully discharged. This will cause it to develop a defect.
13. Cleaning and maintenance
- Switch off and unplug the grass trimmer before putting it away or cleaning it.
- Remove deposits from the guard hood with a brush.
● Clean the plastic body and plastic parts with a
mild household detergent and a damp cloth.
● Never use aggressive agents or solvents for cleaning purposes!
● Never spray down the grass trimmer with water.
● Prevent water getting into the trimmer at all cost.
14. Ordering replacement parts
When ordering replacement parts, please quote the following data:
● Type of product
● Article number of the product
● ID number of the product
● Number of the required replacement part
GB
- Rechargeable battery (18 V) 34.112.30.01.001
- ON/OFF switch 34.112.30.01.002
- Adjuster knob 34.112.30.01.003
- Additional handle 34.112.30.01.004
- Height adjuster 34.112.30.01.005
- Edge guide 34.112.30.01.006
- Line spool 34.112.30.01.007
- Guard hood 34.112.30.01.008
- Tilt adjustment pedal 34.112.30.01.009
- Power supply unit 34.112.30.01.010
15. Faults
● The device does not operate: Check whether the rechargeable battery is charged and whether the battery charger works. If the device still does not work even with a voltage supply, please send it to our customer services department at the address indicated..
16. Waste disposal
Important
● The grass trimmer and its accessories are made of various types of material, such as metal and plastic. Defective components must be disposed of as special waste. Ask your dealer or your local council.
natural_image
Three abstract symbols: tree, hand, and leaf with dot patterns (no text or labels)1
natural_image
Three black-and-white icons representing abstract shapes: a tree with radiating lines, a hand holding a cross, and a stylized tree with stripes (no text or symbols)natural_image
Three abstract black-and-white icons: tree with striped pattern, hand with cross, and fish-like shape (no text or symbols)2000/14/EG: LWM = 89 dB; LWA = 94 dB L/O = 26 cm
×
89/336/EWG_93/68/EEC
□
95/54/EG:
□
90/396/EWG
□
97/68/EG:
□
89/686/EWG
The product described in those instructions comes with a 2-year warranty covering defects. This 2-year warranty period begins with the passing of risk or when the customer receives the product.
For warranty claims to be accepted, the product has to receive the current maintenance and be put to the proper use as described in the operating instructions.
Your statutory rights of warranty are naturally unaffected during these 2 years. This warranty applies in Germany, or in the respective country of the manufacturer's main regional sales partner, as a supplement to local regulations. Please note the details for contacting the customer service center responsible for your region in the service address below below.
© CERTIFICADO DE GARANTIA
Eschenstraße 6 - D-94405 Landau/Isar (Germany)
Info-Tel. 0180-5 120 509 • Telefax 0180-5 835 830
GB Recycling alternative to the demand to return electrical devices: As an alternative to returning the electrical device, the owner is obliged to cooperate in ensuring that the device is properly recycled if ownership is relinquished. This can also be done by handing over the used device to a returns center, which will dispose of it in accordance with national commercial and industrial waste management legislation. This does not apply to the accessories and auxiliary equipment without any electrical components which are included with the used device.
For EU countries only
Never place any electric tools in your household refuse.
To comply with European Directive 2002/96/EC concerning old electric and electronic equipment and its implementation in national laws, old electric tools have to be separated from other waste and disposed of in an environment-friendly fashion, e.g. by taking to a recycling depot.
The reprinting or reproduction by any other means, in whole or in part, of documentation and papers accompanying products is permitted only with the express consent of ISC GmbH.
F


- Important notes
- Important!
- Safety information
- Additional safety instructions
- GB
- Explanation of the warning notice (see Figure 2) on the grass trimmer
- Technical data
- Fitting the guard hood
- Fitting the handle (fig. 5)
- Proper use
- Before starting
- Adjusting the height (Fig. 9)
- Adjusting the position of the auxiliary handle (Fig. 5)
- Adjusting the tilt of the handle (Fig. 10)
- Starting for the first time and operation
- IMPORTANT! Make sure that you unplug the rechargeable battery before adjusting the line length (Fig. 11+12)!
- Note
- Using the grass trimmer as an edge cutter
- Replacing the line spool
- Charging the rechargeable battery
- Cleaning and maintenance
- Ordering replacement parts
- Faults
- Waste disposal
- Important
- 1
- © CERTIFICADO DE GARANTIA
- F
Brand : EINHELL
Model : Royal AT 18
Category : Brush cutter