Mono 2 - Stroller TfK - Free user manual and instructions
Find the device manual for free Mono 2 TfK in PDF.

User questions about Mono 2 TfK
0 question about this device. Answer the ones you know or ask your own.
Ask a new question about this device
Download the instructions for your Stroller in PDF format for free! Find your manual Mono 2 - TfK and take your electronic device back in hand. On this page are published all the documents necessary for the use of your device. Mono 2 by TfK.
USER MANUAL Mono 2 TfK
natural_image
Abstract logo design featuring a stylized white dinosaur-like shape with 'tfk' text, no readable document content.mono
Gebrauchsanleitung
Operating Manual
Notice d'tilisation
Istruzioni d'uso

natural_image
Abstract gray curved shape with a white centerline, no text or symbols present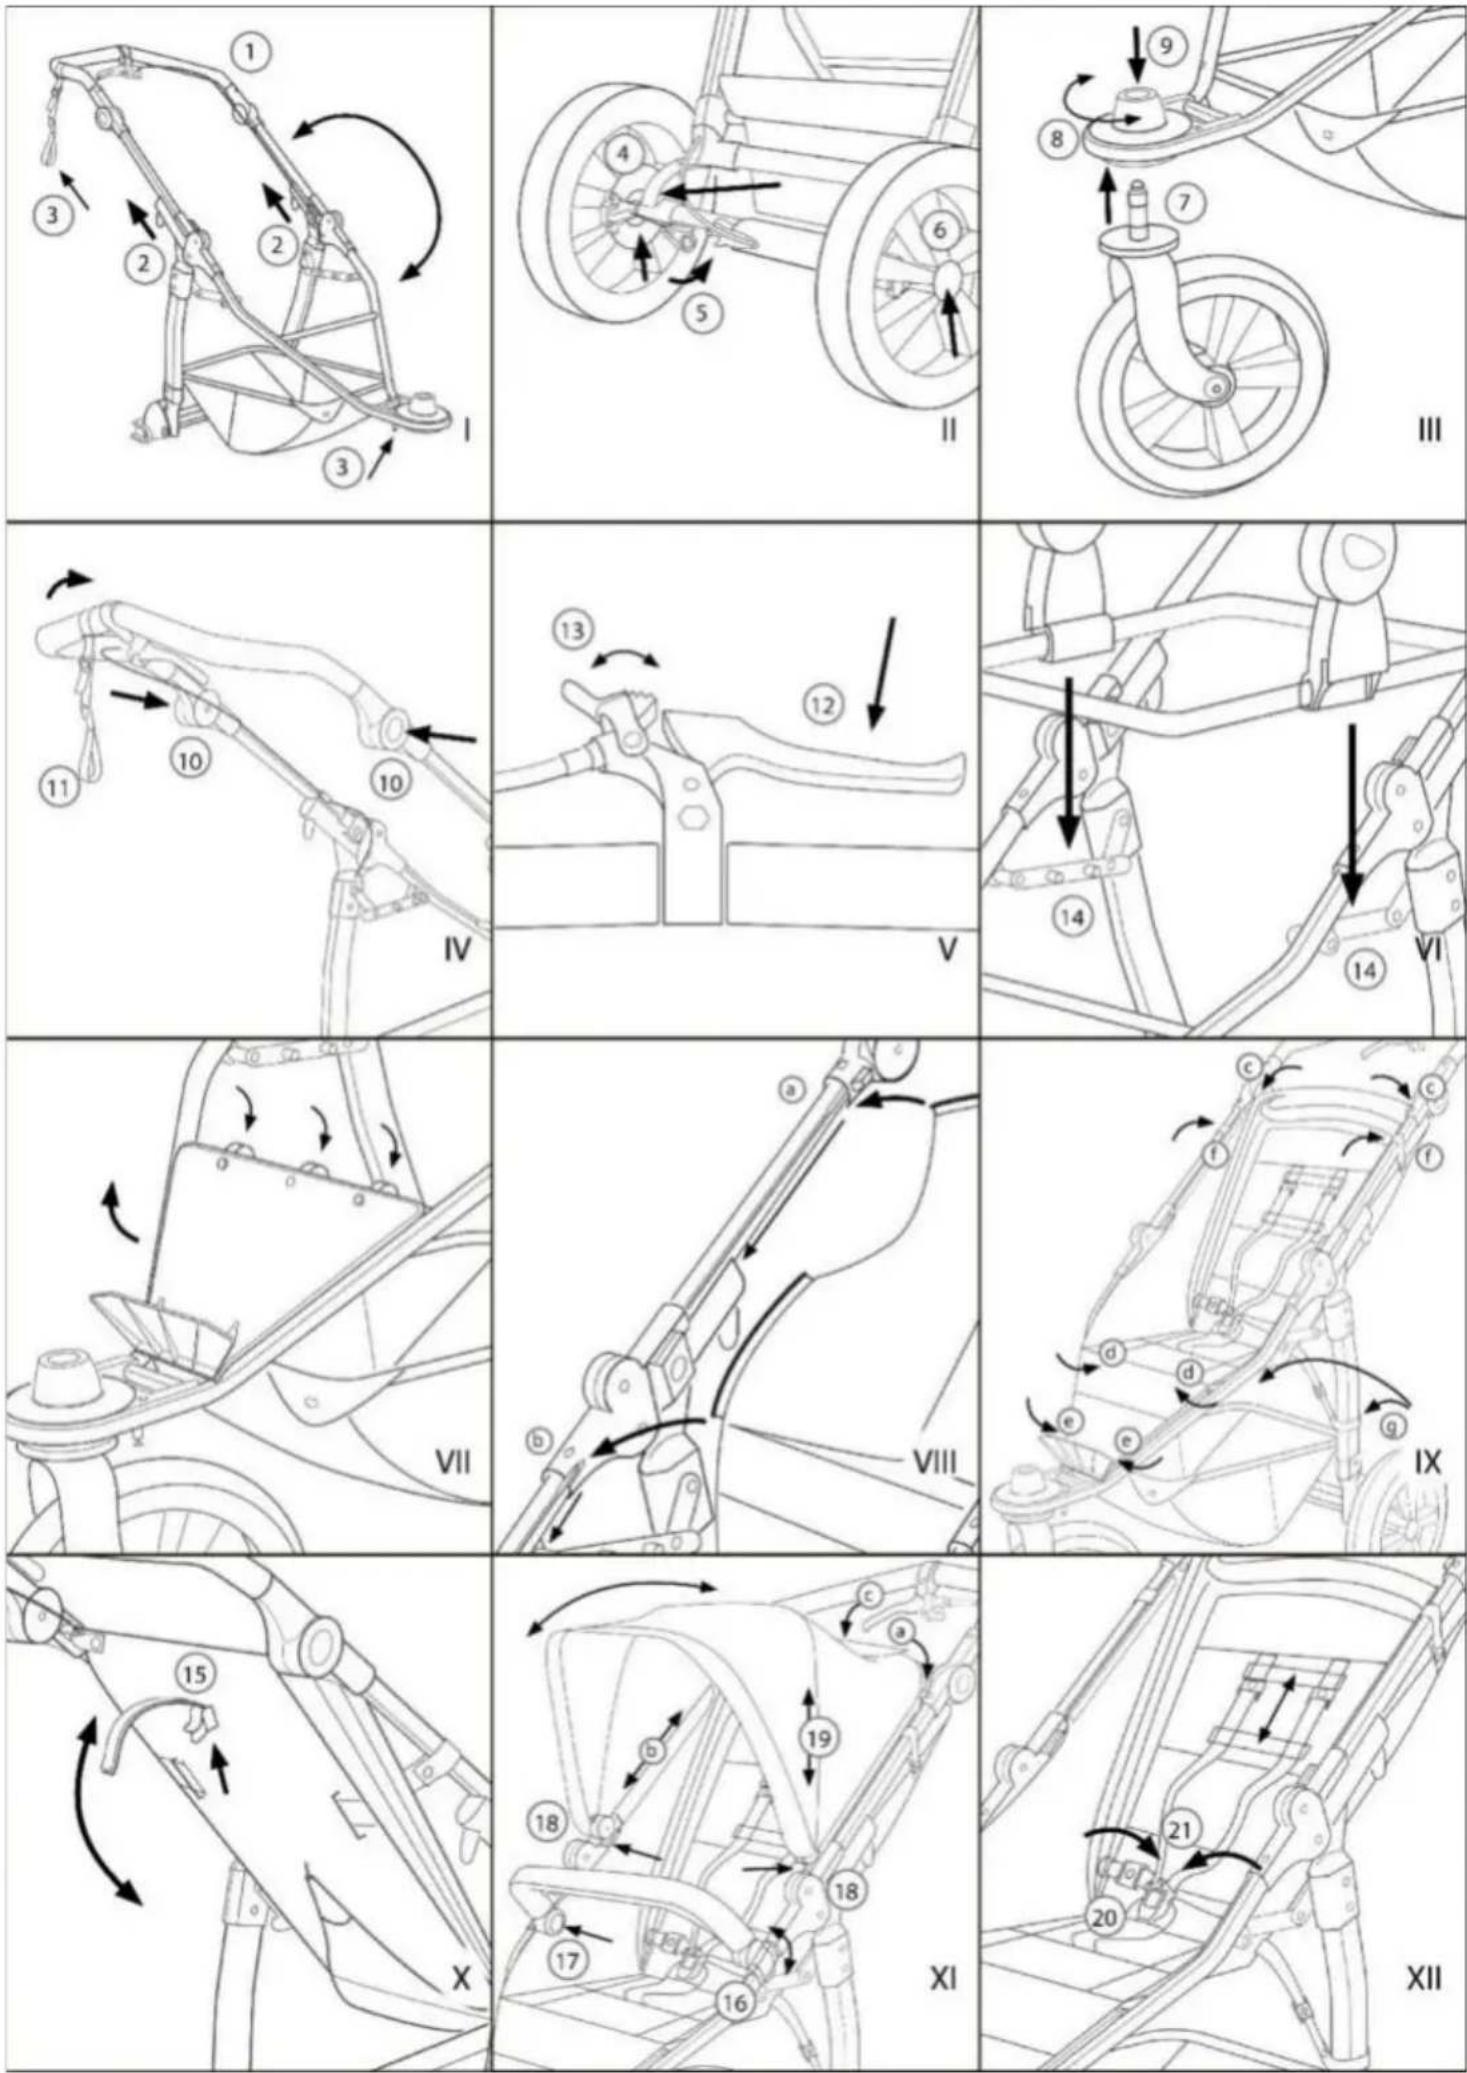
| DE | Gebrauchsanleitung und Garantiebestimmungen 4 | |
| GB | Operating manual and warranty conditions 10 | |
| FR | Notice d'utilisation et dispositions de garantie | 16 |
| IT | Istruzioni d'uso e condizioni di garanzia | 22 |
| ES | Instrucciones de uso y condiciones de garantía 28 | |
| NL | Gebruiksaanwijzing en garantiebepalingen | 34 |
| CZ | Návod k obsluze a zàruční podmínky | 40 |
| SK | Návod na použitie a podmienky záruky | 46 |
| PL | Instrukcja obsługi oraz warunki gwarancji | 52 |
Operating Manual and Warranty Conditions
Welcome to the world of TFK.
Please take a few minutes and read the following instructions carefully before use. IMPORTANT - PLEASE READ THEM CAREFULLY AND KEEP THEM FOR FUTURE REFERENCE. If you do not follow these instructions, the safety of your child may be compromised! Please also observe the safety instructions when using the tfk Mono or tfk Sport for jogging!
SAFETY INSTRUCTIONS + WARNINGS
- WARNING Please also observe the instructions for using the combicarrycot. This frame is only tested and certified with the Mono2 combi unit.
- WARNING Never leave the child unattended!
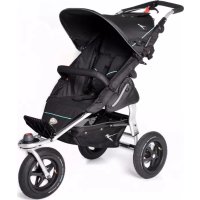
- WARNING The sports seat unit is not suitable for children under 6 months. The sports seat unit is suitable up to a max. weight of 22 kg!
- WARNING The Mono carrycot is suitable for children from 0 months of age.
- WARNING Ensure that the child is out of reach when folding and unfolding the stroller to avoid injury. Apply the parking brake when inserting and removing the child.
- WARNING Ensure that all locks are engaged before use!
- WARNING Do not allow the child to play with the product.
- WARNING Before use, make sure that the stroller attachment or the seat unit or the car seat fasteners are properly engaged.
- WARNING Always use the restraint system.
- Any loads attached to the pushbar or to the back of the backrest or to the sides of the stroller will affect the stability.
- Never park the stroller without a secured parking brake!
- Never lift the stroller with a child inside!
- Do not use an escalator if there is a child in the stroller!
- Do not install any non-TFK accessories!
- The maximum load in the basket is 5 kg! All other bags may be loaded with max. 0.5 kg.
- Tyre air pressure 1.2 bar.
Please check the brakes and connections for proper function at regular intervals! Only use original TFK spare parts to carry out repairs!
INSTRUCTIONS FOR USE AND INSTALLATION
Fig. 1.:
To use the tfk mono2, fold up the push bar (1). This will unfold the trolley. Make sure that the pins (2) audibly engage in the locking mechanism. To fold the pushchair, pull the two light grey catches (2) upwards; they remain open automatically. Then you can fold the push bar (1) forwards. The frame folds up automatically. To keep it folded in during transport, hook the transport lock (3) into the catch loop.
Fig. 2.:
To mount the rear wheels, insert the axle into the frame so that the brake is also in the holder (4). Hook the brake hook (5) into the M-brake. If you want to remove the wheels, loosen the brake hooks (5) and press the kangaroo button (6) in the middle of the wheel. Now you can remove the wheels. You have the option of adjusting the braking force by screwing the adjustment screw of the brake hooks (5) in or out and securing it in the selected position with the counter screw.
Fig. 3:
Insert the front wheel into the opening provided (7) until it audibly engages. By turning the adjustment knob (8) you can choose whether the front wheel is locked in the straight-ahead position or can turn freely. If you press the grey button (9), you can remove the wheel downwards.
Fig. 4.:
The height of the push bar can be adjusted by pressing the two adjustment joints (10). When you are on the move with the tfk mono2, please attach the supplied catch loop (11) to the push bar. Then put the side with the elastic band over your wrist. TFK recommends that you always use the catch strap to prevent the pushchair from rolling away unintentionally. When you are not using it, you can keep it handy in a pocket in the basket.
Fig. 5.:
The handbrake (12) on the push bar is both a running brake and a parking brake. To activate the parking brake, you must pull the brake lever and flip the grey parking lever (13) so that the brake lever remains
maximally applied and the brake is permanently locked. To release the parking brake, pull the brake lever (12) and release the grey parking lever (13). When the braking effect decreases, you can make a fine adjustment. To do this, turn the adjustment screw on the brake handle anti-clockwise and check the braking effect again.
Use as a combination pushchair:
Fig. 6:
The mono-tub of the combi pushchair is pushed from above over the bolts (14) onto the frame struts until it locks into place. For everything else, please refer to the instructions for the carrycot.
Without illustration: The group 0 adapters are placed on the same pins (14). To remove them, you must press the grey button and pull them upwards.
Use as a pushchair:
Fig7.:
Place the footboard on the lower crossbar of the frame and optionally secure it in this position with the Velcro at the narrow end on the back around the frame tubes. You can bring the footboard into a horizontal position by tilting it. To hold it in this position, you can insert the bracket located on the underside into the holder provided.
Fig. 8.:
The seat cover is connected to the frame with four piping straps. First insert these from above into the openings (a) located on the height adjustment of the push bar and repeat the step with the piping straps below the folding joint (b).
Fig 9.:
Then guide the straps in the head area of the seat cover through the loop on the height adjustment and fasten each with a press stud on the backrest (c). Then close the two press studs under the seat (d) and the two pins (e) on the footrest. In addition, the straps of the backrest adjustment (f) must be passed through the opening in the seat cover and around the frame tube and closed with the push buttons. Finally,
close the two sports belt attachments (g) on the left and right around the rear frame tube.
Fig. 10.:
To adjust the position of the backrest, press the latch (15) on the back of the seat backrest and swivel it downwards. To adjust the backrest to an upright position, pull the straps of the lock and push the backrest upwards.
Fig 11.:
Push the belly bar onto the frame tubes from above. Secure it by flipping the clamping levers (16) left and right. You can move it into different positions by pressing the buttons (17).
Insert the canopy left and right into the holders (18) on the folding joint. Then guide the straps on the left and right at the upper end through the loop on the height adjustment and fasten each with a push button (a) on the inside of the canopy. Use the Velcro straps (b) to connect it conclusively to the seat cover and the two press studs on the canopy flap to connect it to the backrest. If you open the zip (19), you can open the soft top further to the front.
Fig 12.:
Always secure your child with the 5-point harness. Close the belt buckle (20) by audibly engaging the two plugs (21) in the belt buckle. To open the buckle, simply press the button in the middle of the buckle. The harness can be adjusted to the size of your child with the tensioning system and the height lock.
Safety instructions for use as a jogger
- WARNING: Check all components for strength and function before using the jogger!
- Lock the front wheel so that it can no longer turn like
- Put the seat in the upright position, tighten the seat belt and fold out the hood.
- Do not jog with children if they are not yet able to sit upright independently. There may be a risk to the child's health and physical development.
- Strap your child in tightly with the 5-point harness! Put on a helmet and sturdy shoes for your child!
- Do not jog with the carrycot or a Group 0 child seat! Make sure that your child does not have any loose objects in the carrycot that could fall out!
Make sure that there are no loose objects in the basket! Wear appropriate protective clothing yourself.
- Always drive with foresight, at an appropriate speed and do not endanger other road users!
- Stay ready to brake!
Walk only on even road surfaces and avoid inclines and declines of more than - and gradients of more than 5%! Do not drive over obstacles and holes! All wheels must always be in contact with the ground! Do not make
- changes of direction and curves!
- Do not jog in environmental conditions such as storms, rain, snow, icy roads and darkness!
CARE INSTRUCTIONS
- Clean all parts with a damp cloth.
- Store in a dry place without direct sunlight.
- Before storage, the tub must be dry to prevent mould.
- Oil spray on the folding joints and wheel bearings ensures smooth running.
- You can wash the seat cover by hand at 30^ . Do not put it in the washing machine or dryer.
- The tyres may discolour the floor covering under certain circumstances.
Foreign bodies (e.g. stones) in the tyres must be removed to avoid possible damage to floor coverings.
to avoid possible damage to floor coverings.
WARRANTY CONDITIONS
The statutory provisions shall apply for justified complaints. As proof of purchase, please keep the till receipt for the duration of the statutory period of limitation. This term is 2 years *) and starts with the handover of the product to you. Should any faults arise in relation to this product, they shall involve any faults of material and manufacture that exist at the date of transfer. Any claims shall be excluded for:
- Natural wear and damage due to excessive stress
- Damage due to unsuitable or improper use
- Damage due to faulty assembly and commissioning
- Damage due to negligent handling or maintenance
- Damage due to improper modifications to the pushchair
Faults must be notified immediately, so that no subsequent damage can be caused!
A case for complaint or not?
- Most TFK products are produced to a large extent from aluminium and so are rust-proof. However, some parts are also painted, galvanized or have other surface protection. These parts may rust, depending on the level of maintenance and stress. This can therefore not be regarded as a fault.
- Scratches are normal signs of wear and are not a fault.
- Moist textiles that are not dried can moulder and so can not be considered as a production-related fault.
- The fading of colours due to sunshine, perspiration, cleaning agents, abrasion or excessively frequent washing cannot be ruled out and so does not represent a fault.
- Please check carefully at the time of purchase whether all the fabric parts, seams, press studs and zips are sewn and function properly.
- Worn-down wheels are of course a sign of wear. Damage due to external influences is not a fault. Slight imbalances are inevitable and do not represent a fault. The handover check must always be carried out to prevent inconvenient problems right at the outset. If you find a fault at a later date, please notify your authorised dealer immediately. He will then contact us to discuss the subsequent procedure. Any deliveries to TFK that are unnotified or not prepaid will not be accepted.