Joggster Sport - Stroller TfK - Free user manual and instructions
Find the device manual for free Joggster Sport TfK in PDF.

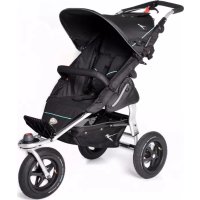
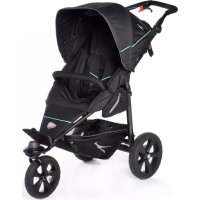
| Product type | All-terrain stroller for jogging and roller skating |
| Brand | TfK |
| Model | Joggster Sport |
| Recommended age | From 6 months |
| Maximum child weight | 15 kg |
| Stroller weight (estimated) | Approximately 12 kg |
| Unfolded dimensions (estimated) | 120 x 60 x 100 cm (L x W x H) |
| Folded dimensions (estimated) | 80 x 60 x 30 cm |
| Frame material | Aluminium |
| Braking system | Adjustable disc brake on rear axle + parking brake |
| Wheel type | Fixed front wheel, rear wheels with disc brakes |
| Recommended tire pressure (jogging) | 1.5 bars |
| Safety harness | 5-point harness |
| Adjustments | Backrest (4 positions), footrest (3 positions), height-adjustable handle |
| Included accessories | Belly bar, mosquito net, wrist tether |
| Basket capacity | 5 kg |
| Care | Clean with a damp cloth; cover hand washable at 30°C |
| Sport use | Suitable for jogging and roller skating with precautions (child harnessed, helmet, etc.) |
Frequently Asked Questions - Joggster Sport TfK
User questions about Joggster Sport TfK
0 question about this device. Answer the ones you know or ask your own.
Ask a new question about this device
Download the instructions for your Stroller in PDF format for free! Find your manual Joggster Sport - TfK and take your electronic device back in hand. On this page are published all the documents necessary for the use of your device. Joggster Sport by TfK.
USER MANUAL Joggster Sport TfK
Operating Manual and Warranty Conditions
Welcome to the world of TFK.
Please take a few moments of your valuable time to read the following instructions carefully before use and keep them in a safe place. If you do not comply with the instructions, the safety of your child could be compromised! Please also note the safety instructions for using the Joggster Sport when jogging or inline skating!
SAFETY INSTRUCTIONS + WARNINGS
- WARNING: Do not leave your child unsupervised.
- WARNING: This pushchair is signed for children aged over six months and with maximum weight of 15kg ! Always carry one child only!
- WARNING: Before use, make sure that all the locks are properly engaged!
- WARNING: Loads attached to the push bar may impair the balance of the pushchair!
- WARNING: Always secure your child with the 5-point harness, even when using the foot muff!
- WARNING: Always use the crotch strap in connection with the lap belt!
- Never park the pushchair without engaging the parking brake!
- Never lift the pushchair when the child is sitting in it!
- Do not use stairs or escalators while the child is sitting in the pushchair!
- When carrying the pushchair on stairs or over other obstacles, always check that the locks are secure!
- Lift the pushchair only at the fixed frame parts!
- Do not attach any non-TFK accessories!
- The maximum load in the basket is 5kg ! Any other bag or hook on the hood may be loaded with max. 0,5kg .
Please check the function of the brakes and the joints at regular intervals! In case of repairs, please always use original spare parts only!
OPERATING AND ASSEMBLY MANUAL
- (Fig. I) In order to be able to use Joggster Sport, fold the push bar (1) upwards. The complete pushcar is folded open. Make sure that the pins are audibly engaged in the lock (2).
- (Fig. II) Basic adapters (3) are pulled on the bars, so that they lock bearable into the pins.
- (Fig. III) Before assembling the seat, you have to remove the basic adapters. The seat is mounted to the frame with 3 push buttons (a)
on each side of the frame. Additionally, it's fixed to the foot rest with 2 pushbuttons (b). On each side of the seat, there're 2 push buttons (c) where the wind protection of the hood are fixed.
- (Fig. IV) Insert the hood into the holders (4) on the outer push bar and into the holder on the centre push bar. Then it is secured to the seat and the frame (d) with two push buttons (c). It can be additionally secured to the centre bar with a belt. If you open the zipper (5), you can extend the hood further forwards.
- (Fig. V) For the assembly of the rear wheels, insert the axle (6) in the frame so that the brake is also located in the holder. Mount the brake calliper (7) in the M-brake (8). If you want to remove the wheels, release the brake cable (7) and press the kangaroo button in the centre of the wheel. Now you can remove the wheels.
- (Fig. VI) For the initial assembly of the front wheel, first push the quick-release hub axle (12) through the fall-out protection piece ("nose" facing the wheel) and then through the wheel hub. After that, push on another fall-out protection piece ("nose" facing the wheel) and secure the axle with the knurled nut (14). Then insert the wheel into the front fork (15) and tighten the knurled nut (14) slightly with the quick-release lock (12) still open. Make sure that the "noses" of the fall-out protection pieces are positioned in the provided openings. You can now close the quick-release lock (12) so that the wheel is positioned firmly in the front fork (15). Inside of the wheel attachment you find two set screws (13) to adjust the straight running when necessary.
- (Fig. VII) Backrests can be continuously adjusted with the belt. To this end, you must press both plastic parts (13) together and adjust the seat angle with the belt.
- (Fig. VIII) The foot rest can be folded upwards. To this end, it must be locked in place with the foot board (14).
- (Fig. IX) Close the belt buckle by audibly engaging both plugs (15) in the belt buckle (16). If you want to open the harness, simply press the button in the centre of the buckle (16). The harnesses can be adjusted to the size of your child using the tensioning system x, y and z. The harness is located at the 5 points x, y, z.
- (Fig. X) Insert the belly bar from above into the frame tubes. Secure it by moving the clamping lever (17). By pressing the red buttons (18) at the left and right side you can swivel it to different positions.
- (Fig. XI) You can set the height of the push bar by pressing the two adjustment joints (23).
- (Fig. XII) The handbrake is a walking and parking brake at the same time. To activate the parking brake, you must pull the brake lever (20) fully tight and completely close the red parking lever (21),
so that the brake lever (20) remains tightened to the maximum and the brake is permanently blocked. If the braking effect starts to weaken, you can carry out a fine adjustment. To do so, turn the adjusting screw (22) on the brake grip anti-clockwise and check the braking effect again.
- (Fig. XIII) To close Joggster Sport, you must push both locks (23) upwards. They remain automatically open. Then you can move the push bar (24) in forward direction. The frame construction automatically closes.
- (Fig. XIV) Close the transport lock (25) on the frame to ensure that the Joggster Trail does not accidentally open up again.
Safety instructions for use while jogging or inline skating
- Attach the enclosed retention strap (29) on the rear axle and pull the side with the elastic band over your wrist (Fig. XV)!
- Place the seat in its upright position and secure your child tightly with the 5-point harness! Give your child a helmet! Do not jog or skate with the seat lowered!
Fix the seat with 4 belts of the backrest to the frame (30 & 31)
- Make sure that your child does not have any loose objects in the pushchair that could fall out!
- Always proceed carefully and never put any other road or path users at risk! Always be ready to brake!
- Skate and run on level surfaces only and avoid gradients and slopes of over 5% . Do not roll over obstacles or potholes!
- Do not jog or skate with the carry-cot or a Group 0 child's seat!
- Increase the tyre pressure to 1.5 bar!
- Do not jog or skate in weather conditions such as storms, rain, snow, frost or darkness!
- Additional stable loads in the basket increase the anti-filt stability! Please use the Joggster Sport for skating only if you are already an experienced skater. The Joggster Sport is not a "learning aid for skaters"! Please do not lean on the pushchair or use it as a "brake"! The Joggster Sport is equipped with the following components that are indispensable for sports use: Adjustable brake discs on the rear axle, fixed front wheel, fine adjustment for straight running, retention strap for the wrist, freely attached seat cover for better shock absorption, mosquito net, height-adjustable push bar, bumper bar and 5-point safety harness.
CARE INSTRUCTIONS
- Clean all parts with a damp cloth.
- Do not use any caustic cleaning or lubricating agents!
- An oil spray on the folding joints and the wheel bearings will guarantee smooth running.
- You can wash the seat cover by hand at 30^ . Not suitable for a washing machine or tumble dryer!
- The tires can cause eventually a discoloration of the floor surfacing.
Foreign bodies in the tires (such as small stones) have to be removed in order to prevent a possible damage of the floor surfacing.
WARRANTY CONDITIONS
The statutory provisions shall apply for justified complaints. As proof of purchase, please keep the till receipt for the duration of the statutory period of limitation. This term is 2 years *) and starts with the handover of the product to you. Should any faults arise in relation to this product, they shall involve any faults of material and manufacture that exist at the date of transfer. Any claims shall be excluded for:
- Natural wear and damage due to excessive stress
- Damage due to unsuitable or improper use
- Damage due to faulty assembly and commissioning
- Damage due to negligent handling or maintenance
- Damage due to improper modifications to the pushchair Faults must be notified immediately, so that no subsequent damage can be caused!
A case for complaint or not?
- Most TFK products are produced to a large extent from aluminium and so are rust-proof. However, some parts are also painted, galvanized or have other surface protection. These parts may rust, depending on the level of maintenance and stress. This can therefore not be regarded as a fault.
- Scratches are normal signs of wear and are not a fault.
- Moist textiles that are not dried can moulder and so can not be considered as a production-related fault.
- The fading of colours due to sunshine, perspiration, cleaning agents, abrasion or excessively frequent washing cannot be ruled out and so does not represent a fault.
- Please check carefully at the time of purchase whether all the fabric parts, seams, press studs and zips are sewn and function properly.
- Worn-down wheels are of course a sign of wear. Damage due to external influences is not a fault. Slight imbalances are inevitable and do not represent a fault. The handover check must always be carried out to prevent inconvenient problems right at the outset. If you find a fault at a later date, please notify your authorised dealer immediately. He will then contact us to discuss the subsequent procedure. Any deliveries to TFK that are unnotified or not prepaid will not be accepted.
CONDITIONS DE GARANTIE
VEDLIKEHOLDSANVISNING
Moa, He ce o6aIte Ha KOAnKata n He r 3nO3BaIte KaTo "CInpaKa"!
Joggster Sport e cha6aeh Cbc CaeHnTe KOMnoHEnTH, KOHTo Ca Heo6xoAHHm npi cepeynpemycn Cnnpaunn AnckOBe Bbpxv 3aHata OC, pHKcnpaHO npeAHO KOeAo, peyaaunr 3a TnueHe, 3aBpkaU, peMbK 3a KITkata, CBO6oAHO 3akpeen H KaAe CeaaaKaT a No-ao6po abCopbnpaHe Ha yap, Mpeka npOTIB KOMApn, peyampyema BBB BnCOHHa Dpbkkq, OpaHnHteA N 5-ToKOB ObE0PiACITEAHKOAH.
YKA3AHN83A NOADPbXKA
-Почистваиме BCИЧКИ части CBlaЖнк Кьрпа.
- He n3noaBaiTe aIrpceNBn noHCTBaUu nn Cma3OuH npenapatn!
- Cma30eH cnpeBbpxy cIbBaemnte cIaO6kn I aIepnTe Ha KOaEaTa Ie rapaHTnpa rAaKOTO BO3eHe.
-MoKe Da nepete KaIbpa Ha CeAaTa Ta Yact Ha pbKa npn 30^
He e noxodrao n3noa3baheTo Ha nepaHn Hn cyuHa maunHa!