BTCRH002 - Drill Batavia - Free user manual and instructions
Find the device manual for free BTCRH002 Batavia in PDF.

| Brand | Batavia |
| Model | BTCRH002 |
| Product Type | SDS+ cordless rotary hammer |
| Power Source | Lithium-ion battery (not included) |
| No-load Speed | 0 – 1200 min⁻¹ |
| Impacts per Minute | 0 – 5300 min⁻¹ |
| Chuck | SDS Plus |
| Impact Energy | 2.2 J |
| Drilling Capacity (masonry) | ∅ 26 mm |
| Drilling Capacity (wood) | ∅ 30 mm |
| Drilling Capacity (metal) | ∅ 13 mm |
| Weight | 2.28 kg |
| Dimensions (L × W × H) | 33 × 10 × 19 cm |
| Sound pressure level (hammer mode) | 93.54 dB(A) |
| Sound power level (hammer mode) | 104.54 dB(A) |
| Vibration level (main handle, hammer mode) | Value not specified |
| Lighting | Integrated LED lamp, turns on automatically |
| Auxiliary Handle | Yes, 360° adjustable |
| Depth Stop | Yes, adjustable |
| Operating Modes | Drilling, hammer drilling, hammer only (chiselling) |
| Maintenance | Clean with a damp cloth and black soap; do not use solvents |
| Safety | Wear safety glasses, ear protection, gloves; use both hands; disconnect power before changing accessories |
| Warranty | 2 years |
Frequently Asked Questions - BTCRH002 Batavia
User questions about BTCRH002 Batavia
0 question about this device. Answer the ones you know or ask your own.
Ask a new question about this device
Download the instructions for your Drill in PDF format for free! Find your manual BTCRH002 - Batavia and take your electronic device back in hand. On this page are published all the documents necessary for the use of your device. BTCRH002 by Batavia.
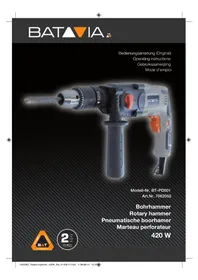
USER MANUAL BTCRH002 Batavia
Cordless SDS+ Rotary hammer – brushless
Akku-Bohrhammer SDS+ Brushless
Marteau perforateur SDS+ brushless sans fil
Accu SDS+ boorhamer brushless
natural_image
Exterior view of a Batavia Ultra electric drill with yellow handle and drill bit (no text or symbols on the device itself)Operating instructions
www.bataviapower.com
natural_image
Close-up of a white curled corner with an orange background, no text or symbols visible.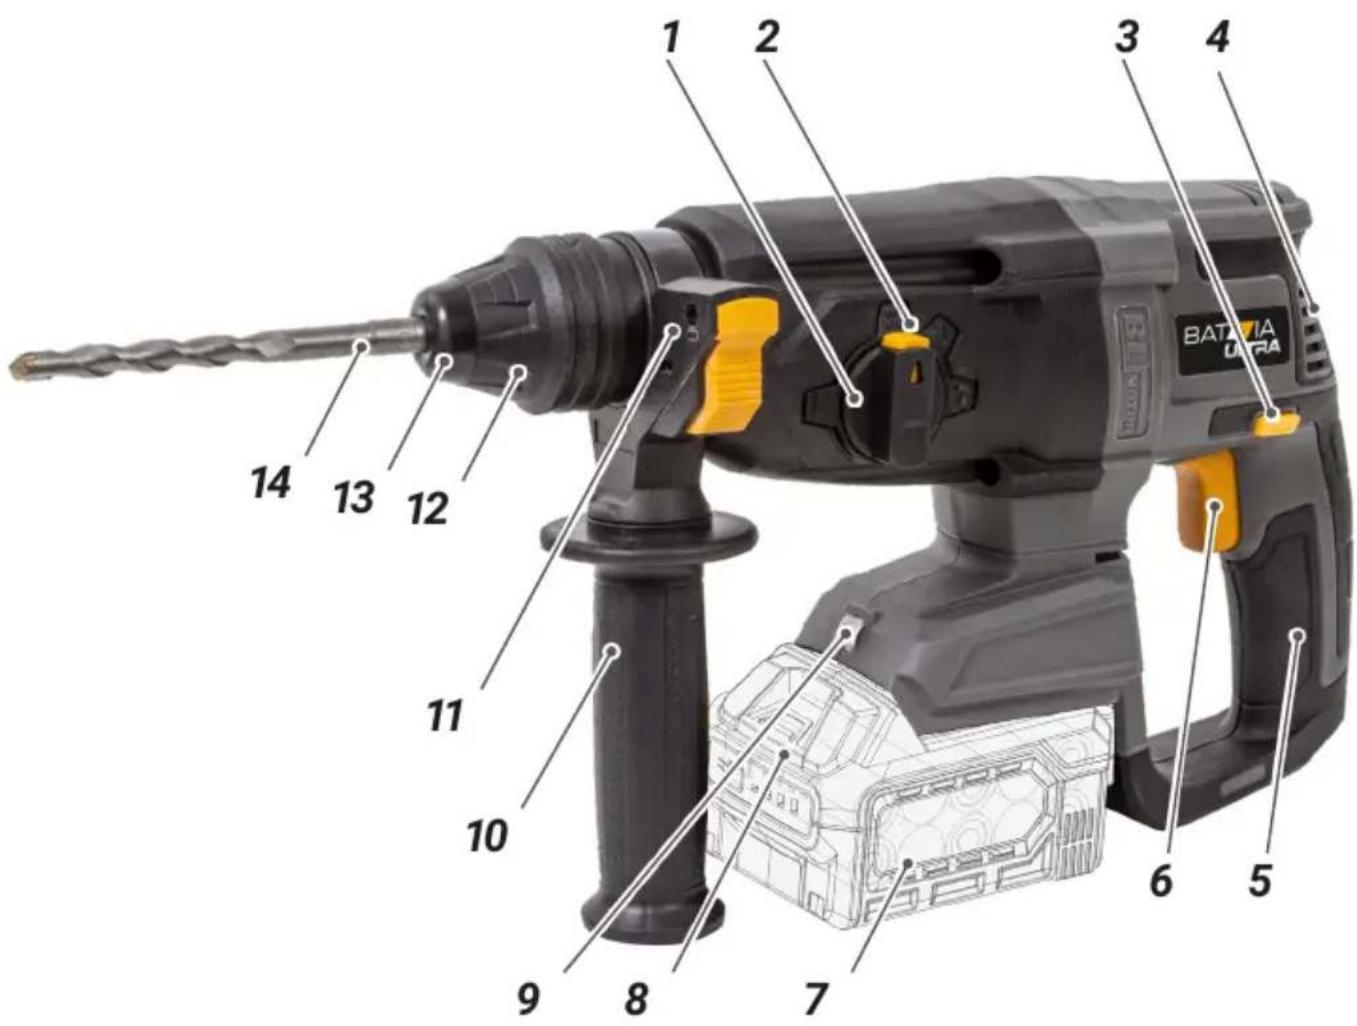
text_image
1 2 3 4 BATRIVIA Ultra 14 13 12 11 10 9 8 7 6 5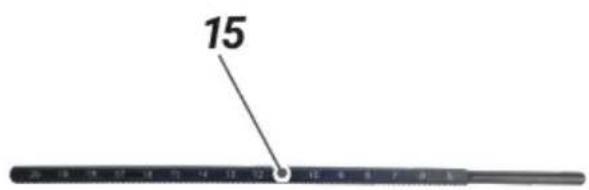
text_image
15Overview
- Mode Selector
- Mode Selector Release Button
- Forward / Reverse Switch
- Motor Vents
- Insulated Handle
- Trigger Switch
- Battery (not included)
- Battery Release Button
- LED worklight
- Auxiliary Handle
- Depth Stop Mount
- Chuck Collar
- Chuck
- SDS Plus drill bit
- Depth Stop
Übersicht
Instruction manuals provide valuable hints for using your new device. They enable you to use all functions, and they help you avoid misunderstandings and prevent damage. Please take the time to read this manual carefully and keep it for future reference.
EXPLANATION OF THE SYMBOLS

Warning! To reduce the risk of injury, the user must read the instruction manual.

Denotes risk of personal injury, loss of life or damage to the tool in case of non-observance of the instructions in this manual.

Always wear hearing protection. The effects of noise can cause hearing loss.

Wear safety glasses. When working with electric power tools, sparks, splinters, chips and dust particles may be generated and these can cause loss of sight.

CE stands for “Conformité Européenne”, which means “In accordance with EU Regulations”. With the CE marking, the manufacturer confirms that this Electric tool complies with the applicable European directives.

UKCA stands for: "UK Conformity Assessment". This means "Compliant with UK regulations". With the UKCA mark manufacturer confirms that this unit complies with the applicable UK regulations.
Do not dispose of electric power tools with domestic refuse.
SAFETY INSTRUCTIONS FOR CORDLESS DRILL/DRIVERS
General
- The tool/charger is not intended for use by persons (including children) with reduced physical, sensory or mental capabilities, or lack of experience and knowledge, unless
they have been given supervision or instruction concerning use of the tool/charger by a person responsible for their safety.
- Ensure that children do not play with the tool/charger.
- Ensure that the Forward/Reverse switch (3) is in the middle (locking) position before making any adjustments or changing accessories as well as when carrying or storing the tool.
- Do not work materials containing asbestos (asbestos is considered carcinogenic).
- Dust from material such as paint containing lead, some wood species, minerals and metal may be harmful (contact with or inhalation of the dust may cause allergic reactions and/or respiratory diseases to the operator or bystanders); wear a dust mask and work with a dust extraction device when connectable.
- Certain kinds of dust are classified as carcinogenic (such as oak and beech dust) especially in conjunction with additives for wood conditioning; wear a dust mask and work with a dust extraction device when connectable.
- Follow the dust-related national requirements for the materials you want to work with.
- When using the drill, use safety equipment including safety glasses or shield, ear defenders, and protective clothing including safety gloves. Wear respiratory protection suitable for the work being undertaken. A minimum rating of FFP2 is recommended. If operating the tool causes discomfort in any way, stop immediately and review your method of use.
- Battery chargers are for indoors use only. Ensure that the power supply and charger are protected against moisture at all times.
- Ensure that the lighting is adequate.
- Ensure that the drill bit is securely fixed in the chuck. Insecure drill bits can be ejected from the machine causing a hazard.
- Ensure that the drill bit is not in contact with the workpiece prior to starting up the tool.
- Before drilling, check that there is sufficient clearance for the drill bit under the workpiece.
- Drill bits get hot during operation, allow to cool prior to handling them.
- NEVER use your hands to remove saw-dust, chips or waste close by the bit.
- Examine the chuck regularly for signs of wear or damage. Have damaged parts repaired by a qualified service centre.
- ALWAYS wait until the drill has come to a complete stop before putting it down.
ADDITIONAL SAFETY FOR SDS PLUS DRILLS
WARNING: If you suspect or discover asbestos is present in any area you are working seek professional advice immediately. Removal of asbestos should be carried out by a licensed contractor. Contact the HSE in the UK (www.hse.gov.uk) or your national health and safety authority in your country for further information about dealing with asbestos. European Directive 2009/148/EC provides additional information related to exposure to asbestos at work.
- It is imperative to follow all national safety regulations concerning the type of work being undertaken.
- Do not allow anyone under the age of 18 years to use this tool, and ensure that operators are qualified and familiar with the operating and safety instructions.
- Masonry drilling or chiselling can create sharp particles that will impact the operator. Wear impact-resistant safety glasses and protective clothing, including safety boots.
- Core drills should only be used with SDS drills featuring a safety clutch to prevent jamming, which could cause an injury to the operator.
- If the safety clutch operates during use, quickly release the trigger and remove the core drill or bit from the masonry surface being drilled. Do not continue work until the cause of the safety clutch operating is understood.
- Do not operate SDS drills whilst up a ladder or in any location where there is a risk of falling. SDS drills are heavy and produce strong vibration and high torque in use.
- Wear suitable protective anti-vibration gloves that are non-fabric or coated fabric to prevent loose strands of material catching in the rotating drill bit. Discard gloves immediately if material is visibly frayed.
- Drilling can produce large volumes of dust and debris that may be toxic. Wear respiratory protection suitable for the work being undertaken. A minimum rating of FFP2 is recommended.
- SDS drills produce high volumes of noise and suitable ear protection must be worn at all times while operating the tool.
- SDS drills produce a very high level of vibration when operating in hammer or chisel mode. Frequent breaks are advised.
- Only use SDS Chisels or Points with SDS drills that can disengage rotary drilling mode.
- Use metal and voltage detectors to locate concealed electric, water or gas lines. Avoid touching live components or conductors.
- Extension cable reels used with this tool must be completely unwound. Minimum conductor cross section: 1.25mm ^2 .
- Extension reels used outside should be designed for outdoor use and should feature water-protected sockets and correct cable insulation.
- When using an SDS drill outdoors, an RCD device must be used either by connecting to a socket which incorporates an RCD, or through use of an inline RCD.
- Ensure that the chisel or drill bit is securely fixed in the chuck before operating the tool. Insecure drill bits can be ejected from the machine, causing a hazard.
- Ensure lighting is adequate.
- Use both hands when operating this tool.
- Always use the auxiliary handle supplied with the tool.
- Do not place pressure on the tool – to do so could shorten its service life.
- Drill bits become hot during operation. Allow to cool prior to handling.
- If you are interrupted when operating the drill, complete the process and switch off before diverting your attention elsewhere.
- Always disconnect the SDS drill from the electric supply before changing a chisel or drill bit.
- Examine the chuck regularly for signs of wear or damage. Have damaged parts repaired by a qualified service centre.
- Always wait until the drill has come to a complete stop before placing it down.
- On completion of the work, disconnect the tool from the power source and remove the chisel/bit from the machine.
- Periodically check all nuts, bolts and other fixings and tighten where necessary.
- Visibly check the tool after use, especially the power cable, which can be damaged by sharp masonry.
- Always fit the dust guard to the bit in use to prevent damage from debris entering the SDS chuck.
- If operating the tool causes discomfort in any way, stop immediately and review your method of use.
DURING USE
- Hold power tool by insulated gripping surfaces (5), when performing an operation where the cutting accessory or fastener may contact hidden wiring (cutting accessory and fasteners contacting a "live" wire may make exposed metal parts of the power tool "live" and could give the operator an electric shock).
- In case of electrical or mechanical malfunction, immediately switch off the tool or unplug charger from power source.
BEFORE FIRST USE
Remove the machine and the accessories from the packaging. Check the machine for transport damage and do not use the machine in case of damages. Keep the packing materials away from children, risk of suffocation!
INTENDED USE
The SDS Plus Hammer drill is designed for drilling masonry. Also capable of drilling wood and metal with the optional purchase of a standard chuck with SDS Plus connector. The equipment is to be used only for its prescribed purpose.
OPERATION
Auxiliary Handle
- The auxiliary handle (10) should always be used when drilling.
- The auxiliary handle (10) can be rotated 360° around the drill head, enabling safe and comfortable operation for both left and right-handed users.
To adjust the auxiliary handle:
- Rotate the grip anti-clockwise. This will loosen the handle assembly.
- Move the side handle to the required position.
- Secure in position by rotating the grip clockwise.
Depth Stop
- Move the depth stop (15) to the required position.
Operating the Chuck
- This rotary hammer has a chuck designed for SDS Plus drill bits.
- The SDS Plus system allows bits to be inserted with a simple push-fit action.
- Always grease the tail end of SDS bits. Bits should be freshly greased and free from dirt and dust before use.
Inserting a Drill Bit
- Pull back the chuck collar (12) and hold.
- Insert SDS Plus drill bit fully into the chuck (13). Use a twisting motion to line up the grooves in the accessory.
- Release the chuck collar.
- The bit should now be locked into the machine. Check by pulling the bit; if the bit can be removed, repeat the above procedure until secure.
- To remove a bit from the chuck, pull the chuck collar back, and pull firmly on the drill bit.
WARNING: Never fit any attachment with a maximum speed lower than the no load speed of the machine.
Hammer Selection
- The rotary hammer can be used in either hammer drill mode (for masonry work), or conventional rotary drill mode (for wood, metal, plastics etc.) with the optional purchase of a standard chuck to SDS Plus adaptor.
- To select rotary drilling mode, depress the mode selector release button (2) on the mode selector (1) and align the mode selector with the „” symbol.
- To select hammer drilling mode, depress the mode selector release button (2) on the mode selector (1) and align the mode selector with the „T ^i ” symbol.
- To select hammer only mode, depress the mode selector release button (2) on the mode selector (1) and align the mode selector with the „T“ symbol.
- The bit angle position is intended for use with chipping bits such as bull points, spades, gouges, etc. Choose a position which is best suited for your operation. Turn the mode selector dial, to the “” symbol. Next, rotate the locking sleeve, along with the accessory, to the desired position. Then turn the mode selector dial to the “” symbol and slightly turn the locking sleeve to have it automatically lock into a definite position.
- Do not attempt to move the mode selector whilst the rotary hammer is running.
OPERATING INSTRUCTIONS
IMPORTANT: Put on all safety equipment required before you operate this drill.
Trigger Switch
- Always hold the rotary hammer firmly using both hands.
- To start the rotary hammer, squeeze the trigger switch (6).
- To stop the rotary hammer, release the trigger switch.
Selecting forward or reverse rotation
- The direction of the drill can be changed using the forward/reverse switch (3).
- To run the drill in a clockwise direction, position the forward/reverse switch on the left, adjacent to the „▶“ symbol.
- To run the drill in an anti-clockwise direction, position the forward/reverse switch on the right, adjacent to the „◀“ symbol.
- Do not attempt to move the forward/ reverse switch whilst the rotary hammer is running.
- Do not attempt to run the rotary hammer with the forward/reverse switch in mid position.
Speed Control
- The speed of the rotary hammer is controlled by the pressure applied to the trigger switch (6). The further the trigger is depressed the higher the speed.
Note: Always read the documentation provided with drill bits and accessories for the recommended or maximum speed setting and use the most appropriate gear. See ‘Technical Data’ for the maximum no load speed of each gear.
Drilling Concrete
- Using hammer drill mode, apply pressure to the rear of the rotary hammer, in line with the drill bit.
- For efficient drilling, it is advisable to use TCT (tungsten carbide tipped) drill bits. Ensure that drill bit size is within the maximum capacity of the rotary hammer (see 'Technical Data').
- Do not apply too much pressure if debris blocks the drill hole. Run the rotary hammer slowly, and remove the bit from the hole. Repeat until hole is cleared.
LED lamp
The LED lamp (9) will be lit automatically as soon as you press the ON/OFF switch (6).
ACCESSORIES
Use only accessories with an allowable speed matching at least the highest no-load speed of the tool.
MAINTENANCE AND CLEANING
WARNING: Always disconnect from the mains power supply, before carrying out any maintenance/ cleaning of the charger. Remove the battery before carrying out any maintenance/cleaning of the tool.
Maintenance
There are no inner parts of the tool which need maintenance.
Cleaning
- Keep safety devices, ventilation openings and the motor housing as free as possible from dirt and dust. Rub the electric power tool with a clean cloth or blow over it with low pressure compressed air.
- We recommend that you clean your electric power tool immediately after each use.
- Clean the electric power tool regularly with a damp cloth and somewhat soft soap.
Do not use any cleaning or solvent materials; these can attack the device's plastic components. Make sure that no water can get inside the electric power tool.
TECHNICAL DATA
| Speed | 0 – 1200 min ^-1 |
| Impacts per Minute. | 0 – 5300 min ^-1 |
| Chuck | .SDS Plus |
| Impact Energy | 2.2 J |
| Dimensions | 33 × 10 × 19 cm |
| Weight | 2.28 kg |
Rotary hammer mode:
| Sound Pressure Level L_pA | 93.54 dB(A) |
| Uncertainty K_pA | 3 dB |
| Sound Power Level L_WA | 104.54 dB(A) |
| Uncertainty K_WA | 3 dB |
| Hand Arm Vibration | |
| Main Handle | 17.53 m/s ^2 |
| Auxiliary Handle | 12.70 m/s ^2 |
| Uncertainty K | 1.5m/s ^2 |
Chiseling mode:
| Sound Pressure Level L_pA | 96.51 dB(A) |
| Uncertainty K_pA | 3 dB |
| Sound Power Level L_WA | 107.51 dB(A) |
| Uncertainty K_WA | 3 dB |
| Hand Arm Vibration | |
| Main Handle | 17.18 m/s ^2 |
| Auxiliary Handle | 11.25 m/s ^2 |
| Uncertainty K | 1.5m/s ^2 |
| Drilling Cap. Masonry | 26 mm |
| Drilling Cap. Wood | 30 mm |
| Drilling Cap. Steel | 13 mm |
DISPOSAL
Do not dispose of electric power tools with domestic refuse.
The electric power tool is shipped in packaging to reduce transport damage. This packaging is a raw material and as such can either be reused or can be fed back into the raw material cycle. The electric power tool and its accessories are made from various materials such as metals and plastics. Take defective components to a special refuse collection point. Ask about these at your specialist shop or local council. The product and the user manual may be subject to changes. Technical data may be changed without prior notice.
Batteries
Think of the environment when disposing of batteries. Contact your local authorities to find out where your nearest disposal area is.
Do not dispose of batteries with domestic refuse.
Do not dispose of by burning, risk of explosion.
EC-DECLARATION OF CONFORMITY
We, the Batavia B.V., Weth.
Wassebaliestraat 6d, NL-7951 SN
Staphorst, declare by our own responsibility that the product Cordless
SDS+ Rotary hammer – brushless, Model
BT-CRH002, Item-No 7064296 is according to the basic requirements, which are defined in the European Directives Electromagnetic Compatibility 2014/30/EU (EMC), 2006/42/EC (Machinery), 2011/65/EU (RoHS) and their amendments. For the evaluation of conformity, the following harmonized standards were consulted:
EN 60745-1:2009+A11,
EN 60745-2-6:2010,
AfPS GS:2019:01 PAK,
EN 55014-1:2017,
EN 55014-2:2015
Staphorst, 7 September 2022

text_image
Handwritten signature or scribble on a white background, possibly a signature or artistic markMeino Seinen, QA Representative
Batavia B.V., Weth. Wassebaliestraat 6d, 7951 SN Staphorst, Netherlands
UK DECLARATION OF CONFORMITY
We, the Batavia B.V., Weth.
Wassebaliestraat 6d, NL-7951 SN
Staphorst, Netherlands declare by our own responsibility that the product Cordless
SDS+ Rotary hammer – brushless, Model
BT-CRH002, Item-No 7064296 is according
to the basic requirements, which are defined in the UK Regulations Supply of Machinery
(Safety) Regulations 2008, Electromagnetic Compatibility Regulations 2016, Restriction of the Use of Certain Hazardous
Substances in Electrical and Electronic Equipment Regulations 2012 and their amendments.
Staphorst, 7 September 2022

text_image
Handwritten signature or scribble on a white background, possibly a signature or autograph.Meino Seinen, QA Representative
Batavia B.V., Weth. Wassebaliestraat 6d, 7951
SN Staphorst, Netherlands
The product and the user manual may be subject to changes. Technical data may be changed without prior notice.
Staphorst, den 7. September 2022

text_image
JennyCE-DÉCLARATION DE CONFORMITÉ
text_image
Handwritten signature or scribble on a white background, possibly a signature or autograph.text_image
Handwritten signature or scribble on a white background, possibly a signature or artistic mark.text_image
Handwritten signature or scribble on a white background, possibly a signature or autograph.Meino Seinen, QA Representative Batavia B.V., Weth. Wassebaliestraat 6d, 7951 SN Staphorst, Países Baixos
text_image
Handwritten signature or scribble on a stylized oval backgroundMeino Seinen, Przedstawiciel ds. QA Batavia B.V., Weth. Wassebaliestraat 6d, 7951 SN Staphorst, Holandia
natural_image
Three-panel image showing outdoor cleaning and handwashing: a stack of MAXPACK 2Ah machines, a worker using a tool on a wooden fence, and a handheld power tool with orange filter.BATAVIA
2 YEAR WARRANTY
This product has got a 2 year warranty
Dear Client, if for any reason this product is not working, please ensure you contact our Client Service Centre. Ensure you have your original receipt of purchase. This warranty covers all defects in workmanship or materials in this Batavia product for a two year period from the date of purchase. The warranty does not cover any malfunction, or defect resulting from misuse, neglect, alteration, or repair.
Other European countries – Customer Services /
www.bataviapower.com
info@batavia.eu
BATAVIA
2 YEAR WARRANTY
Other European countries – Customer Services /
www.bataviapower.com
info@batavia.eu